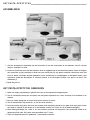
Yoo Digital Home COOKYOO 7900 Le manuel du propriétaire
- Catégorie
- Robots culinaires
- Taper
- Le manuel du propriétaire
Ce manuel convient également à


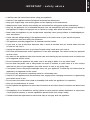
IMPORTANT : safety advice
Carefully read the instructions before using your appliance.•
Switch off the appliance before fitting and removing the attachment.•
Keep your fingers away from moving parts and the opening on the attachment. •
Always ensure loose articles and clothing are secured before using pasta makers attachment. •
Only use the appliance for its intended domestic use, the manufacture will not accept any liability if •
the appliance is subject to improper use or failure to comply with these instructions.
Never leave the appliance to run unsupervised, especially when young children or handicapped per-•
sons are present.
Check that the voltage rating of the appliance does in fact match that of your electrical system. •
Any connection error will nullify the guarantee.
The appliance must be plugged into an earthed electrical socket.•
If you have to use an electrical extension lead, it must be earthed and you should make sure that •
no-one can trip over it.
Unplug the appliance as soon as you have finished using it and when you clean it.•
Don’t use your attachment and/or appliance if it has been damaged. You should contact an approved •
service centre.
Any work on the appliance other than normal care and cleaning by the customer must be carried out •
by an approved service centre.
Do not immerse the appliance, the power cord or the plug in water or in any other liquid.•
Do not allow the power cord to hang within the reach of children, to come close to or into contact •
with the hot parts of your appliance, any other source of heat or any sharp edge.
If the power cord or the plug are damaged, don’t use your appliance .To avoid any risk, these must be •
replaced by an approved service centre.
Do not put any accessories containing metal in a microwave oven.•
Switch off the appliance and disconnected from supply before changing accessories or approaching •
parts which move in use.
Do not touch the whisk, mixer blade or kneading hook while the appliance is in operation.•
Only ues one attachment at a time.•
Do not operate the appliance for more than 10 minutes at one time. Allow 30 minutes rest before next •
use.
This appliance is not intended for use by children or other persons without assistance or supervision •
if their physical, sensory or mental capabilities prevent them form using it safely.
Children should be supervised to ensure that they do not play with the appliance.•
ENGLISH

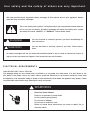
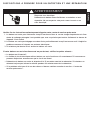
Your safety and the safety of others are very important.
We have provided many important safety messages in this manual and on your appliance. Always
read and obey all safety messages.
This is the safety alert symbol. This symbol alerts you to potential hazards that can
kill or hurt you and others. All safety messages will follow the safety alert symbol
and either the word “DANGER” or “WARNING.” These words mean:
You can be killed or seriously injured if you don’t immediately fol-
low instructions.
You can be killed or seriously injured if you don’t follow instruc-
tions.
All safety messages will tell you what the potential hazard is, tell you how to reduce the chance of
injury, and tell you what can happen if the instructions are not followed.
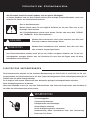
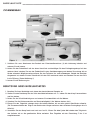
ELECTRICAL REQUIREMENTS
Volts:220/240 V.A.C. Hertz: 50/60 Hz
The wattage rating for your stand mixer is printed on a tag under the mixer base. It is also listed on the
trim band. If the power cord is too short, have a qualifi ed electrician or serviceman install an outlet near
the appliance. The maximum rating is based on the attachment that draws the greatest load (power). Other
recommended attachments may drawsignifi cantly less power.
Electrical Shock Hazard
Plug into a grounded 3 prong outlet.
Do not remove ground prong.
Do not use an adapter.
Do not use an extension cord.
Failure to follow these instructions can result in death, fire, or
electrical shock.
DANGER
WARNING
WARNING

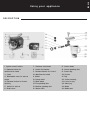
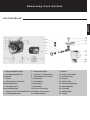
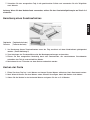
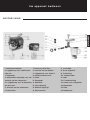
Using your appliance
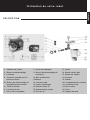
DESCRIPTION
ENGLISH
1. Speed control switch
2. Release button for
multifunction head
3. Cover
4. Removable cover for mincer
outlet
4.1. Release button for Cutter
housing
5. Outlet for mincer
6. Bowl cover
7. Stainless steel bowl
8. Outlet for blender
9. Release button for Cover 3
10. Multifunction head
11. Whisk
12. Dough hook
13. Mixer blade
14. Fine grinding disc
15. Medium grinding disc
16. Worm shaft
17. Cutter blade
18. Coarse grinding disc
19. Screw ring
20. Pusher
21. Tray
22. Cutter housing
23. Cover for jug
24. Glass jug
25. Blade
26. Blade seat

Injury Hazard
Unplug mixer before touching beaters.
Failure to do so can result in broken bones, cuts or bruises.
NOTE : Do not scrape the bowl while the stand mixer is operating.
The bowl and beater are designed to provide thorough mixing without frequent scraping. Scraping the bowl
once or twice during mixing is usually suffi cient. Turn the stand mixer off before scraping.
The stand mixer may warm up during use. Under heavy load with extended mixing time, you may not be able
to comfortably touch the top of the stand mixer. This is normal.
TECHN ICAL INFO R MATI O N
Voltage/frequency : 220—240V - 50/60Hz (1200W)
Agitator kettle capacity : 5,5 liters
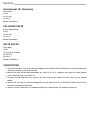
BEFOR E FI R ST U S E
All parts of the stand mixer are to be thoroughly cleaned before being used for the first time. (see •
section: Cleaning).
Take out the required length of cable from the cable tidy on the base of the blender and connect the •
device to the mains supply.
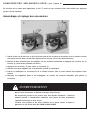
ADJUSTING THE HEIGHT OF YOUR ATTACHMENTS (See figure A)
Your attachments are equipped with a system for adjusting the height above the bottom of the bowl for
optimum results.
Press the release button (2) lift the multifunction head and insert the mixer blade, dough hook or 1.
whisk.
Hold it in position. 2.
Lower the head of the appliance (10) with the button (2) press until a click is heard.3.
Adjust the height by turning the shaft: adjust the accessories to the ideal position.4.
Lift the head (10) of the appliance again, hold the Mixer blade, Hook or whisk in position.5.
Before using for the first time, clean all parts of the accessories with soapy water .rinse and dry.6.
Place the appliance on a flat, clean and dry surface and then plug in your appliance.7.
WARNING

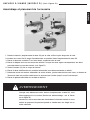
MIXING/KNEADING/BEATING/EMULSIFYING/WHISKING (See figure B)
Depending on the nature of the ingredients, the bowl (7) with its cover can be used to prepare up to 2.3
kg of dough.
Press button (2) to the release the multifunction head (10) and raise it to a vertical position.1.
Fit the bowl(7) onto the appliance by turning until it locks in position and place the ingredients in it, 2.
weighting them as indicated under the weighing function (see figure B).
Position the cover on the head with the filling opening at the front of the appliance (see figure B).3.
Fit the desired accessory (11, 12,13) in the outlet, pushing the shaft of the accessory home and turn it a 4.
quarter turn towards you to lock it in position (see figure B).
Lower the multifunction head of the appliance to horizontal position and press button again (a click 5.
should be heard).
During preparation, you can add ingredients through the opening the cover. 6.
To stop the appliance, turn the knob (1) back to 0.7.
ENGLISH

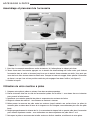
HOMOGENISING /MIXING/BLENDING (See figure C)___________________
Depending on the nature of the ingredients, the blender can be used to prepare up to 1.4L of mixture.
Assembling and fitting the attachment
Assemble the blade assembly to the seal and lock it with a quarter turn clockwise into the bottom of 1.
the jug (the jug must be upright).
Lower the multifunction heard of the appliance (10) to a horizontal position and press button (2) 2.
again (a click should be heard).
Press button (9) to open the cover (3).3.
Ensure that the appliance is at a standstill before latching on the assembled blender.4.
Fit the assembled blender and lock it in position by turning it anticlockwise.5.
Place the ingredients in the blender jug, weighing them as indicated under the weighing function and 6.
then fit the cover with the measuring plug.
WARNING
Do not run the blender empty for more than 1 minute.
Never fill the mixing jug with boiling fluids, you could allow these to
cool down to a room temperature. Otherwise, the appliance could
overheat and the glass of the mixing jug could crack.
When you use the jug operate ice, you could select nine ices each time
and the every ice size is 40MM * 40 MM * 2 0M M.

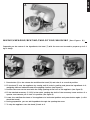
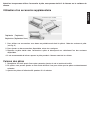
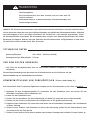
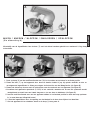
MEAT GRINDER (ACCORDING TO MODEL D) (See figure D) _______________________
Assembling and fitting the attachment
Take the body (Cutter housing 22) by the feed tube with the largest opening upwards.1.
Insert the worm shaft 16 (drive pins first ) in the cutter housing 22.2.
Fit the cutter blade 17 on the shaft with the cutting edges upwards.3.
Place the selected hole-plate over the blades ensuring that the two lugs fit in the two cut-outs in the 4.
body (see the figure D).
Screw ring (19) the cap nut fully home on the body.5.
Check the assembly .the shaft should have no play nor be able to turn on itself.6.
Play the multifunction head in the horizontal position (a click should be heard).7.
Offer up the assembled mincer attachment, titled towards you, to the outlet and engage it fully. 8.
Return the feed tube to a vertical position by turning to the rear until it stops.
Place the removable tray on the feed tube.9.
WARNING
When you dissembled the body (Cutter housing 22), you must press
the button (Release button for Cutter housing, see the arrow of figure
D).
Insert the pieces of meat in the feed tube piece by piece using the
pusher, never push the meat with the finger or any other utensil.
ENGLISH

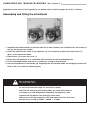
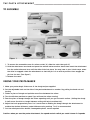
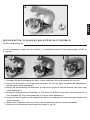
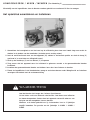
THE PASTA ATTACHEMENT________________________________________
TO ASSEMBLE
To remove the removable cover for mincer outlet (4), slide the catch then pull off. 1.
Hold the attachment one hand and press the release button another hand, then insert the attachment 2.
into the outlet drive and turn until the drive clicks into place. You may have to turn it both ways, when
the drive is engaged, rotate the attachment so that the pin is in a vertical position, then engage the
pin into the slot. (See figure 1)
Release the catch. 3.
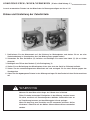
USEING YOUR PASTA MAKER
Make your pasta dough, follow one of the dough recipes supplied.1.
Set the adjustable knob on the side of the pasta attachment to number 1 by pulling the knob out and 2.
turning.
Flatten a piece of dough and sprinkle some flour between the rollers. 3.
Turn the kitchen machine to speed 1(you will see the rollers turning). 4.
Pass the piece of dough through the rollers repeating until you get a smooth surface ,(folding the dough 5.
in half across its witch or length between rolling will help to achieve this).
Adjust the knob progressively from 1 to 9, each time re-feeding the dough through the attachment to 6.
achieve the desired thickness ,pasta thickness using settings 7 to 9 is recommended.
Cut the rolled pasta into desired /manageable pieces, use as required. 7.
Caution: when you use the pasta attachment, the speed control switch you could choose 3-4 speeds.

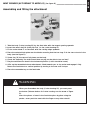
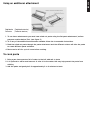
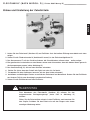
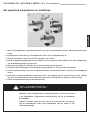
Using an additional attachment
Tagliatelle (Tagliatelle device)
Trenette (Trenette device)
To use these attachments you must have rolled out pasta using the flat pasta attachment (surface 1.
pressure noodles device) first. (see figure 2)
To fit any of the additional attachments available, follow the to assemble instructions. 2.
Feed the rolled out pasta through the pasta attachment and the different cutters will slice the pasta 3.
to create different pasta variations.
Pasta can be left for up to 4 hours before cooking.4.
To cook pasta
Bring a pan three quarters full of water to the boil, add salt to taste.1.
It is optional to add a small amount of olive oil to the water, this may help prevent the pasta from 2.
sticking.
Add the pasta and gently boil for approximately 2 to 4 minutes to taste.3.
ENGLISH

RECIPES_________________________________________________________
Basic pasta dough
500g flour or plain flour
4 eggs
2.5ml salt
2.5ml oil
Water if necessary
WHOLEMEAL PASTA
500g wholemeal flour
4 eggs
2.5ml salt
2.5ml oil
Water if necessary
PASTA ROSSA
500g flour or plain flour
3 eggs
75g pureed tomato
2.5ml salt
2.5ml oil
Water if necessary
Method
It the flour, salt, oil and beaten eggs (eggs should be mixed with tomato puree if applicable) into the 1.
mixing bowl.
2. Mix with the dough hook on speed 1-2 for approximately 2-3 minutes, adding water if the mix is too 2.
dry.
Switch off the machine and gather the ingredients together and knead by hand until you obtain a 3.
smooth dough.
For best results, wrap the dough then let it rest for approximately 15 minutes before rolling out with 4.
the pasta attachment
Fit the flat pasta making attachment and follow the previous instructions.5.

ENGLISH
CLEANING_______________________________________________________
Unplug the appliance.1.
Never immerse the motor until in water or put it under running water wipe it with a soft dry or slight 2.
damp cloth.
For easier cleaning, quickly rinse the accessories after use. Completely dismantle the mixer 3.
attachment. Handle the blades with care, as some have sharp cutting edges.
Wash , rinse and wipe the accessories or the can be put in the dishwasher, except for the metal 4.
components of the mincer attachment body Fine grinding disc(14),Medium grinding disc(15),Worm
shaft(16), Cutter blade (17),Coarse grinding disc (18) and Screw ring(19).
The grinding disc and the blade must be kept lubricated. Wipe them over with cooking oil after each 5.
use.
If your accessories are discoloured by food (carrots, oranges etc), rub them gently with kitchen towel 6.
dipped in cooking oil and then clean in the usual way.
Blender assembly: pour hot water with a few drops of washing up liquid into the blender jug. Close 7.
the cover. Fit it on the appliance and give a few pulses. Remove the blender, rinse the jug under
running water and leave it upside down to dry .for cleaning more difficult residues, especially with
thicker preparations. The blade nut assembly can be detached from the bottom of the jug, to do
this, place the empty blender upside down on a flat surface, release the blade /nut assembly with a
quarter turn and lift out the seal with care.
WARNING
Don’t wash the pasta attachment in the dishwasher, wipe clean with a
damp cloth do not immerse in water.

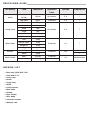
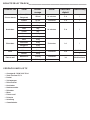
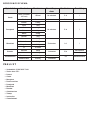
PROCESSING GUIDE______________________________________________
Accessory Food Maximum Operation
time
Speeds Preparation
whisk
Cream(include
38%fat)
250ml 10 minutes 5-6 /
Egg white 12pcs 3 minutes 5-6 /
Dough hook
Flour 1700g
10 minutes
5-6 /
Salt 20g
Yeast 10g
Sugar 10g
Water 1100g
Lard 20g
Mixer blade
Flour 100g
5 minutes 1-4 /
Castor sugar 100g
Margarine 100g
Egg 2pcs
Blender
Carrot 560g
3 minutes P/6
15x15x15mm
Water 840g /
Meet Grinder
Beef 2000g 3 minutes
3-6 20x20x60mm
Pork 2000g 3 minutes
PACKING LIST
Main body COOKYOO 7900•
Steel bowl 5.5 L•
Dusty cover•
Beater•
Dough hook•
Whisk•
Pasta machine•
Mixer blade•
Blender•
Meet Grinder•
Wire whipe•
Instruction manual•
Warranty card•

WARNING
WHEN YO U NE E D SE RVIC E
Electrical Shock Hazard
Unplug before servicing.
Failure to do so can result in death or electrical shock.
Please read the following before calling your service center.
The Stand Mixer may warm up during use. Under heavy loads with extended mixing time periods, you 1.
may not be able to comfortably touch the top of the unit. This is normal.
The Stand Mixer may emit a pungent odor, especially when new. This is common whit electric 2.
motors.
If the flat beater hits the bowl, stop the stand mixer.3.
If your Stand Mixer should malfunction or fail to operate, please check the following :
Is the Stand Mixer plugged in?•
Is the fuse in the circuit to the Stand Mixer in working order ? If you have a circuit breaker box, be •
sure the circuit is closed.
Turn the Stand Mixer off for 10-15 secons, then turn it back on. If the mixer still does not star, allow it •
to cool for 30 minutes before turning it back on.
If the problem is not due to one of the above items, see “Service Centers“.•
ENGLISH


IMPORTANT : consignes de sécurité
Veuillez lire attentivement les consignes avant d’utiliser votre appareil.•
Éteignez l’appareil avant d’assembler ou de détacher les pièces.•
N’approchez pas vos doigts des pièces mobiles ou des orifices des accessoires.•
Assurez-vous que les pièces détachées et les revêtements soient sécurisés avant d’utiliser les acces-•
soires de fabrication des pâtes.
N’utilisez l’appareil que pour les besoins domestiques pour lesquels il a été conçu, le fabricant ne cou-•
vrira aucune garantie si l’appareil est utilisé à des fins impropres ou si vous ne suivez pas les présentes
consignes.
Ne laissez jamais l’appareil fonctionner sans surveillance, particulièrement en présence d’enfants en •
bas âge ou de personnes handicapées.
Vérifiez que le voltage de l’appareil correspond à celui de votre installation électrique.•
Toute erreur de branchement annule la garantie.
L’appareil doit être branché à une prise électrique à la terre.•
Si vous avez besoin de faire usage d’une allonge électrique, elle doit être à la terre et vous devez •
veillez à ce que personne ne marche dessus.
Débranchez l’appareil sitôt que vous ne l’utilisez plus et lorsque vous le nettoyez.•
N’utilisez pas d’accessoire ni l’appareil s’il est endommagé. Faites appel à un service après-vente •
agréé.
Toute intervention sur l’appareil autre qu’une action de nettoyage de routine doit être effectuée par •
un service après-vente agréé.
Ne plongez ni l’appareil, ni le cordon électrique, ni la prise dans l’eau ou dans tout autre liquide.•
Ne laissez pas le cordon à portée de main d’enfants ; ne les laissez pas approcher ou touchez les •
parties chauffées ou coupantes de l’appareil.
Si le cordon électrique ou la prise est endommagée, n’utilisez pas l’appareil. Pour éviter tout accident, •
ces deux éléments doivent être remplacés par un service après-vente agréé.
Ne mettez jamais un accessoire muni d’une pièce métallique dans un four à micro-ondes.•
Mettez l’appareil hors tension et débranchez-le de la prise électrique avant de changer un accessoire •
ou avant de vous approcher d’un accessoire en plein mouvement.
Ne touchez ni le batteur, ni la lame du mélangeur ni le crochet à pâte pendant que l’appareil est en •
cours de fonctionnement.
N’utilisez qu’un seul accessoire à la fois.•
N’utilisez pas l’appareil pour une durée supérieure à 10 mn consécutives. Laissez-le au repos pendant •
30 minutes avant une nouvelle utilisation.
Cet appareil n’est pas conçu pour être utilisé par des enfants ou tout autre personne sans surveillance •
si leurs capacités physique, sensorielles ou mentales les empêchent de l’utiliser en toute sécurité.
Ne laissez pas les enfants sans surveillance pour éviter qu’ils ne jouent avec l’appareil.•
FRANCAIS

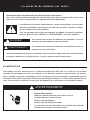
La sécurité du batteur sur socle
Votre sécurité est très importante, au même titre que celle d’autrui.
Nous avons affiché plusieurs messages de sécurité importants dans ce manuel ainsi que sur votre
robot sur socle. Lisez-les attentivement et respectez-les systématiquement.
Ce symbole est synonyme d’avertissement. Il attire votre attention sur les risques
potentiels susceptibles de provoquer des blessures mortelles ou graves à l’utilisa-
teur ou d’autres personnes présentes.
Tous les messages de sécurité sont imprimés en regards du symbole d’avertisse-
ment ou après les mots “DANGER” ou “AVERTISSEMENT”. Ces mots signifient :
Vous risquez d’être blessé mortellement ou gravement si vous ne
respectez pas immédiatement les instructions.
Vous risquez d’être blessé mortellement ou gravement si vous ne
respectez pas les instructions.
Tous les messages de sécurité vous indiquent en quoi consiste le danger potentiel, comment réduire
le risque de blessure et ce qui peut arriver si vous ne respectez pas les instructions.
ALIMENTATION
Votre batteur sur socle fonctionne sur le courant domestique 220-240 volts c.a., 50/60 Hz. La puissance
nominale de notre batteur sur socle est imprimée sur la bande de garniture. Cette puissance est détermi-
née en utilisant l’accessoire consommant le plus de puissance. D’autres accessoires recommandés peuvent
consommer bien moins de puissance. N’utilisez pas de rallonge électrique. Si le cordon d’alimentation est trop
court, faites installer une prise de courant près de l’appareil par un électricien ou un technicien qualifié.
Risque d’électrocution
Branchez l’appareil dans une prise reliée à la terre.
Ne démontez pas la prise de terre.
N’utilisez pas d’adaptateur.
N’utilisez pas de rallonge électrique.
Le non-respect de ces instructions peut entraîner des blessures
mortelles, un incendie ou une électrocution.
DANGER
AVERTISSEMENT
AVERTISSEMENT
La page charge ...
La page charge ...
La page charge ...
La page charge ...
La page charge ...
La page charge ...
La page charge ...
La page charge ...
La page charge ...
La page charge ...
La page charge ...
La page charge ...
La page charge ...
La page charge ...
La page charge ...
La page charge ...
La page charge ...
La page charge ...
La page charge ...
La page charge ...
La page charge ...
La page charge ...
La page charge ...
La page charge ...
La page charge ...
La page charge ...
La page charge ...
La page charge ...
La page charge ...
La page charge ...
La page charge ...
La page charge ...
La page charge ...
La page charge ...
La page charge ...
La page charge ...
La page charge ...
La page charge ...
La page charge ...
La page charge ...
La page charge ...
La page charge ...
-
 1
1
-
 2
2
-
 3
3
-
 4
4
-
 5
5
-
 6
6
-
 7
7
-
 8
8
-
 9
9
-
 10
10
-
 11
11
-
 12
12
-
 13
13
-
 14
14
-
 15
15
-
 16
16
-
 17
17
-
 18
18
-
 19
19
-
 20
20
-
 21
21
-
 22
22
-
 23
23
-
 24
24
-
 25
25
-
 26
26
-
 27
27
-
 28
28
-
 29
29
-
 30
30
-
 31
31
-
 32
32
-
 33
33
-
 34
34
-
 35
35
-
 36
36
-
 37
37
-
 38
38
-
 39
39
-
 40
40
-
 41
41
-
 42
42
-
 43
43
-
 44
44
-
 45
45
-
 46
46
-
 47
47
-
 48
48
-
 49
49
-
 50
50
-
 51
51
-
 52
52
-
 53
53
-
 54
54
-
 55
55
-
 56
56
-
 57
57
-
 58
58
-
 59
59
-
 60
60
-
 61
61
-
 62
62


Yoo Digital Home COOKYOO 7900 Le manuel du propriétaire
- Catégorie
- Robots culinaires
- Taper
- Le manuel du propriétaire
- Ce manuel convient également à
dans d''autres langues
Autres documents
-
 Yoo Digital COOKYOO 7000 Le manuel du propriétaire
-
 Yoo Digital COOKYOO 4500 Le manuel du propriétaire
-
Tristar MX-4170 Le manuel du propriétaire
-
-
Bosch MUMXX20G/01 Le manuel du propriétaire
-
Bosch MUMXL20G/02 Manuel utilisateur
-
Bosch MUMXL10T Le manuel du propriétaire
-
Bosch MUMXX20G/02 Manuel utilisateur
-
Bosch MUM53 Le manuel du propriétaire
-
KitchenAid 521500 Manuel utilisateur

