Yoo Digital COOKYOO 4500 Le manuel du propriétaire
- Catégorie
- Mélangeurs
- Taper
- Le manuel du propriétaire


IMPORTA N T : s a fety advice
To avoid electric shocks, do not use this device in the vicinity of water. Do not immerse the mains •
lead in water or other liquid.
Please read through the information and safety advice contained in these operating instructions care-•
fully and thoroughly before you use the stand mixer for the first time.
Do not kink or clamp the mains lead. To avoid any risk of stumbling, do not allow the mains lead to •
hang over the edge of a table or a counter.
Make sure that the voltage shown on the rating label corresponds with that of the mains supply. The •
rating label can be found on the bottom of the motor block. The stand mixer is only to be connected
to an AC supply. The motor must always be switching off before the stand mixer is connected with
the mains supply. (Knob 10 in the “0” setting).
Do not use outdoors. Only suitable for use indoors.•
This device should not be set up in close proximity to a naked flame, easily flammable materials (cur-•
tains, textiles, etc.), a radiator, an oven or some other heat source.
Before use, place the device on a horizontal and flat surface.•
Place this device as close as possible to the power source so that you can disconnect the plug quickly •
and easily.
The device must be operated with the type of power specified on the rating plate. If you are unsure •
about the details of the available power supply, ask your dealer or the local power supply company.
Do not attempt to repair the device yourself, since you will be exposed to hazardous live components •
or other hazards by opening and removing the covers.
Repairs should only be carried out in a qualified workshop.•
This is not a toy! Keep away from children. The device should be used and stored out of the reach of •
children.
Careful supervision is required when the device is used by or in the vicinity of children.•
The device should only be used for its intended purpose.•
Never operate empty and without supervision.•
During use, do not touch moving parts with your fingers.•
Please note that when passing the device on to a third party, the operating instructions must be •
included.
No liability is accepted for damage due to improper use or the failure to observe our operating ins-•
tructions / safety notes.
Unplug the appliance when not in use or before cleaning.•
If the supply cord is damaged, it must be replaced by the manufacturer or its service agent or a simi-•
larly qualified person in order to avoid a hazard.
The blades are very sharp. Be careful while clean the jar.•
Switch off the appliance and disconnect from supply before changing accessories or approaching parts •
that move in use.
This appliance is not intended for use by persons (including children) with reduced physical, sensory •
or mental capabilities, or lack of experience and knowledge, unless they have been given supervision
or instruction concerning use of the appliance by a person responsible for their safety.
Children should be supervised to ensure that they do not play with the appliance.•
Do not use mixing, mincing and blending function at the same time. Only use one of them at a time.•
ENGLISH

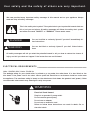
Your safet y a n d t h e s a fety of others a re very important.
We have provided many important safety messages in this manual and on your appliance. Always
read and obey all safety messages.
This is the safety alert symbol. This symbol alerts you to potential hazards that can
kill or hurt you and others. All safety messages will follow the safety alert symbol
and either the word “DANGER” or “WARNING.” These words mean:
You can be killed or seriously injured if you don’t immediately fol-
low instructions.
You can be killed or seriously injured if you don’t follow instruc-
tions.
All safety messages will tell you what the potential hazard is, tell you how to reduce the chance of
injury, and tell you what can happen if the instructions are not followed.
E L E C T R I C A L R E Q U I R E M E N T S ______________________________________
Volts : 220/240 V.A.C. Hertz : 50/60 Hz
The wattage rating for your stand mixer is printed on a tag under the mixer base. It is also listed on the
trim band. If the power cord is too short, have a qualifi ed electrician or serviceman install an outlet near
the appliance. The maximum rating is based on the attachment that draws the greatest load (power). Other
recommended attachments may drawsignifi cantly less power.
Electrical Shock Hazard
Plug into a grounded 3 prong outlet.
Do not remove ground prong.
Do not use an adapter.
Do not use an extension cord.
Failure to follow these instructions can result in death, fire, or
electrical shock.
DANGER
WARNING
WARNING

1
2
3
4
5
6
7
8
9
10
11
12
12
13
14
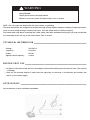
Using your appliance
V ___________________________________________________
ENGLISH
Fixing ring1.
Bowl cover2.
Steel bowl3.
Face cover4.
Enclosure5.
Top enclosure6.
Middle enclosure7.
Rise button8.
Control panel9.
Knob10.
Base cover11.
Rubber foot12.
Beater13.
Whip14.
Dough hook15.

Injury Hazard
Unplug mixer before touching beaters.
Failure to do so can result in broken bones, cuts or bruises.
NOTE : Do not scrape the bowl while the stand mixer is operating.
The bowl and beater are designed to provide thorough mixing without frequent scraping. Scraping the bowl
once or twice during mixing is usually suffi cient. Turn the stand mixer off before scraping.
The stand mixer may warm up during use. Under heavy load with extended mixing time, you may not be able
to comfortably touch the top of the stand mixer. This is normal.
T E C H N I C A L I N F O R M A T I O N _________________________________________
Voltage : 220-240 V
frequency : 50/60Hz
Power : 650W
Agitator kettle capacity : 5 liters
B E F O R E F I R S T U S E ________________________________________________
All parts of the stand mixer are to be thoroughly cleaned before being used for the first time. (See section •
: Cleaning).
Take out the required length of cable from the cable tidy on the base of the blender and connect the •
device to the mains supply.
A C C E S S O R I E S ___________________________________________________
Les accessoires et leurs utilisations possibles.
WARNING

Mixer1. : For making cakes, biscuits, cakes, icings, fillings, éclairs and mashed potatoes.
Dough hook2. : For mixtures containing yeast.
Whip3. : To the eggs, cream, batter, cakes without fat, meringues, cheesecakes, mousses, soufflés. Do not
use the whisk for heavy mixtures (eg, fat and sugar) - you could damage it.
Using your mixer
Press the release lever of the head and lift the beater until it clicks into place. To insert a utensil1.
Select a pan and press it in the output accessory. Always ensure that the protection is installed on the 2.
shaft of the dough hook before inserting it in the output. Once inserted the pan, put the protection on
the output of the mixer to avoid splashing of food.
Place the bowl on the base and turn clockwise to clockwise to lock it into position.3.
Press the release lever of the head and lower the mixer head until it clicks into position.4.
To remove a utensil
Raise the mixer head and, while holding the camera firmly, remove the pan from the output.
Testing the device
Press the rise button, then lift the machine arm. 1.
Put the mixing bowl onto the base, and lock it as the arrowhead denotes.2.
Fix the dusty cover onto the mixing blade, then lock the blade into the machine’3.
Press the rise button, Make the arm down. Make sure the arm is fixed together the basc,4.
Plug-in the cord, and turn on the adjustable knob, then try every function for a few seconds.5.
After the trial, turn off the knob. 6.
Press the button and lift the arm, then take apart the mixing blade from the blade conector.7.
Important
Movements at the mixer head is normal when mixing heavy ingredients, tells the dough.
If you raise the mixer head while the unit is operating, it stops immediately. To restart the mixer,
lower the head, move the gear selector to «Off», wait a few seconds, then re-select a speed. The
batter should be restarted immediately.
If for any reason, the power supply is interrupted and the drummer stops the machine, set the speed
to «stop», wait a few seconds, then re-select a speed. The batter should be restarted immediately.
T O M I X O R K N E A D D O U G H __________________________________________
Suggestion flour and water at a ratio of 5 : 3.1.
Assembly the dough hook, and turn on knob 11.2.
When filling the agitator kettle, please ensure that the maximum quality is not exceeded.3.
Maximum quantity of flour is 1500g.4.
The dough hook or mixer beater should be used.5.
Turn on the knob, The device oprated 30’s at speed”1”, then operated 4min at speed”2”6.
No longer use than 5 minutes continuously at a time. And cool down used again.7.
ENGLISH

Important
Never exceed the maximum capacities stated - you overload the machine.
Movements at the mixer head is normal when mixing heavy ingredients such as bread dough.
The ingredients mix best if you pour the liquid first.
Stop periodically and scrape the mixture with the dough hook.
W H I P P I N G E G G W H I T E S O R C R E A M __________________________________
Turn the device, whip the egg whites without stopping for about 5 minutes, according to the size of the 1.
eggs until stiff.
Maximum quantity 12 eggs.2.
For whipped cream, whip 250ml fresh cream at high speed for about 5 minutes.3.
When filling the agitator kettle with fresh milk, cream or other ingredients, please ensure that the maxi-4.
mum quality is not exceeded.
The egg beater should be used.5.
No longer use than10 minutes continuously at a time.6.
MIXING SHAKES, COCKTAILS OR OTHER LIQUIDS ______________________
Mix the ingredients according to the available recipe, at high speed for about 5 minutes.1.
Do not exceed the maximum quantity for the agitator kettle.2.
The mixer beater should be used.3.
No longer use than10 minutes continuously at a time.4.
INSTALLATION ET UTILISATION DE LA PROTECTION ANTI-PROJECTIONS ________
Place the bowl on the base and add the ingredients.1.
Install the pan, then lower the mixer head.2.
Place the bowl on the protection by sliding the open around the mixer head.3.
To remove the splashguard, repeat the above procedure in reverse order.4.
The ingredients can be added directly into the bowl through the opening during operation of the device.
N E T T O YA G E _____________________________________________________
Before cleaning, please ensure that the knob turn off and that the plug has been disconnected from the 1.
socket.
After use, allow the device to cool down before you start to clean it.2.
To clean the exterior of the device, use a moist cloth and a mild detergent.3.
When cleaning the interior and exterior and protective dust cover do not use any abrasive detergents 4.
or alcohol.

ENGLISH
To clean the device, never submerge it in water.5.
The dough beater, mixer beater, Food plate are not in dishwasher. The accessories must be cleaned only 6.
in warm water and washing-up liquid.
The plastic accessories, Mixing bowl, egg beater and blades , Must be cleaned with warm water and 7.
washing-up liquid or in dishwasher. Do not use any abrasive detergents..
C L E A N I N G _______________________________________________________
Unplug the appliance.1.
Never immerse the motor until in water or put it under running water wipe it with a soft dry or slight 2.
damp cloth.
For easier cleaning, quickly rinse the accessories after use. Completely dismantle the mixer attach-3.
ment.
Wash , rinse and wipe the accessories or the can be put in the dishwasher.4.
If your accessories are discoloured by food, rub them gently with kitchen towel dipped in cooking oil and 5.
then clean in the usual way.
P R O C E S S I N G G U I D E ______________________________________________
Accessory Food Maximum Operation
time
Speeds Preparation
whisk Cream(include
38%fat)
250ml 10 minutes 5-6 /
Egg white 12pcs 3 minutes 5-6 /
Dough hook Flour 1700g 10 minutes 5-6 /
Salt 20g
Yeast 10g
Sugar 10g
Water 1100g
Lard 20g
Mixer blade Flour 100g 5 minutes 1-4 /
Castor sugar 100g
Margarine 100g
Egg 2pcs
P A C K I N G L I S T ____________________________________________________
Main body COOKYOO 4500•
Steel bowl•
Dusty cover•

Beater•
Dough hook•
Wire whipe•
Instruction manual•
Warranty card•
WHEN YOU NEED SERVICE __________________________________________
Electrical Shock Hazard
Unplug before servicing.
Failure to do so can result in death or electrical shock.
Please read the following before calling your service center.
The Stand Mixer may warm up during use. Under heavy loads with extended mixing time periods, you 1.
may not be able to comfortably touch the top of the unit. This is normal.
The Stand Mixer may emit a pungent odor, especially when new. This is common whit electric motors.2.
If the flat beater hits the bowl, stop the stand mixer.3.
If your Stand Mixer should malfunction or fail to operate, please check the following :
Is the Stand Mixer plugged in?•
Is the fuse in the circuit to the Stand Mixer in working order ? If you have a circuit breaker box, be sure •
the circuit is closed.
Turn the Stand Mixer off for 10-15 secons, then turn it back on. If the mixer still does not star, allow it •
to cool for 30 minutes before turning it back on.
If the problem is not due to one of the above items, see “Service Centers“.•
WARNING

This marking indicates that this product should not be disposed with other household wastes throu-
ghout the EU. To prevent possible harm to the environment or human health from uncontrolled waste
disposal, recycle it responsibly to promote the sustainable reuse of material resources. To return your
used device, please use the return and collection systems or contact the retailer where the product was
purchased. They can take this product for environmental safe recycling.


IMPORTANT : consignes de sécurité
Pour éviter les chocs électriques, n’utilisez pas cet appareil à proximité de l’eau. Ne plongez pas le •
cordon d’alimentation dans l’eau ou tout autre liquide.
Lisez toutes les consignes de sécurité et les instructions d’utilisation attentivement avant d’utiliser •
l’appareil.
Ne tordez pas et n’écrasez pas le cordon d’alimentation. Placez-le libre de tout encombrement. Ne •
laissez pas le cordon d’alimentation pendre sur le bord d’une table ou d’un comptoir.
Veillez à ce que la tension requise de l’appareil corresponde à celle du secteur. La plaque signalétique •
se trouve en bas du bloc moteur. L’appareil ne doit être raccordé qu’à un circuit de courant alternatif.
N’oubliezpasd’éteindrelemoteur(enmettantlebouton⑩enposition«0»)avantdebrancherl’ap-
pareil à l’alimentation secteur.
Placez l’appareil sur une surface horizontale, plane et stable•
Installez l’appareil près de la prise secteur de manière à ce que vous puissiez débrancher la fiche •
rapidement et facilement.
Pour éviter tout danger, ne tentez pas de démonter ou de réparer l’appareil vous-même.•
Utilisez l’appareil comme indiqué dans ce manuel.•
Le fabricant n’est pas responsable des dommages dus à une mauvaise utilisation. Veuillez à bien •
respecter les consignes de sécurité et d’utilisation.
La lame et les grilles à hacher sont tranchantes. Soyez prudent lors du nettoyage de l’appareil.•
N’utilisez pas les fonctions du mixeur et du hachoir simultanément. Utilisez une seule fonction à la •
fois.
Prenez des précautions lorsque vous soulevez cet appareil. Assurezvous que la tête est verrouillée et •
que le bol, les ustensiles et le cordon sont bloqués avant de soulever le robot.
Cet appareil n’est pas destiné à être utilisé par des personnes (y compris des enfants) dont les capa-•
cités physiques, sensorielles ou mentales sont diminuées, ou qui ne disposent pas des connaissances
ou de l’expérience nécessaires, à moins qu’elles n’aient été formées et encadrées pour l’utilisation de
cet appareil par une personne responsable de leur sécurité.
Les enfants doivent être surveillés afin qu’ils ne puissent pas jouer avec cet appareil.•
N’employez l’appareil qu’à la fin domestique prévue. •
Éteignez et débranchez l’appareil avant d’adapter ou de retirer tout élément, après l’utilisation et avant •
le nettoyage.
N’approchez jamais vos doigts des éléments ou des accessoires mobiles. Ne mettez jamais vos doigts •
etc. dans la charnière de l’appareil.
Ne laissez jamais l’appareil sous tension sans surveillance•
Assurez-vous que la tension de votre installation est la même que celle indiquée sous votre appareil.•
Si le câble d’alimentation est endommagé, il doit être remplacé par le fabricant, son service après •
vente ou des personnes de qualification similaire afin d’éviter un danger.
FRANCAIS

La sécurité du batteur sur socle
Votre sécurité est très importante, au même titre que celle d’autrui.
Nous avons affiché plusieurs messages de sécurité importants dans ce manuel ainsi que sur votre
robot sur socle. Lisez-les attentivement et respectez-les systématiquement.
Ce symbole est synonyme d’avertissement. Il attire votre attention sur les risques
potentiels susceptibles de provoquer des blessures mortelles ou graves à l’utilisa-
teur ou d’autres personnes présentes.
Tous les messages de sécurité sont imprimés en regards du symbole d’avertisse-
ment ou après les mots “DANGER” ou “AVERTISSEMENT”. Ces mots signifient :
Vous risquez d’être blessé mortellement ou gravement si vous ne
respectez pas immédiatement les instructions.
Vous risquez d’être blessé mortellement ou gravement si vous ne
respectez pas les instructions.
Tous les messages de sécurité vous indiquent en quoi consiste le danger potentiel, comment réduire
le risque de blessure et ce qui peut arriver si vous ne respectez pas les instructions.
A L I M E N T AT I O N __________________________________________________
Votre batteur sur socle fonctionne sur le courant domestique 220-240 volts c.a., 50/60 Hz. La puissance
nominale de notre batteur sur socle est imprimée sur la bande de garniture. Cette puissance est détermi-
née en utilisant l’accessoire consommant le plus de puissance. D’autres accessoires recommandés peuvent
consommer bien moins de puissance. N’utilisez pas de rallonge électrique. Si le cordon d’alimentation est trop
court, faites installer une prise de courant près de l’appareil par un électricien ou un technicien qualifié.
Risque d’électrocution
Branchez l’appareil dans une prise reliée à la terre.
Ne démontez pas la prise de terre.
N’utilisez pas d’adaptateur.
N’utilisez pas de rallonge électrique.
Le non-respect de ces instructions peut entraîner des blessures
mortelles, un incendie ou une électrocution.
DANGER
AVERTISSEMENT
AVERTISSEMENT

FRANCAIS
Utilisation de votre robot
D E S C R I P T I O N ___________________________________________________
1
2
3
4
5
6
7
8
9
10
11
12
12
13
14
Anneau de fixation1.
Couvercle anti-éclaboussure2.
Bol en acier3.
Couvercle de la base4.
Base5.
Bloc moteur6.
Axe d’ouverture7.
Bouton de déverrouillage8.
Panneau de contrôle9.
Bouton de contrôle10.
Trappe11.
Pieds en caoutchouc12.
Batteur13.
Fouet14.
Crochet à Pâte15.

Risque de blessure
Débranchez le batteur avant de toucher les fouets.
Ne pas suivre ces consignes peut se traduire par des os brisés, des
coupures ou des ecchymoses.
REMARQUE : Ne grattez pas le bol pendant que le batteur sur socle fonctionne.
Le bol et le fouet sont conçus pour assurer une homogénéité du mélange sans raclage fréquent. En général,
il suffit de racler le bol une ou deux fois durant le mélange. Arrêtez l’appareil pour le raclage.
Le batteur sur socle peut s’échauffer lorsqu’il fonctionne. Dans le cas de charges importantes et d’une durée
de mélange prolongée, il est possible que vous ne puissiez pas toucher facilement le dessus de l’appareil.
C’est normal.
I N F O R M A T I O N S T E C H N I Q U E S ______________________________________
Tension : 220-240 V
Fréquence : 50 Hz
Puissance : 1000 Watts
Capacité du bol : 5 litres
A VA N T L A P R E M I È R E U T I L I S A T I O N ___________________________________
Retirez tous les emballages.•
Poussez le surplus de cordon dans le compartiment range-cordon situé à l’arrière de l’appareil.•
Lavez les différentes parties de l’appareil•
A C C E S S O I R E S ___________________________________________________
Les accessoires et leurs utilisations possibles.
AVERTISSEMENT

Batteur1. : Pour la confection de cakes, biscuits, pâtisseries, glaçages, garnitures, éclairs et purées de
pommes de terre.
Crochet à pate2. : Pour les mélanges à base de levure.
Fouet3. : Pour les œufs, la crème, la pâte à beignet, les gâteaux sans matière grasse, les meringues, les
gâteaux au fromage, les mousses, les soufflés. N’utilisez pas le fouet pour les mélanges épais (ex matière
grasse et sucre) – vous pourriez l’endommager.
Utilisation de votre batteur
Appuyez sur la manette de déblocage de la tête et levez le batteur jusqu’à ce qu’il s’enclenche en posi-1.
tion. Pour insérer un ustensile
Sélectionnez un ustensile et enfoncez-le dans la sortie pour accessoires. Assurez-vous toujours que la 2.
protection est installée sur l’arbre du crochet pétrisseur avant de l’insérer dans la sortie. Une fois l’usten-
sile inséré, placez la protection sur la sortie du batteur pour éviter les projections d’aliments.
Placez le bol sur le socle et tournez dans le sens des aiguilles d’une montre pour le verrouiller dans sa 3.
position.
Appuyez sur la manette de déblocage de la tête et abaissez la tête du batteur jusqu’à ce qu’elle s’en-4.
clenche dans sa position.
Pour retirer un ustensile
Levez la tête du batteur et, tout en tenant l’appareil fermement, retirez l’ustensile de la sortie.
Test de l’appareil
Appuyez sur le bouton de déverrouillage puis soulevez le bloc moteur. 1.
Mettez le bol sur la base et tournez-le dans le sens de la flèche afin de le verrouiller.2.
Fixez le couvercle anti-éclaboussures sur l’arbre du batteur. Ensuite montez le batteur plat.3.
Appuyez sur le bouton de déverrouillage et baissez le bloc moteur. Assurez-vous que le bloc moteur soit 4.
fixé fermement en place.
Branchez l’appareil au secteur puis essayez chaque fonction pendant quelques secondes.5.
Eteignez l’appareil. 6.
Appuyez sur le bouton de déverrouillage et soulevez le bloc moteur. Retirez le batteur plat de l’appareil.7.
Important
Les mouvements au niveau de la tête du batteur sont normaux lorsque vous mixez des ingrédients
lourds, tells que la pâte à pain.
Si vous soulevez la tête du batteur alors que l’appareil fonctionne, celui-ci s’arrête immédiatement.
Pour redémarrer le batteur, abaissez la tête, positionnez le sélecteur de vitesse sur «Arrêt», atten-
dez quelques secondes, puis sélectionnez à nouveau une vitesse. Le batteur doit se remettre en
marche immédiatement.
Si, pour une raison quelconque, l’alimentation électrique du batteur est interrompue et l’appareil
s’arrête, positionnez le sélecteur de vitesse sur « arrêt », attendez quelques secondes, puis sélec-
tionnez à nouveau une vitesse. Le batteur doit se remettre en marche immédiatement.
MÉLANGER OU PÉTRIR (de la pâte) ___________________________________
FRANCAIS

La proportion suggérée de farine et d’eau est de 5 à 3.1.
Vous pouvez utiliser le crochet pétrisseur ou le batteur plat. Pour pétrir la pâte, installez le crochet 2.
pétrisseur.
Mettez les ingrédients dans le bol mélangeur. N’ajoutez pas plus de 1.500 g de farine dans le bol.3.
Tournez le bouton de contrôle (11 de la fig. 1) pour faire fonctionner l’appareil à la vitesse « 1 » pendant 30 4.
secondes puis à la vitesse « 2 » pendant 4 minutes.
Ne faites pas fonctionner l’appareil pendant plus de 5 minutes consécutives. Laissez-le refroidir avant 5.
de continuer.
Important
Ne dépassez jamais les capacités maximales indiquées – vous surchargeriez l’appareil.
Les mouvements au niveau de la tête du batteur sont normaux lorsque vous mixez des ingrédients
lourds, tels que la pâte à pain.
Les ingrédients se mélangeront mieux si vous versez les liquides en premier.
Arrêtez régulièrement l’appareil et raclez le mélange avec le crochet à pâte.
FOUETTER (des blancs d’œufs ou de la crème) _________________________
Installez le fouet. Allumez l’appareil. 1.
Ajoutez entre 3 et 24 œufs dans le bol mélangeur à la fois.2.
Battez les blancs d’œufs à vitesse élevée pendant environ 5 minutes afin de les monter en neige.3.
Mettez le lait, la crème ou d’autres ingrédients dans le bol mélangeur. Faites attention à ne pas trop 4.
remplir le bol.
Pour réaliser de la crème fouettée, battez à vitesse élevée 250 ml de crème pendant environ 5 minutes.5.
Ne faites pas fonctionner l’appareil pendant plus de 10 minutes consécutives.6.
MIXER (des milk-shakes, cocktails ou autres liquides) _________________
Utilisez le batteur plat. 1.
Ajoutez les ingrédients selon votre recette. Faites attention à ne pas trop remplir le bol.2.
Mixez les ingrédients à vitesse élevée pendant environ 5 minutes.3.
Ne faites pas fonctionner l’appareil pendant plus de 10 minutes consécutives.4.
INSTALLATION ET UTILISATION DE LA PROTECTION ANTI-PROJECTIONS ________
Installez le bol sur le socle et ajoutez les ingrédients.1.
Installez l’ustensile, puis abaissez la tête du batteur2.
Placez la protection sur le bol en faisant glisser la partie ouverte autour de la tête du batteur.3.
Pour retirer la protection anti-projections, répétez la procédure ci-dessus dans l’ordre inverse.4.
Les ingrédients peuvent être ajoutés directement dans le bol par l’ouverture pendant le fonctionnement de
La page est en cours de chargement...
La page est en cours de chargement...
La page est en cours de chargement...
La page est en cours de chargement...
-
 1
1
-
 2
2
-
 3
3
-
 4
4
-
 5
5
-
 6
6
-
 7
7
-
 8
8
-
 9
9
-
 10
10
-
 11
11
-
 12
12
-
 13
13
-
 14
14
-
 15
15
-
 16
16
-
 17
17
-
 18
18
-
 19
19
-
 20
20
-
 21
21
-
 22
22
-
 23
23
-
 24
24


Yoo Digital COOKYOO 4500 Le manuel du propriétaire
- Catégorie
- Mélangeurs
- Taper
- Le manuel du propriétaire
dans d''autres langues
Documents connexes


Autres documents
-
Breville the Scraper Mixer Pro Manuel utilisateur
-
DeLonghi 34655 Manuel utilisateur
-
-
KitchenAid KSM7586P Manuel utilisateur
-
KitchenAid KP26M9PC Mode d'emploi
-
KitchenAid KSM6521XSR Manuel utilisateur
-
-
CONTINENTAL EDISON CERP530W Manuel utilisateur
-
CONTINENTAL EDISON CERP700W Manuel utilisateur
-