Braun 1361 Manuel utilisateur

Catégorie
Cadres photo numériques
Taper
Manuel utilisateur
1361
Gebrauchsanweisung
Instruction Manual
Mode d'emploi
Manuale di Istruzioni
Instrucciones de manejo
Handleiding
οδηγίες
DigiFrame
DigiFrame
DigiFrame
DigiFrame
DigiFrame
DigiFrame
DigiFrame
DigiFrame
DigiFrame
DigiFrame
DigiFrame
DigiFrame
DigiFrame
DigiFrame
DigiFrame
DigiFrame
DigiFrame
DigiFrame
DigiFrame
DigiFrame
DigiFrame
DigiFrame
DigiFrame
DigiFrame
DigiFrame
DigiFrame
DigiFrame
DigiFrame
DigiFrame
DigiFrame
DigiFrame
1 3.3”
1 3.3”
1 3.3”
1 3.3”
1 3.3”
1 3.3”
1 3.3”
1 3.3”
1 3.3”
1 3.3”
1 3.3”
1 3.3”
1 3.3”
1 3.3”
1 3.3”
1 3.3”
1 3.3”
1 3.3”
1 3.3”
1 3.3”
1 3.3”
1 3.3”
1 3.3”
1 3.3”
1 3.3”
1 3.3”
1 3.3”
1 3.3”
1 3.3”
1 3.3”
1 3.3”
1 3.3”
1 3.3”
1 3.3”
1 3.3”
1 3.3”
1 3.3”
1 3.3”
1 3.3”
1 3.3”
1 3.3”
1 3.3”
1 3.3”
1 3.3”
1 3.3”
1 3.3”
1 3.3”
1 3.3”
1 3.3”
1 3.3”
1 3.3”
1 3.3”
1 3.3”
1 3.3”
1 3.3”
1 3.3”
1 3.3”
1 3.3”
1 3.3”
DigiFrame
1 3.3”
DigiFrame
DigiFrame
1 3.3”
DigiFrame
DigiFrame
1 3.3”
DigiFrame
DigiFrame
1 3.3”
DigiFrame
DigiFrame
1 3.3”
DigiFrame
DigiFrame
1 3.3”
DigiFrame
DigiFrame
1 3.3”
DigiFrame
DigiFrame
1 3.3”
DigiFrame
DigiFrame
1 3.3”
DigiFrame
DigiFrame
1 3.3”
DigiFrame
DigiFrame
1 3.3”
DigiFrame
DigiFrame
1 3.3”
DigiFrame
DigiFrame
1 3.3”
DigiFrame
DigiFrame
1 3.3”
DigiFrame
DigiFrame
1 3.3”
DigiFrame
DigiFrame
1 3.3”
DigiFrame
DigiFrame
1 3.3”
DigiFrame
DigiFrame
1 3.3”
DigiFrame
DigiFrame
1 3.3”
DigiFrame
DigiFrame
1 3.3”
DigiFrame
DigiFrame
1 3.3”
DigiFrame
DigiFrame
1 3.3”
DigiFrame
DigiFrame
1 3.3”
DigiFrame
DigiFrame
1 3.3”
DigiFrame
DigiFrame
1 3.3”
DigiFrame
DigiFrame
1 3.3”
DigiFrame
DigiFrame
1 3.3”
DigiFrame
DigiFrame
1 3.3”
DigiFrame
DigiFrame
1 3.3”
DigiFrame
DigiFrame
1 3.3”
DigiFrame
DigiFrame
1 3.3”
DigiFrame
DigiFrame
1 3.3”
DigiFrame
DigiFrame
1 3.3”
DigiFrame
DigiFrame
1 3.3”
DigiFrame
DigiFrame
1 3.3”
DigiFrame
DigiFrame
1 3.3”
DigiFrame
DigiFrame
1 3.3”
DigiFrame
DigiFrame
1 3.3”
DigiFrame
DigiFrame
1 3.3”
DigiFrame
DigiFrame
1 3.3”
DigiFrame
DigiFrame
1 3.3”
DigiFrame
DigiFrame
1 3.3”
DigiFrame
DigiFrame
1 3.3”
DigiFrame
DigiFrame
1 3.3”
DigiFrame
DigiFrame
1 3.3”
DigiFrame
DigiFrame
1 3.3”
DigiFrame
DigiFrame
1 3.3”
DigiFrame
DigiFrame
1 3.3”
DigiFrame
DigiFrame
1 3.3”
DigiFrame
DigiFrame
1 3.3”
DigiFrame
DigiFrame
1 3.3”
DigiFrame
DigiFrame
1 3.3”
DigiFrame
DigiFrame
1 3.3”
DigiFrame
DigiFrame
1 3.3”
DigiFrame
DigiFrame
1 3.3”
DigiFrame
DigiFrame
1 3.3”
DigiFrame
DigiFrame
1 3.3”
DigiFrame
DigiFrame
1 3.3”
DigiFrame
Gebrauchsanweisung
Instruction Manual
1 3.3”
Gebrauchsanweisung
1361
DigiFrame
DigiFrame
DigiFrame
DigiFrame
DigiFrame
DigiFrame
DigiFrame
DigiFrame
DigiFrame
DigiFrame
DigiFrame
DigiFrame
DigiFrame
DigiFrame
DigiFrame
DigiFrame
DigiFrame
DigiFrame
DigiFrame
DigiFrame
DigiFrame
DigiFrame
DigiFrame
DigiFrame
DigiFrame
DigiFrame
DigiFrame
DigiFrame
DigiFrame
1 3.3”
1 3.3”
1 3.3”
1 3.3”
1 3.3”
1 3.3”
1 3.3”
1 3.3”
1 3.3”
1 3.3”
1 3.3”
1 3.3”
1 3.3”
1 3.3”
1 3.3”
1 3.3”
1 3.3”
1 3.3”
1 3.3”
1 3.3”
1 3.3”
1 3.3”
1 3.3”
1 3.3”
1 3.3”
1 3.3”
1 3.3”
1 3.3”
1 3.3”
1 3.3”
1 3.3”
1 3.3”
1 3.3”
1 3.3”
1 3.3”
1 3.3”
1 3.3”
1 3.3”
1 3.3”
1 3.3”
1 3.3”
1 3.3”
1 3.3”
1 3.3”
1 3.3”
1 3.3”
1 3.3”
1 3.3”
1 3.3”
1 3.3”
1 3.3”
1 3.3”
1 3.3”
1 3.3”
1 3.3”
1 3.3”
1 3.3”
1 3.3”
1 3.3”
1 3.3”
1 3.3”
1 3.3”
1 3.3”
1 3.3”
1 3.3”
1 3.3”
1 3.3”
1 3.3”
1 3.3”
1 3.3”
DigiFrame
1 3.3”
DigiFrame
DigiFrame
1 3.3”
DigiFrame
DigiFrame
1 3.3”
DigiFrame
DigiFrame
1 3.3”
DigiFrame
DigiFrame
1 3.3”
DigiFrame
DigiFrame
1 3.3”
DigiFrame
DigiFrame
1 3.3”
DigiFrame
DigiFrame
1 3.3”
DigiFrame
DigiFrame
1 3.3”
DigiFrame
DigiFrame
1 3.3”
DigiFrame
DigiFrame
1 3.3”
DigiFrame
DigiFrame
1 3.3”
DigiFrame
DigiFrame
1 3.3”
DigiFrame
DigiFrame
1 3.3”
DigiFrame
DigiFrame
1 3.3”
DigiFrame
DigiFrame
1 3.3”
DigiFrame
DigiFrame
1 3.3”
DigiFrame
DigiFrame
1 3.3”
DigiFrame
DigiFrame
1 3.3”
DigiFrame
DigiFrame
1 3.3”
DigiFrame
DigiFrame
1 3.3”
DigiFrame
DigiFrame
1 3.3”
DigiFrame
DigiFrame
1 3.3”
DigiFrame
DigiFrame
1 3.3”
DigiFrame
DigiFrame
1 3.3”
DigiFrame
DigiFrame
1 3.3”
DigiFrame
DigiFrame
1 3.3”
DigiFrame
DigiFrame
1 3.3”
DigiFrame
DigiFrame
1 3.3”
DigiFrame
DigiFrame
1 3.3”
DigiFrame
DigiFrame
1 3.3”
DigiFrame
DigiFrame
1 3.3”
DigiFrame
DigiFrame
1 3.3”
DigiFrame
DigiFrame
1 3.3”
DigiFrame
DigiFrame
1 3.3”
DigiFrame
DigiFrame
1 3.3”
DigiFrame
DigiFrame
1 3.3”
DigiFrame
DigiFrame
1 3.3”
DigiFrame
DigiFrame
1 3.3”
DigiFrame
DigiFrame
1 3.3”
DigiFrame
DigiFrame
1 3.3”
DigiFrame
DigiFrame
1 3.3”
DigiFrame
DigiFrame
1 3.3”
DigiFrame
DigiFrame
1 3.3”
DigiFrame
DigiFrame
1 3.3”
DigiFrame
DigiFrame
1 3.3”
DigiFrame
DigiFrame
1 3.3”
DigiFrame
DigiFrame
1 3.3”
DigiFrame
DigiFrame
1 3.3”
DigiFrame
DigiFrame
1 3.3”
DigiFrame
DigiFrame
1 3.3”
DigiFrame
DigiFrame
1 3.3”
DigiFrame
DigiFrame
1 3.3”
DigiFrame
DigiFrame
1 3.3”
DigiFrame
DigiFrame
1 3.3”
DigiFrame
1 3.3”
DEUTSCH 3
ENGLISH 10
FRANÇAIS 17
ITALIANO 24
ESPOL 31
ROMÂNESC 38
NEDERLANDS 45
ελληνικά 52
3
DEUTSCH
Einleitung:
Vielen Dank, dass Sie sich für diesen digitalen Bilderrahmen
entschieden haben. Er ermöglicht die schnelle Anzeige von
Fotos, die Sie mit eine Digitalkamera oder dem Handy auf-
genommen haben oder von einer Speicherkarte. Bitte lesen
Sie die Bedienungsanleitung aufmerksam durch, um den
digitalen Bilderrahmen korrekt nutzen zu können.
Inhaltsverzeichnis:
1. Aufstellungsanleitung 4
2a. Rückseite und linke Seite des Bilderrahmens 4
2b. Fernbedienung 5
2c. Einlegen und Wechseln der Batterie 5
3. Erste Schritte 6
4. Bedienungshinweise 6
Speicherkarte und USB 6
5. Bildmodus 6
6. Musikmodus 7
7. Videomodus 7
8. Kopierfunktion für Untertitel 8
9. Scrollfunktion für Untertitel 8
10. Kalender 8
11. HDMI-Eingang 8
12. Einstellungen 8
13. Technische Spezi kationen 9
14. Anleitung zur Problembehebung 9
Technischer Support
Wir sind bestrebt, den besten Kundendienst zu bieten. Wenn Sie Hilfe
mit Ihrem Produkt von BRAUN benötigen, wenden Sie sich an den
technischen Kundendienst von BRAUN, bevor Sie das Gerät zurück-
schicken. Sie erreichen uns auf einem der folgenden Wege:
Web: www.braun-phototechnik.de
+49 (0) 7457 / 9465-60
Erklärung zu Radio- und TV-Störungen
Dieses Gerät wurde getestet und entspricht den Beschränkungen für
ein Digitalgerät der Klasse B entsprechend der CE-Bestimmungen.
Diese Grenzwerte sollen einen angemessenen Schutz gegen abträg-
liche Störungen in häuslichen Installationen bieten.
Zur Ansicht der zugehörigen Konformitätserklärung besuchen Sie
bitte unsere Webseite.
BRAUN PHOTO TECHNIK GmbH
Merkurstraße 8
72184 Eutingen/Deutschland
Tel.: +49 (0) 7457/-9465-60
Lieferumfang:
1. 13,3-Zoll digitaler Bilderrahmen
2. Netzteil
3. Fernbedienung
4. Bedienungsanleitung
5. Standfuß
Wichtige Hinweise:
Vorsichtsmassnahmen und Pfl ege
Nur für Verwendung im Innenbereich
Zur Vermeidung von Feuer oder eines elektrischen
Schlages darf das Gerät Feuchtigkeit oder Kondensation
nicht ausgesetzt sein.
Um eine Überhitzung zu vermeiden, dürfen die Lüftungs-
öffnungen auf der Rückseite des digita-len Bilderrahmens
nicht abgedeckt werden.
Setzen Sie den digitalen Bilderrahmen nicht direkter
Sonneneinstrahlung aus.
Den digitalen Bilderrahmen nicht öffnen. Es besteht die
Gefahr eines elektrischen Schlages und es gibt darin
keine vom Anwender zu wartenden Teile.
Öffnen des digitalen Bilderrahmens führt zum Erlöschen
der Garantie.
Reinigung des LCD-Displays
Behandeln Sie das Display vorsichtig. Da das Display
des digitalen Bilderrahmens aus Glas besteht, könnte es
brechen oder zerkratzt werden.
Wenn sich Fingerabdrücke oder Staub auf dem LCD-
Display ansammeln, empfehlen wir die Verwendung eines
weichen, nicht scheuernden Tuches, zum Beispiel eines
Reinigungstuchs für Kameralinsen, um das LCD-Display
zu reinigen.
Feuchten Sie das Reinigungstuch mit der Reinigungs-
lösung an und wenden Sie das Tuch auf dem Display an.
WARNHINWEIS:
Bitte schalten Sie das Gerät vor dem Einsetzen oder Heraus-
nehmen einer Speicherkarte oder eines USB-Geräts aus.
Andernfalls kann es zu Schäden an der Speicherkarte oder
des USB-Geräts und dem digitalen Bilderrahmen kommen.
Um Gefahren durch Feuer oder eines elektrischen Schocks
zu verringern, setzen Sie das Gerät nicht Regen oder
Feuchtigkeit aus.
Hinweis:
Dieses Gerät ist nur zum privaten Gebrauch und nicht für
kommerzielle Nutzung ausgelegt.
Einleitung:
4DEUTSCH
Funktionen:
1. Unterstützte Bildformate: JPEG
2. Unterstützte Audioformate: MP3
3. Unterstützte Videoformate: MPEG1, MPEG2, MPEG4,
RMVB, MOV, MJPEG, DivX 4.0, DivX 5.0, AVI
4. Unterstützte Speicherkarten: SD/MMC/MS
5. USB-Port: USB 2.0
6. HDMI-Port: unterstützt HDMI-IN-Funktion
7. Diashow mit Hintergrundmusik
8. Unterstützt laufende Untertitel während der Foto-,
Musik- und Filmwiedergabe
9. Unterstützt Zeitleiste während der Foto-, Musik-und
Filmwiedergabe
10. Integrierte Uhr und Wecker, automatische
Ein-/Ausschaltung
11. Helligkeit, Kontrast, Farbsättigung einstellbar
12. OSD-Sprachen: Deutsch, Englisch und andere
Sprachen wählbar
1. Aufstellungsanleitung
Stecken Sie den Standfuß in den Schlitz des Digitalen
Bilderrahmens und drehen Sie ihn im Uhrzeigersinn fest.
Bitte stellen Sie vorher sicher, dass der Standfuß fest sitzt,
dann stellen Sie das Gerät auf eine feste und stabile Unter-
lage. Bitte beachten Sie die Darstellung unten.
1. SD/MMC/MS-Speicherkarte
2. USB
3. HDMI
4. Stromeingang
1. Ein/Aus
2. AUF/Vorheriges
3. Leiser/Links
4. AB/Nächstes
5. Play/Pause/OK
6. Lauter/Rechts
7. MENÜ
2a. Rückseitige Schaltfl ächen und linke
Seite des Bilderrahmens
1. SD/MMC/MS-Speicherkarte
2. USB
3. HDMI
4. Stromeingang
5
DEUTSCH
2b. Fernbedienung
1. Stumm: Lautsprecher stummschalten
2. Source: Eingangsquelle wählen
(HDMI-IN/DMP)
3. Ein/Aus: Ein- und ausschalten
4. Foto: Fotos anzeigen
5. Musik: Musik abspielen
6. Film: Filme abspielen
7.4 Wiedergabe/Pause: Wiedergabe im Stopp- oder
Pausemodus starten, mit erneutem Tastendruck
unterbrechen (Pause)
8. Verlassen – Rückkehr zur vorherigen Seite
9. 3Navigation links
10.4Navigation rechts
11.5Navigation aufwärts
12.6Navigation abwärts
13. Enter: Bestätigung
14. Einstellungen: Einstellungsmodus aufrufen
15. Werkzeugleiste: Informationsleiste anzeigen oder
Foto-, Musik-, Videodatei löschen
16. VOL +: Lautstärke erhöhen
17. VOL : Lautstärke verringern
18. 7Rücklauf Musik- oder Videodatei
19. 8Schneller Vorlauf Musik- oder Videodatei
20. 9Vorherige Musik- oder Videodatei abspielen
21. Nächste Musik- oder Videodatei abspielen
2c. Einlegen und Wechseln der Batterie
Drehen Sie die Fernbedienung um und drücken Sie den ge-
riffelten Bereich des Batteriefachs herunter, dann ziehen Sie
die Lade heraus. Legen Sie eine CR2025 Lithium-Knopfzelle
mit „+“ auf Sie ausgerichtet ein. Setzen Sie die Lade zurück
Englisch –> Deutsch
Source –> Quelle
SETUP –> Einstellungen
Toolbar –> Werkzeugleiste
EXIT –> Verlassen
6DEUTSCH
3. Erste Schritte
3.1 Schließen Sie das mitgelieferte Netzteil an einer
110-240 V AC Steckdose und am Netzteileingang des
Bilderrahmens an.
3.2 Ziehen Sie den Schutzlm des Displays ab.
3.3 Ziehen Sie den Schutzlm der Batterie im Batteiefach
heraus und achten Sie darauf, dass eine eine Batterie
in der Fernbedienung eingesetzt ist. Siehe „Batterie
einsetzen“, wenn eine neue Batterie eingesetzt werden
muss.
3.4 Schalten Sie das Gerät mit der Ein-/Austaste auf
der Fernbedienung ein.
4. Bedienungshinweise
Nach dem Einschalten des Geräts wird der Begrüßungsbild-
schirm angezeigt.
4.1 Hauptmenü
Nach dem Begrüßungsbildschirm wird automatisch das
Hauptmenü aufgerufen.
Insgesamt 5 Symbole:
Foto,
Musik,
Video,
Kalender,
Einstellungen
USB-Speichermedium und Speicherkarte
Das Gerät unterstützt SD/MMC/MS und USB 2.0.
Drücken Sie Enter zur Auswahl der Signalquelle.
HINWEIS:
1) Achten Sie darauf, dass unterstützte Bild-, Musik- und
Videodateien auf der Karte oder dem USB-Gerät
gespeichert sind.
2) Wählen Sie Auto-play Photo, Music, Movie oder Photo +
Movie im Menü Gemeinsam.
5. Bildmodus
Wählen Sie im Hauptmenü Photo, oder drücken Sie PHOTO
auf der Fernbedienung, um die Fotos auf dem USB-Lauf-
werk oder der SD-Karte anzuzeigen. Drücken Sie EXIT auf
der Fernbedienung, um die Bilddateiliste des Speicherme-
diums anzuzeigen.
Mit5634markieren und wählen Sie das anzuzeigende
Bild, mit ENTER wird es angezeigt. Drücken Sie EXIT auf der
Fernbedienung, um das Menü Speichermedium anzuzeigen.
Mit34markieren und wählen Sie das Speichermedium
(Karte, USB Stick), mit ENTER zeigen Sie die auf diesem
Medium gespeicherten Bilder an.
Bildwiedergabe
Während der Bildanzeige drücken Sie Toolbar zur Anzeige
der Informationsleiste und Einstellung.
7
DEUTSCH
HINWEIS:
1) Im Einstellungsmodus drücken Sie34zum Aufrufen
des Zeiteinstellungsmenüs. Hier stellen Sie das
Zeitformat, die Anzeigeposition und die Farbe der
Zeitleiste ein.
2) Im Untermenü Zeitformat verbergen Sie die Zeitleiste
mit „Off“.
3) Drücken Sie Toolbar zur Anzeige der Informationsleiste,
mit34nehmen Sie die Einstellungen vor.
6. Musikmodus
Wählen Sie im Hauptmenü Music, oder drücken Sie MUSIK
auf der Fernbedienung, um die Musik auf dem USB-Lauf-
werk oder der SD-Karte abzuspielen. Drücken Sie EXIT auf
der Fernbedienung, um die Musikdateiliste des Speicherme-
diums anzuzeigen. Mit 5634markieren und wählen
Sie den Titel, mit ENTER wird er abgespielt. Drücken Sie
EXIT auf der Fernbedienung, um das Menü Speicherme-
dium anzuzeigen. Mit34markieren und wählen Sie das
Speichermedium (Karte, USB Stick), mit ENTER zeigen Sie
die auf diesem Medium gespeicherten Titel an.
Musikwiedergabe
Während der Musikwiedergabe drücken Sie Toolbar zur
Anzeige der Musik-Informationsleiste. Hier wählen Sie mit
34aus und drücken Sie Enter zur Bestätigung.
7. Videomodus
Wählen Sie im Hauptmenü Video, oder drücken Sie VIDEO
auf der Fernbedienung, um die Videos auf dem USB-Lauf-
werk oder der SD-Karte anzuzeigen. Drücken Sie EXIT auf
der Fernbedienung, um die Videodateiliste des Speicherme-
diums anzuzeigen. Mit 5634markieren und wählen
Sie das anzuzeigende Video, mit ENTER wird es abgespielt.
Drücken Sie EXIT auf der Fernbedienung, um das Menü
Speichermedium anzuzeigen. Mit34markieren und wäh-
len Sie das Speichermedium (Karte, USB Stick), mit ENTER
zeigen Sie die auf diesem Medium gespeicherten Videos an.
Videowiedergabe
Während der Videowiedergabe drücken Sie Toolbar zur An-
zeige der Informationsleiste für die Einstellungen.
8DEUTSCH
8. Dateien in den internen Speicher kopieren
Fügen Sie dem USB-Speicherstick eine Datei namens „copy.
txt“ hinzu. Der Dateiname muss kleingeschrieben werden.
Dateien auf dem USB-Speicherstick werden automatisch in den
integrierten Speicher kopiert, wenn der USB-Speicherstick ange-
schlossen wird. Wichtig: 1.Achten Sie darauf, dass die Dateien
im integrierten Speicher gesichert wurden, da sie anderenfalls
gelöscht werden.
2.Die Kapazität des integrierten Speichers beträgt 8 GB. Nicht alle
Dateien auf dem USB-Speicherstick werden in den integrierten
Speicher kopiert, wenn die Gesamtgröße der zu kopierenden
Dateien 8 GB überschreitet.
9. Scrollfunktion für Untertitel
Das Gerät unterstützt die Scrollfunktion für Untertitel wäh-
rend der Wiedergabe von Foto-, Musik-und Videodateien.
HINWEIS:
Folgen Sie den nachstehenden Schritten zur Einstellung der
laufenden Untertitel:
a) Erstellen Sie eine TXT-Datei.
b) Speichern Sie die TXT-Datei im Format „Unicode“ und
nennen Sie sie „SCROLL.TXT“ in Großbuchstaben.
c) Kopieren Sie diese TXT-Datei auf einen USB-Stick oder
eine Speicherkarte.
d) Schließen Sie den USB-Stick oder die Speicherkarte an,
die Untertitel werden nun während der Anzeige der Foto-,
Musik- oder Filmdatei angezeigt.
Hinweis:
Ziehen Sie nicht alle Foto-, Musik und Videodateien in einen
Ordner im USB-Speichermedium, ohne zuvor eine .txt
Datei mit dem Namen „Kopieren“ im USB-Speichermedium
erstellt zu haben.
10. Kalender
Rufen Sie den Kalender im Hauptmenü auf oder wählen Sie
die Funktion direkt in der Werkzeugleiste.
Drücken Sie5634, um den Kalender zu durchsuchen.
11. HDMI-Eingang
Schließen Sie ein Gerät mit HDMI-Ausgang an HDMI-IN des
Bilderrahmens an. Drücken Sie Source und wählen Sie
„HDMI“ als Signalquelle.
12. Einstellungsmenü
Markieren Sie das Symbol Einstellungen im Hauptmenü und
drücken Sie ENTER, um das Menü zu öffnen. Drücken Sie
56 zur Auswahl des gewünschten Menüpunkts (Hinweis:
Drücken Sie EXIT, um in das Hauptmenü zurück-
9
DEUTSCH
zukehren oder drücken Sie SETUP, um in das vorherige
Menü zurückzukehren).
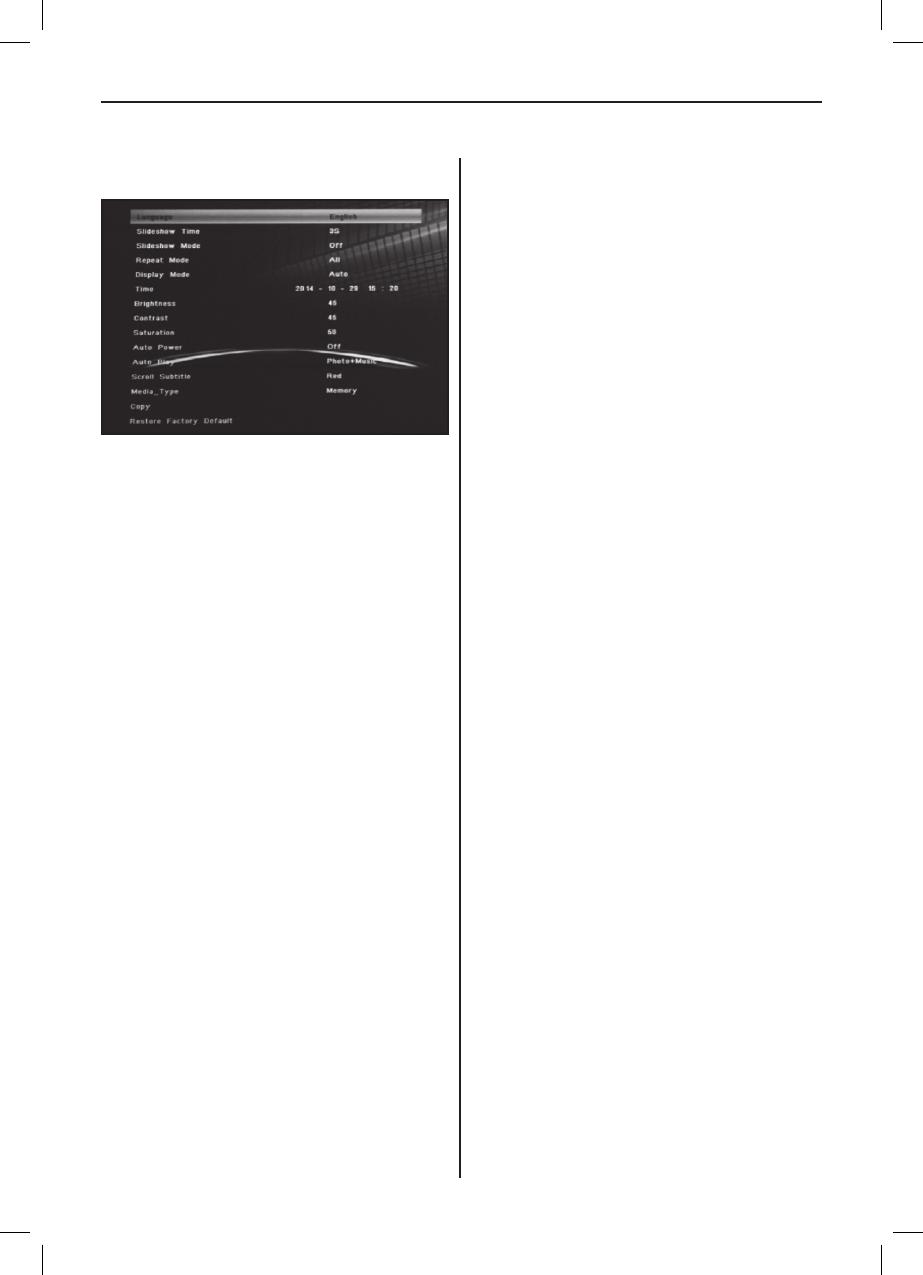
12.1 Sprache: Englisch, Deutsch, Französisch, Italienisch,
Spanisch, Niederländisch, Rumänisch, Griechisch.
12.2 Diashow Zeitintervall: 3, 5, 15, 30 Sekunden
1 Minute, 2, 5, 15, 30, 60 Minuten
12.3 Diashow-Modus: Aus/Ein.
12.4 Wiederholungsmodus: ALLE/Eine Datei/Aus.
12.5 Anzeigemodus: Auto, Passend, Panorama.
12.6 Zeit: Drücken Sie OK zum Aufrufen des Untermenüs,
dann drücken Sie34zum Einstellen der Zeit:
Datum, Monat, Jahr, Stunde, Minute, Sekunde.
12.7 Helligkeit: Drücken Sie34zur Auswahl zwischen 0
(niedrigste Einstellung) und 100 (höchste Einstellung).
12.8 Kontrast: Drücken Sie34zur Auswahl zwischen 0
(niedrigste Einstellung) und 100 (höchste Einstellung).
12.9 Sättigung: Drücken Sie34zur Auswahl zwischen 0
(niedrigste Einstellung) und 100 (höchste Einstellung).
12.10 Automatisches Ein-/Ausschalten: Drücken Sie OK,
dann drücken Sie5634zum Einstellen der
Häugkeit des automatischen Ein-/Ausschaltens als:
Einmal, Täglich, Aus.
Drücken Sie5634zum Aufrufen der ge
wünschten Alarm-ID.
Drücken Sie5634zur Auswahl von Aus/Ein;
bei Auswahl von „Ein“ können die Stunden und
Minuten für das automatische Ein-/Ausschalten
eingestellt werden.
12.11 Automatische Wiedergabe: Drücken Sie OK, dann
drücken Sie5634zur Auswahl des auto-
matischen Wiedergabetyps als: Foto, Musik, Video,
Foto + Musik, Aus.
12.12 Untertitel: Schwarz, Weiß, Rot, Blau, Grün, Aus.
12.13 Kopieren: Kopieren von Dateien vom USB-Speicher
medium zur SD-Karte.
12.14 Werkseinstellungen wiederherstellen: Drücken Sie
OK, um die Rücksetzung zu den Werkseinstellungen
zu bestätigen.
13. Technische Spezikationen
Netzadapter: Eingang AC 100-240V 50/60Hz Ausgang
DC: 12V/2A
Bildformat: JPEG
Audioformat: MP3
Video-Formate: MPEG1, MPEG2, MPEG4, Divx4.0,
Divx5.0, M-JPEG, AVI, MOV, RMVB
Speicherkarten: SD/SDHC/MS/MMC
USB: USB-Host
• Displayparameter:
Displaygröße: 33,78 cm, 13,3 Zoll IPS TFT
Auösung: 1920x1080 Pixel
Bildseitenverhältnis: 16:9
Betriebstemperatur: 0°~40°Luftfeuchtigkeit: 10-85%
14. Anleitung zur Problembehebung
Falls Sie Probleme mit Ihrem Gerät haben, beachten Sie die
folgenden Hinweise. Für weitere Hilfe, kontaktieren Sie den
technischen Support.
Kein Strom: Bitte überprüfen Sie, ob der Stecker korrekt
eingesteckt ist.
Fernbedienung funktioniert nicht: Bitte überprüfen Sie,
ob die Batterie genügend Spannung aufweist. Die Batterie
kann unter normalen Bedingungen ein halbes Jahr verwen-
det werden. Ersetzen Sie diese durch eine neue Batterie,
falls erforderlich.
Lesen von Speicherkarte oder USB nicht möglich:
Bitte überprüfen Sie ob sich gespeicherte Dateien auf der
Speicherkarte oder dem USB-Gerät benden.
Von leeren Speichermedien kann nicht gelesen werden.
Datei kann nicht wiedergeben werden: Bitte überprüfen
Sie ob das Datei-Format vom Gerät unterstützt wird.
Display zu hell oder zu dunkel: Bitte stellen Sie die
Helligkeit oder Kontrast über das Menü Einstellungen ein.
Die Farbe ist blass oder keine Farbe: Bitte ändern Sie
die Farb- und Kontrasteinstellungen.
Kein Sound: Bitte überprüfen Sie, ob die Lautstärke richtig
eingestellt ist und der Spieler nicht im Stumm-(Mute)-Modus.
10 ENGLISH
Introduction:
Thank you for purchasing this Digital Photo Frame. It is de-
signed to allow quick and easy viewing of photos taken with
your digital camera, mobile phone, or from a memory card.
Please read this user manual carefully to learn the correct
way to use the digital photo frame.
Contents:
1. Stand Installation 11
2a. Rear and Left Side View 11
2b. Remote Control 12
2c. Installing & Replacing the Batteryl 12
3. Getting Started 13
4. Operating Instructions 13
Memory card and USB 13
5. Picture Mode 13
6. Music Mode 14
7. Video Mode 14
8. Copy function 15
9. Scrolling Subtitle Function 15
10. Calendar 15
11. HDMI-IN Function 15
12. Setup 16
13. Speci cations 16
14. Troubleshooting 16
Technical Support
We are committed to providing the best customer service support.
If you need assistance with your BRAUN product, please contact the
BRAUN Technical Support department prior to returning this device.
Reach out to us in any of the following ways:
Web: www.braun-phototechnik.de
+49 (0) 7457 / 9465-60
Radio and TV Interference Statement
This equipment has been tested and found to comply with the limits
of a Class B digital device, pursuant to part of the CE rules. These
limits are designed to provide reasonable protection against harmful
interference in a residential installation.
To view the associated declaration of conformity, please visit our
website.
BRAUN PHOTO TECHNIK GmbH
Merkurstraße 8
72184 Eutingen / GERMANY
Tel.: +49 (0) 7457 / 9465-60
Packaging Check List:
1. 13.3 inch digital photo frame
2. AC/DC adapter
3. Remote control
4. User manual
5. Bracket
Cautions:
Precautions and maintenance
• For indoor use only
• To avoid risk of  re or electric shock, do not expose the
unit to moisture or condensation.
To avoid overheating, do not block the ventilation holes on
the back of the Digital Photo Frame.
• Keep the Digital Photo Frame out of direct sunlight.
• Do not dismantle the Digital Photo Frame. There is a risk
of electric shock and there are no user serviceable parts
inside.
• Dismantling the Digital Photo Frame will void your
warranty
Cleaning the LCD Screen
Treat the screen carefully. Because the screen of the
Digital Photo Frame is made of glass and it would easily
be broken or scratched.
• If  ngerprints or dust accumulate on the LCD screen,
we recommend using a soft, non-abrasive cloth such as a
camera lens cloth to clean the LCD screen.
• Moisten the cleaning cloth with the cleaning solution and
apply the cloth to the screen.
WARNING:
Please turn off the power before inserting or removing a
memory card or USB device. Otherwise, damage may occur
to the memory card or the USB device and the digital picture
frame. To reduce the risk of re or electric shock, do not
expose this unit to rain or moisture.
Note:
This Device is for private use only and not designed for
commercial utilization.
10
Introduction:
11
ENGLISH
Features:
1. Supported picture formats: JPEG
2. Supported audio formats: MP3
3. Supported video formats: MPEG1, MPEG2, MPEG4,
RMVB, MOV, MJPEG, DivX 4.0, DivX 5.0, AVI
4. Supported memory cards: SD/MMC/MS
5. USB port: USB 2.0
6. HDMI interface: supports HDMI-IN function
7. Slideshow with background music
8. Supports running subtitles during photo, music and
movie playback
9. Supports timeline during photo, music and movie
playback
10. Integrated clock and alarm clock, automatic
On / off
11. Brightness, Contrast, Saturation adjustable
12. OSD languages: German, English and others
Languages selectable
1. Stand Instruction
Insert the bracket into the slot of the digital photo frame
and rotate the bracket clockwise to set it tight. Please make
sure the bracket is locked before then put it on the table
steadily .Please refer to the illustration showing below.
1. SD/MMC/MS CARD
2. USB
3. HDMI
4. DC IN
1. Power
2. UP/ Previous
3. VOL -/ Left
4. Down / Next
5. Play/Pause/OK
6. VOL +/Right
7. MENU
2a. Rear and Left side of Frame
12 ENGLISH
2b Remote Control
1. Mute: Mute speaker output
2. Source: Press it to select input source (HDMI-IN/DMP)
3. Power: Switch On/Off
4. Photo: Press to show photos
5. Music: Press to play music
6. Movie: Press to play movies
7. 4Play/Pause: Press to start playback in
stop or pause modes, and press again to pause
8. Exit – Return to previous page
9. 3Navigation left
10.4Navigation right
11.5Navigation up
12.6Navigation down
13. Enter: Press to conrm
14. Setup: Enter setup mode
15. Toolbar: Enter info bar or Calendar
16.VOL +: Turn up the volume
17.VOL –: Turn down the volume
18.7Rewind music or video le
19.8Fast forward in music or video le
20.9Previous music or video le
21.Next music or video le
2c INSTALLING & REPLACING THE
BATTERY
Place the upside of the remote control down, press down
on the ridged area of the battery cover and pull towards you
to remove the tray. Place one CR2025 lithium button-cell
battery on the tray with the positive “+” side facing you.
Reinsert the tray.
13
ENGLISH
Total 5 icons:
Photo,
Music,
Video,
Calendar,
Setup
USB and Memory Card
The unit supports SD/MMC/MS and USB 2.0. Press Enter to
select the source device
NOTE:
1) Make sure there are supported picture, music and video
les in the Card or USB device.
2) You can also select Auto-play Photo, Music, Movie or
Photo + Music, off in the Setup Menu.
5. Picture Mode
Highlight Photo from the main menu or press the PHOTO
button on the remote control to display the photos stored
on the USB drive or SD card. Press the EXIT button on the
remote control to display the photo le list of the memory
device.
Press5634to highlight and select the photo to be
displayed and press ENTER to display the photo. Press the
EXIT button on the remote control to display the memory
device menu. Press34to highlight and select the memory
device (card/USB) and press ENTER to display the photos
stored on this device.
Picture Playback
When playing the single picture, press Toolbar to enter
information bar and set up the item.
3. Getting Started
3.1 Plug one end of the included AC adapter into a standard
110-240V AC electrical outlet and the other end into DC
in of the photo frame.
3.2 Remove the protective lm covering the LCD.
3.3 Remove the plastic battery insulator from the battery
compartment and make sure the remote control has
a battery inside. Please refer to “Installing & Replacing
Battery” if you need a new battery.
3.4 Power on the unit by pressing the Power button on the
remote control.
4. Operating Instructions
After turning the Units, it will show the start-up logo, and
then show the main interface after 3~5 seconds. If there
are picture and music’s in USB/SD or memory, it will play
the slideshow and enter the main menu after pressing
RETURN button.
4.1 Main Menu
After showing the start-up picture, it will automatically enter
the main menu
14 ENGLISH
NOTE:
1) In the setup menu, press34to enter the time
setup menu, here you can set up Time format, Time
position, Time colour of the time bar.
2) In the sub-menu Time format you can select “Off” to
close the time bar.
3) Press Toolbar to enter info bar, then use34to operate.
6. Music Mode
Highlight Music from the main menu or press the MUSIC
button on the remote control to play the music stored on the
USB drive or SD card.
Press the EXIT button on the remote control to dis-play the
music le list of the memory device. Press5634to
highlight and select the music to be played and press EN-
TER to play the music. Press the EXIT button on the remote
control to dis-play the memory device menu. Press34to
high-light and select the memory device and press ENTER
to display the music stored on this device.
Music Playback
During music playback, press Toolbar to enter the music
information bar, select with34and press Enter to operate.
7 Video Mode
Highlight Video from the main menu or press the VIDEO
button on the remote control to display the videos stored
on the USB drive or SD card. Press the EXIT button on the
remote control to display the video le list of the memory
device. Press5634to highlight and select the video
to be played and press ENTER to play the video. Press the
EXIT button on the remote control to display the memory
device menu. Press34to highlight and select the memory
device and press ENTER to display the videos stored on this
device.
Video play
When playing a single video, press Toolbar to enter info bar
to set up.
15
ENGLISH
8. Copy les to internal memory
Add a le named copy.txt” to the USB memory stick. The
le name must be written in lower case. Files on the USB me-
mory stick are automatically copied to the integrated memory
when the USB memory stick is connected. Important:
1. Make sure that the les have been backed up in the built-
in memory, otherwise they will be deleted.
2. The capacity of the built-in memory is 8 GB. Not all les on
the USB memory stick are copied to the built-in memory if the
total size of the les to be copied exceeds 8 GB.
9. Scroll Subtitle function
The unit supports scrolling subtitles when playing photo,
music, video les.
NOTE:
Follow these steps to set up scrolling subtitle:
a) Create a TXT le.
b) Save as TXT le in “Unicode” format and name it
“SCROLL.TXT” in CAPITALS.
c) Copy this TXT le to USB stick or memory card.
d) Insert the USB stick or memory card, it will show the
subtitle when playing the photo, music or movie le.
Note:
Do not drag and drop all picture, music and video les into
a folder in the USB device before creating a .txt le with the
name “Copy” in the USB device.
10. Calendar
Enter the Calendar from the main menu or select the func-
tion directly in the toolbar.
Press5634to browse the calendar.
11. HDMI-IN Function
Connet the HDMI-out device with the HDMI-IN interface of
the frames. Press Source to select input Source “HDMI”
16 ENGLISH
12. Setup Menu
Mark the Setup icon on the main menu and press OK to
open the menu. Press56to select the desired menu item
(Note: Press RETURN to return to the main menu or press
SETUP to return to the previous menu).
12.1 Language: English, German, French, Italian, Spanish,
Dutch, Romanian, Greek.
12.2 Slideshow Time: 5 minutes, 15 minutes, 30 minutes,
60 minutes, 2 hours, 4 hours, 8 hours, 24 hours.
12.3 Slideshow Mode: Off/On.
12.4 Repeat Mode: ALL/One/Off.
12.5 Display Mode: Auto, Fit, Panorama.
12.6 Time: Press OK to enter the submenu, then press
34to adjust the time: Date, Month, Year, Hour,
Minute, Second.
12.7 Brightness: Press34to select from 0 (lowest)
to 100 (highest).
12.8 Contrast: Press34to select from 0 (lowest)
to 100 (highest).
12.9 Saturation: Press34to select from 0 (lowest)
to 100 (highest).
12.10 Auto Power: Press OK, then press5634to set
the frequency of automatic power On/Off as: Once,
Every Day, Off.
Press5634to enter the desired alarm ID.
Press5634to select Off/On; when selecting
“On” you can setup Hours and Minutes for Auto
power On/Off.
12.11 Auto Play: Press OK, then press5634to select
the auto play type as: Photo, Music, Movie, Photo +
Music, Off.
12.12 Scroll Subtitle: Black, White, Red, Blue, Green, Off.
12.13 Copy: Copy les from USB to SD.
12.14 Restore Factory Default: Press OK to conrm reset to
factory settings.
13. 12. Technical Specications
Adapter: Input AC 100-240V 50/60HZ
Output DC: 12V/2A
Picture Format: JPEG
Audio Format: MP3
Video formats: MPEG1, MPEG2, MPEG4,
Divx4.0, Divx5.0, M-JPEG, AVI, MOV, RMVB
Memory Cards: SD/SDHC/MS/MMC
USB: USB Host
Screen Parameter:
Screen Size: 33,78 cm, 13,3 Zoll IPS TFT
Resolution: 1920x1080 Pixel
spect Ratio: 16:9
Operating temperature: 0°~ 40°
Moisture: 10 – 85%
14. Troubleshooting Guide
If you are having problems with your player, please consult
this guide. If you need further assistance, please contact
Technical Support.
No power:
• Please check whether the plug is inserted correctly.
Remote control no function:
• Please check whether the battery has power (the battery
can be used for half a year in normal conditions).
Replace with new battery if necessary.
Can not read the CARD or USB:
• Please conrm whether there is storage in the card or
USB device.
• Empty devices cannot be read.
Can not play the le:
• Please conrm if the le format is compatible with the
player.
Display too bright or too dark:
• Please adjust the brightness or contrast in the setup
menu.
The color is light or no color:
• Please adjust the color and contrast setup.
No sound:
• Please check whether the volume is correct and the
player is not in Mute mode.
17
FRANÇAIS
lntroduction:
Merci d‘avoir achet ce cadre photo numrique. II est conu
pour regarder rapidement et facilement les photos prises
avec votre appareil photographi que, votre tlphone portable
ou encore prsentes sur une carte mmoire. Veuillez lire
attentivement ce manuel de l‘utilisateur pour matriser ce
cadre photo numrique .
Table des matires:
1. Instructions d‘installation 18
2a. Dos et côté gauche du cadre photo 18
2b. À distance 19
2c. Insérer et changer la batterie 19
3. Premiers pas 20
4. Mode d‘emploi 20
Carte mémoire et USB 20
5. Mode d‘image 20
6. Mode musique 21
7. Mode vidéo . 21
8. Fonction de copie pour les chiers imagine,
musique et vidéo 22
9. Fonction de dé lement pour les sous-titres 22
10. Calendrier 22
11. Entrée HDMI 22
12. Paramètres 23
13. Spéci cations techniques 23
14. Guide de dépannage 23
Assistance technique
Nous nous engageons à offrir le meilleur service dassistence à nos
clients. Si vous avez besoin d'aide avec votre produit BRAUN, veuillez
contacter le service dassistence technique BRAUN avant de renvoy-
er cet appareil. Contactez-nous de lune des façons suivantes:
Web: www.braun-phototechnik.de
+49 (0) 7457 / 9465-60
Déclaration relative aux interférences radio et TV
Cet équipement a été testé et reconnu conforme aux limites d’un
appareil numérique de classe B, conformément à du règlement de la
CE. Ces limites visent à assurer une protection raisonnable contre les
interférences nuisibles dans une installation résidentielle.
Pour voir la déclaration de conformité associée, veuillez visiter notre
site Web.
BRAUN PHOTO TECHNIK GmbH
Merkurstraße 8
72184 Eutingen/ Allemagne
Tel.: +49 (0) 7457 / 9465-60
portée de l‘offre:
1. Cadre photo numérique de 13,3 pouces
2. Alimentation
3. contrôle à distance
4. manuel
5. support
Remarques importantes:
Precautions d‘emploi et entretie
Pour une utilisation en interieur exclusivement
Pour eviter taut incendie ou decharge electrique,
l‘appareil ne doit pas eire soumis ade l‘humidite ou de la
condensation.
Pour eviter taute surchauffe, les ouvertures d‘aeration
au das du cadre photo numerique ne doivent pas eire
recouvertes.
N‘exposez pas le cadre photo numerique a la lumiere
directe du soleil.
Ne pas ouvrir le cadre photo numerique. II existe
un rique de decharge electrique et il n‘y a pas de pieces
a l‘interieur a entretenir par l‘utilisateur.
L‘ouverture du cadre photo numerique entralne
l‘annulation de la garantie.
Nettoyage de l‘ecran LCD
Manipulez l‘ecran avec precaution. Etant donne que
l‘ecran du cadre photo numerique est com pose de verre,
il risque de se briser au de se rayer.
Si des traces de doigts au de la poussiere s‘accu mulent
sur l‘ecran LCD, nous conseillons d‘utili ser un chiffon
doux, non abrasif, tels que les chiffons de nettoyage des
lentilles pour nettoyer l‘ecran LCD.
Humidi ez le chiffon de nettoyage avec la soluti- on
nettoyante et passez le chiffon sur l‘ecran..
MISE EN GARDE:
Veuillez teindre l‘appareil avant d‘insrer au de ter une carte
mmoire au une cl USB. Cela peut endommager la carte
mmoire au la cl USB ainsi que le cadre photo numrique.
Pour viter taut risque d‘incendie au de dcharge lectrique,
n‘exposez pas l‘appareil la pluie au l‘humidit.
Remarque:
Cet appareil est conu pour une utilisation exclusi vement
prive et non commerciale.
lntroduction:
18 FRANÇAIS
Caractéristiques:
1. Formats d‘image pris en charge: JPEG
2. Formats audio pris en charge: MP3
3. Formats vidéo pris en charge: MPEG1, MPEG2, MPEG4,
RMVB, MOV, MJPEG, DivX 4.0, DivX 5.0, AVI
4. Cartes mémoire prises en charge: SD / MMC / MS
5. Port USB: USB 2.0
6. Port HDMI: prend en charge la fonction HDMI IN
7. Diaporama avec musique de fond
8. Soutient des sous-titres courants pendant la lecture de
photo, de musique et de  lm
9. Prend en charge la chronologie pendant la lecture de
photos, de musique et de  lms
10. Horloge intégrée et réveil automatique
Marche / Arrêt
11. Luminosité, Contraste, Saturation réglable
12. Langues OSD: allemand, anglais et autres
Langues sélectionnables
1. Instructions d‘installation
Insérez le support dans la fente du cadre photo numérique
et tournez-le dans le sens des aiguilles d‘une montre.
S‘il vous plaît assurez-vous que la base est fermement en
place à l‘avance, Placez ensuite l‘appareil sur une surface
ferme et stable. Veuillez noter l‘illustration ci-dessous.
1. Garte mmoire
SD/MMG/MS
2. USB
3. HOMI
4. Prise d‘alimentation
1. On/Off
2. ON/Précédent
3. Volume Bas/Gauche
4. AB/Next
5. Lecture/Pause/OK
6. Augmenter le volume
/droite
7. MENU
2a. Boutons arrire et et gauche du cadre photo
19
FRANÇAIS
2b. Contrôle à distance
1. Muet: Désactiver le haut-parleur
2. Source: Sélectionnez la source d‘entrée
(HDMI-IN / DMP)
3. On/Off: Allumer et éteindre
4. Photo: Afcher les photos
5. Musique: jouer de la musique
6. Film: lire des lms
7. 4 Lecture / Pause: Lancer la lecture en mode
arrêt ou pause, appuyer à nouveau sur Interrompre
(pause)
8. Quitter - revenir à la page précédente
9. 3Navigation à gauche
10.4Droit de navigation
11.5Navigation vers le haut
12.6Navigation vers le bas
13. Entrez: Conrmation
14. Paramètres: Entrer en mode de réglage
15. Barre d‘outils: Afcher la barre d‘informations ou
supprimer photo, musique, chier vidéo
16. VOL +: augmente le volume
17. VOL -: diminuer le volume
18. 7Recharger de la musique ou un chier vidéo
19. 8Avance rapide de la musique ou du chier vidéo
20. 9Lecture de chiers musicaux ou vidéo passés
21. Play la prochaine musique ou le chier vidéo
2c. Installation et remplacement de la pile
Placez la tlcommande face vers le bas, appuyez vers le
bas le bord du couvercle de la batterie et faites glisser vers
l‘avant le tiroir. Placez une pile de type bouton CR2025 au
lithium dans le tiroir avec la polarit C + E face vers vous.
Remettez en place le tiroir.
Englisch –> FRANÇAIS
Source –> Source
SETUP –> RGLAGES
Toolbar –> Barre doutils
EXIT –> Quitter
3. Premiers pas
3.1 Connectez l‘adaptateur d‘alimentation fourni à une prise
de courant alternatif 110-240V et à l‘entrée
d‘alimentation du cadre photo.
3.2 Retirez le lm protecteur de l‘écran.
3.3 Tirer le lm protecteur de la batterie dans le
compartiment de la batterie et assurez-vous que
l‘on est une batterie est inséré dans la télécommande.
Voir Batterie quand une nouvelle batterie doit
être utilisée.
3.4 Allumer l‘appareil avec le bouton marche / arrêt
la télécommande.
4. Mode d‘emploi
Après avoir allumé l‘appareil, l‘écran d‘accueil s‘afche.
4.1 Menu principal
Après l‘écran d‘accueil, le menu principal est automatique-
ment appelé.
5 icönes au total:
Photo,
musique,
video,
calendrier,
reglages
Garte mémoire et stockage USB
L‘appareil prend en charge les cartes SD/MMC/MS et les
dispositifs de stockage USB 2.0. Appuyez sur Entar pour
slectionner le dispositif source..
REMARQUE:
1) Vriez que les chiers d‘images, de musiques ou de lms
de la carte mmoire au du dispositif USB sont pris en
charge.
2) Vous pouvez aussi choisir entre les options Auto-play C
Photo E, C Music E, C Movie E ou C Photo+ Movie E
dans le menu commun .
5. Mode d‘image
Mettez en surbrillance Photo dans le menu princi pal ou ap-
puyez sur la tauche PHOTO de la tlcom mande pour afcher
les photos stocks sur le lec teur USB ou la carte SD.
Appuyer sur la tauche EXIT de la tlcommande pour afcher
la liste des photos du dispositif de stockage. Appuyez
sur5634pour mettre en surbrillance et slectionnez
la photo puis appuyez sur ENTER pour lafcher. Appuyer
sur la tauche EXIT de la tlcammande pour afcher le menu
du dispositif de stockage. Appuyez sur 34 pour mettre
en surbrillance et slectionnez le dispositif de stockage puis
appuyez sur ENTER pour afcher les photos du dispositif.
Visualisation des imaues
Lars de l‘afchage d‘une seule image, appuyez sur C Toolbar
E pour accder la barre d‘information et rgler les options.
20 FRANÇAIS
  • Page 1 1
  • Page 2 2
  • Page 3 3
  • Page 4 4
  • Page 5 5
  • Page 6 6
  • Page 7 7
  • Page 8 8
  • Page 9 9
  • Page 10 10
  • Page 11 11
  • Page 12 12
  • Page 13 13
  • Page 14 14
  • Page 15 15
  • Page 16 16
  • Page 17 17
  • Page 18 18
  • Page 19 19
  • Page 20 20
  • Page 21 21
  • Page 22 22
  • Page 23 23
  • Page 24 24
  • Page 25 25
  • Page 26 26
  • Page 27 27
  • Page 28 28
  • Page 29 29
  • Page 30 30
  • Page 31 31
  • Page 32 32
  • Page 33 33
  • Page 34 34
  • Page 35 35
  • Page 36 36
  • Page 37 37
  • Page 38 38
  • Page 39 39
  • Page 40 40
  • Page 41 41
  • Page 42 42
  • Page 43 43
  • Page 44 44
  • Page 45 45
  • Page 46 46
  • Page 47 47
  • Page 48 48
  • Page 49 49
  • Page 50 50
  • Page 51 51
  • Page 52 52
  • Page 53 53
  • Page 54 54
  • Page 55 55
  • Page 56 56
  • Page 57 57
  • Page 58 58
  • Page 59 59
  • Page 60 60

Braun 1361 Manuel utilisateur

Catégorie
Cadres photo numériques
Taper
Manuel utilisateur