Bertazzoni MAST244GASNEE Le manuel du propriétaire
- Catégorie
- Barbecues
- Taper
- Le manuel du propriétaire
Ce manuel convient également à

BERTAZZONI
OWNER’S MANUAL
FREESTANDING FULL GAS RANGES
3100428
WWW.BERTAZZONI.COM

2
/ From the desk of the President
From the desk of the President
Dear new owner of a Bertazzoni,
I want to thank youDear new owner of a Bertazzoni appliance.
I want to thank you for choosing one of our beautiful products for your
home.
My family started manufacturing kitchen appliances in Italy in 1882,
building a reputation for quality of engineering and passion for good food.
Today, our products stand out because of their unique blend of authentic
Italian design and superior appliance technology. It is our mission to make
products that function perfectly and bring joy to their owners.
By making beautiful products we respond to our customers’ fl air for
good design. By making them versatile and easy-to-use, cooking with
Bertazzoni becomes a real pleasure.
This manual will help you learn to use and care for your Bertazzoni
appliance in the safest and most eff ective way, so that it can give you the
highest satisfaction for years to come.
Enjoy!
Paolo Bertazzoni
President

3
/ Table of contents
TABLE OF CONTENTS
WARNINGS ___________________________________________________________________
WORKTOP AND KNOBS LAYOUT ________________________________________________
GAS COOKTOP ________________________________________________________________
Burners caps and grates _______________________________________________________
Making sure the fl ame is optimal ________________________________________________
Using the gas burners _________________________________________________________
Using the power burner ________________________________________________________
Gas shut-off safety - thermocouple ______________________________________________
Using specialty cookware ______________________________________________________
Gas burner dimensions and recommended pan size ________________________________
GAS OVEN ____________________________________________________________________
Shelves positions _____________________________________________________________
Cooling fan __________________________________________________________________
Gas shut-off safety - thermocouple ______________________________________________
Preheating the oven ___________________________________________________________
Oven cooking modes __________________________________________________________
Special functions _____________________________________________________________
Condensation ________________________________________________________________
Getting the best results ________________________________________________________
Cooking recommendations _____________________________________________________
Broil recommendation _________________________________________________________
Troubleshooting common problems with oven cooking _____________________________
Telescopic glides _____________________________________________________________
KEEPING YOUR BERTAZZONI CLEAN _____________________________________________
SIMPLE MAINTENANCE _________________________________________________________
Replacing oven lights _________________________________________________________
Cleaning inside glass door _____________________________________________________
TROUBLESHOOTING ___________________________________________________________
TWO YEAR LIMITED WARRANTY _________________________________________________
4
8
9
9
9
9
10
10
10
10
11
11
11
11
11
11
12
12
13
13
14
14
15
16
17
17
18
19
20

4
/ Warnings
WARNINGS
Warning and Important Safety Instructions ap-
pearing in this manual are not meant to cover all
possible conditions and situations that may occur.
Common sense, caution, and care must be exer-
cised when installing, maintaining, or operating
the appliance.
Read and follow all instructions before using
this appliance to prevent the potential risk of
fi re, electric shock, personal injury or damage
to the appliance as a result of improper usage
of the appliance. Use appliance only for its in-
tended purpose as described in this manual.
Save this Manual for local electrical inspector’s
use. Read and save these instructions for future
reference. Observe all governing codes, ordinan-
ces and regulations.
WARNING!
If the information in these instructions is not fol-
lowed exactly, a fi re or explosion may result cau-
sing property damage, personal injury or death.
- Do not store or use gasoline or other fl ammable
vapors and liquid in the vicinity of this or any
other appliance.
- WHAT TO DO IF YOU SMELL GAS
• Do not try to light any appliance.
• Do not touch any electrical switch.
• Do not use any phone in your building.
• Immediately call your gas supplier from a
neighbor’s phone. Follow the gas sup-
plier’s instructions.
• If you cannot reach your gas suppliers,
call the fi re department.
- Installation and service must be performed by
a qualifi ed installer, service agency or the gas
supplier
In Massachusetts:
All gas products must be installed by a “Massa-
chusetts” licensed plumber or gasfi tter. A “T” han-
dle type manual gas valve must be installed in the
gas line connected to this appliance.
To ensure proper and safe operation: Appliance
must be properly installed and grounded by a
qualifi ed technician. DO NOT attempt to adjust,
repair, service, or replace any part of your applian-
ce unless it is specifi cally recommended in this
manual. All other servicing should be referred to a
qualifi ed servicer. Have the installer show you the
location of the gas shut-off valve and how to shut
it off in an emergency.
A certifi ed technician is required for any adjust-
ments or conversions to Natural or LP gas.
To Prevent Fire or Smoke Damage
• Be sure all packing materials are removed from
the appliance before operating it.
• Never let clothing, potholders, or other fl am-
mable materials come in contact with or too clo-
se to any element, top burner or burner grate
until it has cooled.
• If appliance is installed near a window, proper
precautions should be taken to prevent curtains
from blowing over burners.
• Never leave any items on the cooktop. The hot
air from the vent may ignite fl ammable items
and may increase pressure in closed contai-
ners which may cause them to burst.
• Many aerosol-type spray cans are EXPLOSI-
VE when exposed to heat and may be highly
fl ammable. Avoid their use or storage near an
appliance.
In Case of Fire
Turn off appliance and ventilation hood to avoid
spreading the fl ame. Extinguish fl ame then turn
on hood to remove smoke and odor.
• Cooktop: Smother fi re or fl ame in a pan with a
lid or cookie sheet.
• NEVER pick up or move a fl aming pan.
• Oven: Smother fi re or fl ame by closing the oven
door. DO NOT use water on grease fi res. Use
baking soda, a dry chemical or foamtype extin-
guisher to smother fi re or fl ame, if available, a
multipurpose dry chemical or foam type extin-
guisher.
Child Safety
• NEVER leave children alone or unsupervised
near the appliance when it is in use or is still
hot.
• NEVER allow children to sit or stand on any
part of the appliance as they could be injured
or burned.
• CAUTION do not store items of interest to chil-
dren in cabinets above the range or on the
backguard of the range. Children climbing on
the range to reach those items could be seriou-
sly injured.

5
/ Warnings
Cooking Safety
• Once the unit has been installed as outlined in
the Installation Instructions, it is important that
the fresh air supply is not obstructed. The use
of a gas cooking appliance results in the pro-
duction of heat and moisture in the room in whi-
ch it is installed.
• Ensure that the kitchen is well-ventilated. Keep
natural venting holes open or install a mecha-
nical ventilation device. Prolonged or intensi-
ve use of the appliance may call for additional
(such as opening a window) or more eff ective
ventilation (such as increasing the level of a
mechanical ventilation if present).
• NEVER use aluminum foil to cover oven racks
or oven bottom. This could result in risk of
electric shock, fi re, or damage to the appliance.
Use foil only as directed in this guide.
• To eliminate the hazard of reaching over hot
surface burners, cabinet storage should not be
provided directly above a unit. Temperatures
may be unsafe for some items, such as volatile
liquids, cleaners or aerosol sprays.
• ALWAYS place a pan on a surface burner befo-
re turning it on. Be sure you know which knob
controls which surface burner. Make sure the
correct burner is turned on and that the bur-
ner has ignited. When cooking is completed,
turn burner off before removing pan to prevent
exposure to burner fl ame.
• ALWAYS adjust surface burner fl ame so that it
does not extend beyond the bottom edge of the
pan. An excessive fl ame is hazardous, wastes
energy and may damage the appliance, pan or
cabinets above the appliance. This is based on
safety considerations.
• NEVER leave a surface cooking operation
unattended especially when using a high heat
setting or when deep fat frying. Boilovers cau-
se smoking and greasy spillovers may ignite.
Clean up greasy spills as soon as possible. DO
NOT use high heat for extended cooking ope-
rations.
• DO NOT heat unopened food containers, bu-
ild up of pressure may cause the container to
explode and result in injury.
• ALWAYS let quantities of hot fat used for deep
fat frying cool before attempting to move or
handle.
• NEVER wear garments made of fl ammable
material or loose fi tting or long-sleeved appa-
rel while cooking. Clothing may ignite or catch
utensil handles. DO NOT drape towels or mate-
rials on oven door handles. These items could
ignite and cause burns.
• ALWAYS place oven racks in the desired posi-
tions while oven is cool. Slide oven rack out to
add or remove food, using dry, sturdy pothol-
ders.
• ALWAYS avoid reaching into the oven to add or
remove food. If a rack must be moved while hot,
use a dry pot-holder.
• ALWAYS turn the oven off at the end of cooking.
• Use care when opening the oven door. Let hot
air or steam escape before moving or replacing
food.
• DO NOT cook directly on the oven bottom.
This could result in damage to your appliance.
Always use the oven racks when cooking in the
oven.
Do not connect any appliances to the plugs
above or near to the induction cooktop; con-
nection cable insulation can melt if in contact
with heat, and this may result in an injury and
a property damage.
Recommended Utensils
• Use pans with fl at bottoms and handles that
are easily grasped and stay cool. Avoid using
unstable, warped, easily tipped or loose-han-
dled pans. Also avoid using pans, especially
small pans, with heavy handles as they could
be unstable and easily tip. Pans that are heavy
to move when fi lled with food may also be ha-
zardous.
• Be sure utensil is large enough to properly con-
tain food and avoid boilovers. Pan size is parti-
cularly important in deep fat frying. Be sure pan
will accommodate the volume of food that is to
be added as well as the bubble action of fat.
• To minimize burns, ignition of fl ammable mate-
rials and spillage due to unintentional contact
with the utensil, DO NOT extend handles over
adjacent surface burners. ALWAYS turn pan
handles toward the side or back of the applian-
ce, not out into the room where they are easily
hit or reached by small children.
• NEVER let a pan boil dry as this could damage
the utensil and the appliance.
• Follow the manufacturer’s directions when
using oven cooking bags.
• Only certain types of glass, glass/ceramic, ce-
ramic or glazed utensils are suitable for range-
top surface or oven usage without breaking due
to the sudden change in temperature. Follow
manufacturer’s instructions when using glass.

6
/ Warnings
Induction Cooking Surfaces
• Surface areas on or adjacent to the unit may be
hot enough to cause burns. Do not touch the
cooking area as long as the light indicating re-
sidual heat on the glass-ceramic cooktop area,
is “on”; this indicates that the temperature in the
relative area is still high.
• DO NOT COOK ON BROKEN COOKING SUR-
FACE – If cooking surface should break, cle-
aning solutions and spillovers may penetrate
the broken cooking surface and create a risk
of electric shock. Contact a qualifi ed technician
immediately.
• Keep a close eye on children because they are
unlikely to see the residual heat warning lights.
The cooking zones are still very hot for some
time after use, even if they are switched off .
Make sure that children never touch them.
• NEVER use aluminum foil to to hold the food
while cooking on a glass-ceramic cooktop area.
• Never place pan with bottoms which are not
perfectly fl at and smooth on the cooktop area.
• If you drop a heavy pot on your cooktop area it
will not break. On the contrary, if a hard object,
such as the salt shaker or the spice bottle strikes
the edge or the corner of the cooktop area, the
cooktop area may break.
• Never use the glass-ceramic cooktop area as
support surface.
• Only use cleaning products made specifi cally
for ceramic glass cooking surfaces.
Metal items such as cutlery or lids must ne-
ver be placed on the surface of the cooktop
area since they may become hot.
Oven Heating Elements
• NEVER touch oven bake and broil burner areas
or interior surfaces of oven.
• Bake and broil burners may be hot even though
they are dark in color. Areas near burners and
interior surfaces of an oven may become hot
enough to cause burns.
• During and after use, DO NOT touch or let
clothing or other fl ammable materials contact
heating elements, areas near elements, or in-
terior surfaces of oven until they have had suf-
fi cient time to cool. Other surfaces of the oven
may become hot enough to cause burns, such
as the oven vent opening, the surface near the
vent opening, and the oven door window.
Cleaning Safety
• Turn off all controls and wait for appliance parts
to cool before touching or cleaning them. DO
NOT touch the burner grates or surrounding
areas until they have had suffi cient time to cool.
• Clean the range with caution. Avoid steam
burns; DO NOT use a wet sponge or cloth to
clean the range while it is hot. Some cleaners
produce noxious fumes if applied to a hot sur-
face. Follow directions provided by the cleaner
manufacturer.
• DO NOT clean, rub, damage, move or remove
the door gasket. It is essential for a good seal
during baking. If the gasket becomes worn or
excessively soiled with food particles, replace
gasket to assure a tight seal.
Power failure warning
Due to safety considerations and the possibility of
personal injury in attempting to light and extingui-
sh the oven burners, the grill and the oven burner
should not be used during a power failure. The
oven control knob should always remain in the
“OFF” position during a power failure.
WARNING!
Never use this appliance as a space heater to heat
or warm the room. Doing somay result in carbon
monoxid poisoning and overheating of the oven
Room ventilation
An exhaust fan may be used with the appliance;
in each case it shall be installed in conformity
with the appropriate national and local standards.
Exhaust hood operation may aff ect other vented
appliances; in each case it shall be installed in
conformity with the appropriate national and local
standards.
Electrical shock hazard
Make sure all controls are OFF and oven is COOL
before cleaning. Failure to do so can result in
burns or electrical shock.
DO NOT touch a hot oven light bulb with a damp
cloth as the bulb could break. Should the bulb
break, disconnect power to the appliance before
removing bulb to avoid electrical shock.
WARNING!
Never cover any slots, holes or passages in the
oven bottom or cover an entire rack with materials
such as aluminum foil. Doing so blocks air fl ow
through the oven and may cause carbon monoxi-
de poisoning. Aluminum foil linings may also trap
heat, causing a fi re hazard.
Burn hazard
The oven door, especially the glass, can get hot.
DO NOT touch the oven door glass!

7
/ Warnings
Warning-tipping hazard
A child or adult can tip over the range and be kil-
led.
Verify the anti-tip device has been properly instal-
laed and engaged.
Ensure the anti-tip device is re-engaged when
the range is moved.
Do not operate the range without the anti-tipdevi-
ce in place and engaged.
Failure to do so can result in death or serious
burns to children or adults.
The instructrions shall warn the user of possible
hazard or injures that may result from the misuse
of appliance doors such as stepping, leanign or
sitting on the doors.
WARNING:
Cancer and Reproductiv Harm-
www.P65Warnings.ca.gov
.

8
/ Worktop and knobs layout
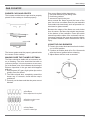
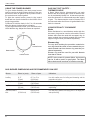
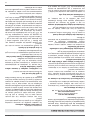
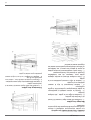
WORKTOP AND KNOBS LAYOUT
Heating element
1
2
3
4
5
6
Oven functions selector
Oven thermostat
Left front burner
Left rear burner
Right front burner
Right rear burner

9
BURNER CAPS AND GRATES
The burners and the burner caps must be properly
placed for the cooktop to function properly.
The burner grates must be properly placed inside
the recess on the cooktop.
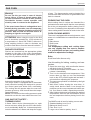
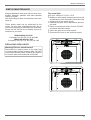
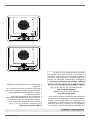
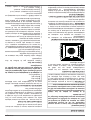
MAKING SURE THE FLAME IS OPTIMAL
The fl ame should be stable with no excessive noi-
se or fl uttering. The color should be blue with no
yellow on the tips. It is not uncommon to see oran-
ge in the fl ame color; this indicates the burning of
airborne impurities in the gas and will disappear
with use.
• With propane (LP) gas, slight yellow tips on the
primary icon are normal.
• The fl ame should burn completely around the
burner cap. If it doesn’t, check that the cap is
positioned
• Correctly on the base and that the ports are not
blocked.
The correct fl ame height depends on:
• size and material of pan being used
• food being cooked
• amount of liquid in the pan.
Never extend the fl ame beyond the base of the
pan. Use a low or medium fl ame for pan materials
that conduct the heat slowly, such as porcelain co-
ated steel or glass-ceramic.
Because the edges of the fl ame are much hotter
than its center, the fl ame tips should stay benea-
th the bottom of the cookware. Flame tips which
extend beyond the sides of the cookware emit un-
necessary heat into the room and can also dama-
ge cookware handles, which increases the risk of
injury.
USING THE GAS BURNERS
• Press in the control knob and turn it anti-clockwi-
se, to HIGH position.
• Continue to hold the knob in for 5 to 10 seconds
after the burner ignition before releasing
• Adjust fl ame with the knob as needed.
GAS COOKTOP
X
X
high
low
yellow fl ames:
further adjustment is required
yellow tips on outer cones:
normal for LP gas
soft blue fl ames:
normal for natural gas
/ Gas cooktop
OFF

10
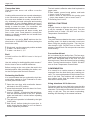
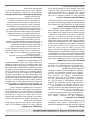
USING THE POWER BURNER
To give further fl exibility, the dual power burner
can be used as a single simmer burner if the cen-
tral burner alone is ignited or as a power burner if
the outer burner is also ignited.
To light the central burner, press in the control
knob and turn it anti-clockwise to the HIGH of the
single ring position
Continue to hold the knob in for 5 to 10 seconds
after the burner ignites before releasing
To also light the outer burner ,turn the knob to the
HIGH double ring. Adjust the fl ame as required.
GAS SHUT-OFF SAFETY -
THERMOCOUPLE
A fl ame failure device (thermocouple) on each
burner acts as a safety gas cut-off in case the fl a-
me is accidentally blown out. A thermocouple de-
tects the absence of a fl ame and stops the supply
of gas. The thermocouple must be heated for a
few seconds when the burner is ignited before the
knob is released.
USING SPECIALTY COOKWARE
Woks
Either fl at-based or round-bottom woks with the
accessory ring can be used on all models. Round
bottom woks must be used with a support ring. In
some models the porcelain-coated cast iron wok
support ring must be purchased separately.
Simmer ring
For very slow cooking the porcelain coated sim-
mer ring should be used. In some models the por-
celain-coated cast iron simmer ring must be pur-
chased separately.
Simmer ring must be used for pan with diametr
less than 4 inches.
NOTE: In the event of a power failure, the burners
can be lit with a match or gas lighter. The fl ame
failure devices will continue to function normally.
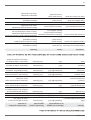
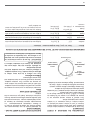
Burner
GAS BURNER DIMENSIONS AND RECOMMENDED PAN SIZE
Diam. in (mm) Diam. of pan Utilization
Auxiliary
Semi-rapid
Rapid
Dual inner/outer or
Wok
Ø 2”
(50mm)
Ø 2”3/4
(70mm)
Ø 3”
3/4
(95 mm)
Ø1”
11/16-5”1/2
(43-140 mm)
Use with smaller pans for boiling and simmering and the
preparation of sauces.
Use for normal frying and boiling in medium and small pans.
Use with large and medium pans of water for frying and
rapid boiling.
Use with woks, griddle’s and frying pans or for large pans
and rapid boiling.
/ Gas cooktop
OFF
high
central
high
central-outer
low
central-outer
OFF
Ø 3”1/2- 5”1/2
(90-140mm)
Ø 5”
1/2 -10”1/4
(140-260mm)
Ø 7”
1/8 -10”1/4
(180-260 mm)
Ø 8”
2/3 -10”1/4
(220-260 mm)
low central

11
/ gas oven
Warning!
Do not use the gas oven in case of electric
power failure. In case of electric power failu-
re reset oven/broiler controls to OFF position.
Oven/broiler burners cannot operates until
electric power is restored to the appliance.
If the oven burner fl ame is extinguished acci-
dentally during operation, turn the temperatu-
re control knob counter-clockwise to the OFF
position. Wait at least 60 seconds before at-
tempting to light the oven again.
ATTENTION! When using the oven for the fi rst
time it should be operated for 15-30 minutes at
a temperature of about 500°F/260°C without co-
oking anything inside in order to eliminate any
moisture and odours from the internal insulation.
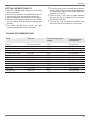
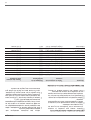
SHELVES POSITIONS
Shelves are mounted on the appropriate guides
situated on the sides of the oven compartment.
Insert the shelf between top and bottom guide in
any of the 5 positions indicated.
COOLING FAN
Automatic operation of the cooling fan.
The range cooker is equipped with a thermosta-
tically controlled cooling fan designed to prevent
the control panel and knobs from overheating.
The cooling fan will operate when the oven tem-
perature groves up. It will turn off when the tempe-
rature decreases.
NOTE: It is normal for the cooling process to push
heated air out into the room when the oven is on.
GAS SHUT-OFF SAFETY -
THERMOCOUPLE
A fl ame failure device (thermocouple) on each
burner acts as a safety gas cut-off in case the fl a-
me is accidentally blown out. A thermocouple de-
tects the absence of a fl ame and stops the supply
of gas. The thermocouple must be heated for a
few seconds when the burner is ignited before the
knob is released.
PREHEATING THE OVEN
Most cooking times in recipes are intended for a
preheated oven and require that the oven already
be at the set temperature before placing food in
the oven. Preheating time depends on the tempe-
rature setting and the number of racks in the oven.
OVEN COOKING MODES
The oven is equipped with several elements, used
alone or in combination to create diff erent cooking
modes:
• Bake burner
• Broil burner
• Oven fan
The temperature setting and cooking times
can vary slightly from one oven to another.
It is possible that recipes and cooking times
need to be adjusted accordingly.
Bake
Heat from bake burner only.
Use this setting for baking, roasting, and cas-
seroles.
• Open the oven door, with oven/broiler thermo-
stat knob in the OFF position,
• Press the thermostat knob for about 1 to 2 sec.,
release it immediately
• Turn it to the desired oven temperature; if the
burner does not light up, turn the thermostat
knob to the OFF position again and and wait 1
minute before repeating the sequence.
• The gas oven operation is indicated by the light
in the cavity.
• Wait 20sec. before closing the oven door, vi-
sually check that the fl ame is on through the
portholes on the oven compartment bottom pa-
nel. If no fl ame is visible, repeat the procedure.
• After lighting the burner and setting the desired
temperature, wait until the thermometer shows
the set temperature before placing food in the
oven.
The BAKE mode is best for baking on one rack:
• Standard baking: level 2 or 3
• Baking tall items: level 2
• Pies: level 1 or 2
• Large cuts of meat or poultry: level 1
GAS OVEN
1
2
3
4
5

12
/Ggas oven
Convection bake
Heat from
bake burner and airfl ow convection
with fan.
Cooking with convection has several advantages.
In the convection system, two fans in the back of
the oven move heated air evenly around the ca-
vity, eliminating hot and cold spots and ensuring
temperature is even. Multiple dishes can be co-
oked at the same time on diff erent levels, without
having to rotate the pans. For convection, use
shallow bakeware to reduce heat shadows.
Food cooked uncovered will brown evenly and
form a nice crust. Food placed in covered ba-
keware or delicate custards do not benefi t from
convection cooking.
Preheat the oven as for BAKE and turn the fun-
ction knob to ‘CONVECTION’ before placing the
food in the cavity.
• Single rack: use the same rack position as bake
• 2 racks: use level 2 and 4
• 3 racks : use level 1, 3, 5
Broil
Infrared heat from the BROIL burner in the top of
the cavity.
Use this setting for broiling/grilling dark meats 1”
thick or less to rare or medium doneness.
Before turning on the oven, place the rack in the
desired position. After preheating the broiler, cen-
ter the broil pan under the broil element.
Preheating the Broiler
It is recommended that you preheat the broil ele-
ment before starting to cook. Preheat for 5 minu-
tes then place food in oven.
• Open the oven door, with oven/broiler thermo-
stat knob in the OFF position,
• press the thermostat knob for about 1to 2 sec.,
release it immediately
• turn it to ‘ BROIL’ ; if the broiler fails to light up,
turn the thermostat knob to the OFF position
again and and wait 1 minute before repeating
the sequence.
• The gas broil operation is indicated by the light
in the cavity.
• Wait 20 sec. before closing the oven door, vi-
sually check that the fl ame is on.If no fl ame is
visible, repeat the procedure.
The broil mode is eff ective when food is placed on
upper racks.
• Beef steaks, ground meat patties, and lamb
chops 1 inch or less: level 5.
• Meat 1 inches or more thick, fi sh, poultry, pork
chops, ham steaks 1 inch or more: level 4.
• Browning food: level 5.
SPECIAL FUNCTIONS
Light
Use this function to light the oven when the oven
is off (for example to clean the oven). Turn the
function knob to ‘bake’. DO NOT turn on Oven
Temperature Control Knob.
Proofi ng
The proof feature maintains the warm, needed for
proofi ng yeast. It is best to start with a cool oven
when using the proofi ng function. Turn the fun-
ction knob to ‘light’. DO NOT turn on Oven Tem-
perature Control Knob. Do not open the oven door
unnecessarily.
Convection defrost
Air is circulated by the airfl ow fans. The fan acce-
lerates natural defrosting of food without heat. DO
NOT leave defrosted food in the oven for more
than two hours. Place the frozen food on a baking
sheet. Turn the function knob to ‘CONV’. DO NOT
turn on Oven Temperature Control Knob.
CONDENSATION
It is normal for a certain amount of moisture to
evaporate from the food during any cooking pro-
cess. The amount depends on the moisture con-
tent of the food. The moisture will condense on
any surface cooler than the inside of the oven,
such as the control panel.
Using aluminum foil in the oven
Foil can be used to cover food in the oven but this
should not come into close proximity with the oven
elements. Foil should not be used to line the oven
cavity or grill pan. This can cause overheating,
buckling and cracking of the enamel surfaces.

13
/ Gas oven
GETTING THE BEST RESULTS
• Minimize opening and closing the oven door
during operation.
• Use the rack position recommended by the re-
cipe and fi ne-tune with personal experience.
• Use the bakeware recommended in the recipe.
• Store the broiler pan(s) outside the oven. An ex-
tra pan without food will impact browning and
cooking.
• For tender, golden brown crusts, use light
non-stick/anodized or shiny metal pans.
• For brown crisp crusts, use dark non-stick/ano-
dized or dark, dull metal pans or glass bakewa-
re. These may require lowering the bake tem-
perature 25°F (14°C).
• Allow at least 1” (25.4 mm) of space between
the pans and the oven walls so heat can circu-
late around each pan.
• To keep the oven as clean as possible, cook
meat on a pan and not directly on the racks.
COOKING RECOMMENDATIONS
Food Pan size Control temperature
setting
Total suggested
cooking time
Cookies
Layer Cakes
Sheet Cakes
Bunt Cakes
Brownies or Bar Cookies
Biscuits
Quick Bread
Muffi ns
Fruit Pies
Fruit Cobblers
Yeast Bread, Loaves
Dinner Rolls
Cinnamon Rolls
Yeast Cotter and Cake
12”x15” Cookie Sheet
8”or 9” Round
9”x13” Pan
12 Cup
9”x9” Pan
12”x15” Cookie Sheet
8”x4” Loaf Pan
12 cup Muffi n Pan
9” Diameter
9”x9” Pan
8”x4” Loaf Pan
9”x13” Pan
9”x13” Pan
12”x15” Cookie Sheet
375°F
350°F
350°F
325°F
325°F
425°F or Package Directions
350°F
425°F
425°F
400°F
375°F
400°F
375°F
400°F
8 to 12 minutes
25 to 35 minutes
30 to 40 minutes
60 to 75 minutes
20 to 25 minutes
10 to 15 minutes
55 to 70 minutes
14 to 19 minutes
35 to 45 minutes
25 to 30 minutes
25 to 30 minutes
12 to 18 minutes
25 to 30 minutes
20 to 30 minutes

14
/ Gas oven
BROIL RECOMMENDATION
TROUBLESHOOTING COMMON PROBLEMS WITH OVEN COOKING
Food item
Problems
Control temperature
setting selector
Cause
Approximate
cooking time
Remedy
Special instructions
and tips
BEEF
Ground Beef Patties, ½” thick
T-Bone Steak
Flank Steak
Eye of Round Roast
PORK Loin Roast
POULTRY
Boneless Skinless
Chicken Breasts
Chicken Thighs
Half Chickens
Roast Chicken
Turkey
Cakes burned on the sides or not
done in center
Cakes crack on top
Food too brown on bottom
Food too brown on top
Cookies too fl at
Pies burned around edges
Pies too light on top
500°F fi xed temperature setting
500°F fi xed temperature setting
500°F fi xed temperature setting
325°F
325°F
500°F fi xed temperature setting
500°F fi xed temperature setting
500°F fi xed temperature setting
350°F
325°F
Oven too hot
Wrong pan size
Batter too thick
Oven too hot
Wrong pan size
Oven door opened too often
Incorrect rack position
Wrong bake setting
Incorrect rack position
Oven not preheated
Hot cookie sheet
Oven too hot
Oven not preheated
Oven not hot enough
Oven not preheated
15 to 20 minutes
12 to 20 minutes
12 to 20 minutes
20 to 25 min/lb
20 to 25 min/lb
20 to 25 minutes
25 to 30 minutes
30 to 45 minutes
75 to 90 minutes
20 to 25 min/lb
Reduce temperature
Use recommended pan size
Follow recipe or add liquid
Reduce temperature
Use recommended pan size
Use door window to check food
Use recommended rack position
Adjust to conventional or convection setting as
needed
Use recommended rack position
Allow oven to preheat
Allow sheet to cool between batches
Reduce temperature
Allow oven to preheat
Increase temperature
Allow oven to preheat
Broil until no pink in center
Time depends on rareness of steak
Rare to Medium Rare
Small roasts take more minutes
per pound; reduce time by using
Convection Bake
Cook until juices are clear
Cook until juices are clear
Remove skin; Cook until juices are
clear
Turn with tongs; Cook until juices
are clear
Do not stuff; reduce time by using
Convection Bake
Do not stuff; reduce time by using
Convection Bake
Pr
ob
l
e
m
s
C
aus
e
R
emed
y

15
/ Gas oven
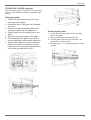
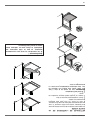
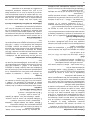
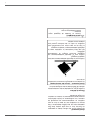
TELESCOPIC GLIDES (optional)
The telescopic glides fi t any shelf level and work
with the wire shelves provided as standard equi-
pment.
Fitting the glides
1 - Locate the two spring clips at the front
and back of the glides.
2 - Locate the pin on the glide that indicates
the back.
3 - Choose the right level and position the
telescopic glide near the upper wire.
4 - Gently insert the front spring clip on the
glide.
5 - Insert the rear spring clip on the glide.
6 - Pull and push each glide to ensure the
correct installation and smooth operation.
7 - Extract both glides to the fully extended
position and place the shelf over them,
making sure it’s accurately placed betwe
en the rear pin and the front pin.
Removing the glides
1 - Locate the two spring clips at the front and
back of the glide.
2 - Gently pull down the front spring clip.
3 - Pull the glide away from the oven side - be
careful not to strain the clip.
4 - Repeat steps 2 - 3 on rear spring clip to remo-
ve glide.
1
2
3
4

16
Burn hazard
Make sure the heating elements are turned off
and allowed to cool completely before any clea-
ning and/or maintenance operation.
Things to avoid:
• Do not use a steam cleaner to clean the range:
the steam could reach electrical components
and cause a short.
• Do not spray liquids such as cleaning agents
into the openings on the bottom and top of the
ovencavity.
• All surfaces can discolor or be damaged if un-
suitable cleaning agents are used. The front
of the oven, in particular, will be damaged by
oven cleaners and descalers. All surfaces are
susceptible to scratching. Scratches on glass
surfaces may cause a breakage. Immediately
remove any residues by using suitable cleaning
products.
• The heating elements in the oven do not requi-
re cleaning. The elements burn off any residue
when the oven is in use.
Cleaning stainless steel
All stainless steel parts should be wiped with hot
water and soap solution at the end of each cycle.
Wipe up spills and boilovers immediately. Use su-
itable, non-abrasive stainless cleaning products
when water and soap solution will not do the job.
DO NOT use steel wool, abrasive cloths, clean-
sers, or powders. If necessary, scrape stainless
steel to remove encrusted materials, soak the
area with hot towels to soften the residue, then
use a wooden or nylon spatula or scraper. DO
NOT use a metal knife, spatula, or any other me-
tal tool to scrape stainless steel. DO NOT permit
citrus or tomato juice to remain on stainless ste-
el surface, as citric acid will permanently discolor
stainless steel.
Cleaning painted surfaces
Clean with a soft cloth, warm water and non-abra-
sive dishwashing liquid. Whilst still damp, polish
dry with a clean soft cloth.
Cleaning glass surfaces
Clean with cleaning detergent and warm water.
Glass cleaner can be used to remove fi ngerprints.
If using glass cleaner containing ammonia, make
sure that it does not drip on exterior door surface.
Cleaning the broiler pan
Clean with detergent and hot water. For stubborn
spots, use a soap-fi lled steel wool pad.
The porcelain enamel fi nish is acid resistant, but
not acid proof. Acidic foods, such as citrus jui-
ces, tomatoes, rhubarb, vinegar, alcohol or milk,
should be wiped up and not allowed to bake onto
the porcelain during the next use.
Cleaning the stainless steel griddle
The stainless steel griddle is quiote heavy and
it can be cleaned in place without removing it.
After cooking, allow the Griddle to cool until just
warm. Use a spatula to remove any cooking resi-
due. Wipe away any fat in the drip tray with paper
towels. Clean the entire surface with warm water
and dishwashing liquid, using a stainless steel
scourer. Always work with the grain of the stain-
less steel. Certain types of food with high sodium
content such as bacon may leave white rmarks.
For these and other stubborn marks, use a cream
cleaner suitable for stainless steel surfaces.
Cleaning the oven cavity
• Always allow the oven interior to cool before
cleaning.
• Do not allow vinegar, wine, coff ee, milk, salt
water or fruit juices to remain in contact with
enamelled surfaces for prolonged periods as
they may stain or discolour the surface.
• Never use sharp utensils to remove stains as
this could scratch the surface.
• Never use steam cleaners on the oven inte-
riors as steam may damage electronic parts.
• For light cleaning, wipe with a soft cloth, using
warm water and washing up liquid. For heavier
residues, use a cream cleaner and a nylon
scourer.
• Oven cleaning products can be used accor-
ding to the manufacturer’s directions but care
should be taken that they do not come in con-
tact with any stainless steel, chrome, painted
or alloy parts of the range or the door seals
and elements.
Cleaning oven racks and supports
Clean with detergent and hot water. Stubborn
spots can be scoured with a soap-fi lled steel wool
pad.
KEEPING YOUR BERTAZZONI CLEAN
/ Keeping your Bertazzoni clean

17
SIMPLE MAINTENANCE
Keeping appliance area clear and free from com-
bustible materials, gasoline and other fl amable
vapors or liquids.
Not obstructing the fl ow of combustion and venti-
lation air.
These simple tasks can be performed by the
owner. For any other maintainance task, we re-
commend employing a trained service technician.
Please call our toll free line to identify service te-
chnicians in your area:
ENGLISH 866 905 0010
if located in the US, BC, B, Sk and MB
FRANCAIS 800 561 7265
if located in ON, QC, PE, NU, NS, NL, NB
REPLACING OVEN LIGHTS
Warning! Electric shock hazard!
Disconnect the electric power at the main fuse
or circuit breaker before replacing bulb. DO NOT
touch bulb with bare hands. Clean off any signs of
oil from the bulb and handle with a soft cloth.
Top oven light
Bulb type: halogen G9 120 V, 25 W
• Make sure the heating elements are turned off
and allowed to cool completely. Disconnect the
appliance from the power supply.
• Unscrew the glass cover and remove the halo-
gen bulb.
• Place a new halogen bulb in its slot. DO NOT
touch bulb with bare hands
• Screw the glass cover back in place.
• Reconnect the oven to the electrical supply.
/ Simple maintenance

18
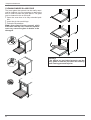
CLEANING INSIDE GLASS DOOR
The inner glass door panels can be easily remo-
ved for cleaning. It is not necessary to remove the
door in order to clean the glass panes. The glass
can be cleaned in situ or removed.
• Open the oven door to its fully extended posi-
tion.
• Insert the pin into each hinge.
• Follow the illustrations.
Note: when glass is being removed, which
side faces into the oven. Incorrect replace-
ment may cause the glass to shatter or be
damaged.
Warning!
If the hinges are not locked properly and the
inner glass is removed, the door can close by
itself causing personal injuries.
/ Simple maintenance

19
TROUBLESHOOTING
Here are answer to common problems you
may experience. You are also welcome to call
our toll free Customer Service line to trouble-
shoot any issue with your Bertazzoni:
ENGLISH 866 905 0010
if located in the US, BC, B, Sk and MB
FRANCAIS 800 561 7265
if located in ON, QC, PE, NU, NS, NL, NB
The oven will not operate
Is there power to the range? Are the igniters or
burner holes blocked? Check the switch fuse or
circuit breaker.
The surfer burners will not ignite
Is there power to the range? Are the igniters or
burner holes blocked? Are the burner rings and
burner caps seated fi rmly?
Check the switch fuse or circuit breaker. Check
that the igniter is clean and the burner holes are
open and clean of any residue.
The burner ignites but switches off when
the knob is released
The burners have fl ame failure devices fi tted as
standard. Therefore, after lighting the burner, keep
the knob pressed for a few seconds to deactivate
the fl ame failure device.
The ignition candles are sparking
continuously
Is the cooktop wet from cleaning or a boil over?
Turn off the electricity supply and thoroughly dry
the burner components and igniters.
The control knob are getting too hot
Are you cooking with the oven door open?
Keep the oven door shut when not in use or when
grilling/broiling.
A control knob is loose on its shaft
The knob retaining spring clip may have been
damaged. Call our service department for advice
and a replacement if necessary.
Food is cooking too quickly
Are you using a convection mode?
When using a fan-assisted oven cooking mode,
it is recommended to reduce the cooking tempe-
rature by 70°F (20°C) compared to conventional
cooking.
Food is not cooking evenly
Are you cooking large amount of food or are you
using large bakeware?
Air needs to circulate through the oven for even
cooking. Remove the grill pan from the oven when
not in use and always allow a gap on all four sides
of dishes. You may need to turn your bakeware
during the cooking cycle. Oversized baking she-
ets, roasting pans and cakeware will act as a baf-
fl e and prevent hot air from moving evenly around
the cavity. Choose cooking equipment that allows
a minimum of 1 inch ( 2,5 cm) space on all sides to
allow the free movement of heat inside the cavity.
Grilling in the oven is slow
Have you selected the correct function?
The fan continues to run after the oven is
switched off
This is normal. The cooling fan may run on and off
for up to 30 minutes after the oven is switched off
to keep the controls cool.
Condensation forms in the oven
Have you pre-heated the oven?
Condensation is less likely to form when the oven
or grill is pre-heated before use.
Smoke is generated in the oven
Have you selected the right cooking temperature?
Are you cooking food with high fat? Do you rarely
use the grill? Have you cooked fat under the grill?
Does the oven interior need to be cleaned?
Remember to reduce the oven temperature by
70°F (20°C) if using a fan function with a recipe
designed for conventional cooking. Use high-si-
ded dishes to contain fats and splashes. Leave
the grill on for a few minutes after grilling or roa-
sting to burn off fat deposits from the oven roof.
Oven surfaces should be cleaned regularly to pre-
vent build-up of cooking residues.
Please kindly register on our web site
www.bertazzoni.com to validate your new product
warranty and help us to assist you better in case
of any inconvenience.
/ Troubleshooting

20
The warranties provided by Bertazzoni SpA in this
statement apply exclusively to Bertazzoni applian-
ces and accessories sold as new products to the
original owner by a Bertazzoni authorized distribu-
tor, retailer, dealer or service center and installed
in the United States and Canada. The warranties
provided in this statement are not transferable
and have validity from the date of installation.
Coverage information
Bertazzoni SpA will repair or replace any compo-
nent part which fails or proves defective due to
materials and/or workmanship within 2 years from
the date of installation and under conditions of
normal residential use. Repair or replacement will
be free of charge, including labor at standard ra-
tes and shipping expenses. Repair service must
be performed by a Bertazzoni Authorized Service
Center during normal working hours.
Cosmetic warranty
Bertazzoni will cover parts showing cosmetic de-
fects in material and workmanship for a period
of thirty (30) days from date of installation of the
unit. This coverage will include scratches, stains,
surface imperfections on stainless steel, paint and
porcelain, with the exclusion of slight diff erences
in color due to materials and painting/enamelling
technologies.
Exclusions are labor costs, B stock items, out-
of-box appliances and display units.
How to obtain service
To obtain warranty service please contact Bertaz-
zoni Customer Service at the numbers below and
provide model number, serial number and date of
purchase.
ENGLISH 866 905 0010
if located in the US, BC, B, Sk and MB
FRANCAIS 800 561 7265
if located in ON, QC, PE, NU, NS, NL, NB
Save proof of original purchase or of original in-
stallation to establish warranty period. Copy of the
product serial tag is affi xed to the back cover of
the instruction manual.
What is not covered
The product used in any commercial application
Repair service provided by other than a Bertazzo-
ni authorized service agency.
Damage or repair service to correct service pro-
vided by an unauthorized agency or the use of
unauthorized parts.
Installation not in accordance with local electrical
codes, gas codes or plumbing codes
Defects or damage due to improper storage of the
product.
Defects or damage or missing parts on products
sold out of the original factory packaging or from
displays.
Service calls or repairs to correct the installation
of the product and/or related accessories.
Service calls to connect, convert or otherwise re-
pair the electrical wiring and/or gas line to properly
use the product.
Service calls to provide instructions on the use of
a Bertazzoni product.
Repair service due to product usage in manner
other than what is normal and customary for home
use.
Replacement of wear and tear parts
Replacement of glasses and light bulbs if they are
claimed to have failed later than 30 days after in-
stallation and in no case later than 4 months after
date of purchase
Defects and damages arising from accident, alte-
ration, misuse, abuse, improper installation.
Defects and damages arising from transportation
of the product to the home of the owner.
Defects and damage arising from external forces
beyond the control of Bertazzoni SpA such as fi re,
fl ood, earthquakes and other acts of God.
In case the product will be installed in a re-
mote area, where certifi ed trained technicians
are not reasonably available, the customer will
be responsible for the transportation costs for
the delivery of the product to the nearest au-
thorized service center or for the displacement
costs of a certifi ed trained technician.
Bertazzoni does not assume any responsibi-
lity for incidental or consequential damages.
Some states do not allow the exclusion or limi-
tation of incidental or consequential damages, so
the above limitation or exclusion may not apply to
you. This warranty gives you specifi c legal rights
and you may also have other rights which may
vary from state to state or province to province.
TWO YEAR LIMITED WARRANTY
/ Two year limited warranty
La page est en cours de chargement...
La page est en cours de chargement...
La page est en cours de chargement...
La page est en cours de chargement...
La page est en cours de chargement...
La page est en cours de chargement...
La page est en cours de chargement...
La page est en cours de chargement...
La page est en cours de chargement...
La page est en cours de chargement...
La page est en cours de chargement...
La page est en cours de chargement...
La page est en cours de chargement...
La page est en cours de chargement...
La page est en cours de chargement...
La page est en cours de chargement...
La page est en cours de chargement...
La page est en cours de chargement...
La page est en cours de chargement...
La page est en cours de chargement...
-
 1
1
-
 2
2
-
 3
3
-
 4
4
-
 5
5
-
 6
6
-
 7
7
-
 8
8
-
 9
9
-
 10
10
-
 11
11
-
 12
12
-
 13
13
-
 14
14
-
 15
15
-
 16
16
-
 17
17
-
 18
18
-
 19
19
-
 20
20
-
 21
21
-
 22
22
-
 23
23
-
 24
24
-
 25
25
-
 26
26
-
 27
27
-
 28
28
-
 29
29
-
 30
30
-
 31
31
-
 32
32
-
 33
33
-
 34
34
-
 35
35
-
 36
36
-
 37
37
-
 38
38
-
 39
39
-
 40
40


Bertazzoni MAST244GASNEE Le manuel du propriétaire
- Catégorie
- Barbecues
- Taper
- Le manuel du propriétaire
- Ce manuel convient également à
dans d''autres langues
Documents connexes
-
Bertazzoni MAST366GASXT Use & Care Full Gas Ranges
-
Bertazzoni MAST365DFMXE Le manuel du propriétaire
-
-
Bertazzoni MAST304INMXE Use & Care Manual Electric Oven Ranges
-
-
Bertazzoni MAST305GASXE Le manuel du propriétaire
-
-
-
-
Autres documents
-
Fulgor Milano F6PIR365S1 Le manuel du propriétaire
-
Frigidaire FFGC3010QW Manuel utilisateur
-
Frigidaire FGGC3047QSB Manuel utilisateur
-
Frigidaire FGGC3645QWB Manuel utilisateur
-
Danby DERM240BSSC Le manuel du propriétaire
-
 Frigidaire Professional FPGC3087MS Manuel utilisateur
-
-
-
Fulgor Milano F6PDF486GS1 Manuel utilisateur
-
Dometic RA, CA, RV, CV Mode d'emploi
