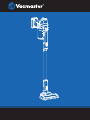
Vacmaster Orson Lite VSE2101EU Manuel utilisateur
- Taper
- Manuel utilisateur

VSE2101EU
Suzhou Cleva Electric Appliance Co., Ltd.
No.8 Ting Rong Street
Suzhou Industrial Park, Suzhou
Jiangsu Province, China
www.cleva-europe.com
Made in P.R.C


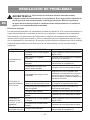
16
15
18
14
12
11
13
9
10
5
2
1
7
6
4
3
8
17

4
GB
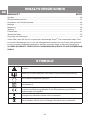
CONTENTS
SECTION PAGE
Thank you for choosing our Orson
TM
Lite cordless vacuum cleaner. This cordless vacuum
cleaner is intended for domestic use only and suitable for indoor use within a normal household
environment for light, dry dust and debris.
FOR YOUR SAFETY: CAREFULLY READ AND UNDERSTAND ALL INSTRUCTIONS.
Symbols
Safety Information
Unpacking and Product Features
Assembly
Operation
Maintenance
Troubleshooting
Technical Data
Recycling and Disposal
..........................................................................................................................................
...........................................................................................................................
...................................................................................................
........................................................................................................................................
........................................................................................................................................
...................................................................................................................................
..............................................................................................................................
................................................................................................................................
..................................................................................................................
4
5
7
7
8
10
11
14
14
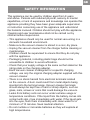
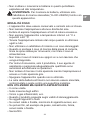
Caution
Read instruction manual before any installation or operation.
For indoor use only.
Protection Class II.
The product complies with the applicable European directives and an evaluation
method of conformity for these directives was followed.
Do not dispose of electrical equipment in domestic waste.
Batteries contain Lithium-ion. Do not dispose of batteries in household waste.
Li-ion
SYMBOLS

5
GB
SAFETY INFORMATION
This appliance can be used by children aged from 8 years
and above. Persons with reduced physical, sensory or mental
capabilities, or lack of experience and knowledge can operate this
appliance providing they have been given adequate supervision
or instruction concerning use of the appliance and understand
the hazards involved. Children should not play with the appliance.
Cleaning and user maintenance shall not be carried out by
children without supervision.
• This appliance should only be used for normal vacuuming in a
domestic household environment.
• Make sure the vacuum cleaner is stored in a cool, dry place.
• Unplug the vacuum cleaner from the charger before cleaning or
maintenance.
• Children should be supervised to ensure that they do not play
with the appliance.
• Packaging material, including plastic bags should not be
accessible to children to avoid suffocation.
• Check that your supply voltage is the same as that stated on the
rating plate on the charging adapter.
•Eachvacuumcleanerisdesignedforaspeciccharging
voltage, use only the original charging adapter supplied with this
vacuum cleaner.
• There is no shock hazard from electrical terminals located
on the vacuum. A burn could result from metal objects being
inserted into the terminal areas. Vacuum cleaner terminals
should always be kept free of hard or sharp objects, such as
glass, nails, screws or coins that could damage the vacuum.
• Leaks from battery cells can occur under extreme usage or
temperature conditions. If the liquid from the battery comes into
contact with skin, rinse immediately with water. If the liquid gets
intotheeyes,ushthemimmediatelywithcleanwaterfora
minimum of 10 minutes. Seek medical attention.
• Do not mutilate or incinerate batteries as they will explode at
high temperatures.

6
GB
WARNING:For the purposes of recharging the battery,
only use the detachable charging adapter (YLJXC-256050)
provided with this appliance.
PROPER USE
• The appliance must only be stored and charged indoors.
• Do not leave the vacuum cleaner in direct sunlight.
• Avoid exposing the vacuum cleaner to excessive heat sources.
• Do not expose the appliance to temperatures below 4 °C or
above 40 °C.
• Keep the vacuum cleaner away from your body when using
nozzles and tubes.
• Do not use a damaged charging adapter or cable.
• When disconnecting the charging cable from the mains, pull the
plug itself to remove it; do not pull on the power cord.
• Do not pull the charging cable over sharp edges or allow it to
become trapped.
• For safety reasons, only manufacturer, its service agent or
suitablyqualiedpersonsarepermittedtocarryoutrepairs.
• Do not try to touch the brush roll while the vacuum cleaner is
switched on and the brush roll is turning.
• Switch off the appliance when it is not in use.
• The battery packs must not be dismantled and short circuited.
NEVER USE THIS VACUUM CLEANER
• In wet areas.
• On building rubble.
•Closetoammablegases,etc.
• When the product shows visible signs of damage.
•Onsharpobjectsoruids.
• On hot or cold cinders, lighted cigarette butts, etc.
•Onnedust,forinstancefromplaster,concrete,our,hotor
cold ashes.
•Withoutitslters.
Using the vacuum cleaner in the above circumstances may cause
serious personal injury or damage to the product. Such injury or
damage is not covered by the warranty or by the manufacturer.

7
GB
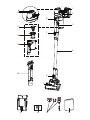
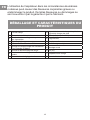
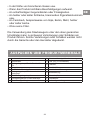
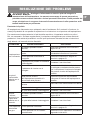
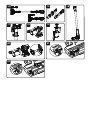
UNPACKING AND PRODUCT FEATURES
1 Charging Port 10
Battery Power Level Indicator/Battery
Charging Indicator
2 Power Switch 11 Filter (x2) (x1 pre-installed)
3 Dust Bin Door Release Button 12 Filter Cage
4 Suction Wand 13 Dust Bin
5 Motorised Floor Head 14 Combination Tool
6 Motorised Floor Head Release Button 15 Wall Mount
7 Wand Release Button 16 Screw (x2)
8 Motor Head Release Button 17 Charging Adapters
9 Speed Adjustment Switch 18 Instruction Manual
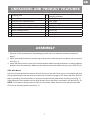
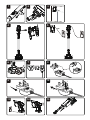
ASSEMBLY
1. Remove all the contents from the packaging; make sure you have all contents as listed on
page 7.
2. Insert the handheld vacuum into the top of the suction wand and lock into place until you hear a
click (Fig. 1).
3. Insertthewandintotheneckofthemotorisedoorheadensuringthatthereisnothingtrapped
between the unit connections. Make sure the wand is locked into place until you hear a click (Fig. 2.)
Afx Wall Mount
Use the 2 screws provided to secure the wall mount on the wall. Ensure you use suitable wall plug
xingsdependingonthewallstructure.Mountataminimumheightof44’’abovetheoor.Ensure
that no plumbing, electrical cables or wires are located directly behind the mounting area (Fig. 3).
Align the base of the handheld vacuum with the wall mount and slide in as shown in the picture (Fig. 4).
NOTE: To be able to charge vacuum while it is mounted, attach wall mount to wall no more than
59″fromanelectricalpoweroutlet(Fig.5).

8
GB
OPERATION
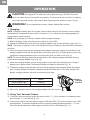
CAUTION:
Moving parts! To reduce the risk of personal injury, DO NOT touch the
brush roll when the vacuum cleaner is operating. Touching the brush roll while it is rotating
can cause personal injuries. Use caution when operating near children or pets (Fig. 6).
WARNING!
Donotoperatethevacuumcleanerwithoutlterinplace.
1. Charging
NOTE:Chargethebatterypackforatleast4hoursbeforeusingforthersttime.Nevercharge
the batteries in temperatures above 40°C or below 4°C. It is normal for the charging adapter to
become warm when charging.
NOTE: Only recharge your vacuum cleaner with the supplied charger.
1) Before charging, make sure the vacuum cleaner is turned OFF.
2) Choosethedesiredplugtotontothechargingadapterbodyfortheoperatingregion(Fig.7).
NOTE: The three pin plug is for UK, while the two pin plug is suitable for almost all other European
countries.
3) Insert the desired plug into the charging power adapter. Align the support rails located on the
charging adapter body with the guide rails on the plug insert (Fig. 8). Slide the plug insert fully
towards the charging adapter body to lock into place until you hear a click (Fig. 9).
NOTE: To remove the plug, press the release latch on the charging adapter and slide the plug
insert off the charging adapter body (Fig. 10).
4) Insert the charging adapter into the charging port on the side of the hand vacuum. Plug the
adapterintoapoweroutlet.Thebatteryindicatorwillbegintoashblue(Fig.11).
5) The battery charging indicator light will show the progress during charging. Whilst the battery
packisbeingcharged,thebatterychargingindicatorwillashblue.Oncefullycharged,the
battery charging indicator will show a continuous blue light.
6) When fully charged, remove the charging adapter from the vacuum.
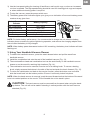
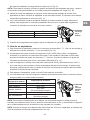
2. Using Your Vacuum Cleaner
1) To start the vacuum cleaner, press the power switch (
①
). Once turned on, the battery power
level indicator (
②
) will be lit (Fig. 12).
2) The vacuum cleaner has two-speed controls, LOW and HIGH. The vacuum starts in the LOW
speed position. To switch the speed to HIGH, press the speed adjustment switch (
③
) once.
Press the speed adjustment switch again to switch back to LOW speed (Fig. 12).
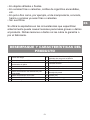
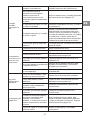
Battery Charging Indicator Status
Flashing Blue Light Charging
Continuous Blue Light Fully charged
Battery
Charging
Indicator

9
GB
NOTE: For better battery performance, it is recommended to charge the unit when the battery
indicator shows a continuous yellow light during operation, and remove the charging adapter from
the unit after the battery is fully charged.
NOTE: When battery power decreases to about 10% remaining, the battery level indicator will start
ashingred.
3. Using Your Handheld Vacuum Cleaner
1) To detach the handheld vacuum, press the wand release button and pull the wand from
handheld vacuum.
2) Install the combination tool onto the end of the handheld vacuum (Fig. 13).
3) Themotorisedoorheadandcombinationtoolcanbeuseddirectlyonthehandheldvacuum
cleaner or on the wand for reaching high locations (Fig. 14).
4) The combination tool can be used as a crevice tool or a dusting brush. To use as a dusting
brush, simply squeeze the buttons in the side of the tool and push the brush forward. (Fig. 15).
5) To return the combination tool back to the crevice function, press the button once more and
slide the brush back into the bottom position. Ensure it is securely locked into place.
NOTE: When the hand vacuum is removed, push the wand forward so that the bottom of the wand
locks into vertical position on the nozzle. This will enable the unit to stand in place.
CAUTION:
The hand vacuum must be removed from the wand when using the stand-
up feature. The unit will not be stable if standing in vertical position with the hand vacuum
attached (Fig. 16).
Battery
Power
Level
Indicator
Battery Power Level
Indicator
Battery Capacity
Blue, Continuous 75%~100%
Green, Continuous 50%~74%
Yellow, Continuous 25%~49% (Recharge recommended)
Red, Continuous 10%~24%
Red, Flashing 0~9% (Recharge required)
3) Usethelow-speedsettingforcleaningofhardoors,andlowpilerugs,orwhenanincreased
run time is needed. The high-speed setting should be used for cleaning plush rugs and carpets
or when additional cleaning power is required.
4) To stop the vacuum, press the power switch once.
5) The battery power level indicators lights up to give you an indication of how much battery power
remains at any given time.

10
GB
MAINTENANCE
CAUTION:
To reduce the risk of electric shock, turn the vacuum cleaner off and
remove the charging adapter from the vacuum cleaner before any maintenance.
WARNING!
Donotoperatethevacuumcleanerwithoutltersinplace.
1. Emptying the Dust Bin
NOTE:Forbestperformance,emptydustbinaftereveryuseoroncedustreachesMAXllline.
Before emptying the dust bin, ensure the vacuum cleaner is turned off.
1) Position dust bin area of vacuum over a waste receptacle. Press down on the dust bin door
release button to open dust bin lid and allow bin contents to drop into waste receptacle (Fig. 17).
2) Close the dust bin door until you hear a click.
2. Cleaning the Filters
NOTE:Thekeytomaximumperformanceishavingacleanlter.Cleaningthelterfrequentlywill
helpyourvacuumcleaneroperateatpeakefciency.Asparelterisprovidedwithyourvacuum
cleanertoallowyoutodryonelterproperlywhileusingtheother.Additionallterscanbe
purchased from www.cleva-europe.com.
1) With one hand grasped around the handle, press the motor head release button to separate
the dust bin from the handheld vacuum (Fig. 18).
NOTE: Grasp the dust bin when pressing the release button.
2) Removethelterandltercagefromthedustbin(Fig.19).
3) Useasoftbrushtocleanloosedebrisfromthelterandthenrinsewithwarmwater.Rinseand
gentlysqueezedrythelters.Setallltersasideandallowtoairdryfor24hours.
IMPORTANT:Theltersandtheltercagemustbecompletelydrybeforereuse.
4) Placetheltercagebackintothedustbin,thenplacethelterbackin.
5) To reassemble the dust bin to the handheld vacuum, align the tabs on the dust bin with slots in
the handheld vacuum. Once aligned, attach the dust bin to the handheld vacuum until you hear
a click (Fig. 20).
3. Cleaning the Motorised Floor Head & Blockage
Remove the Brush Roll
1) Make sure the vacuum cleaner is turned OFF, then remove the wand and set aside.
2) Turntheoorheadovertoaccessthebrushroll.Pressandpushthetabonthelefthandside
of the head to the left and hold it. This will unlock the brush roll (Fig. 21).
3) With the tab pushed to the left, simply lift the brush roll out of the head housing. Clean off
debris
and anything wrapped around the brush roll. Use a pair of scissors to remove threads, etc.
4) Place the brush roll back into the housing by aligning the hexagonal end of the brush roll into
the right end of the head. Then push the unlock tab to the left and hold it. Align the square end
of the brush roll with the left end of the head and insert it into place (Fig. 22). Release the tab to
lock the brush roll.

11
GB
Remove the Wand Blockage
1) To clean out the wand, press the wand release button, and pull the wand away from motorized
oorhead.
2) Carefullyremoveanydebrisorblockagefromtheinsideofthemotorisedoorhead.
3) Reattachthemotorisedoorheadontothevacuumbody.
4) Oncetheblockageisremoved,startthevacuumtoensureairowthroughthehose.
CAUTION:
Do not use scissors or other sharp objects to remove a blockage from the hose.
TROUBLESHOOTING
WARNING!
Disconnect electrical supply before performing maintenance to the vacuum cleaner. Failure to do
so could result in electrical shock or personal injury. Remove the handheld unit form the main body
ifperformingmaintenanceonthebrushrollormotorisedoorhead.
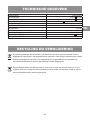
Cleaning Performance
Vacmaster vacuum cleaners are tested for endurance. If your motor is operational, then the most
likely cause for a loss in suction is a blockage or an opening in the vacuum.
To maintain a high cleaning performance from your machine, it is important to replace or clean
ltersasnecessary.Emptythedustbinregularlytopreventperformancedrops.Aperformance
dropwithcleanlterscanonlybecausedbyablockageinthetoolsorthehoseconnections.

12
GB
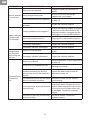
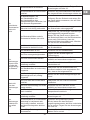
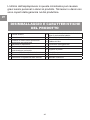
PROBLEM POSSIBLE CAUSE SOLUTION
Vacuum cleaner
will not power
on.
Battery may be depleted.
Charge the battery as instructed on
page 8.
Wrong charger being used.
Be sure to use only the charger
supplied with your product.
The motorised brush roll is jammed.
Remove obstruction. Follow instructions
on page 10.
Handheld vacuum or battery is
damaged.
Contact the customer helpline.
Battery charging
indicator does
not illuminate.
Charging adapter is not plugged in.
Be sure the charging adapter is plugged
in properly to the socket and and the
charging connector is plugged into the
charging port of the handheld vacuum.
Dust accumulated on the charging
port of the handheld vacuum.
Clean off any dust accumulated on the
charging port of the handheld vacuum.
Power supply is not switched on Ensure the power supply is active.
The battery is damaged. Contact the customer helpline.
The battery indicator is damaged. Contact the customer helpline.
Battery
indicator does
not illuminate
when using the
vacuum.
Battery may be depleted.
Charge the battery as instructed on
page 8.
The battery indicator is damaged. Contact the customer helpline.
Motorised brush
roll does not
turn.
Brush roll is jammed.
Remove obstruction. Follow instructions
on page 10.
Brush roll is not installed correctly.
Remove brush roll and reinstall
following instructions.
Debris accumulates on metal
contacts connecting the dust bin
and the main body of the handheld
vacuum.
Remove the debris and reinstall as
instructed on page 10.
The handheld vacuum and the wand
are not connected into place.
Reinstall the hand vacuum and the
wand correctly
Floor head motor and brush roll both
are not turning.
Checktoconrmtheaboveconnections
are properly made. Re-start the unit. If
theoorheadmotorandbrushrollare
still not turning, the nozzle motor may
be damaged. Contact the customer
helpline.
The motor is spinning, but the brush
roll is not rotating.
The belt is broken. Contact the
customer helpline.

13
GB
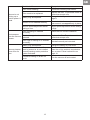
Vacuum is not
picking up or
suction power is
weak.
Dust bin is full. Empty dust bin.
Filter needs cleaning. Followltercleaninginstructions.
Filter needs to be replaced.
Replacethelter.Topurchaseonlineat
www.cleva-europe.com.
Battery may be depleted.
Charge the battery as instructed on
page 8.
Dust bin is not installed correctly.
Check dust bin for correct installation
andensureitissnappedrmlyinplace.
Vacuum speed adjustment switch
setting on low.
Adjust speed adjustment switch setting
to high.
Dust escapes
from the vacuum
cleaner.
Filter is missing or installed
incorrectly.
Checklterforcorrectinstallation.
Filter is damaged and needs to be
replaced.
Replacethelter.Topurchaseonlineat
www.cleva-europe.com.
Filter cage is missing or is installed
incorrectly.
Reinstall correctly as instructed.
Vacuum cleaner
turns off on its
own.
Battery may be depleted. Charge the battery as instructed.
Brushrollinthemotorizedoor
head is jammed or is not installed
correctly causing motor protection
system activated.
Remove obstruction from brush, cool
down the unit to ambient, temperature,
then re-start. Follow instructions on
page 10.
Excessive loading on brush roll
brush.
Turn the vacuum off and re-start.

14
GB
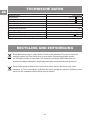
TECHNICAL DATA
Model Number VSE2101EU
Battery power 21.6V 2.2Ah
Nominal Rated Voltage of Battery Pack 21.6V Li-ion
Max Rated Voltage of Battery Pack 24V MAX Li-ion
Max Running Time 40mins
Speed Settings 2 speeds
Dust Capacity 0.6L
The Whole Unit Weight 2.14kg
Charger Adapter Input 100-240V~ 50/60Hz
Charger Adapter Output 25.6V 500mA
Battery Full Charge Time 5.5 hours
RECYCLING AND DISPOSAL
This marking indicates that this product should not be disposed with other household wastes
throughout the EU. The machine must be delivered in rigid packaging to avoid damage during
transportation. The packaging and the machine itself are manufactured from recyclable
materials and should be disposed of accordingly.
This vacuum cleaner contains lithium-ion battery. Do not dispose of batteries in household
waste,reorwater.Disposeofbatteriesinaccordancewiththelocalregulationswherethey
will be recycled in an environmentally friendly manner.
Li-ion

15
FR
TABLE DES MATIÈRES
SECTION PAGE
Nousvousremercionsd’avoirchoisinotreaspirateursanslOrson
TM
Lite. Il s'agit d'un aspirateur
sansluniquementconçupourunusagedomestiqueetadaptéàuneutilisationàl'intérieurdans
unenvironnementdomestiquenormalpouraspirerdespoussièresetdébrislégersetsecs.
POUR GARANTIR VOTRE SÉCURITÉ : VEUILLEZ LIRE ET ASSIMILER TOUTES LES
CONSIGNES.
Attention
Veuillez lire le manuel d'instructions avant toute installation ou utilisation.
Conçupourunusageàl’intérieurexclusivement.
Classe de protection II.
Leproduitestconformeauxdirectiveseuropéennesenvigueuretuneméthode
d'évaluationdelaconformitérelativesàcesdirectivesaétéadoptée.
Nepasmettreaurebutdesappareilsélectriquesaveclesorduresménagères.
Les piles contiennent du lithium-ion. Ne pas mettre au rebut des piles avec les
orduresménagères.
Li-ion
Symboles
Consignesdesécurité
DéballageetCaractéristiquesduproduit
Montage
Fonctionnement
Entretien
Dépannage
Caractéristiquestechniques
Recyclage et Mise au rebut
.......................................................................................................................................
...................................................................................................................
......................................................................................
...........................................................................................................................................
.............................................................................................................................
.........................................................................................................................................
.....................................................................................................................................
...........................................................................................................
...........................................................................................................
15
16
18
19
19
21
23
25
25
SYMBOLES

16
FR
CONSIGNES DE SÉCURITÉ
Cetappareilpeutêtreutiliséparlesenfantsâgésde8ans
etplus.Lespersonnesprésentantdescapacitésphysiques,
mentalesetsensoriellesréduitespeuventutilisercetappareilà
conditionqu’ellessoientsousétroitesurveillanceouaientreçu
desinstructionsappropriéesconcernantl'utilisationdel'appareil
etencomprennentlesdangersliésàladiteutilisation.Les
enfants ne doivent pas jouer avec cet appareil. Le nettoyage et
l’entretienparl'utilisateurnedoiventpasêtreeffectuéspardes
enfants sans surveillance.
•Cetappareildoitêtreutiliséuniquementpourunaspirateur
normal dans un environnement domestique.
•Veillezàrangerl'aspirateurdansunendroitfraisetsec.
•Débranchezl'aspirateurduchargeuravantdeprocéderàson
nettoyageouàsonentretien.
•Lesenfantsdoiventêtresurveillésandes'assurerqu'ilsne
jouent pas avec l'appareil.
•Lesmatériauxd'emballage,ycomprislessacsenplastique,ne
doiventpasêtreaccessiblesauxenfantsandeprévenirtout
risqued’étouffement.
• Assurez-vous que votre tension d'alimentation est identique
àcelleindiquéesurlaplaquesignalétiquedel'adaptateurde
charge.
•Chaqueaspirateurestconçupourunetensiondecharge
spécique,utilisezuniquementl'adaptateurdecharged'origine
livréaveccetaspirateur.
•Lesbornesélectriquessituéessurl'aspirateurneprésentent
aucunrisqued'électrocution.L’insertiond’objetsmétalliques
dans les zones des bornes peut occasionner des brûlures. Les
bornes de l'aspirateur doivent toujours être exemptes d'objets
durs ou coupants, tels que du verre, des clous, des vis ou des
pièces de monnaie, qui risquent d'endommager l'aspirateur.
•Desélémentsdespilespeuventcoulerdansdesconditions
extrêmesd’utilisationoudetempérature.Sileliquide
provenant de la pile entre en contact avec la peau, rincez-
laimmédiatementàl'eau.Sileliquidepénètredanslesyeux,
rincez-lesimmédiatementàl'eauclairependantaumoins10
minutes.Veuillezobtenirl’avisd’unmédecin.
•Nepasabîmerniincinérerdespiles,carcelles-cirisquent

17
FR
d’exploseràdestempératuresélevées.
AVERTISSEMENT : Pour recharger la pile, utilisez
uniquement l'adaptateur de charge amovible (YLJXC-256050)
livréaveccetappareil.
UTILISATION APPROPRIÉE
•L'appareildoitêtrerangéetchargéexclusivementàl'intérieur.
•Nepasexposerl’aspirateurauxrayonsdusoleil.
•Évitezd'exposerl'aspirateuràdessourcesdechaleur
excessives.
•Nepasexposerl'appareilàdestempératuresinférieuresà4°C
ousupérieuresà40°C.
•Gardezl’aspirateuràl’écartdevotrecorpslorsquevousutilisez
des buses et des tubes.
•Nepasutiliserd'adaptateurdechargeoudecâbleendommagé.
•Lorsquevousdébranchezlecâbledechargedusecteur,tirez
lacheelle-mêmepourleretirer;nepastirersurlecordon
d'alimentation.
•Nepastirerlecâbledechargepardessusdesbordstranchants
ni le laisser se coincer.
•Pourdesraisonsdesécurité,seulslefabricant,sonagentde
serviceoudespersonnesdûmentqualiéessontautorisésà
effectuerdesréparations.
•Nepasessayerdetoucherlabrosseàrouleaulorsque
l'aspirateurestenmarcheetquelabrosseàrouleautourne.
•Mettezhorstensionl'appareillorsquevousnel’utilisezpas.
•Lesélémentsdelapileàl’intérieurnedoiventpasêtre
démontés,court-circuitésniplacéscontreunesurface
métallique.
NE JAMAIS UTILISER CET ASPIRATEUR
• Dans des endroits humides.
• Sur des gravats.
•Enprésencedegazinammables,etc.
• Lorsque le produit montre des signes visibles
d’endommagement.
•Surdesobjetspointusoudesuides.
•Surdescendreschaudesoufroides,desmégotsdecigarettes
allumés,etc.
•Surdelapoussièrene,parexempleduplâtre,dubéton,dela
farine, des cendres chaudes ou froides.
•Sanssesltres.

18
FR
L'utilisationdel'aspirateurdanslescirconstancesénumérées
ci-dessus peut causer des blessures corporelles graves ou
endommager le produit. De telles blessures ou dommages ne
sont couverts ni par la garantie ni par le fabricant.
DÉBALLAGE ET CARACTÉRISTIQUES DU
PRODUIT
1 Port de charge 10
Voyant de niveau de charge des piles/
Voyant de charge des piles
2 Commutateurd’alimentation 11 Filtre(x2)(x1préinstallé)
3
Touchededéverrouillagedelaportedu
sacàpoussière
12 Cagedeltre
4 Tiged’aspiration 13 Sacàpoussière
5 Accessoire Pour Plancher À Moteur 14 Outilàusagesmultiples
6
ToucheDeDéverrouillageDel’Accessoire
Pour Plancher À Moteur
15 Montage mural
7 Touchededéverrouillagedelatige 16 Vis (x2)
8
Touchededéverrouillagedelatêtedu
moteur
17 Adaptateurs de charge
9 Commutateurderéglagedevitesse 18 Manueld’instructions

19
FR
MONTAGE
FONCTIONNEMENT
1. Videztoutlecontenudel'emballage;puisassurez-vousdedisposerdelatotalitéducontenu
ainsiquerépertoriéàlapage18.
2. Insérezl'aspirateurportatifdanslapartiesupérieuredelatiged'aspiration,puisverrouillez-le
jusqu'àcequevousentendiezundéclic(Fig.1).
3. Insérezlatigedanslecoldel’accessoirepourplancheràmoteurenveillantàcequ’aucun
objetnerestecoincéentrelesraccordementsdel’appareil.Assurez-vousquelatigese
verrouilleenplacejusqu'àcequevousentendiezundéclic(Fig.2.)
Fixation du support mural
Utilisezles2visfourniespourxerlesupportmuralaumur.Veillezàutiliserlesxations
appropriéesenfonctiondelastructuredumur.Montezleproduitàunehauteurminimumde44po
(1,12m)audessusdusol.Assurez-vousqu'aucuntuyaudeplomberie,câbleoulélectriquene
se trouve directement derrière la zone de montage (Fig. 3).
Alignezlesocledel’aspirateurportatifsurlesupportmural,puisfaites-lecoulisserainsiqu’illustré
sur la photo (Fig. 4).
REMARQUE:Pourpouvoirchargerl'aspirateurencoursdemontage,xezlesupportmuralsur
unmursituéà59po(1,5m)auplusd’uneprisedecourant(Fig.5).
ATTENTION:
Piècesmobiles!Anderéduiretousrisquesdeblessures,NEPAStoucherlabrosseàrouleau
lorsquel'aspirateurestenmarcheToutcontactaveclabrosseàrouleauenrotationpeutentraîner
desblessurescorporelles.Faitespreuvedeprudencelorsquevousfaitesfonctionnerl’appareilen
présenced'enfantsoud'animauxfamiliers(Fig.6).
AVERTISSEMENT!
Ne pas utiliser l'aspirateur sans un ltre xé en place.
1.Charge
REMARQUE : Chargez le bloc-batterie pendant au moins 4 heures avant la première utilisation.
Nejamaischargerlespilesàdestempératuressupérieuresà40°Couinférieuresà4°C.Ilest
normal que l'adaptateur de charge chauffe lors de la charge.
REMARQUE:Rechargezvotreaspirateurexclusivementàl’aideduchargeurfourni.
1) Avantdechargerl’aspirateur,assurez-vousquecelui-ciesthorstension(OFF).
2) Choisissezlachesouhaitéequis'adaptesurlecorpsdel'adaptateurdechargecorrespondant
àlarégiond'utilisation(Fig.7).
REMARQUE :LacheàtroisbrochesestdestinéeauRoyaume-Uni,tandisquelacheàdeux
brochesestcompatibleavecpresquetouslesautrespayseuropéens.
3) Insérezlachesouhaitéedansl’adaptateursecteurdecharge.Alignezlesrailsdesupport

20
FR
situéssurlecorpsdel’adaptateurdechargesurlesrailsdeguidagesituéssurl'insertdela
che(Fig.8).Faitescoulisserl'insertdelacheentièrementverslecorpsdel’adaptateurde
chargepourqu’ilseverrouilleenplacejusqu’àcequevousentendiezundéclic(Fig.9).
REMARQUE:Pourretirerlache,appuyezsurleloquetdedéverrouillagedel'adaptateurdecharge,
puisfaitescoulisserl'insertdelachepourledétacherducorpsdel’adaptateurdecharge(Fig.10).
4) Insérezlachedel'adaptateurdechargedansleportdechargesituésurlecôtédusocle
del'aspirateurportatif.Branchezl'adaptateuràuneprisedecourant.Levoyantdeniveaude
chargedespilescommenceàclignoterenbleu(Fig.11).
5) Le voyant de charge des piles indique la progression en cours de charge. Pendant la charge
du bloc-batterie, le voyant de charge des piles clignote en bleu. Une fois le produit entièrement
chargé,levoyantdechargedespilesafcheunelumièrebleuexe.
6) Lorsquelachargeestcomplète,retirezl’adaptateurdechargedel’aspirateur.
2. Utilisation De Votre Aspirateur
1) Pourdémarrerl'aspirateur,appuyezsurlecommutateurd'alimentation(
①
). Une fois le produit
en marche, le voyant de niveau de charge des piles (
②
)s’allume(Fig.12).
2) L'aspirateurestéquipédecommandesàdeuxvitesses,LOW(Faible)etHIGH(Élevée).
L'aspirateurdémarreenpositiondevitesseLOW(Faible).PourpositionnerlavitessesurHIGH
(Élevée),appuyezunefoissurlecommutateurderéglagedevitesse(
③
).Appuyezànouveau
surlecommutateurderéglagedevitessepourreveniràlavitesseLOW(Faible)(Fig.12).
3) Utilisezleréglagedevitessefaiblepournettoyerlessolsdursetlestapisàpoilscourts,ou
lorsqu'uneduréedefonctionnementaccrueestrequise.Leréglagedevitesseélevéedoitêtre
utilisépournettoyerlestapisetmoquettesàpoilslongsoulorsqu'unepuissancedenettoyage
supplémentaireestnécessaire.
4) Pour arrêter l'aspirateur, appuyez une fois sur le commutateur d'alimentation.
5) Lesvoyantsdeniveaudechargedespiless’allumentpourvousindiquerleniveaudecharge
despilesàtoutmoment.
REMARQUE:Pouraméliorerlesperformancesdespiles,ilestrecommandédechargerl'appareil
lorsquelevoyantdeniveaudechargedespiless’allumeenjauneencoursdefonctionnementet
deretirerl'adaptateurdechargedel'appareilunefoislespilesentièrementchargées.
Voyant de charge des
piles
État
Voyant bleu clignotant Charge en cours
Voyantbleuxe Charge complète
Voyant
de
charge
des piles
Voyant
du
niveau de
charge
des piles
Voyant du niveau de
charge des piles
Puissance des piles
Bleu,xe de75%à100%
Vert,xe de50%à74%
Jaune,xe
de25%à49%
(Rechargerecommandée)
Rouge,xe de10%à24%
Rouge, clignotant
0à9%
(Recharge requise)
La page charge ...
La page charge ...
La page charge ...
La page charge ...
La page charge ...
La page charge ...
La page charge ...
La page charge ...
La page charge ...
La page charge ...
La page charge ...
La page charge ...
La page charge ...
La page charge ...
La page charge ...
La page charge ...
La page charge ...
La page charge ...
La page charge ...
La page charge ...
La page charge ...
La page charge ...
La page charge ...
La page charge ...
La page charge ...
La page charge ...
La page charge ...
La page charge ...
La page charge ...
La page charge ...
La page charge ...
La page charge ...
La page charge ...
La page charge ...
La page charge ...
La page charge ...
La page charge ...
La page charge ...
La page charge ...
La page charge ...
La page charge ...
La page charge ...
La page charge ...
La page charge ...
La page charge ...
La page charge ...
La page charge ...
La page charge ...
La page charge ...
La page charge ...
La page charge ...
La page charge ...
-
 1
1
-
 2
2
-
 3
3
-
 4
4
-
 5
5
-
 6
6
-
 7
7
-
 8
8
-
 9
9
-
 10
10
-
 11
11
-
 12
12
-
 13
13
-
 14
14
-
 15
15
-
 16
16
-
 17
17
-
 18
18
-
 19
19
-
 20
20
-
 21
21
-
 22
22
-
 23
23
-
 24
24
-
 25
25
-
 26
26
-
 27
27
-
 28
28
-
 29
29
-
 30
30
-
 31
31
-
 32
32
-
 33
33
-
 34
34
-
 35
35
-
 36
36
-
 37
37
-
 38
38
-
 39
39
-
 40
40
-
 41
41
-
 42
42
-
 43
43
-
 44
44
-
 45
45
-
 46
46
-
 47
47
-
 48
48
-
 49
49
-
 50
50
-
 51
51
-
 52
52
-
 53
53
-
 54
54
-
 55
55
-
 56
56
-
 57
57
-
 58
58
-
 59
59
-
 60
60
-
 61
61
-
 62
62
-
 63
63
-
 64
64
-
 65
65
-
 66
66
-
 67
67
-
 68
68
-
 69
69
-
 70
70
-
 71
71
-
 72
72


Vacmaster Orson Lite VSE2101EU Manuel utilisateur
- Taper
- Manuel utilisateur
dans d''autres langues
Autres documents
-
Shark IZ251EUT DUOCLEAN MULTIFLEX Le manuel du propriétaire
-
Hoover BH53120 Manuel utilisateur
-
KALORIK WFVC 44452 W Manuel utilisateur
-
-
Miele 11423920 Manuel utilisateur
-
Miele Triflex HX1 Robijnrood Le manuel du propriétaire
-
Miele TRIFLEX HX1 POWER Le manuel du propriétaire
-
-
 Jimmy JV71 Manuel utilisateur
-
 Jimmy JV63 Manuel utilisateur

