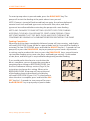
Infinity MOOG-INFORNG Small Volume Enteral Feeding Pump Manuel utilisateur
- Taper
- Manuel utilisateur

OPERATOR’S MANUAL


© Copyright 2022 Moog, Inc.
i
Page
ENGLISH ...................................................................... ii
FRANCAIS .................................................................. 49

Innity® Orange® Operator’s Manual ii
TABLE OF CONTENTS
Page
TABLE OF CONTENTS ............................................................................................. i
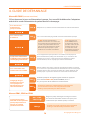
PRODUCT OVERVIEW ............................................................................................ iii
INDICATIONS FOR USE ......................................................................................... iii
LIST OF WARNINGS AND CAUTIONS .................................................................. iv
Warnings .......................................................................................................................................... iv
1. PUMP COMPONENTS ......................................................................................... 1
Innity Orange Small Volume Enteral Feeding Pump ............................................... 1
Keypad .............................................................................................................................................. 3
Display .............................................................................................................................................. 4
Disposable Set .............................................................................................................................. 5
Symbols ............................................................................................................................................ 6
2. DIRECTIONS FOR USE ....................................................................................... 7
Priming and Loading the Disposable Set ........................................................................ 7
Operating the Pump
A Single Feeding Example ................................................................................................... 10
The Battery ..................................................................................................................................... 14
Running on Battery Power ................................................................................................ 14
Charging the Battery ............................................................................................................ 15
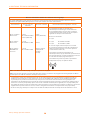
User Preference Settings .......................................................................................................... 16
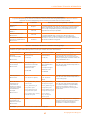
ALARMS, MESSAGES, AND INDICATIONS .......................................................... 19
TROUBLESHOOTING GUIDE .................................................................................. 26
CLEANING ............................................................................................................... 29
ACCESSORIES .......................................................................................................... 30
SPECIFICATIONS ..................................................................................................... 33
IMPORTANT PEDIATRIC CONSIDERATIONS ........................................................ 35
ADDITIONAL TECHNICAL INFORMATION ........................................................... 36
WARRANTY ............................................................................................................. 38
LIST OF FIGURES ................................................................................................... 39
WHO TO CALL ........................................................................................................ 42
INDEX ...................................................................................................................... 43

© Copyright 2022 Moog, Inc.
iii
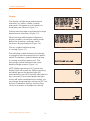
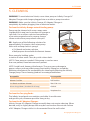
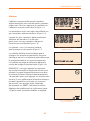
PRODUCT OVERVIEW
The Innity® Orange® is a rotary peristaltic enteral feeding pump designed to
deliver programmed doses of enteral nutrition solutions at selectable rates. It
is easy to use with a simple user interface and keypad. Moog technology allows
an accuracy rate of +/- 5% and the ability to safely operate in any orientation.
The Innity Orange system includes a complete line of delivery sets that are
made with materials that do not contain the plasticizer DEHP or natural rubber
latex. All Innity delivery sets feature automatic free-ow protection.
The Innity Orange is designed for both hospital and alternate site
care use. It is durable, water resistant, and easily carried in a Moog
carry pack. The Innity Orange’s size, weight, accuracy, and portability
promote and support health improving physical activity.
Enteral feeding is considered a medical procedure and following the instructions
for use in the Operator Manual is important for the pump to operate normally.
INDICATIONS FOR USE
The Innity Orange enteral feeding pump is a rotary peristaltic pump designed
to deliver programmed doses of enteral nutrition solutions at selectable rates.

Innity® Orange® Operator’s Manual iv
LIST OF WARNINGS AND CAUTIONS
Be sure to carefully read the following warnings and cautions. Failure to
review all the warnings and cautions can cause harm to the operator or
patient. Healthcare personnel who provide training to lay users should be
sure to review all the warning and cautions with the lay user. If there is a
change in the performance of the pump, contact customer service.
WARNINGS
4 Use ONLY feeding solutions prescribed by the responsible
physician, registered dietitian, registered nurse, or other licensed
practitioner. Failure to do so may result in harm to the patient.
4 Use ONLY Innity brand disposable sets to ensure proper uid
delivery. Others will not deliver the correct dose, may allow dangerous
free-ow conditions, and may generate hazardous uid pressures
which may activate occlusion alarms at unpredictable pressures.
4 Low ow rates, combined with high dose settings may exceed the life of the
disposable set. The disposable bag and screw cap sets must be replaced every
24 hours and the spike sets must be replaced every 48 hours (max 1.5 L) to
maintain delivery accuracy, allow proper air and occlusion sensing, and prevent
growth of bacteria. DO NOT PROGRAM RATE AND DOSE COMBINATIONS
WHICH EXCEED A 24 HOUR FEED REGIMEN FOR THE DISPOSABLE BAG AND
SCREW CAP SETS OR A 48 HOUR FEED REGIMEN FOR THE SPIKE SETS.
4 The battery capacity is an approximation. If you are unsure that
enough capacity remains for your intended use, recharge it. Failure
to do so may result in delayed or under-delivered therapy.
4 To avoid electrical shock, never clean pump with charger
plugged into an outlet or when pump is on.
4 To avoid electrical shock, make sure the Innity AC Adapter/Charger
is completely dry before plugging into an electrical outlet.
4 Do not use Innity Orange enteral feeding pump for delivery
of non-enteral solutions. Serious injury may result.
4 Proper operation of pump requires door to be closed and latched.
Make sure door is closed and latched when motor is running.

© Copyright 2022 Moog, Inc.
v
4 If an error occurs (ER01 - ER99 will appear in display), check all settings
and volume counters and verify before starting a feeding. Failure
to do so may result in delayed or under-delivered therapy.
4 No modication of this equipment is allowed including the pump,
disposable sets, and accessories. Modication can result in delayed
therapy, over or under delivery, electrocution, injury, or death.
4 Prior to starting the pump, conrm rate, dose, and food type are
programmed as prescribed to avoid an unsafe feeding condition.
4 Device contains small parts. Dispose of or store connector cap when
not in use to avoid choking hazard for children under 3 years.
4 Avoid leaving tubing and cords where infants, children, or those deemed at high
risk for medical line entanglement, can become entangled. Be aware that if these
items become wrapped around a patient’s neck, there is an increased risk of
strangulation or death. Caregivers of patients who are at risk for entanglement
should discuss with their health care provider how to properly manage their
lines and properly monitor patients based on their needs while in use.

Innity® Orange® Operator’s Manual vi
CAUTIONS
4 Federal law (U.S.A.) restricts this device to sale by or on the order of a physician,
registered dietitian, registered nurse, or other licensed practitioner.
4 Dispose of the Innity Pump, Innity Orange Pump and
Disposable Sets properly, as required by local law.
4 If any leaks are detected in the disposable set, stop pump operation
and disconnect set from patient and replace with a new disposable
set. Failure to do so may result in under-delivered therapy.
4 Care should be used when manually priming delivery set
to ensure cassette is not damaged by excess force.
4 Do not overload carry packs with personal items. Pump function may be
aected by kinked or pinched tubing and/or unintentional button presses.
4 The Innity Orange uses an optical air-in-line sensor to detect air in the
tubing as it passes through the pump, causing the pump to alarm if feeding
is inadvertently interrupted or when feeding is complete. It is important
to keep this sensor free of debris including spilled uids or food that may
adhere to the sensor and prevent proper detection of air in the tubing.
The clinician and caregiver should be trained regarding the care, use,
and maintenance of the Innity Orange pump and accessories, including
proper cleaning of the area around the optical air-in-line sensor.
4 Use ONLY commercially available pre-packed or commercially prepared
feeding solutions formulated for use with a feeding pump that are
prescribed by a licensed health care provider or dietitian.
4 DO NOT USE HOMEMADE BLENDERIZED OR LIQUIDIZED FOODS, OR OTHER
NON-PRESCRIBED, NON-COMMERCIALLY AVAILABLE FEEDING SOLUTIONS.
Use of homemade blenderized or other non-prescribed feeding solutions
may cause sticky solids which could cause an obstruction of the optical
sensor. It is recommended that all users clean and maintain the pump
and optical sensors according to manufacturer’s recommendations.
4 The use of commercially available blenderized formula (HCPCS Code:
B4149) can impact pump accuracy and performance. It is recommended
to follow the formula manufacture guidelines for pump use.

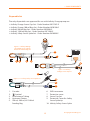
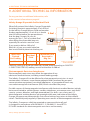
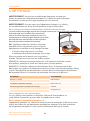
1. PUMP COMPONENTS
1
1
3
5
6
7
8
9
2
4
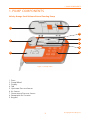
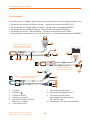
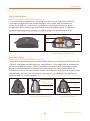
1. PUMP COMPONENTS
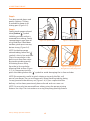
Innity Orange Small Volume Enteral Feeding Pump
1. Door
2. Pump Wheel
3. Display
4. Tab
5. Upstream Pressure Sensor
6. Air Sensor
7. Downstream Pressure Sensor
8. Receptacle for Cassette
9. Keypad
Figure 1-1 Pump: Front
© Copyright 2022 Moog, Inc.

Innity® Orange® Operator’s Manual 2
1. PUMP COMPONENTS
Innity Orange Small Volume Enteral Feeding Pump
1. Serial Number Label
2. Charger/Power Connector
3. Receptacle for Pole Clamp
4. Speaker
5. Pump Instruction Label
1
2
3
4
5
Figure 1-2 Pump: Rear

1. PUMP COMPONENTS
© Copyright 2020 Moog, Inc.
3
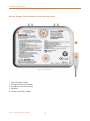
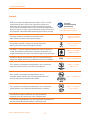
Keypad
Press ON/OFF key for 1.5 seconds to
either turn Innity Orange on or o.
Press and hold PRIME key to
rapidly ll disposable set with
uid. Release key to stop.
Press RUN/PAUSE key to start or
pause pump, or to clear an alarm.
Press FOOD TYPE key to display and select type of
food to be delivered (formula or human milk).
Press VOL/TOTAL key once to display volume delivered for current
feeding. Press key again to display total cumulative volume
delivered in all feed cycles since total volume was last cleared.
Press RATE/DOSE key to transition between rate
and dose settings, and to conrm settings.
Press CLEAR key to reset displayed function to its minimum
value. Press and hold for three seconds to clear rate, dose, and
volume delivered to minimum values at the same time.
Press + key to increase displayed feed function. Press
and hold key to increase value rapidly.
Press - key to decrease displayed feed function. Press
and hold key to decrease value rapidly.
NOTE: The following keys only function when pump
is in pause mode: PRIME, CLEAR, +, and -.
Figure 1-3 Keypad Layout

Innity® Orange® Operator’s Manual 4
1. PUMP COMPONENTS
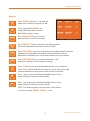
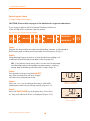
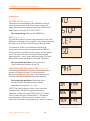
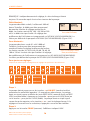
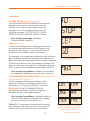
Display
The display includes large alphanumeric
characters, as well as smaller symbols
and words. All segments and symbols on
the display are shown in Figure 1-4.
Settings and messages are displayed in large
alphanumeric characters (Figure 1-5).
When the large alphanumeric characters
display numbers, one of the smaller words
below the characters indicates which
function is being displayed (Figure 1-6).
The run symbol indicates pump
is running (Figure 1-7).
The wall plug symbol indicates the charger
is plugged in and connected to a live power
outlet. The battery symbol indicates pump
is running on battery power only. The
fuel gauge symbol indicates how much
battery charge remains (Figure 1-8).
NOTE: When operating on A/C power the
display light will remain on. When operating
on battery power the display light will
automatically turn o 10 seconds after the last
key is pressed. If you would prefer the light
to turn o when connected to an outlet, you
can change the pump light setting to OFF. See
the User Preference Settings section (Page
16) for instructions to change this setting.
Figure 1-4 Display Segments
Figure 1-5 Alphanumeric
Characters and Units
Figure 1-6 Setting Indicators
Figure 1-7 Run Indicators
Figure 1-8 Power Indicators

1. PUMP COMPONENTS
© Copyright 2020 Moog, Inc.
5
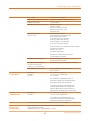
Disposable Set
The only disposable sets approved for use with Innity Orange pump are:
4 Innity Orange Screw Cap Set - Order Number INFOCAP-E
4 Innity Orange 100 ml Bag Set - Order Number INF0100-E
4 Innity 500 ml Bag Set - Order Number INF0500-E
4 Innity 1200 ml Bag Set - Order Number INF1200-E
4 Innity Safety Screw Spike Set - Order Number INF0020-E
1. Cassette
2. “ ” Symbol
3. Downstream Tubing
4. Upstream Tubing
5. 100 ml, 500 ml, or 1200 ml
Feeding Bag
6. ENFit connector
7. Protective cover
8. Screw Cap Set
9. Protective Cover for Safety
Screw Spike tip
10. Innity Safety Screw Spike
Figure 1-9 Innity Orange
100 ml Bag Set, or Innity
500 ml or 1200 ml Bag Set
21 3 4
5
6
7
Figure 1-11 Innity Safety Screw Spike Set 10
9
Figure 1-10 Innity
Orange Screw Cap Set
8
6
7
6
7

Innity® Orange® Operator’s Manual 6
1. PUMP COMPONENTS
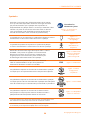
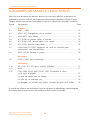
Symbols
Brief instructions for operation of pump as well as a brief
explanation of each alarm message which pump may
communicate are printed on the label attached to pump.
These are not intended to be used in place of the Operator’s
Manual. They are simply a quick reference guide. Please read
the Operator’s Manual before operating the Innity Orange.
Consult
Accompanying
Documents
Figure 1-12 Consult
Accompanying Documents
The bag symbol is printed on pump door over
port where upstream tubing enters pump.
Figure 1-13 Feeding
Bag Connection
The patient symbol is printed on pump door over
port where downstream tubing exits pump.
Figure 1-14 Patient
Connection
EN 60601-1 Type BF degree of protection against electrical
shock. No electrical connection to patient. Drop from any
angle from height of 3 feet shall not damage pump operation.
Figure 1-15 TYPE BF
Shock Protection
EN 60529 degree of protection against water entering the
enclosure. Water jets from any direction shall have no eect. IP25 Figure 1-16 EN 60529
This symbol is printed on pump delivery sets. It indicates
only one patient should use each disposable set.
Figure 1-17 Single
Patient Use
This symbol is printed on pump delivery sets. It
indicates pump delivery sets are made with materials
that do not contain the plasticizer DEHP
Figure 1-18 DEHP-free
This symbol is printed on pump delivery sets. It indicates
pump delivery sets should be replaced every 24 hours.
Figure 1-19 Replace
Every 24 Hours
The Innity pump and delivery sets are made with
materials that do not contain natural rubber latex.
The Innity pump delivery sets are made with materials that
do not contain Bisphenol A (BPA) in the uid path.

2. DIRECTIONS FOR USE
© Copyright 2022 Moog, Inc.
7
2. DIRECTIONS FOR USE
Recommendation for First Use:
Since battery may not be fully charged when pump
is rst received, it is recommended that battery be
charged for 6 hours prior to operating on battery
power (see Page 15 for additional information).
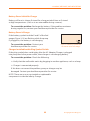
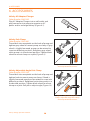
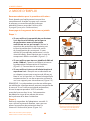
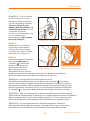
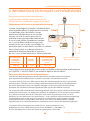
Priming and Loading the Disposable Set
Step 1:
4If you are using the Innity Safety Screw
Spike Set with a vented bottle or pre-lled
bag: Remove protective cover from tip, then
insert tip into formula exit port of container.
If using the Innity Safety Screw Spike Set,
secure the tip by tightly screwing threaded
components together. (Figure 2-1).
4 If you are using the 100ml, 500ml, or 1200ml
disposable set: Hold bag upright and pour in
feeding solution (Figure 2-2). Close cap securely.
4 If you are using the Screw Cap delivery set:
Fill a feeding bottle/container with a 40 mm
opening and secure it to the screw cap. Place
the bottle/container into the suspension bag
and secure the bag to an IV pole (Figure 2-3).
NOTE: Blenderized or aggressively mixed solutions may
have foam. If using this type of solution, allow it to sit
for 10 to 15 minutes before pouring into bag. This will
reduce the chance of an alarm due to air in the tubing.
Step 2:
Remove protective cover from transitional stepped
connector. If using pole clamp, protective cover may
be placed in the groove on back of clamp (Figure 2-4).
NOTE: If set is to be used with a carry pack, all
air must be removed from bag and tubing.
Continue to step 3 for instructions on
removing air. If set is to be hung above pump,
i.e. on an IV pole, you may skip to step 4.
Figure 2-1 Screw Tip Into Container
Figure 2-2 Fill Bag
Figure 2-4 Remove Cover from
Transitional Stepped Connector
/ Place Cover on Pole Clamp
Cover Receptacle
Figure 2-3 Fill Screw Cap Set

Innity® Orange® Operator’s Manual 8
2. DIRECTIONS FOR USE
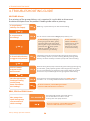
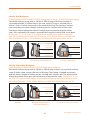
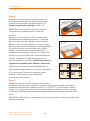
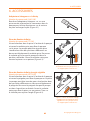
Step 3:
Turn bag upside down and
gently squeeze. Tilt bag
as needed to keep air at
tubing port (Figure 2-5).
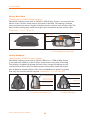
Step 4:
Gently pinch orange colored
tubing below “ ” symbol.
Hold this position until air is
removed from tubing. Gently
squeeze bag at same time to
assist uid ow. If uid does
not ow, pinch pressure may
be too strong. (Figure 2-6).
NOTE: Inside the orange
colored tubing, below the “ ”
symbol is the in-line occluder.
The in-line occluder is the
built-in anti free-ow valve.
By pinching tubing gently,
the tubing moves away
from the in-line occluder
allowing uid to ow (Figure
2-7). It is important to only
pinch the tubing below the “ ” symbol to avoid damaging the in-line occluder.
NOTE: Be extremely careful to pinch tubing using only the at, soft
part of your nger. Do not use ngernails when pinching tubing; doing
so may puncture the delivery set (Figure 2-8). If you suspect that the
delivery set has been punctured, please discard and use a new set
NOTE: Air may also be removed from tubing using the pump priming
feature. See step 7 for instructions on using the pump priming feature.
Figure 2-5 Squeeze Bag Figure 2-6 Pinch Tubing
Figure 2-7 Tubing
Segment Being Pinched
Figure 2-8 Tubing Segment
Being Punctured by Fingernail

2. DIRECTIONS FOR USE
© Copyright 2022 Moog, Inc.
9
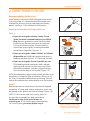
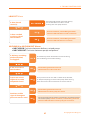
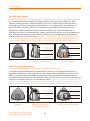
Step 5:
Loop silicone tubing around pump wheel
stretching lightly. Place cassette into pump
(Figure 2-9). Close pump door (Figure 2-10).
NOTE: See pages 31-32 for pump use with a backpack.
Step 6:
Press and hold ON/OFF key for 1.5 seconds to
turn pump on. While pump runs through a self
test, display will light and an audible alarm will
sound as pump displays the nine digit serial
number three digits at a time for one second each.
The display will then show the letter ‘N’ followed
by a number, which is the software revision.
Next, all segments of display will be
shown for 2 seconds. Verify all display
segments and symbols are active.
The self test is complete and pump will then display
last programmed rate and will be in pause mode.
If any air is still in the tubing, continue to
Step 7 to use pump prime feature.
Step 7:
Press and hold PRIME key. Alarm will sound once
and pump will begin pumping at an approximate
rate of 360 ml/hr. Display will read “TO STOP LET GO”
(Figure 2-11). Once all air is removed from tubing,
release key. Pump will stop, display will revert to last
programmed rate, and pump will be in pause mode.
NOTE: occlusion and air in line alarms are disabled while priming
Figure 2-9 Seat Cassette
Figure 2-10 Close Pump Door
Figure 2-11 Priming Indication

Innity® Orange® Operator’s Manual 10
2. DIRECTIONS FOR USE
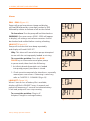
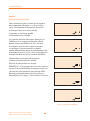
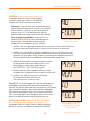
Operating the Pump
A Single Feeding Example
CAUTION: Please refer to pages vi for additional usage considerations.
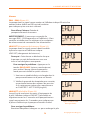
If you want to deliver 50 ml of enteral feeding solution at
a rate of 100 ml/hr and then stop the pump:
Key Sequence for “A Single Feeding Example”
100 ml/h 50 ml
FORM ULA
HUMN MILK
Step 1:
Prepare the disposable set with enteral feeding solution as described in
the Priming and Loading the Disposable Set instructions (Page 7).
Step 2:
Hang feeding bag or container so that the bottom of bag is at
or above the level of the pump door (refer to page 35).
OR - If an Innity brand carry pack is to be used, load pump
and feeding bag into the proper compartments, securing
pump, bag and tubing with the pack’s straps (Page 31).
Step 3:
Turn pump on by pressing the ON/OFF
key. After running the self test, display
will show last programmed rate.
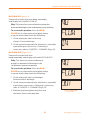
Step 4:
Press the + or - key to change the rate to 100 ml/hr.
Hold down either key to change rapidly (Figure 2-12).
Step 5:
Press the RATE/DOSE key to display dose. Press the +
or - key until a dose of 50 ml is displayed (Figure 2-13).
Figure 2-13 Program
Dose to 50 ml
Figure 2-12 Program
Rate to 100 ml/hr

2. DIRECTIONS FOR USE
© Copyright 2022 Moog, Inc.
11
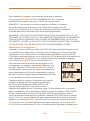
Step 6
Conrm food type to be delivered (formula or
human milk) before starting pump by pressing
the FOOD TYPE key. Press the + or - key to
change between formula and human milk.
Step 7
Connect end of disposable set to the patient’s
enteral feeding tube (Figure 2-14).
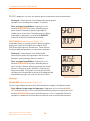
Step 8
Press the RUN/PAUSE key. Pump will begin running.
Display will show programmed rate and the arcs
around the run symbol will rotate (Figure 2-15).
While pump is running, the following may
be viewed by pressing the appropriate
key: RATE, DOSE, and FOOD TYPE.
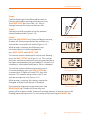
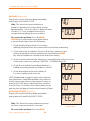
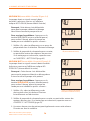
To view the amount delivered in the current feeding,
press the VOL/TOTAL key (Figure 2-16). This counter
will reset itself when the previously programmed dose
has been completed and a new feeding is started, or if
a feeding is interrupted and Rate or Dose is changed.
To view the amount delivered over the course
of several feedings press the VOL/TOTAL key
a second time. Display will read TOTL then the
amount. This counter never resets itself. It can
only be reset by the user (Figure 2-17).
While pump is running, the settings cannot be
changed and the Prime feature is disabled.
If you want to stop pump at any time, press the
RUN/PAUSE key. Display will show rate, and
pump will be in pause mode. Pump will save the memory of where it was in the
feeding before being paused. Or, turn pump o by pressing the ON/OFF key.
Figure 2-17 Total
Amount Delivered
Figure 2-15 Pump is Running
Figure 2-16 Amount
Currently Delivered
Figure 2-14 Connect disposable
set to feeding tube

Innity® Orange® Operator’s Manual 12
2. DIRECTIONS FOR USE
To restart pump when in paused mode, press the RUN/PAUSE key. The
pump will restart the feeding at the point where it was paused.
NOTE: If pump is turned o and turned back on again, the volume delivered
counter resets to 0 and food type resets to formula. Rate, dose, and food
type must be conrmed before restarting the pump with a new feeding.
NOTE: ANY CHANGES TO PUMP SETTINGS EXCEPT FOOD TYPE DURING
A FEEDING CYCLE WILL CAUSE PUMP TO START A NEW FEEDING; IT WILL
NOT START WHERE IT LEFT OFF. RATE, DOSE, AND FOOD TYPE MUST BE
CONFIRMED BY VIEWING EACH PARAMETER BEFORE RESTARTING THE PUMP.
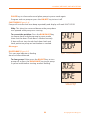
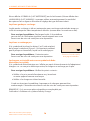
Feeding Completion:
When the dose has been completely delivered, pump will stop running, and display
will read DOSE DONE. Pump will be in a pause mode until it is turned o or feeding is
restarted. To clear DOSE DONE, press and hold the ON/OFF key for 1.5 seconds to turn
pump o, or press the RUN/PAUSE key to put pump in pause mode. Adjustments
to settings can be made at this time, or press the RUN/PAUSE key a second time to
start another feeding using same rate, dose, and food type settings. Conrmation
of rate, dose, and food type is required before beginning another feeding.
If you would prefer the alarm to sound when the
dose is complete, you can change the pump dose
complete alarm setting to BEEP WHEN DONE. See
the User Preference Settings section (Page 16) for
instructions to change this setting. When set to
BEEP WHEN DONE, the pump will stop at the end
of the feeding, beep intermittently, and display
will read DOSE DONE (Figure 2-18). To silence alarm
when the dose is complete, press and hold the ON/
OFF key for 1.5 seconds to turn pump o, or press
the RUN/PAUSE key to put pump in pause mode. Figure 2-18 DOSE DONE
La page est en cours de chargement...
La page est en cours de chargement...
La page est en cours de chargement...
La page est en cours de chargement...
La page est en cours de chargement...
La page est en cours de chargement...
La page est en cours de chargement...
La page est en cours de chargement...
La page est en cours de chargement...
La page est en cours de chargement...
La page est en cours de chargement...
La page est en cours de chargement...
La page est en cours de chargement...
La page est en cours de chargement...
La page est en cours de chargement...
La page est en cours de chargement...
La page est en cours de chargement...
La page est en cours de chargement...
La page est en cours de chargement...
La page est en cours de chargement...
La page est en cours de chargement...
La page est en cours de chargement...
La page est en cours de chargement...
La page est en cours de chargement...
La page est en cours de chargement...
La page est en cours de chargement...
La page est en cours de chargement...
La page est en cours de chargement...
La page est en cours de chargement...
La page est en cours de chargement...
La page est en cours de chargement...
La page est en cours de chargement...
La page est en cours de chargement...
La page est en cours de chargement...
La page est en cours de chargement...
La page est en cours de chargement...
La page est en cours de chargement...
La page est en cours de chargement...
La page est en cours de chargement...
La page est en cours de chargement...
La page est en cours de chargement...
La page est en cours de chargement...
La page est en cours de chargement...
La page est en cours de chargement...
La page est en cours de chargement...
La page est en cours de chargement...
La page est en cours de chargement...
La page est en cours de chargement...
La page est en cours de chargement...
La page est en cours de chargement...
La page est en cours de chargement...
La page est en cours de chargement...
La page est en cours de chargement...
La page est en cours de chargement...
La page est en cours de chargement...
La page est en cours de chargement...
La page est en cours de chargement...
La page est en cours de chargement...
La page est en cours de chargement...
La page est en cours de chargement...
La page est en cours de chargement...
La page est en cours de chargement...
La page est en cours de chargement...
La page est en cours de chargement...
La page est en cours de chargement...
La page est en cours de chargement...
La page est en cours de chargement...
La page est en cours de chargement...
La page est en cours de chargement...
La page est en cours de chargement...
La page est en cours de chargement...
La page est en cours de chargement...
La page est en cours de chargement...
La page est en cours de chargement...
La page est en cours de chargement...
La page est en cours de chargement...
La page est en cours de chargement...
La page est en cours de chargement...
La page est en cours de chargement...
La page est en cours de chargement...
La page est en cours de chargement...
La page est en cours de chargement...
La page est en cours de chargement...
La page est en cours de chargement...
La page est en cours de chargement...
La page est en cours de chargement...
La page est en cours de chargement...
La page est en cours de chargement...
La page est en cours de chargement...
La page est en cours de chargement...
La page est en cours de chargement...
La page est en cours de chargement...
-
 1
1
-
 2
2
-
 3
3
-
 4
4
-
 5
5
-
 6
6
-
 7
7
-
 8
8
-
 9
9
-
 10
10
-
 11
11
-
 12
12
-
 13
13
-
 14
14
-
 15
15
-
 16
16
-
 17
17
-
 18
18
-
 19
19
-
 20
20
-
 21
21
-
 22
22
-
 23
23
-
 24
24
-
 25
25
-
 26
26
-
 27
27
-
 28
28
-
 29
29
-
 30
30
-
 31
31
-
 32
32
-
 33
33
-
 34
34
-
 35
35
-
 36
36
-
 37
37
-
 38
38
-
 39
39
-
 40
40
-
 41
41
-
 42
42
-
 43
43
-
 44
44
-
 45
45
-
 46
46
-
 47
47
-
 48
48
-
 49
49
-
 50
50
-
 51
51
-
 52
52
-
 53
53
-
 54
54
-
 55
55
-
 56
56
-
 57
57
-
 58
58
-
 59
59
-
 60
60
-
 61
61
-
 62
62
-
 63
63
-
 64
64
-
 65
65
-
 66
66
-
 67
67
-
 68
68
-
 69
69
-
 70
70
-
 71
71
-
 72
72
-
 73
73
-
 74
74
-
 75
75
-
 76
76
-
 77
77
-
 78
78
-
 79
79
-
 80
80
-
 81
81
-
 82
82
-
 83
83
-
 84
84
-
 85
85
-
 86
86
-
 87
87
-
 88
88
-
 89
89
-
 90
90
-
 91
91
-
 92
92
-
 93
93
-
 94
94
-
 95
95
-
 96
96
-
 97
97
-
 98
98
-
 99
99
-
 100
100
-
 101
101
-
 102
102
-
 103
103
-
 104
104
-
 105
105
-
 106
106
-
 107
107
-
 108
108
-
 109
109
-
 110
110
-
 111
111
-
 112
112


Infinity MOOG-INFORNG Small Volume Enteral Feeding Pump Manuel utilisateur
- Taper
- Manuel utilisateur
dans d''autres langues
Autres documents
-
 Compat DualFlo 199255 Mode d'emploi
-
 Compat DualFlo 199255 Mode d'emploi
-
Occlusion Cuff Elite Blood Flow Restriction Bands Mode d'emploi
-
Ortovox POCKET SPIKE Mode d'emploi
-
 Ismatec ISM918A Mode d'emploi
-
Whirlpool WFW9500TC01 Troubleshooting guide
-
 Philips AVENT ISIS iQ DUO SCF294/21 Manuel utilisateur
-
-
-
Agilent Technologies LC 1220 90 60 Manuel utilisateur


