
User Manual
ENGLISH – Pages 1-18
FRANÇAIS – Pages 19-35
ESPAÑOL – Páginas 36-52
DEUTSCH – Seiten 53-69
ITALIANO – Pagine 70-86
LD2-Full_Manual Rev19LIT# LD2-160324

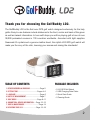
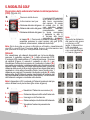
• 1 LD2 GPS Golf Watch
• 1 USB Charging/Data Cable
• 1 Quick Start Guide
• 1 Cleaning Brush
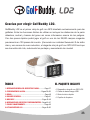
The GolfBuddy LD2 is the rst ever GPS golf watch designed exclusively for the lady
golfer. Easy-to-use features include distances to the front, center and back of the green
as well as hazard information. In two swift steps you will be playing golf at one of over
38,000 preloaded courses in 130 countries worldwide. Accented with light sapphire
Swarovski ® crystals and a genuine leather band, the stylish LD2 GPS golf watch will
make you the envy of the club, lowering your scores and raising the standards!
2
Thank you for choosing the GolfBuddy LD2.
PACKAGE INCLUDESTABLE OF CONTENTS
1. DEVICE OVERVIEW & CHARGING .....................Page 3
2. SETTING TIME.......................................Pages 4–5
3. LANGUAGE.................................................Page 6
4. UNITS OF MEASUREMENT............................Page 7
5. GOLF MODE.........................................Page 8–11
6. ODOMETER & DEVICE INFORMATION.....Page 12–13
7. CARE & MAINTENANCE.............................Page 14
8. UPDATING YOUR LD2...........................Page 15–18

1. DEVICE OVERVIEW & CHARGING
I.
I.
II.
III.
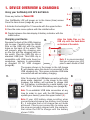
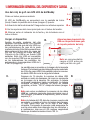
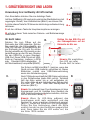
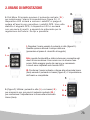
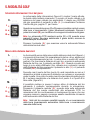
Using your GolfBuddy LD2 GPS Golf Watch
Press any button to Power ON.
Your GolfBuddy LD2 will power on to the Home (time) screen.
From the time screen (image A.) you can:
I. Activate the backlight for 10 seconds with the upper button.
II. View the main menu options with the middle button.
III. Toggle between the date display & battery indicator with the
lower button.
Charging your Device
Squeeze the back of the USB charging
clip to open. Carefully align the Guide
Pins on the USB clip with the guide
holes on the back of the watch. This
will properly align the charging pins
on the clip with the charging ports on
the watch. Plug the USB clip into a
standard USB port. This USB clip is
compatible with USB ports found on
computers, laptops, in automobiles,
or standard 5V AC USB chargers
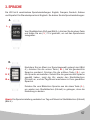
(image B.). The screen shown in the image to the left (image
C.) will display when the device is connected to the
USB charging clip. This screen indicates USB data
connection as well as battery charging.
After 15 minutes, the USB data connection will enter
sleep mode, depicted in the image to the right;
however, the battery will continue to charge until
full. Full battery is indicated by a solid battery icon
and "100%" text below the battery icon (image D.).
Note: To re-establish USB data connection at any
time (in order to sync with the GB Manager and
update your device), press the upper button ( I. ).
Note: If your LD2 battery stops scrolling when
connected and shows a low-battery icon (image
C.), it indicates that a full charge has not been
achieved. Check your connection to make sure
the pins are properly aligned with the contacts,
then allow the LD2 to charge until the battery
shows 100%. 3
Align the Guide Pins on the
USB clip with the Guide Holes
on the back of the watch.
Note: It is recommended
that you charge your LD2
prior to each round of Golf
A.
B.
C. D.

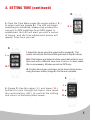
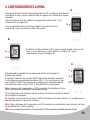
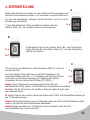
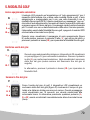
Set your time when you unpackage your LD2, and anytime you want
to update your clock, such as when traveling to dierent timezones.
To set your time, follow steps 1 – 5 below (continues on page 5).
1. From the Home (time) screen (image A.) press the center
button ( II. ) to access the Main Menu.
2. Use the lower button ( III. ) to navigate to the clock icon, then
press the center button ( II. ) to select the Clock icon (image B.).
3. The Time Options screen (image C.) will display. From here you can:
I. Adjust Daylight Savings Time (DST) using the upper button.
The default setting is ON +1. In areas that observe DST, this is
the setting used from Spring – Autumn. , use OFF -1 from
Autumn – Spring.
Note: After a 4-second delay, the LD2 will return to the home (time)
screen, and the time will be updated accordingly.
II. Set Time using the middle button (see item 4. on next page).
III. Change time format (12/24) using the lower button. The default setting is 12-Hour
Clock.
Note: After a 4-second delay, the LD2 will return to the home (time) screen, and the clock
will be updated accordingly.
Note: If no selection is made within15 seconds, the LD2 will return to the Home (Time) screen).
4
2. SETTING TIME
II.
II.
III.
II.
III.
I.
A.
B.
C.

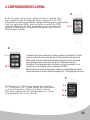
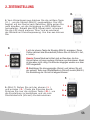
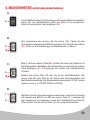
4. From the Time Menu press the center button ( II. )
to select set time (image D.). The LD2 will begin
searching for satellites; please step outdoors to
connect to GPS satellites Once GPS signal is
established, the LD2 will alert you with a series
of beeps, and the time adjustment screen will
appear. From here you can:
I. Adjust the hours using the upper button (image E.). This
option will activate the hours eld (proceed to step 5. below).
Note: This feature is included to allow users that prefer to sync
their time with a dierent time zone to do so. In most cases,
this is unnecessary. Minutes are set via GPS only.
III. Conrm time shown and return to the home (time) screen
using the lower button (image E.). Set time is complete.
5. (Image F.) Use the upper ( I. ) and lower ( II. )
buttons to cycle through the hours, then press
the center button ( III. ) to confirm the setting
and return to the Home (time) screen.
2. SETTING TIME (continued)
II.
III.
I.
II.
III.
I.
5
D.
E.
F.

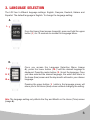
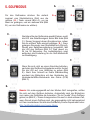
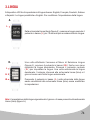
From the Home (time) screen (image A.), press and hold the upper
button ( I. ) for 10 seconds to access the Language Menu.
Once you access the Language Selection Menu (image
A.), press the lower button ( III. ) until the desired language is
displayed. Press the center button ( II. ) to set the language. Once
you have selected the desired language, the watch will return to
the home (time) screen and the day/month will read in your chosen
language.
Pressing the upper button ( I. ) while in the language screen will
return you to the Home (time) screen without changing the setting.
The LD2 has 5 dierent language settings: English, Français, Deutsch, Italiano and
Español. The default language is English. To change the language setting:
Note: The language setting only aects the Day and Month on the Home (Time) screen
(image A.).
6
3. LANGUAGE SELECTION
II.
III.
I.
I.
A.
B.

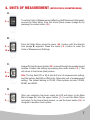
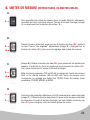
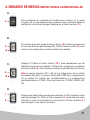
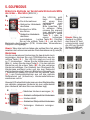
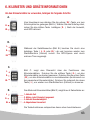
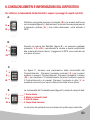
To set the Units of Measurement (aecting Golf Mode and Odometer),
access the Main Menu from the Home (time) screen (image A.) by
pressing the center button ( II. ).
From the Main Menu press the lower ( III. ) button until the Wrench
Icon (image B.) appears. Press the center ( II. ) button to enter the
Units of Measurement Settings.
(Image C.) Use the lower button ( III. ) to scroll through the measurement
options. Conrm the setting by pressing the center button ( II. ). This
will return to the Home (time) screen.
Note: The top eld (YD or M) is the Golf unit of measurement setting,
and the bottom eld (MI or KM) is the Odometer unit of measurement
setting. The default setting is YD/MI. Other options include YD/KM,
M/KM, and M/MI.
After your selection has been made the LD2 will return to the Main
Menu (image D.). Use the upper button ( I. ) to exit the Main Menu
and return to the Home (time) screen, or use the lower button ( II. ) to
navigate to another menu option.
7
4. UNITS OF MEASUREMENT (METERS/YARDS, KILOMETERS/MILES)
II.
II.
II.
III.
III.
I.
A.
B.
C.
D.
II.

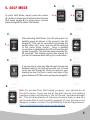
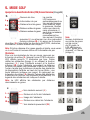
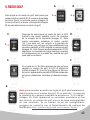
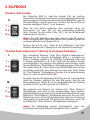
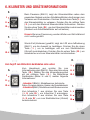
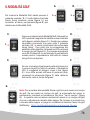
To enter Golf Mode, simply press the center
( II. ) button 2-times from the Home (time) Screen
(rst press (image A.) to enter menu, second
press (image B.) to select Golf Mode).
After selecting Golf Mode, the LD2 will search for
satellite signal as shown in the image to the left
(image C.). This can be cancelled by pressing the
center button ( II. ) once, and you will be returned
to the home (time) screen. Once a satellite
connection is established the LD2 will load the golf
course (image D.). This will take approximately 25–
30 seconds. The loading screen also shows the
golf unit of measurement setting for conrmation.
If you are not at a tee box after the golf course has
nished loading, the LD2 will prompt you to head
to the tee box (image E.). Once you arrive at your
starting tee box, the front, center, and back of the
green distances (FCB) screen will appear (image F.).
Note: To access Play Golf mode properly, you should be at
the golf course. If you are not at the golf course, the loading
courses screen will display a "Go to Course" animation(image
G.). This will also display in the rare occasion that you are at a
golf course that is not currently mapped. If your course is not
m a p p e d , p l e a s e c o n t a c t t h e G o l f B u d d y C o u r s e D e p a r t m e n t :
http://golfbuddyglobal.com/course library
8
5. GOLF MODE
II.
II. II.
A.
C.
E.
G.
D.
F.
B.

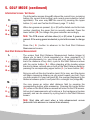
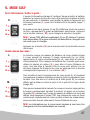
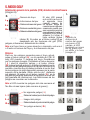
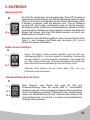
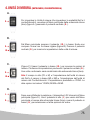
The LD2 watch
will automatically
advance to the next
hole as you play
through a course.
Please note that
in rare instances it
may be necessary
to manually advance
t o t h e n e x t h o l e
( upper button I. ) or
return to a previous
hole ( lower button III. ). Pressing the center
button ( II. ) will cycle through golf features
(FCB, Hazards, Information, Dual Shot Distance).
Note: If the hole has a Left or Right green, you will see an (L or
(R) between the hole number and par information.
To view the available hazards for your current hole,
press the center button ( II. ) from the FCB screen.
The LD2 watch displays up to 11 hazards per hole.
Cycle through hazards (Image J.) using the upper
button ( I. ) for next Hazard and the lower button (
III. ) for previous hazard. Distance to the start point
of hazards display at the bottom of the screen, while
distance to the end point of hazards (if available) display
at the top of the screen (Note: only 1 distance provided a t
a time). Pressing the center button ( II. ) from the
Hazards screen will pull up the next Golf feature
(Information screen). Hazard denitions are shown to
the right.
Note: LD2 displays Hazards in order from closest to the
tee box to furthest from tee box (closest to the green).
Front/Center/Back (FCB) Screen Overview (Image H.)
Hazards
Back Green Distance
Center Green Distance
Front Green Distance
Par Information
Hole Number
Distance to end point of hazard
Hazard image
Distance to start point of hazard
View Next Hazard ( I. )
View Previous Hazard ( III. )
5. GOLF MODE (continued)
II.
II.
III.
III.
I.
I.
Note:
When the distance
to the center of the
green is less than 20
yards, the LD2 will
display a green-
with-pin icon and
the time (image I.).
9
H. I.
J.

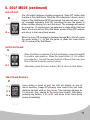
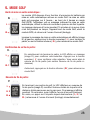
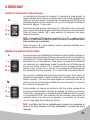
The unique Dual Shot Distance Measurement feature (image L.)
allows you to track 2 shots separately (i.e. drive, approach) or 2
shots simultaneously (i.e. your drive and your partner's drive). To
track the distance of any shot, cycle to the Shot Distance screen
with the center button ( II. ). When standing at the location where
the shot is taken, activate one or both of the Shot Distance elds by
pressing the corresponding upper button ( I. ) or lower button ( III. ).
Doing so will set the shot location (point A) to zero, and the device
will begin measuring distance as you move toward your ball. Once
you have made it to your ball (point B), the number displayed is the
distance between point A and point B in a straight line (image M.).
You may pause an active shot distance eld by pressing the
corresponding button while measuring. Pressing the center button
( II. ) when on the Shot Distance screen will return to the FCB screen.
Active shot measurements will continue in the background (unless
paused), and can be viewed by cycling back to the Shot Distance
screen.
Note: Shot data will reset when a hole advancement occurs
(automatic hole advance or manual hole advance).
The Information screen (image K.) shows the current time, remaining
battery life, current hole number, and current green selection (when
applicable). The user may EXIT the round by pressing the upper
button ( I. ) and see Conrm Exit Round, page 11 to Exit.
When two greens are present, (L) or (R) will be listed next to the hole
number, depicting the green that is currently selected. Press the
lower button ( III. ) to change the green selection accordingly.
Note: The FCB screen will also show (L) or (R) when 2 greens are
present. If the wrong green is selected, cycle to this screen to change
it.
Press the ( II. ) button to advance to the Dual Shot Distance
Measurement screen.
Dual Shot Distance Measurement:
Information Screen / Exit Game:
5. GOLF MODE (continued)
10
II.
II.
II.
III.
III.
III.
I.
I.
I.
K.
L.
M.

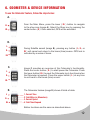
Auto-Off Alert:
The LD2 watch features a battery-preserving “Auto-O” setting that
is active in Play Golf Mode. The Auto-O is preset for 5 hours; once 5
hours in Play Golf Mode (GPS) has passed, the user will see a “pop-
up” message indicating Auto-O, providing the user the option to
either continue playing or to exit the round. The message will remain
on-screen for 15 minutes and if no selection is made within that time
frame, the device will exit Play Golf Mode, power o the GPS module,
and return to the home (time) screen.
When the Auto-O message is displayed (image N.) to the left, press
the upper button ( I. ) to Exit the game, or press the lower button
( III. ) to resume Play Golf Mode.
Upon exiting a round of golf, the LD2 will display an end of
round summary (image P. ) showing total round time and total
distance traveled while on the course. This message displays for
15 seconds, then returns to the home time screen. Alternately,
pressing any button ( I., II., or III. ) will return to the home (time)
screen immediately.
End of Round Summary:
5. GOLF MODE (continued)
11
II.
III.
I.
III.
I.
When Exit Game is selected, the LD2 will display a prompt (image O.)
to conrm your selection. Press the upper button ( I. ) to conrm
your selection. You will then see the End of Round Summary (see
End of Round Summary section below).
Alternately, press the lower button ( III. ) to return to Golf Mode.
III.
I.
Conrm Exit Round:
N.
O.
P.

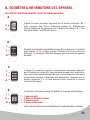
From the Main Menu, press the lower ( III. ) button to navigate
to the shoe icon (image A.). Select the Shoe icon by pressing the
center button ( II. ). Once selected, GPS will be activated.
During Satellite search (image B.), pressing any button ( I., II., or
III. ) will cancel and return to the home (time) screen. GPS lock is
indicated by a series of tones.
Image C. provides an overview of the Odometer's functionality.
Press the center button ( II. ) to start/pause the Odometer. Press
the lower button ( III. ) to reset the Odometer (only functional when
the Odometer is paused). Press the upper button ( I. ) at any time
to exit back to the Home (time) screen.
The Odometer feature (image D.) shows 4 elds of data:
1. Current Time
2. Total Miles (or Kilometers)
3. Current Speed
4. Total Time Elapsed
Button functions are the same as described above.
To use the Odometer Feature, follow the steps below:
6. ODOMETER & DEVICE INFORMATION
12
II.
II.
II.
II.
III.
III.
III.
III.
I.
I.
I.
A.
C.
B.
D.

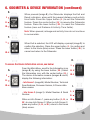
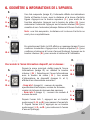
When paused (image E.), the Odometer displays the Exit and
Reset indicators, along with the paused distance and activity
time fields. Press the upper button ( I. ) to exit the Odometer
feature. Press the center button ( II. ) to resume the Odometer
feature. Press the lower button ( III. ) to reset the Odometer
feature (zero-out Distance & Activity Time fields).
Note: When paused, mileage and activity time do not continue
to accumulate.
When Exit is selected, the LD2 will display a prompt (image F.) to
conrm the selection. Press the upper button ( I. ) to conrm and
return to the Home (time) screen. Press the lower button ( III. ) to
cancel and return to the Odometer.
To access the Device Information screen, see below:
From the Main Menu, scroll to the Information icon
(image G.) by using the lower button ( III. ) Select
the Information icon with the center button ( II. ).
The device Information screens (images H. and I.)
display the following information:
- Info Screen 1 (image H.): Model Number, Technical
Specications, Firmware Version, & Course data
base version
- Info Screen 2 (image I.): Model Number & Serial
Number
When on Info Screen 1, press any button ( I., II., or
III. ) to view Info Screen 2. When on Info Screen 2,
press any button ( I., II., or III. ) return to the Home
(time) screen.
6. ODOMETER & DEVICE INFORMATION (continued)
13
II.
II.
II.
II.
III.
III.
III.
III.
III.
I.
I.
I.
I.
I.
E.
F.
G.
H.
I.

The LD2 GPS Golf Watch is durable and waterproof. To help ensure reliable operation,
the following care and maintenance guidelines are recommended:
• Avoid exposing the device to extreme environmental conditions for prolonged periods of time.
• Avoid severe impacts on the device.
• You may clean the device occasionally with a soft, damp cloth.
• Brush the clip contacts on the bottom of the device regularly. Debris accumulation may aect charging
& data transfer. Use a soft-bristled brush. Hard bristles or wire brushes may scratch the device.
• DO NOT expose the device to strong chemicals such as alcohol, gasoline, etc. as they will damage
the device.
• Store the device in a dry place when not in use.
WARNING
• DO NOT attempt to open the LD2 watch. Risk of explosion if battery is replaced with incorrect type.
• DO NOT attempt to open, disassemble, or service the internal battery, the battery MUST be replaced
by a qualied technician.
• DO NOT crush, puncture, or short the battery’s external contacts. DO NOT expose to temperatures
above 140º F (60 º C).
• Properly recycle or dispose of the battery. DO NOT dispose in re or water.
Legal Disclaimer
By using this product, you agree that Deca International Corp. will not be held legally responsible for
any injury or damage to you or any person or property caused by the user’s improper operation and/
or poor judgment while using this product.
Additional Information
The Global Positioning System (GPS), a network of 32 satellites orbiting the Earth, is operated and
maintained by the U.S. government. This GPS device requires at least 3 acquired satellites to accurately
determine your position. Any change made to the system by the government could aect the accuracy
and performance of this product.
7. CARE & MAINTENANCE
14

Your GolfBuddy LD2 unit has been pre-loaded with the latest rmware and world-wide
course maps available at the time of manufacture, so it’s ready to play right out of
the box. For optimum performance and longer product life, we recommend that you
register your unit and keep it updated with the latest course maps and updates for free.
The instructions below will provide a step-by step guide on how to register and update
your GolfBuddy LD2.
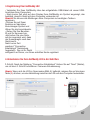
1. Downloading the GolfBuddy Management Software (GB Manager) to your computer:
• Please visit our website at www.golfbuddyglobal.com
• Click on the panel titled “Download GB Course Manager.” You will then see a screen
with an option to choose either Windows or Mac based software.
• Click on the correct version for your computer. Once downloaded, you can run the
application to install the GB Manager on your computer.
• Once completed, you will see a blue icon labeled “GolfBuddy World Course Manager”
on your desktop. Use this to access the GB Manager once you have registered.
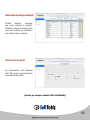
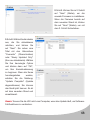
2. Creating a User ID:
• Open the GB Manager application by clicking on the blue icon on your desktop.
• You will see a Login Panel . Click on “Sign up” at the bottom. This will bring up a
webpage for you to create your User ID and Password.
• Fill in all the details that are required ( indicated by " * " ). Please note the instructions
regarding no Caps, Symbols, Spaces, & a 4-15 character-long requirement. You will
need to click “Check Availability” to verify your selected User ID is valid and not already
being used.
• Click “Submit” at the bottom of the form when nished.
• Your User ID and Password are now created...Make sure to write them down and keep
them in a safe place in case you forget them!
8. UPDATING YOUR LD2
15

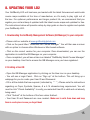
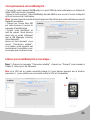
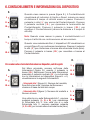
3. Registering your GolfBuddy LD2:
4. Updating your GolfBuddy LD2 in three Steps:
Step 1. Once you get the “Connection Established” message, please click “Next” to
proceed to Step #2: Firmware Update.
Note: If the LD2 is in lock mode (image A.) you will need to press the upper button ( I. ) to
establish a connection between the LD2 and the computer.
16
• Connect your GolfBuddy unit to a USB port on your computer using the USB cable
provided with the unit.
• After a short time, your GolfBuddy unit should show an icon on the screen indicating
it is connected to the computer.
Notes: Disregard any driver download requests that your computer may say is required.
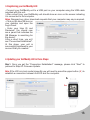
• Click on the blue GB icon on
your desktop and open the
Login Panel.
• Enter your User ID and
Password. You should now
see a panel that indicates the
GB Manager is searching for
the device.
After a short time, you will
see “Connection Established”.
At this stage, your unit is
successfully registered to your
account that you created.
I.
A.

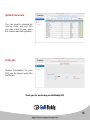
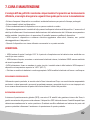
Step 2. At step 2, click “Next” to
install the latest rmware. If the
rmware is already up to date,
click “Next” to proceed to step 3.
Step 3. Select the countries
that you would like to update
and click “Next”. You will
see a panel that asks you to
“Overwrite” or “Newly Updated
Only”. Select your preferred
option, then click “OK” to
start the course update. Once
all the courses have been
downloaded you will receive a
message “Update Complete”.
You can now disconnect the
unit. Your GolfBuddy is now
ready to go with the latest
updates!
Note: Do not disconnect the LD2 from the computer during the update process to prevent
software malfunctions.
17

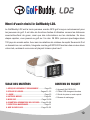
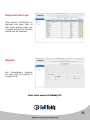
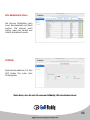
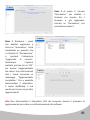
Updated Course Info
Prole Info
Thank you for purchasing our GolfBuddy LD2!
18
You can search courses by
country, state, and city. You
can also check to see when
the course was last updated.
System Information for your
LD2 can be found under the
prole tab.

• 1 Appareil Golf GPS LD2
• 1 Câble USB chargeur/données
• 1 Guide de prise en main rapide
• 1 Brosse de nettoyage
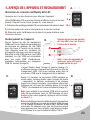
Le GolfBuddy LD2 est la toute première montre GPS golf conçue exclusivement pour
les joueuses de golf. Il est doté de fonctions faciles d'utilisation comme les distances
enrée/milieu/fond de green, ainsi que des informations sur les obstacles. En deux
étapes rapides, vous jouerez au golf sur l'un des 38 000+ parcours préchargés dans
130 pays du monde entier. Avec ses incrustations de cristaux de saphir Swarovski ® et
un bracelet en cuir véritable, l'élégante montre golf GPS LD2 fera bien des envieux dans
votre club, réduisant vos scores et plaçant la barre plus haut !
19
Merci d'avoir choisi le GolfBuddy LD2.
CONTENU DU PAQUETTABLE DES MATIÈRES
1. APERÇU DE L'APPAREIL ET RECHARGEMENT .............Page 20
2. RÉGLAGE DE L'HEURE....................................Pages 21–22
3. LANGUE...............................................................Page 23
4. UNITÉS DE MESURE..............................................Page 24
5. MODE GOLF...................................................Page 25–28
6. ODOMÈTRE & INFORMATIONS DE L'APPAREIL....Page 29–30
7. ENTRETIEN & MAINTENANCE.................................Page 31
8. MISE À JOUR DU LD2.....................................Page 32–35

1. APERÇU DE L'APPAREIL ET RECHARGEMENT
I.
I.
II.
III.
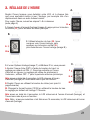
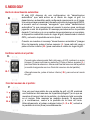
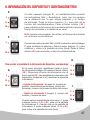
Utilisation de la montre GolfBuddy GPS LD2
Appuyez sur l'un des boutons pour allumer l'appareil.
Votre GolfBuddy LD2 se met en marche et ache l'écran d'accueil
(heure). Depuis l'écran heure (image A.) vous pouvez :
I. Activer le rétro-éclairage pendant 10 secondes avec le bouton du haut.
II. Voir les options du menu principal avec le bouton central.
III. Basculer entre l'achage de la date & la jauge batterie avec
le bouton du bas.
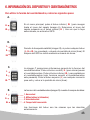
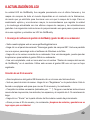
Rechargement de l'appareil
Pincez l'arrière du clip de chargement
USB pour l'ouvrir. Alignez soigneusement
les broches de guidage du clip USB
avec les trous à l'arrière de la montre.
Ceci alignera ainsi les contacts de
recharge du clip avec ceux de la montre.
Branchez le clip USB dans un port USB
standard. Le clip USB est compatible
avec les ports USB d'ordinateurs,
portables, automobiles, ou chargeurs
USB 5V secteur (image B.).
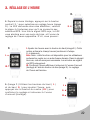
L'écran illustré dans l'image à gauche (image C.)
s'achera lorsque l'appareil est connecté au clip de
chargement USB. Cet écran indique aussi bien la
connexion USB que le chargement de la batterie.
Après 15 minutes, la connexion USB passera en
mode veille, comme illustré dans l'image de droite
; cependant, la batterie continuera à se charger
jusqu'à la charge complète. Une batterie pleine est
indiquée par un icône de batterie pleine et le texte
"100%" en-dessous de l'icône de batterie (image D.).
Note : pour rétablir la connexion USB à tout moment
(an de synchroniser avec le GB Manager et pour
mettre à jour votre appareil), appuyez sur le bouton
du haut ( I. ).
Note : si la batterie cesse de déler lorsque l'appareil est
connecté et ache un icône de batterie faible (image
C.), la charge complète n'a pas eu lieu. Vériez votre
connexion et assurez-vous que les broches soient
bien alignées avec les contacts, puis laissez charger
le LD2 jusqu'à ce que la batterie ache 100%. 20
Alignez les broches de guidage
du clip USB avec les trous à
l'arrière de la montre.
Note : il est recommandé de
recharger votre LD2 avant
chaque partie de golf.
A.
B.
C. D.
La page est en cours de chargement...
La page est en cours de chargement...
La page est en cours de chargement...
La page est en cours de chargement...
La page est en cours de chargement...
La page est en cours de chargement...
La page est en cours de chargement...
La page est en cours de chargement...
La page est en cours de chargement...
La page est en cours de chargement...
La page est en cours de chargement...
La page est en cours de chargement...
La page est en cours de chargement...
La page est en cours de chargement...
La page est en cours de chargement...
La page est en cours de chargement...
La page est en cours de chargement...
La page est en cours de chargement...
La page est en cours de chargement...
La page est en cours de chargement...
La page est en cours de chargement...
La page est en cours de chargement...
La page est en cours de chargement...
La page est en cours de chargement...
La page est en cours de chargement...
La page est en cours de chargement...
La page est en cours de chargement...
La page est en cours de chargement...
La page est en cours de chargement...
La page est en cours de chargement...
La page est en cours de chargement...
La page est en cours de chargement...
La page est en cours de chargement...
La page est en cours de chargement...
La page est en cours de chargement...
La page est en cours de chargement...
La page est en cours de chargement...
La page est en cours de chargement...
La page est en cours de chargement...
La page est en cours de chargement...
La page est en cours de chargement...
La page est en cours de chargement...
La page est en cours de chargement...
La page est en cours de chargement...
La page est en cours de chargement...
La page est en cours de chargement...
La page est en cours de chargement...
La page est en cours de chargement...
La page est en cours de chargement...
La page est en cours de chargement...
La page est en cours de chargement...
La page est en cours de chargement...
La page est en cours de chargement...
La page est en cours de chargement...
La page est en cours de chargement...
La page est en cours de chargement...
La page est en cours de chargement...
La page est en cours de chargement...
La page est en cours de chargement...
La page est en cours de chargement...
La page est en cours de chargement...
La page est en cours de chargement...
La page est en cours de chargement...
La page est en cours de chargement...
La page est en cours de chargement...
La page est en cours de chargement...
-
 1
1
-
 2
2
-
 3
3
-
 4
4
-
 5
5
-
 6
6
-
 7
7
-
 8
8
-
 9
9
-
 10
10
-
 11
11
-
 12
12
-
 13
13
-
 14
14
-
 15
15
-
 16
16
-
 17
17
-
 18
18
-
 19
19
-
 20
20
-
 21
21
-
 22
22
-
 23
23
-
 24
24
-
 25
25
-
 26
26
-
 27
27
-
 28
28
-
 29
29
-
 30
30
-
 31
31
-
 32
32
-
 33
33
-
 34
34
-
 35
35
-
 36
36
-
 37
37
-
 38
38
-
 39
39
-
 40
40
-
 41
41
-
 42
42
-
 43
43
-
 44
44
-
 45
45
-
 46
46
-
 47
47
-
 48
48
-
 49
49
-
 50
50
-
 51
51
-
 52
52
-
 53
53
-
 54
54
-
 55
55
-
 56
56
-
 57
57
-
 58
58
-
 59
59
-
 60
60
-
 61
61
-
 62
62
-
 63
63
-
 64
64
-
 65
65
-
 66
66
-
 67
67
-
 68
68
-
 69
69
-
 70
70
-
 71
71
-
 72
72
-
 73
73
-
 74
74
-
 75
75
-
 76
76
-
 77
77
-
 78
78
-
 79
79
-
 80
80
-
 81
81
-
 82
82
-
 83
83
-
 84
84
-
 85
85
-
 86
86


dans d''autres langues
- italiano: Golf Buddy LD2 Manuale utente
- español: Golf Buddy LD2 Manual de usuario
- Deutsch: Golf Buddy LD2 Benutzerhandbuch

