
EN/DE/ES/FR/IT
User Manual

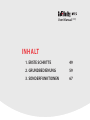
CONTENTS
1. GETTING STARTED 13
2. BASIC OPERATIONS 23
3. ADVANCED OPERATIONS 31
User Manual (EN)

5
EN
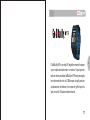
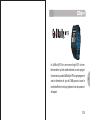
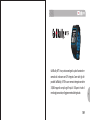
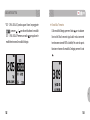
Thank you for choosing GolfBuddy.
The GolfBuddy WT5 is a feature-rich golf GPS watch that fits
comfortably on your wrist. As with all other GolfBuddy products
the WT5 comes preloaded with over 37,000 course information
along with free lifetime course & software updates, in more than
130 countries around the world.

67
EN
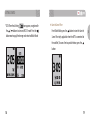
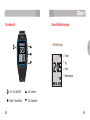
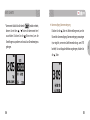
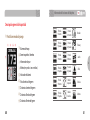
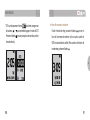
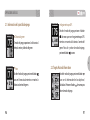
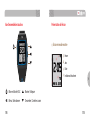
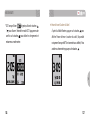
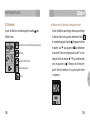
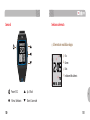
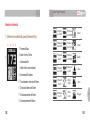
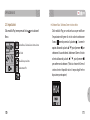
Up / Mark
Power / ESC
Menu / Select Down / Score card
Button overview
1
2
3
4
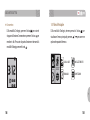
Time
Day
Date
Battery Indicator
⦾
Watch Mode Screen
Screen Overview
1
4
2
3

89
EN
⦾
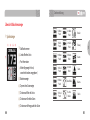
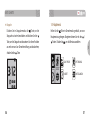
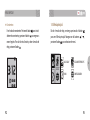
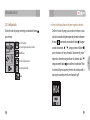
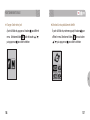
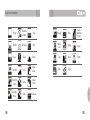
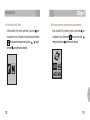
Play Mode Screen
Screen Overview
50Yardpost
50Meterpost
250Yardpost
250Meterpost
Bush
Trees
100Meterpost
Left Bunker
100Yardpost
Right Bunker
150Meterpost
Bunkers
150Yardpost
Fairway
200Meterpost
200Yardpost
Garden
Tree
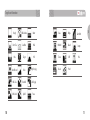
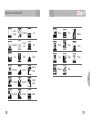
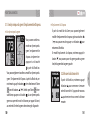
Target Icon Information
1
2
3
4
5
6
7
8
9
Hole Number
Left/ Right Green
Par Info
Meters (In Yards if not indicated)
Battery Indicator
Dynamic Green View
Distance to the Center of the Green
Distance to the Back of the Green
Distance to the Front of the Green
5
6
7
9
8
3 421

10 11
EN
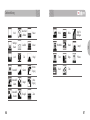
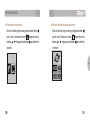
Target Icon Information
Out of Bound
OB + Tree
OB + Rock
Sand Box
OB + Bunker
Right Dogleg
Hill
Beach
Bridge
Target Cliff
Rock
Fence
Pond
Downhill
Cave Cart Path
Uphill
Windmill
Stump
Water
Wall
Tower
Creek
Pole
Left Dogleg
Rough
Short Tree
Hole

1. GETTING STARTED

14 15
EN
GETTING STARTED
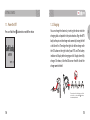
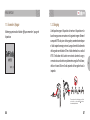
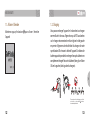
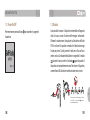
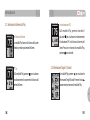
1.1. Power On/Off
Press and hold the button to turn on/off the device.
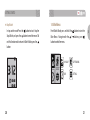
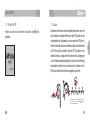
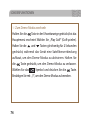
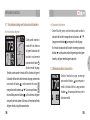
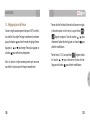
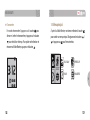
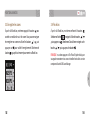
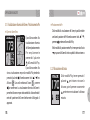
1.2. Charging
You can charge the device by inserting the device into the
charging dock as depicted in the picture below. Align the WT5
body to the pins on the charger and connect by having the left
side slide in first. Then align the right side of the charger with
the OK button on the right side of your WT5 unit. The battery
indicator will displaywhile charging and will displaywhen fully
charged. To release, slide the GB icon on the left side of the
charger over to the left.
OK
Please make sure that the charging cradle does
not interfere or overlap with the button, as
demonstrated in photo above.
OK

16 17
EN
GETTING STARTED
* Day Format: The default Day Format is in English; the
secondary option is in French. When the blinking /
icon appears, navigate with the / buttons to select
desired selection. Press the button to apply the changes.
* 12/24 Hour Format: When the blinking icon appears,
navigate with the / buttons to select desired selection.
Press the button to apply the changes.
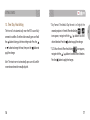
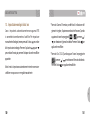
1.3. Time / Day / Hour Setting
The time will set automatically once the WT5 successfully
connects to satellites. To set the clock manually, press and hold
the button to bring up the time setting mode. Press the
or button to change the hour, then press the button to
apply the changes.
Note: The minutes are set automatically upon successful satellite
connection and cannot be manually adjusted.

18 19
EN
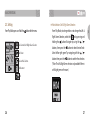
GETTING STARTED
* DST: When the blinking icon appears, navigate with
the / buttons to turn on/off DST mode. Press the
button once to apply the changes and return to Watch Mode.
■ Sunrise/Sunset Time
From Watch Mode, press the button to view the Sunrise/
Sunset Time (only applicable when the WT5 is connected to
the satellite). To access the stop watch feature, press the
button.

20 21
EN
GETTING STARTED
■ Stop Watch
In stop watch mode. Press the button to start/ stop the
Stop Watch, and press the button to reset the record. To
exit this function and to return to Watch Mode, press the
button.
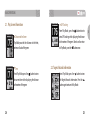
1.4. Main Menu
From Watch Mode, press and hold the button to view the
Main Menu. Navigate with the / buttons, press
button to select the menu.
PLAY GOLF GPS TRACKING
TIME SETTING

22
2. BASIC OPERATIONS
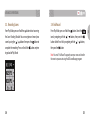
GETTING STARTED
■ Switching to Play Screen
From Watch Mode, press and hold the button. Press
the button to select the icon and to switch to Play
Screen. After the GolfBuddy WT5 connects to satellites, it will
recognize the nearest golf course and provide the course/
hole information.

24 25
EN
BASIC OPERATIONS
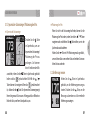
2.1. Play Screen Information
■ Distance to the Green
Play Mode provides the distances to the front,
center and back of the green.
■ Time
From Play Mode, press the button to view
the current time while displaying the distance
to the center of the green.
■ GPS Tracking
From Play Mode, press the button twice to
view GPS tracking while displaying the distance
to the center of the green. To exit and to return
to Play Mode, press the button once.
2.2. Targets/Hazards Information
From Play Mode, press the button to view
the Targets/Hazards information. Press the
button again to return to Play Mode.

26 27
EN
BASIC OPERATIONS
■ Hole Selection / Left & Right Green Selection
From Play Mode, to change holes or to change the Left &
Right Green Selection, select the icon by pressing and
holding the button. Navigate by using the /
buttons, then press the button to select desired hole.
Select left or right green* by navigating with the /
buttons then press the button to confirm the selection.
(*Note: The Left & Right Green selection is only available if there is
a left & right green on the course).
2.3. Setting
From Play Mode, press and hold the button for the menu.
Hole Selection/ Left & Right Green Selection
Pin Placement
Exit
Yard / Meter
Previous Hole Selection

28 29
EN
BASIC OPERATIONS
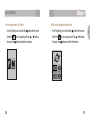
■ Switching between Yard / Meter
From Play Mode, press and hold the button for the menu.
Select the icon by navigating with the / buttons,
then press the button to confirm the selection.
■ Previously Recognized Hole Selection
From Play Mode, press and hold the button for the menu.
Select the icon by navigating with the / buttons,
then press the button to confirm the selection.

3. ADVANCED OPERATIONS

32 33
EN
ADVANCED OPERATIONS
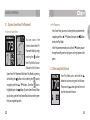
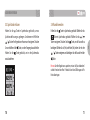
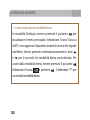
3.1. Dynamic Green View / Pin Placement
You can access the
Dynamic Green View/ Pin
Placement Mode by simply
pressing the button
from Play Mode. You can
also access the Dynamic
Green View/ Pin Placement Mode from Play Mode, by pressing
and holding the button and by selecting the icon by
navigating with the / buttons. Once the icon is
highlighted, press the button. Dynamic Green View will allow
you to always get the Front/Center/Back distances to the green
from your angle of approach.
■ Pin Placement
From Green View, you may also change the pin placement by
navigating with the / buttons, then press the button
to return to Play Mode.
In the Pin placement mode, press and hold button, you can
change from left green to right green, and right green to left
green.
■ Dynamic Green View
3.2. Measuring Shot Distance
From Play Mode, press and hold the
button to start measuring your shot distance.
Then press the button again to finish and
view the measured distance.

34 35
EN
ADVANCED OPERATIONS
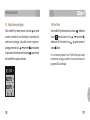
3.3. Recording Scores
From Play Mode, press and hold the button to start accessing
the Score Tracking Module. You can navigate and record your
scores by using the / buttons then press the button to
complete the recording. Press and hold the button anytime
to go back to Play Mode.
3.4. End Round
From Play Mode, press and hold the button. Select the
icon by navigating with the / buttons, then press the
button. Select Yes or No by navigating with the / buttons,
then press the button.
Note: You must “End Round” to properly save your scores and transfer
the scores to your account using the GB Course Manager program.

36 37
EN
ADVANCED OPERATIONS
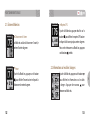
3.5. GPS Tracking
While in Watch Mode, press the button then select the icon.
Press the button to start recording and press the button to
delete the record. Press the button to switch between Yard /
Meter. GPS tracking is activated automatically when the WT5 is in
Play Mode.
3.6. Systems Information
While in Watch Mode, press the button twice then select the
icon. You can navigate using the buttons and press the OK button
to exit.
※ How to Reset the WT5
To reset the device, press the / / buttons
simultaneously to restart the device.

38
ADVANCED OPERATIONS
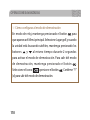
※ How to Set in Demo Mode
In Watch Mode, press and hold the button to bring up the
Main Menu. Select Play Golf, and when the unit is searching
for satellites, press and hold the and buttons
simultaneously for 2 seconds to activate the Demo Mode. To
exit Demo Mode, press and hold the button. Select the
icon and press the button. Confirm “Y” to exit Demo
Mode.
La page est en cours de chargement...
La page est en cours de chargement...
La page est en cours de chargement...
La page est en cours de chargement...
La page est en cours de chargement...
La page est en cours de chargement...
La page est en cours de chargement...
La page est en cours de chargement...
La page est en cours de chargement...
La page est en cours de chargement...
La page est en cours de chargement...
La page est en cours de chargement...
La page est en cours de chargement...
La page est en cours de chargement...
La page est en cours de chargement...
La page est en cours de chargement...
La page est en cours de chargement...
La page est en cours de chargement...
La page est en cours de chargement...
La page est en cours de chargement...
La page est en cours de chargement...
La page est en cours de chargement...
La page est en cours de chargement...
La page est en cours de chargement...
La page est en cours de chargement...
La page est en cours de chargement...
La page est en cours de chargement...
La page est en cours de chargement...
La page est en cours de chargement...
La page est en cours de chargement...
La page est en cours de chargement...
La page est en cours de chargement...
La page est en cours de chargement...
La page est en cours de chargement...
La page est en cours de chargement...
La page est en cours de chargement...
La page est en cours de chargement...
La page est en cours de chargement...
La page est en cours de chargement...
La page est en cours de chargement...
La page est en cours de chargement...
La page est en cours de chargement...
La page est en cours de chargement...
La page est en cours de chargement...
La page est en cours de chargement...
La page est en cours de chargement...
La page est en cours de chargement...
La page est en cours de chargement...
La page est en cours de chargement...
La page est en cours de chargement...
La page est en cours de chargement...
La page est en cours de chargement...
La page est en cours de chargement...
La page est en cours de chargement...
La page est en cours de chargement...
La page est en cours de chargement...
La page est en cours de chargement...
La page est en cours de chargement...
La page est en cours de chargement...
La page est en cours de chargement...
La page est en cours de chargement...
La page est en cours de chargement...
La page est en cours de chargement...
La page est en cours de chargement...
La page est en cours de chargement...
La page est en cours de chargement...
La page est en cours de chargement...
La page est en cours de chargement...
La page est en cours de chargement...
La page est en cours de chargement...
La page est en cours de chargement...
La page est en cours de chargement...
La page est en cours de chargement...
La page est en cours de chargement...
La page est en cours de chargement...
La page est en cours de chargement...
-
 1
1
-
 2
2
-
 3
3
-
 4
4
-
 5
5
-
 6
6
-
 7
7
-
 8
8
-
 9
9
-
 10
10
-
 11
11
-
 12
12
-
 13
13
-
 14
14
-
 15
15
-
 16
16
-
 17
17
-
 18
18
-
 19
19
-
 20
20
-
 21
21
-
 22
22
-
 23
23
-
 24
24
-
 25
25
-
 26
26
-
 27
27
-
 28
28
-
 29
29
-
 30
30
-
 31
31
-
 32
32
-
 33
33
-
 34
34
-
 35
35
-
 36
36
-
 37
37
-
 38
38
-
 39
39
-
 40
40
-
 41
41
-
 42
42
-
 43
43
-
 44
44
-
 45
45
-
 46
46
-
 47
47
-
 48
48
-
 49
49
-
 50
50
-
 51
51
-
 52
52
-
 53
53
-
 54
54
-
 55
55
-
 56
56
-
 57
57
-
 58
58
-
 59
59
-
 60
60
-
 61
61
-
 62
62
-
 63
63
-
 64
64
-
 65
65
-
 66
66
-
 67
67
-
 68
68
-
 69
69
-
 70
70
-
 71
71
-
 72
72
-
 73
73
-
 74
74
-
 75
75
-
 76
76
-
 77
77
-
 78
78
-
 79
79
-
 80
80
-
 81
81
-
 82
82
-
 83
83
-
 84
84
-
 85
85
-
 86
86
-
 87
87
-
 88
88
-
 89
89
-
 90
90
-
 91
91
-
 92
92
-
 93
93
-
 94
94
-
 95
95
-
 96
96


dans d''autres langues
- italiano: Golf Buddy WT5 Manuale utente
- English: Golf Buddy WT5 User manual
- español: Golf Buddy WT5 Manual de usuario
- Deutsch: Golf Buddy WT5 Benutzerhandbuch


