Dustbane Integra Series Operations Manual
- Catégorie
- Machine à plancher
- Taper
- Operations Manual

Parts & Operations Manual
Manuel de pièces et d’opérations
Integra TX / LA / UHS
Floor Machines / Machines à plancher
19914 (Integra TX 17”) / 19915 (Integra TX 19”)
19934 (Integra LA 17”) / 19935 (Integra LA 19”) / 19918 (Integra UHS)
Date of Issue / Date d’émission : 2018-07
Serial Number / Numéro de série : Date of Purchase / Date d’achat :
Distributor Name / Nom du distributeur :


3Parts & Operations Manual Integra TX / LA / UHS
Safety, Operations and Maintenance
Save these instructions. Read and follow all warnings and cautions before using this machine. This unit is intended for commercial use.
This oor machine will give you many years of trouble-free operating satisfaction, provided it is given proper care. All parts have
passed rigid quality control standards prior to their assembly to produce the nal product. Prior to packaging, your oor machine
was again inspected for assurance of awless assembly.
This oor machine is protectively packed to prevent damage in shipment. We recommend that upon delivery, you unpack the unit
and inspect it for any possible damage. Only a visual examination will reveal damage that may have occurred during shipping.
Important Safety Instructions
WARNING: Electric shock may occur if used on wet surfaces. Store indoors.
To reduce the risk of re, electric shock or injury:
• Use only as described in this manual. This machine is for commercial use only and should not be used by untrained
personnel.
• Test all outlets with an outlet tester before plugging machine into any outlet. Plug cord into the nearest grounded outlet.
• Ensure voltage and amperage supply are sucient for machine. See electrical diagram.
• Do not unplug by pulling on the cord, grasp the plug.
• Do not pull unit by the cord, run over cord or pull cord around sharp obstacles.
• Keep cord away from heated surfaces.
• Never attempt adjustments or repairs while the machine is plugged in.
• Do not use with damaged cord or plug.
• Do not use outdoors, in standing water on wet surfaces.
• Operate machine with all covers, guards and safety devices in place.
• Floor should be free from any dirt and particles that may become airborne should the revolving oor pad hit them.
• Do not handle machine with wet hands when it is plugged in.
• Always wear the appropriate clothing and safety equipment when operating the machine.
• Keep all body parts, hair and loose clothing away from openings and moving parts.
• Do not leave the machine plugged in when unattended or being maintained.
• Use only Original Equipment Manufacturer (OEM) parts supplied by the distributor of this machine.
N.B. This oor machine is intended for commercial use only.

4 Parts & Operations Manual Integra TX / LA / UHS
Grounding Instructions
IMPORTANT: Improper grounding method can result in a risk of electrical shock. The machine must be grounded
Electrical equipment must be grounded. If the machine should malfunction or breakdown,
grounding provides a path of least resistance for electrical current to reduce the risk of
electric shock. The Floor Machine is equipped with a cord containing a grounding conductor
and grounding plug. The plug must be inserted into an appropriate outlet that is properly
installed and grounded in accordance with all local codes and ordinances.
If repair or replacement of the cord or plug is necessary, DO NOT connect the grounded wire
to a at bed terminal. The grounding wire is the wire with insulation and an outer green
surface, with or without yellow stripes.
WARNING: Improper connection of the equipment grounding conductor can result in a risk of electric shock. Check with a qualied
electrician or service person if you are in doubt as to whether the outlet is properly grounded. Do not modify the plug provided with
theappliance – if it will not t the outlet, have a proper outlet installed by a qualied electrician. INTENDED FOR USE ON ANOMINAL
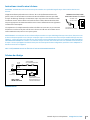
120-VOLT SUPPLY CIRCUIT: the carpet extractors have a grounding attachment plug that looks like the plug illustrated. Make sure that the
oor machine is connected to an outlet having the same conguration as the plug. Noadaptor should be used with these carpet extractors.
NOTE: THIS EQUIPMENT SHALL NOT BE USED WITH ANY EXTENSION CORD.
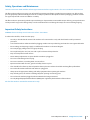
Wiring Diagram
GROUNDING PIN
BRANCHE DE MISE À LA TERRE
GROUNDED OUTLET
PRISE DE COURANT
GROUNDING INSTRUCTIONS
DIRECTIVES DE MISE À LA TERRE
Dual Speed
SAFETY TRIGGER
DISJONCTEUR DE SÉCURITÉ
BLACK
NOIR
WHITE
BLANC
GREEN
VERT
DUAL SPEED
DOUBLE VITESSE
115V
60Hz
15A
POWER
SUPPLY CABLE
CABLE
ÉLECTRIQUE
DUAL OR SINGLE
CAPACITOR MOTOR 115V
MOTEUR RETRESSER 115V
À AIMANTS PERMANENTS
M

5Parts & Operations Manual Integra TX / LA / UHS
Getting Started
IMPORTANT: Do not use on wet surfaces. Do not expose to rain. Store indoors.
Your polisher has been assembled to allow you to operate the machine within a few minutes after removal from the shipping
carton. There are several procedures to follow that will ensure a safe and proper start-up.
1. Check the machine over completely after removal from the carton. Any damage or missing pieces must be reported
toyour sales representative immediately.
2. Dual Speed Models: Each unit requires a drive pad and oor pad. Before plugging the unit into an AC outlet, lay the
machine back down on its wheels and handle and install the drive pad onto the motor gearbox by engaging it into the
hub and turning it counter-clockwise (as viewed from the bottom). The drive pad must seat fully. Center the oor pad
andpress lightly to allow the drive pad to grip it.
UHS Models: Drive pad and oor pads are already installed before shipping. The oor pad may be replaced by turning
the“Center-Lock” counter clockwise to remove. Replace pad by centering it on drive pad and re-install “Center-Lok”.
3. Return the unit to the upright position and plug it into a grounded 115VAC wall outlet with a rating no higher than
15amps.
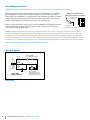
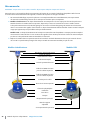
Dual Speed Models UHS Models
Speed Selection Switch
Trigger
Safety Lever
AMP Meter
Handle Adjustment Lever
75’ 600V Cord with
Hospital Grade Plug
50’ 600V Cord with
Hospital Grade Plug
Cord Hook
Molded Poly Chassis
Vinyl Bumper Pad
Adjustable
Support Wheel
Dust Skirt
Dust Collector Bag
5” Non-Marking Wheels
Pad

6 Parts & Operations Manual Integra TX / LA / UHS
Operation
1. Loosen the handle adjustment lever by pulling it to the upright position. Pull the handle back to a comfortable operating
position and lock the lever by pushing it forward. Do not start the machine with the handle in the upright position.
2. Start the machine by putting both hands on the handle, push either safety lever down with one nger then pull up on
the trigger. The motor will start and will pull to one side or the other. Adjust the speed selector switch for low or high
speed operation.
3. Dual Speed Models: Lift on the handle to put weight on the front and the polisher will pull to the right. Push down and
the polisher will pull to the left. When balanced, the polisher will remain stationary. Be sure to use both hands for proper
control of the machine. Maintain a hold on the machine until it comes to a complete stop.
UHS Models: The unit is supported by two rear wheels and a third adjustable front wheel. The machine is preset at the
factory but may be easily changed. With the machine o, apply more pressure by turning the adjustment knob counter
clockwise. Turn it only 1 to ½ turn and check each time by restarting as in (2) above. Turn the adjustment knob clockwise
to lessen the pressure on the pad. There will be a change in both speed and sound of the machine as the pressure is
changed. Too much pressure may cause serious problems by over-loading the motor and tripping a circuit breaker.
Toolittle pressure will not produce the desired results.
4. Dual Speed Models: To apply extra pressure on tough to clean areas or to seat the drive pad “heel” the polisher by lifting
the left edge of the chassis to force the right edge of the drive pad down on the oor. Use caution when doing this.
Maintenance
After each use disconnect the power cable from the outlet before installing or removing drive pad, oor pad or performing
maintenance on the polisher.
1. Dual Speed Models: Remove the drive pad and oor pad from the machine and clean with fresh water after every use.
Set the machine on the plastic chassis with handle in the upright position.
2. UHS Models: The oor pad need not be removed for storage but will last longer if it is cleaned after each use.
Adjust the height of the machine so that the oor pad is o the oor if it is left attached to the drive pad.
3. Wipe the chassis, motor cover, handle and power cable with a mild detergent and water. Do not spray water near
theairinlet of the motor cover.
4. Check unit for damage to the power cord (yellow cable), pigtail (black) and motor cable (black). Replace immediately,
ifrequired. Wrap power cord around cord hook and handle for storage.
5. All other components should be serviced by trained personnel.
Who to call for assistance
If you work with a Dustbane-authorized distributor, contact them for assistance. If any contents of the box are missing, contact
your Dustbane-authorized dealer, distributor or reseller. Make sure you have the machine’s serial number, located on the back
ofthe machine, when you call.

7Parts & Operations Manual Integra TX / LA / UHS
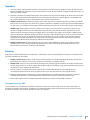
Troubleshooting Guide
PROBLEM:
Machine won’t start
CAUSE SOLUTION
1. Faulty cord connections 1. Check all cables
2. Building circuit breaker tripped 2. Reset
3. Faulty cord or plugs 3. See your authorized dealer
4. Capacitor or Rectier burned out 4. See your authorized dealer
PROBLEM:
Vibration during operation
CAUSE SOLUTION
1. Drive pad not seated properly 1. ‘Heel’ machine several times
2. Floor pad worn or excessively dirty 2. Replace
PROBLEM:
Circuit breaker tripping
CAUSE SOLUTION
1. Improper oor pad for the operation 1. Replace with proper one
2. Motor damaged 2. See your authorized dealer
3. Faulty dual speed control 3. See your authorized dealer
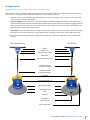
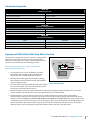
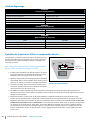
Operation of UHS Polishers With Amp Meter Attached
The amp meter is designed to assist the operator in setting polisher
pad pressure on the oor. This will assure the operator that the
optimum pad contact pressure setting is attained without causing
anexcessive current draw due to overloading the motor.
Note: This polisher should only be used by a trained operator.
Please follow all safety procedures.
1. Set your UHS unit on a clean, dry, at oor and adjust
thehandle to the operating position suitable for you.
Plugtheunit into a 120 Volt supply wall receptacle.
2. Adjust the front wheel support by turning the adjusting
knobclockwise to the end of thread travel. This will lift the
unit toits highest position.
3. From the operators position (with both hands on the handle
bars) start the polisher. The meter indicator needle should
bein the green zone far from the red zone.
4. Allow the machine to stop and adjust the front wheel support by turning the knob approximately two or more turns
counter-clockwise. This will lower the unit increasing pad contact pressure with the oor.
5. Start the machine, as in #3, and observe the meter. The needle should be closer to the red zone. The polisher is
operational at this point but some operators may want to lower the pad more. Repeat knob adjustments until desired
setting is reached but DO NOT LET THE MACHINE OPERATE CONTINUOUSLY IN THE RED ZONE! This means that the motor
is drawing excessive current and a breaker or fuse on the power supply circuit may blow. Note: Due to dierent oor and
operating conditions, the indicator needle may jump into the red zone temporarily and return to green. To avoid this,
adjust the pad pressure by turning the support knob clockwise until needle stays in the green zone.
Front of Switch Box
Amp Meter
Indicator Needle
Green Zone Red Zone

8 Parts & Operations Manual Integra TX / LA / UHS
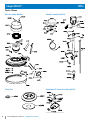
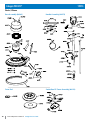
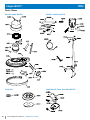
Integra TX DS 17” 19914
Parts / Pièces
Base Assembly (04984) Handle Assembly (04972)
Switch Box DS Cover Assembly (04193)Drive Pad

9Parts & Operations Manual Integra TX / LA / UHS
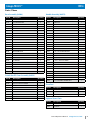
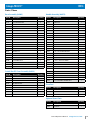
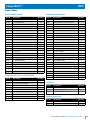
Integra TX DS 17” 19914
Parts / Pièces
Base Assembly (04984)
Part N. Description Quantity
01096 1024 X ½" PHILLIPS SCREW 2
03016 5/16 LOCKWASHER 4
03063 ½" NYLON WASHER 4
03163 5/16" FLAT WASHER 4
03847 CARBON BRUSH 4 PER SET 1
03865 RECTIFIER 1
03935 1 ½ HP DC MOTOR C/W GEARBOX11:1 1
03945 5" WHEEL 2
04103 HANDLE BRACE 1
04105 AXLE SHAFT 1
04107 THANDLE SUPPORT 1
04112 AXLE END CAP 4
04113 5/16 18 X 1 ½" BOLT 4
04167 HITCH PIN 1
04184 INDICATOR LIGHT 1
04213 WATER HOLE PLUG 1
04901 CHASSIS 17" 1
04905 ¼20 X ¾" PHILLIPS SCREW 2
04906 ¼" WASHER 2
04920 BUMPER 17" 1
04944 TSUPPORT AXLE 1
04947 MOTOR COVER 1
20060 ½" TENSION WASHER 2
20139 FOAM SHROUD 1
Switch Box DS Cover Assembly (04193)
Part N. Description Quantity
03699 1 ½ HP MICRO SWITCH 1
03954 6/32 X ¼" PHILLIPS SCREW 2
04133 SWITCH BOX COVER 1
04163 HILOW SWITCH 1
04166 832 X ¼" PHILLIPS SCREW 4
04169 632 X 7/8" PHILLIPS SCREW 2
04340 SPEED CONTROL 1
04366 LEAD WIRE 1
20031 INTERNAL LOCK WASHER 2
Handle Assembly (04972)
Part N. Description Quantity
01372 POWER CORD 50' / 15.24M 1
01745 PIGTAIL 42" 1
03789 FOAM HANDLE GRIP 2
03949 SAFETY SWITCH KNOB 2
03951 SAFETY SWITCH SPRING 1
04131 SWITCH BOX 1
04137 CORD HOOK 1
04139 CHROME HANDLE TUBE 1
04142 CAM LEVER ASSEMBLY C/W 04147 PLUG 1
04148 EXTENSION ROD 1
04151 TAPERED SLEEVE 1
04152 HANDLE WEDGE 1
04155 CABLE SPRING 1
04158 BUSHING 2
04159 5/16" X 18 NYLON LOCK NUT 2
04173 3/8" GROMMET 1
04177 HANDLE TUBE 1
04179 #141 ½" FLAT HEAD SCREW 2
04190 832 X ½" PHILLIPS SCREW 4
04198 HANDLE TUBE PLUG 2
04199 832 X ¼" PHILLIPS SCREW 3
04248 ¼20 X ¾" BOLT 3
04260 5/1618 X 5/16" SET SCREW 1
04909 TRIGGER 1
04910 SAFETY SWITCH LEVER 1
20002 ¼"20 NYLON LOCK NUT 2
20484 CORD GRIP 2
22305 3/8"16 FLANGED ACCORN NUT 1
Drive Pad
Part N. Description Quantity
04382 CLUTCH PLATE C/W SCREWS 6 1
40276 STANDARD DRIVE PAD 16" 1
42104 RED BUFFING PAD 17" 5 / CS 0.2
Optional Spare Parts
Part N. Description Quantity
03847 CARBON BRUSH 4 PER SET 1
03865 RECTIFIER 1

10 Parts & Operations Manual Integra TX / LA / UHS
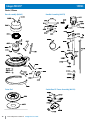
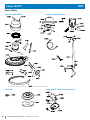
Integra TX DS 19” 19915
Parts / Pièces
Base Assembly (04985) Handle Assembly (04972)
Switch Box DS Cover Assembly (04193)Drive Pad

11Parts & Operations Manual Integra TX / LA / UHS
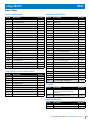
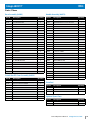
Integra TX DS 19” 19915
Parts / Pièces
Base Assembly (04985)
Part N. Description Quantity
01096 1024 X ½" PHILLIPS SCREW 2
03016 5/16 LOCKWASHER 4
03063 ½" NYLON WASHER 4
03163 5/16" FLAT WASHER 4
03935 1 ½ HP DC MOTOR C/W GEARBOX11:1 1
03945 5" WHEEL 2
04103 HANDLE BRACE 1
04105 AXLE SHAFT 1
04107 THANDLE SUPPORT 1
04112 AXLE END CAP 4
04113 5/16 18 X 1 ½" BOLT 4
04167 HITCH PIN 1
04184 INDICATOR LIGHT 1
04213 WATER HOLE PLUG 1
04900 CHASSIS 19" 1
04905 1/420 X ¾" PHILLIPS SCREW 2
04906 1/4" WASHER 2
04921 BUMPER 19" 1
04944 TSUPPORT AXLE 1
04947 MOTOR COVER 1
20060 ½" TENSION WASHER 2
20139 FOAM SHROUD 1
Switch Box DS Cover Assembly (04193)
Part N. Description Quantity
03699 1 ½ HP MICRO SWITCH 1
03954 6/32 X ¼" PHILLIPS SCREW 2
04133 SWITCH BOX COVER 1
04163 HILOW SWITCH 1
04166 832 X ¼" PHILLIPS SCREW 4
04169 632 X 7/8" PHILLIPS SCREW 2
04340 SPEED CONTROL 1
04366 LEAD WIRE 1
20031 INTERNAL LOCK WASHER 2
Handle Assembly (04972)
Part N. Description Quantity
01372 POWER CORD 50' / 15.24M 1
01745 PIGTAIL 42" 1
03789 FOAM HANDLE GRIP 2
03949 SAFETY SWITCH KNOB 2
03951 SAFETY SWITCH SPRING 1
04131 SWITCH BOX 1
04137 CORD HOOK 1
04139 CHROME HANDLE TUBE 1
04142 CAM LEVER ASSEMBLY C/W 04147 PLUG 1
04148 EXTENSION ROD 1
04151 TAPERED SLEEVE 1
04152 HANDLE WEDGE 1
04155 CABLE SPRING 1
04158 BUSHING 2
04159 5/16" X 18 NYLON LOCK NUT 2
04173 3/8" GROMMET 1
04177 HANDLE TUBE 1
04179 #141 ½" FLAT HEAD SCREW 2
04190 832 X ½" PHILLIPS SCREW 4
04198 HANDLE TUBE PLUG 2
04199 832 X ¼" PHILLIPS SCREW 3
04248 ¼20 X ¾" BOLT 3
04260 5/1618 X 5/16" SET SCREW 1
04909 TRIGGER 1
04910 SAFETY SWITCH LEVER 1
20002 ¼"20 NYLON LOCK NUT 2
20484 CORD GRIP 2
22305 3/8"16 FLANGED ACCORN NUT 1
Drive Pad
Part N. Description Quantity
04382 CLUTCH PLATE C/W SCREWS 6 1
40278 STANDARD DRIVE PAD 18" 1
42106 RED BUFFING PAD 19" 5/CS 0.2
Optional Spare Parts
Part N. Description Quantity
03847 CARBON BRUSH 4 PER SET 1
03865 RECTIFIER 1

12 Parts & Operations Manual Integra TX / LA / UHS
Integra TX DS 19” 19915S
Parts / Pièces
Base Assembly (04985) Handle Assembly (04972)
Switch Box DS Cover Assembly (04193)Drive Pad

13Parts & Operations Manual Integra TX / LA / UHS
Integra TX DS 19” 19915S
Parts / Pièces
Base Assembly (04985)
Part N. Description Quantity
01096 1024 X ½" PHILLIPS SCREW 2
03016 5/16 LOCKWASHER 4
03063 ½" NYLON WASHER 4
03163 5/16" FLAT WASHER 4
03935 1 ½ HP DC MOTOR C/W GEARBOX11:1 1
03945 5" WHEEL 2
04103 HANDLE BRACE 1
04105 AXLE SHAFT 1
04107 THANDLE SUPPORT 1
04112 AXLE END CAP 4
04113 5/16 18 X 1 ½" BOLT 4
04167 HITCH PIN 1
04184 INDICATOR LIGHT 1
04213 WATER HOLE PLUG 1
04900 CHASSIS 19" 1
04905 1/420 X ¾" PHILLIPS SCREW 2
04906 1/4" WASHER 2
04921 BUMPER 19" 1
04944 TSUPPORT AXLE 1
04947 MOTOR COVER 1
20060 ½" TENSION WASHER 2
20139 FOAM SHROUD 1
Switch Box DS Cover Assembly (04193)
Part N. Description Quantity
03699 1 ½ HP MICRO SWITCH 1
03954 6/32 X ¼" PHILLIPS SCREW 2
04133 SWITCH BOX COVER 1
04163 HILOW SWITCH 1
04166 832 X ¼" PHILLIPS SCREW 4
04169 632 X 7/8" PHILLIPS SCREW 2
04340 SPEED CONTROL 1
04366 LEAD WIRE 1
20031 INTERNAL LOCK WASHER 2
Handle Assembly (04972)
Part N. Description Quantity
01372 POWER CORD 50' / 15.24M 1
01745 PIGTAIL 42" 1
03789 FOAM HANDLE GRIP 2
03949 SAFETY SWITCH KNOB 2
03951 SAFETY SWITCH SPRING 1
04131 SWITCH BOX 1
04137 CORD HOOK 1
04139 CHROME HANDLE TUBE 1
04142 CAM LEVER ASSEMBLY C/W 04147 PLUG 1
04148 EXTENSION ROD 1
04151 TAPERED SLEEVE 1
04152 HANDLE WEDGE 1
04155 CABLE SPRING 1
04158 BUSHING 2
04159 5/16" X 18 NYLON LOCK NUT 2
04173 3/8" GROMMET 1
04177 HANDLE TUBE 1
04179 #141 ½" FLAT HEAD SCREW 2
04190 832 X ½" PHILLIPS SCREW 4
04198 HANDLE TUBE PLUG 2
04199 832 X ¼" PHILLIPS SCREW 3
04248 ¼20 X ¾" BOLT 3
04260 5/1618 X 5/16" SET SCREW 1
04909 TRIGGER 1
04910 SAFETY SWITCH LEVER 1
20002 ¼"20 NYLON LOCK NUT 2
20484 CORD GRIP 2
22305 3/8"16 FLANGED ACCORN NUT 1
Drive Pad
Part N. Description Quantity
40218 HIGH SPEED DRIVE PAD ASSEMBLY
18” C/W 04382 CLUTCH PLATE AND
SCREWS 6
1
42106 RED BUFFING PAD 19" 5/CS 0.2
Optional Spare Parts
Part N. Description Quantity
03847 CARBON BRUSH 4 PER SET 1
03865 RECTIFIER 1

14 Parts & Operations Manual Integra TX / LA / UHS
Integra LA DS 17” 19934
Parts / Pièces
Base Assembly (04994)
Handle Assembly (04973)
Switch Box DS Cover Assembly (04193)Drive Pad

15Parts & Operations Manual Integra TX / LA / UHS
Integra LA DS 17” 19934
Parts / Pièces
Base Assembly (04994)
Part N. Description Quantity
01096 1024 X ½" PHILLIPS SCREW 2
03016 5/16 LOCKWASHER 4
03063 ½" NYLON WASHER 4
03163 5/16" FLAT WASHER 4
03935 1 ½ HP DC MOTOR C/W GEARBOX11:1 1
03945 5" WHEEL 2
04103 HANDLE BRACE 1
04105 AXLE SHAFT 1
04112 AXLE END CAP 4
04113 5/16 18 X 1 ½" BOLT 4
04184 INDICATOR LIGHT 1
04213 WATER HOLE PLUG 1
04901 CHASSIS 17" 1
04905 ¼20 X ¾" PHILLIPS SCREW 2
04906 ¼" WASHER 2
04920 BUMPER 17" 1
04944 TSUPPORT AXLE 1
04947 MOTOR COVER 1
20060 ½" TENSION WASHER 2
20139 FOAM SHROUD 1
04944 TSUPPORT AXLE 1
04947 MOTOR COVER 1
20060 ½" TENSION WASHER 2
20139 FOAM SHROUD 1
Switch Box DS Cover Assembly (04193)
Part N. Description Quantity
03699 1 ½ HP MICRO SWITCH 1
03954 6/32 X ¼" PHILLIPS SCREW 2
04133 SWITCH BOX COVER 1
04163 HILOW SWITCH 1
04166 832 X ¼" PHILLIPS SCREW 4
04169 632 X 7/8" PHILLIPS SCREW 2
04340 SPEED CONTROL 1
04366 LEAD WIRE 1
20031 INTERNAL LOCK WASHER 2
Handle Assembly (04973)
Part N. Description Quantity
01372 POWER CORD 50' / 15.24M 1
01640 LOCKING HANDLE C/W 04147 PLUG 1
01745 PIGTAIL 42" 1
03789 FOAM HANDLE GRIP 2
03949 SAFETY SWITCH KNOB 2
03951 SAFETY SWITCH SPRING 1
04131 SWITCH BOX 1
04155 CABLE SPRING 1
04173 3/8" GROMMET 1
04177 HANDLE TUBE 1
04179 #141 ½" FLAT HEAD SCREW 2
04190 832 X ½" PHILLIPS SCREW 4
04198 HANDLE TUBE PLUG 2
04199 832 X 1/4" PHILLIPS SCREW 3
04248 1/420 X 3/4" BOLT 2
04909 TRIGGER 1
04910 SAFETY SWITCH LEVER 1
04933 CHROME HANDLE TUBE 1
04942 CORD HOOK CLAMP 1
20002 1/4"20 NYLON LOCK NUT 2
20484 CORD GRIP 2
04260 5/1618 X 5/16" SET SCREW 1
04909 TRIGGER 1
04910 SAFETY SWITCH LEVER 1
20002 ¼"20 NYLON LOCK NUT 2
20484 CORD GRIP 2
22305 3/8"16 FLANGED ACCORN NUT 1
Drive Pad
Part N. Description Quantity
04382 CLUTCH PLATE C/W SCREWS 6 1
40276 STANDARD DRIVE PAD 16" 1
42104 RED BUFFING PAD 17" 5/CS 0.2
Optional Spare Parts
Part N. Description Quantity
03847 CARBON BRUSH 4 PER SET 1
03865 RECTIFIER 1

16 Parts & Operations Manual Integra TX / LA / UHS
Integra LA DS 19” 19935
Parts / Pièces
Base Assembly (04995)
Handle Assembly (04973)
Switch Box DS Cover Assembly (04193)Drive Pad

17Parts & Operations Manual Integra TX / LA / UHS
Integra LA DS 19” 19935
Parts / Pièces
Base Assembly (04995)
Part N. Description Quantity
01096 1024 X ½" PHILLIPS SCREW 2
03016 5/16 LOCKWASHER 4
03063 ½" NYLON WASHER 4
03163 5/16" FLAT WASHER 4
03935 1½ HP DC MOTOR C/W GEARBOX 11:1 1
03945 5" WHEEL 2
04103 HANDLE BRACE 1
04105 AXLE SHAFT 1
04112 AXLE END CAP 4
04113 5/16 18 X 1 ½" BOLT 4
04184 INDICATOR LIGHT 1
04213 WATER HOLE PLUG 1
04900 CHASSIS 19" 1
04905 ¼20 X ¾" PHILLIPS SCREW 2
04906 ¼" WASHER 2
04921 BUMPER 19" 1
04944 TSUPPORT AXLE 1
04947 MOTOR COVER 1
20060 ½" TENSION WASHER 2
20139 FOAM SHROUD 1
04944 TSUPPORT AXLE 1
04947 MOTOR COVER 1
20060 ½" TENSION WASHER 2
20139 FOAM SHROUD 1
Switch Box DS Cover Assembly (04193)
Part N. Description Quantity
03699 1 ½ HP MICRO SWITCH 1
03954 6/32 X ¼" PHILLIPS SCREW 2
04133 SWITCH BOX COVER 1
04163 HILOW SWITCH 1
04166 832 X ¼" PHILLIPS SCREW 4
04169 632 X 7/8" PHILLIPS SCREW 2
04340 SPEED CONTROL 1
04366 LEAD WIRE 1
20031 INTERNAL LOCK WASHER 2
Handle Assembly (04973)
Part N. Description Quantity
01372 POWER CORD 50' / 15.24M 1
01640 LOCKING HANDLE C/W 04147 PLUG 1
01745 PIGTAIL 42" 1
03789 FOAM HANDLE GRIP 2
03949 SAFETY SWITCH KNOB 2
03951 SAFETY SWITCH SPRING 1
04131 SWITCH BOX 1
04155 CABLE SPRING 1
04173 3/8" GROMMET 1
04177 HANDLE TUBE 1
04179 #141 ½" FLAT HEAD SCREW 2
04190 832 X ½" PHILLIPS SCREW 4
04198 HANDLE TUBE PLUG 2
04199 832 X 1/4" PHILLIPS SCREW 3
04248 1/420 X 3/4" BOLT 2
04909 TRIGGER 1
04910 SAFETY SWITCH LEVER 1
04933 CHROME HANDLE TUBE 1
04942 CORD HOOK CLAMP 1
20002 1/4"20 NYLON LOCK NUT 2
20484 CORD GRIP 2
04260 5/1618 X 5/16" SET SCREW 1
04909 TRIGGER 1
04910 SAFETY SWITCH LEVER 1
20002 ¼"20 NYLON LOCK NUT 2
20484 CORD GRIP 2
22305 3/8"16 FLANGED ACCORN NUT 1
Drive Pad
Part N. Description Quantity
04382 CLUTCH PLATE C/W SCREWS 6 1
40278 STANDARD DRIVE PAD 18" 1
42106 RED BUFFING PAD 19" 5/CS 0.2
Optional Spare Parts
Part N. Description Quantity
03847 CARBON BRUSH 4 PER SET 1
03865 RECTIFIER 1

18 Parts & Operations Manual Integra TX / LA / UHS
Integra UHS 19918
Parts / Pièces
Base Assembly (04988) Handle Assembly (04975)
Switch Box UHS / 20 DC
Cover Assembly (04389)

19Parts & Operations Manual Integra TX / LA / UHS
Integra UHS 19918
Parts / Pièces
Base Assembly (04988)
Part N. Description Quantity
01037 3/8" LOCKWASHER 4
01096 1024 X ½" PHILLIPS SCREW 2
03016 5/16 LOCKWASHER 4
03063 ½" NYLON WASHER 4
03163 5/16" FLAT WASHER 4
03945 5" WHEEL 2
04103 HANDLE BRACE 1
04107 THANDLE SUPPORT 1
04112 AXLE END CAP 6
04113 5/16 18 X 1 ½" BOLT 4
04167 HITCH PIN 1
04184 INDICATOR LIGHT 1
04298 1 ½ HP DC MOTOR 2000 RPM 1
04320 MOTOR SUPPORT BRACKET 4
04322 FLEX LOCK 1
04324 CENTER LOCK C/W SCREWS 3 1
04329 3/8"16 X 5/8" BOLT 4
04334 5/16"18 X ¾" SOCKET SCREW 1
04335 1 ¼" WASHER CUP 1
04348 8 X 5/8" PHILLIPS SCREW 10
04370 CASTER 1
04902 CHASSIS UHS 1
04905 ¼20 X ¾" PHILLIPS SCREW 2
04912 ADJUSTMENT KNOB 1
04914 AXLE 4.40" 1
04916 AXLE 13.78" 1
04923 WHEEL STUD 1
04944 TSUPPORT AXLE 1
04951 MOTOR COVER 1
05001 WHEEL ADJUSTMENT SPRING 1
05003 BUMPER / DUST SKIRT 1
20060 ½" TENSION WASHER 2
20139 FOAM SHROUD 1
20292 BRASS WASHER 1
42410 BLUE ICE BURNISHING PAD 19" 5/CS 0.2
Filter Cartridge Assembly (05031)
Part N. Description Quantity
04998 Filter Sleeve 1
05030 Filter Cartridge 1
Handle Assembly (04975)
Part N. Description Quantity
01372 POWER CORD 50' / 15.24M 1
01640 LOCKING HANDLE C/W 04147 PLUG 1
01745 PIGTAIL 42" 1
03789 FOAM HANDLE GRIP 2
03949 SAFETY SWITCH KNOB 2
03951 SAFETY SWITCH SPRING 1
04131 SWITCH BOX 1
04155 CABLE SPRING 1
04173 3/8" GROMMET 1
04177 HANDLE TUBE 1
04179 #141 ½" FLAT HEAD SCREW 2
04190 832 X ½" PHILLIPS SCREW 4
04198 HANDLE TUBE PLUG 2
04199 832 X ¼" PHILLIPS SCREW 3
04248 ¼20 X ¾" BOLT 2
04909 TRIGGER 1
04910 SAFETY SWITCH LEVER 1
04933 CHROME HANDLE TUBE 1
04942 CORD HOOK CLAMP 1
20002 ¼"20 NYLON LOCK NUT 2
20484 CORD GRIP 2
04248 ¼20 X ¾" BOLT 3
04260 5/1618 X 5/16" SET SCREW 1
04909 TRIGGER 1
04910 SAFETY SWITCH LEVER 1
20002 ¼"20 NYLON LOCK NUT 2
20484 CORD GRIP 2
22305 3/8"16 FLANGED ACCORN NUT 1
Switch Box UHS / 20 DC Cover Assembly (04389)
Part N. Description Quantity
03699 1 ½ HP MICRO SWITCH 1
04166 832 X ¼" PHILLIPS SCREW 4
04169 632 X 7/8" PHILLIPS SCREW 2
04214 INSERT SWITCH 1
04281 SWITCH BOX COVER 1
04285 UHS AMP METER 1
04911 METER LEAD WIRE 1
Optional Spare Parts
Part N. Description Quantity
03847 CARBON BRUSH 4 PER SET 1
03865 RECTIFIER 1

20 Manuel de pièces et d’opérations Integra TX / LA / UHS
Sécurité, opération et entretien
Conservez ces instructions. Lisez et suivez tous les avertissements et mises en garde avant d’utiliser cette machine. Cette unité est conçue
pour un usage commercial.
S’il est bien entretenu, cette machine vous donnera de nombreuses années de satisfaction de fonctionnement sans problèmes.
Toutes les pièces ont été inspectées en suivant des normes de contrôles de qualités rigides avant leur assemblage nal. Avant
l’emballage, votre machine a été de nouveau inspectée pour assurer un assemblage sans défauts.
Cette machine est emballée pour prévenir les dommages en cours d’expédition. Nous recommandons que lors de la livraison,
vous déballiez l’unité et l’inspecter pour tous dommages. Seul un examen visuel révélera des dommages qui ont pu se produire
lors du transport.
Consignes de sécurité importantes
AVERTISSEMENT : Lire toutes les instructions et consignes avant d’utiliser votre machine.
Pour réduire le risque d’incendie, de décharge électrique et de blessures :
• Utilisez uniquement tel que décrit dans ce manuel. Utilisez uniquement les accessoires recommandés par le fabricant.
• Testez tous les prises avec un testeur d’alimentation avant de brancher la machine sur une prise. Branchez le cordon dans
la prise mise à terre la plus proche.
• Ne pas débrancher en tirant sur le cordon, tirez sur la prise.
• Ne tirez pas l’unité par le cordon.
• Éloignez le cordon des surfaces chauées.
• Ne tentez jamais de faire des ajustements ou des réparations pendant que l’appareil est branché.
• NE PAS utiliser si le cordon ou la prise sont endommagés.
• NE PAS utiliser à l’extérieur, dans l’eau stagnante sur les surfaces mouillées.
• Portez une attention particulière lors de l’utilisation de l’appareil à proximité d’enfants.
• Ne ramassez pas de matériaux inammables ou combustibles ou utilisez la machine où ces matériaux peuvent être présents.
• Ne pas laisser la machine à l’extérieur, dans la chaleur ou le froid extrêmes. Les éléments météorologiques vont
endommager les composants et annuler la garantie.
• Soulevez en utilisant uniquement les poignées appropriées.
• Toujours porter l’équipement de sécurité et des vêtements appropriés lorsque vous utilisez la machine.
• Garder toutes les parties du corps, les cheveux et les vêtements amples à distance des ouvertures et des pièces mobiles.
• Redoubler de prudence lors du nettoyage des escaliers. Ne jamais déplacer la machine vers le haut ou descendre
lesescaliers avec du liquide dans la machine.
• Utilisez votre bon sens pour vous protéger et protéger les autres contre les blessures lors de l’utilisation de la machine.
N.B. Cette machine à plancher est destinée à l’usage commercial seulement.
La page est en cours de chargement...
La page est en cours de chargement...
La page est en cours de chargement...
La page est en cours de chargement...
La page est en cours de chargement...
La page est en cours de chargement...
La page est en cours de chargement...
La page est en cours de chargement...
-
 1
1
-
 2
2
-
 3
3
-
 4
4
-
 5
5
-
 6
6
-
 7
7
-
 8
8
-
 9
9
-
 10
10
-
 11
11
-
 12
12
-
 13
13
-
 14
14
-
 15
15
-
 16
16
-
 17
17
-
 18
18
-
 19
19
-
 20
20
-
 21
21
-
 22
22
-
 23
23
-
 24
24
-
 25
25
-
 26
26
-
 27
27
-
 28
28


Dustbane Integra Series Operations Manual
- Catégorie
- Machine à plancher
- Taper
- Operations Manual
dans d''autres langues
- English: Dustbane Integra Series
Documents connexes
Autres documents
-
Toro Bumper Kit, For 832, 1032, 1132 and 1142 Lawn Tractors Guide d'installation
-
NSS High-Speed Burnishers Manuel utilisateur
-
Clarke US 2500 Manuel utilisateur
-
Alto 230V Manuel utilisateur
-
-
MTD 31AS62N2711 Manuel utilisateur
-
Windsor BDS 51/175 C Le manuel du propriétaire