Maytag UMC5200BAB Le manuel du propriétaire
- Catégorie
- Micro-ondes
- Taper
- Le manuel du propriétaire
Ce manuel convient également à

Use & Care Guide
Models: UMC5200BAB/W/S
UlVlC5200 BC B/W/S
IMPORTANT SAFETY INSTRUCTIONS ........... 2
Precautions to Avoid Possible Exposure to Excessive
Microwave Energy ............................ 4
installation and Operation ..................... 6
Features .................................... 7
Operating Instructions ........................ 9
Care and Cleaning ........................... 21
Cooking Utensils ............................ 22
Troubleshooting ............................. 23
Warranty and Service ........................ 24
Manuel d'entretien et d'utilisation .............. 25
Guia de uso y cuidado ....................... 49
Keep instructions for future reference.
Be sure Use & Care Guide stays with oven.
Part No $112P306-60
Form No & 0S 05 Code No DE6S-03154A

IMPORTANT SAFETY INSTRUCTIONS
What You Need to
Know About
Safety instructions
Warning and Important Safety Instructions appearing in this Use
& Care Guide are not meant to cover all possible conditions and
situations that may occur.Common sense,caution, and care must
be exercisedwhen installing, maintaining, or operating microwave.
Always contact your dealer, distributor, service agent, or
manufacturer about problems or conditions you do not understand.
Recognize Safety
Symbols, Words,
Labels
SAVE TH I STRUCTIONS

IMPORTANT SAFETY INSTRUCTIONS
SAVE T ESEI ST JCTlO S

IMPORTANT SAFETY INSTRUCTIONS
Precautionsto Avoid
PossibleExposure
to Excessive
" Energy
icrowave
A. DO NOT attempt to operate this oven with the door open
since open-door operation can result in harmful exposure
to microwave energy, it is importantnot to defeat or
tamper with the safety interlocks.
B.DO NOT place any object between the oven front
face and the door or allow soil or cleaner residue to
accumulate on sealing surfaces.
C. DO NOT operate the oven if itisdamaged. It is
particularly importantthat oven door close properly and
that there isno damage to:
1.door (bent),
2. hinges and latches (broken or loosened),
3. door seals and sealing surfaces.
D.Oven should not be adjusted or repaired by anyone
except properly qualified service personnel.
SAVE TH I STRUCTIONS

IMPORTANT SAFETY INSTRUCTIONS
Oven MUST be grounded. Grounding reduces risk
of electric shock by providing an escape wire for the
electric current if an electrical short occurs. This oven
is equipped with a cord having a grounding wire with a
grounding plug. The plug must be plugged into an outlet
that is properly installed and grounded. See Installation
Instructions.
Consult a qualified electrician or servicer if grounding
instructionsare not completely understood, or ifdoubt
exists as to whether the oven is properly grounded.
Do not use an extension cord. If the product power
cord is too short, have a qualified electrician install a
three-slot receptacle. This oven should be plugged into
a separate 60 hertz circuit with the electrical rating as
shown in specifications table. When the oven is on a
circuit with other equipment, an increase in cooking
times may be required and fuses can be blown.
Microwave operates on standard household current, 110-
120V.
Federal
Communications
Commission o
Frequency interference
Statement
( .S.A. Only}
This equipment generates and uses ISM frequency energy
and if not installedand used properly, that is in strict
accordance with the manufacturer's instructions,may cause
interference to radio and television reception. It has been type
tested and found to comply with limits for ISM Equipment
pursuant to part 18 of FCC Rules, which are designed to
provide reasonable protection against such interferencein a
residential installation.
However, there isno guarantee that interferencewill not
occur in a particular installation.If this equipment does cause
interference to radio or television reception, which can be
determined by turning the equipment off and on, the user is
encouraged to try to correct the interference by one or more
of the following:
• Reorient the receiving antenna of the radio or television.
,, Relocate the microwave oven with respect to the receiver.
,, Move the microwave oven away from the receiver.
,, Plug the microwave oven into a different outlet so that the
microwave oven and the receiver are on different branch
circuits.
The manufacturer is not responsible for any radio or
television interference caused by unauthorized
modification to this microwave oven. it is the responsibility
of the user to correct such interference.
SAVE T ESEI ST JCTIO S

Installation and Operation
CIRCUITS
For safety purposes this oven must
be plugged into a 15A (CANADA)or
20A (USA) circuit. No other electrical
appliances or lighting circuits should
be on this line. If in doubt, consult a
licensed electrician.
VO LTAGE
The voltage used at the wall
receptacle must be the same as
specified on the oven name plate
located inside oven door. Use of a
higher voltage is dangerous and
may result in a fire or other type of
accident causing oven damage. Low
voltage will cause slow cooking. In
case your microwave oven does not
perform normally in spite of proper
voltage, remove and reinsert the plug.
PLACEMENT OF THE OVEN
Your microwave oven can be placed
easily in your kitchen, family room, or
anywhere else in your home. Place
the oven on a flat surface such as
a kitchen countertop or a specially
designed microwave oven cart. Do
not place oven above a gas or electric
range. Free air flow around the oven
is important.
UNPACKING OVEN
• Inspect oven for damage such as
dents in door or inside oven cavity.
• Report any dents or breakage to
source of purchase immediately. Do
not attempt to use oven if damaged.
• Remove all materials from oven
interior.
• If oven has been stored in extremely
cold area, wait a few hours before
connecting power.
BUILT-IN CAPACITY
For information call:
1-800-688-9900 U.S.A.
1-800-688-2002 Canada
• Available Trim kit is UMTK30/27.
6
DO NOT BLOCK
AIR VENTS
All air vents should be kept clear
during cooking. If air vents are
covered during oven operation the
oven may overheat. In this case,
a sensitive thermal safety device
automatically turns the oven off.The
oven will be inoperable until it has
cooled sufficiently.
GETTING THE BEST
COOKING RESULTS
To get the best results from your
microwave oven, read and follow the
guidelines below.
,, Storage Temperature: Foods
taken from the freezer or refrigerator
take longer to cook than the same
foods at room temperature.
,, Size: Small pieces of food cook
faster than large ones, pieces
similar in size and shape cook more
evenly. For even cooking, reduce
the power when cooking large
pieces of food.
,, Natural Moisture: Very moist
foods cook more evenly because
microwave energy isattracted to
water molecules.
,, Stir foods such as casseroles and
vegetables from the outside to the
center to distribute the heat evenly
and speed cooking. Constant
stirring is not necessary.
,, Turn over foods like pork chops,
baking potatoes, roasts, or whole
cauliflower halfway through the
cooking time to expose all sides
equally to microwave energy.
,, Place delicate areas of foods,
such as asparagus tips, toward the
center of the dish.
,, Arrange unevenly shaped foods,
such as chicken pieces or salmon
steaks, with the thicker, meatier
parts toward the outside of the dish.
,, Shield, with small pieces of
aluminum foil, parts of food that
may cook quickly, such as wing tips
and leg ends of poultry.
,, Let It Stand: After you remove the
food from the microwave, cover food
with foil or casserole lid and let it
stand to finish cooking in the center
and avoid overcooking the outer
edges. The length of standing time
depends on the density and surface
area of the food.
• Wrapping in waxed paper or
paper towel: Sandwiches and
many other foods containing
prebaked bread should be wrapped
prior to microwaving to prevent
drying out.

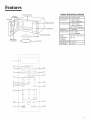
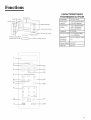
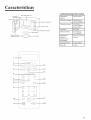
Features
Window
Door Screen
Door Seal
Safety Door
Lock System
Oven Front Plate
Display Window
Control Panel
<_=_Turntable Door Open Button
_ Rotter Ring
OVEN SPECIFICATIONS
Power Supply 120 VAC, 60 Hz
Input Power 1,550 W (USA)
1,500 W (CANADA)
Cooking Power 1,100 W (USA)
1,000 W (CANADA)
(IEC 60705 Standard)
Frequency 2,450 MHz
Rated Current 13.5 A (USA)
13 A (CANADA)
Outer 23 21/32" x 13 17/64"x
Dimensions 18 3/16"
(WxHxD)
Cavity Volume 2.0 Cu. Ft.
Net Weight 41.4 Ibs.
1
2
3--
4--
5
6
7
8--
9--
_/;>_ ¸ <_O__k)_
....................w ....................
I I i
'_ft / t :
[ <;t>; ,? } , >< __
__ !<t< ; }
STOP
-- CLEAR
--12
--13
14
17
--18

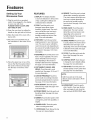
Features
Setting Up Your
Microwave Oven
1. Plug the cord into a grounded
outlet. Once plugged in, the display
on your oven will show:
PLEASE TOUCH CLOCK AND
SET TIME OF DAY.
2. Open the oven door by pulling the
handle on the right side of the door.
3. Wipe the inside of the oven with a
damp cloth.
4. Place the pre-assembled ring in
the indentation in the center of the
oven.
5. Place the glass tray on top of the
ring so that the three glass tabs in
the center of the tray fit securely
into the tabs on the floor of the
oven.
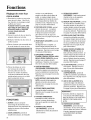
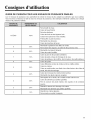
FEATURES
1. DISPLAY: The Display includes
a clock and indicators to tell you time
of day, cooking time settings and
cooking functions selected.
2. COOK: Touch this pad tocook
beverage, frozen dinner,frozen
breakfast,chicken breast.Theoven's
sensor will tellthe oven how long to
cook depending on the amount of
humidity coming from the food. See
page 13 for more information.
3. POPCORN: Touch this pad when
popping popcorn in your microwave
oven. The oven's sensor will tell the
oven how long to cook depending on
the amount of humidity itdetects from
the popcorn. See page 12 for more
information.
4.VEGETABLES: Touch this pad to cook
fresh or frozen vegetables.The oven's
sensor will tell the oven how long to
cook depending on the amount of
humidity it detects from the vegetables.
See page 13 formore information.
5. SOFTEN/MELT,SNACKS, KIDS
MEALS: Touch this pad to cook
specific food. See pages 15,16and 17
formore information.
6. CUSTOM PROGRAM: Touch this
pad to recall one cooking instruction
previously programmed into memory.
See page 10 for more information.
7. AUTO DEFROST: Touch this pad to
defrostfood byweight.See page 18 for
more information.
8. KITCHEN TIMER: Touchthis pad to set
the kitchen timer.See page 9 for more
information.
9. NUMBER: Touch number pads toenter
cooking time, power level,quantities, or
weights.
10.POWER LEVEL: Touchthis pad to
select a cooking power level.
11. STOP/CLEAR: Touchthis pad to stop
the oven or to clear all entries.
12. REHEAT: Touch this pad to reheat
dinner plate, casserole, and pasta.
The oven's sensor will tell the oven
how long to reheat depending on
the amount of humidity coming
from the food. See page 13 formore
information.
13. PIZZA SLICE: Touch this pad to
reheat pizza.The oven's sensor
will tell the oven how long to cook
depending on the amount of
humidity itdetects. See page 12 for
more information.
14. BAKED POTATO:Touch this pad
to cook potatoes. The oven's sensor
will tellthe oven how long to cook
depending on the amount of humidity
itdetects from the potato.See page
13 for more information.
15.CLOCK: Touch this pad toenter the
time of day.See page 9 for more
information.
16.CONTROL SETUP: Touchthis pad
to change the oven'sdefault settings.
See page 9 for more information.
17.ADD 30 SEC: Touch this pad toset
and startquickly at 100% power level.
See page 9 for more information.
NOTE:
,,Add 30 sec pad can not be used
with any sensor control pad or AUTO
DEFROST.
18.ENTER/START: Touch this pad to
start a function. Ifyou open thedoor
after oven begins to cook, close the
door and touch ENTER/STARTagain.

Operating Instructions
LEARN ABOUTYOUR
MICROWAVE OVEN
This section introduces you to the
basics you need to know to operate
your microwave oven. Please read
this information before use.
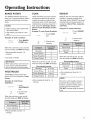
KITCHEN TIMER
You can use your microwave oven as a
timer. Use the Kitchen Timer for timing
up to 99 minutes, 99 seconds.
Example: To set for 3 minutes.
< t : _c,_ 1.Touch KITCHEN
......_,_ TIMER pad.
2. Enter the time by
using the number
pads.
E;] 3. Touch ENTER/
@ _ /_,[:? START pad.
When the time is over, you will hear
beeps and END will display.
CLOCK
Example: To set 8:00 AM.
Co<" 1.Touch CLOCK
pad.
2. Enter the time
by using the
number pads.
• ,_ ..... 3. Touch ENTER/
/_. _ START pad.
4. Touch 1 for AM.
_-- _ /_ ¸_ _
_ 5.Touch ENTER/
/_ START pad.
NOTE:
* Follow steps 1-3 above, when clock
is set in the 24 hour clock mode.
CONTROL SETUP
You can change the default values.
See following chart for more information.
1
2
3
4
5
6
7
8
Weight mode 1 Lbs.
selected 2 Kg.
Sound ON/OFF 1 Sound ON
control 2 Sound OFF
Clock display 1 12HR
control 2 24HR
1 Slow speed
Scroll speed 2 Nomal speed
3 Fast speed
Remind end 1 ON
Signal 2 OFF
1 ON
Demo Mode
2 OFF
Daylight 1 ON
Saving Time 2 OFF
1 English
Language 2 Spanish
Example: To change weight mode
(from Lbs. to Kg).
Coy}L o 1.Touch CONTROL
SETUP pad.
2. Touch number 1 pad.
/ e55
3. Touch number 2 pad.
CHILD LOCK
You may lock the control panel to
prevent the microwave from being
accidentally started or used by
children.
The Child Lock feature is also useful
when cleaning the control panel.
Child Lock prevents accidental
programming when wiping the control
panel.
Example: To set the child lock.
STOP 1.Touch STOP/
CLEAR CLEAR pad.
::i,, 2. Touch and hold
J
ENTER/START
pad more than 3
seconds. CHILD
LOCK ON will
appear in the
display window
with two beeps.
Example: To cancel the child lock.
G i}!",i/_i:/:._ 1.Touch and hold
,................... ENTER/START
% 2
pad more than 3
seconds. LOCKED
will disappear
and you hear two
beeps.
ADD 30 SEC.
A time-saving pad, this simplified
control lets you quickly set and start
microwave cooking without the need
to touch the ENTER/START pad.
Example: To set ADD 30 SEC. for 2
minutes.
;;_J , (, (
Touch ADD 30 SEC.
pad 4 times. The
oven begins cooking
and display shows
time counting down.

Operating Instructions
CUSTOM PROGRAM
CUSTOM PROGRAM lets you recall
one cooking instruction previously
placed in memory and begin cooking
automatically.
Example: Memory to cook for 2
minutes at 70% power.
1. Touch CUSTOM
PROGRAM pad.
COOKING AT HIGH
POWER LEVELS
Example: To cook food for 8 minutes
30 seconds at 100% power.
1. Enter the cook
time.
2. Touch ENTER/
START pad.
2. Enter the cook
time.
When the cook time isover, you will
hear four beeps and END will display.
3. Touch POWER
L<'w::' LEVEL pad.
4. Enter the power
level.
"/
E7 5. Touch ENTER/
_ !_/_ _ START pad.
Example: To recall the custom
program.
Cuso_ 1. Touch CUSTOM
PROGRAM pad.
_:_,__-1-[_{_
_;_ , .... 2. Touch ENTER/
_;i_ START pad.
When the cook time isover, you will
hear four beeps and END will display.
MORE/LESS
By using the MORE(9) or LESS(l)
pad, al of the pre-programmed
cook and time cook features can be
adjusted to cook food for a longer or
shorter time.
1. Touching MORE(9)
pad will add 10
seconds of cooking
time each time you
touch it.
2. Touching LESS(l)
pad will subtract 10
seconds of cooking
time each time you
touch it.
Note:
If the oven is set to cook for
more than 25 minutes, it will
automaticaly adjust itself to 70
percent power after 25 minutes to
avoid overcooking.
COOKING AT LOWER
POWER LEVELS
HIGH power cooking does not always
give you the best results with foods
that need slower cooking, such as
roasts, baked goods, or custards. Your
oven has 9 power settings in addition
to HIGH.
Example: To cook food for 7
minutes 30 seconds at 70% power.
1. Enter the cook
time.
Po'v'¢or 2. Touch POWER
Levo LEVEL pad.
3. Enter the power
level.
4. Touch ENTER/
START pad.
When the cook time isover, you will
hear four beeps and END will display.
See cooking guide for Power levels,
page 11.
COOKING WITH
MORE THAN ONE
COOK CYCLE
For best results, some recipes call for
one Power Level for a certain length
of time, and another Power Level for
another length of time.Your oven can
be set to change from one to another
automatically, for up to three cycles if
the first cycle is defrost.
Example: To cook food for 3
minutes at 100% power and then
70% power for 7 minutes 30
seconds.
1. Enter the first
cook time.
! _!!,!;
2. Touch POWER
LEVEL pad.
3. Enter the power
level.
4. Enter the
second cook
time.
_o'¢s_:' 5. Touch POWER
Leyc! LEVEL pad.
6. Enter the power
level.
C__ "¢ 7. Touch ENTER/
_ START pad.
When the cook time is over, you will
hear four beeps and END will display.
10

Operating Instructions
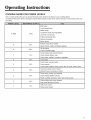
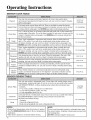
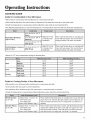
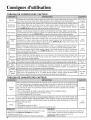
COOKING GUIDE FOR POWER LEVELS
The 10 power levels allow you to choose the best power level for the food you are cooking. Below
are listed all the power levels, examples of foods best cooked at each level, and the amount of microwave power you
are using.
100%
Boil water.
Cook ground beef.
Make candy.
Cook fresh fruits and vegetables
Cook fish and poultry.
Preheat browning dish.
Reheat beverages.
Bacon slices.
Reheat meat slices quickly.
Saute onions, celery, and green pepper.
All reheating.
Cook scrambled eggs.
Cook breads and cereal products.
10 High
9 90%
8 80%
7 70% Cook cheese dishes, veal.
Cook cakes, muffins, brownies, cupcakes.
6 60% Cook pasta.
Cook meats, whole poultry.
5 50% Cook custard.
Cook whole chicken, turkey, spare ribs, rib roast, sirloin roast.
Cook less tender cuts of meat.
4 40%
Reheat frozen convenience foods.
Thaw meat, poultry, and seafood.
3 30% Cook small quantities of food.
Finish cooking casserole, stew, and some sauces.
Soften butter and cream cheese.
2 20%
Heat small amounts of food.
Soften ice cream.
1 10%
Raise yeast dough.
11

Operating Instructions
SENSOR OPERATING
INSTRUCTIONS
Sensor Cook allows you to cook
most of your favorite foods without
selecting cooking times and power
levels. The display will indicate the
sensing period by scrolling the name
of the food. The oven automatically
determines required cooking time for
each food item. When the internal
sensor detects a certain amount of
humidity coming from the food, it will
tell the oven how much longer to heat.
The oven will beep and either turn off
or the display will show the remaining
heating time.
For best results for cooking
by Sensor, follow these
recommendations:
1. Food cooked with the sensor
system should be at normal
storage temperature.
2. Glass turntable and outside of
container should be dry to assure
best cooking results.
3. Most foods should always be
covered loosely with microwavable
plastic wrap, waxed paper, or a lid.
See sensor tables on page 14.
4. Do not open the door or touch
the STOP/CLEAR pad during the
sensing time. When sensing time
is over, the oven beeps once and
the remaining cooking time will
appear in the display window or the
oven will turn off. At this time you
can open the door to stir, turn, or
rearrange the food.
IMPORTANT:
When using sensor cook, the oven
must cool for 5 minutes between
uses or food will not cook properly.
2. Never use tight-sealing plastic
covers. They can prevent steam
from escaping and cause food to
overcook.
3. Match the amount to the size of the
container. Fill containers at least
half full for best results.
4. Be sure the outside of the cooking
container and the inside of the
microwave oven are dry before
placing food in the oven. Beads of
moisture turning into steam can
mislead the sensor.
ADDING OR
SUBTRACTING
COOK TIM E
By using the MORE(9) or LESS(l)
pad all of the sensor cook and time
cook settings can be adjusted to cook
food for a longer or shorter time.
POPCORN
POPCORN lets you pop commercial-
ly packaged microwave popcorn. Pop
only one package at a time. For best
results, use fresh bags of popcorn.
Example: To pop popcorn
Touch POPCORN
pad.
When the cook time is over, you will
hear four beeps and END will display.
,,Recommended amounts:
3.0-3.5 ozs.
PIZZA SLICE
Reheating pizza with PIZZA SLICE
lets you reheat one or several slices
of pizza without selecting cooking
times and power levels.
Example: To reheat 2 slices of
pizza.
i,;,_ Touch PIZZA
_ _:_, SLICE pad.
When the cook time is over, you will
hear four beeps and END will display.
,, Recommended amounts: 1-4 slices.
,, After heating, let stand for 1-3
minutes
NOTE:
If food is not thoroughly cooked or
reheated when using the sensor
feature, complete cooking using a
power level and cooking time.
DO NOT continue using the sensor
pad.
SENSOR COOKING
GUIDE
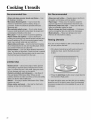
Appropriate containers and coverings
help assure good Sensor cooking
results.
1. Always use microwavable con-
tainers and cover them with lids or
vented plastic wrap.
12

Operating Instructions
BAKED POTATO COOK
The BAKED POTATO pad lets you
bake one or several potatoes without
selecting cooking times and power
levels.
NOTES:
,, Before baking, pierce potato with
fork several times.
• After baking, let stand for 5 min-
utes.
Example: To cook 2 potatoes.
i%;ks, _::_ 1. Touch BAKED
F>o,No POTATO pad.
Using COOK lets you heat common
microwave-prepared foods without
needing to program cooking times
and power levels. COOK has preset
cooking times and power levels for 4
food categories: Beverage, Frozen
Dinner, Frozen Breakfast, Chicken
Breast.
Example: To cook Frozen Breakfast.
1. Touch COOK
.........., pad.
2. Choose food
category.
When the cook time is over, you will
hear four beeps and END will display.
,, Recommended amounts: 1-6
potatoes.
,, Let stand 5 minutes.
IMPORTANT:
When using sensor cook, the oven
must cool for 5 minutes between
uses or food will not cook properly.
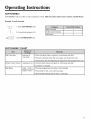
VEGETABLES
VEGETABLES have preset cook
powers for 2 food categories: Fresh,
Frozen.
Example: To cook Frozen
Vegetables.
1. Touch
VEGETABLES
pad.
2. Choose food
category.
When the cook time is over, you will
hear four beeps and END will display.
Fresh Vegetable
Frozen Vegetable
1
2
,, Recommended amounts :1-4
servings
Beverage 1
Frozen Dinner 2
Frozen Breakfast 3
Chicken Breast 4
When the cook time is over, you will
hear four beeps and END will display.
Recommendedamounts:
Beverage 8-10 ozs.
Frozen Dinner 8-14 ozs.
Frozen Breakfast 4-8 ozs.
Chicken Breast 8-24 ozs.
,, After cooking let stand for 1-3
minutes.
REHEAT
REHEAT lets you heat foods without
needing to program cooking times
and power levels. REHEAT has preset
cooking times and power levels for 3
categories: Dinner Plate, Casserole,
and Pasta.
Example: To reheat Casserole.
1.Touch REHEAT
............. pad.
2. Choose food
category.
i i i i i i i iiiiiiiiiiiiiiiiiiiiiiiiiiii : i i i !!i!ili!ii!ii!ii!iii!iii iiiiiiiiiiiiiiii iiii!iii i i ii
Dinner Plate 1
Casserole 2
Pasta 3
When the cook time is over, you will
hear four beeps and END will display.
Recommended amounts:
Dinner Plate 1 serving
Casserole 1-4 servings
Pasta 1-4 servings
After reheating let stand for 1-3
minutes.
NOTE:
If food is not thoroughly cooked or
reheated when using the sensor
feature, complete cooking using a
power level and cooking time.
DO NOT continue using the sensor
pad.
13

Operating Instructions
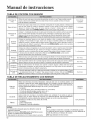
SENSOR COOK TABLE
Use only one microwave-only bag of popcorn at a time. Use caution when
3.0-3.5 oz
Popcorn removing and opening the hot bag from oven. Let oven cool for at least 5 minutes
before using again. 1package.
Prick each potato several times with fork. Place on turntable in spoke-like fashion.
Baked Potato Turn the food over when oven beeps. Let stand 3-5 minutes. Let oven cool for at least 1 to 6 potatoes
5 minutes before using again. Use IVIORE(9)pad when cooking larger potatoes.
Put 1-3 slices of pizza on microwave-safe plate with wide end of slice towards the
Pizza Slice outside edge of the plate. Do not let slices overlap. Do not cover. Let oven cool for 1 to 4 slices
at least 5 minutes before using again. Use MORE(9) pad to increase reheat time
for thick crust pizza.
Place fresh vegetables in microwave-safe ceramic, glass or plastic dish and
co Fresh add 2-4 Tbs. water. Cover with lid or vented plastic wrap during cooking and
1 to 4 servings
u4, Vegetables stir before standing. Let oven cool for at least 5 minutes before using again. Use
ca MORE(9) pad when cooking dense vegetables such as carrots or broccoli spears.
LU Place frozen vegetables in microwave-safe ceramic, glass or plastic dish and
Frozen add 2-4 Tbs. water. Cover with lid or vented plastic wrap during cooking and
1 to 4 servings
> Vegetables stir before standing. Let oven cool for at least 5 minutes before using again. Use
MORE(9) pad when cooking dense vegetables such as carrots or broccoli spears.
Use measuring cup or mug, do not cover. Place the beverage in the oven. After
Beverage heating, stir well. Let oven cool for at least 5 minutes before using again. 8 to 10 oz.
Frozen Remove food from outer wrapping and follow box instructions for covering and
8 to 14 oz.
Dinner standing. Let oven cool for at least 5 minutes before using again.
Frozen Follow package instructions for covering and standing. Use this pad for frozen
© Breakfast sandwich, breakfast entree, etc. Let oven cool for at least 5 minutes before using 4 to 8 oz.
again.
Place chicken breasts on a microwave-safe plate and cover with plastic wrap.
Chicken
Cook to an internal temperature of 170 degrees F. Let stand 5 minutes. Use the 8 to 24 oz.
Breast
MORE(9) pad to increase cooking time for larger or thicker chicken breasts.
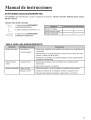
SENSOR REHEAT TABLE
Use only pre-cooked, refrigerated foods. Cover plate with vented plastic wrap or
waxed paper, tucked under plate. If food is not as hot as you prefer after heating
with SENSOR REHEAT, continue heating using cooking time and power level.
Dinner Plate Contents :
- 3-4 oz. meat, poultry or fish(up to 6 oz. with bone)
- 1/2 cup starch (potatoes, pasta, rice, etc.)
- 1/2 cup vegetables (about 3-4 oz.)
Cover plate with lid or vented plastic wrap. If food is not as hot as you prefer after heating
Casserole with SENSOR REHEAT,continue heating usingcooking time and power level.
Stir foods once before serving.
Contents :
Pasta - Casserole-refrigerated foods.
- Pasta-canned spaghetti and ravioli, refrigerated foods.
1 serving
(1 plate)
1 to 4 servings
NOTES:
• Desired food temperature varies from person to person.
• Use the MORE(9)/LESS(1) pads to fit your temperature
I preference.
.Allow food to stand 3 to 5 minutes before serving.
14
NOTE:
If food is not thoroughly cooked or reheated when using
the sensor feature, complete cooking using a power level
and cooking time.
DO NOT continue using the sensor pad.

Operating Instructions
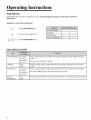
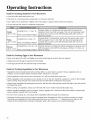
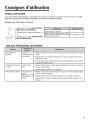
SOFTEN/M ELT
SOFTEN/MELT lets you soften or melt 3 categories of food : Melt Chocolate, Soften Cream Cheese and Melt Butter.
E×ample: To melt chocolate.
_ _ _t¸
_U_T__T _
1. Touch SOFTEN/MELT pad.
2. Choose food category(1-3).
3. Touch ENTER/START pad.
! !i ! i i! !! ! i ! ! ii i ii ii ii ii i i ii ii iiiii ii ii ii ii iiiii ii iiiiiiiiiiiiiiiiiii iiiiiiiiiiiii iii !}
Melt Chocolate
Soften Cream Cheese
Melt Butter
1
2
3
SOFTEN/MELT CHART
Melt Chocolate 2 squares or
1 cup chips
Soften Cream Cheese 1 package (8 oz.)
Melt Butter
1 stick (1/4 lb.)
2 sticks (1/2 lb.)
• Place chocolate chips or square in a microwave-safe dish.
Stir well at half time when the oven beeps, and re-start the oven.
• Unless stirred, the chocolate keeps its shape even when heating time isover.
• Unwrap cream cheese and place on microwave-safe dish.
Let stand 1-2 minutes.
Remove wrapping and cut butter in half vertically.
Place butter in dish, cover with wax paper.
Stir well after finishing and let stand 1-2 minutes.
15

Operating Instructions
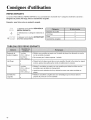
KIDS MEALS
KIDS MEALS lets you heat 4 categories of food : Chicken Nuggets, Hot dogs, French Fries and Frozen
Sandwiches.
Example: To cook frozen sandwiches.
1.Touch KIDS MEALS pad.
2. Choose food category(I-4).
3. Touch ENTER/START pad.
i i i i i i i iii ! i !i !!i!i!iiiiiiiiiiiiiiiiiiiiiiiiiii i
Chicken Nuggets
Hot Dogs
French Fries
Frozen Sandwiches
1
2
3
4
KIDS MEALS CHART
Chicken Nuggets 1 serving • Put a paper towel on top of plate and arrange nuggets in spoke fashion on paper
(4-5 oz.) towel.
2 servings • Do not cover. Let stand 1 minute.
(6-7 oz.)
Hot Dogs 2 EA • Prick hot dogs, place on plate. When the oven beeps, add buns and re-start the
4 EA oven.
French Fries 1 serving • Place 2 paper towels on plate and arrange french fries on towels, do not overlap.
(4-5 oz.) • Blot with additional paper towel after removal from oven.
2 servings
(6-7 oz.)
Frozen 1 EA • Place frozen sandwich in susceptor "sleeve" (which is in package) and put on plate.
Sandwiches 2 EA
16

Operating Instructions
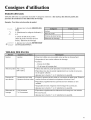
SNACKS
SNACKS lets you heat 4 categories of food :Nachos, Chicken Wings, Potato Skins, and Cheese Sticks.
Example: To cook chicken wings.
1. Touch SNACKS pad.
2. Choose food category(1-4).
3. Select serving size.
(Chicken Wings, Potato Skins,
Cheese Sticks)
4. Touch ENTER/START pad.
Nachos
Chicken Wings
Potato Skins
Cheese Sticks
1
2
3
4
SNACKS CHART
Nachos
Chicken Wings
Potato Skins
1 serving
5-6 oz.
7-8 oz.
1 cooked potato
2 cooked potatoes
Cheese Sticks 5-6 pcs
7-10 pcs
• Place tortilla chips on plate without overlapping.
Sprinkle evenly with cheese.
Contents :
- 2 cups tortilla chips
- 1/3 cup grated cheese
Use pre-cooked, refrigerated chicken wings.
Place chicken wings around plate in spoke fashion and cover with wax paper.
Touch '1'or '2' to select amount.
Cut cooked potato into 4 even wedges. Scoop or cut out potato flesh, leaving
about 1/4" of skin.
Place skins in spoke fashion around plate.
Sprinkle with bacon, onions and cheese. Do not cover.
Touch '1'or '2' to select amount.
Place cheese sticks on plate in spoke fashion.
Do not cover.
Touch '1'or '2' to select amount.
17

Operating Instructions
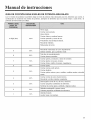
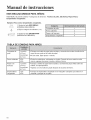
AUTO DEFROST DEFROSTING GUIDE
Defrost choices are preset in the
oven. The defrost feature provides
you with the best defrosting method
for frozen foods, because the oven
automatically sets the defrosting
times according to the weight you
enter. For added convenience, the
AUTO DEFROST includes beeps to
remind you to check or turn over the
food during the defrost cycle.
After touching the AUTO DEFROST
pad once, select the food weight.
Available weight ranges are 0.1 to 6.0
Ibs.
Example :To defrost 1.2 Ibs of
meat.
Auto 1.Touch AUTO
Defrost DEFROST pad.
2. Enter the weight.
_,,,.,/::::',._ !i::_ 3. Touch ENTER/
START pad.
NOTES:
,, After you touch ENTER/START
pad, the display counts down the
defrost time. The oven will beep
twice during the Defrost cycle. At
this time, open the door and turn
the food as needed. Remove any
portions that have thawed then
return frozen portions to the oven
and touch ENTER/START pad to
resume the defrost cycle.
,, The oven will beep to signal you
to check or turn over the food.
,, Follow the instructions below when
defrosting different types of food.
Standard
Food Procedure
Amount
Roast
Beef,
Pork
Steaks,
Chops,
Fish
Ground
Meat
Whole
Chicken
Chicken
Pieces
2.5-6.0 Ibs.
0.5-3.0 Ibs.
0.5-3.0 Ibs.
2.5-6.0 Ibs.
0.5-3.0 Ibs.
Startwith thefood
placedfatsidedown.
Aftereachstage,turn
thefoodoverandshield
anywarmportions
withnarrowstripsof
aluminumfoil.
Letstand,covered,for
15to30minutes.
Aftereachstage,
rearrangethefood.If
thereare anywarm
orthawedportionsof
food,shieldthemwith
narrowflat piecesof
aluminumfoil.Remove
anypiecesoffoodthat
arenearlydefrosted.
Letstand,covered,for
5-10minutes
Aftereachstage,
removeanypiecesd
foodthatarenearly
defrosted.Letstand,
coveredwithfoil,for5-
10minutes.
Removegibletsbefore
freezingpoulty.Start
defrostingwiththe
breastsidedown.
Afterthe firststage,
turnthechickenover
andshieldanywarm
portionswithnarrow
stripsofaluminumfoil.
Afterthe secondstage,
againshieldanywarm
portionswithnarrow
stripsofaluminumfoil.
Letstand,coveredfor
30-60minutesinthe
refrigerator.
Aftereachstage,
rearrangeorremove
anypiecesoffoodthat
arenearlydefrosted.
Letstandfor 10-20
minutes.
DEFROST TIPS
,,When using AUTO DEFROST,
the weight to be entered is the
net weight in pounds and tenths
of pounds (the weight of the food
minus the container).
,, Use AUTO DEFROST only for raw
food. AUTO DEFROST gives best
results when food to be thawed is a
minimum of O°F (taken directly from
a true freezer). If food has been
stored in a refrigerator-freezer that
does not maintain a temperature
of 5°F or below, always program
a lower food weight (for a shorter
defrosting time) to prevent cooking
the food.
,, If the food is stored outside the
freezer for up to 20 minutes, enter a
lower food weight.
,,The shape of the package alters the
defrosting time. Shallow rectangular
packets defrost more quickly than a
deep block.
,, Separate pieces as they begin to
defrost. Separated pieces defrost
more easily.
,, Shield areas of food with small
pieces of foil if they start to become
warm.
,,You can use small pieces of alu-
minum foil to shield foods like
chicken wings, leg tips, and fish
tails, but the foil must not touch the
side of the oven. Foil causes arcing,
which can damage the oven lining.
,, Let food stand covered for 15 to 30
minutes.
,, Let Roasts or Whole poultry stand
for 30 to 60 minutes.
18

Operating Instructions
COOKING GUIDE
Guide for Cooking Meat in Your Microwave
,, Place meat on a microwave-safe roasting rack in a microwave-safe dish.
,, Start meat fat-side down. Use narrow strips of aluminum foil to shield any bone tips or thin meat areas.
,, Check the temperature in several places before letting the meat stand the recommended time.
,,The following temperatures are removal temperatures. The temperature of the food will rise during the standing time.
Roast Beef Boneless
(Up to 4 Ibs.)
Pork Boneless or bone=in
(Up to 4 Ibs.)
8-12 min./Ib, for 145° F
(Rare)
9-13 min./Ib, for 160° F
(Medium)
10-15 min./Ib, for 170 ° F
(Well Done)
12-16 min./Ib, for 170 ° F
(Well Done)
High(lO) for first
i5 minutes, then
i medium(5)
High(lO) for first
i5 minutes, then
i medium(5)
Place roast fat-side down on roasting rack.
Cover with wax paper. Turn over half way
through cooking. Let stand 10 minutes.
Place roast fat-side down on roasting rack.
Cover with wax paper. Turn over half way
through cooking. Let stand 10 minutes.
,, Expect a IO°F rise in temperature during the standing time.
Rare 135°F 145°F
Beef Medium 150°F 160°F
Well Done 160°F 170°F
Medium 150°F 160°F
Pork
Well Done 160°F 170°F
Dark meat 170°F 180°F
Poultry
Light meat 160°F 170°F
Guide for Cooking Poultry in Your Microwave
,, Place poultry on a microwave-safe roasting rack in a microwave-safe dish.
,, Cover poultry with wax paper to prevent spattering.
• Use aluminum foil to shield bone tips, thin meat areas, or areas that start to overcook.
• Check the temperature in several places before letting the poultry stand the recommended time.
Whole Chicken
Up to 4 Ibs.
Chicken Pieces
Up to 2 Ibs.
Cooking Time: 7-10 min./lb.
180°F dark meat
170°F light meat
Power Level: Medium High(7).
Cooking Time: 7-10 min./lb.
180°F dark meat
170°F light meat
Power Level: Medium High(7).
19

Operating Instructions
Guide for Cooking Seafood in Your Microwave
• Cook fish until itflakes easily with a fork.
• Place fish on a microwave-safe roasting rack in a microwave-safe dish.
_,Use a tight cover to steam fish. A lighter cover of wax paper or paper towel provides less steaming.
_,Do not overcook fish; check itat minimum cooking time.
Steaks Cooking Time: 7-11 min. / lb. Arrange steaks on roasting rack with meaty portions towards the
outside of rack. Cover with wax paper. Turn over and rearrange when
Up to 1.5 Ibs. Power Level: Medium-High(7). cooking time is half up. Cook until fish flakes easily with a fork. Let
stand 3-5 minutes.
Fillets Cooking Time: 4-8 min. / Ib Arrange fillets in a baking dish, turning any thin pieces under. Cover
with wax paper. If over 1/2inch thick, turn over and rearrange when
Up to 1.5 Ibs. Power Level:Medium-High(7). cooking time is half up. Cook until fish flakes easily with a fork. Let
stand 2-3 minutes.
Shrimp Cooking Time: 4-6 1/2min. / lb. Arrange shrimp in a baking dish without overlapping or layering. Cover
with wax paper. Cook until firm and opaque, stirring 2 or 3 times. Let
Up to 1.5 Ibs. Power Level: Medium-High(7). stand 5 minutes.
Guide for Cooking Eggs in Your Microwave
,, Never cook eggs in the shell, and never warm hard-cooked eggs in the shell; they can explode.
,, Always pierce whole eggs to keep them from bursting.
,, Cook eggs just until set; they become tough if overcooked.
Guide for Cooking Vegetables in Your Microwave
,,Vegetables should be washed just before cooking. Often, no extra water is needed, if dense vegetables such as
potatoes, carrots and green beans are being cooked, add about 1Acup water.
_,Small vegetables (sliced carrots, peas, lima beans, etc.) will cook faster than larger ones.
_,Whole vegetables, such as potatoes, acorn squash or corn on the cob, should be arranged in a circle on the turntable
before cooking. They will cook more evenly ifturned over after half the cooking time has passed.
,, Always place vegetables like asparagus and broccoli with the stem ends pointing towards the edge of the dish and the
tips toward the center.
,,When cooking cut vegetables, always cover the dish with a lid or vented microwavable plastic wrap.
_,Whole, unpeeled vegetables such as potatoes, squash, eggplant, etc., should have their skin pricked in several spots
before cooking to prevent them from bursting.
_,For more even cooking, stir or rearrange whole vegetables halfway through the cooking time.
_,Generally, the denser the food, the longer the standing time. (Standing time refers to the time necessary for dense,
large foods and vegetables to finish cooking after they come out of the oven.) A baked potato can stand on the
counter for five minutes before cooking is completed, while a dish of peas can be served immediately.
2O
La page est en cours de chargement...
La page est en cours de chargement...
La page est en cours de chargement...
La page est en cours de chargement...
La page est en cours de chargement...
La page est en cours de chargement...
La page est en cours de chargement...
La page est en cours de chargement...
La page est en cours de chargement...
La page est en cours de chargement...
La page est en cours de chargement...
La page est en cours de chargement...
La page est en cours de chargement...
La page est en cours de chargement...
La page est en cours de chargement...
La page est en cours de chargement...
La page est en cours de chargement...
La page est en cours de chargement...
La page est en cours de chargement...
La page est en cours de chargement...
La page est en cours de chargement...
La page est en cours de chargement...
La page est en cours de chargement...
La page est en cours de chargement...
La page est en cours de chargement...
La page est en cours de chargement...
La page est en cours de chargement...
La page est en cours de chargement...
La page est en cours de chargement...
La page est en cours de chargement...
La page est en cours de chargement...
La page est en cours de chargement...
La page est en cours de chargement...
La page est en cours de chargement...
La page est en cours de chargement...
La page est en cours de chargement...
La page est en cours de chargement...
La page est en cours de chargement...
La page est en cours de chargement...
La page est en cours de chargement...
La page est en cours de chargement...
La page est en cours de chargement...
La page est en cours de chargement...
La page est en cours de chargement...
La page est en cours de chargement...
La page est en cours de chargement...
La page est en cours de chargement...
La page est en cours de chargement...
La page est en cours de chargement...
La page est en cours de chargement...
La page est en cours de chargement...
La page est en cours de chargement...
-
 1
1
-
 2
2
-
 3
3
-
 4
4
-
 5
5
-
 6
6
-
 7
7
-
 8
8
-
 9
9
-
 10
10
-
 11
11
-
 12
12
-
 13
13
-
 14
14
-
 15
15
-
 16
16
-
 17
17
-
 18
18
-
 19
19
-
 20
20
-
 21
21
-
 22
22
-
 23
23
-
 24
24
-
 25
25
-
 26
26
-
 27
27
-
 28
28
-
 29
29
-
 30
30
-
 31
31
-
 32
32
-
 33
33
-
 34
34
-
 35
35
-
 36
36
-
 37
37
-
 38
38
-
 39
39
-
 40
40
-
 41
41
-
 42
42
-
 43
43
-
 44
44
-
 45
45
-
 46
46
-
 47
47
-
 48
48
-
 49
49
-
 50
50
-
 51
51
-
 52
52
-
 53
53
-
 54
54
-
 55
55
-
 56
56
-
 57
57
-
 58
58
-
 59
59
-
 60
60
-
 61
61
-
 62
62
-
 63
63
-
 64
64
-
 65
65
-
 66
66
-
 67
67
-
 68
68
-
 69
69
-
 70
70
-
 71
71
-
 72
72


Maytag UMC5200BAB Le manuel du propriétaire
- Catégorie
- Micro-ondes
- Taper
- Le manuel du propriétaire
- Ce manuel convient également à
dans d''autres langues
- English: Maytag UMC5200BAB Owner's manual
- español: Maytag UMC5200BAB El manual del propietario
Documents connexes
Autres documents
-
Amana AMV5164BAB Le manuel du propriétaire
-
-
Jenn-Air JMV8208BAS17 Le manuel du propriétaire
-
Jenn-Air JMC5200BAW15 Le manuel du propriétaire
-
-
-
-
-
-
Jenn-Air JMV8208BCS Le manuel du propriétaire