Samsung SC-D5000 Manuel utilisateur
- Catégorie
- Caméscopes
- Taper
- Manuel utilisateur
Ce manuel convient également à

ENGLISH
FRANÇAIS
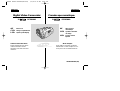
Digital Video Camcorder
Owner’s Instruction Book
Before operating the unit, please
read this instruction manual
thoroughly, and retain it for future
reference.
AF Auto Focus
CCD Charge Coupled Device
LCD Liquid Crystal Display
AF Mise au point
automatique
CCD Système à transfert
de charge
LCD Écran à cristaux
liquides
SCD5000
Caméscope numérique
SCD5000
ELECTRONICS
Mode d’emploi
Avant d’utiliser cet appareil, veuillez lire
attentivement ce mode d’emploi et le con-
server pour toute consultation ultérieure.
AD68-00655C(01)
00655C D5000 USA+FRA(001~033) 7/3/03 9:19 AM Page 101

ENGLISH
FRANÇAIS
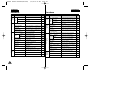
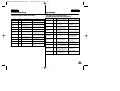
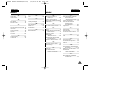
Contents Sommaire
22
Start............................................................................ 8
Precautions on Camcorder Care ......................................................... 8
Quick Start ............................................................................................ 9
Features .............................................................................................. 14
Accessories Supplied with the Camcorder ........................................ 15
Basic Accessories ......................................................................... 15
Front & Left View ................................................................................ 16
Left side View ..................................................................................... 17
Right & Top View ................................................................................ 18
Rear & Bottom View ........................................................................... 19
Remote Control .................................................................................. 20
OSD (On Screen Display in CAMERA and PLAYER Modes) ........... 21
OSD (On Screen Display in CAMERA / M.PLAY Modes) ................. 22
Turning the OSD on/off (On Screen Display) ............................... 23
How to use the Remote Control ......................................................... 24
Battery Installation for the Remote Control .................................. 24
Self Record using the Remote Control ........................................ 24
Adjusting the Hand Strap .................................................................. 25
Hand strap ..................................................................................... 25
Shoulder strap.................................................................................25
Connecting a Power Source .............................................................. 26
To use the AC Power adapter and DC Cable ............................. 26
Using the Lithium Ion Battery Pack ................................................... 27
Charging the Lithium Ion Battery Pack ......................................... 27
Table of Continuous Recording Time Based on Model and
Battery Type ................................................................................. 28
Battery Level Display .................................................................... 29
Avant de commencer...................................................8
Précautions d'emploi du caméscope .....................................................8
Démarrage rapide...................................................................................9
Fonctionnalités......................................................................................14
Accessoires fournis avec le caméscope..............................................15
Accessoires de base.......................................................................15
Vue avant et latérale (côté gauche ......................................................16
Vue du côté gauche..............................................................................17
Vue de droite et du dessus...................................................................18
Vue arrière et du dessous ....................................................................19
Télécommande.....................................................................................20
Affichage à l’écran en mode CAMERA <APPAREIL PHOTO> ou
PLAYER <LECTEUR>..........................................................................21
Affichage à l’écran en mode CAMERA <APPAREIL PHOTO> ou
M.PLAY <LECTURE PHOTO>.............................................................22
Activation/désactivation de l’affichage (mode OSD)......................23
Utilisation de la télécommande ............................................................24
Installation de la batterie pour la télécommande...........................24
Enregistrement automatique avec la télécommande ....................24
Mise en place de la poignée de soutien ..............................................25
Poignée de soutien.........................................................................25
Bandoulière.....................................................................................25
Connexion d’une source d’alimentation...............................................26
Utilisation de l’adaptateur secteur et du câble CC.........................26
Utilisation du bloc batterie au lithium-ion .............................................27
Chargement du bloc batterie au lithium-ion...................................27
Durée d’enregistrement selon le mode et le type de batterie........28
Affichage du niveau de la batterie..................................................29
Notes and Safety Instructions .................................. 10
Getting to Know Your Device................................... 14
Remarques et consignes de sécurité ..........................10
Familiarisez-vous avec votre appareil........................11
Preparation............................................................... 24
Préparez votre caméscope ........................................24
00655C D5000 USA+FRA(001~033) 7/3/03 9:19 AM Page 2

ENGLISH
FRANÇAIS
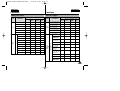
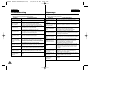
Contents Sommaire
33
Setting to CAMCORDER / CAMERA modes .................................... 30
Setting the Power Switch .................................................................. 31
Adjusting the LCD ............................................................................. 32
Using the VIEWFINDER ................................................................... 33
Adjusting the Focus ...................................................................... 33
Adjusting the LCD during PLAY ................................................... 34
Controlling Sound from the Speaker ................................................. 34
Using MENU ...................................................................................... 35
Setting menu items ............................................................................ 37
Setting the Camcorder to REC, TAPE PLAY,
MEMORY PLAY modes ................................................................ 39
Availability of Functions in CAMCORDER Mode. ........................ 40
CLOCK SET .................................................................................. 41
WL.REMOTE ................................................................................ 42
DEMONSTRATION ....................................................................... 43
DATE/TIME ................................................................................... 44
TV DISPLAY .................................................................................. 45
EASY Mode (for Beginners) .............................................................. 46
MF/AF (Manual Focus/Auto Focus) .................................................. 47
Auto Focusing ............................................................................... 47
Manual Focusing ........................................................................... 47
Zooming In and Out with DIGITAL ZOOM ................................... 48
Zooming In and Out ...................................................................... 48
Inserting and Ejecting a Cassette ..................................................... 49
To select the CAMCORDER mode .................................................. 50
Making Your First Recording ............................................................. 51
Record Search (REC SEARCH) .................................................. 52
Hints for Stable Image Recording ..................................................... 53
Recording with the LCD Monitor .................................................. 53
Recording with the Viewfinder ...................................................... 53
Playing Back a Tape You Have Recorded on the LCD .................... 54
Réglage des modes CAMCORDER <CAMESCOPE> et CAMERA
<APPAREIL PHOTO> ..........................................................................30
Réglage du commutateur principal ......................................................31
Réglage de l’écran LCD.......................................................................32
Utilisation du viseur...............................................................................33
Réglage de la mise au point...........................................................33
Réglage de l’écran LCD lors de la lecture.....................................34
Réglage du volume du haut-parleur.....................................................34
Utilisation du menu...............................................................................35
Liste des réglages.................................................................................37
Réglage des modes REC <ENR.>, TAPE PLAY <LECTURE BANDE>,
MEMORY PLAY <LECTURE PHOTO>
.............................................39
Fonctions disponibles pour le mode CAMCORDER <CAMESCOPE>
..40
CLOCK SET <REGLAGE DE L'HORLOGE>................................41
WL.REMOTE <TELECOMMANDE>..............................................42
DEMONSTRATION <DEMONSTRATION>...................................43
DATE/TIME <DATE/HEURE> ........................................................44
TV DISPLAY <AFFICHAGE>.........................................................45
Mode EASY <SIMPLIFIE> (pour débutants).......................................46
MF/AF (Manual Focus/Auto Focus <Mise au point manuelle/
automatique>).......................................................................................47
Mise au point automatique...................................................................47
Mise au point manuelle.........................................................................47
Utilisation du zoom numérique.............................................................48
Zoom avant et arrière...........................................................................48
Insertion et éjection d’une cassette......................................................49
Sélection du mode CAMCORDER <CAMESCOPE>..........................50
Premier enregistrement........................................................................51
Recherche de séquences (REC SEARCH)...................................52
Astuces pour la stabilité de l’image......................................................53
Utilisation de l’écran LCD...............................................................53
Utilisation du viseur.........................................................................53
Lecture d’une bande à l’écran..............................................................54
Fonctions...................................................................35
Utilisation du caméscope – enregistrement simple
............49
Functions.................................................................. 35
Using the CAMCORDER - Basic Recording.............. 49
00655C D5000 USA+FRA(001~033) 7/3/03 9:19 AM Page 3

ENGLISH
FRANÇAIS
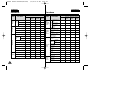
Contents Sommaire
44
Using the CAMCORDER - Advanced Recording ...... 55
PROGRAM AE ............................................................................. 55
Setting PROGRAM AE ................................................................ 56
WHT. BALANCE (WHITE BALANCE) - CAMCORDER Mode ... 57
Digital Zoom in CAMCORDER Mode ......................................... 58
EIS (Electronic Image Stabilizer) ................................................. 59
DSE(Digital Special Effects) SELECT in CAMCORDER Mode . 60
Selecting a Digital effect in CAMCORDER Mode ....................... 61
REC MODE .................................................................................. 62
AUDIO MODE .............................................................................. 63
WIND CUT ................................................................................... 64
Using Quick Menu(Navigation Menu) ............................................... 65
Setting the Quick Menu ............................................................... 66
SHUTTER SPEED & EXPOSURE ............................................. 67
SLOW SHUTTER (Low Shutter Speed) ........................................... 68
BLC (Back Light Compensation) ....................................................... 69
Fade In and Out ................................................................................ 70
To Start Recording ....................................................................... 70
To Stop Recording (use FADE IN / FADE OUT) ......................... 70
Audio Dubbing ................................................................................... 71
Dubbing Sound ............................................................................ 71
Dubbed Audio Playback .............................................................. 72
PHOTO Image Recording ................................................................. 73
Searching for a PHOTO Picture .................................................. 73
NITE PIX (0 Lux Recording) ............................................................. 74
POWER NITE PIX ............................................................................. 75
Various Recording Techniques .......................................................... 76
Tape Playback .................................................................................... 77
Playback on the LCD .................................................................... 77
Playback on a TV Monitor ............................................................ 77
Connecting to a TV which has Audio Video Input Jacks ............. 77
Utilisation du caméscope – enregistrement perfectionné 55
PROGRAM AE <EXPOSITION AUTOMATIQUE>........................55
Réglage de l’exposition automatique.............................................56
Equilibrage du blanc (WHT. BALANCE) – mode CAMCORDER
<CAMESCOPE>.............................................................................57
Zoom numérique en mode CAMCORDER <CAMESCOPE>.......58
EIS (Stabilisateur électronique d'image)........................................59
DSE (Effets spéciaux numériques) en mode CAMCORDER
<CAMESCOPE>.............................................................................60
Sélection d'un effet numérique en mode CAMCORDER
<CAMESCOPE>.............................................................................61
REC MODE <MODE D'ENREGISTREMENT>.............................62
AUDIO MODE <MODE AUDIO>....................................................63
WIND CUT <COUPE-VENT>.........................................................64
Quick Menu <Menu rapide> (menu de navigation).............................65
Utilisation de Quick Menu <MENU RAPIDE>................................66
SHUTTER SPEED <VITESSE D’OBTURATION> &
EXPOSURE <EXPOSITION>........................................................67
SLOW SHUTTER (Vitesse d'obturation lente).....................................68
BLC (Contre-jour intelligent).................................................................69
Fade In and Out <Fondu en ouverture et en fermeture>....................70
Début de l’enregistrement ..............................................................70
Fin de l’enregistrement (avec fondu)..............................................70
Audio Dubbing <Doublage sonore>.....................................................71
Réalisation du doublage sonore.....................................................71
Écoute du son doublé.....................................................................72
Enregistrement d’une image fixe....................................................73
Recherche d’images fixes ....................................................................73
NITE PIX <PIX DE NUIT> (Enregistrement à 0 lux) ...........................74
POWER NITE PIX <PIX DE NUIT RENFORCÉE>.............................75
Techniques d’enregistrement................................................................76
Lecture d’une bande.............................................................................77
Lecture sur l’écran LCD........................................................................77
Lecture sur l’écran de votre téléviseur.................................................77
Connexion à un téléviseur avec entrée A/V.........................................77
Playback .................................................................. 77
Lecture ......................................................................77
00655C D5000 USA+FRA(001~033) 7/3/03 9:19 AM Page 4

ENGLISH
FRANÇAIS
Contents Sommaire
55
Connecting to a TV which has No Audio and Video Input Jacks 78
Playback ...................................................................................... 78
Various Functions while in PLAYER Mode ....................................... 79
Playback Pause ........................................................................... 79
Picture Search (Forward/Reverse) ............................................. 79
Slow Playback (Forward) ............................................................ 79
ZERO MEMORY ............................................................................... 80
Transferring usingIEEE1394 (i.LINK)-DV Standard Data Connections
.81
Connecting to a DV Device ......................................................... 81
Connecting to a PC ..................................................................... 81
System Requirements ................................................................. 82
Recording with a DV Connection Cable...................................... 82
MEMORY STICK .............................................................................. 83
Memory Stick Functions............................................................... 83
Inserting and Ejecting the Memory Stick ......................................... 84
Inserting the Memory Stick ........................................................ 84
Ejecting the Memory Stick ......................................................... 84
Structure of the Folders and Files on the Memory Stick....................85
MEMORY FILE NUMBER ............................................................... 86
Taking Your First Picture .................................................................. 87
Viewing Still Images ......................................................................... 88
To View a Single image ................................................................... 88
To View a Slide Show ...................................................................... 89
Quick Review ................................................................................... 90
Adjusting the Focus ......................................................................... 91
IEEE 1394 Data Transfer .......................................... 81
Using the CAMERA................................................... 83
Basic Picture-Taking ................................................. 87
Connexion à un téléviseur sans entrée A/V...................................78
Lecture ............................................................................................78
Fonctions du mode PLAYER <LECTEUR>.........................................79
Arrêt sur image (mode pause)........................................................79
Recherche d’image avant/arrière...................................................79
Lecture au ralenti (avant)................................................................79
ZERO MEMORY <Mémoire compteur>...............................................80
Connexion pour transfert de données numériques par
IEEE 1394 (i.LINK) ...............................................................................81
Connexion à un autre appareil vidéo numérique...........................81
Connexion à un PC ........................................................................81
Configuration système requise.......................................................82
Enregistrement avec un câble de connexion DV...........................82
MEMORY STICK..................................................................................83
Fonctions disponibles avec la carte Memory Stick........................83
Insertion/retrait de la carte Memory Stick ............................................84
Insertion de la carte........................................................................84
Retrait de la carte ...........................................................................84
Structure des dossiers et fichiers sur la carte Memory Stick ..............85
NUMERO DE FICHIER MEMOIRE .....................................................86
Première photo .....................................................................................87
Visualisation d’images fixes..................................................................88
Visualiser une seule image...................................................................88
Visualiser les images sous forme de diaporama.................................89
Visionnage rapide.................................................................................90
Réglage de la mise au point.................................................................91
Transfert de données IEEE 1394.................................81
Utilisation du mode CAMERA <APPAREIL PHOTO>
..........83
Prise de photo simple................................................87
00655C D5000 USA+FRA(001~033) 7/3/03 9:19 AM Page 5

ENGLISH
FRANÇAIS
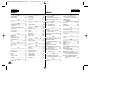
Contents Sommaire
66
Advanced Techniques............................................... 92
FOCUS LOCK ................................................................................... 92
Digital Zoom in CAMERA Mode ........................................................ 93
MACRO Mode ................................................................................... 94
CONT. SHOT (Continuous Shot) ...................................................... 95
Using the FLASH ............................................................................... 96
FLASH SELECT ................................................................................ 97
WHT. BALANCE (WHITE BALANCE) - CAMERA Mode ................. 98
DSE(Digital Special Effects) SELECT in CAMERA Mode ............... 99
Selecting a Digital effect in CAMERA Mode ................................... 100
SPOT-AE ......................................................................................... 101
NIGHT SCENE ................................................................................ 102
Selecting the Image Quality ............................................................ 103
Select the Image Quality ........................................................... 103
Number of images on the Memory Stick ................................... 103
Selecting the Image Size ................................................................ 104
Select the Image Size ................................................................ 104
Memory Stick and Image Resolutions ...................................... 105
MPEG REC ..................................................................................... 106
MPEG PB ........................................................................................ 107
MPEG SIZE ..................................................................................... 108
Copying Still Images from a Cassette to the Memory Stick ........... 109
Marking Images for Printing ............................................................ 110
Protection from Accidental Erasure ................................................. 111
Deleting Still images ........................................................................ 112
Formatting the Memory Stick .......................................................... 114
Attention ..................................................................................... 114
Recording an Image from a Cassette as a Still Image. .................. 115
Techniques perfectionnées.........................................92
FOCUS LOCK <VERROUILLAGE DE LA MISE AU POINT>............92
Zoom numérique en mode CAMERA <APPAREIL PHOTO>.............93
Mode MACRO <MACRO>...................................................................94
CONT. SHOT (plan continu).................................................................95
Utilisation du flash.................................................................................96
FLASH SELECT <SELECT FLASH>...................................................97
Equilibrage du blanc (WHT. BALANCE) – mode CAMERA
<APPAREIL PHOTO> ..........................................................................98
DSE (Effets spéciaux numériques) en mode CAMERA <APPAREIL
PHOTO>...............................................................................................99
Sélection d'un effet numérique en mode CAMERA
<APPAREIL PHOTO>..............................................................................100
SPOT-AE <ECLAIRAGE D'EXPOSITION AUTOMATIQUE>
.................101
NIGHT SCENE <SCENE DE NUIT>.................................................102
Sélection de la qualité d’image ..........................................................103
Sélectionner la qualité d’image ....................................................103
Nombre d’images pouvant être stockées sur la carte.................103
Sélection de la taille d’image..............................................................104
Sélectionner la taille d’image........................................................104
Memory Stick et résolutions d'image ...........................................105
MPEG REC <ENREGISTREMENT AU FORMAT DE FICHIER
MPEG> ...............................................................................................106
MPEG PB <LECTURE AU FORMAT DE FICHIER MPEG>.............107
Format MPEG.....................................................................................108
Copie d’images fixes d’une cassette sur la carte Memory Stick.......109
Marquage des images pour leur impression......................................110
Protection contre un effacement accidentel.......................................111
Effacement des images fixes mémorisées.........................................112
Formatage d’une carte Memory Stick................................................114
Avertissement................................................................................114
Enregistrement d’une image à partir d’une cassette .........................115
00655C D5000 USA+FRA(001~033) 7/3/03 9:19 AM Page 6

ENGLISH
FRANÇAIS
Contents Sommaire
77
USB Interface ........................................................ 116
Transferring a Digital Image through a USB Connection ................ 116
System Requirements ...................................................................... 116
Installing the DVC Media 5.0 Program...............................................117
Connecting to a PC .......................................................................... 118
After Finishing a Recording .............................................................. 119
Cleaning and Maintaining the Camcorder ........................................ 120
Cleaning the Video Heads .......................................................... 120
Using Your Camcorder Abroad ........................................................ 121
Power Sources ............................................................................ 121
Color System .............................................................................. 121
Troubleshooting ................................................................................ 122
Self Diagnosis Display ................................................................ 122
Moisture Condensation ............................................................... 122
Self Diagnosis Display in M.REC, M.PLAY Mode ..................... 123
Interface USB...........................................................116
Transfert d’images numériques via l’interface USB...........................116
Configuration système requise...........................................................116
Installation du programme DVC Media 5.0........................................117
Connexion à un PC.............................................................................118
Fin d’un enregistrement......................................................................119
Nettoyage et entretien du caméscope...............................................120
Nettoyage des têtes vidéo..................................................................120
Utilisation du caméscope à l’étranger................................................121
Sources d’alimentation .......................................................................121
Norme de couleurs.............................................................................121
Dépannage .........................................................................................122
Auto-diagnostic .............................................................................122
Condensation................................................................................122
Auto-diagnostic en modes M.REC <ENREGISTREMENT PHOTO>
et M.PLAY <LECTURE PHOTO>................................................123
Conseils d’utilisation................................................119
Dépannage...............................................................122
Spécifications techniques ........................................125
INDEX......................................................................126
Maintenance........................................................... 119
Troubleshooting...................................................... 122
Specifications ......................................................... 125
INDEX..................................................................... 126
Garantie pour le Canada .........................................128
Warranty (Canada users only)................................ 128
00655C D5000 USA+FRA(001~033) 7/3/03 9:19 AM Page 7

ENGLISH
FRANÇAIS
Start Avant de commencer
88
Precautions on Camcorder Care Précautions d'emploi du caméscope
✤ Please note the following precautions for use:
✤ Please keep your device in a safe place. This device contains a
lens that can be damaged by shock. Keep away from the reach of
the children.
■
Do not place your device in a wet place. Moisture and water may
cause the device to malfunction.
■
Do not aim the device at the sun while looking through the
viewfinder; this may cause permanent damage to your eyes.
■
To avoid electric shock, do not touch your device or power cable
with wet hands.
■
Do not use the flash close to another's eyes. The flash emits a
strong light that may cause damage similar to direct sunlight on
one's eyesight.
■
If the device is not working properly, please consult your nearest
dealer or authorized Samsung service facility. Disassembling the
device yourself may cause irrecoverable damage which will be
difficult to repair.
■
Clean the body with a dry, soft cloth. Use a soft cloth moistened
with a mild detergent solution for removing stains. Do not use any
type of solvent, especially benzenes, as they may seriously
damage the finish.
■
Keep your device away from rain and saltwater. After using, clean
the device. Saltwater may cause the parts to corrode.
■
For better quality, please use CAMERA mode when taking still
images. (CAMERA mode image quality is better than CAM-
CORDER mode.)
✤ Veuillez tenir compte des précautions d'emploi suivantes :
✤ Veuillez entreposer votre appareil dans un endroit sûr.
Cet appareil contient un objectif pouvant être endommagé en cas
de choc.
Tenez le caméscope hors de portée des enfants.
■
Ne rangez pas votre appareil dans un endroit humide.
La condensation de même que l'eau peuvent être à l'origine de
dysfonctionnements de l'appareil.
■
N'orientez pas le caméscope en direction du soleil lorsque vous
utilisez le viseur ;
vos yeux pourraient en souffrir irrémédiablement.
■
Pour proscrire tout risque d'électrocution, ne manipulez pas
l'appareil ou le câble d'alimentation avec les mains mouillées.
■
N'utilisez pas le flash à proximité des yeux d'une personne.
Une lumière violente est émise et pourrait avoir des effets néfastes
similaires à ceux du soleil sur la vue.
■
Si l'appareil ne fonctionne pas correctement, veuillez vous adress-
er au service après-vente Samsung ou consulter votre revendeur
le plus proche. Ne procédez pas au désassemblage de l'appareil
car il pourrait en découler des dommages difficilement réparables.
Nettoyez l'appareil à l'aide d'un chiffon doux et sec.
■
Les tâches pourront être ôtées au moyen d'un chiffon doux imbibé
d'une solution légèrement détergente.
N'utilisez aucun solvant, quel qu'il soit, en particulier de type
benzène, sous peine d'endommager la finition.
■
Maintenez votre caméscope à l'écart de la pluie et de l'eau salée.
Nettoyez l'appareil après utilisation. L'eau salée peut être à
l'origine de corrosion.
■
Pour garantir une meilleure qualité, utilisez le mode appareil photo
pour prendre des images fixes.
(La qualité d'image du mode appareil photo est supérieure à celle
du mode caméscope.)
00655C D5000 USA+FRA(001~033) 7/3/03 9:19 AM Page 8

ENGLISH
FRANÇAIS
Start Avant de commencer
99
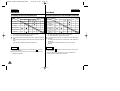
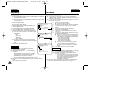
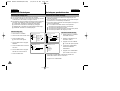
Quick Start Démarrage rapide
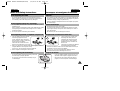
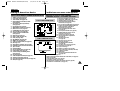
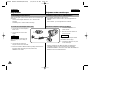
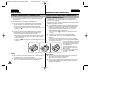
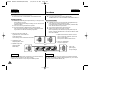
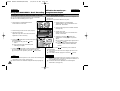
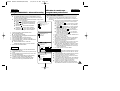
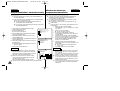
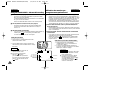
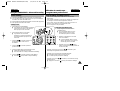
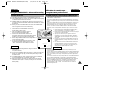
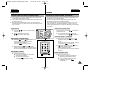
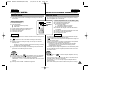
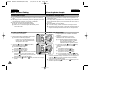
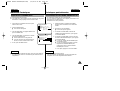
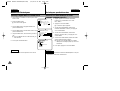
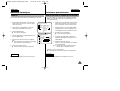
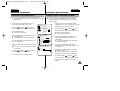
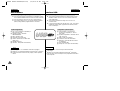
✤ This device provides a variety of functions because it is a
Camcorder and Digital Still Camera in one system. Please read
this manual thoroughly.
✤ Before using the device, install the accessories in the following
order:
1. Install the battery pack.
2. Insert the Memory Stick into the slot.
3. Charge the battery pack by connecting
the power cable to the camcorder.
4. Set your device to CAMCORDER
mode or CAMERA mode by flipping
the lens body block.
5. Set the Power Switch to proposed
position.
6. When finished, set the Power Switch
to OFF.
✤ Cet appareil, fusion d'un caméscope et d'un appareil photo
numérique, dispose d'une multitude de fonctions.
Veuillez lire attentivement ce mode d'emploi.
✤ Avant d'utiliser cet appareil, installez les accessoires selon l'ordre
suivant.
1. Installez le bloc batterie.
2. Insérez la carte Memory Stick
dans son emplacement.
3. Chargez le bloc batterie en
branchant le câble d'alimentation
au caméscope.
4. Positionnez votre appareil sur le
mode caméscope ou sur le mode
appareil photo en basculant le
bloc d'objectif.
5. Placez le commutateur sur la
position proposée.
6. Après utilisation, replacez le
commutateur sur OFF.
FAD E
S.SHOW
BLC
TAPE
MEMORY
P
L
A
Y
R
E
C
O
F
F
FADE
S.SHOW
BLC
REV FWD
TAPE
MEMORY
R
E
C
P
L
A
Y
O
F
F
1
3
5
2
4
6
00655C D5000 USA+FRA(001~033) 7/3/03 9:20 AM Page 9

ENGLISH
FRANÇAIS
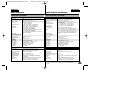
Notes and Safety Instructions Remarques et consignes de sécurité
1010
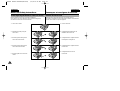
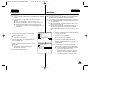
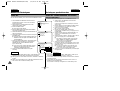
Notes Regarding the Rotation of the LCD Screen Rotation de l’écran LCD
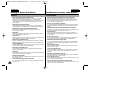
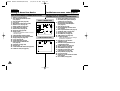
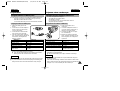
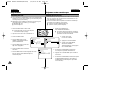
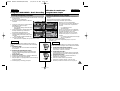
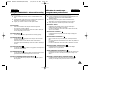
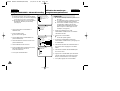
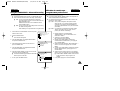
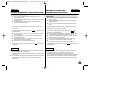
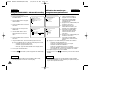
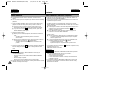
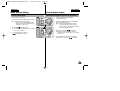
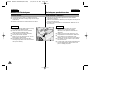
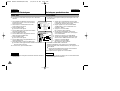
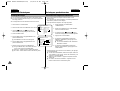
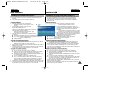
Please rotate the LCD screen carefully as illustrated.
Over rotation may cause damage to the inside of the hinge that
connects the LCD screen to the Camcorder.
1. LCD screen closed.
2. Standard recording using the
LCD screen.
3. Recording when looking at the
LCD screen from the left.
4. Recording when looking at the
LCD screen from the front.
5. Recording with the LCD screen
closed.
Manipulez l’écran doucement lorsque vous le faites tourner.
Une rotation intempestive peut endommager l’intérieur de la charnière
qui relie l’écran LCD au corps de l’appareil.
1. Écran LCD fermé.
2. Enregistrement standard lors de
l’utilisation de l’écran LCD.
3. Enregistrement en regardant l’écran
LCD depuis le côté gauche.
4. Enregistrement en regardant l’écran
LCD de face.
5. Enregistrement avec l’écran
LCD fermé.
1
2
3
4
5
180 °
180 °
00655C D5000 USA+FRA(001~033) 7/3/03 9:20 AM Page 10

ENGLISH
FRANÇAIS
Notes and Safety Instructions Remarques et consignes de sécurité
1111
Notices Regarding COPYRIGHT
Notes Regarding Moisture Condensation
Notes Regarding the CAMCORDER
Television programs, video tapes, DVD titles, films, and other program
materials may be copyrighted.
Unauthorized copying of copyrighted material may be against the law.
1. A sudden rise in atmospheric temperature may cause moisture
condensation to form inside the camcorder.
For Example:
- When you take the camcorder from a cold place to a warm place
(e.g. from outside to inside during winter.)
- When you take the camcorder from a cool place to a hot place
(e.g. from inside to outside during the summer.)
2. When the (DEW) protection feature is activated, leave the
camcorder in a dry, warm room with the cassette compartment
opened and the battery removed, for at least two hours.
1. Do not leave the camcorder exposed to high temperatures
(above 60°C or 140°F).
For example, in a parked car in the sun or exposed to direct
sunlight.
2. Do not let the camcorder get wet.
Keep the camcorder away from rain, saltwater, and any other form
of moisture. If the camcorder gets wet, it may be damaged.
A malfunction due to exposure to liquids cannot always be
repaired.
Droits d'auteur
Formation de condensation
Caméscope
Les programmes de télévision, les bandes vidéo, les DVD, les films et
tout autre support enregistré de ce type peuvent être protégés par des
droits d’auteurs.
Les copier sans autorisation peut aller à l’encontre des lois en vigueur
dans votre pays.
1. Un accroissement soudain de température peut entraîner la forma-
tion de condensation à l’intérieur de l’appareil.
Ce peut être le cas lorsque vous passez
- d’un extérieur froid à un intérieur chaud (en hiver, par exemple),
- d’un intérieur frais à un extérieur chaud (en été, par exemple).
2. Si la fonction de protection "DEW" se déclenche, laissez
l’appareil pendant deux heures dans un endroit sec et à tempéra-
ture ambiante, le compartiment à cassette ouvert et sans le bloc
batterie.
1. N’exposez pas votre caméscope à des températures trop élevées
(plus de 60°C), par exemple, en plein soleil ou dans une voiture
garée au soleil.
2. Ne mouillez pas votre caméscope.
Tenez-le à l’abri de toute humidité (pluie, eau salée, etc.).
Sinon, il risque d’être endommagé, entraînant parfois un
dysfonctionnement irréparable de l’appareil.
00655C D5000 USA+FRA(001~033) 7/3/03 9:20 AM Page 11

ENGLISH
FRANÇAIS
Notes and Safety Instructions
Remarques et consignes de sécurité
1212
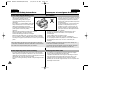
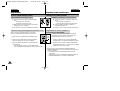
Notes Regarding the Battery Pack
Notes Regarding Video Head Cleaning
Bloc batterie
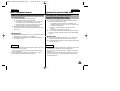
- Make sure that the battery pack is fully
charged before starting to record.
- To preserve battery power, keep your
camcorder turned off when you are not
operating it.
- If your device is in CAMCORDER mode with
a tape installed, and it is left in STBY mode
without being operated for more than
5 minutes it will automatically turn itself off to
protect against unnecessary battery
discharge.
- Make sure that the battery pack fits firmly into place.
Dropping the battery pack may damage it.
- A brand new battery pack will not be charged.
Before using the battery pack, you need to charge it completely.
- It is a good idea to use the viewfinder rather than the LCD when
recording for long periods, because the LCD uses up more battery
power.
- Assurez-vous que le bloc batterie est chargé
avant de filmer sans connexion au secteur.
- Pour prolonger la durée de votre batterie,
gardez votre caméscope éteint lorsque vous
ne l’utilisez pas.
- En mode caméscope, si vous laissez votre
appareil en veille pendant plus de cinq
minutes sans vous en servir et avec une
bande à l’intérieur, il s’éteint automatique-
ment pour éviter tout déchargement inutile
de la batterie.
- Assurez-vous que le bloc batterie est parfaitement en place.
Ne faites pas tomber le bloc batterie ; vous risqueriez de
l’endommager.
- Un bloc batterie neuf n’est jamais chargé.
Avant de l’utiliser, vous devez le charger complètement.
- Si vous prévoyez de filmer longtemps, il est conseillé d’utiliser le
viseur plutôt que l’écran LCD, car celui-ci consomme plus
d’énergie.
- Pour garantir un enregistrement normal et obtenir des images
claires, nettoyez régulièrement les têtes vidéo.
L’apparition de déformations de l’image ou l’affichage d’un écran
vide peut signifier que les têtes vidéo sont sales. Dans ce cas,
nettoyez-les avec la cassette de type sec prévue à cet effet.
- N’utilisez pas de cassette de type humide, car vous risqueriez d’en-
dommager les têtes vidéo.
- To ensure normal recording and a clear picture, clean the video
heads regularly. If the picture is distorted, or only a blue screen is
displayed, the video heads may be dirty. If this happens, clean the
video heads with a dry type cleaning cassette.
- Do not use a wet-type cleaning cassette. It may damage the video
heads.
* When the battery reaches the end of its life, please contact your
local dealer. The batteries need to be dealt with as chemical waste.
* Be careful not to drop the battery when you release it
Nettoyage des têtes vidéo
* Lorsque la batterie ne fonctionne plus ou est hors d’usage, con-
tactez votre revendeur le plus proche.
Les batteries doivent être traitées en tant que déchets chimiques.
* Veillez à ne pas laisser tomber la batterie en la relâchant
00655C D5000 USA+FRA(001~033) 7/3/03 9:20 AM Page 12

ENGLISH
FRANÇAIS
Notes and Safety Instructions Remarques et consignes de sécurité
1313
Note Regarding the LENS
Notes Regarding Electronic Viewfinder
Notes Regarding ‘Record’ or ‘Playback’ Using the LCD
Notes Regarding the Hand Strap
Objectif
- Do not film with the camera lens pointing directly at the sun.
Direct sunlight can damage the CCD (Charge Coupled Device).
- Over-rotating of the LENS body block may damage it.
1. Do not position the camcorder such that the viewfinder is pointing
towards the sun.
Direct sunlight can damage the inside of the viewfinder. Be careful
when placing the camcorder under sunlight or near a window
exposed to sunlight.
2. Do not pick up the camcorder by the viewfinder.
1. The LCD display has been manufac-
tured using high-precision tech-
nology. However, there may be tiny
dots (red, blue or green in color) that
appear on the LCD display.
These dots are normal and do not
affect the recorded picture in any way.
2. When you use the LCD display under direct sunlight or outdoors,
it maybe difficult to see the picture clearly.
If this occurs, we recommend using the viewfinder.
3. Direct sunlight can damage the LCD monitor.
- To ensure a steady picture during filming, check that
the hand strap is properly adjusted.
- Do not force your hand into the hand strap as you
could damage it.
- Si vous filmez en plein soleil, veillez à ne pas diriger l’objectif vers
le soleil. La lumière solaire directe peut endommager le système à
transfert de charge (Charge Coupled Device).
- Évitez les rotations intempestives du bloc de l'objectif qui risquent
de l’endommager.
1. N’orientez pas le viseur vers le soleil.
La lumière solaire directe peut endommager l’intérieur du viseur.
Soyez vigilant lorsque vous placez votre caméscope au soleil ou
près d’une fenêtre.
2. Ne saisissez pas votre caméscope par le viseur.
1. L’écran a été conçu à l’aide d’une
technologie de haute précision.
Cependant, de minuscules points
(rouges, bleus ou verts) peuvent
apparaître de façon constante sur
l’écran LCD.
Ces points sont normaux et n’affectent
aucunement l’image enregistrée.
2. Lorsque vous utilisez l’écran LCD à la lumière directe du soleil, la
visualisation à l’écran peut s’avérer difficile.
Dans ce cas, nous vous recommandons d’utiliser le viseur.
3. La lumière directe peut endommager l’écran LCD.
- Pour une meilleure qualité de prise de vue, il est
important de bien ajuster la poignée de soutien.
- Ne forcez pas pour insérer votre main dans la
poignée, car vous risqueriez de l’endommager.
Viseur électronique
Enregistrement ou lecture avec l’écran LCD
Poignée de soutien
00655C D5000 USA+FRA(001~033) 7/3/03 9:20 AM Page 13

ENGLISH
FRANÇAIS
Getting to Know Your Device Familiarisez-vous avec votre appareil
1414
Features Fonctionnalités
• Digital data transfer function with IEEE1394
By incorporating the IEEE 1394 (i.LINK™ : i.LINK is a serial data
transfer protocol and interconnectivity system, used to transmit
DV data) high speed data transport port, both moving and still images
can be transferred to a PC, making it possible to produce or edit
various images.
• Unique Style & Free Style Shooting
An integrated digital imaging device that easily converts between a
CAMCORDER and a CAMERA by using a revolving Lens Body Block.
• High Resolution Image Quality (Digital Still Camera)
Employing a 4.13 Mega Pixels CCD, a maximum resolution of
2272 X 1704 is possible.
• Digital Zoom
Allows you to magnify an image up to 800X (CAMCORDER mode) or
6X (CAMERA mode) its original size.
• Color TFT LCD
A high-resolution color TFT LCD gives you clean, sharp images as well
as the ability to review your recordings immediately.
• Electronic Image Stabilizer (EIS)
The EIS compensates for any shaking that occurs when the camera is
handheld, reducing unstable images particularly at high magnification.
• Various Digital Effects
The DSE (Digital Special Effects) function allows you to give your films
a special look by adding various special effects.
• Back Light Compensation (BLC)
The BLC function compensates for a bright background behind the
subject you're recording.
• Program AE
The Program AE enables you to alter the shutter speed and aperture to
suit the type of scene/action to be filmed.
• NITE PIX / NIGHT SCENE
The NITE PIX or NIGHT SCENE function enables you to record a sub-
ject in a dark place.
• USB Interface for Digital Image Data Transfer
You can transfer still images to a PC using the USB interface without
an add-on card.
• Transfert de données numériques avec le port IEEE 1394
Le port haute vitesse IEEE 1394 de type i.LINK™ (i.LINK est un
protocole de transfert de données série et système d’interconnexion)
vous permet de transférer des images mobiles et fixes vers un PC,
où vous pourrez les modifier à loisir.
• Prise de vue style unique et style libre
Un appareil d'imagerie numérique intégré permet de jongler aisément
entre le caméscope et l'appareil photo via un bloc d'objectif pouvant
basculer.
• Qualité d'image haute résolution (appareil photo numérique)
L'utilisation d'un système à transfert de charge à 4.13 mégapixels rend
possible une résolution maximale de 2272 x 1704.
• Zoom numérique
La fonction Zoom vous permet de grossir l'image jusqu'à 800 fois
(mode caméscope) ou jusqu'à 6 fois (mode appareil photo) sans avoir
à vous déplacer.
• Écran LCD TFT couleur
L’écran LCD TFT couleur à haute résolution offre une image nette et
vous permet de visionner vos enregistrements immédiatement.
• Stabilisateur électronique d'image (EIS)
La fonction EIS rétablit la stabilité des images lorsque le tremblement
de la main provoque des vibrations désagréables, surtout en mode
zoom avant.
• Effets numériques divers
L’ajout de différents effets spéciaux vous permet de donner un côté
spectaculaire à vos films.
• Contre-jour intelligent (BLC)
Lorsque vous filmez un sujet devant une source lumineuse ou devant
un fond clair, utilisez la fonction BLC pour effectuer un contre-jour
intelligent.
• Exposition automatique (Program AE)
La fonction Program AE vous permet d’adapter la vitesse d’obturation
et le diaphragme selon la scène à filmer.
• Pix de nuit/scène de nuit
La fonction NITE PIX ou NIGHT SCENE vous permet de filmer un sujet
dans un endroit à faible luminosité.
• Transfert d’images numériques avec l’interface USB
Le port USB vous permet de transférer des images vers votre PC sans
utiliser de carte vidéo supplémentaire.
00655C D5000 USA+FRA(001~033) 7/3/03 9:20 AM Page 14

ENGLISH
FRANÇAIS
Getting to Know Your Device Familiarisez-vous avec votre appareil
1515
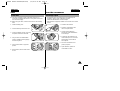
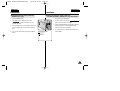
Accessories Supplied with the Camcorder Accessoires fournis avec le caméscope
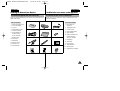
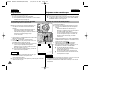
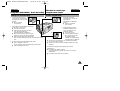
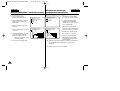
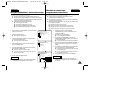
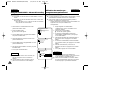
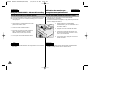
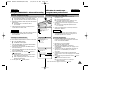
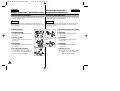
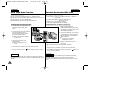
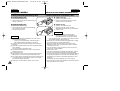
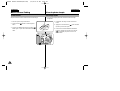
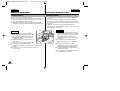
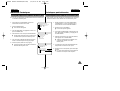
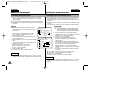
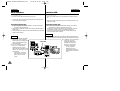
Make sure that the following basic accessories are supplied with your
digital video camera.
Basic Accessories
1. Lithium Ion Battery Pack
2. AC Power Adapter
3. AC Cord
4. AUDIO/VIDEO Cable
5. Instruction Manual
6. Lithium Battery for
Remote Control.
(TYPE: CR2025)
7. Shoulder Strap
8. USB Cable
9. Software CD
10. Remote Control
11. Memory Stick
12. Tripod Adaptor
Assurez-vous que les accessoires ci-après ont été livrés avec votre
caméscope numérique.
Accessoires de base
1. Bloc batterie au
lithium-ion
2. Adaptateur secteur
3. Cordon secteur
4. Câble AUDIO/VIDEO
5. Mode d'emploi
6. Batterie au lithium pour
la télécommande
(de type : CR2025)
7. Bandoulière
8. Câble USB
9. CD du logiciel
10. Télécommande
11. Memory Stick
12. Adaptateur pour trépied
1. Lithium Ion Battery pack
3. AC cord
4. AUDIO/VIDEO cable
10. Remote Control
8. USB cable7. Shoulder strap
5. Instruction Book
2. AC Power Adapter
START/STOP
PHOTO
REW/RPS
A.DUB STOP SELF TIMER
SLOW
PLAY FF/FPS
STILL ZERO MEM.
F.ADV
TW
11. Memory Stick
12. Tripod Adapter
9. Software CD
6. Lithium battery
00655C D5000 USA+FRA(001~033) 7/3/03 9:20 AM Page 15

ENGLISH
FRANÇAIS
Getting to Know Your Device Familiarisez-vous avec votre appareil
1616
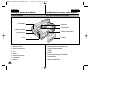
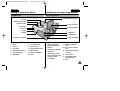
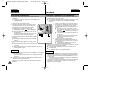
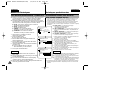
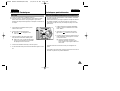
Front & Left View Vue avant et latérale (côté gauche)
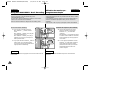
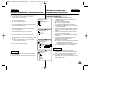
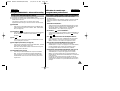
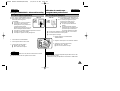
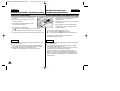
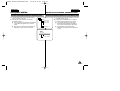
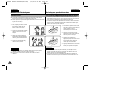
1. Internal MIC
2. Memory Stick Slot
3. Remote Control Sensor
4. Lens
5. Battery
6. Battery release button
7. Slow Shutter
8. NITE PIX
1. Entrée microphone interne
2. Emplacement de la carte Memory Stick
3. Capteur de la télécommande
4. Objectif
5. Batterie
6. Touche de déverrouillage de la batterie
7. Obturation lente
8. NITE PIX <PIX DE NUIT>
1. Internal MIC
2. Memory Stick Slot
3. Remote Sensor
8. NITE PIX
4. Lens
5. Battery
6. Battery release button
7. Slow Shutter
00655C D5000 USA+FRA(001~033) 7/3/03 9:20 AM Page 16

ENGLISH
FRANÇAIS
Getting to Know Your Device Familiarisez-vous avec votre appareil
1717
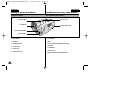
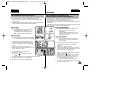
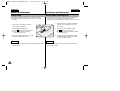
Left Side View Vue du côté gauche
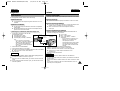
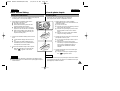
1. Display
2. MF/AF
3. PB Zoom
4. Easy Button
5. External MIC / Earphone
6. Hook for handstrap
7. MENU Button
8. MENU Dial
9. Focus Adjust knob
10. TFT LCD Screen
11. Rotation Release Button
12. MACRO Button
13. NIGHT SCENE Button
14. Flash
1. Touche Display
2. Mise au point automa-
tique/manuelle (MF/AF)
3. PB Zoom
4. Touche Easy <SIMPLIFIE>
5. Microphone
externe/casque d'écoute
6. Anneau de fixation pour la
poignée de soutien
7. Touche MENU
8. Molette MENU
9. Molette de réglage du
zoom
10. Écran à cristaux liquides
(LCD)
11. Touche de déverrouillage
de rotation
12. Touche MACRO
13. Touche NIGHT SCENE
<SCENE DE NUIT>
14. Flash
8. MENU Dial
7. MENU Button
6. Hook for handstrap
13. NIGHT SCENE Button
12. MACRO Button
14. Flash
5. External MIC / Earphone
10. TFT LCD Screen
9.Focus Adjust Knob
11. Rotation Release Button
1. Display
2. MF/AF
3. PB zoom
4. Easy Button
00655C D5000 USA+FRA(001~033) 7/3/03 9:20 AM Page 17

ENGLISH
FRANÇAIS
Getting to Know Your Device Familiarisez-vous avec votre appareil
1818
Right & Top View Vue de droite et du dessus
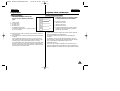
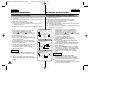
1. Photo Button
2. Viewfinder
3. Start/Stop Button
4. Power switch
5. Zoom Lever
6. Memory Stick Slot
1. Touche Photo
2. Viseur
3. Touche Start/Stop <Début/Arrêt de l’enreg-
istrement>
4. Commutateur
5. Touche Zoom
6. Emplacement de la carte Memory Stick
5. Zoom Lever
1. PHOTO button
3. START/STOP button
4. Power switch
2. Viewfinder
6. Memory Stick Slot
00655C D5000 USA+FRA(001~033) 7/3/03 9:20 AM Page 18

ENGLISH
FRANÇAIS
Getting to Know Your Device Familiarisez-vous avec votre appareil
1919
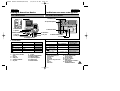
Rear & Bottom View Vue arrière et du dessous
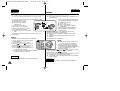
1. Function Button
6. Charging Indicator
8. AV/S-Video
12. Tripod Receptacle
13. TAPE EJECT
11. MACRO Button
10. NIGHT SCENE Button
9. FLASH
7. DC Jack
2. Speaker
1. Function Button
FADE
S.SHOW
BLC
REV FWD
TAPE
MEMORY
R
E
C
P
L
A
Y
O
F
F
14. RESET button
4. DV Jack
3. Hook for shoulder strap
FAD E
S.SHOW
BLC
REV FWD
TAPE
MEMORY
R
EC
PLAY
OFF
5. USB Jack
TAPE PLAY REC MEMORY PLAY
- EASY MULTI
: (REW) REC SEARCH – REV
: (FF) REC SEARCH + FWD
: (PLAY/STILL) FADE SLIDE SHOW
: (STOP) BLC SPOT AE
2. Speaker
3. Hook for the shoulder
strap
4. DV Jack
5. USB Jack
6. Charging Indicator
7. DC Jack
8. AV/S-Video
9. FLASH
10. NIGHT SCENE Button
11. MACRO Button
12. Tripod Receptacle
13. TAPE EJECT
14. RESET button
1. Touches de fonction
LECTURE DE BANDE REC <ENR.>
MEMORY PLAY
<LECTURE PHOTO>
- EASY <SIMPLIFIE> MULTI <MULTI>
: Touche REW REC SEARCH – REV <REV>
<rembobinage>
: Touche FF REC SEARCH + FWD <AVANCE>
<avance rapide>
:
Touche PLAY/STILL
FADE <FONDU> SLIDE SHOW
<LECTURE/PAUSE>
<INDICATEUR DE DIAPORAMA>
: Touche STOP BLC <CONTRE-JOUR SPOT-AE
<ECLAIRAGE
<arrêt> INTELLIGENT>
D'EXPOSITION AUTOMATIQUE>
2. Haut-parleur intégré
3. Anneau de fixation pour
la bandoulière
4. Prise DV
5. Prise USB
6. Témoin de charge de la bat-
terie
7. Prise CC
8. AV/S-Vidéo
9. FLASH
10. Touche NIGHT SCENE
<Scène de nuit>
11. Touche MACRO
12. Pas de vis trépied
13. TAPE EJECT
<EJECTION DE LA BANDE>
14. Touche RESET
<REINITIALISATION>
00655C D5000 USA+FRA(001~033) 7/3/03 9:20 AM Page 19

ENGLISH
FRANÇAIS
Getting to Know Your Device Familiarisez-vous avec votre appareil
2020
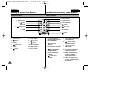
Remote Control Télécommande
1. START / STOP
2. (STILL)
3. PHOTO
4. (REW) / RPS
5. A.DUB
6. (STOP)
7. SELF TIMER
8. (FF) / FPS
9. (PLAY)
10. ZERO MEMORY
11. WIDE (F.ADV +)
12. TELE (F.ADV -)
1. Touche START/STOP
<DEBUT/ARRET DE L’EN-
REGISTREMENT>
2. Touche STILL
<PAUSE>
3. Touche PHOTO <PHOTO>
4. Touche REW/RPS
<REMBOBINAGE>
5. A.DUB <DOUBLAGE
SONORE>
6. Touche STOP
<ARRET>
7. SELF TIMER <MINUTERIE
AUTOMATIQUE>
8. Touche FF/FPS
<AVANCE RAPIDE>
9. Touche PLAY
<LECTURE>
10. Touche ZERO MEMORY
<Mémoire compteur>
11. WIDE <GRAND ANGLE>
(F.ADV +) <AVANCE
IMAGE PAR IMAGE +>
12. TELE <TELEOBJECTIF>
(F.ADV -) <AVANCE IMAGE
PAR IMAGE ->
START/STOP
PHOTO
REW/RPS
A.DUB STOP SELF TIMER
SLOW
PLAY FF/FPS
STILL ZERO MEM.
F.ADV
TW
12. TELE (F.ADV -)
1. START / STOP
11. WIDE (F.ADV +)
10. ZERO MEMORY
9. (PLAY)
8. (FF) / FPS
7. SELF TIMER
6. (STOP)
3. PHOTO
4. (REW) / RPS
5. A.DUB
2. (STILL)
00655C D5000 USA+FRA(001~033) 7/3/03 9:20 AM Page 20
La page est en cours de chargement...
La page est en cours de chargement...
La page est en cours de chargement...
La page est en cours de chargement...
La page est en cours de chargement...
La page est en cours de chargement...
La page est en cours de chargement...
La page est en cours de chargement...
La page est en cours de chargement...
La page est en cours de chargement...
La page est en cours de chargement...
La page est en cours de chargement...
La page est en cours de chargement...
La page est en cours de chargement...
La page est en cours de chargement...
La page est en cours de chargement...
La page est en cours de chargement...
La page est en cours de chargement...
La page est en cours de chargement...
La page est en cours de chargement...
La page est en cours de chargement...
La page est en cours de chargement...
La page est en cours de chargement...
La page est en cours de chargement...
La page est en cours de chargement...
La page est en cours de chargement...
La page est en cours de chargement...
La page est en cours de chargement...
La page est en cours de chargement...
La page est en cours de chargement...
La page est en cours de chargement...
La page est en cours de chargement...
La page est en cours de chargement...
La page est en cours de chargement...
La page est en cours de chargement...
La page est en cours de chargement...
La page est en cours de chargement...
La page est en cours de chargement...
La page est en cours de chargement...
La page est en cours de chargement...
La page est en cours de chargement...
La page est en cours de chargement...
La page est en cours de chargement...
La page est en cours de chargement...
La page est en cours de chargement...
La page est en cours de chargement...
La page est en cours de chargement...
La page est en cours de chargement...
La page est en cours de chargement...
La page est en cours de chargement...
La page est en cours de chargement...
La page est en cours de chargement...
La page est en cours de chargement...
La page est en cours de chargement...
La page est en cours de chargement...
La page est en cours de chargement...
La page est en cours de chargement...
La page est en cours de chargement...
La page est en cours de chargement...
La page est en cours de chargement...
La page est en cours de chargement...
La page est en cours de chargement...
La page est en cours de chargement...
La page est en cours de chargement...
La page est en cours de chargement...
La page est en cours de chargement...
La page est en cours de chargement...
La page est en cours de chargement...
La page est en cours de chargement...
La page est en cours de chargement...
La page est en cours de chargement...
La page est en cours de chargement...
La page est en cours de chargement...
La page est en cours de chargement...
La page est en cours de chargement...
La page est en cours de chargement...
La page est en cours de chargement...
La page est en cours de chargement...
La page est en cours de chargement...
La page est en cours de chargement...
La page est en cours de chargement...
La page est en cours de chargement...
La page est en cours de chargement...
La page est en cours de chargement...
La page est en cours de chargement...
La page est en cours de chargement...
La page est en cours de chargement...
La page est en cours de chargement...
La page est en cours de chargement...
La page est en cours de chargement...
La page est en cours de chargement...
La page est en cours de chargement...
La page est en cours de chargement...
La page est en cours de chargement...
La page est en cours de chargement...
La page est en cours de chargement...
La page est en cours de chargement...
La page est en cours de chargement...
La page est en cours de chargement...
La page est en cours de chargement...
La page est en cours de chargement...
La page est en cours de chargement...
La page est en cours de chargement...
La page est en cours de chargement...
La page est en cours de chargement...
La page est en cours de chargement...
La page est en cours de chargement...
La page est en cours de chargement...
La page est en cours de chargement...
-
 1
1
-
 2
2
-
 3
3
-
 4
4
-
 5
5
-
 6
6
-
 7
7
-
 8
8
-
 9
9
-
 10
10
-
 11
11
-
 12
12
-
 13
13
-
 14
14
-
 15
15
-
 16
16
-
 17
17
-
 18
18
-
 19
19
-
 20
20
-
 21
21
-
 22
22
-
 23
23
-
 24
24
-
 25
25
-
 26
26
-
 27
27
-
 28
28
-
 29
29
-
 30
30
-
 31
31
-
 32
32
-
 33
33
-
 34
34
-
 35
35
-
 36
36
-
 37
37
-
 38
38
-
 39
39
-
 40
40
-
 41
41
-
 42
42
-
 43
43
-
 44
44
-
 45
45
-
 46
46
-
 47
47
-
 48
48
-
 49
49
-
 50
50
-
 51
51
-
 52
52
-
 53
53
-
 54
54
-
 55
55
-
 56
56
-
 57
57
-
 58
58
-
 59
59
-
 60
60
-
 61
61
-
 62
62
-
 63
63
-
 64
64
-
 65
65
-
 66
66
-
 67
67
-
 68
68
-
 69
69
-
 70
70
-
 71
71
-
 72
72
-
 73
73
-
 74
74
-
 75
75
-
 76
76
-
 77
77
-
 78
78
-
 79
79
-
 80
80
-
 81
81
-
 82
82
-
 83
83
-
 84
84
-
 85
85
-
 86
86
-
 87
87
-
 88
88
-
 89
89
-
 90
90
-
 91
91
-
 92
92
-
 93
93
-
 94
94
-
 95
95
-
 96
96
-
 97
97
-
 98
98
-
 99
99
-
 100
100
-
 101
101
-
 102
102
-
 103
103
-
 104
104
-
 105
105
-
 106
106
-
 107
107
-
 108
108
-
 109
109
-
 110
110
-
 111
111
-
 112
112
-
 113
113
-
 114
114
-
 115
115
-
 116
116
-
 117
117
-
 118
118
-
 119
119
-
 120
120
-
 121
121
-
 122
122
-
 123
123
-
 124
124
-
 125
125
-
 126
126
-
 127
127
-
 128
128
-
 129
129


Samsung SC-D5000 Manuel utilisateur
- Catégorie
- Caméscopes
- Taper
- Manuel utilisateur
- Ce manuel convient également à
dans d''autres langues
- English: Samsung SC-D5000 User manual
Documents connexes
-
Samsung SCD 70 Manuel utilisateur
-
-
-
-
Samsung SCD23/D24 Manuel utilisateur
-
-
-
-
-
