XtendLan XL-SATA-MULTI Manuel utilisateur
- Catégorie
- Disques durs externes
- Taper
- Manuel utilisateur

XL-SATA-MULTI
XL-SATA-MULTI-E
Manual
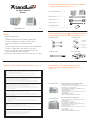
Package content / Verpackungsinhalt / Contenu de l'emballage /
Contenido del embalaje / Contenuto / 部品 / 配件
XL-SATA-MULTI /E
1
eSATA
cable
(MULTI-E
only)
1
SATA
cable
(MULTI
only)
1
Power
cord
(MULTI-E
only)
1
Accessories
bag
1
www.
XtendLan
.com
REV
1.0
(including
22
x
6#-32
screws
and
10
x
M3
X
6
screws,
Key
x
2)
Notes
1.System
Requirements
PC
Minimum
Intel
Processor
II
350MHz,
64MB
RAM
USB
2.0
equipped
PC;
WinME,
Win2000,
WinXP
Serial
ATA
equipped
PC;
Win2000,
WinXP
Mac
Minimum
Apple
G3
processor
(G4
for
1394b),
64MB
RAM
USB
2.0
equipped
Mac;
Mac
OS
10.2,
10.3,
later
2.Once
SATA
and
USB
cable
connected
simultaneously,
i302
has
priority
to
use
SATA
interface.
3.When
using
SATA
interface,
the
Access
LED
does
not
shine.
Attention / Achtung / Attention / Attenzione / Atencion / 注意 / 注意
Optional obtainable / Optional erhaltlich / Obtenable comme option
Se puede adquirir como opcion / Opzionale / 選択製品 / 選擇配件
1.SATA
Bracket
2.SATA
Card
PCI-Express
(PC only)
PCI-X Bus
(PC / Mac only)
3.eSATA
Cable
4.Tray
Module
Product Family / Produkt Familie / Famille de produit /
Familia de productos / Famiglia di prodotti / 製品ファミリー /
相關系列產品
A new HDD must first be initialized, partitioned and formatted by the operation
system to be displayed by the system.
If you connect SATA and USB cable simultaneously, SATA has priority.
If you use SATA interface, the LED display doesn’t shine by data access.
Eine neue Festplatten muss vom Betriebssystem erst initialisiert, partitioniert und
formatiert werden um vom System angezeigt zu werden.
Wenn Sie SATA- und USB- Kabel gleichzeitig anschließen, hat SATA Priorität.
Wenn Sie SATA Interface benutzen, blinkt LED-Anzeige nicht bei Datenzugriff.
Avant tout, un disque dur nouvel doit être initialisé, partitionné, et formaté par le
système d’exploitation pour être indiqué par le système.
Si vous branchez les deux câbles en même temps, SATA sera prioritaire.
Si vous utilisez l’interface SATA, la diode d’indication ne clignotera. pas pendant
l’accès aux données.
Antes de instalar o desinstalar un disco duro se debe desenchufar todos cables de
conexión al ordenador.
Se fissate il cavo del USB e di SATA allo stesso tempo, SATA ha priorità.
Se usate l'interfaccia di SATA, l'annuncio del LED non espone a flash nel caso di
accesso di dati.
最初に、システムから表示するために、オペレーションシステムで新しいHDDを初
期化、パーティション、フォーマットして下さい。
データケーブル(SATAかUSB 2.0)を一本だけコンピュータに接続してください。
新硬碟首先必須進行磁碟分割及格式化後才會在系統中顯示。
如果同時使用SATA和USB介面,SATA將為電腦優先選擇。
如果使用SATA介面,讀取資料時LED將不閃爍。
XL-RAID-SATA
XL-SATA-MULTI-E
USB2.0 & SATA Combo RAID Subsystem
˙ Hardware RAID Design, supports RAID 0,1
˙ Host Interface: SATA 1.5 GHz (eSATA port) & USB 2.0 Combo
˙ Drive Interface: 2x 3.5" SATA 1.5 GHz
˙ Hot Swappable Tray Module Design compatible with vary
Brands of Hard Drive (RAID 1)
˙ Data Auto-Rebuilding
˙ Hard Disk, Fan and Temperature failure detectors to ensure
system stability
˙ Windows-based GUI software
˙ Standard Interface, No Extra Driver Required
SCSI to SATA RAID 5 Subsystem
˙ Hardware RAID Design,supports RAID 0,1,3,5,0+1,JBOD
& Hot Spare Disk
˙ Host Interface: SCSI Ultra 320
˙ Drive Interface: 5 x 3.5" SATA 1.5 GHz
˙ Hot Swappable Tray Module Design compatible with vary
Brands of Hard Drive (RAID 1, 3, 5)
˙ Data Auto-Rebuilding
˙ Hard Disk, Fan and Temperature failure detectors to ensure
system stability
˙ Browser-based GUI software
˙ Standard Interface, No Extra Driver Required

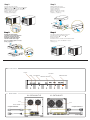
Step.1
Press
the
key
in
the
lock
hole.
Drucken
Sie
den
Schlusselstift
in
das
Schlusselloch.
Poussez
le
goujon-cle
dans
le
trou
de
la
serrure.
Empuje
la
clavija-clave
al
ojo
de
la
cerradura.
Premete
il
tasto
di
bloccaggio.
鍵穴のキーを押してください。
使用鑰匙插進
Tray
的鑰匙孔。
Step.3
Mount
the
HDD
into
the
tray.
Schrauben
Sie
die
Festplatte
fest.
Vissez
le
disque
dur.
Tornille
el
disco
duro.
Montare
l'hard
disk
nel
cassetto.
HDDをトレーに取り付けてください。
將硬碟裝上並用螺絲固定。
Step.2 Step.4 Step.2 Step.4
Demount
the
transport
holder.
Schrauben
Sie
den
Transporthalter
ab.
Devissez
le
support
de
transport.
Destornille
el
soporte
de
transporte.
Smontare
la
staffa
di
bloccaggio.
Demount
the
transport
holder.
Schrauben
Sie
den
Transporthalter
ab.
Devissez
le
support
de
transport.
Destornille
el
soporte
de
transporte.
Smontare
la
staffa
di
bloccaggio.
中についているホルダーを外してください。
中についているホルダーを外してください。
將
Tray
上的磁架拆下。
將
Tray
上的磁架拆下。
Push
the
tray
with
the
HDD
back
to
the
case.
Schieben
Sie
den
Trager
wieder
zuruck.
Ecartez
le
support.
Remeta
el
soporte.
Reinserire
nel
case
il
cassetto
con
l'hard
disk
montato.
HDDが入ったトレーをケースに押し戻してください。
將
Tray
放進外殼
Front
Panel
Power
Lock Hole
Temp Fan Detector HDD LED State
HDD LED indicator
Rear
Panel
XL-SATA-MULTI-E
XL-SATA-MULTI
Fan
Power
Switch
Fan
Computer SATA Port Computer SATA Port
Power Supply
-
 1
1
-
 2
2


XtendLan XL-SATA-MULTI Manuel utilisateur
- Catégorie
- Disques durs externes
- Taper
- Manuel utilisateur
dans d''autres langues
- English: XtendLan XL-SATA-MULTI User manual
Autres documents
-
Akitio NT2 U3e Manuel utilisateur
-
Stardom SR4-SB3 Manuel utilisateur
-
ASROCK Z77 Extreme11 Guide de démarrage rapide
-
-
ASROCK X79 Extreme11 Guide de démarrage rapide
-
ASROCK Z77 Extreme6 Guide de démarrage rapide
-
Cooler Master X Craft 350 Lite, Black spécification
-
ASROCK Z77 Extreme6/TB4 Guide de démarrage rapide
-
Asus MAXIMUS V FORMULA/THUNDERFX Manuel utilisateur
-