
Montage- und Gebrauchsanleitung / Instructions for
Installation and Use / Notice de montage et d’utilisation /
Istruzioni per il montaggio e per l’uso
PALAZZO
®
Royal / E

1. Sicherheitsvorschriften 4
1.1 Verwendung der Schirme 4
1.2 Anzugsmomente der Schrauben 4
2. Lieferumfang 5
3. Montage 5
3.1 Bodenbefestigung 5
3.2 Elektroinstallation 5
3.3 Montage Mast 5
3.4 Montage Dachstreben 6
3.5 Montage Stoffbahnen 6
4. Demontage 7
4.1 Abbau des Überzugs 7
4.2 Mast umlegen 8
5. Bedienung 8
5.1 Schirm aufspannen 8
5.2 Schirm schliessen 9
5.3 Bemerkungen zum Wind 9
6. Wartung und Pflege 10
6.1 Reinigung 10
6.2 Gestell 10
6.3 Überwinterung 10
1. Safety Instructions 11
1.1 Use of the Sunshade 11
1.2 Screw Torque Values 11
2. Scope of Delivery 11
3. Installation 12
3.1 Ground Attachment 12
3.2 Electrical Installation 12
3.3 Setting up the Pole 12
3.4 Installing the Roof Struts 13
3.4 Installing the Lengths of Material 13
4. Dismantling 14
4.1 Dismantling the Cover 14
4.2 Tipping Sunshade 15
5. Use 15
5.1 Spanning Sunshade 15
5.2 Closing Sunshade 16
5.3 Remarks Concerning the Wind 16
6. Maintenance and Care 17
6.1 Cleaning 17
6.2 Frame 17
6.3 Winter Storage 17
INHALTSVERZEICHNIS | DE TABLE OF CONTENTS | EN

1. Prescrizioni in materia di sicurezza 25
1.1 Utilizzo degli ombrelloni 25
1.2 Coppie di serraggio delle viti 25
2. Oggetto della fornitura 26
3. Montaggio 26
3.1 Ancoraggio a terra 26
3.2 Installazione elettrica 26
3.3 Montaggio del palo 26
3.4 Montaggio delle stecche del tetto 27
3.5 Montaggio delle falde del telo 27
4. Smontaggio 28
4.1 Smontaggio del telo di copertura 28
4.2 Spostamento del palo 29
5. Utilizzo 29
5.1 Messa in tensione dell’ombrellone 29
5.2 Chiusura dell’ombrellone 30
5.3 Osservazioni sul vento 30
6. Manutenzione e cura 31
6.1 Pulizia 31
6.2 Struttura 31
6.3 Svernamento 31
1. Consignes de sécurité 18
1.1 Utilisation des parasols 18
1.2 Couple de serrage des vis 18
2. Contenu de la livraison 19
3. Montage 19
3.1 Fixation au sol 19
3.2 Installation électrique 19
3.3 Montage du mât 19
3.4 Montage des baleines de toit 20
3.5 Montage des bandes de tissu 20
4. Demontage 21
4.1 Démontage de la toile 21
4.2 Poser le mât 22
5. Utilisation 22
5.1 Ouvrir le parasol 22
5.2 Fermer le parasol 23
5.3 Remarques par rapport au vent 23
6. Entretien et maintenance 24
6.1 Nettoyage 24
6.2 Structure 24
6.3 Rangement pour l'hiver 24
TABLE DES MATIÈRES | FR INDICE | IT

| 4DE DE
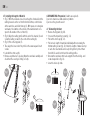
1. SICHERHEITSVORSCHRIFTEN
• Diese Anleitung muss vor Montage und Inbetriebnahme gelesen
und verstanden worden sein. Sie ist für einen späteren Gebrauch
aufzuheben.
• Eine Missachtung von Sicherheitsvorschriften und Anweisungen
der Montage und Bedienungsanleitung kann gravierende Schäden
an Personen und Material zur Folge haben für welche der Hersteller
ausdrücklich jede Haftung oder Gewährleistungspflicht wegbedingt!
• Es ist unerlässlich, dass der Schirm und sein Zubehör von einge-
wiesenem Fachpersonal montiert wird.
• Stellen Sie den Schirm nie ungesichert an eine Wand, er könnte ins
Rutschen kommen und umstürzen.
• Am Schirmgestell darf nur das dafür vorgesehene GLATZ - Zubehör
angebracht werden. Das Aufhängen irgendwelcher anderer Objekte
ist nicht erlaubt.
• Der Schirm und sein Zubehör darf nicht von Kindern oder Personen
mit eingeschränkten körperlichen oder geistigen Fähigkeiten bedient
werden.
• Kinder dürfen nicht mit dem Schirm und dem Zubehör spielen.
• Vor dem Öffnen und Schliessen des Schirmes prüfen, ob sich kein
Hindernis im Öffnungsbereich befindet.
• Während dem Öffnen und Schliessen des Schirmes muss dieser
überwacht werden.
• Der Schirm ist nicht für Schneelasten ausgelegt. Bei Schneefall
muss er geschlossen werden.
• Der Schirm und sein Zubehör sind regelmässig auf übermässigen
Verschleiss und Beschädigung zu überprüfen. Falls Mängel festge-
stellt werden, sind diese vor einem weiteren Gebrauch zu beheben.
• Verwenden Sie nur Original GLATZ - Zubehör und Ersatzteile, um
Gewähr für Sicherheit, ungetrübten Komfort und einwandfreie
Funktion zu erhalten.
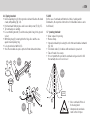
• Bei auffrischendem Wind oder nahenden Sturm-
böen ist der Schirm zu schliessen.
• Unbeaufsichtigte Schirme dürfen nicht geöffnet
bleiben. Unverhofft auftretender Starkwind könnte
gravierende Schäden verursachen.
• Beim Einsatz an exponierten Orten wie Küstennähe oder stark
windigen Regionen ist mit erhöhtem Verschleiss zu rechnen.
1.1 Verwendung der Schirme
Die GLATZ - Grossschirme sind ausschliesslich als wetterbeständiger
Sonnenschutz bestimmt. Die Windfestigkeit des aufgespannten
Schirmes ist begrenzt und die Angaben darüber setzen eine Ver-
ankerung gemäss der Anleitung voraus. Mobile Ständer haben eine
reduzierte Standfestigkeit. Einsatztemperatur: − 20 °C bis + 50 °C
1.2 Anzugsmomente der Schrauben
M6 M8 M10 M12
6 Nm 16 Nm 32 Nm 56 Nm

21
3
4
3
8
8
6
7
7
7
5
Fig. 2
Fig. 3
5 |
DE DE
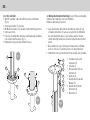
2. LIEFERUMFANG
Der Schirm wird in Baugruppen geliefert und wird am Aufstellort
zusammengebaut werden.
• Mast komplett mit Kurbel (Motorvariante ohne Kurbel) (1)
• Aufstell-Scharnier mit Befestigungsmaterial und Diebstahlsicherung (2)
• Top (3)
• Achsbock (4)
• Streben Nummer (5)
• Keder Profile (6)
• Strebendeckel (7)
3. MONTAGE
3.1 Bodenbefestigung
Die Bodenbefestigung ist gemäss den technischen Informationen der
Anleitung « Bodenhülsen, Montageplatten und Sockel » auszuführen.
3.2 Elektroinstallation
Die Elektroinstallation ist gemäss der Anleitung « PALAZZO
®
Style, No-
blesse, Royal – Elektrozubehör » oder «Steuerung Pz14 » auszuführen.
3.3 Montage Mast
(Es sind 2 erwachsene Personen notwendig)
Hinweis: Alle losen Schrauben müssen mit Loctite 243 gesichert
werden. Bei einer erneuten Montage die Schrauben vorher reinigen oder
neue verwenden.
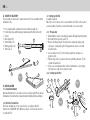
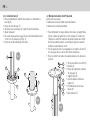
3.3.1 Vorbereitung
• Mast/Aufstellscharnier Verbindungsschrauben auf Sitz überprüfen!
• Deckel der Bodenhülse (1) abschrauben.
• Fixiersteg (2) vom Mastfuss entfernen und Pressring (3) bis über
Kurbelöffnung (4) hochschieben, gegen Mast abpolstern und mit
eingesteckter Kurbel sichern.
• Sicherungsschraube (5) lösen und Scharnierscheibe (6) herausklap-
pen und auf Bodenhülse platzieren.
• Scharnierscheibe mit Drehhaltern (7) auf Bodenhülse spannen.
Mittlere Gewindelöcher verwenden.
• Bei Schirmen mit Elektroinstallation Stecker (8) verbinden. Lose
Kabel in Bodenhülse verstauen.
2
7
4
5
5
6
4
1
3
Fig. 1

1
2
3
4
5
6
7
5
9
11
11
3
12
| 6DE DE
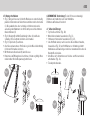
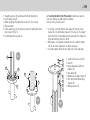
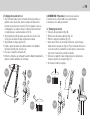
3.3.2 Mast aufstellen
• Mast (9) sorgfältig senkrecht aufrichten und noch festhalten
(Fig. 4).
• Sicherungsschraube (5) einsetzen.
• Mit Nivellierschrauben (11) allenfalls Senkrechtstellung justieren.
• Schirm ausrichten.
• Pressring (3) auf Mastfuss absenken und Verankerungsschrauben
(12) einsetzen und festziehen (Fig. 5).
• Diebstahlsicherung einsetzen und abschliessen.
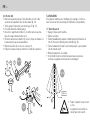
3.4 Montage Dachstreben Vorbereitung (Es sind 2 Personen notwendig):
1 Monteur auf standfester Leiter oder Hebebühne
1 Monteur am Boden als Assistent
• Lange Dachstreben mit Achsbock (4) an Kronenrondelle (3) fest-
schrauben, Kedernuten (7) nach aussen gerichtet. Die Stützstrebe
der ersten Dachstrebe muss in gleicher Weise auf die Schieber-
rondelle befestigt werden bevor die weiteren Dachstreben montiert
werden.
• Bei quadratischen oder rechteckigen Schirmen müssen die Num-
mern von Schienen (5) und Kronenlöchern (3) übereinstimmen.
• Stützstreben in der gleichen Art auf Schieberrondelle festschrauben.
• Schrauben (kein Loctite
verwenden) (1)
• Scheiben (2)
• Kronenrondelle mit Loch-
nummern (3)
• Achsbock (4)
• Dachstreben-Einsatz mit
Nummer (5)
• Dachstreben-Profil mit
Kedernuten (6)
• Kedernuten (7)
Fig. 4
Fig. 5
Fig. 6

2
3
5
1
2
1
6
7 |
DE DE
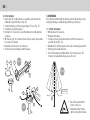
3.5 Montage Stoffbahnen
• (Fig. 7) Am geschlossenen Schirm Stoffbahnen von unten beidseitig
parallel in Kedernuten der Dachstreben einführen und hochschieben
(1). Bei quadratischen oder rechteckigen Schirmen müssen die
aussenliegenden Nummern des Stoffes mit jenen der Dachstreben
übereinstimmen (2).
• (Fig. 8) Kederprofil mit Nut-Ende bündig richten (3) und Keder-
schraube (4) ins Zentrum des Keders einschrauben.
• (Fig. 9) Topscheibe (5) aufsetzen.
• Anschliessend am unteren Profilende in gleicher Weise Keder bündig
richten und Schrauben einsetzen.
• Mit Strebenverschlussdeckel (6) abschliessen.
• Hindernisse im Öffnungsbereich entfernen. Schirm sorgfältig öffnen
und korrekten Sitz der Bespannung kontrollieren.
4. DEMONTAGE Vorbereitung (Es sind 2 Personen notwendig):
1 Monteur auf standfester Leiter oder Hebebühne
1 Monteur am Boden als Assistent
4.1 Abbau des Überzugs
• Top Scheibe entfernen (Fig. 10).
• Obere Kederschraube herausdrehen (Fig. 11).
• Strebenverschlussdeckel herausziehen (Fig. 12).
• Jede Stoffbahn einzeln, nach Lösen der unteren Kederschrauben,
herausziehen (Fig. 12) und Stoffbahnen vor Schmutz geschützt
bündelweise aufeinanderlegen und locker zusammenrollen ohne die
Kederprofile zu knicken.
• Achsböcke der Schirmstreben von Schieber- und Kronenrondelle
abschrauben (Fig. 13).
• Teleskoprohr absenken.
Fig. 7
Fig. 8
Fig. 9
Fig. 10
Fig. 11
Fig. 12
Fig. 13

vorspreizen
1
Fig. 16
21
3
3
7
7
7
5
Fig. 14
Fig. 15
| 8
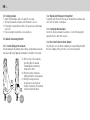
5. BEDIENUNG
(Bei Schirmen mit Motorantrieb, Heizung und/oder Beleuchtung ist die
zugehörige Montage- und Bedienungsanleitung zu befolgen.)
5.1 Schirm aufspannen
• Öffnungsbereich freimachen.
• Bindegurt abnehmen.
• Schirm vorspreizen indem Dachstreben und Stoff nach aussen
gelockert werden (Fig. 16).
• Handkurbel (1) im Uhrzeigersinn drehen bis Schirm aufgespannt ist.
• Kurbel gegebenenfalls abziehen.
• Die Schirmbedienung mit Akku-Bohrer ist nicht zugelassen. Für
Schäden ist die Gewährleistung ausgeschlossen!
DE DE
4.2 Mast umlegen
• Anpressring (3) von Bodenhülse losschrauben und oberhalb der
Handkurbel gepolstert fixieren (Fig. 14).
• Schirm festhalten und Sicherungsschraube (5) lösen (Fig. 15).
• Schirmmast sorgfältig umlegen.
• Drehhalter (7) lösen und in einem Plastikbeutel in der Bodenhülse
verstauen.
• Mit Fixiersteg (2) die Scharnierscheibe und den wieder abgesenkten
Pressring verschrauben.
• Bodenhülse mit Deckel (1) verschliessen.
• Schirm trocken und staubgeschützt einlagern.
• Bei auffrischendem Wind
Schirm schliessen.
• Unbeaufsichtigte Schirme
dürfen nicht geöffnet bleiben.

1
3
2
9 |
DE DE
5.2 Schirm schliessen
• Allfällige Hindernisse aus Schliessbereich entfernen. Gegebenenfalls
Beleuchtung und / oder Heizung ausschalten.
• Mit Handkurbel im Gegenuhrzeigersinn drehen bis Schirm geschlos-
sen ist.
• Stoffbahnen aus Streben hervorziehen, aufwickeln und mit Bindeg-
urte sichern (siehe 4.3.2).
• Gegebenenfalls Schutzhülle überziehen und binden.
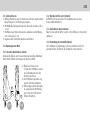
5.3 Bemerkungen zum Wind
5.3.1 Korrektes Aufwickeln des Schirms
Vermeiden Sie Klemm- und Scheuerschäden und vorzeitige Abnützung
durch starkes Flattern und Schlagen des Stoffes im Wind.
(1) Nach dem Schliessen des
Schirms alle Stoffbahnen einzeln
und vollständig zwischen den
Streben hervorziehen.
(2) Die Stoffbahnen lagenweise eng
um das Schirmteil aufwickeln.
(3) Mit der mitgelieferten Bindegurte
die aufgewickelten Stoffbahnen
gut sichern ( der Stoff darf im
Wind nicht flattern ).
5.3.2 Regionen mit Viel- oder Starkwind
Im Herbst nach Saisonende den Schirm abbauen und an einem
trockenen Ort überwinternx.
5.3.3 Aufstellen von neuen Schirmen
Neue Schirme nicht im Herbst, sondern erst im Frühling vor Saisonstart
aufbauen!
5.3.4 Verwendung der Schutzhülle ( Option )
Die Schutzhülle soll vollständig geschlossen und mit dem Seil fest-
gebunden werden. Ein Flattern der Schutzhülle ist zu vermeiden.
Fig. 18Fig. 17

| 10DE EN
6. WARTUNG UND PFLEGE
6.1 Reinigung
Der Stoff kann mit handwarmem Wasser und mit Feinwaschmittel
gereinigt werden. Dazu Schwamm oder weiche Bürste verwenden.
Mit klarem Wasser gut spülen. Bei Bedarf mit handelsüblichem Spray
nachimprägnieren. Neue Schirme können bei starkem Regen leicht
durchsprühen. Diese Erscheinung verliert sich nach einigen Tagen.
6.2 Gestell
Die Gestellteile können mit Wasser abgerieben werden. Die Beschicht-
ungsfarben lassen sich mit einer Autopolitur auffrischen. Lackschäden
können mit dem bei GLATZ erhältlichen Farbreparaturset nachgebessert
werden.
6.3 Überwinterung
Schirm trocken und staubgeschützt lagern.
Testen Sie vor Wiederinbetriebnahme den Zustand und die einwandfreie
Funktion. Sichern Sie allfällig vor der Überwinterung gelöste Schrauben
und Muttern der Streben mit einem wiederlösbaren Leim
(z.B. Loctite 243).
GLATZ AG, Neuhofstrasse 12, 8500 FRAUENFELD / SWITZERLAND
Technische Änderungen vorbehalten.
© GLATZ AG Dokument 261 00 350 035

11 |
DE EN
1. SAFETY INSTRUCTIONS
• Please read and understand these instructions before setting up or
using your sunshade. Please keep this manual for later reference.
• Failure to follow these safety instructions and instructions for
installation and use could result in serious personal injury and
damage to materials, for which the manufacturer assumes no
responsibility.
• The sunshade and accessories must only be installed by appropria-
tely qualified personnel.
• Never lean the sunshade unsecured against a wall. It could slip and
fall.
• Only attach GLATZ accessories intended for that purpose to the
sunshade. Do not hang any other object from the structure.
• The sunshade and accessories must not be used by children, or by
persons with reduced physical or mental capabilities.
• Do not allow children to play with the sunshade or accessories.
• Before opening or closing the sunshade, check that there are no
obstructions in the way.
• Opening and closing of the sunshade must be supervised.
• The sunshade is not designed to hold the weight of snow. It must be
closed in case of snowfall.
• The sunshade and accessories must be checked regularly for
damage. Any defects should be rectified before further use.
• Only use original GLATZ accessories and spare parts to ensure
safety, complete comfort and proper functioning.
• In case of freshening wind or approaching squall,
please close the sunshade.
• Unsupervised sunshades must not remain open.
Unexpected gales could cause serious damage.
• If used in exposed locations, for example near the coast or in regions
with heavy winds, increased wear is to be expected. In these cases,
we recommend more intensive maintenance.
1.1 Use of the Sunshade
The GLATZ giant sunshades are exclusively intended as weather-
resistant sun protection. The wind resistance of the extended sunshade
is limited and the information given concerning this presupposes
anchoring in accordance with instructions. In comparison to ground
anchorage, mobile stands have reduced resistance to the wind.
Operation temperature: − 20 °C to + 50 °C
1.2 Screw Torque Values
M6 M8 M10 M12
6 Nm 16 Nm 32 Nm 56 Nm

2
7
4
5
5
6
4
1
3
Fig. 1
21
3
4
3
8
8
6
7
7
7
5
Fig. 2
Fig. 3
| 12EN EN
2. SCOPE OF DELIVERY
The sunshade is delivered in components and is to be assembled at the
installation site.
• Pole complete with crank (motor version without crank) (1)
• Positioning-hinge with fastening material and theft protection (2)
• Top (3)
• Axle support (4)
• Strut numbers (5)
• Welting profiles (6)
• Strut cap (7)
3. INSTALLATION
3.1 Ground Attachment
Ground attachment is to be carried out in accordance with the technical
information in the instructions „Ground Sockets, Mounting Plates and Base“.
3.2 Electrical Installation
Electrical installation is to be carried out in accordance with the
instructions „PALAZZO
®
Style, Noblesse, Royal – Electrical Accessories“
or „Control Pz14“.
3.3 Setting up the Pole
(2 adults required)
Note: All loose screws are to be secured with Loctite 243. In the event of
a new assembly, clean the screws beforehand or use new screws.
3.3.1 Preparation
• Check that the screws connecting pole and positioning hinge fit properly.
• Unscrew lid from ground socket (1).
• Remove the fixing stay (2) from pole base and push jacking-ring
(3) up over crank opening (4). Pad against pole and secure with
inserted crank.
• Loosen safety screw (5), fold out hinge plate (6) and place on
ground socket.
• Tighten hinge disc to ground socket using twisting mounts (7). Use
central threaded holes.
• In the case of sunshades with electrical installation, connect plug
(8). Stow loose cable in the ground socket.
3.3.2 Setting up the Pole

5
9
11
11
3
12
Fig. 4
Fig. 5
1
2
3
4
5
6
7
Fig. 6
13 |
EN EN
• Straighten up pole (9) carefully and still hold firmly (fig. 4).
• Insert safety screw (5).
• Adjust upright position with plate screws (11), if necessary.
• Align sunshade.
• Lower jacking ring (3) onto pole base and insert and tighten ancho-
ring screws (12) (fig. 5).
• Insert theft protection and lock.
3.4 Installing the Roof Struts Preparation (2 adults are required):
1 person to stand on a stable ladder or platform
1 person on the ground to assist
• Screw long roof struts with the axle support (4) onto the crown-
shaped disc (3), with welting channels (7) facing out. The support
strut of the first roof strut must also be fastened to the sliding disc
before mounting the other roof struts.
• With square or rectangular sunshades, the hole numbers from the
rail (5) and crown-shaped disc (3) must correspond.
• Screw the support struts onto the sliding disc in the same way.
• Screws (do not use Loctite) (1)
• Disks (2)
• Crown-shaped disc with hole
numbers (3)
• Axle support (4)
• Numbered roof support insert (5)
• Roof-strut profile with welting
channels (6)
• Welting channels (7)

| 14EN EN
3.5 Installing the Lengths of Material
• (Fig. 7) With the sunshade closed, insert lengths of material into the
welting channels on the roof struts from the bottom, on both sides
at the same time, and slide them up (1). With square or rectangular
sunshades, the number on the outside of the material must corre-
spond to the number of the roof strut (2).
• (Fig. 8) Align the welting profile with the end of the channel (3) and
screw the welting screw into the centre of the welting (4).
• (Fig. 9) Put on the top plate (5).
• Then, align the lower end of the profile in the same way and insert
screws.
• Lock with the strut cap (6).
• Remove any obstacles to opening. Open the sunshade carefully and
check that the covering is sitting correctly.
4. DISMANTLING Preparation (2 adults are required):
1 person to stand on a stable ladder or platform
1 person on the ground to assist
4.1 Dismantling the Cover
• Remove the top plate (fig. 10).
• Screw out the top welting screw (fig. 11).
• Pull out the strut cap (fig. 12).
• Pull out each length of material individually after unscrewing the
bottom welting screws (fig. 12). Stack the lengths of material on top
of each other in a bundle and loosely roll together to protect them
from dirt. Be careful not to bend the welting profiles.
• Unscrew the sunshade struts’ axle supports from the sliding- und
crown-shaped discs (fig. 13).
• Lower the telescopic tube.
2
3
5
1
2
1
6
Fig. 7
Fig. 8
Fig. 9
Fig. 10
Fig. 11
Fig. 12
Fig. 13

spread
1
Fig. 16
21
3
3
7
7
7
5
Fig. 14
Fig. 15
15 |
EN EN
4.2 Tipping Sunshade
• Unscrew jacking ring (3) from ground socket and fix above the hand
crank, with padding (fig. 14).
• Hold sunshade firmly in place and loosen safety screw (5) (fig. 15).
• Tip sunshade pole carefully.
• Loosen twisting mounts (7) and stow in a plastic bag in the ground
socket.
• With fixing stay (2) screw together the hinge disc and the once
again lowered jacking ring.
• Lock ground socket with lid (1).
• Store the sunshade in a place protected from dust and moisture.
5. USE
(In the case of sunshades with motorised drive, heating and/or
illumination, the respective instructions for installation and use are to
be followed.)
5.1 Spanning Sunshade
• Clear a space for opening.
• Remove strap.
• Spread sunshade by loosening the roof struts and material outwards
(fig. 16).
• Turn hand crank (1) clockwise until sunshade is spread out.
• Take off crank if necessary.
• It is not permitted to operate the sunshade using an electric drill:
the warranty does not cover losses!
• Close sunshade if there is
freshening wind.
• Unsupervised sunshades
must not be left open.

| 16EN EN
5.3.2 Regions with Frequent or Strong Wind
In autumn, after the end of the season, dismantle the sunshade and
store it for the winter in a dry place.
5.3.3 Setting Up New Sunshades
Do not set up new sunshades in autumn - do not set them up until
spring before the start of the season!
5.3.4 Use of the Protective Cover (Option)
The protective cover should be completely closed and firmly tied with
the rope. Flapping of the protective cover is to be prevented.
5.2 Closing Sunshade
• Switch off illumination and / or heating if necessary.
• Turn hand crank anti-clockwise until sunshade is closed.
• Pull lengths of material from struts, roll up and secure with straps
(see 4.3.1).
• If necessary, pull on protective cover and tie up.
5.3 Remarks Concerning the Wind
5.3.1 Correct Rolling of the Sunshade
Prevent damage from jamming and scuffing, and premature wear and
tear caused by strong flapping and beating of the fabric in the wind.
(1) After closing of the sunshade,
pull all lengths of material
individually and completely
between the struts.
(2) Roll the lengths of material
tightly around the sunshade part.
(3) Using the straps provided,
properly secure the rolled-up
lengths of material. (The material
must not flap in the wind).
1
3
2
Fig. 18Fig. 17

17 |
EN EN
6. MAINTENANCE AND CARE
6.1 Cleaning
The material can be cleaned with hand-hot water and mild detergent.
Use a sponge or soft brush for this. Rinse well with clear water. If
necessary, re-impregnate using commercially available spray. New
sunshades can let through a light spray in strong rain. This stops after
a few days.
6.2 Frame
The frame parts can be wiped with water. The coating paints can be
freshened up with a car polish. Paint damage can be repaired with the
paint repair set available from GLATZ.
6.3 Winter Storage
Store sunshade in a dry place, protected from dust.
Before putting back into use, check its condition and test for perfect
functioning. If possible, before winter storage, protect loosened screws
and nuts of the struts with a resoluble glue (e.g. Loctite 243).
GLATZ AG, Neuhofstrasse 12, 8500 FRAUENFELD / SWITZERLAND
Subject to technical changes without notice.
© GLATZ AG Document 261 00 350 035

| 18FR FR
1. CONSIGNES DE SÉCURITÉ
• La présente notice doit être lue et comprise avant le montage et
l'utilisation. Elle doit être conservée pour une utilisation ultérieure.
• Le non-respect des consignes et des remarques de sécurité de la
notice de montage et d'utilisation peut entraîner sur les personnes
et le matériel de graves blessures et dommages pour lesquels le
fabricant exclue expressément toute responsabilité ou garantie !
• Il est impératif que le parasol et ses accessoires soient installés par
un personnel spécialisé et initié.
• Ne posez jamais le parasol contre un mur sans l'attacher, celui-ci
pourrait glisser et tomber.
• Seuls les accessoires GLATZ prévus à cet effet peuvent être montés
sur la structure du parasol. Il est interdit d'accrocher tout autre
objet.
• Le parasol et ses accessoires ne doivent pas être manipulés par des
enfants ou des personnes à capacité physique ou mentale limitée.
• Les enfants ne doivent pas jouer avec le parasol ou ses accessoires.
• Avant d'ouvrir ou de fermer le parasol, vérifier qu'aucun obstacle
n'entrave l'ouverture/fermeture de celui-ci.
• Surveiller le parasol lors de l'ouverture et de la fermeture de celui-ci.
• Le parasol n'est pas prévu pour soutenir une couche de neige. En
cas de neige, il doit être fermé.
• Il est nécessaire de contrôler régulièrement que le parasol et ses
accessoires ne présentent pas de signes d'usure importants ou
de dommages. Si des défauts sont constatés, ceux-ci doivent être
réparés avant d'utiliser à nouveau le parasol.
• Utilisez uniquement des accessoires et des pièces de rechange
d'origine de GLATZ, afin de garantir la sécurité, le confort et la
tranquillité, ainsi qu'un fonctionnement correct.
• Si le vent commence à se lever ou que des bourras-
ques se rapprochent, le parasol doit être refermé.
• Les parasols non surveillés ne doivent pas rester
ouverts. Des rafales de vents impromptues pour-
raient entraîner de lourds dégâts.
• En cas d'utilisation dans des lieux exposés comme en bord de mer
ou des régions soumises à des vents violents, il faut s'attendre
à une abrasion élevée. Dans ces cas là, nous recommandons une
maintenance intensive.
1.1 Utilisation des parasols
Les parasols géants GLATZ sont exclusivement prévus comme protec-
tion contre le soleil et sont résistants aux intempéries. La résistance
au vent du parasol ouvert est limitée et les prescriptions à ce sujet
requièrent un ancrage conformément à la notice. Les supports mobiles
ont une stabilité réduite.
Température d'utilisation: de − 20 °C à + 50 °C
1.2 Couple de serrage des vis
M6 M8 M10 M12
6 Nm 16 Nm 32 Nm 56 Nm

2
7
4
5
5
6
4
1
3
Fig. 1
21
3
4
3
8
8
6
7
7
7
5
Fig. 2
Fig. 3
19 |
FR FR
2. CONTENU DE LA LIVRAISON
Le parasol est livré en différents modules et doit être assemblé à
l'endroit où il sera installé.
• Mât complet avec manivelle (variante motorisée sans manivelle) (1)
• Charnière d'installation avec matériel de fixation et sécurité antivol (2)
• Top (3)
• Support d'axe (4)
• Numéros
baleines (5)
• Profils de
rainures (6)
• Capuchon
de baleine (7)
3. MONTAGE
3.1 Fixation au sol
La fixation au sol doit être effectuée conformément aux informations
techniques de la notice «douilles de sol, plaques de montages et socles».
3.2 Installation électrique
L'installation électrique doit être effectuée conformément à la notice
«PALAZZO
®
Style, Noblesse, Royal – accessoires électriques» ou
«Commande Pz14».
3.3 Montage du mât
(2 personnes adultes nécessaires)
Indication: Sécuriser toutes les vis avec du Loctite 243. En cas de mon-
tage répété, nettoyer les vis au préalable ou en utiliser de nouvelles.
3.3.1 Préparation
• Vérifier le serrage des vis de fixation de la charnière du mât/
d'installation!
• Visser le couvercle de la douille de sol (1).
• Retirer la traverse de fixation (2) du pied de mât et glisser l'anneau
de pressage (3) au-dessus de l'ouverture de manivelle (4), appuyer
contre le mât et sécuriser en insérant la manivelle.
• Desserrer la vis de blocage (5), déplier le disque de charnière (6) et
poser celui-ci sur la douille de sol.
• Serrer le disque de charnière sur la douille de sol avec les supports
anti-rotation (7). Utiliser les perçages filetés moyens.
• Pour les parasols avec installation électrique, connecter la fiche (8).
Ranger les câbles non-attachés dans la douille de sol.

5
9
11
11
3
12
Fig. 4
Fig. 5
1
2
3
4
5
6
7
Fig. 6
| 20FR FR
3.4 Montage des baleines de toit Préparation
(2 personnes nécessaires):
1 monteur sur une échelle stable ou un pont élévateur
1 monteur au sol en tant qu'assistant
• Visser fermement les longues baleines de toit avec le support d'axe
(4) sur le disque de support (3), le bord à rainure (7) orienté vers
l'extérieur. Le renfort de soutien de la première baleine de toit doit
être fixé de la même manière sur le disque de glissière, avant de
monter les autres baleines de toit.
• Pour les parasols carrés ou rectangulaires, les numéros de rails (5)
et les perçages de la couronne (3) doivent correspondre.
• Visser les renforts de soutien de la même manière sur le disque de
glissière.
• Vis (ne pas utiliser de Loctite) (1)
• Disques (2)
• Disque de support avec numéros
des perçages (3)
• Support d'axe (4)
• Insert de baleine de toit avec
numéro (5)
• Profil de baleine de toit avec
rainure (6)
• Bord à rainure (7)
3.3.2 Installation du mât
• Dresser prudemment le mât (9) à la verticale en continuant à le
tenir (fig. 4).
• Insérer la vis de blocage (5).
• À l'aide des vis de nivelage (11), ajuster la position verticale.
• Aligner le parasol.
• Descendre l'anneau de pressage (3) sur le pied du mât puis insérer
et serrer les vis d'ancrage (12) (fig. 5).
• Insérer la sécurité antivol puis verrouiller.
La page est en cours de chargement...
La page est en cours de chargement...
La page est en cours de chargement...
La page est en cours de chargement...
La page est en cours de chargement...
La page est en cours de chargement...
La page est en cours de chargement...
La page est en cours de chargement...
La page est en cours de chargement...
La page est en cours de chargement...
La page est en cours de chargement...
La page est en cours de chargement...
-
 1
1
-
 2
2
-
 3
3
-
 4
4
-
 5
5
-
 6
6
-
 7
7
-
 8
8
-
 9
9
-
 10
10
-
 11
11
-
 12
12
-
 13
13
-
 14
14
-
 15
15
-
 16
16
-
 17
17
-
 18
18
-
 19
19
-
 20
20
-
 21
21
-
 22
22
-
 23
23
-
 24
24
-
 25
25
-
 26
26
-
 27
27
-
 28
28
-
 29
29
-
 30
30
-
 31
31
-
 32
32


Glatz PALAZZO Royal E Installation and Use Manual
- Taper
- Installation and Use Manual
- Ce manuel convient également à
dans d''autres langues
- italiano: Glatz PALAZZO Royal E
- English: Glatz PALAZZO Royal E
- Deutsch: Glatz PALAZZO Royal E
Documents connexes
-
 Glatz Ambiente Manuel utilisateur
-
 Glatz PALAZZO Royal Manuel utilisateur
-
 Glatz Castello M4 Manuel utilisateur
-
 Glatz AURA Manuel utilisateur
-
 Glatz SUNWING CASA Manuel utilisateur
-
 Glatz AMBIENTE NOVA Manuel utilisateur
-
 Glatz PALAZZO Style Manuel utilisateur
-
 Glatz ALEXO Manuel utilisateur
-
 Glatz Pendalex P+ Manuel utilisateur
-
 Glatz Twist Manuel utilisateur


Autres documents
-
 Suncomfort Glatz Parasol Fortello Easy Manuel utilisateur
-
 Shademaker Sirius Installation and Operating Instruction
-
 Bauhaus Flex Roof Manuel utilisateur
-
Sony MPK-DVF5M Manuel utilisateur
-
Sachtler Ace Matte Box Manuel utilisateur
-
Sony MPK-DVF7 Le manuel du propriétaire
-
-
Dometic Heki 1 Mode d'emploi
-
-
Haba 4356 Sofie Schildpad Le manuel du propriétaire


