GBC FOTON 30 Le manuel du propriétaire
- Catégorie
- Laminateurs
- Taper
- Le manuel du propriétaire
Ce manuel convient également à

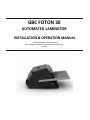
GBC FOTON 30
AUTOMATED LAMINATOR
INSTALLATION & OPERATION MANUAL
Document Number: CBT10000 Rev B
Do not duplicate without written
permission
from ACCO
Brands

ACCO Brands reserves the right to make changes to this publication and to the products described in it without notice. All
specifications and information concerning products are subject to change without notice. Reference in this publication to
information or products protected by copyright or patent does not convey any license under the rights of ACCO Brands or
others. ACCO Brands assumes no liability arising from infringements of patents or any other rights of third parties.
This publication is copyrighted © 2018 by ACCO Brands. All rights reserved.

1. Safety
YOUR SAFETY, AS WELL AS THE SAFETY OF OTHERS IS
IMPORTANT TO ACCO. IN THIS INSTRUCTION
MANUAL AND ON THE PRODUCT ARE IMPORTANT
SAFETY MESSAGES. BEFORE YOU INSTALL OR USE
THE MACHINE, READ AND FOLLOW ALL THE SAFETY
NOTICES CAREFULLY IN THIS CHAPTER.
Observe all the safety information provided.
Observe all safety warnings. Never remove safety
warnings or other information from the equipment.
Read all of the instructions and save these
instructions for further use.
The safety alert symbol precedes each safety
notice in this manual. The symbol indicates a
potential personal safety hazard to you or others, as
well as cause product damage or property damage.
This safety alert symbol indicates a potential
electrical shock. It warns you not to open the
laminator and expose yourself to hazardous voltage.
DO NOT OPEN. NO USER SERVICABLE PARTS INSIDES.
REFER SERVICING TO QUALITFIED SERVICE PERSONAL.
THE FOLLOWING WARNINGS ARE FOUND ON THE
FOTON 30 AUTOMATED LAMINATOR.
CAUTION Hot Surface: Laminator rollers can
be in excess of 260° F/ 126.7° C. Please use caution
and do not touch the rollers.
WARNING: Do not attempt to service or
repair the laminator.
WARNING: do not connect the
laminator to an electrical supply or attempt to
operate the laminator until you have completely
read these instructions. Maintain these
instructions in a convenient location for future
reference.
General safeguards
• Use this laminator only for its intended
purposes as according to the
specifications outlined in the operating
instructions.
• Keep hands, long hair, loose clothing and
articles such as necklaces or ties away
from the front of the feed rollers to
avoid entanglement and entrapment.
• When opening the top door of the
laminator, avoid contact with the
internal rollers when laminator is
powered on or shortly after the
laminator has been turned off. The
rollers can reach temperatures in excess
of 260º F / 126.7° C.
• Keep hands and fingers away from the
path of the sharp film cutter blade
located at the film exit.
Do not place the laminator on an
unstable cart, stand or table. An
unstable surface may cause the
laminator to fall resulting in serious
bodily injury. Avoid quick stops,
excessive force and uneven floor
surfaces when moving the laminator on
a cart or stand.
• Do not defeat or remove electrical and
mechanical safety equipment such as
interlocks, shields and guards.
• Do not insert objects unsuitable for
lamination.
• Do not expose laminator to liquids.

Electrical Safeguards
• The equipment should be connected to an
easily accessible and grounded (3-pin)
receptacle (socket outlet) near the
equipment.
• This laminator must be connected to a supply
voltage corresponding to the electrical rating
as indicated on the serial plate located on the
rear of the machine.
• Unplug the laminator before moving it, or
when it is not in use for an extended period
of time.
• Do not operate the laminator with a damaged
power supply cord or plug.
• Do not overload electrical outlets as this can
result in fire or shock.
• Do not alter the attachment plug. This plug is
configured for the appropriate electrical
supply.
• The unit is intended for indoor use only.
• Disconnect the attachment plug from the
receptacle to which it is connected and keep
the power supply cord in your possession
while moving the laminator.
• Do not operate the laminator with a damaged
power supply cord or attachment plug, upon
occurrence of a malfunction, or after
laminator has been damaged. Contact an
authorized GBC service representative for
assistance.
CAUTION: The receptacle must be located
near the equipment and easily accessible. Do not
use an extension cord.
GBC Technical Service
To order replacement accessories, service, parts,
or an Equipment Maintenance Agreement, please
contact GBC Technical Service and Support at:
United States
ACCO Brands GBC Technical Service and Support
4 Corporate Drive Lake Zurich, IL 60047-8997
www.gbcconnect.com
1-800-723-4000
Canada
Ontario and Quebec – 1-800-268-3310
All other Provinces – 1-800-268-3447
Local 905-595-3100
Callcentre@GBCCanada.com
Mexico
(55) 1500 5778
Lada SIN costo: 01 800 759 6825

2. Warranty
Limited 2 year/5000 Laminates Warranty; USA,
Mexico, and Canada
ACCO Brands USA LLC, ACCO Brands, 4 Corporate
Drive, Lake Zurich, IL 60047 (in Mexico, ACCO Brands
Mexicana, Neptuno 43, Fraccionamiento Nueva
Industrial Vallejo México 07700 D.F. México), (in
Canada, ACCO Brands Canada Inc., 7381 Bramalea
Road, Mississauga ON L5S1C4) (each, respectively,
“ACCO Brands”) warrants to the original purchaser
that this ACCO Brands product is free from defects in
workmanship and material under normal use and
service for a period of: two (2) years or 5000
laminates whichever comes first for parts.
ACCO Brands’ obligation under this warranty is limited
to replacement or repair, at ACCO Brands’ option, of
any warranted part found defective by ACCO Brands
without charge for material or labor. Any replacement,
at ACCO Brands’ option, may be the same product or a
substantially similar product that may contain
remanufactured or refurbished parts. This warranty
shall be void in the following circumstances:
(i) if the product has been improperly installed or
misused,
(ii) if the product has been damaged by negligence or
accident, or
(iii) if the product has been altered by anyone other
than ACCO Brands or ACCO Brands’ authorized agents.
Without limiting the generality of the previous
paragraph, ACCO Brands’ obligation under this limited
warranty does not include:
(iiii) damage caused to the rollers by knives, razors, or
other sharp tools; by any foreign objects falling into
the working area of the laminator; or by cleaning the
laminator with solutions or materials that harm its
surfaces;
For warranty execution, please contact ACCO Brands
at: 800-723-4000 or www.gbcconnect.com in the USA
800-263-1063 or www.gbccanada.com in Canada (55)
1500 5578 or www.accomexico.mx in Mexico
TO THE EXTENT ALLOWED BY APPLICABLE LAW,
THIS WARRANTY IS IN LIEU OF ALL OTHER
EXPRESSED WARRANTIES. REPRESENTATIONS OR
PROMISES INCONSISTENT WITH OR IN ADDITION
TO THIS WARRANTY ARE UNAUTHORIZED AND
SHALL NOT BE BINDING ON ACCO BRANDS. TO
THE EXTENT PERMITTED BY APPLICABLE LAWS,
ANY IMPLIED WARRANTIES (IF APPLICABLE) ARE
LIMITED IN DURATION TO THE DURATION OF
THIS WARRANTY. SOME STATES AND
JURISDICTIONS DO NOT ALLOW LIMITATIONS ON
HOW LONG AN IMPLIED WARRANTY LASTS, SO
THE ABOVE LIMITATION MAY NOT APPLY TO
YOU. TO THE EXTENT PERMITTED BY APPLICABLE
LAW, IN NO EVENT SHALL ACCO BRANDS BE
LIABLE FOR ANY SPECIAL, INCIDENTAL, PUNITIVE,
EXEMPLARY, CONSEQUENTIAL OR SIMILAR
DAMAGES, WHETHER OR NOT FORESEEABLE.
SOME STATES AND JURISDICTIONS DO NOT
ALLOW THE EXCLUSION OR LIMITATION OF
SPECIAL, INCIDENTAL, PUNITIVE, EXEMPLARY,
CONSEQUENTIAL, OR SIMILAR DAMAGES, SO THE
ABOVE EXCLUSION OR LIMITATION MAY NOT
APPLY TO YOU.
FOR CONSUMERS WHO HAVE THE BENEFIT OF
CONSUMER PROTECTION LAWS OR
REGULATIONS IN THEIR JURISDICTION OF
PURCHASE OR, IF DIFFERENT, IN THEIR
JURISDICTION OF RESIDENCE, THE BENEFITS
CONFERRED BY THIS WARRANTY ARE IN
ADDITION TO ALL RIGHTS AND REMEDIES
CONVEYED BY SUCH CONSUMER PROTECTION
LAWS AND REGULATIONS.
To the extent permitted by law, this warranty is
not transferable and will automatically terminate
if the original product purchaser sells or
otherwise disposes of the product.
This warranty gives you specific legal rights. Other
rights, which vary from jurisdiction to jurisdiction,
may exist. In addition some jurisdictions do not
allow (i) the exclusion of certain warranties, (ii)
limitations on how long an implied warranty lasts
and/or (iii) the exclusion or limitation of certain
types of costs and/ or damages, so the above
limitations may not apply.

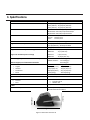
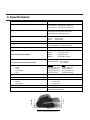
3. Specifications
Model
FOTON 30 Automated Laminator
Operating Speed
3mil (75mic) 29.1"/min (700mm)
4mil (100mic) 25.6"/min (670mm)
5mil (125mic) 23.6"/min (650mm)
Operation Modes
Auto Feed / Auto Cut
Manual Feed / Auto Cut
Manual Feed / Manual Cut
Warm-up Time
3.5 min.
75mic/3mil
3.5 min. 100mic/4mil
4 min.
125mic/5mil
30 Sheets 75gsm paper
Maximum Film Width
12.01” (306mm) – Rest of World
11.5” (292mm) – North America
Maximum Document Thickness
250gsm Manually Fed
Document Lengths Supported
Document Widths Supported
Minimum 6” (152mm)
Maximum 17” (432mm)
Minimum 5” (127 mm)
Maximum 11.69” (297mm)
Auto Feeder Media Weight
Manual Feed Media Weight
High Reliability: 64 – 120 gsm
Variable Reliability: 121 – 220 gsm
64 – 250 gsm
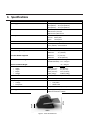
Dimensions:
Width
Height
Depth
Weight
Machine: Shipping:
22.7” (57.7 cm) 27” (68.6 cm)
9.6” (24.5 cm) 15” (38.1 cm)
18.8” (47.8 cm) 22.7” (57.8 cm)
21lbs (9.5kgs) 32.8lbs (14.9kg)
Auto Shut Off
15 minutes of inactivity
Duty Cycle
80 documents per week
Electrical Requirements
Voltage
Receptacle
120V, 60Hz
NEMA 5-15P
Fuse
Yes (internal & non-replaceable)
Operating Environment
41 – 95 (F) / 5 – 35 (C)
Maximum Altitude of 2,000m
Height
Width
Depth
Figure 1. Foton 30 Dimensions

FCC Class B Notice
This device complies with Part 15 of the FCC Rules.
Operation is subject to the following two conditions:
This device may not cause harmful
interference.
This device must accept any interference
received, including interference that may
cause undesired operation.
NOTE: This equipment has been tested and found
to comply with the limits for a Class B digital device,
pursuant to Part 15 of the FCC Rules. These limits
are designed to provide reasonable protection
against harmful interference in a residential
installation. This equipment generates, uses, and
can radiate radio frequency energy and, if not
installed and used in accordance with the
instructions, may cause harmful interference to
radio communications. However, there is no
guarantee that interference will not occur in a
particular installation. If this equipment does cause
harmful interference to radio or television reception,
which can be determined by turning the equipment
off and on, the user is encouraged to try to correct
the interference by one or more of the following
measures:
- Reorient or relocate the receiving antenna.
- Increase the separation between the
equipment and receiver.
- Connect the equipment into an outlet on a
circuit different from that to which the
receiver is connected.
- Consult the dealer or an experienced
radio/TV technician for help.
Canada Class B Notice - Avis
Canada, Class B
This Class B digital apparatus complies with
Canadian ICES-003.
Modifications
Any modifications made to this device that are
not approved by ACCO Brands may void the
authority granted to the user by the FCC and/or
by Industry Canada to operate this
e
q
u
ip
m
e
n
t
.

4. Installation
Service
WARNING:
Do not attempt to service or repair
the laminator.
Failure
to observe this warning could
result in
severe
personal injury or death.
Disconnect the plug from the receptacle and contact
Customer Service when one or more of the following
has o
cc
urr
e
d
.
•
The
power supply cord or attachment plug is
damaged.
• Liquid has been spilled into the laminator.
• The laminator is m
a
l
f
un
c
t
i
o
nin
g
after being
mishandled.
• The laminator does not operate as described in
these ins
tr
u
c
t
i
o
ns.
Installation
• Shipping damage should be brought to the
immediate attention of the delivering carrier.
• Place the laminator on a stable flat surface
capable of supporting 50 lbs.
• The surface should be at least 30” high to
assure comfortable positioning during
operation. All four rubber feet should be on the
supporting surface.
• Connect power cord to an appropriate power
source. Avoid connecting other equipment to
the same branch circuit to which the laminator
is connected as this may cause nuisance
tripping of the circuit breaker or blown fuses.
• The laminator should be positioned to allow
exiting film to drop freely to a flat surface.
Accumulation of laminated documents as they
exit the laminator may cause a jam.
• Avoid placing laminator near sources of heat or
cold. Avoid locating the laminator in the direct
path of forced, heated or cooled air.
Caring for Foton 30
The only maintenance required by the operator is to
periodically clean the rollers. Keeping the rollers clean
ensures that your finished items will not be damaged by
dirt and adhesive build-ups.
CAUTION: the following procedure is performed
while the laminator is hot. Use extreme caution.
WARNING: Do not apply cleaning fluids or
solvents to the rollers.
WARNING: Do not attempt to laminate
adhesives marked ‘Flammable’.
WARNING: Do not expose laminator to liquids.
1. Power the machine on, wait for it to completely
warm up.
2. Open the laminator door using the silver latch.
3. Clean the top rollers with a clean, damp lint-free
cloth. If there are any adhesive build-ups, you
may use isopropyl alcohol instead of water.
4. Lift leading film edge up to the handle of the
cartridge.
5. Clean the bottom rollers with a clean, damp lint-
free cloth. If there are any adhesive build-ups,
you may use isopropyl alcohol instead of water.
6. Place the leading film edge into proper position
and close the door.
7. Press and hold the RUN/STOP button for 5-7
seconds to manually advance the rollers.
8. Open the laminator door using the silver latch.
9. Repeat steps 4 – 6.
Note: Do not use metal scouring pads to clean the heat
rollers!
WARNING: Do not laminate glitter and/or
metallic items. Damage to the rollers may result.
The side covers and feed table can be cleaned with a
lint-free cloth and a mild detergent.


5. Feature Guide
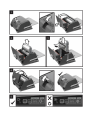
A. GETTING TO KNOW YOUR LAMINATOR:
(Shown in image A above)
a. FEED TRAY & SIDE GUIDES:
i. Place document(s) to be
laminated and use the slide guides
to minimize skew. Flip out
extension for larger documents.
b. FEEDER/FEEDER DOOR:
i. Feeds document into laminator. A
red light on the door will indicate
that a mis-feed has occurred.
Open the door to clear any mis-
feeds.
c. LAMINATOR DOOR:
i. Door that gives access to the inner
parts of the laminator: rollers, film
cartridge, etc.
ii. To Open: pull on the silver latch,
and lift up
iii. To Close: gently lower using the
silver latch, and push latch closed.
DO NOT push down on the
laminator door to close.
d. FILM CARTRIDGE:
i. Replace the film cartridge when
empty or when a different
thickness is required. See
CARTRIDGE FILM LOADING for
details.
e. LAMINATORS ROLLERS:
i. Rollers heat-up to activate the
adhesive on the film and apply the
pressure to ensure the film sticks
to the document.
f. AUTO TRIMMER:
i. When in Auto Cut modes, the
trimmer finds the leading and
trailing edge of the document and
cuts the film. In Manual Cut
mode, it will cut the film when the
CUT button is pressed.
B. CONTROL PANEL: (Shown in image B above)
BUTTONS
a. POWER – turns the machine on/off. After
15 minutes of no use, the machine will
automatically turn off.
b. RUN/STOP – used to start and stop the
laminator.
i. Dual Function – Manual Advance:
Continuously hold the button to
manually advance the laminator
rollers. This can be used to clear
jams and debris for cleaning.
c. MODE – allows users to toggle through
three modes of operation.
i. Auto Feed / Auto Cut – best for
standard paper sizes printed on
20-32lb bond paper.
ii. Manual Feed / Auto Cut – best for
standard paper sizes on heavy
paper stocks that won’t Auto
Feed.
iii. Manual Feed / Manual Cut – best
for odd shaped and non-
rectangular documents.
d. CUT – pressing this button will cycle the
trimmer to cut the film one time. This
button is primarily used in Manual Cut
mode.
INDICATORS
e. STATUS – communicates the status of the
machine:
i. Solid Green = ready to use
ii. Green Blinking Sequence =
running
iii. Solid Amber = warming up
iv. Amber Blinking Sequence =
warming up and RUN command
accepted. Will begin laminating
once ready.
v. Solid Red = error status
f. FILM – LED light will indicate when film is
low (approx. 30% remaining) or is empty.
i. Low = Amber LED light
ii. Empty = Red LED light
g. MODE – green LED light identifies what
mode of operation the machine is in.
h. ERROR MESSAGE – communicates error
messages that need to be resolved.
i. DOOR: one or both doors are
open
ii. JAM: the machine may encounter
two types of jams:
1. Laminator jam: push and
hold the RUN button to
manually advance the
rollers to clear itself.
2. Feeder jam: open the
feeder door and remove
the paper.
iii. CUTTER: trimmer cannot
complete full cut cycle

i. MANUAL FEED INDICATOR – Located on
the Feeder Door, Illuminates GREEN when
the laminator is ready for a document to
be manually fed.
C. FILM CARTRIDGE: (Shown in image C above)
a. CARTRIDGE – inserts into the laminator.
b. CARTRIDGE LABEL – indicates film
thickness. Located on top of handle.
a. FILM LEADER – the first 3-4” (75-100mm)
of sealed laminating film provided on the
film cartridge. The film leader must be
placed facing the exit of the machine.

6. Operation
OPERATION MODES:
AUTO FEED / AUTO CUT
Note: Best for standard paper sizes printed
on 20-32lb bond (75-120 gsm) paper.
1. Press the POWER button to turn the machine ON.
The machine will automatically start in Auto Feed
/ Auto Cut mode.
2. Place your document(s) in the FEED TRAY.
3. Slide the Side Guides to fit your document(s) to
minimize skew during lamination.
4. Press the RUN button:
Note: If RUN is pressed before the machine
has completely warmed up, the status bar
will be AMBER blinking in a sequence. The
laminator has accepted the command and
will start automatically when machine
reaches proper temperature.
5. Document(s) will be automatically laminated and
automatically trimmed as they exit the machine.
Note: If you hit stop while the document is
still feeding through the laminator, the
machine will finish laminating the document
before stopping.
MANUAL FEED / AUTO CUT
Note: Best for standard rectangular paper
sizes on heavy paper stocks that won’t Auto
Feed.
1. Press the POWER button to turn the machine ON.
2. Select the Manual Feed / Auto Cut mode by
pressing the Mode button.
3. Wait for the machine to reach proper
temperature: solid green STATUS light.
4. Place only the first document in the FEED TRAY.
The document must be placed in the center of the
Feed Tray and far enough into the feeder to grab
your document.
5. Press the RUN button. The document will begin to
feed into the laminator.
6. After your first document begins laminating, wait
for the MANUAL FEED indicator to illuminate
green. Once illuminated, the machine can be
manually fed the next document. Repeat this
process one sheet at a time until the job is
complete.
7. Documents will be manually laminated and
automatically trimmed as they exit the machine.
8. After the final document has been cut and exits
the machine will automatically stop.
MANUAL FEED / MANUAL CUT
Note: This mode is best used for odd-shaped
or non-rectangular documents that won’t
Auto Feed.
1. Press the POWER button to turn the machine
ON.
2. Select the Manual Feed / Manual Cut mode by
pressing the Mode button.
3. Wait for the machine to reach proper
temperature: solid green STATUS light.
4. Place only the first document in the FEED TRAY.
The document must be placed in the center of
the Feed Tray and far enough into the feeder to
grab your document.
5. Press the RUN button. The document will begin
to feed into the laminator.
6. After your first document begins laminating,
wait for the MANUAL FEED indicator to
illuminate green. Once illuminated, the
machine can be manually fed the next
document. Repeat this process one sheet at a
time until the job is complete.
7. Press the CUT button to cycle the trimmer
anytime you want to cut the film.
Note: It is recommended to press the CUT
button after you see the entire document
exit the machine to avoid cutting the
document.
8. After the final document has exited the
machine, press the STOP button to stop the
lamination process.
9. Once lamination has stopped, press CUT to cut
the remaining film that has exited the machine.
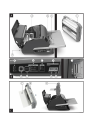
CARTRIDGE FILM LOADING
(Reference Images 1-4 to demonstrate process)
CAUTION: the following procedure might be
performed while the laminator is hot. Use extreme
caution.
Note: The film cartridges have an End of Roll sticker
which the laminator will automatically detect. Once
detected, the laminator will stop feeding any
remaining documents in the feed tray. The
laminator continue to laminate in the laminator.
The sticker may appear on the last document but
can be removed from the laminate.
1. Open Laminator Door: Open the laminator
door by fully raising the silver latch on the
top of the machine and pull up until door
fully opens.

2. Remove Cartridge: Lift upward on the
cartridge handle to remove the installed
cartridge.
Caution: full cartridges tend to be
heavy
3. Insert Cartridge: Insert replacement
cartridge by aligning edges of cartridge over
grey channel guide in laminator and lowering.
Note: Film leader should be inserted
away from the feeder, facing
towards the exit of the machine.
4. Close Laminator Door: Close the laminator
door by gently lowering the door and fully
close the silver hatch on top. DO NOT push
down on the laminator door to close; use
the latch.
5. Ensure Cartridge is Fully Inserted: Film
6. Empty indicator will be illuminated when
no cartridge is installed or if the cartridge is
not fully seated on the bottom.
7. Automatically Thread: When the laminator
reaches proper temperature, the machine
will finish threading film and feed
approximately 9” (22.9 cm) of film to
eliminate potential wrinkles in the film.

TROUBLE SHOOTING
SYMPTON
POSSIBLE CAUSE
CORRECTIVE ACTION
Pressing the Power
button does not
turn the machine
ON
The power cord may not
be inserted all the way
into outlet
Fully Insert plug into outlet
Make sure the outlet has power
Status Indicator
Red:
Door Error Indicator Red:
Paper Jam Error Indicator
Red:
Film Empty Indicator Red:
Cutter Error Indicator Red
Remove any paper from the feeder tray. Open and Close both the
laminator door and the feeder door. Ensure they are fully closed
Open the feeder door, and remove any paper from the feeder tray.
Close the feeder door.
If the above does not clear the error, press and hold the RUN button for
10 seconds to manually feed film. Film should begin to exit the machine
and Jam should clear.
If Jam error remains, open laminator door and look to see if film leader
is caught on an obstacle or the rollers. DO NOT CUT the film. Lift-up the
film leader and replace it in proper position. Shut Laminator door and
hold the run button for 10 Seconds.
Cartridge End of Roll label has been detected. Replace the film cartridge
with new cartridge and shut the laminator door.
The cutter could not initiate a cut, or did not finish a cut.
Press the manual cut button one time to try and activate the cutter. Not
resolved, try the following:
Observe the film at the exit of the laminator to see if the film is not cut
or partially cut.
Film is not cut:
Press and hold the RUN button for about 10-20 seconds to
manually advance the film. If there is laminated media in the
exit of the laminator, hold the RUN button until the media has
fully exited the laminator. Now press the manual cut button to
see if the cutter is activated.
Film is Partially Cut:
Open the laminator door and look to see if you can see the
trimmer blade. It will be near the back of the laminator
partway through the film. Using scissors cut the film hanging
out the exit of the laminator. Then using caution not to put
your fingers near the trimmer knife, carefully remove the
cartridge. Close the laminator door and try to manually cycle
the cutter. If the cutter works Re-insert your cartridge. Might
need to trim off the leading edge of film where the cutter
jammed. If you need to trim the film leave 4 inches (100mm)
of sealed film as the cartridge leader. Re-insert the cartridge.
The machine once warmed-up will automatically thread the
film and activate the trimmer.
If the cutter does not work after the above steps contact your service
provider.

Film Wrinkles on
output
Film Misaligned
Press and hold the RUN button to manually advance the film. After 5 –
20 inches (125 – 500mm) of film has been advanced the wrinkle should
work themselves out. If wrinkle clear press the manual cut button and
you are ready to begin.
If wrinkles still present, open the laminator door. Grasp the film exiting
the laminator and hold it Taut while closing the laminator door. Repeat
above step and wrinkles should disappear.
Film Edges are not
evenly aligned.
Top and bottom rolls of
film are not matched
properly.
Press and hold the RUN button to manually advance the film. After 5
inches (125 mm). Grasp the film exiting the laminator and hold it Taut
while closing the laminator door.
Documents are
skewed in the film
when exiting
Documents fed in skewed
Before loading paper, try tapping the leading edge of the paper on a flat
surface and then repeat with the bottom or top edge to get your paper
properly squared.
Insert your media in the auto feeder and slide the edge guide up to edge
of your media.
Experiencing
frequent double
feeds
Paper has heavy static
Try fanning the media or placing in a paper jogger prior to feeding it. If
issues persist use the Manual Feed / Auto Cut mode.
Experiencing
frequent mis-feeds
Rollers are slipping on
media and do not feed
sheets
Try fanning the media or placing in a paper jogger prior to feeding it. If
issues persist use the Manual Feed / Auto Cut mode.
If mis-feeds continue use the Manual Feed / Auto Cut operation mode
and manual feed the media one sheet at a time

Contre-colleuse sans pochette
GBC FOTON 30
MANUEL D’INSTALLATION ET D’UTILISATION
Numéro de document : CBT10000 Rév. B
Ne pas reproduire sans la permission écrite d'ACCO Brands.

ACCO Brands se réserve le droit de modifier cette publication et les produits décrits dans les présentes sans préavis.
Toutes les spécifications et tous les renseignements concernant les produits peuvent être modifiés sans préavis. Dans cette
publication, toute référence à des renseignements ou des produits protégés par des droits d'auteur ou des brevets ne
confère aucune licence au titre des droits d'ACCO Brands ou des autres. ACCO Brands n’assume aucune responsabilité
découlant de toute violation aux brevets ou de tout autre droit de tiers.
Cette publication est protégée par des droits d’auteur © 2018 par ACCO Brands. Tous droits réservés.

1. Sécurité
ACCO PREND TRÈS AU SÉRIEUX VOTRE SÉCURITÉ ET
CELLE DES AUTRES. D’IMPORTANTS MESSAGES DE
SÉCURITÉ SE TROUVENT DANS CE MANUEL
D’UTILISATION ET SUR LE PRODUIT. AVANT D’INSTALLER
OU D’UTILISER LA MACHINE, VEUILLEZ LIRE ET SUIVRE
ATTENTIVEMENT TOUTES LES CONSIGNES DE SÉCURITÉ
FIGURANT DANS CE CHAPITRE.
Respectez toutes les consignes de sécurité fournies.
Respectez tous les avertissements de sécurité. Ne
retirez pas les avertissements de sécurité ou les
autres renseignements de l’équipement.
Lisez toutes les directives et conservez-les
pour référence ultérieure.
Dans ce manuel le symbole d’alerte de
sécurité précède chaque consigne de sécurité.
Le symbole indique un risque éventuel pour votre
sécurité personnelle ou celle des autres, et la
possibilité de causer des dommages matériels.
Ce symbole d’alerte de sécurité indique le
risque d’un choc électrique. Il vous recommande de
ne pas ouvrir la contre-colleuse et de ne pas vous
exposer à des tensions dangereuses.
LES AVERTISSEMENTS SUIVANTS SE TROUVENT SUR LA
CONTRE-COLLEUSE SKYWARP.
NE L’OUVREZ PAS. IL NE CONTIENT AUCUNE PIÈCE QUI
PEUT ÊTRE RÉPARÉE PAR L’UTILISATEUR. TOUTE
RÉPARATION DOIT ÊTRE EFFECTUÉE PAR LE
PERSONNEL DE SERVICE QUALIFIÉ.
MISE EN GARDE surface chaude : La
température des rouleaux de la contre-colleuse peut
dépasser 126,7°C (260 °F). Soyez prudent et ne
touchez aux rouleaux.
AVERTISSEMENT : Ne tentez pas de
réparer la contre-colleuse.
AVERTISSEMENT : Ne reliez pas la
contre-colleuse à une alimentation électrique et
ne tentez pas d’utiliser la contre-colleuse avant
d’avoir complètement lu ces directives.
Conservez ces directives dans un endroit
pratique pour référence ultérieure.
Protections générales
• N'utilisez cette contre-colleuse que pour
son usage prévu et conformément aux
spécifications décrites dans les directives
d'utilisation.
• Gardez les mains, les cheveux longs, les
vêtements amples et les articles comme
les colliers ou les cravates loin des
rouleaux d’alimentation pour éviter tout
enchevêtrement et blocage.
• Lorsque vous ouvrez la porte de la
contre-colleuse, évitez tout contact avec
les rouleaux internes lorsque la contre-
colleuse est sous tension ou peu après
qu'elle ait été mise hors tension. La
température des rouleaux peut
atteindre 126,7°C (260 °F).
• Gardez les mains et les doigts loin de la
lame tranchante du massicot de pellicule
située à la sortie de la pellicule.
Ne placez pas la contre-colleuse sur un
chariot, un support ou une table
instables. Une surface instable peut
provoquer la chute de la contre-colleuse
et causer des blessures graves. Évitez les
arrêts rapides, une force excessive et
des planchers à surface irrégulière
lorsque vous devez déplacer la contre-
colleuse sur un chariot ou un support.
• Ne déjouez pas et ne retirez pas
l’équipement de sécurité électrique et
mécanique, comme les dispositifs de
verrouillage, les écrans et les éléments
de protection.
• N’insérez pas des objets qui ne doivent
pas être plastifiés.
• N’exposez pas la contre-colleuse à des
liquides.

Protections électriques
• L’équipement doit être relié à une prise
facilement accessible et mise à la terre (trois
broches) près de celui-ci.
• Cette contre-colleuse doit être reliée à une
tension d’alimentation correspondant à la
puissance électrique indiquée sur la plaque
signalétique située à l’arrière de la machine.
• Débranchez la contre-colleuse avant de la
déplacer ou lorsqu’elle ne sera pas utilisée
pendant de longues périodes.
• N’utilisez pas contre-colleuse si le cordon
d’alimentation ou la fiche sont endommagés.
• Ne surchargez pas les prises électriques pour
éviter tout risque d'incendie ou de choc
électrique.
• Ne modifiez pas la fiche. Cette fiche est
configurée pour l’alimentation électrique
appropriée.
• L’unité est conçue pour être utilisée à
l’intérieur seulement.
• Débranchez la fiche de la prise dans laquelle
elle est insérée et gardez le cordon
d’alimentation en votre possession lorsque
vous déplacez la contre-colleuse.
• N’utilisez pas la contre-colleuse si le cordon
d’alimentation ou la fiche sont endommagés,
en cas de mauvais fonctionnement ou si elle a
été endommagée. Communiquez avec un
représentant de service GBC autorisé pour
obtenir de l’aide.
MISE EN GARDE : La prise doit être située
près de l’équipement et être facilement
accessible. N’utilisez pas de rallonge.
AVERTISSEMENT : Ne reliez pas la contre-
colleuse à une alimentation électrique et ne tentez
pas d’utiliser la contre-colleuse avant d’avoir
complètement lu ces directives. Conservez ces
directives dans un endroit pratique pour référence
ultérieure.
AVERTISSEMENT: Cet appareil n'est pas
conçu pour être utilisé dans le champ de vision direct
des postes de travail à affichage visuel. Pour éviter
les réflexions gênantes sur les lieux de travail avec
écrans de visualisation, cet appareil ne doit pas être
placé dans le champ de vision directe.
Service technique GBC
Pour commander des accessoires de rechange,
des pièces, obtenir du service ou un contrat
d’entretien d’équipement, communiquez avec le
service technique et d’assistance GBC :
États-Unis
ACCO Brands GBC Technical Service and Support
4 Corporate Drive Lake Zurich, IL 60047-8997
www.gbcconnect.com
1-800-723-4000
Canada
Ontario et Québec – 1-800-268-3310
Toutes les autres provinces – 1-800-268-3447
Localement – 905-595-3100
Callcentre@GBCCanada.com
Mexique
(55) 1500 5778
Lada SIN costo: 01 800 759 6825
La page est en cours de chargement...
La page est en cours de chargement...
La page est en cours de chargement...
La page est en cours de chargement...
La page est en cours de chargement...
La page est en cours de chargement...
La page est en cours de chargement...
La page est en cours de chargement...
La page est en cours de chargement...
La page est en cours de chargement...
La page est en cours de chargement...
La page est en cours de chargement...
La page est en cours de chargement...
La page est en cours de chargement...
La page est en cours de chargement...
La page est en cours de chargement...
La page est en cours de chargement...
La page est en cours de chargement...
La page est en cours de chargement...
La page est en cours de chargement...
La page est en cours de chargement...
La page est en cours de chargement...
La page est en cours de chargement...
La page est en cours de chargement...
La page est en cours de chargement...
La page est en cours de chargement...
La page est en cours de chargement...
La page est en cours de chargement...
-
 1
1
-
 2
2
-
 3
3
-
 4
4
-
 5
5
-
 6
6
-
 7
7
-
 8
8
-
 9
9
-
 10
10
-
 11
11
-
 12
12
-
 13
13
-
 14
14
-
 15
15
-
 16
16
-
 17
17
-
 18
18
-
 19
19
-
 20
20
-
 21
21
-
 22
22
-
 23
23
-
 24
24
-
 25
25
-
 26
26
-
 27
27
-
 28
28
-
 29
29
-
 30
30
-
 31
31
-
 32
32
-
 33
33
-
 34
34
-
 35
35
-
 36
36
-
 37
37
-
 38
38
-
 39
39
-
 40
40
-
 41
41
-
 42
42
-
 43
43
-
 44
44
-
 45
45
-
 46
46
-
 47
47
-
 48
48


GBC FOTON 30 Le manuel du propriétaire
- Catégorie
- Laminateurs
- Taper
- Le manuel du propriétaire
- Ce manuel convient également à
dans d''autres langues
- English: GBC FOTON 30 Owner's manual
- español: GBC FOTON 30 El manual del propietario
Documents connexes
-
GBC 4410011 Manuel utilisateur
-
-
Swingline 1703078 Manuel utilisateur
-
Swingline Fusion 5000L Manuel utilisateur
-
ACCO Brands 1703075 Manuel utilisateur
-
Swingline 1703074 Manuel utilisateur
-
Acco 1703072 Manuel utilisateur
-
MyBinding GBC Falcon 3064 Laminator Manuel utilisateur
