Arris MXV4 RF Manuel utilisateur
- Catégorie
- Télécommandes
- Taper
- Manuel utilisateur

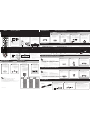
Touches de Mode - Contrôle du dispositif
correspondant à la dernière touche enfoncée
Ache l’INFO sur le
programme sélection
SORTIE du menu actuel et retourne
au programme en cours
Revient au canal PRÉCÉDENT (LAST)
que vous regardiez
Accéder à la bibliothèque de programmes
SUR DEMANDE (ON DEMAND)
Contrôle la lecture de programmes
en direct et enregistrés
Ache le MENU principal de
la télévision
Ache le GUIDE de programmation
Contrôle le VOLUME et la
fonction MUET du téléviseur
Utiliser pour programmer la RÉGLAGE (SETUP)
de la télécommande à distance
Ache une liste des
programmes enregistrés
Marques populaires
Méthode de réglage B:
Configurez en utilisant l’entrée de code directe
Comment démarrer
MANUEL D’UTILISATEUR DE LA COMMANDE À DISTANCE
Recherche de code
Méthode de réglage C:
Réglage des contrôles du volumeMéthode de réglage A:
Verrouillez le commutateur d’entrée sur un appareil
Appuyez sur la touche
pour l’appareil que vous
désirez congurer.
Appuyez et tenez la
touche de RÉGLAGE
(SETUP) jusqu’à ce que le
DEL clignote deux fois.
Inscrivez le premier code de
votre marque à partir de la
liste de codes.
(Voir au verso pour codes.)
Appuyez sur la touche
de mise en marche
(POWER) pour tester
votre équipement. Si
l’appareil s’éteint, le
réglage est terminé.
Si l’appareil ne s’éteint
pas, veuillez répéter la
MÉTHODE DE RÉGLAGE
B en utilisant le code
suivant pour votre
marque.
Appuyez et tenez la touche
de RÉGLAGE (SETUP)
jusqu’à ce que le DEL
clignote deux fois.
Appuyez sur la touche
pour l’appareil que vous
désirez congurer. La
touche reste allumée.
Appuyez et tenez la
touche OK.
Laissez aller la touche OK
quand votre appareil
s’éteint.
Les fonctions de volume servent à contrôler
le téléviseur par défaut. Suivez ces étapes si
vous désirez utiliser l’appareil audio et
contrôler le volume.
Appuyez et tenez la touche de
RÉGLAGE (SETUP) jusqu’à ce que le
DEL clignote deux fois.
Appuyez sur la touche de volume
(VOL +) en même temps.
Appuyez sur la touche qui correspond à
l’appareil que vous utilisez pour
contrôler le volume.
Appuyez et tenez la touche RÉGLAGE (SETUP)
jusqu’à ce que le DEL clignote deux fois.
Appuyez sur la touche TV / Vidéo
(TV/Video).
Appuyez sur la touche qui correspond à
l’appareil que vous utilisez pour modier
l’entrée audio/vidéo.
Assurez-vous que tout l’équipement de cinéma
maison est EN MARCHE avant d’entamer la
réglage de la télécommande à distance.
Couvercle du compartiment des
piles de la télécommande.
Insérez deux piles AA en veillant à
faire correspondre les repères + et -.
Remettez le couvercle en place.
Le DEL clignotera cinq fois avec chaque
pression quand les batteries ont besoin
d’être remplacées.
Appuyez et tenez la
touche de RÉGLAGE
(SETUP) jusqu’à ce
qu’elle clignote deux
fois.
Appuyez la touche de
mode pour l’appareil
que vous désirez
congurer. Le touche
reste allumée.
Trouvez votre appareil et la
marque à partir du tableau
ci-dessous et remarquez le
NUMÉRO assigné à votre
marque. Appuyez cette
touche pour votre
appareil/marque.
Libérer la touche quand
votre appareil s’éteint. Le
réglage pour cet appareil
est terminé.
Si votre marque d’appareil ne paraît pas sur le tableau à droite, eectuez une réglage
en utilisant une ENTRÉE DE CODE DIRECT (B) ou une RECHERCHE DE CODE (C).
Utiliser pour boucler un
cycle par les prises
S-vidéo sur le téléviseur
ou le récepteur audio
2 CLIGNOTEMENTS = SUCCÈS
1 CLIGNOTEMENT PROLONGÉ = ÉCHEC
TV / Vidéo par défaut clé pour contrôler
l'entrée du téléviseur. Suivez ces étapes si
vous voulez verrouiller la touche TV / Vidéo à
un autre appareil, peu importe ce mode est
sélectionné.
Remarque:
Conseil:
Conseil:
Conseil:
Conseil:
Configuración - Método B:Método de Emparejamiento de RF:
Configuración del Control de TV utilizando Entrada Directa de Código
Búsqueda de Código
Configuración – Método C:
Bloqueo de los Controles de Volumen a un Dispositivo
Bloqueo de la Tecla de TV/Video a Un Dispositivo
Configuración – Método A:
Marcas famosas
Modo de aprendizaje
La tecla de Modo parpadeará 5 veces
con cada pulsación de tecla cuando sea
necesario reemplazar las pilas.
De forma predeterminada, las teclas de volumen
se bloquea en el modo TV. Siga estos pasos para
bloquear las teclas de volumen a otro dispositivo
sin importar el modo seleccionado, si lo desea.
Mantenga presionado la tecla SETUP (Congurar)
hasta que una tecla de modo parpadee dos
veces. Luego presione 975.
La tecla de modo parpadee dos veces más.
Posición controles remotos de
2-5 centímetros de separación
To cancel the volume control lock:
1 - Press and hold SETUP until a mode key blinks twice.
2 - Press the Mute key. The mode key will blink 4 times
upon successful unlock.
Para cancelar el bloqueo de control de volumen:
1 - Presione y mantenga presionada la tecla SETUP (Congurar)
hasta que la tecla de modo parpadee dos veces.
2 - Presione la tecla Silencio. La tecla de modo parpadeará 4 veces
al desbloqueo exitoso.
De forma predeterminada, la tecla TV / Vídeo
controlar cualquier dispositivo en función del modo
seleccionado. Siga estos pasos para bloquear la tecla
de TV/Video en un solo dispositivo, sin importar lo
que se selecciona el modo.
By default, the TV/Video key will control
any device depending on the mode
selected. Follow these steps to lock the
TV/Video key to just one device no matter
what mode is selected.
Para cancelar el bloqueo del interruptor de entrada:
1 - Presione y mantenga presionada la tecla SETUP (Congurar)
hasta que la tecla de modo parpadee dos veces.
2 - Presione la tecla TV/Video. Luego la tecla Exit To TV. La tecla
de modo parpadeará 4 veces al desbloqueo exitoso.
2 Blinks = Success 1 Long Blink = Failure
2 Parpadeos = Correcta, 1 Parpadeo Largo = Incorrecta
Code Search
Locking Volume Controls to One Device
Setup Method C:
Locking TV/Video Key to One Device
Consejo:Tip/
Consejo:Tip/
By default, the volume keys will be locked
to TV mode. Follow these steps to lock the
volume keys to another device no matter
which mode is selected, if desired.
Press and hold SETUP until a mode key blinks
twice. Then press 975.
The mode key will blink twice again.
1
Press and hold the desired key on the teaching remote
until the mode key blinks twice.
Repeat steps 2 and 3 to learn other keys.
To exit: press and hold SETUP until a mode key blinks twice.
3
Learning Mode
The mode key will blink 5 times with
each key-press when batteries need
replacement.
Setup Method A: Popular Brands
Setup Using Direct Code Entry
MUG_MXv4_RF_ARRIS_A01
Setup Method B:RF Pairing Method:
Position remotes
1-2 inches apart.
CONTROL REMOTO: GUÍA DEL USUARIO
MXV4 RF
REMOTE CONTROL USER’S GUIDE
Mantenga presionado la tecla deseada en el control que
ensena hasta que la tecla de modo parpadee dos veces.
Repita los pasos 2 y 3 para aprender otras teclas.
Para salir: mantenga presionado la tecla SETUP (Congurar)
hasta que una tecla de modo parpadee dos veces.
DRAFT E -- 04 May 2012
English/Spanish
Presione la tecla de modo que
corresponda al equipo que está utilizando
para cambio de entradas audio/video.
Press the mode key that corresponds with
the device you use for changing
audio/video inputs.
3
Presione la tecla TV/Video.
Press the TV/Video key.
2
Consejo:Tip/
Consejo:Tip/
Presione la tecla del modo deseado, luego la
tecla para ser enseñado.
Press the desired mode key, then the key
to be taught.
2
2 Blinks = Success 1 Long Blink = Failure
2 Parpadeos = Correcta, 1 Parpadeo Largo = Incorrecta
Presione la tecla de modo que
corresponda al equipo que está
utilizando para controles de volumen.
Press the mode key that corresponds to
the device you use for volume controls.
3
?
2
Presione la tecla aumentar
volumen (VOL +).
Press VOL + key.
1
2
Remove sticker and secure the RF
Adapter to the top of the set-top
box as shown (above the “IR”
designation, if labeled).
Retire la etiqueta y asegure el
Adaptador de RF a la parte superior
de la caja de conexión como se
muestra (por encima de la" IR"
designación, si la etiqueta).
Install batteries.
Instale las pilas.
3
4
5
4
Presione la tecla de encendido/
apagado (POWER) para probar con
su equipo. Si el equipo se apaga, la
conguración se ha completado.
Press POWER key to test with
your device. If the device turns
o, setup is complete.
Presione la tecla de modo para el equipo
que desee congurar. La tecla de modo
permanece encendida.
Press the mode key for the device you wish to
set up. The mode key stays lit.
2
Presione y mantenga presionada la
tecla OK (Aceptar).
Press and hold the OK key.
3
Suelte la tecla OK (Aceptar) cuando
su equipo se apague.
Release the OK key when your device turns o.
4
5
If device does not turn on, repeat
Setup Method B using the next
code for your brand or use Setup
Method C.
Si el equipo no se apaga, repita el
Método de Conguración B
utilizando el próximo código que
corresponda a su marca o utiilice
Método de Conguración C
When successfully paired, the
green RF Adapter LED will stop
blinking and will stay on.
Al lograr emparejamiento, la luz
LED del adaptador RF dejara de
parpadear y permanecerá
encendida.
© Universal Electronics 2012
1
2
4
3
Presione la tecla de
modo para el equipo
que desee congurar.
La tecla de modo
permanece encendida.
2 PARPADEOS = CORRECTA
1 PARPADEO LARGO = INCORRECTA
Si la marca que utiliza no aparece en la tabla de marcas a la derecha,
realice la conguración utilizando ya sea ENTRADA DIRECTA DE
CÓDIGO (B) o BÚSQUEDA DE CÓDIGO (C).
Press and hold SETUP until
a mode key blinks twice.
Presione y mantenga
presionada la tecla SETUP
(Congurar) hasta que el
LED parpadea dos veces.
Find your device and brand
from the charts below and note
the number key assigned to
your brand. Press and hold the
number key for your
device/brand.
Busque su equipo y la marca en
las tablas que guran a
continuación y observe el
código de número (Número)
asignado a su marca. Mantenga
presionada la tecla del numero
que corresponda a la marca de
su equipo.
Release the key when your
device turns o. Setup for
that device is complete.
Suelte la tecla cuando su
equipo se apague. La
conguración para ese
equipo se ha completado.
If your brand does not appear in the brand chart to the right, perform
setup using either DIRECT CODE ENTRY (B) or CODE SEARCH (C).
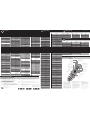
Number
Numéro
TV
1
2
3
4
5
6
7
8
9
0
Insignia / Dynex
LG
Mitsubishi
Panasonic
Philips / Magnavox
Samsung
Sharp
Sony
Toshiba
Vizio
Number
Numéro
DVD/VCR
1
2
3
4
5
6
7
8
9
0
LG
Memorex
Panasonic
Philips / Magnavox
RCA
Samsung
Sharp
Sony
Sylvania
Toshiba
Number
Numéro
Audio
1
2
3
4
5
6
7
8
9
0
Bose
Denon
LG
Onkyo
Panasonic
Philips
Pioneer
Samsung
Sony
Yamaha
Press and hold SETUP until a mode key
blinks twice.
Presione y mantenga presionada SETUP hasta
que la tecla de modo parpadea dos veces.
1
Press and hold SETUP until a mode key
blinks twice.
Presione y mantenga presionada SETUP
hasta que la tecla de modo parpadea
dos veces.
1
Press and hold SETUP until a mode
key blinks twice.
"Presione y mantenga presionada
SETUP hasta que la tecla de modo
parpadea dos veces.
1
3
Ingrese el primer código de TV que
corresponda a la marca de su TV de
la lista de códigos.
(Vea el reverso para los códigos.)
Enter the 1st code for your brand
from the code list.
(See reverse side for codes.)
Plug the RF Adapter into an open
USB slot on the STB.
Note: RF Adaptor must be
blinking when starting Step #4.
Otherwise, repeat Step #3.
Conecte el Adaptador de RF en
un puerto de USB de la caja
de conexión.
Nota: Adaptador RF debe
parpadear cuando se inicia el
paso # 4. De lo contrario, repita el
paso # 3.
USB
Press and hold both the SETUP
and NAV UP keys simultane-
ously until the “STB” mode key
on the remote begins blinking.
Presione y sostenga las teclas SETUP
y NAVUP simultáneamente hasta
lograr que la tecla STB del remoto
empiece a parpadear.
SETUP
+
- If pairing is not successful, the remote LED will
blink one long blink and will exit pairing mode.
- If the RF Adapter LED is not lit, then either
power is not supplied or pairing has failed.
- If pairing failed, repeat from step 3.
- Si el emparejamiento no se realiza
correctamente, el LED del control remoto
parpadeará un parpadeo largo y saldrá el modo
de emparejamiento.
- Si el LED del Adaptador de RF no está
encendido, entonces le falta corriente electrica
o el emparejamiento fallo.
- Si el emparejamiento fallo, repita comenzando
desde el paso 3.
Consejo:Tip/
1
Press the mode key for the
device you wish to set up.
Presione la tecla de modo para
el equipo que desee congurar.
2
Press and hold SETUP until the
selected mode key blinks twice.
Presione y mantenga presionada
SETUP hasta que la tecla del modo
seleccionado parpadeé dos veces.
To cancel TV/Video lock:
1 - Press and hold SETUP until a mode key blinks twice.
2 - Press the TV/Video key, then the EXIT key.
The mode key will blink 4 times upon successful unlock.
Press the mode key for
device you wish to set up.
The mode key stays lit.
Presione la tecla de modo
para el equipo que desee
congurar. La tecla de modo
permanece encendida.
2
3
7 8
9
0
1
2
3
4
5
6
8
9
0
OK
ENTER
DVDTV
AUX
STB
INFO
MUTE
LAST
MENU
GUIDE
TV
SETUP
3
VOL
CH
PG
ABC DEF
JKL MNOGHI
TUV WXYZPQRS
SPACE ZOOMDELETE

Codes: TÉLÉVISEUR
RÉSOLUTION DE PROBLÈMES
Codes: Audio
Codes: DVD
Codes: Blu-ray
Mode D'apprentissage
Problème:
Solution:
Problème:
Solution:
Problème:
Solution:
Problème:
Solution:
Le DEL ne clignote pas quand une touche est appuyée.
Remplacez les piles.
Le DEL clignote, mais la télécommande ne contrôle pas mon équipement.
Appuyez sur la bonne touche et pointez la télécommande vers l’équipement que
vous désirez contrôler.
J’ai essayé tous les codes pour ma marque, mais aucun ne fonctionne.
Essayez la RECHERCHE DE CODE (MÉTHODE D) ou visitez le www.urcsupport.com
pour une recherche par modèle.
Je veux modier le VÉROUILLAGE DE VOLUME du contrôle AUDIO au contrôle TV.
Suivez les étapes de réglage de la Méthode E, mais appuyez sur la touche TV au lieu
de sur la touche AUDIO.
Écrivez le code qui fonctionne ici pour une
référence future.
Code TV
Code Audio
Code DVD
Appuyez sur RÉGLAGE (SETUP) puis 975.
LED clignote deux fois.
Appuyez sur la touche de mode désiré,
puis de conguration, puis sur la touche
à enseigner.
Appuyez et maintenez enfoncé la touche
désirée sur l'enseignement à distance
jusqu'à ce que la LED clignote deux fois.
Répétez les étapes 2 et 3 pour apprendre
d'autres touches.
Position télécommandes
2-5 la distance centimètres.
Conseil:
Códigos: TV
Códigos: Audio
Descripción de Teclas
Códigos: Blu-ray
RESOLUCIÓN DE PROBLEMAS
Problema:
Solución:
Problema:
Solución:
Problema:
Solución:
Problema:
Solución:
Problema:
Solución:
La tecla de modo no parpadea al presionar una tecla.
Reemplace las pilas.
La tecla de modo parpadea, pero el control remoto no controla mi equipo.
Presione la tecla de modo correcta y apunte el control remoto al equipo que necesita
controlar.
Probé con todos los códigos que corresponden a mi marca de equipo y ninguno funciona.
Solución: Intente con el método BÚSQUEDA DE CÓDIGOS (MÉTODO C).
Deseo cambiar el BLOQUEO DE VOLUMEN pasando de control de TV a control de AUX .
Siga Conguración de los Controles de Volumen, pero presione la tecla de modo AUX en lugar
de la tecla de modo TV .
Tecla POWER no gira ON / OFF de la TV y STB, al mismo tiempo.
Código de TV no está correctamente programado. Siga uno de los métodos de conguración
que aparecen en la página anterior.
Escriba el código de funcionamiento aquí
para una referencia futura.
Consejo:
MUG_MXv4_RF_ARRIS_A01
Codes: Audio
Keys Description
TROUBLESHOOTING
Problem:
Solution:
Problem:
Solution:
Problem:
Solution:
Problem:
Solution:
Problem:
Solution:
Mode key does not blink when a key is pressed.
Replace batteries.
Mode key blinks, but remote does not control my equipment.
Press correct mode key and point remote at equipment you need
to control.
Tried all codes for my brand of device and none work.
Try CODE SEARCH (METHOD C) method.
I want to switch VOLUME LOCK from TV to AUX control.
Follow instructions in Locking Volume Controls to One Device and press
the AUX mode key.
POWER button not turning ON/OFF both TV and STB at the same time.
TV code is not properly programmed. Follow one of the setup methods
shown on prior page.
Write the working code here for future use.
Código de Audio
Audio code
Código deDVD
DVD code
Tip/
Aiwa 1405, 0189, 1388, 1641
Alco 1390
Altec Lansing 2720
AMC 1077
Anam 1609
Apex Digital 1257, 1430, 1774
Apple 1115
Arcam 1189, 0189
Audiotronic 1189
Audiovox 1390
Bose 1629, 1933
Carver 1189, 0189
Coby 1389, 2127
Curtis 1389
Daewoo 1250
Denon 2706, 2857, 1360, 1460,
2247, 2279, 2516, 2820,
2987, 3001, 2502
Dynex 2971
Fisher 1801
Gateway 1517
Harman/Kardon 0892, 3045, 0110, 0189,
1304, 1306, 2241, 2443
Hitachi 1801
HitPlus 2483
iHome 2435
iLive 2013
Insignia 1030, 1077, 1751, 1893, 2126,
2169, 2175, 2472, 2929, 2966
Integra 1298, 1320, 1805
iSymphony 2442
JBL 0110, 1306, 2241
JVC 1374, 1495, 1871, 2040, 2239,
2331, 2969
Kenwood 1313, 1569
KLH 1390, 1428
Koss 1366, 1497
Left Coast 0892
LG 1293, 2197, 2284, 2676
Linn 0189
Liquid Video 1497
Magnavox 1189, 1269, 0189, 1514, 1831
Marantz 0892, 1892, 1189, 1269, 0189,
1289, 2114
McIntosh 1289
Micromega 1189
Myryad 1189
Nakamichi 1313
NexxTech 1751
Norcent 1389, 1751
Nova 1389
Onkyo 0842, 1298, 1320, 1531, 1805
Optimus 1023
Oritron 1366, 1497
Panasonic 1308, 1518, 1275, 1288, 1316,
1548, 1633, 1763,1764, 2105,
2221, 2452, 2967
Philco 1390
Philips 0892, 1189, 1269, 0189, 1831,
2311, 2459
Pioneer 1023, 1384, 1935
Polk Audio 0892, 0189, 1289, 2270
Proscan 1254
RCA 1023, 1609, 1254, 1390, 1511,
2041, 2426, 2485, 2490, 2611
Rio 1869
Samsung 1295, 1304, 1500, 1868, 2609
Sansui 0189
Sanyo 1801
Sharp 3097
Sherwood 1077, 1517, 1905, 2169
Sherwood Newcastle 2169
Sonic Blue 1869
Sony 1759, 1058, 1441, 1258, 1622,
1558, 1658, 1758, 1822, 1858,
2172, 2227, 2475, 2522, 2610
Stereophonics 1023
Sunre 1313
Teac 1390, 1528
Technics 1308, 1518, 1633
Thorens 1189
Toshiba 1788
Venturer 1390
Vizio 1517, 2454, 2695
Vtrek 2426, 2483
Wards 0189
Yamaha 2592, 0176, 0376, 1176,
1276, 1375, 1376, 1476,
1815, 2061, 2455, 2467,
2608, 3030, 1797, 2021, 2458
Zenith 1293, 2197
Denon 2258, 2748
Harman/Kardon 2927, 3228
Insignia 0675, 2428, 2596
Integra 2147
JVC 2365, 2855
Lexicon 2545
LG 0741, 1602
Magnavox 0675
Marantz 2414
Memorex 2331
Olevia 2331
Onkyo 2147
Oppo 2545
Panasonic 1641
Philips 2084, 2434
Pioneer 0142, 2442, 2854
Samsung 0199
Sharp 2250
Sony 1516
Sylvania 0675
Toshiba 2705, 3157
Viore 2553
Vizio 2563
Yamaha 2298
Codes: Blu-ray
Codes: TV
Accurian 1803
Action 0873
Admiral 0093, 0463
Advent 0761, 0783, 1933
Aiko 0092
Aiwa 1362
Akai 0812, 1675, 0702, 0765, 0030,
0672, 1207, 1385, 1935, 2232
Akura 1687
Albatron 0843
Alde 0672
America Action 0180
Anam 0180
AOC 0030, 1365, 1589, 1590,
2014, 2087, 2402, 2479
Aomni 1623
Apex Digital 0748, 0879, 0765, 0767,
0890, 1217, 1992, 2397
Astar 1531, 1738
Audinac 0180
Audiovox 1564, 0451, 0180, 0092,
0623, 0802, 0846, 0875,
1284, 1766, 1769, 1803,
1865, 1937, 1951, 1952, 2121
Aventura 0171
Axion 1937
Bay 0236, 0463, 0180
Bell & Howell 0154
BenQ 1032, 1315, 1756
BGH 0876, 0898
Blue Sky 1254
Boigle 1696
Bradford 0180
Brillian 1007
Broksonic 0236, 0463, 1935, 1938
Byd:sign 1309
Candle 0030, 0056
Carnivale 0030
Carver 0054
Casio 1205
CCE 0037, 0623
Celebrity 0000
Celera 0765
Champion 1362
Changhong 0765
Cineral 0451, 0092
Citizen 0451, 0060, 0030, 0092,
0056, 0561, 1672, 1935
Clarion 0180
Coby 1538, 1634, 2306, 2314,
2315, 2338, 2340, 2343,
2344, 2345, 2350, 2560, 3202
Commercial Solutions 1447, 0047
Concerto 0056
Conia 1687
Contec 0180
Continental 2357
Coradir 2844
Craig 0180
Croma 1011
Crosley 0000, 0054
Crown 0180, 0672
Crown Mustang 0672
Curtis 1200, 1326, 2352, 2397, 2466
Curtis Mathes 0047, 0054, 0154, 0451, 0093,
0060, 0702, 0030, 0145, 0166,
1661, 0056, 1147, 1347, 1959
CXC 0180
Cytron 1326
Daenyx 0180, 0672
Daewoo 0154, 0451, 0092, 1661,
0623, 0661, 0672, 1816
Daytron 0180
Dell 1264, 1080, 1178, 1863
Denon 0145
Diamond Vision 1997
Digistar 1565
Digital Lifestyles 1765
Disney 1665, 2152
Drean 0037
DSE 1565
Dumont 0017
Durabrand 0463, 0180, 0178, 0171,
1034, 1463, 1665
Dynex 1463, 1785, 1810, 2049, 2184
Electroband 0000
Electrograph 1755, 1623
Electrohome 0463, 1670, 1672
Elektra 0017, 1661
Element 1687, 1886, 2183
Emerson 1864, 0154, 0451, 0236,
0463, 0180, 0178, 0171,
1661, 0623, 1394, 1665,
1886, 1944, 1963, 1997
Emprex 1422, 1765
Encross 0876
Envision 0030, 0813, 1365, 1589,
2014, 2087
Epson 1122
ESA 0812, 0171, 1944, 1963
Firstline 0037
Fisher 0154, 1362
Fluid 2964
Fujimaro 1687
Fujitsu 0809, 0683, 0853
Fujitsu Siemens 0809
Funai 0000, 0180, 0171, 1271,
1904, 1963, 1979
Futuretech 0180
Gateway 1755, 1756
GE 1547, 1447, 0047, 0051, 0451,
0765, 0178, 1347, 1922, 2359
General Electric 0047
GFM 1864, 0171, 1665, 1886, 1963
Gibralter 0017, 0030
Global Home 1565
Go Video 0886
GoldStar 0178, 0030, 0037, 0056
Gradiente 0053, 0056
Grundig 0037, 0070, 0672, 0683
Grunpy 0180
H & B 1366
Haier 1034, 1748, 1749, 1753,
2293, 2309, 2494, 3204
Hallmark 0178
Hanns.G 1783
Hannspree 1348, 1745, 1783, 2786
Harley Davidson 1904
Harman/Kardon 0054
Harvard 0180
Havermy 0093
Helios 0865
Hello Kitty 0451
Hewlett Packard 1494, 2540
Himitsu 0180
Hisense 0748, 1314, 1660, 2098,
2355, 2419
Hitachi 1643, 1145, 0145, 0056,
0679, 0797, 1345, 1445,
1904, 2215, 2431, 2433
Hitech 1814
HP 1494, 2540
Hyundai 0849, 1219, 1814
I-Inc 1746
iLo 1463, 1286, 1394, 1603,
1665, 1684, 1990
Innity 0054
Initial 1603, 1990
Innova 0037
Insignia 1423, 1564, 0463, 0171,
2751, 2432, 2184, 2088,
2049, 2002, 1963, 1892,
1810, 1785, 1660, 1641,
1517, 1385, 1326, 1204
Inteq 0017
IRT 0451, 1661
ITT Nokia 0180
IX 0877
JBL 0054
JCB 0000
JCM 2256
Jensen 0761, 1299, 1326, 1933
JVC 0463, 0053, 0650, 0731, 1253,
1601, 1774, 1923, 2264, 2271
KDS 1687
KEC 0180
Ken Brown 0236, 0463, 1321
Kenia 0030, 0082
Kenwood 0030
Kioto 0054
KLH 0765, 0767
Konka 1385
Kost 1262, 1483
Kreisen 0876
KTV 0180, 0030
LG 1423, 1447, 0017, 1265, 0178,
0030, 2834, 2731, 2424, 2359,
2358, 2182, 1993, 1860, 1859,
1768, 1721, 1325, 1178, 0856, 0056
Lloyd's 1904
Loewe 0087
Luxman 0056
LXI 0047, 0054, 0154, 0156, 0178
Lynx 1565
M&S 0054, 0236
MAG 1687
Magnavox 1454, 1866, 1755, 0054,
0051, 0030, 0171, 2372,
1990, 1963, 1944, 1904,
1867, 1525, 1455, 1365,
1254, 1198, 0802
Marantz 1454, 0054, 0030, 0037,
0704, 0855, 1398, 1714
Matsushita 0250, 0650
Maxent 1755, 0762, 1211, 1714,
1757
Megatron 0178, 0145
Memorex 0154, 0463, 0150, 0178, 0877,
1665, 1670, 1785, 1892, 1924,
1927, 1938
MGA 0150, 0178, 0030
Midland 0047, 0017, 0051
Mintek 1603, 1990
Mitsubishi 1250, 0093, 0150, 0178, 0836, 1797
Monivision 0843
Motorola 0093
MTC 0060, 0030, 0056
Multitech 0180
Mx Onda 1687
NAD 0156, 0178, 0037, 0056, 0866, 1156
Naxa 2104
NEC 0030, 0056, 0704, 0876, 1398,
1704, 1797
Netsat 0037
NetTV 1755, 0762
NEX 1814
Nexus Electronics 2183
Nikko 0178, 0030, 0092
Nimbro 2104
Noblex 0154
Nokia 0180, 0861
Norcent 0748, 0824, 1365, 1589, 1590,
1591, 1745, 2110
Norwood Micro 1286
NTC 0092
Nu-Tec 2157
NuVision 2158
Olevia 1610, 1144, 1240, 1331
Onwa 0180
Optimus 0250, 0154, 0166, 0650, 1924, 1927
Optoma 1348
Optonica 0093
Orion 0236, 0463, 1463, 1938
Otic 1687
Packard Bell 0092
Panasonic 1480, 0250, 0051, 0650, 1271,
1291, 1345, 1924, 1927, 1941,
1946, 1947, 2240, 2264
Panavox 0861
PARK 2104
Penney 0047, 0156, 0051, 0060, 0178,
0030, 1347
Petters 1523
Philco 0054, 0451, 0463, 0030, 0145,
0171, 0092, 1661, 0082, 1271,
1394, 1665, 1963
Philips 1454, 1866, 0054, 0171, 0037,
0690, 1394, 1455, 1483, 1744,
1806, 1867, 1961, 2372, 2374, 2564
Pilot 0030
Pioneer 1457, 0166, 0679, 0866, 1260,
1398, 2240
Planar 1288, 1589
Polaroid 1523, 0765, 2425, 2121,
2117, 2063, 2002, 1992,
1769, 1767, 1766, 1763,
1762, 1687, 1565, 1538,
1385, 1341, 1327, 1326,
1316, 1314, 1286, 1276, 1262, 0865
Portland 0451, 0092, 1661
Precision 1792
Prima 0761, 0783, 1749, 1753,
1785, 1933
Prism 0051
Proscan 1447, 0047, 0030, 1347,
1922, 2147, 2183, 2256
Proton 0178
Proview 1687
Pulsar 0017
Punktal 2687
Pye 0412
Pyle 1200
Quasar 0250, 0051, 0650, 1291,
1924, 1927
RadioShack 0047, 0154, 0180, 0178,
0030, 0056, 1904
RCA 1547, 1447, 0047, 0051,
0093, 0060, 1661, 2932,
2746, 2434, 2247, 2187,
2002, 1959, 1958, 1953,
1922, 1781, 1347, 1147, 0679
Realistic 0154, 0180, 0178, 0030, 0056
RevolutionHD 1623
Runco 0017, 0030, 1398
Sampo 1755, 0030, 0762
Samsung 0812, 0060, 0702, 0178,
0030, 2814, 2697, 2596,
2137, 2103, 2051, 1959, 1060,
0814, 0766, 0650, 0056, 0037
Sansei 0451, 0092
Sansui 0463, 0171, 1463, 1409,
1670, 1892, 1904, 1935, 1938
Sanyo 0054, 0154, 1142, 1362
Sceptre 0878, 1217, 1360, 1599,
2337, 2506
Scotch 0178
Scott 0236, 0180, 0178, 1711
Sears 0047, 0054, 0154, 0156,
0178, 0171, 0056, 1007, 1904
Semivox 0236, 0463, 0180
Semp 0156, 1356, 1743
Sense 1865
Serie Dorada 0156, 0180, 0178, 0030, 0056
Sharp 0818, 0093, 1459, 1602,
1659, 2360, 2402, 2495
Sheng Chia 0093
Sherwood 1399
Siam 0037
Signature 0054
Signet 1262
SKY 0037
Skyworth 1799
Sole 1366, 1483, 1623, 2075
Sony 0810, 0000, 1685, 1825,
1904, 1925, 2736
Soundesign 0180, 0178
Sova 1952
Soyo 1746, 1824
Space Tek 1696
Spectroniq 1687
Squareview 0171
SSS 0180
Starlite 0180
Studio Experience 0843
SunBriteTV 1420, 2337
Superscan 0093, 0864, 1944
Supersonic 1753, 2104, 3204
Supreme 0000
SVA 0748, 0865, 1963
Sylvania 1864, 0054, 0030, 0171,
1271, 1314, 1394, 1665,
1886, 1944, 1963
Symphonic 0180, 0171, 1394, 1904, 1944
Syntax 1610, 1144, 1240, 1331
Tahoci 0561
Talent 0178
Tandy 0093
Tatung 1286, 1288, 1361, 1756, 2496
TCL 2414, 2434, 3183
Technics 0250, 0051
Techwood 0051, 0056
Teknika 0054, 0180, 0150, 0060,
0092, 0056
Telefunken 0702, 0056
Thomas 1904
TMK 0178, 0056
TNCi 0017
Tophouse 0180, 0672, 1385
Toshiba 1524, 0154, 0156, 1256,
0093, 1265, 0060, 2724,
2006, 1959, 1945, 1936,
1935, 1743, 1704, 1656,
1356, 1343, 1325, 1156,
0822, 0650
TruTech 1665, 1723, 2066
TVS 0463
US Logic 1286
Vector Research 0030
Venturer 1865
VEOS 1007
Victor 0053
Vidikron 0054, 1398
Vidtech 0178
Viewsonic 1755, 1564, 0797, 0857,
0864, 0885, 1330, 1365,
1578, 1627, 1640, 1742,
2014, 2049, 2087, 2277
Viore 1207, 1684, 1811, 2104,
2352, 3118
Visart 1336
Vizio 1758, 0864, 0885, 1756,
2512, 2757
Wards 0000, 0047, 0054, 0017,
0154, 0156, 0051, 0180,
0060, 0178, 0030, 0056,
0866, 1147, 1156, 1347
Waycon 0156
Westinghouse 1712, 0451, 0885, 0889,
0890, 1217, 1282, 1300,
1577, 2195, 2293, 2499
White Westinghouse 0463, 1661, 0623
Winco 0412
Wyse 1365
Xion 1792
Yamaha 0030, 0797
Zenith 0000, 1423, 0047, 0017,
0463, 1265, 0178, 0030,
1145, 0145, 0092, 1661,
1325, 1365, 0037, 1721,
1859, 1904, 2358
Código de TV
TV code
© Universal Electronics 2012
Códigos: DVD
ABS 1972
Accurian 0675, 0000
Admiral 0048
Adventura 0000
Aiko 0278
Aiwa 0641, 0037, 0000
Akai 0675, 0695, 0000
Alco 0790
Alienware 1972
Allegro 0869, 0039
America Action 0278
American High 0035
Amoisonic 0764
AMTC 1630
Apex Digital 0672, 0717, 0755, 0796,
1020, 1056, 1061
Asahi 2615
Asha 0240
Astar 1461
Astry 1513
Audio Authority 2555
Audiovox 0717, 0790, 0037, 0278
Beaumark 0240
Bel Canto Design 1571
Bell & Howell 0104
Blaupunkt 0717
Blue Parade 0571
Blue Sky 2623
Broksonic 0695, 0184
California Audio Labs 0490
Calix 0037
Cambridge Soundworks 0690
Canon 0035
Carver 0081
CCE 0278
Cinea 0831
Cineral 0278
CineVision 0869
Citizen 0695, 2116, 0037, 0278
Coby 1107, 2494
Contel 2331
Contex 2066
Craig 0831, 0037, 0047, 0240
Crosley 0081, 0000
Curtis Mathes 1087, 0060, 0035, 0162,
0240, 0278
CyberHome 0816
Cybernex 0240
CyberPower 1972
Daewoo 0705, 0869, 1172, 0045, 0278
Datsun 1233
Dell 1972
Denon 0490, 0634, 1634, 2258,
2748, 0042
DirecTV 0739
Disney 0675, 1270, 2318
Durabrand 2066, 0039
Dynatech 0000
Dynex 2596
E:max 0330
Electrohome 2116, 0037, 0043
Electrophonic 0037
Emerex 0032
Emerson 0591, 0675, 2213, 0037,
0184, 0000, 0043, 0278,1593
Enterprise 0591
F&D 2533
Fisher 0670, 0047, 0104
Fuji 0035, 0033
Funai 0675, 0000, 1593
Garrard 0000
Gateway 1077, 1158, 1972
GE 0522, 0717, 0060, 0035, 0240
General Electric 0717
GFM 0675, 1593
Global Home 2123
Go Video 0744, 0741, 0783, 0869, 1075,
1158, 0240, 0614
GoldStar 0741, 0869, 0037
Gradiente 0651, 0000
Greenhill 0717
Grundig 0539, 0705
Harley Davidson 0000
Harman/Kardon 0582, 0702, 1229, 2927, 3228, 0081
Headquarter 0046
Helios 2192
Hello Kitty 0831
Hewlett Packard 1972
HI-Q 0047
Hitachi 0573, 0664, 0695, 0000, 0042
Hiteker 0672
Howard Computers 1972
HP 1972
Hughes Network Systems 0042
Humax 1588, 0739
Hush 1972
Hyundai 1451
iBUYPOWER 1972
iLo 1348
Initial 0717
Insignia 0675, 0741, 2095, 2428, 2596
Instant Replay 0035
Integra 0571, 1769, 0627, 1634, 2147
Irradio 0646
IRT 0783, 1654
JBL 0702
JVC 0558, 0623, 1164, 1275, 1550,
1602, 2365, 2855, 0067
Kawasaki 0790
KEC 0037, 0278
Kenwood 0490, 0534, 0067
KLH 0717, 0790, 1020
Kodak 0035, 0037
Koss 0651
Lasonic 0798
Lexicon 2545
LG 0591, 0741, 0869, 1602, 2135, 0037
Linksys 1972
LiteOn 1158
Lloyd's 0000
Logitech 2639
LXI 0037
Magnasonic 0651
Magnavox 0503, 0539, 0646, 0675, 1354,
1506, 0035, 0039, 0081, 0000, 1593
Magnin 0240
Marantz 0539, 2414, 0035, 0081
Marta 0037
Matsushita 0035, 0162
Media Center PC 1972
MEI 0035
Memorex 0695, 0831, 1270, 2213, 2331,
3153, 0035, 0162, 0037, 0048,
0039, 0047, 0240, 0000, 0104, 0046
MGA 0240, 0043
MGN Technology 0240
Microsoft 0522, 2083, 1972
Mind 1972
Minolta 0042
Mintek 0717
Mitsubishi 1521, 0067, 0043
Motorola 0035, 0048
MTC 0240, 0000
Multitech 0000
NAD 0741
NEC 0104, 0067
Nesa 0717
Nikko 0037
Niveus Media 1972
Noblex 1233, 0240
Norcent 1107, 1461
Northgate 1972
Olevia 2331
Olympus 0035
Onkyo 0503, 1769, 0627, 1627, 2147, 2215
Oppo 0575, 2185, 2545
Optimus 1062, 0162, 0037, 0048, 0104
Orion 0695, 0184
Oritron 0651
Panasonic 0490, 0503, 0703, 1579, 1641,
1062, 0035, 0162, 0614, 0616
Penney 0035, 0037, 0240, 0042
Pentax 0042
Philco 0675, 0690, 0733, 0790, 0862, 0035
Philips 0503, 0539, 2056, 2084, 0646,
0675, 1158, 1340, 1354, 1506,
2434, 0739, 0035, 0081, 0618
Pilot 0037
Pioneer 0571, 0142, 0631, 1512, 1571,
2442, 2854, 0067
Polaroid 1020, 1061
Polk Audio 0539, 0081
Portland 0278
Presidian 0675, 1593
Proceed 0672
Protronic 0240
Proline 2616
Proscan 0522, 0060
Protron 1461
Pulsar 0039
Quarter 0046
Quartz 0046
Quasar 0035, 0162
Qwestar 0651
RadioShack 0000
Radix 0037
Randex 0037
Ranser 3154
RCA 0522, 0571, 1769, 0717, 0790, 0822,
2213, 2587, 0060, 0035, 0240, 0042
Realistic 0035, 0037, 0048, 0047, 0000,
0104, 0046
RE-BL 2555
ReplayTV 0614, 0616
Ricavision 1972
Rio 0869
Rotel 0623
Royal 0690
Runco 0039
Samsung 0490, 0573, 0744, 0199, 0820,
1075, 1470, 2069, 2329, 2369,
2489, 2556, 0240, 0045
Sanky 0048, 0039
Sansui 0695, 0000, 0067
Sanyo 0670, 0695, 2123, 0047, 0240,
0104, 0046
Sceptre 0104
Schneider 0646
Scott 0184, 0045, 0043
Sears 0035, 0037, 0047, 0000, 0042,
0104, 0046
Semivox 0045
Semp 0503, 0045
Sensory Science 1158
Sharp 0630, 0675, 1256, 2250, 0048
Sherwood 1077
Sherwood Newcastle 1077
Shinsonic 0533
Shogun 0240
Signature 0035
Silver 1228
Sonic Blue 0869, 0614, 0616
Sony 1633, 0533, 0864, 0772, 0862, 1033,
1070, 1431, 1516, 0032, 0035, 0033,
0000, 0636, 1972
Stack 9 1972
STS 0042
Sylvania 0630, 0675, 0035, 0081, 0000, 0043, 1593
Symphonic 0675, 0000, 1593
Systemax 1972
Tagar Systems 1972
Tashiko 0037
TCL 2587
Teac 0790, 0000
Technics 0490, 0703, 0035, 0162
Teknika 0035, 0037, 0000
Theta Digital 0571
Thomas 0000
TiVo 1503, 1512, 0739, 0618, 0636
TMK 0240
Toshiba 0503, 1769, 0695, 1154, 1503, 1510,
1588, 1608, 2006, 2277, 2705, 3157,
0045, 0043, 1972
Totevision 0037, 0240
Touch 1972
TYT 0705
Unitech 0240
Urban Concepts 0503
V 1064
Vector 0045
Venturer 0790
Video Concepts 0045
Videomagic 0037
Videosonic 0240
Viewsonic 1972
Villain 0000
Viore 2553
Vizio 1064, 2563
Voodoo 1972
Voxson 1630
Vtrek 2587
Wards 0060, 0035, 0048, 0039, 0047, 0081,
0033, 0240, 0045, 0000, 0042, 0046
WB Electronics 2555
Xbox 0522, 2083
XR-1000 0035, 0000
X-View 1233
Yamaha 0490, 0539, 0646, 0545, 0497, 0817,
1354, 2298
Zenith 0503, 0591, 0741, 0869, 0037, 0039,
0033, 0000
ZT Group 1972
Codes: DVD
Federal Communication Commission Interference
Statement
This equipment has been tested and found to comply
with the limits for a Class B digital device, pursuant to
Part 15 of the FCC Rules. These limits are designed to
provide reasonable protection against harmful
interference in a residential installation. This
equipment generates, uses and can radiate radio
frequency energy and, if not installed and used in
accordance with the instructions, may cause harmful
interference to radio communications. However, there
is no guarantee that interference will not occur in a
particular installation. If this equipment does cause
harmful interference to radio or television reception,
which can be determined by turning the equipment
o and on, the user is encouraged to try to correct the
interference by one of the following measures:
• Reorient or relocate the receiving antenna.
• Increase the separation between the equipment
and receiver.
• Connect the equipment into an outlet on a circuit
dierent from that to which the receiver is connected.
• Consult the dealer or an experienced radio/TV
technician for help.
This device complies with Part 15 of the FCC Rules.
Operation is subject to the following two conditions:
(1) This device may not cause harmful interference,
and (2) this device must accept any interference
received, including interference that may cause
undesired operation.
The user is cautioned that changes and modications
made to the equipment without the approval of
manufacturer could void the user's authority to
operate this equipment.
Controla la reproducción de TV
en vivo y grabada
Muestra el MENÚ principal
SALE del menu en curso y vuelve
al programa en curso
Muestra la GUÍA de programas
Controla y SILENCIA EL
VOLÚMEN DEL TELEVISOR
Se utiliza para recorrer las
entradas de video ajustadas en
el TV o receptor de audio
Se utiliza para ingresar la
CONFIGURACIÓN del control remoto
Teclas de Modo - Selecciona el
equipo para el control remoto.
Accede a la biblioteca
de programas A DEMANDA
Muestra una lista de los
programas grabados
Muestra INFORMACIÓN sobre
el programa seleccionado
Controls playback of
live and recorded TV
Displays main MENU
Displays program GUIDE
Controls and MUTEs
TV VOLUME
Mode Keys - Selects the device
the remote will control
EXITs current menu and
returns to current program
Returns to LAST channel you were watching
Accesses ON DEMAND
program library
Used to enter remote control SETUP.
Displays a list of recorded programs
Used to cycle through video
inputs on TV or audio receiver
Vuelve al ÚLTIMO canal
que estaba mirando
Displays INFO for currently selected program
For Industry Canada
Industry Canada statement
This device complies with RSS-210 of the Industry
Canada Rules. Operation is subject to the following
two conditions: (1) this device may not cause
harmful interference, and (2) this device must
accept any interference received, including
interference that may cause undesired operation.
French translation:
Ce dispositif est conforme à la norme CNR-210
d’Industrie Canada applicable aux appareils radio
exempts de licence. Son fonctionnement est sujet
aux deux conditions suivantes: (1) le dispositif ne
doit pas produire de brouillage préjudiciable, et (2)
ce dispositif doit accepter tout brouillage reçu, y
compris un brouillage susceptible de provoquer un
fonctionnement indésirable.
-
 1
1
-
 2
2


Arris MXV4 RF Manuel utilisateur
- Catégorie
- Télécommandes
- Taper
- Manuel utilisateur
dans d''autres langues
- English: Arris MXV4 RF User manual
- español: Arris MXV4 RF Manual de usuario
Autres documents
-
Logitech MXV4 IR Manuel utilisateur
-
Motorola MXv5 IR Manuel utilisateur
-
-
Bose AM312515 Rev.03 Manuel utilisateur
-
Universal Electronics DVR M1055F Manuel utilisateur
-
-
-
Universal Electronics R32068BD00 Mode d'emploi
-
Daewoo AKR-1010RC Le manuel du propriétaire
-