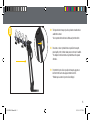
Saris & 5-Bike Le manuel du propriétaire
- Catégorie
- Accessoires de vélo
- Taper
- Le manuel du propriétaire
Ce manuel convient également à

Glide EX
Installation Instructions | Instrucciones de montaje | Instructions d’assemblage
772 | 774 | 774BLU | 774BRZ | 775
26676D Glide EX Manual.indd 126676D Glide EX Manual.indd 1 1/11/2021 9:56:45 AM1/11/2021 9:56:45 AM

TELL US WHAT YOU THINK
SARIS.COM/FEEDBACK
REGISTER YOUR PRODUCT FOR UPDATES
SARIS.COM/REGISTRATION
26676D Glide EX Manual.indd 226676D Glide EX Manual.indd 2 1/11/2021 9:56:54 AM1/11/2021 9:56:54 AM

3
LONG FOR THE RIDE
Just as no garage is complete without a bicycle, at Saris, we believe no car is
complete without a bike rack.
Since setting off on this journey nearly 30 years ago, Saris racks have freed
millions of bike-lovers to explore new territory and terrain, take part in group
rides, bike pool to races, and commute to and from work.
And we continue to do so in style.
As the all-time #1 best-selling bike rack, Saris Bones® continues to set the
standard for excellence in design. Today all Saris bicycle racks are intuitive to
load and secure, and guaranteed for life.
Built by cyclists for cyclists in Madison, Wisconsin, we strive to create the
world’s best bike racks.
Because cycling is what we live for.
26676D Glide EX Manual.indd 326676D Glide EX Manual.indd 3 1/11/2021 9:56:58 AM1/11/2021 9:56:58 AM

4
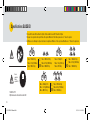
Specifications: GLIDE EX
* Guía de
adaptación
* Guide de
compatibilité
Fit
Guide
1.800.783.7257
http://www.saris.com/en/vehicle-racks.html
Max = 35 lbs/kg 16
Máx.= 16 kg (35 libras)
Max = 35lb/16kg
Max = 140 lbs/63.5kg
Máx.= 63.5 kg (140 libras)
Max = 140lb/63.5kg
4
BIKE
Max = 150 lbs/68 kg
Máx.= 68 kg (150 libras)
Max = 150lb/68 kg
5
BIKE
Max = 30 lbs/kg 13.5
Máx.= 13.5 kg (30 libras)
Max = 30lb/13.5 kg
For use with receiver hitches Class II or higher. 5-bike model for use with 2’’ Class III or higher.
Para usar con enganches del receptor Clase III o superior. Modelo de 5 bicicletas para usar con 2 “clase II o superior.
À utiliser avec les attelages récepteurs de classe II ou supérieure. Modèle à 5 vélos pour une utilisation avec 2 ’’ Classe III ou supérieure.
Max = 50 lbs/22.5kg
Máx.= 22.5kg (50 libras)
Max = 50lb/22.5kg
Max = 100 lbs/45.5kg
Máx.= 45.5kg (100 libras)
Max = 100lb/45.5kg
2
BIKE
26676D Glide EX Manual.indd 426676D Glide EX Manual.indd 4 1/11/2021 9:56:58 AM1/11/2021 9:56:58 AM

5
Tools Needed: Items Included:
Herramientas necesarias:
Outils nécessaires:
Artículos incluidos
éléments inclus
x 2
Accesorios opcionales
Accessoires en option
Optional Accessories:
Adjustable or 3/4” Wrench
Llave ajustable
Clé ajustable
5mm Hex Key
Hex Key de 5 mm
Clé hexagonale de 5mm
3040 – Bike Beam
3040 – Bike Beam
3040 – Barre Transversale
View our installation video at
http://www.saris.com/en/instructional-videos-1.html
Vea nuestro vídeo de instalación en
http://www.saris.com/en/instructional-videos-1.html
Visionnez notre vidéo d’installation à l’adresse
http://www.saris.com/en/instructional-videos-1.html
For relevant patents, see www.saris.com/patents
Para las patentes pertinentes, consulte www.saris.com/patents
Pour les brevets concernés, consultez www.saris.com/patents
Customer Support
1-800-783-7257
saris.com Live
Chat
Bike Beam is required if bicycle wheels are not parallel to the ground when carrying a bicycle with a sloped top tube, or a full suspension bicycle. Bike Beam is also required if bicycle
wheels are 12” or less from the ground when installed on the rack.
Se requiere Bike Beam si las ruedas de la bicicleta no están paralelas al suelo cuando se transporta una bicicleta con un tubo superior inclinado o una bicicleta de suspensión total.
También se requiere Bike Beam si las ruedas de la bicicleta están a 12 ”o menos del suelo cuando se instalan en el soporte.
Bike Beam est nécessaire si les roues du vélo ne sont pas parallèles au sol lors du transport d’un vélo avec un tube supérieur incliné ou d’un vélo à suspension intégrale. Bike Beam est
également requis si les roues de vélo sont à 12 po ou moins du sol lorsqu’elles sont installées sur le porte-vélos.
26676D Glide EX Manual.indd 526676D Glide EX Manual.indd 5 1/11/2021 9:57:04 AM1/11/2021 9:57:04 AM

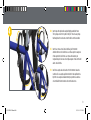
Install receiver tube into hitch. Install lock washer on hitch pin. Hitch pin
should enter in on the driver’s side. Tighten hitch pin with wrench. Secure
with lock.
Note: If your receiver is 1.25” remove the adapter block as shown (A/B). Tools
Required: 3/4’’ Wrench, 5mm Hex Key (to remove adapter block). 2’’ adapter
on 5-bike model is not removable.
IInstale el tubo receptor en el enganche. Instale la arandela de seguridad en
el pasador del enganche. El pasador de enganche debe entrar por el lado
del conductor. Apretar el pasador de enganche con una llave. Asegure con la
cerradura.
Nota:Siel receptor es de 1,25”, retire el bloque de adaptador como se
muestra (A/B). Herramientas necesarias: Llave de 3/4”, llavehexagonal de
5mm (para retirar el bloque adaptador). El adaptador de 2 ‘’ en el modelo de
5-bicicletas no es removible.
Installez le tube récepteur dans l’attelage. Installer la rondelle de blocage sur
la goupille d’attelage. La goupille d’attelage doit entrer du côté du conducteur.
Serrer la goupille d’attelage avec une clé. Sécurisé avec serrure.
Remarque: si votre récepteur de barre est un modèle 1,25”, ôtez le bloc
adaptateur comme illustré (A/B). Outils nécessaires: clé 3/4’’, clé hexagonale
5mm (pour ôter le bloc adaptateur). L’adaptateur 2 ’’ sur le modèle 5-vélos
n’est pas amovible.
1
INSTALL RACK / INSTALAR PORTABICICLETAS / INSTALLATION DU PORTEVÉLOS
EN
6
2”
1.25”
1.25”
A
B
ES
FR
26676D Glide EX Manual.indd 626676D Glide EX Manual.indd 6 1/11/2021 9:57:09 AM1/11/2021 9:57:09 AM

EN
ES
FR
2
7
INSTALL RACK / INSTALAR PORTABICICLETAS / INSTALLATION DU PORTEVÉLOS
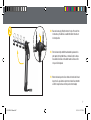
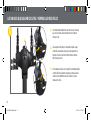
Raise rack arms up by lifting the lever at the top of the rack, then
rotate arms up. You will hear an audible click when the arms are
inlocked position.
Eleve los brazos del portabicicletas levantando la palanca de la
partesuperior del portabicicletas, a continuación gire los brazos
hacia arriba. Escuchará un clic audible cuando los brazos estén
enlaposición bloqueada.
Relevez les bras du porte-vélos en tirant sur le levier situé en haut
du porte-vélos, puis faites-les pivoter vers le haut. Vous entendrez
undéclic lorsque les bras seront en position de verrouillage.
26676D Glide EX Manual.indd 726676D Glide EX Manual.indd 7 1/11/2021 9:57:17 AM1/11/2021 9:57:17 AM

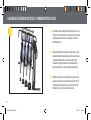
Load bikes, heaviest to lightest, with heaviest bikes closest to car.
The rear of each bike should be on the same side as the anti-sway
strap that hangs below the rack arm. Load bikes on the arms
alternating directions.
Cargue las bicicletas, de la más pesada a la más ligera. Las más
pesadas deben quedar más próximas al vehículo. La parte trasera
de cada bicicleta debe estar en el mismo lado que la correa
antibalanceo que cuelga debajo del brazo del portabicicletas.
Cargue las bicicletas en los brazos alternando las direcciones.
Chargez les vélos, du plus lourd au plus léger, et le plus lourd au
plus près de la voiture. L’arrière de chaque vélo doit être du côté
de la sangle anti-devers qui pend sous les bras du porte-vélos.
Chargez les vélos sur les bras en alternant leur sens.
EN
ES
FR
3
8
lb
lb
lb
lb
LOAD BIKES / CARGAR BICICLETAS / CHARGEMENT DES VÉLOS
26676D Glide EX Manual.indd 826676D Glide EX Manual.indd 8 1/11/2021 9:57:18 AM1/11/2021 9:57:18 AM

4EN
ES
FR
9
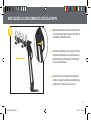
Insert straps through buckles and pull tightly around bike frame.
The top straps secure the top tube of bicycle. The anti-sway straps
that hang below the rack arms secure the bike’s vertical seat tube.
Inserte las correas a través de las hebillas y jale firmemente
alrededor del marco de la bicicleta. Las correas superiores aseguran
el tubo superior de la bicicleta. Las correas anti-balanceo que
cuelgan debajo de los brazos de la rejilla aseguran el tubo vertical del
asiento de la bicicleta.
Insérez les sangles dans les boucles et tirez fermement autour du
cadre du vélo. Les sangles supérieures fixent le tube supérieur de la
bicyclette. Les sangles anti-balancement qui pendent sous les bras
de la crémaillère fixent le tube de selle vertical de la moto.
LOAD BIKES / CARGAR BICICLETAS / CHARGEMENT DES VÉLOS
26676D Glide EX Manual.indd 926676D Glide EX Manual.indd 9 1/11/2021 9:57:24 AM1/11/2021 9:57:24 AM

EN
ES
FR
5
10
To lock bikes with integrated lock, pull cable lock out of housing,
loop over top of bikes and insert cable into end of right arm.
Turnkey to lock.
Para asegurar las bicicletas con el candado integrado, saque
el cable de su alojamiento, páselo por la parte superior de las
bicicletas e inserte el cable en el extremo del brazo derecho.
Girela llave para cerrar.
Pour cadenasser les vélos avec le système de verrouillage intégré,
sortez le câble de son logement, passez-le par-dessus les vélos
et insérez-le à l’extrémité du bras droit. Tournez la clé pour
cadenasser les vélos.
LOCK BIKES / BLOQUEAR BICICLETAS / VERROUILLER DES VÉLOS
26676D Glide EX Manual.indd 1026676D Glide EX Manual.indd 10 1/11/2021 9:57:29 AM1/11/2021 9:57:29 AM

EN
ES
FR
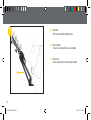
6While standing between the rack and vehicle, hold handle on back
ofrackand press trigger to push rack away from vehicle. Rack can
beextended with or without bikes installed.
Situado entre el portabicicletas y el vehículo, sujete el tirador de la
parte posterior del portabicicletas y pulse el gatillo para apartar el
portabicicletas del vehículo. El portabicicletas se puede extender
conosin las bicicletas montadas.
Debout entre le porte-vélos et la voiture, tenez la poignée arrière
duporte-vélos et appuyez sur la détente pour en déployer les bras.
Leporte-vélos peut être déployé avec ou sans les vélos.
11
HATCH ACCESS / ACCESO A SOMBREADO / ACCÈS À LA TRAPPE
LOCK BIKES / BLOQUEAR BICICLETAS / VERROUILLER DES VÉLOS
26676D Glide EX Manual.indd 1126676D Glide EX Manual.indd 11 1/11/2021 9:57:32 AM1/11/2021 9:57:32 AM

EN
ES
FR
7
12
Access hatch.
*Arms cannot be articulated in extended position.
Acceda al maletero.
*Los brazos no se pueden articular en posición extendida.
Accès au coffre.
*Les bras ne peuvent pas être articulés en position allongée.
26676D Glide EX Manual.indd 1226676D Glide EX Manual.indd 12 1/11/2021 9:57:36 AM1/11/2021 9:57:36 AM

EN
ES
FR
8To bring rack back to transport position, pull backon handle until an
audible click is heard.
*Do not operate vehicle while rack is tilted away from the vehicle.
Para volver a colocar el portabicicletas en posición de transporte,
pulseelgatillo y retire el tirador hasta que se escuche un clic audible.
* No desplace el vehículo mientras el portabicicletas esté separado
delmismo.
Pour remettre le porte-vélos en position de transport, appuyez sur
ladétente et tirez sur les bras jusqu’à entendre un déclic.
*N’utilisez pas la voiture si le porte-vélos est déployé.
13
Access hatch.
*Arms cannot be articulated in extended position.
Acceda al maletero.
*Los brazos no se pueden articular en posición extendida.
Accès au coffre.
*Les bras ne peuvent pas être articulés en position allongée.
26676D Glide EX Manual.indd 1326676D Glide EX Manual.indd 13 1/11/2021 9:57:37 AM1/11/2021 9:57:37 AM

14
CAUTIONS:
• All requirements for compatability/fit as stated in the current Saris vehicle/carrier compatability guide must be followed (available at any Saris dealer or www.saris.com).
If your vehicle is not listed or you have any questions, please call our customer service at 800-783-7257 or visit www.saris.com.
• Read and follow instructions carefully. Save owner’s manual for future reference or parts information. Ensure that any other users of the bicycle carrier are familiar with
its content.
• Allow a minimum distance of 12” between the ground and the bottom of a hanging bike tire.
• Drive slowly over speed bumps, 5 to 10 mph max speed.
• It’s the end user’s responsibility to ensure that use of this product meets all local and state laws.
• When cleaning vehicle and rack, use only water soluble cleaners. Do not take rack through car wash.
• Make sure bike tires are not directly behind exhaust pipe.
• Rack must be installed directly into vehicle hitch receiver. Do not modify the hitch receiver or use hitch extenders.
• Do not mount to any type of trailer or RV including Class B vehicles.
• Prior to usage on the road, remove all loose parts from bicycle, including (but not limited to) child seat, basket, lock, light, pump, etc.
• This carrier is not recommended for off-road use or for use at speed exceeding 70 mph (113 km/h).
• The handling characteristics of a vehicle will change when a rear bicycle carrier is fitted and especially when it is loaded (in particular, crosswind sensitivity, handling on
bends and braking). Driving techniques should be altered to allow for these changes: reduce speed, especially on bends and allow for longer braking distances.
• The vehicle’s total length increases when the bike carrier is attached. The bikes themselves may increase the vehicle’s total width and height. Take care when reversing
and/or entering garages or ferries, etc.
• Remove carrier from vehicle when not in use.
EN Technical Specifications
5 Bike carrier weight: 37lb/ 17kg
Permitted load capacity: 150lb/ 68 kg
Max bike weight: 30 lb/13.5 kg
Technical Specifications
2 Bike carrier weight: 37lb/ 17kg
Permitted load capacity: 100lb/ 45.5 kg
Max bike weight: 50 lb/22.5 kg
Technical Specifications
4 Bike carrier weight: 37lb/ 17kg
Permitted load capacity: 140lb/ 63.5 kg
Max bike weight: 35 lb/16 kg
26676D Glide EX Manual.indd 1426676D Glide EX Manual.indd 14 1/11/2021 9:57:37 AM1/11/2021 9:57:37 AM

15
• This carrier is constructed to carry standard bike frames. It is not intended for use with tandem or recumbent bicycles.
• Replace any mounting strap at the first sign of wear. Replacement parts are available through your local Saris dealer or call 1-800-783-7257.
• Tighten straps regularly during the journey.
• Vehicle should be in good condition in the area at which the hitch is located.
• Do not exceed maximum load capacity of carrier! Secure properly and adjust for even load distribution, loading the heaviest/biggest bike first and closest to the vehicle.
• Saris absolves itself of responsibility for any personal injuries or consequential damage to property or wealth caused by incorrect fitting or use.
Recommended Rack Maintenance & Care Instructions
Each use:
• Wipe down trunk rack feet
• Avoid ground contact with trunk rack feet
• Check straps for signs of wear
• Check bike cradles and wheel scoops
• Check for loose bolts
Every 90 days actions:
• Clean with water and mild soap
• Lubricate locks if applicable (use wet, oil-based lubricant; NO WD-40)
• Grease hitch bolt threads
• Check for scratches in paint.
Official Warranty Terms: Saris Racks
Saris Cycling Group, Inc (SCG), parent company of Saris Racks, warrants our products to the original consumer to be free from defects in materials and workmanship. Your purchase
includes the following warranty which is in lieu of all other express warranties. This warranty is extended only to the initial consumer purchaser. This warranty gives you specific legal
26676D Glide EX Manual.indd 1526676D Glide EX Manual.indd 15 1/11/2021 9:57:37 AM1/11/2021 9:57:37 AM

16
EN
rights. You may have other legal rights which vary from state to state. Please retain your sales slip for your records, as proof of purchase will be required.
Warranty Term
Car Racks Limited Lifetime*
Home Storage/Bike Storage Limited Lifetime*
Kool Rack 1 Year
Parking Racks 1 Year
*Warranty only valid for original purchaser. Limited lifetime warranty available in North America only.
Manufacturing defects are most likely to be identified on new products or early in the product’s lifespan. Each warranty claim is unique, and it is solely up to SCG to determine if a
product can be covered by the limited lifetime warranty due to defects, or if the product has suffered wear and tear.
Any product or part thereof found to be defective within the term as set forth above will be replaced without charge provided that: (1) its failure resulted from a defect in material or
workmanship and not from normal wear and tear expected in the use of the product; (2) the product was not abused, misused, improperly assembled, improperly maintained or dam-
aged by accident or installation of parts or accessories not originally intended or compatible with the racks as originally sold., (3) there was no failure to follow instructions or warn-
ings in Owner’s Manual; (4) no alterations or modifications were made; and (5) the product or part is delivered, freight prepaid, to Saris Cycling Group or an authorized service center.
Please call 1-800-783-7257 to obtain return authorization prior to return. Any other claims not included in the statements above are void and will not be honored. SCG reserves the
right to inspect any product before issuing a replacement. SCG’s only obligation shall be to replace such products or parts that it determines are defective.
Limitations
THE FOREGOING WARRANTIES ARE THE ONLY WARRANTIES MADE BY SCG. THERE ARE NO OTHER WARRANTIES. ANY WARRANTY THAT MIGHT OTHERWISE BE IMPLIED BY LAW
INCLUDING, BUT NOT LIMITED TO ANY IMPLIED WARRANTY OF MERCHANTABILITY OR FITNESS FOR A PARTICULAR PURPOSE ARE LIMITED STRICTLY TO THE APPLICABLE LENGTH OF
THIS LIMITED WARRANTY.
26676D Glide EX Manual.indd 1626676D Glide EX Manual.indd 16 1/11/2021 9:57:37 AM1/11/2021 9:57:37 AM

17
SCG shall not be liable for incidental or consequential losses, damages, or expenses in connection with its products. SCG’s liability hereunder is expressly limited to the replacement of
goods not complying with this warranty or, at SCG’s election, to the repayment of an amount of the purchase price of the product in question.
Exclusions
• If consumer does not comply with all warnings, cautions, or instructions listed in Instruction Manual, damage is not covered under warranty
• Impact/collision damage is not covered under warranty
• Cradles and strap damage due to improper arm placement are not covered under warranty
• Carrying anything other than a bicycle is not covered under warranty
• Paint damage – chipping, cracking, or fading is not covered under warranty
• Rust is wear and tear and is preventable with rack maintenance
• Weather impact (UV, salt air/water)
• Damage to mounting surface
• Damage or loss resulting from failure to replace/maintain consumable items not covered.
• Not following Recommended Rack Maintenance
• Consumable Items not covered by warranty. Including but not limited to.
• Arm and wheel tray adjustment knobs
• Frame and wheel straps
• Vehicle attachment straps
• Molded wheel trays
• Frame cradles
• Threaded assemblies
• Ratcheting assemblies
26676D Glide EX Manual.indd 1726676D Glide EX Manual.indd 17 1/11/2021 9:57:37 AM1/11/2021 9:57:37 AM

18
PRECAUCIONES:
• Se deben respetar todos los requisitos de compatibilidad/idoneidad especificados en la guía actual de compatibilidad de vehículos y portabicicletas de Saris.
(Disponibleentodos los distribuidores de Saris & www.saris.com). Si su vehículo no aparece en el listado o si desea realizar alguna consulta, llame a nuestro servicio
deatención alcliente al teléfono 800-783-7257 o visite www.saris.com.
• Lea y siga estas instrucciones atentamente. Guarde el manual de usuario para consulta en el futuro o información sobre piezas. Asegúrese de que todos los usuarios
delportabicicletas estén familiarizados con el contenido del manual.
• Es responsabilidad del usuario final asegurarse de que el uso de este producto cumpla todas las leyes locales y nacionales.
• Para limpiar el vehículo y el portabicicletas, utilice solo productos de limpieza solubles en agua. No introduzca el portabicicletas en un túnel de lavado.
• Asegúrese de que las bicicletas no queden justo detrás del tubo de escape.
• El portabicicletas se debe instalar directamente en el codo de sujeción del vehículo. No modifique el codo de sujeción ni utilice extensores de codo.
• No monte ningún tipo de remolque o vehículo recreativo incluidos vehículos de Clase B.
• Antes de utilizar en carretera, retire todas las piezas sueltas de la bicicleta, entre otras asiento infantil, cesta, candado, luz, bomba de aire, etc.
• Este portabicicletas no se recomienda para uso en pistas de tierra ni para velocidades superiores a 113 km/h (70 mph).
• Las características de conducción de un vehículo cambiarán cuando se monta un portabicicletas trasero y, especialmente, cuando está cargado (en particular la sensibilidad
a viento lateral, la conducción en curvas y el frenado). Las técnicas de conducción deben modificarse para adecuarse a dichos cambios, reducir la velocidad, especialmente
en curvas y dejar una mayor distancia de frenado.
• La longitud total del vehículo aumenta cuando se monta el portabicicletas. Las propias bicicletas podrían aumentar la anchura y altura total del vehículo. Tenga cuidado
aldar marcha atrás o al entrar en garajes o ferries, etc.
• Desmonte el portabicicletas del vehículo cuando no esté en uso.
ES Especificaciones técnicas
5 Peso del portabicicletas: 37lb/ 17kg
Capacidad de carga permitida: máx. 150lb/ 68kg
Peso máximo de la bicicleta: 30lb / 13.5 kg
Especificaciones técnicas
4 Peso del portabicicletas: 37lb/ 17kg
Capacidad de carga permitida: máx. 140lb/ 63.5kg
Peso máximo de la bicicleta: 35lb / 16 kg
Especificaciones técnicas
2 Peso del portabicicletas: 37lb/ 17kg
Capacidad de carga permitida: máx. 100lb/ 45.5kg
Peso máximo de la bicicleta: 50lb / 22.5 kg
26676D Glide EX Manual.indd 1826676D Glide EX Manual.indd 18 1/11/2021 9:57:37 AM1/11/2021 9:57:37 AM

19
• Este portabicicletas se ha fabricado para transportar bicicletas con cuadro estándar. No está diseñado para su uso con tándem o bicicletas reclinadas.
• Fíjelo de forma segura y ajuste una distribución de cargas uniforme, cargando primero las bicicletas más grandes o pesadas en la parte más próxima al vehículo.
• Sustituya las correas de montaje a la primera señal de desgaste. Las piezas de repuestos están disponibles a través del distribuidor local de Saris o llamando
al 1-800-783-7257.
• Apriete las correas con regularidad a lo largo del viaje.
• Saris declina toda responsabilidad por lesiones personales o daños y perjuicios en la propiedad o en la salud derivados de un uso o montaje incorrectos.
• El vehículo debe estar en buen estado en la zona en que se encuentra el enganche.
• No exceda la capacidad máxima de carga de la compañía!
Instrucciones de mantenimiento y cuidados recomendados del portabicicletas
En cada uso:
• Limpie las patas del portabicicletas para maletero
• Evite que las patas del portabicicletas para maletero toquen el suelo
• Compruebe las correas para detectar señales de desgaste
• Compruebe las horquillas para bicicleta y las palas para ruedas
• Compruebe que no haya tornillos sueltos
Acciones que se deben realizar cada 90 días:
• Lavar con agua y jabón neutro
• Lubricar los cierres si procede (utilice lubricante húmedo a base de aceite; NO WD-40)
• Engrasar las roscas de los pernos del enganche
• Comprobar si hay arañazos en la pintura
Términos de garantía oficial: Portabicicletas Saris
Saris Cycling Group, Inc (SCG), empresa matriz de Saris Racks, garantiza al comprador original que nuestros productos no presentan defectos de material ni de mano de obra.
Su compra incluye la garantía siguiente que sustituye a todas las demás garantías expresas. Esta garantía se otorga únicamente al comprador original. Esta garantía le ofrece
26676D Glide EX Manual.indd 1926676D Glide EX Manual.indd 19 1/11/2021 9:57:37 AM1/11/2021 9:57:37 AM

20
ES
derechos legales específicos. Es posible que cuente con otros derechos legales que podrían variar en función de la jurisdicción. Conserve la factura, ya que tendrá que presen-
tar una prueba de compra.
Términos de la garantía
Portabicicletas para coches Limitada de por vida*
Almacenamiento doméstico/de bicicletas Limitada de por vida*
Kool Rack 1 año
Aparcabicicletas para aparcamientos 1 año
*Garantía solo válida para el comprador original. Garantía de por vida disponible solo en América del Norte.
Es más probable que los defectos de fabricación se identifiquen en los productos nuevos o al principio de su vida útil. Cada reclamación de garantía es única y solo corresponde
a SCG determinar si un producto puede estar cubierto por la garantía limitada de por vida debido a defectos o si el producto ha sufrido desgaste y deterioro.
Cualquier producto o parte del mismo que resulte ser defectuoso según los términos establecidos más arriba se sustituirá gratuitamente siempre que: (1) el fallo se deba a un
defecto del material o de la mano de obra y no al desgaste normal que cabe esperar del uso del producto; (2) el producto no se haya utilizado de forma inadecuada ni haya sido
objeto de abuso;, no se haya montado de forma incorrecta, no se haya realizado el mantenimiento correcto o se haya dañado por accidente o la instalación de piezas o acceso-
rios no previstos o compatibles con los portabicicletas como se vendieron originalmente; (3) no se hayan seguido incorrectamente las instrucciones o advertencias del Manual
de usuario; (4) no se hayan realizado alteraciones o modificaciones; y (5) el producto se haya enviado, con transporte prepagado, a Saris Cycling Group o a un centro de servicio
autorizado. Llame al 1-800-783-7257 para obtener una autorización de devolución antes de la devolución. Cualquier otra reclamación no incluida en las indicaciones anteriores
es nula y no se respetará. SCG se reserva el derecho a inspeccionar cualquier producto antes de enviar otro de sustitución. La obligación de SCG se limita a la sustitución de los
productos o de las piezas que se determine que son defectuosos.
Limitaciones
26676D Glide EX Manual.indd 2026676D Glide EX Manual.indd 20 1/11/2021 9:57:37 AM1/11/2021 9:57:37 AM
La page est en cours de chargement...
La page est en cours de chargement...
La page est en cours de chargement...
La page est en cours de chargement...
La page est en cours de chargement...
La page est en cours de chargement...
-
 1
1
-
 2
2
-
 3
3
-
 4
4
-
 5
5
-
 6
6
-
 7
7
-
 8
8
-
 9
9
-
 10
10
-
 11
11
-
 12
12
-
 13
13
-
 14
14
-
 15
15
-
 16
16
-
 17
17
-
 18
18
-
 19
19
-
 20
20
-
 21
21
-
 22
22
-
 23
23
-
 24
24
-
 25
25
-
 26
26


Saris & 5-Bike Le manuel du propriétaire
- Catégorie
- Accessoires de vélo
- Taper
- Le manuel du propriétaire
- Ce manuel convient également à
dans d''autres langues
- English: Saris & 5-Bike Owner's manual
- español: Saris & 5-Bike El manual del propietario
Documents connexes
-
Saris Freedom 4-Bike Le manuel du propriétaire
-
-
-
-
Saris MTR 1-Bike Add-On Le manuel du propriétaire
-
-
-
-
-
