Nescafe Dolce Gusto GENIO 2 Manuel utilisateur
- Taper
- Manuel utilisateur


2
EN
TABLE OF CONTENTS
1. IMPORTANT SAFEGUARDS ...............................................3
2. MACHINE OVERVIEW .......................................................5
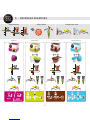
3. BEVERAGE EXAMPLES .....................................................6
4. RECOMMENDATIONS FOR SAFE USE ..................................7
5. FIRST USE ......................................................................8
6. PREPARING A BEVERAGE .................................................9
6.1 ONE CAPSULE (E.G. LUNGO) ......................................9
6.2 TWO CAPSULES (E.G. CAPPUCCINO) ......................... 10
7. CLEANING ................................................................... 12
8. DESCALING AT LEAST EVERY 3 – 4 MONTHS ..................... 13
9. TROUBLESHOOTING ...................................................... 15
9.1 NO LIQUID COMES OUT – NO WATER?....................... 15
9.2 NO LIQUID COMES OUT – CAPSULE / INJECTOR BLOCKED? ..... 15
9.3 VARIOUS ..................................................................... 16

3
EN
1. IMPORTANT SAFEGUARDS
1. Read all instructions and keep these
safety instructions. Any type of mis-
use of the appliance may result in a
potential injury.
2. Do not touch hot surfaces. Use han-
dles or knobs. The heating element
surface is subject to residual heat
after use and plastic housings may
feel warm to touch several minutes
after use.
3. To protect against re, electric
shock and injury to persons, do not
immerse cord, plugs or appliance in
water or other liquid. Avoid spillage
on the plug. Never touch cord with
wet hands. Do not overll water tank.
4. Connect the appliance to outlets with
a grounding contact only. Electrical
voltage must be 120 V.
5. Do not let cord hangover edge of ta-
ble or counter, or touch hot surfaces
or sharp edges. Do not allow cord to
dangle (risk of accident).
6. Do not operate any appliance with
a damaged cord or plug or after the
appliance malfunctions, or has been
damaged in any manner. Unplug
cord immediately. Return appliance
to the nearest authorized service
facility approved by
NESCAFÉ® Dolce Gusto® Hotline for
examination, repair or adjustment.
7. Do not place on or near a hot gas
or electric burner, in a heated oven,
radiators or range top. Always place
on a stable and even surface. The
surface must be resistant to heat
and uids, like water, coffee, descal-
er, or similar.
8. To disconnect, turn machine off, then
remove plug from wall outlet. Do not
unplug by pulling the cord.
9. Unplug from outlet when not in use
and before cleaning. Allow to cool
before putting on or taking off parts,
and before cleaning the appliance.
Never clean wet or immerse appli-
ance in any uid. Never clean the
appliance with running water. Never
use detergents to clean the appli-
ance.
10. Do not dismantle appliance and do
not put anything into openings.
11. The use of accessory attachments not
recommended by the appliance man-
ufacturer may result in re, electric
shock or injury to persons.
12. Any operation, cleaning and care
other than normal use must be
undertaken by aftersales service
centers approved by
NESCAFÉ® Dolce Gusto® Hotline.
13. In case of intensive use without
allowing sufcient cooling time, the
appliance will stop functioning tem-
porarily with the red indicator light
blinking. This is to protect your ap-
pliance from overheating. Switch the
appliance off for 20 minutes to let it
cool down. If beverage volumes are
programmed for 10 or 12 oz, let the
machine cool down for 1½ minutes
before making the next beverage to
prevent the risk of overheating.
14. Close supervision is necessary when
any appliance is used near children.
Keep appliance / power cord / cap-
sule holder out of reach of children.
Children should not use the appli-
ance.
15. This appliance can be used by chil-
dren aged from 8 years and above
and persons with reduced physical,
sensory or mental capabilities or
lack of experience and knowledge
if they have been given supervision
or instruction concerning use of the
appliance in a safe way and if they
understand the hazards involved.
Cleaning and user maintenance
shall not be made by children
unless they are older than 8 and
supervised by an adult.
16. Do not use outdoors.
17. Do not use appliance for other than
intended use. Appliance must be
used in accordance with these
instructions and specications.
18. In case of any inappropriate use or
failure to comply with the instruc-
tions, the manufacturer accepts no
responsibility and the guarantee may
not apply.
19. Do not remove hot capsules by hand.
Use capsule holder handle and turn
it upside down to dispose of used
capsules.
20. Always close machine head with
capsule holder. Do not pull out
capsule holder before indicator stops
blinking.
When using electrical appliances, basic safety precautions shall always be followed, including the following:

4
EN
1. IMPORTANT SAFEGUARDS
21. Machines equipped with a locking
handle: Scalding may occur if the
lever is opened during the brewing
cycles.
22. Do not put ngers under outlet
during beverage preparation.
23. Do not touch the injector of the ma-
chine head.
24. Never carry the appliance by the
machine head.
25. The capsule holder is equipped with
one permanent magnet. Avoid plac-
ing capsule holder near appliances
and objects that can be damaged by
magnetism, e.g. credit cards, dis-
kettes and other data devices, video
tapes, television and computer mon-
itors with picture tubes, mechan-
ical clocks, hearing aids and loud
speakers. Patients with pacemakers
or debrillators: Do not hold capsule
holder directly over pacemaker or
debrillator.
26. We recommend using the
NESCAFÉ® Dolce Gusto® capsules
designed and tested for the
NESCAFÉ® Dolce Gusto® machine.
They were designed to interact to-
gether - the interaction provides the
in-cup quality that
NESCAFÉ® Dolce Gusto® is known
for. Each capsule is designed to
prepare a perfect cup, and cannot be
reused.
27. The capsule should be removed from
the machine after extraction.
SHORT CORD INSTRUCTIONS:
28. a) A short power-supply cord is to
be provided to reduce risks result-
ing from becoming entangled in or
tripping over a longer cord.
b) Longer power-supply or extension
cords are available and may be used
if care is exercised in their use.
c) If a long power-supply or extension
cord is used,
1) The marked electrical rating of the
extension cord should be at least as
great as the electrical rating of the
appliance.
2) If the appliance is of the grounded
type, the extension cord should be a
grounding-type 3-wire cord, and
3) The longer cord should be ar-
ranged so that it will not drape over
the counter top or table top where
it can be pulled on by children or
tripped over.
THIS PRODUCT IS FOR HOUSEHOLD USE
ONLY.
SAVE THESE
INSTRUCTIONS
Packaging is made of recyclable materi-
als. Contact your local council / authority
for further information on recycling
programs. Help protect the environment.
Your appliance contains valuable mate-
rials which can be recovered or recycled.
The guarantee does not cover appli-
ances that do not work or do not work
properly because they have not been
maintained and/or descaled.

5
EN
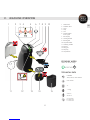
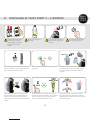
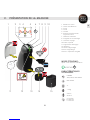
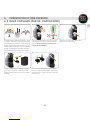
2. MACHINE OVERVIEW
1 Water tank
2 Selection lever
3 Cold
4 Stop
5 Hot
6 Power button /
Error signal
7 Bar display
8 Locking handle
9 Rinsing tool
10 Capsule holder
11 Cleaning needle
12 Injector
13 Drip grid
14 Drip tray
15 Capsule bin
CANADA
120 V, 60 Hz, max. 1460 W
TECHNICAL DATA
max. 15 bar
1 L
~2.7 kg
5-45 °C
41-113 °F
A = 16.5 cm
B = 29.6 cm
C = 25.7 cm
A
C
B
ECONOMY MODE:
after 5 min of non-usage
STOP
12 10
8
6
13 14
7
151211
934 5


7
EN
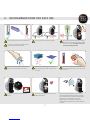
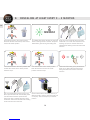
4. RECOMMENDATIONS FOR SAFE USE
Never add hot water to the water tank! After nishing preparation, bar display
ashes and power button blinks red for
about 5 seconds. During that time do
not open locking handle!
Do not touch used capsule after
beverage preparation! Hot surface, risk
of burns!
Never use a wet sponge. Only use a
soft damp cloth to clean the top of the
machine.
Always keep the machine upright!
Never touch injector with surface of
nger!
For rinsing and beverage preparation
only use fresh drinking water.
Do not touch plug with wet hands. Do
not touch machine with wet hands!
IF LEFT UNUSED FOR MORE THAN 2 DAYS: Fill
water tank with fresh drinking water and insert
it into machine. Rinse machine, therefore follow
instructions in “7. CLEANING“ on page 12,
beginning with step 4. Remove water from
water tank. Dry water tank. Insert water tank into
machine.
Do not use the rinsing tool for tea or hot
water preparation.
XL
XL
XL
XL

8
EN
STOP
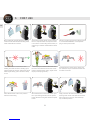
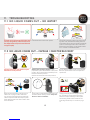
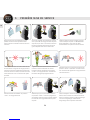
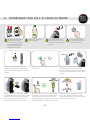
5. FIRST USE
78
456
123
Set bar display to maximum level with selec-
tion lever. Push selection lever to the “COLD”
position. Machine starts rinsing. Lights on bar
display vanish progressively.
Switch on machine. Power button starts
blinking red while machine is heating up for
approximately 40 seconds. Afterwards power
button lights steady green. Machine is ready
to use.
Wait until the lever moves to the “STOP” posi-
tion. Extraction stops. Power button blinks red
for about 5 seconds.
Wait until the lever moves to the “STOP” posi-
tion. Open locking handle. Pull out capsule
holder. Remove rinsing tool. Reinsert capsule
holder.
Push selection lever to the “HOT” position.
Machine starts rinsing.
Empty container. Fill water tank with fresh
drinking water. Insert water tank into machine.
Place drip grid on drip tray. Then insert drip
tray at desired position.
Open locking handle. Make sure that rinsing
tool is in capsule holder and capsule holder
is in machine. Close locking handle. Place an
empty large container underneath the coee
outlet.
Ensure to use the correct mains voltage as given
in “2. MACHINE OVERVIEW“. Connect power
plug to mains power socket.
Rinse water tank manually with fresh drinking
water. Fill water tank with fresh drinking water.
Insert water tank into machine.
9

9
EN
XL
XL
1
4
2
5
3
6
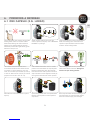
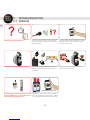
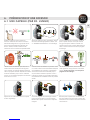
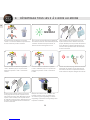
6.1 ONE CAPSULE (E.G. LUNGO)
6. PREPARING A BEVERAGE
After nishing preparation the power button
blinks red for about 5 seconds. During that
time do not open locking handle!
Push selection lever to the “HOT” or “COLD”
position as recommended on capsule packs.
Beverage preparation starts. Wait until the
lever moves to the “STOP” position. Extraction
stops. Extraction can be stopped manually by
moving the lever back to the “STOP” position.
Check if the water tank contains enough fresh
drinking water. Switch on machine. Power
button starts blinking red while machine is
heating up for approximately 40 seconds.
Afterwards power button lights steady green.
Machine is ready to use.
Open locking handle. Pull out capsule holder.
Make sure rinsing tool is not inside. Insert
capsule in capsule holder. Insert it back into
machine. Close locking handle.
Use selection lever to illuminate bars in
accordance with the number of bars shown
on capsule, or set bar display to your own
taste. You can select your desired cup size up
to 12 FL OZ. Wait around 1.5 min if you want to
prepare a second 10 or 12 FL OZ. cup.
Adjust drip tray position. Place cup with
correct cup size on drip tray. See “3. BEVERAGE
EXAMPLES“ or package.
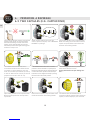
8 9
Open locking handle. Pull out capsule holder.
Remove used capsule. Put used capsule in
capsule bin.
7
After extraction is nished remove cup from
drip tray.
Rinse capsule holder with fresh drinking water
from both sides. Dry capsule holder. Insert it
back into machine. Enjoy your beverage!

10
EN
XL
XL
3
56
12
4
789
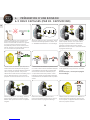
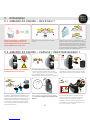
6.2 TWO CAPSULES (E.G. CAPPUCCINO)
6. PREPARING A BEVERAGE
Check if the water tank contains enough fresh
drinking water. Switch on machine. Power
button starts blinking red while machine is
heating up for approximately 40 seconds.
Afterwards power button lights steady green.
Machine is ready to use.
Open locking handle. Pull out capsule holder.
Make sure rinsing tool is not inside. Insert rst
capsule in capsule holder. Insert it back into
machine. Close locking handle.
Use selection lever to illuminate bars in
accordance with the number of bars shown
on capsule, or set bar display to your own
taste. You can select your desired cup size up
to 12 FL OZ. Wait around 1.5 min if you want to
prepare a second 10 or 12 FL OZ. cup.
Adjust drip tray position. Place cup with
correct cup size on drip tray. See “3. BEVERAGE
EXAMPLES“ or package.
Push selection lever to the “HOT” or “COLD”
position as recommended on capsule packs.
Beverage preparation starts. Wait until the lever
moves to the “STOP” position. Extraction stops.
Extraction can be stopped manually by moving
the lever back to the “STOP” position.
Open locking handle. Pull out capsule holder.
Remove used capsule. Put used capsule in
capsule bin.
Use selection lever to illuminate bars in
accordance with the number of bars shown on
capsule, or set bar display to your own taste.
After nishing preparation the power button
blinks red for about 5 seconds.
During that time do not open locking han-
dle!
Insert second capsule in capsule holder. Insert
it back into machine. Close locking handle.

11
EN
XL
XL
XL
13
12
11
10
14
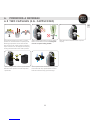
6.2 TWO CAPSULES (E.G. CAPPUCCINO)
6. PREPARING A BEVERAGE
Push selection lever to the “HOT” or “COLD”
position as recommended on capsule packs.
Beverage preparation starts. Wait until the
lever moves to the “STOP” position. Extraction
stops. Extraction can be stopped manually by
moving the lever back to the “STOP” position.
After extraction is nished remove cup from
drip tray.
After nishing preparation the power button
blinks red for about 5 seconds. During that
time do not open locking handle!
Open locking handle. Pull out capsule holder.
Remove used capsule. Put used capsule in
capsule bin.
Rinse capsule holder with fresh drinking water
from both sides. Dry capsule holder. Insert it
back into machine. Enjoy your beverage!

12
EN
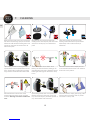
7. CLEANING
2
4
78
3
5
1
6
9
Rinse drip tray and rinsing tool with fresh
drinking water. Clean drip tray with clean food-
safe brush. The drip tray is not dishwasher
proof!
Open locking handle. Put rinsing tool into
capsule holder. Insert capsule holder into ma-
chine. Close locking handle. Place an empty
large container underneath the coee outlet.
Wait until the lever moves to the “STOP”
position. Extraction stops. Empty and clean
container. Warning: Hot water! Handle with
care!
Open locking handle. Pull out capsule holder.
Remove rinsing tool. Place drip grid on drip
tray. Then insert drip tray at desired position. If
any, remove water from water tank.
Clean with washing-up liquid and fresh
drinking water both sides of capsule holder.
Alternatively wash in dishwasher. Dry it
afterwards.
Switch on machine. Power button starts
blinking red while machine is heating up for
approximately 40 seconds. Afterwards power
button lights steady green. Machine is ready
to use.
Rinse and clean water tank. Use a clean food-
safe brush and washing-up liquid as needed.
Afterwards rell with fresh drinking water and
insert it into machine. The water tank is not
dishwasher proof!
Rinse the machine: Set bar display to maxi-
mum level with selection lever. Push selection
lever to the “HOT” position.
Switch o machine. Unplug power plug! Clean
machine with a soft damp cloth. Dry it after-
wards with a soft dry cloth.

13
EN
500 ml
www.dolce-gusto.ca
8. DESCALING AT LEAST EVERY 3 – 4 MONTHS
12
If the beverage comes out slower than usual
(even in droplets), or if it is cooler than usual
the machine has to be descaled.
3
Mix 500 ml fresh drinking water with descaler
in a measuring cup. Pour descaling solution
into water tank and insert water tank into
machine.
Switch o machine. If any, remove water from
water tank.
45
Open locking handle. Put rinsing tool into
capsule holder. Insert capsule holder into
machine. Close locking handle. Place an
empty large container underneath the coee
outlet.
Press and hold power button for at least 5
seconds. Power button blinks green. Machine
enters descaling mode. Set bar display to
maximum level with selection lever.
6
Push selection lever to the “HOT” position.
Machine descales in start-stop operation for
approximately 2 minutes. Lever comes back to
the middle position.
Do not push power button
during descaling cycle.
Use NESCAFÉ® Dolce Gusto®
liquid descaler. To order,
call the hotline or go on the
NESCAFÉ® Dolce Gusto®
website.
Avoid contact of descaling
liquid with any part of the
machine.
Do not use vinegar for
descaling.

14
EN
8. DESCALING AT LEAST EVERY 3 – 4 MONTHS
9
Empty and clean container. Rinse and clean
water tank. Use a clean food-safe brush and
washing-up liquid as needed. Afterwards
rell with fresh drinking water and insert it into
machine.
12
At the end of the rinsing cycle, power button
lights up red. Wait until power button light
turns green. Remove container. Switch o
machine.
13 14
Pull out capsule holder. Remove rinsing tool.
Rinse capsule holder with fresh drinking water
from both sides. Reinsert capsule holder.
Empty and clean container. Rinse and clean
water tank. Afterwards rell with fresh drinking
water and insert it into machine.
Clean machine with a soft damp cloth. Dry it
afterwards with a soft dry cloth. Place drip grid
on drip tray. Then insert drip tray at desired
position.
10
Push selection lever to the “HOT” position. Wait
until the lever moves to the “STOP” position.
Extraction stops.
Push selection lever to the “COLD” position.
Wait until the lever moves to the “STOP”
position. Extraction stops.
11
78
Push selection lever to the “COLD” position.
Machine descales continuously. Lever comes
back to the middle position.
For a better eect of the descaler, the machine
enters a waiting time of 2 minutes. The power
button blinks green during the waiting time.

15
EN
XL
No liquid comes out: The capsule may be
blocked and under pressure.
Rinse the machine: Follow instructions in 5.
“FIRST USE” on page 8. Clean with wash-
ing-up liquid and fresh drinking water both
sides of capsule holder. Rinse drip tray with
fresh drinking water and clean it with a clean
food-safe brush.
Always keep machine upright! To stop
preparation, push selection lever to the “STOP”
position. Do not open locking handle by force.
Machine releases pressure.
Wait for 20 minutes to reduce the pressure.
Do not drink the coee! Lift the locking handle.
Remove capsule holder. Put used capsule in
capsule bin.
Close locking handle. Remove the water tank
and take out the cleaning needle. Keep nee-
dle out of reach of children!
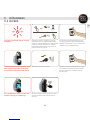
9.1 NO LIQUID COMES OUT – NO WATER?
9.2 NO LIQUID COMES OUT – CAPSULE / INJECTOR BLOCKED?
9. TROUBLESHOOTING
No liquid comes out: Beverage preparation stops
part way during delivery or does not start at all.
Bar display ashes and power button blinks red
and green rapidly.
Push selection lever to the “STOP” position.
1
Check if the water tank contains enough fresh drink-
ing water. If not, rell with fresh drinking water and
push selection lever to the “HOT” position respectively
“COLD” to continue preparation. If the water tank is
full proceed as described in “9.2 NO LIQUID COMES
OUT – CAPSULE / INJECTOR BLOCKED?“.
2
1
4
2
Unplug power plug! Remove drip grid and drip
tray. For better access to injector tilt machine.
Never touch injector with nger! Clean injector
with cleaning needle. Follow instructions in 8.
“Descaling at least every 3-4 months” on page
13.
35

16
EN
www.dolce-gusto.ca
XL
9.3 VARIOUS
9. TROUBLESHOOTING
Machine cannot be switched on.
1
Check if the power plug is correctly plugged
into a mains power socket. If yes, check your
electricity supply.
2
If machine still cannot be switched on, call the
NESCAFÉ® Dolce Gusto® hotline. For hotline
numbers see last page.
1
If the beverage comes out slower than usual
(even in droplets), or if it is cooler than usual
the machine has to be descaled.
Use NESCAFÉ® Dolce Gusto® liquid descaler. To
order, call the NESCAFÉ® Dolce Gusto® Hotline
or go on the NESCAFÉ® Dolce Gusto® website.
1 2
Beverage is splashing out of coee outlet. Push selection lever to the “STOP” position.
Pull out capsule holder. Put used capsule in
capsule bin.
Insert a new capsule in capsule holder and
insert it back into machine.

17
EN
XL
1
Power button ashes red fast. Switch o machine. Check if capsule is blocked,
see “9.2 NO LIQUID COMES OUT – CAPSULE /
INJECTOR BLOCKED? “. Unplug power plug and
wait 20 minutes. Afterwards plug power plug
into mains power socket and switch machine on.
9. TROUBLESHOOTING
9.3 VARIOUS
12
1
Water accumulates underneath or around
machine. Clear water leaks around capsule
holder during beverage preparation.
Call the NESCAFÉ® Dolce Gusto® Hotline or go
on the NESCAFÉ® Dolce Gusto® website. For
hotline numbers see last page.
2
If power button still ashes red call the
NESCAFÉ® Dolce Gusto® hotline. For hotline
numbers see last page.
Unplug power plug!
Water is splashing out of coee outlet dur-
ing rinsing or descaling.
Put rinsing tool into capsule holder. Insert
capsule holder into machine.

18
FR
SOMMAIRE
1. MESURES DE SÉCURITÉ IMPORTANTES ............................. 19
2. PRÉSENTATION DE LA MACHINE ..................................... 21
3. EXEMPLES DE BOISSONS ...............................................22
4. RECOMMANDATIONS POUR UN EMPLOI SÛR ...................23
5. PREMIÈRE MISE EN SERVICE ...........................................24
6. PRÉPARATION D’UNE BOISSON .......................................25
6.1 UNE CAPSULE (PAR EX. LUNGO) ...............................25
6.2 DEUX CAPSULES (PAR EX. CAPPUCCINO) ...................26
7. NETTOYAGE .................................................................28
8. DÉTARTRAGE TOUS LES 3 À 4 MOIS AU MOINS ................29
9. DÉPANNAGE ................................................................ 31
9.1 ABSENCE DE LIQUIDE – PAS D’EAU? ......................... 31
9.2 ABSENCE DE LIQUIDE – CAPSULE / INJECTEUR BLOQUÉ? 31
9.3 DIVERS .................................................................. 32

19
FR
1. MESURES DE SÉCURITÉ IMPORTANTES
L’utilisation d’appareils électriques nécessite le respect de précautions de base, notamment les suivantes:
1. Lisez toutes les instructions et conser-
vez ces consignes de sécurité. Toute
utilisation non conforme de l’appareil
implique des blessures potentielles.
2. Ne touchez pas les surfaces chaudes.
Utilisez les poignées ou les boutons.
La surface de l’élément chauffant
peut rester chaude après utilisation de
même que les couvercles en plastique
peuvent rester chaud au toucher pen-
dant plusieurs minutes.
3. Pour protéger les personnes contre le
feu, les électrocutions et les blessures,
évitez de plonger le câble d’alimen-
tation, les ches et la machine dans
l’eau ou d’autres liquides. Évitez toute
projection sur la che. Ne touchez
jamais le câble d’alimentation avec
des mains humides. Ne faites pas
déborder le réservoir d’eau.
4. Ne branchez la machine que sur une
prise avec contact de mise à la terre. Le
courant d’alimentation doit être de 120V.
5. Ne laissez pas le câble d’alimentation
pendre sur le bord d’une table ou d’un
comptoir, ni entrer en contact avec
des surfaces chaudes ou des bords
tranchants. Ne laissez pas pendre le
câble (risque d’accident).
6. N’utilisez pas de machine dont le
câble ou la che d’alimentation sont
endommagés ni après une défaillance
ou qu’elle ait été endommagée de
quelque façon que ce soit. Débranchez
le câble d’alimentation immédiate-
ment. Retournez votre machine au
centre SAV agréé par l’assistance
téléphonique de
NESCAFÉ® Dolce Gusto® le plus
proche pour la faire contrôler, réparer
ou régler.
7. Ne placez pas la machine sur une
plaque de cuisson, une cuisinière à
gaz ou électrique ou un radiateur en
marche, ni dans un four allumé, ni à
proximité de telles sources de chaleur.
Toujours mettre la machine sur un
plan stable. La surface doit résister à
la chaleur et/ou aux liquides tels que
l’eau, le café, les détartrants et autres
produits similaires.
8. Avant de débrancher la machine,
mettez tous les boutons sur «off»,
puis enlevez la che de la prise de
courant. Ne débranchez pas la che en
tirant sur le câble.
9. Lorsqu’elle n’est pas utilisée et avant
de la nettoyer, débranchez la che
d’alimentation de la machine. Laissez
refroidir la machine avant d’enlever ou
de mettre en place des pièces ou de la
nettoyer. Ne nettoyez jamais la ma-
chine à l’état humide et ne la trempez
pas dans un liquide. Ne nettoyez ja-
mais la machine sous l’eau du robinet.
N’utilisez jamais de détergents pour
nettoyer la machine.
10. Ne désassemblez pas la machine et ne
mettez rien dans les ouvertures.
11. L’utilisation d’accessoires non recom-
mandés par le fabricant de la ma-
chine peut entraîner un incendie, une
électrocution ou des blessures.
12. Tout fonctionnement, nettoyage et
entretien sortant du cadre d’utilisation
normal est réservé au personnel des
centres SAV agréés par l’assistance
téléphonique de
NESCAFÉ® Dolce Gusto®.
13. En cas d’utilisation intensive sans
refroidissement approprié, la machine
s’arrête de fonctionner provisoirement
et le témoin rouge clignote. Cette
opération a pour but de protéger la
machine contre une surchauffe. Étei-
gnez la machine pendant 20 minutes
pour la laisser refroidir. Si le volume
de boisson programmé est de 10 ou
12 oz (30 ou 35 cl), laissez la machine
refroidir pendant 1½ minutes avant
de préparer la boisson suivante an
qu’elle ne surchauffe pas.
14. Une surveillance étroite est nécessaire
quand la machine est utilisée à côté
d’enfants. Conservez la machine / le
câble d’alimentation / le porte-cap-
sule hors de portée des enfants. Les
enfants ne doivent pas utiliser la
machine.
15. Cette machine peut être utilisée par
des enfants à partir de 8 ans ou des
personnes à capacités physiques,
sensorielles ou mentales réduites, ne
possédant pas assez d’expérience ou
de connaissances, s’ils sont surveillés
ou ont reçu des instructions concer-
nant l’utilisation sûre de la machine et
s’ils comprennent les risques encou-
rus. Les enfants de plus de 8 ans ne
doivent pas nettoyer la machine ni en
assurer la maintenance, sauf s’ils sont
supervisés par un adulte.
16. N’utilisez pas la machine à l’extérieur.
17. N’utilisez pas la machine pour une
utilisation différente de celle qui est
prévue. L’utilisation de la machine doit
être conforme aux présentes instruc-
tions et spécications.

20
FR
1. MESURES DE SÉCURITÉ IMPORTANTES
18. En cas d’utilisation inappropriée ou
de non-respect des instructions, le
fabricant décline toute responsabilité
et la garantie devient nulle.
19. N’enlevez pas les capsules chaudes
à la main. Utilisez la poignée du
porte-capsule et renversez celui-ci
pour éliminer les capsules usagées.
20. Refermez toujours la tête de prépara-
tion avec le porte-capsule. Ne sortez
pas le porte-capsule avant que le
témoin ne cesse de clignoter.
21. Machines équipées d’une poignée de
verrouillage: un entartrage peut se
produire si la poignée de verrouillage
est ouverte pendant les cycles de
préparation.
22. Ne mettez pas vos doigts sous la
sortie pendant la préparation de la
boisson.
23. Ne touchez pas l’injecteur de la tête de
préparation.
24. Ne transportez jamais la machine par
la tête de préparation.
25. Le porte-capsule est équipé d’un
aimant permanent. Évitez de placer
le porte-capsule à côté de machines
et d’objets pouvant être endommagés
par le magnétisme, par ex. cartes de
crédit, disquettes et autres sup-
ports de stockage, cassettes vidéo,
téléviseurs et écrans d’ordinateur
avec tubes cathodiques, horloges
mécaniques, aides auditives et
haut-parleurs. Personnes munies d’un
stimulateur cardiaque ou débrilla-
teur: ne tenez pas le porte-capsule
directement au-dessus du stimulateur
cardiaque ou du débrillateur.
26. Nous recommandons d’utiliser les
capsules NESCAFÉ® Dolce Gusto®
conçues et testées pour la machine à
café NESCAFÉ® Dolce Gusto®. L’in-
teraction de ces capsules et de cette
machine est optimale an de procurer
la qualité qui fait la réputation de
NESCAFÉ® Dolce Gusto®. Chaque
capsule est conçue pour préparer une
tasse parfaite et ne peut pas être
réutilisée.
27. Il faut retirer la capsule de la machine
après la n de l’extraction.
INSTRUCTIONS «CÂBLE COURT» :
28. a) Le câble d’alimentation doit être
court pour réduire les risques d’en-
chevêtrement et de trébuchement
inhérents à un long câble.
b) Des câbles plus longs ou des
rallonges sont disponibles et peuvent
être utilisés en prenant les précau-
tions nécessaires.
c) Si un câble d’alimentation long/une
rallonge est utilisé,
1) Le courant spécié pour le câble/
la rallonge doit être au moins égal à
celui que la machine consomme.
2) Si la machine exige une mise à la
terre, le câble/la rallonge doit compor-
ter 3 conducteurs dont un conducteur
de mise à la terre et,
3) Le câble long/la rallonge doit être
disposé de façon à ne pas s’étendre
sur le comptoir ou la table où un
enfant pourrait l’atteindre et tirer ou
trébucher dessus.
CE PRODUIT EST EXCLUSIVEMENT DESTI-
NÉ À UN USAGE DOMESTIQUE.
CONSERVEZ CES
INSTRUCTIONS EN LIEU
SÛR
L’emballage est fabriqué avec des
matières recyclables. Contactez l’autorité
locale pour plus d’informations sur les
programmes de recyclage. Priorité à la
protection de l’environnement!
Votre machine contient des matériaux de
haute valeur susceptibles d’être récupérés
ou recyclés.
La garantie ne couvre pas les machines
qui ne fonctionnent pas ou qui ne fonc-
tionne pas correctement en raison de
l’absence de maintenance ou de dé-
tartrage.
La page est en cours de chargement...
La page est en cours de chargement...
La page est en cours de chargement...
La page est en cours de chargement...
La page est en cours de chargement...
La page est en cours de chargement...
La page est en cours de chargement...
La page est en cours de chargement...
La page est en cours de chargement...
La page est en cours de chargement...
La page est en cours de chargement...
La page est en cours de chargement...
La page est en cours de chargement...
La page est en cours de chargement...
-
 1
1
-
 2
2
-
 3
3
-
 4
4
-
 5
5
-
 6
6
-
 7
7
-
 8
8
-
 9
9
-
 10
10
-
 11
11
-
 12
12
-
 13
13
-
 14
14
-
 15
15
-
 16
16
-
 17
17
-
 18
18
-
 19
19
-
 20
20
-
 21
21
-
 22
22
-
 23
23
-
 24
24
-
 25
25
-
 26
26
-
 27
27
-
 28
28
-
 29
29
-
 30
30
-
 31
31
-
 32
32
-
 33
33
-
 34
34


Nescafe Dolce Gusto GENIO 2 Manuel utilisateur
- Taper
- Manuel utilisateur
dans d''autres langues
- italiano: Nescafe Dolce Gusto GENIO 2 Manuale utente
- English: Nescafe Dolce Gusto GENIO 2 User manual
- português: Nescafe Dolce Gusto GENIO 2 Manual do usuário
Autres documents
-
Dolce Gusto Genio 2 Manuel utilisateur
-
Tefal PK400851 Manuel utilisateur
-
-
-
Krups KP500650 Manuel utilisateur
-
-
Krups Nescafe Dolce Gusto KP250950 Manuel utilisateur
-
-
Krups KP100950 Manuel utilisateur