Jenn-Air 30" (76.2 cm) Mode d'emploi
- Catégorie
- Cuisinières
- Taper
- Mode d'emploi

JENN-AIR
®
30" AND 36" (76.2 CM AND 91.4 CM)
TOUCH-ACTIVATED ELECTRONIC
INDUCTION COOKTOP
TABLE DE CUISSON PAR INDUCTION AVEC
COMMANDES ÉLECTRONIQUES TACTILES JENN-AIR
®
DE 30" ET 36" (76,2 CM ET 91,4 CM)
Use & Care Guide
For questions about features, operation/performance, parts, accessories, or service in the U.S.A., call:
1-800-JENNAIR (1-800-536-6247), or visit our website at www.jennair.com.
In Canada, call: 1-800-807-6777, or visit our website at www.jennair.ca.
Guide d’utilisation et d’entretien
Au Canada, pour assistance, installation ou service, composez le 1-800-807-6777 ou visitez notre site web à www.jennair.ca.
Table of Contents/Table des matières ................... 2
501961901382B
IMPORTANT: READ AND SAVE THESE INSTRUCTIONS.
FOR RESIDENTIAL USE ONLY.
IMPORTANT : LIRE ET CONSERVER CES INSTRUCTIONS.
POUR UTILISATION RÉSIDENTIELLE UNIQUEMENT.

2
TABLE OF CONTENTS
COOKTOP SAFETY........................................................................2
COOKTOP USE ..............................................................................4
Induction Cooking........................................................................5
Cooktop Controls.........................................................................5
Dual Size Surface Cooking Area..................................................7
Sensor Boil ...................................................................................7
Low Settings.................................................................................8
Simmer .........................................................................................8
Melt...............................................................................................8
Keep Warm...................................................................................8
Bridge ...........................................................................................8
Pan Detection...............................................................................9
Control Lock.................................................................................9
Performance Boost Function.......................................................9
Timer...........................................................................................10
Tones..........................................................................................10
Ceramic Glass............................................................................10
Cookware ...................................................................................10
COOKTOP CARE..........................................................................11
General Cleaning........................................................................11
TROUBLESHOOTING ..................................................................12
ASSISTANCE OR SERVICE.........................................................13
WARRANTY ..................................................................................14
TABLE DES MATIÈRES
SÉCURITÉ DE LA TABLE DE CUISSON ....................................15
UTILISATION DE LA TABLE DE CUISSON................................17
Cuisson par induction ................................................................18
Commandes de la table de cuisson ..........................................18
Surface de cuisson à dimension double....................................20
Ébullition avec capteur...............................................................20
Réglages de chaleur réduite ......................................................21
Mijotage......................................................................................21
Faire fondre ................................................................................21
Maintien au chaud......................................................................21
Liaison ........................................................................................22
Détection d'un plat.....................................................................22
Verrouillage des commandes.....................................................22
Fonction d'optimisation du rendement......................................22
Minuterie.....................................................................................23
Signaux sonores.........................................................................23
Vitrocéramique ...........................................................................23
Ustensiles de cuisson ................................................................24
ENTRETIEN DE LA TABLE DE CUISSON ..................................24
Nettoyage général ......................................................................24
DÉPANNAGE.................................................................................25
ASSISTANCE OU SERVICE.........................................................26
GARANTIE.....................................................................................27
COOKTOP SAFETY
You can be killed or seriously injured if you don't immediately
You
can be killed or seriously injured if you don't
follow
All safety messages will tell you what the potential hazard is, tell you how to reduce the chance of injury, and tell you what can
happen if the instructions are not followed.
Your safety and the safety of others are very important.
We have provided many important safety messages in this manual and on your appliance. Always read and obey all safety
messages.
This is the safety alert symbol.
This symbol alerts you to potential hazards that can kill or hurt you and others.
All safety messages will follow the safety alert symbol and either the word “DANGER” or “WARNING.”
These words mean:
follow instructions.
instructions.
DANGER
WARNING

3
This induction cooktop generates and uses ISM frequency energy that heats cookware by using an electromagnetic field. It has been
tested and complies with Part 18 of the FCC Rules for ISM equipment. This induction cooktop meets the FCC requirements to minimize
interference with other devices in residential installation.
This induction cooktop may cause interference with television or radio reception. If interference occurs, the user should try to correct
the interference by:
Relocating the receiving antenna of the radio or television.
Increasing the distance between the cooktop and the receiver.
Connecting the receiver into a different outlet.
It is the user’s responsibility to correct any interference.
NOTE: People with a pacemaker or similar medical device should use care when standing near this induction cooktop while it is on. The
electromagnetic field may affect the pacemaker or similar device. Consult your doctor, or the manufacturer of the pacemaker or similar
medical device for additional information about its effects with electromagnetic fields of the induction cooktop.
SAVE THESE INSTRUCTIONS
IMPORTANT SAFETY INSTRUCTIONS
WARNING: To reduce the risk of fire, electrical shock,
injury to persons, or damage when using the cooktop, follow
basic precautions, including the following:
■ CAUTION: Do not store items of interest to children in
cabinets above a cooktop – Children climbing on the
cooktop to reach items could be seriously injured.
■ Proper Installation – Be sure your cooktop is properly
installed and grounded by a qualified technician.
■ Never Use Your Cooktop for Warming or Heating the
Room.
■ Do Not Leave Children Alone – Children should not be left
alone or unattended in area where cooktop is in use. They
should never be allowed to sit or stand on any part of the
cooktop.
■ Wear Proper Apparel – Loose-fitting or hanging garments
should never be worn while using the cooktop.
■ User Servicing – Do not repair or replace any part of the
cooktop unless specifically recommended in the manual. All
other servicing should be referred to a qualified technician.
■ Storage on Cooktop – Flammable materials should not be
stored near surface units.
■ Do Not Use Water on Grease Fires – Smother fire or flame
or use dry chemical or foam-type extinguisher.
■ Use Only Dry Potholders – Moist or damp potholders on
hot surfaces may result in burns from steam. Do not let
potholder touch hot heating elements. Do not use a towel
or other bulky cloth.
■ DO NOT TOUCH SURFACE UNITS OR AREAS NEAR
UNITS – Surface units may be hot even though they are
dark in color. Areas near surface units may become hot
enough to cause burns. During and after use, do not touch,
or let clothing or other flammable materials contact surface
units or areas near units until they have had sufficient time
to cool. Among those areas are the cooktop and surfaces
facing the cooktop.
■ Use Proper Pan Size – This cooktop is equipped with one
or more surface units of different size. Select utensils
having flat bottoms large enough to cover the surface unit
heating element. The use of undersized utensils will
expose a portion of the heating element to direct contact
and may result in ignition of clothing. Proper relationship of
utensil to burner will also improve efficiency.
■ Never Leave Surface Units Unattended at High Heat
Settings – Boilover causes smoking and greasy spillovers
that may ignite.
■ Glazed Cooking Utensils – Only certain types of glass,
glass/ceramic, ceramic, earthenware, or other glazed
utensils are suitable for cooktop service without breaking
due to the sudden change in temperature.
■ Utensil Handles Should Be Turned Inward and Not Extend
Over Adjacent Surface Units – To reduce the risk of burns,
ignition of flammable materials, and spillage due to
unintentional contact with the utensil, the handle of a
utensil should be positioned so that it is turned inward, and
does not extend over adjacent surface units.
■ Do Not Cook on Broken Cooktop – If cooktop should
break, cleaning solutions and spillovers may penetrate the
broken cooktop and create a risk of electric shock. Contact
a qualified technician immediately.
■ Clean Cooktop With Caution – If a wet sponge or cloth is
used to wipe spills on a hot cooking area, be careful to
avoid steam burn. Some cleaners can produce noxious
fumes if applied to a hot surface.
For units with ventilating hood –
■ Clean Ventilating Hoods Frequently – Grease should not
be allowed to accumulate on hood or filter.
■ When flaming foods under the hood, turn the fan on.
For units with coil elements –
■ Make Sure Reflector Pans or Drip Bowls Are in
Place – Absence of these pans or bowls during
cooking may subject wiring or components
underneath to damage.
■ Protective Liners – Do not use aluminum foil to line surface
unit drip bowls, except as suggested in the manual.
Improper installation of these liners may result in a risk of
electric shock, or fire.
■ Do Not Soak Removable Heating Elements - Heating
elements should never be immersed in water.

4
COOKTOP USE
This manual covers different models. The cooktop you have purchased may have some or all of the features listed.
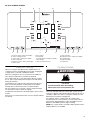
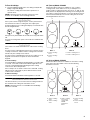
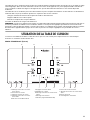
30" (76.2 cm) Model JIC4430X
A. Left rear surface cooking area display
B. Surface cooking area off
C. Heat level display
D. Right rear surface cooking area display
E. Power on/off
F. Low settings
G. Sensor Boil
H. Left front surface cooking area display
I. Timer display
J. Timer (increase/decrease)
K. Heat level slider
L. Right front surface cooking area display
M. Left side bridge
N. Control lock
D
C
A
B
N
M
K
J
IGFE
H
L

5
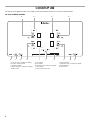
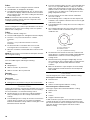
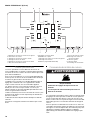
36" (91.4 cm) Model JIC4536X
Induction Cooking
Induction cooking is quite different from traditional forms of
cooking. The heat is generated directly in the pan, keeping the
cooking surface cooler than a traditional element.
Induction cooking does not lose as much heat as traditional
forms because all the heat is created in the pan itself.
The cooktop heats up or cools down quickly after the controls
are set. It also stops heating when the pan is removed without
turning off the power.
Food spilled on the cooktop surface will not burn because the
glass is not heated. Induction cooking allows for immediate
cleaning after use because the heat is created in the pan.
Pan size, material (see “Cookware” section), and positioning is
very important to achieve maximum wattage.
The diameter of the pan’s base should be equal to the size of the
element.
If the pan is too small, the burner does not sense the pan and will
not activate.
Cooktop Controls
The touch-activated electronic controls offer a variety of heat
settings for optimal cooking results. When melting foods such as
chocolate or butter, the surface cooking area can be set to the
Melt function for minimal cooking power.
For maximum surface cooking power, all cooktop touch-
activated electronic controls can be set to Performance Boost
function when bringing liquids to a fast and rapid boil. Touch
BOOST to immediately reach the highest setting.
NOTE: This cooktop will also work with a 208V operation where
240V installation is not available.
A. Left rear surface cooking area display
B. Surface cooking area off
C. Center surface cooking area display
D. Heat level display
E. Right rear surface cooking area display
F. Power on/off
G. Low settings
H. Sensor Boil
I. Left front surface cooking area display
J. Timer display
K. Timer (increase/decrease)
L. Heat level slider
M. Right front surface cooking area display
N. Left side bridge
O. Right side bridge
P. Control lock
A
B
D
E
PONML
K
JIHGF
C
WARNING
Fire Hazard
Turn off all controls when done cooking.
Failure to do so can result in death or fire.

6
First use or after a power failure:
After connecting the cooktop to an electrical power supply or
after a power failure, the control panel will be locked. An indicator
light above the key icon will be on. To unlock the control panel,
press and hold CONTROL LOCK for 3 seconds. The indicator
light will turn off, and the cooktop is ready for use.
To Use
To Turn On the Cooktop:
1. Press POWER.
The indicator light above the Power keypad and a dash (“-”)
in each surface cooking area will light to indicate that each
surface cooking area is ready to be activated.
Inactivity for 1 minute after the main power has been turned
on will automatically turn off the power to the cooktop.
If a cooking function or the power slider are touched without
first selecting a surface cooking area, all dashes (one for each
zone) will flash and an invalid tone will sound 3 times.
To Turn On a Surface Cooking Area:
1. Touch directly on the display area for the surface cooking
area you want to use.
The current power level and indicator light will flash for
10 seconds then remain on.
Touching any other feature or the power slider stops the
flashing and information for the keypad that was touched will
be displayed.
When a surface cooking area is selected, the timer will also
turn on to show that it can now be set.
When a surface cooking area is left at the “0” power level for
1 minute, the surface cooking area will automatically turn off
and display only the middle dash without the indicator light.
2. Select a heat setting from 1 - 9 by touching/sliding on the
power slider. The heat setting will appear in the surface
cooking area display.
The power slider consists of 9 positions plus a “Boost”
position. When the user slides to 0, “0” will be displayed. The
surface cooking area will not turn on but remains active/
selected.
When a surface cooking area is left at the “0” power level for
1 minute, the zone will automatically turn off and display only
the middle dash without the indicator light.
Use the following chart as a guide when setting heat levels.
To Tur n Off:
1. Touch ON/OFF to turn off desired surface cooking area,
1 tone will sound when Off is pressed.
2. Touch POWER to turn off the cooktop when finished.
Hot Surface Indicator
An “H” will appear in the heat setting display as long as any
surface cooking area is too hot to touch, even after the surface
cooking area(s) is turned off.
Dual Size Surface Cooking Area
(on some models)
The dual size surface cooking area offers flexibility to cook using
different sizes of cookware. Single size can be used in the same
way as a regular surface cooking area. The dual size combines
inner and outer surface cooking areas and is recommended for
larger cookware, large quantities of food, and home canning.
The dual size surface cooking area contains two cooking areas.
If the size of the pan is the same as the single size surface
cooking area, the cooking area will work as a single size cooking
area.
If the pan is slightly larger than the single size cooking area, it
may activate only part of the dual size cooking area. This will
result in the burner being less efficient and will increase the
heating time.
If the size of the pan is the same as the dual size surface cooking
area, the dual size cooking area will activate automatically.
SETTING RECOMMENDED USE
9 - Boost
■ Bring liquid to a boil.
9
■ Start food cooking.
7 - 8
■ Quickly brown or sear food.
6 - 7 ■ Hold a rapid boil.
5 - 6
■ Fry or saute foods.
■ Cook soups, sauces and
gravies.
4 - 5
■ Maintain a slow boil.
■ Stew or steam food.
3 - 5 ■ Range of simmer levels for
simmering with or without a lid.
Melt
■ Melt chocolate or butter.
Simmer
■ Simmer sauces.
Keep Warm ■ Keep cooked foods warm.
Dual surface cooking
area
■ Home canning.
■ Large-diameter cookware.
■ Large quantities of food.
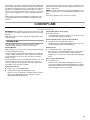
A. Heat setting display
B. Hot surface indicator “H”
A. Single size
B. Dual size
SETTING RECOMMENDED USE
A
B
A
B

7
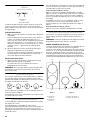
Sensor Boil
The Sensor Boil function automatically selects the ideal power
level to boil water and has an audible beep when boiling is
reached. Sensor Boil is available only on one surface cooking
area. See the following illustrations for which surface cooking
area has Sensor Boil for your cooktop.
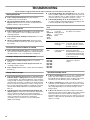
30” (76.2 cm) Model JIC4430X
36” (91.4 cm) Model JIC4536X
When using Sensor Boil:
■ Use only water at room temperature.
■ Do not add salt or any other ingredients to water until boiling
is reached.
■ Do not use a lid on a pot while using the Sensor Boil function.
■ Do not use the Sensor Boil function if the surface cooking
area is hot. “H” will appear in the display when the surface
cooking area is hot.
■ Do not change the power level or move the pot.
■ Fill the pot at least one-third of the way full with at least
4 cups (946 mL) of water but not up to the brim. Do not use
Sensor Boil with more than approximately 5 qt (5 L) for
36" (91.4 cm) models, or 7 qt (7 L) for 30" (76.2 cm) models.
■ For best results, use pots with a diameter between
9½" (24 cm) and 11" (28 cm) for 30" (76.2 cm) models. Use
pots with a diameter between 6½" (17 cm) and 7½" (19 cm)
for 36" (91.4 cm) models.
■ Do not use pressure cookers.
■ The quality of the cookware being used may affect the
performance of the Sensor Boil function.
To Use:
To Tur n On:
1. Check that the surface cooking area with available Sensor
Boil has been selected.
2. Put the pot on the selected surface cooking area for sensor
boiling.
3. Touch SENSOR BOIL. “A” will appear in the display, and the
indicator light next to Sensor Boil will light.
When the boiling point is reached, the cooktop will beep
3 times at regular intervals. After the second set of beeps, a
minute counter will start counting the boiling time
automatically. After the third set of beeps, the cooktop will
automatically switch to a lower power level suitable to
maintain the boil.
To Tur n Off:
Sensor Boil can be turned off in 3 different ways:
1. Use the power slider to set to a heat level.
OR
2. Touch the surface cooking area OFF keypad.
OR
3. Select a different cooking function.
NOTE: The cooktop manages the Sensor Boil and Performance
Boost functions automatically. In some cases, it may not be able
to use the Sensor Boil and Performance Boost functions
simultaneously.
Low Settings
The Low Settings function can be used with all surface cooking
areas. Low Settings can be used on more than 1 surface cooking
area at a time.
The Low Settings function allows you to select the Simmer, Melt
or Keep Warm functions for a specific surface cooking area.
To Use
To Tur n On:
1. Check that a surface cooking area has been selected.
2. Touch LOW SETTINGS. “A” will appear in the display for the
surface cooking area selected.
3. Press LOW SETTINGS until an indicator light next to the
desired function is lit.
The timer remains visible and can be set if desired.
To Tur n Off:
Low Settings can be turned off in 3 different ways:
1. Use the power slider to set to a heat level.
OR
2. Touch the surface cooking area OFF keypad.
OR
3. Select a different cooking function.
A. Surface cooking area with available Sensor Boil
A. Surface cooking area with available Sensor Boil
A
A

8
Simmer
The Simmer function can be used with all surface cooking areas.
Simmer can be used on more than 1 surface cooking area at a
time.
To Use:
To Tur n On:
1. Check that a surface cooking area has been selected.
2. Touch SIMMER. “A” will appear in the display, and the
indicator light next to Simmer will light.
The timer remains visible and can be set if desired.
To Tur n Off:
Simmer can be turned off in 3 different ways:
1. Use the power slider to set to a heat level.
OR
2. Touch the surface cooking area OFF keypad.
OR
3. Select a different cooking function.
Melt
The Melt + Hold function can be used with all surface cooking
areas. Melt + Hold can be used on more than 1 surface cooking
area at a time.
To Use
To Tur n On:
1. Check that a surface cooking area has been selected.
2. Touch MELT + HOLD. “A” will appear in the display, and the
indicator light next to Melt + Hold will light.
The timer remains visible and can be set if desired.
To Tur n Off:
Melt + Hold can be turned off in 3 different ways:
1. Use the power slider to set to a heat level.
OR
2. Touch the surface cooking area OFF keypad.
OR
3. Select a different cooking function.
Keep Warm
The Keep Warm function can be used with all surface cooking
areas. Keep Warm can be used on more than 1 surface cooking
area at a time. Keep warm is not recommended for heating cold
foods.
To Use
To Tur n On:
1. Check that a surface cooking area has been selected.
2. Touch KEEP WARM. “A” will appear in the display, and the
indicator light next to Keep Warm will light.
The timer remains visible and can be set if desired.
To Tur n Off:
Keep Warm can be turned off in 3 different ways:
1. Use the power slider to set to a heat level.
OR
2. Touch the surface cooking area OFF keypad.
OR
3. Select a different cooking function.
Bridge
(on some models)
The Bridge function can be activated when surface cooking areas
are on or when they are off. The Bridge function allows you to use
2 cooking zones as an extra-large cooking zone.
To Turn On a Bridge:
1. Touch the desired Bridge keypad (left side bridge or right side
bridge).
The indicator light above the Bridge keypad will light. The
heat setting levels for the 2 surface cooking areas will default
to “0” and can be set from a minimum of “1” to a maximum of
“9.” Any timers that may be running for the 2 surface cooking
areas will turn off, and 2 dashes “--” will appear in the timer
display.
2. Slide a finger on the Heat Level Slider to change the power
level up or down.
The selected heat level will show in the heat level display for
each surface cooking area using the bridge.
A. Left side bridge
B. Right side bridge
WARNING
Food Poisoning Hazard
Do not let food sit for more than one hour before or
after cooking.
Doing so can result in food poisoning or sickness.
A
B

9
To Turn Off a Bridge:
1. Touch the Bridge keypad for the zone being used (left side
bridge or right side bridge).
The surface cooking areas will resume operation as 2
separate areas.
NOTE: Performance Boost cannot be used on the same
elements in combination when the Bridge function.
Pan Detection
If the system cannot recognize the pan, or if the pan has been
removed from the surface cooking area, the “replace pan”
animation appears in the cooking area display as a reminder. See
the following illustration.
If the pan is not placed within 30 seconds, the zone(s) will switch
Off.
If a Timer is running when a pan is removed, the countdown will
continue.
Control Lock
The Control Lock avoids unintended use of the surface cooking
areas.
If Control Lock is activated when power to the cooktop is off, the
cooktop is locked out, and the surface cooking areas cannot be
turned on by the cooktop touch controls.
If Control Lock is activated when power to the cooktop is on, all
keypads are locked out except for the Power and On/Off
keypads.
To Lock Cooktop:
Touch and hold the CONTROL LOCK keypad for 3 seconds. After
3 seconds, a tone will sound and the indicator light above the
Control Lock keypad will light, indicating that the cooktop
controls are in the lockout position.
If the cooktop is in use when Control Lock is activated, cooking
will proceed as normal and any timers that have been set will
continue their countdown.
To Unlock Cooktop:
Touch and hold the CONTROL LOCK keypad for 3 seconds.
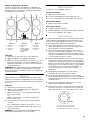
Performance Boost Function
This function allows you to increase the heat setting level above
the maximum heat setting 9 for 10 minutes or less.
NOTE: Performance Boost is not available when the Bridge
function is activated.
30” (76.2 cm) Model JIC4430X
Performance Boost function is available on only 1 surface
cooking area at a time within a zone. If you attempt to use
another surface cooking area in the same zone, “P” and “9” will
briefly flash in the display before returning to heat setting level 9.
The surface cooking area that was set to the Performance boost
function will automatically reset to heat setting level 9. See the
following illustrations for zones.
36” (91.4 cm) Model JIC4536X
Performance Boost function is available on all surface cooking
areas at the same time within a zone. See the following
illustrations for zones.
Zone 1 Zone 2
A. Surface cooking
area 1
B. Surface cooking
area 2
C. Surface cooking area 3
D. Surface cooking area 4
Zone 1 Zone 2 Zone 3
A. Surface cooking
area 1
B. Surface cooking
area 2
C. Surface cooking
area 3, dual
element with
5000W
performance
boost
D. Surface cooking
area 4
E. Surface cooking
area 5
A
D
B
C
C
A
B
D
E

10
To Use:
1. Check that a surface cooking area has been selected.
2. Touch BOOST. “P” will appear in the display.
3. Touch BOOST keypad when finished. The “P” will no longer
be visible in the display, and the Performance boost function
will no longer be active. The surface cooking area turns back
to heat setting level 9.
NOTE: The Performance boost function may automatically
deactivate to keep the internal electronic components of the
cooktop from becoming too hot.
Timer
Use the cooking timer to set times up to 90 minutes. The timer is
independent of any other control settings. There is a separate
timer for each cooking zone.
To Use:
1. Select the desired cooking zone.
2. Touch the TIME keypad. “01” will appear in the timer display.
3. Touch the “>” key to increase the time in 1-minute
increments.
or
Touch the “<” key to decrease the time in 1-minute
increments.
4. The timer will start to count down after a few seconds.
To change the time, touch the time “>” or “<” keypads.
5. When the countdown is finished,”00” flashes and a tone will
sound.
NOTE: When the power is restored after an interruption, the timer
will no longer be running.
Tones
Tones are audible signals, indicating the following:
One tone
■ Valid pad press
■ Slider is moved to “0” power level
■ Slider is moved to “Boost” power level
Two tones
■ Invalid pad press
Three tones
■ End of Timer cycle
■ Boiling point is reached when using the Sensor Boil feature
Ceramic Glass
Cleaning off the induction cooktop before and after each use will
help keep it free from stains and provide the most even heating.
For more information, see “General Cleaning” section.
■ Avoid storing jars or cans above the cooktop. Dropping a
heavy or hard object onto the cooktop could crack the
cooktop.
■ To avoid damage to the cooktop, do not leave a hot lid on the
cooktop. As the cooktop cools, air can become trapped
between the lid and the cooktop, and the ceramic glass could
break when the lid is removed.
■ For foods containing sugar in any form, clean up all spills and
soils as soon as possible. Allow the cooktop to cool down
slightly. Then, while wearing oven mitts, remove the spills
while the surface is still warm. If sugary spills are allowed to
cool down, they can adhere to the cooktop and can cause
pitting and permanent marks.
■ To avoid scratches, do not slide cookware or bakeware
across the cooktop.
■ To avoid damage to the cooktop, do not allow objects that
could melt, such as plastic or aluminum foil, to touch any part
of the entire cooktop.
■ To avoid damage to the cooktop, do not use the cooktop as a
cutting board.
■ Use cookware about the same size as the surface cooking
area. Cookware should not extend more than ½" (1.3 cm)
outside the area.
■ Use flat-bottomed cookware for best heat conduction and
energy efficiency. Cookware with rounded, warped, ribbed or
dented bottoms could cause uneven heating and poor
cooking results.
■ Determine flatness by placing the straight edge of a ruler
across the bottom of the cookware. While you rotate the ruler,
no space or light should be visible between it and the
cookware.
■ Make sure the bottoms of pots and pans are clean and dry
before using them. Residue and water can leave deposits
when heated.
Cookware
Only ferromagnetic pans can be used for induction cooking.
Ferromagnetic materials include:
■ Enameled steel
■ Cast iron
■ Stainless steel designed for induction cooking
Non-ferromagnetic materials include:
These types of pans will not work with induction cooking.
■ Stainless steel
■ Glass
■ Ceramic
■ Copper or aluminum pans
To find out whether your pans can be used with an induction
cooktop, flip the pan over, hold a magnet to the bottom of the
pan, and see whether it sticks. If the magnet sticks to the bottom
of the pan, the pan is ferromagnetic and can be used for
induction cooking.
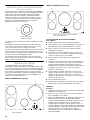
A. Surface cooking area
B. Cookware/canner
C. ½" (1.3 cm) Maximum overhang
A
B
C

11
The number on the surface cooking area heat setting display will
flash if no pan is placed on the surface cooking area, or the pan is
not made of the right material, or it is not the right size. It will stop
flashing once a suitable pan is placed on the surface cooking
area. If you take longer than 90 seconds to place the correct pan
on the surface cooking area, the surface cooking area will turn
off.
Ideal cookware should have a flat bottom, straight sides and a
well-fitting lid, and the material should be of medium-to-heavy
thickness.
Choose the correct pan size for each surface cooking area. The
diameter of the pan’s base should correspond to the size of the
surface cooking area.
NOTE: Cookware manufacturers often give the diameter across
the top of the pan. This is usually larger than the diameter of the
base.
Pans with rough finishes may scratch the cooktop.
COOKTOP CARE
General Cleaning
IMPORTANT: Before cleaning, make sure all controls are off and
the cooktop is cool. Always follow label instructions on cleaning
products.
Soap, water and a soft cloth or sponge are suggested first unless
otherwise noted.
CERAMIC GLASS
To avoid damage, do not use steel wool, abrasive powder
cleansers, chlorine bleach, rust remover or ammonia.
Cleaning Method:
Always wipe with a clean, wet cloth or sponge and dry thoroughly
to avoid streaking and staining.
Cooktop Cleaner is recommended for regular use to help avoid
scratches, pitting and abrasions, and to condition the cooktop. It
may be ordered as an accessory. See “Assistance or Service”
section to order.
A Cooktop Scraper is also recommended for stubborn soils, and
can be ordered as an accessory. See “Assistance or Service”
section to order. The Cooktop Scraper uses razor blades. Store
razor blades out of the reach of children.
Light to moderate soil
■ Paper towels or clean damp sponge.
■ Cooktop Cleaner and clean damp paper towel:
Clean as soon as cooktop has cooled down. Rub creme into
surface with a damp paper towel or soft cloth. Continue
rubbing until white film disappears.
Sugary spills (jellies, candy, syrup)
■ Cooktop Scraper:
Clean while the cooktop is still warm. You may want to wear
oven mitts while cleaning the cooktop.
Heavy soil, dark streaks, specks and discoloration
■ Cooktop Cleaner or nonabrasive cleanser:
Rub product into soil with a damp paper towel or soft cloth.
Continue rubbing until white film disappears.
Burned-on soil
■ Cooktop Cleaner and Cooktop Scraper:
Rub creme into soil with damp paper towel. Hold scraper as
flat as possible on surface and then scrape. Repeat for
stubborn spots. Polish entire cooktop with creme and paper
towel.
Tiny scratches and abrasions
■ Cooktop Cleaner:
Rub creme into surface with a damp paper towel or soft
cloth. Continue rubbing until white film disappears. Scratches
and abrasions do not affect cooking performance and after
many cleanings become less noticeable.

12
TROUBLESHOOTING
Try the solutions suggested here first in order to avoid the cost of an unnecessary service call.
Nothing will operate
■ Is the cooktop wired properly? See the Installation
Instructions for more information.
■ Has a household fuse blown, or has a circuit breaker
tripped? Replace the fuse or reset the circuit breaker. If the
problem continues, call an electrician.
Cooktop will not operate
■ Is the cooktop control set correctly? Touch the display area
on the control panel to select a cooking surface before
selecting a function.
■ Is the “Control Lock” Cooktop Lockout set? See “Control
Lock” section.
■ Has the cooktop turned off by itself? The power off key
was unintentionally touched. Press power key again. Reset
the cooktop.
Excessive heat around cookware on cooktop
■ Is the cookware the proper size? Use cookware about the
same size as the surface cooking area. Cookware should not
extend more than ½" (1.3 cm) outside the cooking area.
Cooktop cooking results not what expected
■ Is the proper cookware being used? See “Cookware”
section.
■ Is the cooktop control set to the proper heat level? See
“Cooktop Controls” section.
■ Is the cooktop level? Level the cooktop. See the Installation
Instructions.
Display shows messages
■ Is the display flashing when you place a saucepan on an
induction surface cooking area? Check that the saucepan
is electromagnetic. Check that the diameter of the saucepan
is large enough. Center the saucepan on the surface cooking
area. Allow the saucepan to cool down in the event that it has
become hot when used. Switch the surface cooking area off,
then on again. If the display still does not light up, turn power
off at the circuit breaker. Wait 20 seconds and turn power
back on.
■ Is the Performance boost function display flashing and
switching off? The Performance boost function operates the
surface cooking area with the most power. During long
cooking times, it is possible that the function will switch the
surface cooking area off to keep the cooktop from
overheating. You can continue to use the cooktop if the
display is not flashing.
■ Is the display flashing “Er” and numbers? If an “Er” and a
series of numbers appear in the display panel, turn power off
at the circuit breaker. Turn on again. If problem continues, call
customer service. See “Assistance or Service” section.
■ Is the display flashing “F” or “C” and numbers? If “F” or
“C” and a number are alternately flashing on the display, refer
to the following table for possible solutions.
Operational cooktop sounds
■ Is there a low humming? This occurs when cooking at high
power. The cause of this is the amount of energy that is
transmitted from the appliance to the cookware. This sound
will quiet or go away when the power is turned down.
■ Is there a crackling? This sound occurs when cookware is
used that consists of different materials. The noise is caused
by vibrations in the joint faces between the different layers. It
may change depending on the amount and type of food
being cooked.
■ Is there a fan noise? The electronics require a controlled
temperature in order to function reliably. The cooktop is fitted
with a fan that runs at various speeds according to the
temperature detected. The fan may also continue to run even
after the cooktop has been switched off, if the temperature it
detects is too high.
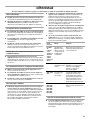
Error
Code
Error Solution
Cooktop
has
turned off
and is
beeping
every
10 sec.
An object, liquids
or soils are
putting pressure
on the control
panel.
Thoroughly wipe or remove
any object on touch keys.
F42, F43 The power
voltage is too low
or too high.
Turn off the cooktop. Wait
5 seconds, then turn it back
on. If this continues, contact a
qualified electrician.
C81, C82,
C83
The surface
cooking area has
overheated.
The surface cooking area
automatic shutoff was
activated. Wait 5 minutes for it
to cool down, then turn it back
on. Turn off oven if it is running
a self cleaning cycle.
F12, F21,
F25, F36,
F37, F40,
F47, F56,
F58, 560,
F61, F62,
F63, F64
Call customer service. See the
“Assistance or Service”
section.

13
ASSISTANCE OR SERVICE
Before calling for assistance or service, please check
“Troubleshooting.” It may save you the cost of a service call. If
you still need help, follow the instructions below.
When calling, please know the purchase date and the complete
model and serial number of your appliance. This information will
help us to better respond to your request.
In the U.S.A.
If the problem is not due to one of the items listed in the
“Troubleshooting” section…
Call the dealer from whom your appliance was purchased, or call
Jenn-Air at 1-800-JENNAIR (1-800-536-6247) to locate an
authorized service company. When calling, please know the
purchase date and the complete model and serial number of your
appliance. Be sure to retain proof of purchase to verify warranty
status.
If the dealer or service company cannot resolve your problem,
write to:
Jenn-Air Brand Home Appliances
Customer eXperience Center
553 Benson Road
Benton Harbor, MI 49022-2692
Web address: www.jennair.com
Or call: 1-800-JENNAIR (1-800-536-6247)
U.S. customers using TTY for deaf, hearing impaired or speech
impaired, call: 1-800-688-2080.
NOTE: When writing or calling about a service problem, please
include the following information:
1. Your name, address and daytime telephone number.
2. Appliance model number and serial number.
3. Name and address of your dealer or servicer.
4. A clear description of the problem you are having.
5. Proof of purchase (sales receipt).
User’s guides, service manuals and parts information are
available from Jenn-Air Brand Home Appliances, Customer
eXperience Center.
Accessories
Cooktop Bracket Adhesive Kit
(for marble countertop installations only)
Order Part Number W10310006
Cooktop Cleaner
(ceramic glass models)
Order Part Number 31464
Cooktop Protectant
(ceramic glass models)
Order Part Number 31463
Cooktop Scraper
(ceramic glass models)
Order Part Number WA906B
All-Purpose Appliance Cleaner
Order Part Number 31662
In Canada
If the problem is not due to one of the items listed in the
“Troubleshooting” section…
Call the dealer from whom your appliance was purchased, or call
Jenn-Air at 1-800-807-6777 to locate an authorized service
company. When calling, please know the purchase date and the
complete model and serial number of your appliance. Be sure to
retain proof of purchase to verify warranty status.
If the dealer or service company cannot resolve your problem,
write to:
Jenn-Air Brand Home Appliances
Customer eXperience Centre
200 - 6750 Century Ave.
Mississauga, ON L5N 0B7
Web address: www.jennair.ca
Or call: 1-800-807-6777.
NOTE: When writing or calling about a service problem, please
include the following information:
1. Your name, address and daytime telephone number.
2. Appliance model number and serial number.
3. Name and address of your dealer or servicer.
4. A clear description of the problem you are having.
5. Proof of purchase (sales receipt).
User’s guides, service manuals and parts information are
available from Jenn-Air Brand Home Appliances, Customer
eXperience Centre.

14
JENN-AIR
®
COOKING APPLIANCE WARRANTY
LIMITED WARRANTY
For one year from the date of purchase, when this major appliance is operated and maintained according to instructions attached to or
furnished with the product, Jenn-Air brand of Whirlpool Corporation or Whirlpool Canada LP (hereafter “Jenn-Air”) will pay for factory
specified parts and repair labor to correct defects in materials or workmanship. Service must be provided by a Jenn-Air designated
service company. This limited warranty is valid only in the United States or Canada and applies only when the major appliance is used
in the country in which it was purchased. Outside the 50 United States and Canada, this limited warranty does not apply. Proof of
original purchase date is required to obtain service under this limited warranty.
SECOND THROUGH FIFTH YEAR LIMITED WARRANTY ON CERTAIN COMPONENT PARTS
In the second through fifth years from the date of purchase, when this appliance is operated and maintained according to instructions
attached to or furnished with the product, Jenn-Air will pay for factory specified parts for the following components (if applicable to the
product) if defective in materials or workmanship:
ITEMS EXCLUDED FROM WARRANTY
This limited warranty does not cover:
1. Service calls to correct the installation of your major appliance, to instruct you on how to use your major appliance, to replace or
repair house fuses, or to correct house wiring or plumbing.
2. Service calls to repair or replace appliance light bulbs, air filters or water filters. Consumable parts are excluded from warranty
coverage.
3. Repairs when your major appliance is used for other than normal, single-family household use or when it is used in a manner that is
contrary to published user or operator instructions and/or installation instructions.
4. Damage resulting from accident, alteration, misuse, abuse, fire, flood, acts of God, improper installation, installation not in
accordance with electrical or plumbing codes, or use of consumables or cleaning products not approved by Jenn-Air.
5. Cosmetic damage, including scratches, dents, chips or other damage to the finish of your major appliance, unless such damage
results from defects in materials or workmanship and is reported to Jenn-Air within 30 days from the date of purchase.
6. Any food loss due to refrigerator or freezer product failures.
7. Costs associated with the removal from your home of your major appliance for repairs. This major appliance is designed to be
repaired in the home and only in-home service is covered by this warranty.
8. Repairs to parts or systems resulting from unauthorized modifications made to the appliance.
9. Expenses for travel and transportation for product service if your major appliance is located in a remote area where service by an
authorized Jenn-Air servicer is not available.
10. The removal and reinstallation of your major appliance if it is installed in an inaccessible location or is not installed in accordance
with published installation instructions.
11. Major appliances with original model/serial numbers that have been removed, altered or cannot be easily determined. This warranty
is void if the factory applied serial number has been altered or removed from your major appliance.
The cost of repair or replacement under these excluded circumstances shall be borne by the customer.
DISCLAIMER OF IMPLIED WARRANTIES; LIMITATION OF REMEDIES
CUSTOMER'S SOLE AND EXCLUSIVE REMEDY UNDER THIS LIMITED WARRANTY SHALL BE PRODUCT REPAIR AS PROVIDED
HEREIN. IMPLIED WARRANTIES, INCLUDING WARRANTIES OF MERCHANTABILITY OR FITNESS FOR A PARTICULAR PURPOSE,
ARE LIMITED TO ONE YEAR OR THE SHORTEST PERIOD ALLOWED BY LAW. JENN-AIR SHALL NOT BE LIABLE FOR INCIDENTAL
OR CONSEQUENTIAL DAMAGES. SOME STATES AND PROVINCES DO NOT ALLOW THE EXCLUSION OR LIMITATION OF
INCIDENTAL OR CONSEQUENTIAL DAMAGES, OR LIMITATIONS ON THE DURATION OF IMPLIED WARRANTIES OF
MERCHANTABILITY OR FITNESS, SO THESE EXCLUSIONS OR LIMITATIONS MAY NOT APPLY TO YOU. THIS WARRANTY GIVES
YOU SPECIFIC LEGAL RIGHTS, AND YOU MAY ALSO HAVE OTHER RIGHTS WHICH VARY FROM STATE TO STATE OR PROVINCE
TO PROVINCE.
If outside the 50 United States and Canada, contact your authorized Jenn-Air dealer to determine if another warranty applies.
If you need service, first see the “Troubleshooting” section of the Use & Care Guide. After checking “Troubleshooting,” you may find
additional help by checking the “Assistance or Service” section or by calling Jenn-Air. In the U.S.A., call 1-800-536-6247. In Canada,
call 1-800-807-6777. 6/09
Keep this book and your sales slip together for future
reference. You must provide proof of purchase or installation
date for in-warranty service.
Write down the following information about your major appliance
to better help you obtain assistance or service if you ever need it.
You will need to know your complete model number and serial
number. You can find this information on the model and serial
number label located on the product.
Dealer name____________________________________________________
Address ________________________________________________________
Phone number__________________________________________________
Model number __________________________________________________
Serial number __________________________________________________
Purchase date __________________________________________________
■ Electric element
■ Touch Pad and microprocessor
■ Glass ceramic cooktop: if due to thermal breakage
■ Electronic controls
■ Magnetron tube
■ Sealed gas burners

15
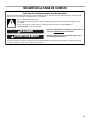
SÉCURITÉ DE LA TABLE DE CUISSON
Risque possible de décès ou de blessure grave si vous ne
suivez pas immédiatement les instructions.
Risque possible de décès ou de blessure grave si vous
ne suivez pas les instructions.
Tous les messages de sécurité vous diront quel est le danger potentiel et vous disent comment réduire le risque de blessure et
ce qui peut se produire en cas de non-respect des instructions.
Votre sécurité et celle des autres est très importante.
Nous donnons de nombreux messages de sécurité importants dans ce manuel et sur votre appareil ménager. Assurez-vous de
toujours lire tous les messages de sécurité et de vous y conformer.
AVERTISSEMENT
DANGER
Voici le symbole d’alerte de sécurité.
Ce symbole d’alerte de sécurité vous signale les dangers potentiels de décès et de blessures graves à vous
et à d’autres.
Tous les messages de sécurité suivront le symbole d’alerte de sécurité et le mot “DANGER” ou
“AVERTISSEMENT”. Ces mots signifient :

16
IMPORTANTES INSTRUCTIONS DE SÉCURITÉ
CONSERVEZ CES INSTRUCTIONS
AVERTISSEMENT : Pour réduire le risque d'incendie, de
choc électrique, de blessures ou de dommages lors de
l'utilisation de la table de cuisson, observer les précautions
élémentaires suivantes, y compris ce qui suit :
■ MISE EN GARDE : Ne pas remiser dans les armoires
au-dessus d'une table de cuisson, des articles que des
enfants pourraient vouloir atteindre. Les enfants pourraient
se brûler ou se blesser en grimpant sur la table de cuisson.
■ Installation appropriée – S’assurer que la table de cuisson
est correctement installée et reliée à la terre par un
technicien qualifié.
■ Ne jamais utiliser la table de cuisson pour réchauffer ou
chauffer la pièce.
■ Ne pas laisser les enfants seuls – Les enfants ne doivent
pas être laissés seuls ou sans surveillance dans la pièce
où la table de cuisson est en service. Ne jamais laisser les
enfants s’asseoir ou se tenir sur une partie quelconque de
la table de cuisson.
■ Porter des vêtements appropriés – Des vêtements amples
ou détachés ne doivent jamais être portés pendant
l’utilisation de la table de cuisson.
■ Entretien par l’utilisateur – Ne pas réparer ou remplacer
toute pièce de la table de cuisson si ce n’est pas
spécifiquement recommandé dans le manuel. Toute autre
opération d’entretien ou de réparation doit être confiée à un
technicien qualifié.
■ Remisage sur la table de cuisson – Des matériaux
inflammables ne doivent pas être remisés près des
éléments à la surface.
■ Ne pas utiliser d’eau sur un feu de graisse – Étouffer le feu
ou la flamme ou utiliser un extincteur à produits chimiques
secs ou à mousse.
■ N’utiliser que des mitaines de four sèches – Des mitaines
de four mouillées ou humides sur des surfaces chaudes
peuvent provoquer des brûlures provenant de la vapeur.
Ne pas laisser les mitaines de four toucher les éléments
chauffants. Ne pas utiliser une serviette ou autre tissu
épais.
■ NE PAS TOUCHER LES ÉLÉMENTS À LA SURFACE OU
L’ESPACE PRÈS DES ÉLÉMENTS – Les éléments de
surface peuvent être chauds même lorsqu’ils ont une teinte
foncée. Les endroits près des éléments à la surface
peuvent devenir assez chauds pour provoquer des
brûlures. Pendant et après l’utilisation, ne pas toucher les
éléments chauffants et ne pas laisser les vêtements ou
autres matériaux inflammables entrer en contact avec ces
éléments de surface ou les endroits près des éléments,
avant qu’ils soient suffisamment refroidis. Ces endroits
comprennent la table de cuisson et les surfaces près de la
table de la cuisson.
■ Utiliser des ustensiles de format approprié – La table de
cuisson est munie d’un ou de plusieurs éléments
chauffants de différentes grandeurs. Choisir les ustensiles
qui ont un fond plat assez grand pour couvrir l’élément
chauffant de la surface de cuisson. L’utilisation d’ustensiles
trop petits exposera une partie de l’élément chauffant, ce
qui peut provoquer l’inflammation des vêtements.
L’utilisation d’un récipient de format correct améliore
l’efficacité de la cuisson.
■ Ne jamais laisser les éléments de la table de cuisson sans
surveillance alors qu’ils chauffent à la puissance maximale
– Il pourrait en résulter une ébullition qui cause de la
fumée et des renversements de corps gras qui peuvent
s’enflammer.
■ Ustensiles de cuisson vitrifiés – Seulement certains types
d’ustensiles de verre, vitrocéramique, céramique, faïence
ou autres surfaces vitrifiées conviennent pour le service
sur une table de cuisson, sans bris attribuables aux
changements soudains de température.
■ Les poignées des ustensiles doivent être tournées vers
l’intérieur et non vers le dessus des éléments adjacents –
Pour réduire les risques de brûlures, d’inflammation de
produits combustibles et de renversements dus à
l’entrechoquement non intentionnel des ustensiles, la
poignée d’un ustensile doit être positionnée de sorte qu’elle
est tournée vers l’intérieur et non au-dessus des éléments
de surface adjacents.
■ Ne pas faire cuire sur une table de cuisson endommagée –
Si la table de cuisson est brisée, les solutions de
nettoyage et les renversements peuvent pénétrer dans la
table brisée et créer le risque d’un choc électrique.
Contacter immédiatement un technicien qualifié.
■ Nettoyer la table de cuisson avec prudence – Si une
éponge ou un chiffon mouillé est utilisé pour essuyer les
renversements sur une surface de cuisson chaude, éviter
les brûlures causées par la vapeur chaude. Certains
nettoyants peuvent produire des émanations désagréables
lorsqu’ils sont utilisés sur une surface chaude.
Pour les appareils avec hotte de ventilation –
■ Nettoyer les hottes de ventilation fréquemment – La
graisse ne doit pas s’accumuler sur la hotte ou le filtre.
■ Lorsque vous flambez des aliments sous la hotte, mettre le
ventilateur en marche.
Pour les appareils à éléments en spirale –
■ S’assurer que les cuvettes de propreté sont en place –
L’absence de ces cuvettes au cours de la cuisson peut
causer des dommages aux fils ou aux composants en
dessous des éléments.
■ Garnissages protecteurs – Ne pas recouvrir les cuvettes
de papier d’aluminium sauf tel que suggéré dans le
manuel. L’installation incorrecte de papier d’aluminium ou
autre matériau peut causer un risque de choc électrique ou
d’incendie.
■ Ne pas tremper les éléments de chauffage amovibles –
Les éléments de chauffage ne doivent jamais être
immergés dans l'eau.

17
Cette table de cuisson à induction génère et utilise une énergie de fréquence ISM qui chauffe l’ustensile de cuisson à l’aide d’un champ
électromagnétique. Elle a été testée et déclarée conforme à la section 18 du règlement FCC pour l’équipement ISM. Cette table de
cuisson à induction satisfait aux exigences du règlement FCC pour la minimisation des interférences avec d’autres dispositifs
résidentiels.
Cette table de cuisson à induction peut causer des interférences pour la réception de la télévision et de la radio. En cas d’interférence,
l’utilisateur doit essayer d’y remédier en prenant une ou plusieurs des mesures suivantes :
Changer l’orientation de l’antenne de réception de la radio ou de la télévision.
Éloigner la table de cuisson du récepteur.
Brancher le récepteur dans une prise différente.
Il incombe à l’utilisateur de corriger toute interférence.
REMARQUE : Les personnes utilisant un pacemaker ou un dispositif médical similaire doivent prendre leurs précautions lorsqu’elles se
trouvent à proximité d’une table de cuisson à induction allumée. Le champ électromagnétique peut affecter le fonctionnement du
pacemaker ou de tout dispositif similaire. Consultez votre médecin ou le fabricant du pacemaker ou du dispositif médical pour obtenir
des informations supplémentaires à propos de ses effets en présence de champs magnétiques émis par la table de cuisson à
induction.
UTILISATION DE LA TABLE DE CUISSON
Ce manuel couvre différents modèles. La table de cuisson que vous avez achetée peut comporter toutes les caractéristiques
énumérées ou seulement certaines d'entre elles.
Modèle JIC4430X de 30" (76,2 cm)
A. Affichage de la surface de cuisson
arrière gauche
B. Arrêt surface de cuisson
C. Affichage du niveau de chaleur
D. Affichage de la surface de cuisson
arrière droite
E. Mise sous tension-Marche/Arrêt
F. Réglages de chaleur réduite
G. Ébullition avec capteur
H. Affichage de la surface de cuisson avant
gauche
I. Affichage de la minuterie
J. Minuterie (augmentation/diminution)
K. Curseur du niveau de chaleur
L. Affichage de la surface de cuisson avant
droite
M. Liaison de gauche
N. Verrouillage des commandes
D
C
A
B
N
M
K
J
IGFE
H
L

18
Modèle JIC4536X de 36" (91,4 cm)
Cuisson par induction
La cuisson par induction est très différente des formes de
cuisson traditionnelles. La chaleur est générée directement dans
l’ustensile de cuisson; la surface de cuisson demeure plus froide
qu’un élément traditionnel.
Avec la cuisson par induction, il y a une moindre déperdition de
chaleur qu’avec les formes de cuisson traditionnelles du fait que
la chaleur est générée dans l’ustensile lui-même.
La table de cuisson chauffe ou se refroidit rapidement après le
réglage des commandes. Elle cesse également de chauffer
lorsqu’on retire l’ustensile sans avoir à éteindre l’appareil.
Les aliments renversés sur la surface de la table de cuisson ne
brûlent pas car le verre n’est pas chauffé. La cuisson par
induction permet un nettoyage immédiat après utilisation car la
chaleur est générée dans l’ustensile.
La taille, le matériau (voir la section “Ustensiles de cuisson”) et le
positionnement du plat sont très importants pour atteindre une
puissance maximale.
Le diamètre de la base du plat doit être identique à la taille de
l’élément.
Si l’ustensile est trop petit, le brûleur ne le détecte pas et reste
éteint.
Commandes de la table de cuisson
Les commandes électroniques tactiles offrent une grande variété
de réglages de chaleur pour des résultats de cuisson optimaux.
Lorsqu’on fait fondre des aliments comme du chocolat ou du
beurre, la surface de cuisson peut être réglée sur la fonction Melt
(faire fondre) pour une consommation minimale de l'énergie de
cuisson.
Pour une puissance maximale de la zone de cuisson, toutes les
commandes électroniques tactiles de la table de cuisson peuvent
être réglées à la fonction Optimisation de rendement pour porter
rapidement un liquide à ébullition. Appuyer sur BOOST
(optimisation) pour atteindre immédiatement le réglage le plus
élevé.
A. Affichage de la surface de cuisson arrière gauche
B. Arrêt surface de cuisson
C. Affichage de la surface de cuisson centrale
D. Affichage du niveau de chaleur
E. Affichage de la surface de cuisson arrière droite
F. Mise sous tension-Marche/Arrêt
G. Réglages de chaleur réduite
H. Ébullition avec capteur
I. Affichage de la surface de cuisson avant gauche
J. Affichage de la minuterie
K. Minuterie (augmentation/diminution)
L. Curseur du niveau de chaleur
M. Affichage de la surface de
cuisson avant droite
N. Liaison de gauche
O. Liaison de droite
P. Verrouillage des commandes
A
B
D
E
PONML
K
JIHGF
C
Risque d'incendie
Fermer tous les réglages lorsque la cuisson est
terminée.
Le non-respect de cette instruction peut causer un
décès ou un incendie.
AVERTISSEMENT

19
REMARQUE : Cette table de cuisson fonctionne également avec
un courant de 208 volts lorsque l'installation ne fonctionne pas
sur du 240 volts.
Première utilisation ou après une panne de courant :
Après avoir raccordé la table de cuisson à une source
d'alimentation électrique ou après une panne de courant, le
tableau de commande est verrouillé. Un témoin lumineux
s'allume au-dessus de l'icône de clé. Pour déverrouiller le tableau
de commande, appuyer sur CONTROL LOCK (verrouillage des
commandes) pendant 3 secondes. Le témoin lumineux s'éteint et
la table de cuisson est prête à être utilisée.
Utilisation
Pour allumer la table de cuisson :
1. Appuyer sur POWER (mise sous tension).
Le témoin lumineux situé au-dessus de la touche Power
(mise sous tension) ainsi qu'un tiret (“-”) pour chaque surface
de cuisson s'allume pour indiquer que toutes les surfaces de
cuisson sont prêtes à être activées.
Si l'on ne fait rien pendant la minute qui suit l'activation de
l'alimentation principale, l'alimentation de la table de cuisson
est automatiquement interrompue.
Si l'on touche une fonction de cuisson ou le curseur
d'alimentation sans sélectionner de surface de cuisson au
préalable, tous les tirets (un par zone) clignotent et un signal
sonore d'action invalide retentit 3 fois.
Pour activer une surface de cuisson :
1. Toucher directement la zone d'affichage correspondant à la
surface de cuisson que l'on souhaite utiliser.
Le niveau de puissance actuel et le témoin lumineux
clignotent pendant 10 secondes, puis restent allumés.
Si l'on touche une autre caractéristique ou le curseur
d'alimentation, le clignotement cesse. De plus, les
informations concernant la touche qui a été touchée
s'affichent.
Si l'on sélectionne une surface de cuisson, la minuterie
s'allume également pour indiquer qu'elle peut maintenant
être réglée.
Si une surface de cuisson reste au niveau de puissance “0”
pendant 1 minute, la surface de cuisson s'éteint
automatiquement et seul le tiret du milieu s'affiche, sans
témoin lumineux.
2. Sélectionner un niveau de chaleur de 1 à 9 en touchant/
faisant glisser le curseur d'alimentation. Le réglage de
chaleur apparaît sur l'afficheur de la surface de cuisson.
Le curseur d'alimentation présente 9 positions, ainsi qu'une
position “Boost” (optimisation). Lorsque l'utilisateur fait
glisser le curseur à 0, “0” s'affiche. La surface de cuisson ne
s'allume pas mais reste active/sélectionnée.
Lorsqu'une surface de cuisson reste au niveau de puissance
“0” pendant 1 minute, la zone s'éteint automatiquement et
seul le tiret du milieu s'affiche, sans témoin lumineux.
Utiliser le tableau suivant comme guide lors du réglage des
niveaux de chaleur.
Désactivation :
1. Appuyer sur ON/OFF (marche/arrêt) pour éteindre la surface
de cuisson désirée.
Un signal sonore retentit lorsqu'on appuie sur Off (arrêt).
2. Appuyer sur POWER (mise sous tension) pour éteindre la
table de cuisson lorsqu'on a terminé.
Indicateur de surface chaude
Un “H” apparaît sur l’afficheur du réglage de chaleur tant qu’une
surface de cuisson est trop chaude pour être touchée, même une
fois que la ou les surfaces sont éteintes.
RÉGLAGE UTILISATION RECOMMANDÉE
9 - Boost
(optimisation)
■ Porter un liquide à ébullition.
9
■ Démarrer la cuisson des
aliments.
7 - 8
■ Brunir ou saisir rapidement les
aliments.
6 - 7
■ Maintenir une ébullition rapide.
5 - 6
■ Faire frire ou sauter les
aliments.
■ Faire cuire les soupes et les
sauces.
4 - 5
■ Maintenir une ébullition lente.
■ Faire mijoter ou étuver les
aliments.
3 - 5
■ Différents niveaux de mijotage
pour un mijotage avec ou sans
couvercle.
Faire fondre
■ Faire fondre le chocolat ou le
beurre.
Mijotage
■ Mijotage des sauces.
Maintien au chaud
■ Pour garder au chaud les
aliments cuits.
Surface de cuisson
double
■ Préparation de conserves à la
maison.
■ Ustensile de cuisson à grand
diamètre.
■ Grandes quantités de
nourriture
A. Afficheur du réglage de
chaleur
B. Témoin lumineux de surface
chaude “H”
A
B

20
Surface de cuisson à dimension double
(sur certains modèles)
La surface de cuisson à dimension double offre une flexibilité qui
permet d'utiliser des ustensiles de cuisson de différentes tailles.
La dimension simple peut être utilisée de la même manière
qu’une surface de cuisson ordinaire. La dimension double
combine les surfaces de cuisson interne et externe; elle est
recommandée pour les ustensiles de cuisson de plus grande
dimension, les grandes quantités d'aliments et pour la
préparation de conserves à la maison.
La surface de cuisson à dimension double comprend deux zones
de cuisson.
Si la taille de l’ustensile est identique à celle de la surface de
cuisson à dimension simple, la surface de cuisson fonctionne
comme une surface de cuisson à dimension simple.
Si l’ustensile est légèrement plus grand que la zone de cuisson à
dimension simple, il se peut que seule une partie de la zone de
cuisson à dimension double s’allume. Le brûleur sera alors moins
efficace et la durée de chauffage plus longue.
Si la taille de l’ustensile est identique à celle de la surface de
cuisson à dimension double, la surface de cuisson à dimension
double s’active automatiquement.
Ébullition avec capteur
La fonction d'ébullition avec capteur sélectionne
automatiquement le niveau de puissance idéal pour faire bouillir
de l'eau et est muni d'un signal sonore pour prévenir l'utilisateur
lorsque le point d'ébullition a été atteint. La fonction d'ébullition
avec capteur n'est disponible que pour une seule surface de
cuisson. Voir les illustrations suivantes pour déterminer quelle est
la surface de cuisson équipée de la fonction d'ébullition avec
capteur sur votre table de cuisson.
Modèle JIC4430X de 30" (76,2 cm)
Modèle JIC4536X de 36" (91,4 cm)
Lors de l'utilisation de la fonction d'ébullition
avec capteur :
■ Utiliser uniquement de l'eau à température ambiante.
■ Ne pas ajouter de sel ou d'autres ingrédients à l'eau que l'on
fait bouillir avant que le point d'ébullition ne soit atteint.
■ Ne pas couvrir la casserole lorsqu'on utilise la fonction
d'ébullition avec capteur.
■ Ne pas utiliser la fonction d'ébullition avec capteur si la
surface de cuisson est chaude. “H” apparaît sur l'affichage
lorsque la surface de cuisson est chaude.
■ Ne pas modifier le niveau de puissance ni déplacer la
casserole.
■ Remplir la casserole à au moins un tiers de sa capacité avec
au moins 4 tasses (946 mL) d'eau, mais ne jamais remplir
jusqu'au rebord du récipient. Ne pas utiliser la fonction
d'ébullition avec capteur avec plus d'environ 5 ptes (5 L) pour
les modèles de 36" (91,4 cm), ou 7 ptes (7 L) pour les
modèles de 30" (76,2 cm).
■ Pour de meilleurs résultats, utiliser des casseroles d'un
diamètre compris entre 9½" (24 cm) et 11" (28 cm) pour les
modèles de 30" (76,2 cm). Utiliser des casseroles d'un
diamètre compris entre 6½" (17 cm) et 7½" (19 cm) pour les
modèles de 36" (91,4 cm).
■ Ne pas utiliser d'autocuiseurs.
■ La qualité des ustensiles de cuisson utilisés peuvent affecter
la performance de la fonction d'ébullition avec capteur.
Utilisation :
Activation :
1. Vérifier que la surface de cuisson avec la fonction d'ébullition
disponible a été sélectionnée.
2. Placer la casserole sur la surface de cuisson sélectionnée
pour une ébullition avec capteur.
3. Appuyer sur SENSOR BOIL. “A” apparaît sur l'affichage et le
témoin lumineux situé à côté de Sensor Boil s'allume.
Lorsque le point d'ébullition a été atteint, le signal sonore de
la table de cuisson retentit 3 fois de suite à intervalles
réguliers. Après la deuxième série de signaux sonores, un
compte à rebours commence automatiquement à décompter
le temps d'ébullition, minute après minute. Après la troisième
série de signaux sonores, la table de cuisson passe
automatiquement à un niveau de puissance adapté pour
maintenir l'ébullition.
A. Dimension simple
B. Dimension double
A. Surface de cuisson avec fonction d'ébullition avec
capteur disponible
A
B
A
A. Surface de cuisson avec fonction d'ébullition
avec capteur disponible
A
La page est en cours de chargement...
La page est en cours de chargement...
La page est en cours de chargement...
La page est en cours de chargement...
La page est en cours de chargement...
La page est en cours de chargement...
La page est en cours de chargement...
La page est en cours de chargement...
-
 1
1
-
 2
2
-
 3
3
-
 4
4
-
 5
5
-
 6
6
-
 7
7
-
 8
8
-
 9
9
-
 10
10
-
 11
11
-
 12
12
-
 13
13
-
 14
14
-
 15
15
-
 16
16
-
 17
17
-
 18
18
-
 19
19
-
 20
20
-
 21
21
-
 22
22
-
 23
23
-
 24
24
-
 25
25
-
 26
26
-
 27
27
-
 28
28


Jenn-Air 30" (76.2 cm) Mode d'emploi
- Catégorie
- Cuisinières
- Taper
- Mode d'emploi
dans d''autres langues
- English: Jenn-Air 30" (76.2 cm) User guide
Documents connexes
Autres documents
-
Whirlpool Kitchen Aid KICU500X Mode d'emploi
-
KitchenAid KICU568S Manuel utilisateur
-
Smeg SIMU524B Le manuel du propriétaire
-
LG LCE30845 Le manuel du propriétaire
-
-
IKEA SAMFALLD Manuel utilisateur
-
KitchenAid KICU509XSS00 Le manuel du propriétaire
-
KitchenAid KICU500 Manuel utilisateur
-
-
JennAir W11362913C Manuel utilisateur