9
FRANÇAIS
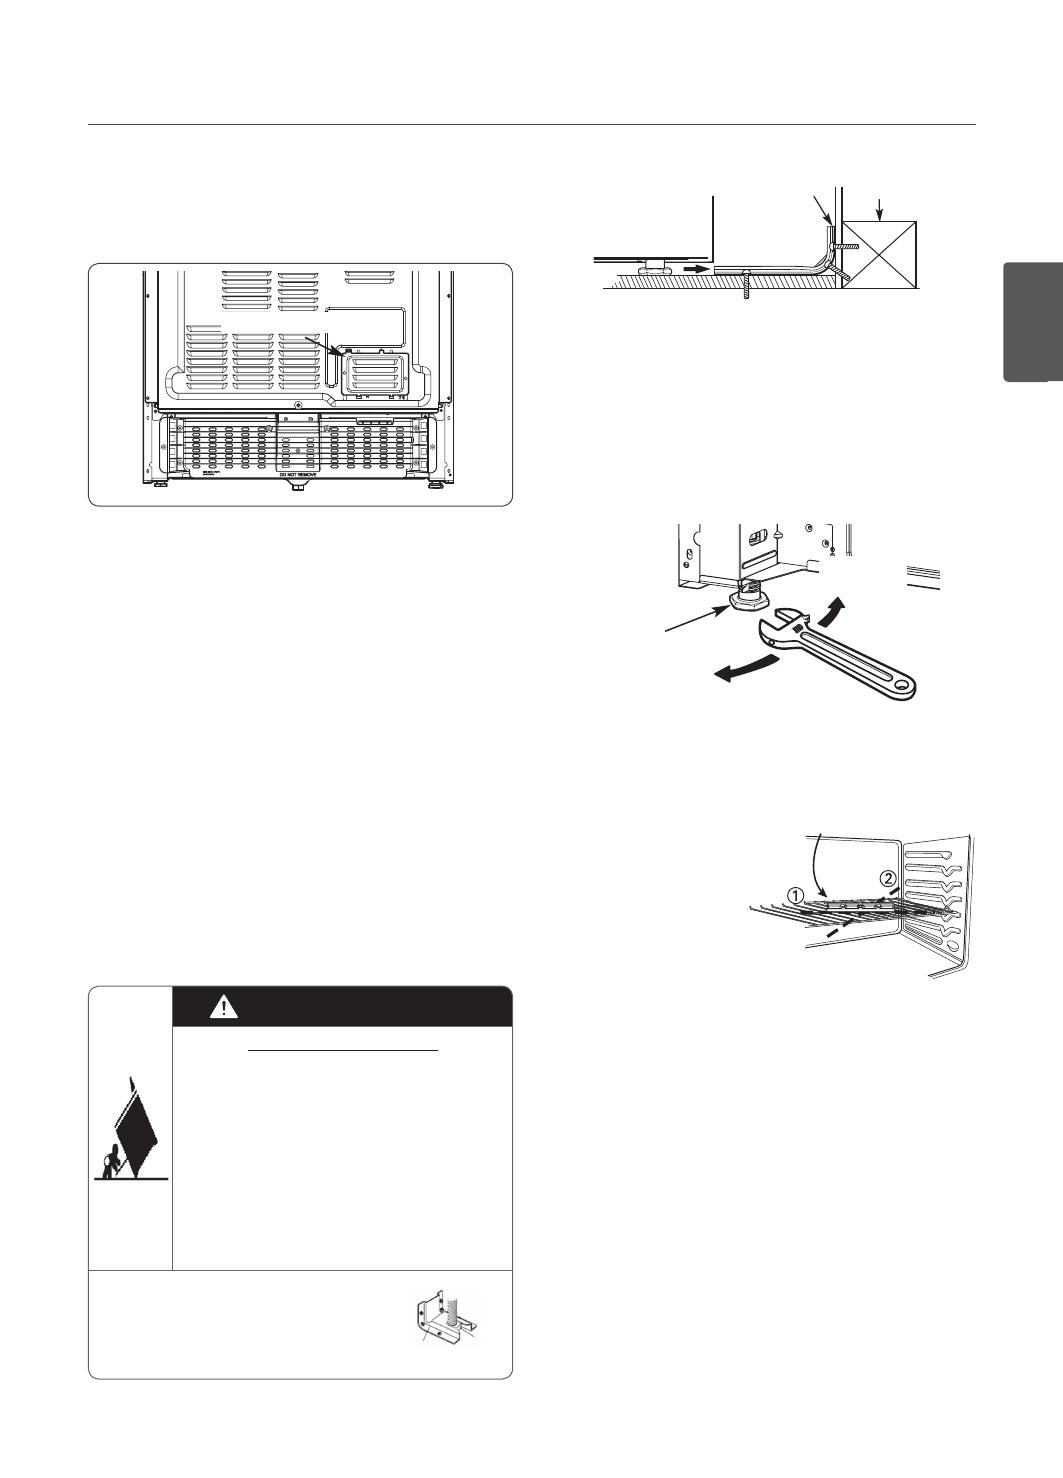
INSTALLATION DE LA CUISINIÈRE
Replacez le capot d'accès à l'arrière de la cuisinière. Pour
replacer le couvre-fils, insérez les deux languettes dans les
ouvertures situées en dessous de l'ouverture et serrez les
trois vis.
d'accès à l'arrière
EXIGENCES POUR LES CONNEXIONS
ÉLECTRIQUES
La cuisinière doit être installée conformément aux codes
municipaux et au code canadien de l'électricité (édition la
plus récente). Voyez la plaque signalétique pour connaître le
A connecté total. Ce modèle est expédié directement de
l'usine avec un câble électrique. Aucune connexion à la
cuisinière n'est requise.
3FNBSRVF3FNQMBDFNFOUEVDÉCMF
N'utilisez qu'un câble de cuisinière 40 A d'une tension
minimale de 120/240 V. Si vous utilisez un câble de cuisinière
de 50 A, il devrait être identifié pour les ouvertures de
diamètre de 1
3
/
8
po.
INSTALLATION DU DISPOSITIF
ANTIBASCULEMENT
%BOHFSEFCBTDVMFNFOU
Un enfant ou un adulte peut faire basculer le
four et se tuer. Assurez-vous que le support
antibasculement a été installé. Assurez-vous
que le support antibasculement est bien xé
lorsque vous déplacez la cuisinière.
Ne faites pas fonctionner la cuisinière si le
support antibasculement n’est pas en place.
Le manquement à respecter ces instructions
peut entraîner de sérieuses brûlures, moire
la mort, aux enfants et aux adultes.
AVERTISSEMENT
Support
Patte de
niveau
Pour une vérication visuelle à savoir si
la patte de la cuisinière est bien insérée
dans le support, attrapez le bord supérieur
arrière de la cuisinière et tentez de la faire
basculer vers l’avant doucement.
Support
antibasculement
Plaque
murale
La vis doit
pénétrer dans le
bois ou le béton
%ÏUFSNJOF[MFNQMBDFNFOUEFTTVQQPSUTFOVUJMJTBOU
MFHBCBSJU
Les supports antibasculement se trouvent dans
l’emballage du gabarit. Les instructions contiennent les
détails nécessaires pour leur installation. Lisez et suivez
les instructions sur la feuille décrivant l’installation de la
cuisinière (gabarit).
.FUUF[MBDVJTJOJÒSFËOJWFBV
Pour ce faire, ajustez les pattes de nivellement à l’aide
d’une clé.
Boulon de
nivellement de
la patte
Relever
la cuisinière
Abaisser
la cuisinière
Servez-vous d’un niveau pour vérifier si des ajustements
sont nécessaires. Placez le niveau diagonalement sur la
grille du four et vérifiez chaque direction pour vous assurer
que la cuisinière est bien de niveau.
Vérifiez d’abord la
direction Å.
Vérifiez ensuite la
direction Ç.
Si la bulle du niveau n’est
pas centrée, ajustez les
pattes de nivellement en
utilisant une clé.
INSTALLATION FINALE
t3BQQSPDIF[MBDVJTJOJÒSFTVGGJTBNNFOUQSÒTEFMFTQBDF
ouvert entre les armoires, de manière à pouvoir la brancher
sur la prise murale.
t(MJTTF[MBDVJTJOJÒSFFOQPTJUJPOUPVUFOWFJMMBOURVFMFT
deux pattes arrière se glissent sous les supports
antibasculement. Une fois correctement installée, la
cuisinière devrait être alignée contre le mur.
t
Essayez d’incliner doucement la cuisinière vers l’avant pour
vous assurer que les pattes arrière sont correctement insérées
dans les supports antibasculement. Si l’installation a été
effectuée correctement, les supports antibasculement
empêcheront la cuisinière de tomber vers l’avant. Si la cuisinière
peut être inclinée vers l’avant, refaites son installation jusqu’à ce
que les supports soient correctement installés et que la
cuisinière ne puisse plus être inclinée vers l’avant.
t.FUUF[MBDVJTJOJÒSFTPVTUFOTJPO7ÏSJGJF[MBQPVSWPVT
assurer de son bon fonctionnement ainsi qu’il est décrit
dans le Guide du propriétaire.
niveau
FRANÇAIS


 Budda 212 COMBO Manuel utilisateur