69-2714EF-01
Quick Installation Guide
RTHL2510/RTHL2410 Series
Programmable Thermostat

69 -2714EF— 01 ii
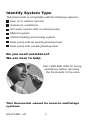
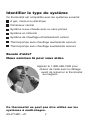
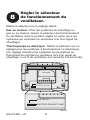
Identify System Type
This thermostat is compatible with the following systems:
Gas, oil or electric furnace
Central air conditioner
Hot water system with or without pump
Millivolt system
Central heating and cooling system
Heat pump without auxiliary/backup heat
Heat pump with auxiliary/backup heat
Do you need assistance?
We are here to help.
Call 1-800-468-1502 for wiring
assistance before returning
the thermostat to the store.
This thermostat cannot be used on multistage
systems.

1 69-2714EF—01
M28097
1
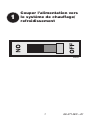
Turn Off Power to Heating/
Cooling System

69 -2714EF— 01 2
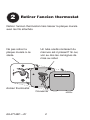
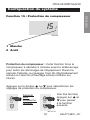
Is there a sealed tube containing
mercury? If so, see back cover for
proper disposal instructions.
M28099
Old thermostat
Cover
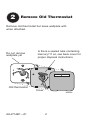
Remove old thermostat but leave wallplate with
wires attached.
Remove Old Thermostat
Do not remove
wallplate yet
2

3 69-2714EF—01
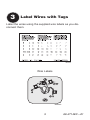
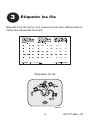
Label Wires with Tags
3
Label the wires using the supplied wire labels as you dis-
connect them.
Wire Labels
M28100
M28093

69 -2714EF— 01 4
M32731
TO REMOVE WALLPLATE
PULL HERE
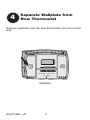
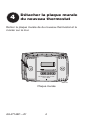
Separate Wallplate from
New Thermostat
4
Remove wallplate from the new thermostat and mount onto
wall.
Wallplate

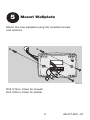
5 69-2714EF—01
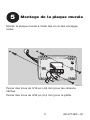
Mount the new wallplate using the included screws
and anchors.
5
Mount Wallplate
Drill 3/16-in. holes for drywall
Drill 3/32-in. holes for plaster
W/
Aux
Not
Used
M32714

69 -2714EF— 01 6
M32715
SCREW
INSERT WIRES
AND TIGHTEN
SCREWS
WIRE
HOLE
LABELED
WIRES
W/
Aux
W
Y
G
R
Not
Used
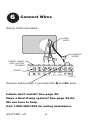
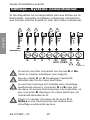
Connect Wires
6
Simply match wire labels.
Remove metal jumper if you have both R and Rc wires.
Labels don’t match? See page 22.
Have a Heat Pump system? See page 23-24.
We are here to help.
Call 1-800-468-1502 for wiring assistance.

7 69-2714EF—01
RTHXXXX
M32707
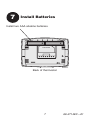
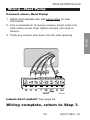
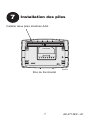
Install two AAA alkaline batteries.
Back of thermostat
7
Install Batteries

69 -2714EF— 01 8
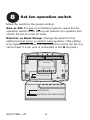
Move the switch to the proper setting:
Gas or Oil: For gas or oil heating systems, leave the fan
operation switch in this factory-set position (for systems that
control the fan in a call for heat).
Electric or Heat Pump: Change the switch to this
setting for heat pump or electric heat systems. (This setting
is for systems that allow the thermostat to control the fan in a
call for heat, if a fan wire is connected to the G terminal.)
8
Set fan operation switch
RTHXXXX
M32716
GAS OR OIL
ELECTRIC OR HEAT PUMP
GAS OR OIL
ELECTRIC OR HEAT PUMP

9 69-2714EF—01
W/
Aux
Not
Used
Heat Off Cool Auto On
Fan
M32705
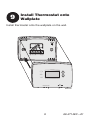
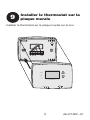
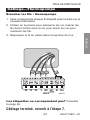
Install thermostat onto the wallplate on the wall.
9
Install Thermostat onto
Wallplate

69 -2714EF— 01 10
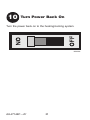
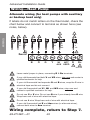
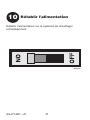
Turn the power back on to the heating/cooling system.
10
Turn Power Back On
M28098

11 69-2714EF—01
If your system type is:
q Single Stage Heat and Cool
q Heat Only or Cool Only
Congratulations, you’re done!
If your system type is:
q Heat Pump* with Backup Heat
Continue with advanced installation
on next page to match your thermostat to your
system type.
*Heat Pump—an air conditioner that provides cooling in the
summer, and also runs in reverse in the winter to provide
heating.
If you are not sure of your system type or if you
have other questions, call us toll-free at 1-800-
468-1502.
This thermostat works on 24 volt or 750 mV systems. It will
NOT work on multi-stage conventional systems or 120/240
Volt systems.
11
If your system type is...

Advanced Installation
Enter system setup .............................................................. 13
Changing settings ................................................................ 14
System type ......................................................................... 15
Heating cycle rate ................................................................16
Early start ............................................................................17
Temperature display ............................................................18
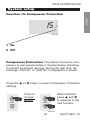
Compressor protection ........................................................19
Clock display .......................................................................20
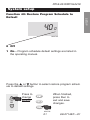
Restore program schedule default ......................................21
Wiring conventional system ................................................. 22
Wiring heat pump ................................................................23
Troubleshooting ...................................................................25
Customer assistance ...........................................................26
Limited warranty ..................................................................27

RTHL2510/RTHL2410
13 69-2714EF—01
SETUP WIRING ASSISTANCE TROUBLESHOOTING
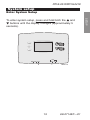
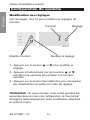
Enter System Setup
System setup
To enter system setup, press and hold both the s and
t buttons until the display changes (approximately 5
seconds).
M32713
Heat Off Cool Auto On
Fan

Advanced Installation Guide
69 -2714EF— 01 14
SETUPWIRINGASSISTANCETROUBLESHOOTING
1
0
M32717
System setup
Change Function Change Setting
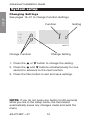
See pages 16–21 to change Function Settings.
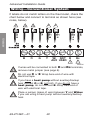
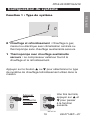
Changing Settings
Function Setting
1. Press the s or t button to change the setting.
2. Press the s and t buttons simultaneously for one
second to advance to the next function.
3. Press the Run button to exit and save settings.
NOTE: If you do not press any button for 60 seconds
while you are in the setup menu, the thermostat
automatically saves any changes made and exits the
menu.

RTHL2510/RTHL2410
15 69-2714EF—01
SETUP WIRING ASSISTANCE TROUBLESHOOTING
1
0
M32718
System setup
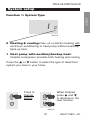
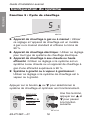
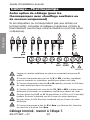
Function 1: System Type
0 Heating & cooling: Gas, oil or electric heating with
central air conditioning or heat pump without auxiliary/
back-up heat.
1 Heat pump with auxiliary/backup heat:
Outside compressor provides both heating and cooling.
Press the s or t button to select the type of Heat/Cool
system you have in your home.
Press to
change
setting.
When finished,
press s and t
to advance to the
next function.
M32719
AND
OR

Advanced Installation Guide
69 -2714EF— 01 16
SETUPWIRINGASSISTANCETROUBLESHOOTING
5
5
M32720
System setup
Press the s or t button to select your heating system
and optimize its operation.
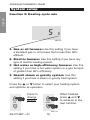
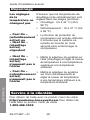
Function 5: Heating cycle rate
5 Gas or oil furnace: Use this setting if you have
a standard gas or oil furnace that is less than 90%
efficient.
6 Electric furnace: Use this setting if you have any
type of electric heating system.
3 Hot water or high-efficiency furnace: Use this
setting if you have a hot water system or a gas furnace
of greater than 90% efficiency.
2 Gas/oil steam or gravity system: Use this
setting if you have a steam or gravity heat system.
Press to
change
setting.
When finished,
press s and t
to advance to the
next function.
M32719
AND
OR

RTHL2510/RTHL2410
17 69-2714EF—01
SETUP WIRING ASSISTANCE TROUBLESHOOTING
13
1
M32721
System setup
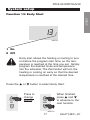
Press the s or t button to select Early Start.
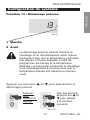
Function 13: Early Start
1 On
0 Off
Early start allows the heating or cooling to turn
on before the program start time, so the tem-
perature is reached at the time you set. Simply
program the desired times and temperature
into the schedule. The thermostat will turn the
heating or cooling on early so that the desired
temperature is reached at the desired time.
Press to
change
setting.
When finished,
press s and t
to advance to the
next function.
M32719
AND
OR

Advanced Installation Guide
69 -2714EF— 01 18
SETUPWIRINGASSISTANCETROUBLESHOOTING
System setup
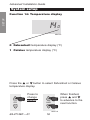
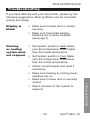
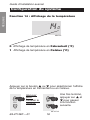
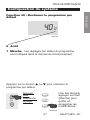
Function 14: Temperature display
0 Fahrenheit temperature display (°F)
1 Celsius temperature display (°C)
Press the s or t button to select Fahrenheit or Celsius
temperature display.
14
0
M32722
Press to
change
setting.
When finished,
press s and t
to advance to the
next function.
M32719
AND
OR
La page est en cours de chargement...
La page est en cours de chargement...
La page est en cours de chargement...
La page est en cours de chargement...
La page est en cours de chargement...
La page est en cours de chargement...
La page est en cours de chargement...
La page est en cours de chargement...
La page est en cours de chargement...
La page est en cours de chargement...
La page est en cours de chargement...
La page est en cours de chargement...
La page est en cours de chargement...
La page est en cours de chargement...
La page est en cours de chargement...
La page est en cours de chargement...
La page est en cours de chargement...
La page est en cours de chargement...
La page est en cours de chargement...
La page est en cours de chargement...
La page est en cours de chargement...
La page est en cours de chargement...
La page est en cours de chargement...
La page est en cours de chargement...
La page est en cours de chargement...
La page est en cours de chargement...
La page est en cours de chargement...
La page est en cours de chargement...
La page est en cours de chargement...
La page est en cours de chargement...
La page est en cours de chargement...
La page est en cours de chargement...
La page est en cours de chargement...
La page est en cours de chargement...
La page est en cours de chargement...
La page est en cours de chargement...
La page est en cours de chargement...
La page est en cours de chargement...
La page est en cours de chargement...
La page est en cours de chargement...
-
 1
1
-
 2
2
-
 3
3
-
 4
4
-
 5
5
-
 6
6
-
 7
7
-
 8
8
-
 9
9
-
 10
10
-
 11
11
-
 12
12
-
 13
13
-
 14
14
-
 15
15
-
 16
16
-
 17
17
-
 18
18
-
 19
19
-
 20
20
-
 21
21
-
 22
22
-
 23
23
-
 24
24
-
 25
25
-
 26
26
-
 27
27
-
 28
28
-
 29
29
-
 30
30
-
 31
31
-
 32
32
-
 33
33
-
 34
34
-
 35
35
-
 36
36
-
 37
37
-
 38
38
-
 39
39
-
 40
40
-
 41
41
-
 42
42
-
 43
43
-
 44
44
-
 45
45
-
 46
46
-
 47
47
-
 48
48
-
 49
49
-
 50
50
-
 51
51
-
 52
52
-
 53
53
-
 54
54
-
 55
55
-
 56
56
-
 57
57
-
 58
58
-
 59
59
-
 60
60


Honeywell RTHL2510 series Le manuel du propriétaire
- Taper
- Le manuel du propriétaire
- Ce manuel convient également à
dans d''autres langues
Documents connexes
-
Honeywell RTHL2410 series Le manuel du propriétaire
-
Honeywell RTHL221 series Manuel utilisateur
-
Honeywell RTH4300B Manuel utilisateur
-
Honeywell RTH7400 Manuel utilisateur
-
Honeywell RTH7600 Manuel utilisateur
-
-
-
-
Honeywell Pro 3000 Series Guide d'installation
-