Power Fist 8667909 Le manuel du propriétaire
- Taper
- Le manuel du propriétaire

V4.0 8667909
Please read and understand all instructions before use. Retain this manual for
future reference.
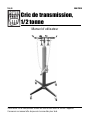
User Manual
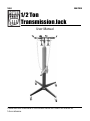
1/2 Ton
Transmission Jack

8667909 1/2 Ton Transmission Jack V4.0
2 For technical questions call 1-800-665-8685
SPECIFICATIONS
Lift Capacity
1,100 lb
Min. Lift Height
51 in.
Max. Lift Height
70 in.
Operation
Hydraulic
Transmission Adapter Size
10-3/8 x 10 in.
Transmission Adapter Tilt
30°
Handle Type Welded tube
Handle Size (O.D. x L) 0.85 x 19.7 in.
Wheel Size 3 in.
Wheel Type
Swivel
Base Size 21 x 22-13/16 in.
Material
Steel construction
INTRODUCTION
The 1/2 Ton Transmission Jack’s transmission adapter tilts for ease of
alignment and includes adjustable brackets and safety chain. Ideal for
installation and removal of automotive and light truck transmissions and
differentials
SAFETY
WARNING! Read and understand all instructions before using this tool. The
operator must follow basic precautions to reduce the risk of personal injury
and/or damage to the equipment.
Keep this manual for safety warnings, precautions, operating or inspection and
maintenance instructions.
1/2 Ton
Transmission Jack

V4.0 1/2 Ton Transmission Jack 8667909
Visit www.princessauto.com for more information 3
HAZARD DEFINITIONS
Please familiarize yourself with the hazard notices found in this manual. A notice
is an alert that there is a possibility of property damage, injury or death if certain
instructions are not followed.
DANGER! This notice indicates an immediate and specific hazard that will
result in severe personal injury or death if the proper precautions
are not taken.
WARNING! This notice indicates a specific hazard or unsafe practice that
could result in severe personal injury or death if the proper
precautions are not taken.
CAUTION! This notice indicates a potentially hazardous situation that may result
in minor or moderate injury if proper practices are not taken.
NOTICE! This notice indicates that a specific hazard or unsafe practice will
result in equipment or property damage, but not personal injury.
WORK AREA
1. Operate in a safe work environment. Keep your work area clean, well-lit
and free of distractions.
2. Keep anyone not wearing the appropriate safety equipment away from the
work area.
3. Store unused tools properly in a safe and dry location to prevent rust or
damage. Lock tools away and keep out of the reach of children.
PERSONAL SAFETY
WARNING! Wear personal protective equipment approved by the Canadian
Standards Association (CSA) or American National Standards Institute (ANSI).
PERSONAL PROTECTIVE EQUIPMENT
1. Always wear impact safety goggles that provide front and side protection
for the eyes. Eye protection equipment should comply with CSA Z94.3-07
or ANSI Z87.1 standards based on the type of work performed.
2. Wear gloves that provide protection based on the work materials or to
reduce the effects of tool vibration.

8667909 1/2 Ton Transmission Jack V4.0
4 For technical questions call 1-800-665-8685
3. Wear protective clothing designed for the work environment and tool.
4. Non-skid footwear is recommended to maintain footing and balance in the
work environment.
5. Wear steel toe footwear or steel toe caps to prevent a foot injury from
falling objects.
PERSONAL PRECAUTIONS
Control the tool, personal movement and the work environment to avoid
personal injury or damage to tool.
1. Do not operate any tool when tired or under the influence of drugs, alcohol
or medications.
2. Avoid wearing clothes or jewelry that can become entangled with the
moving parts of a tool. Keep long hair covered or bound.
3. Do not overreach when operating a tool. Proper footing and balance
enables better control in unexpected situations.
SPECIFIC SAFETY PRECAUTIONS
WARNING! DO NOT let comfort or familiarity with product (gained from
repeated use) replace strict adherence to the tool safety rules. If you use
this tool unsafely or incorrectly, you can suffer serious personal injury.
1. Use the correct tool for the job. This tool was designed for a specific function.
Do not modify or alter this tool or use it for an unintended purpose.
2. This jack is designed for use only on a hard, level surface capable of
sustaining the weight of the tool and load. A surface that does not meet
these requirements can result in jack instability and possible loss of load.
3. Use a transmission jack of proper size and capacity to handle the
anticipated load. Do not overload beyond the jack’s rated capacity (see
Specifications). Overloading may cause damage to, or failure of, the jack.
4. The vehicle must be properly supported and blocked before using the jack.
Set the parking brake to prevent it from moving or shifting.
5. Keep hands, fingers and arms away from moving parts of the jack at all times.
6. Secure the load with the safety chain before lowering or moving the load.
7. Before lowering the load, ensure that there are no obstructions underneath
and that all people are standing clear.

V4.0 1/2 Ton Transmission Jack 8667909
Visit www.princessauto.com for more information 5
8. Lower the load slowly and avoid sudden starts or stops that may cause the
load to shift.
9. Only use with accessories rated to handle the forces exerted by this tool
during operation. Other accessories not designed for the forces generated
may break and forcefully launch pieces.
10. Check to ensure that all bolts and nuts are tight.
HYDRAULIC PRECAUTIONS
DANGER! Seek immediate medical attention if hydraulic fluid under pressure
penetrates your skin. See Injection Injury precautions for instructions
before using a pressurized hydraulic system.
1. Do not touch or handle hydraulic hoses or components while under pressure.
Hydraulic fluid escaping under pressure has sufficient force to penetrate your
clothing and skin. A pinpoint hole may inject hydraulic fluid into your body.
Seek immediate medical attention if this occurs (see Injection Injury).
2. Never exceed the hydraulic system’s load capacity (see Specifications).
3. Do not adjust the hydraulic system’s relief setting. The settings are preset
by the factory.
4. Hydraulic oil under pressure is hot and can cause a burn injury if
touched, sprayed or spilled. Allow the hydraulic system to cool before
conducting maintenance.
5. Hydraulic components require regular inspection. Release all pressure
from the system before you inspect it. Replace damaged hydraulic parts
with identical manufacturer's components.
6. Do not attempt makeshift repairs to a hydraulic system. Such repairs can fail
suddenly and create a hazardous condition.
7. Hydraulic fluid has a combustible flash point of 200°F (93°F). Do not
expose the fluid to an ignition source.
8. Change your clothing immediately if sprayed with hydraulic fluid. Store
clothing or rags contaminated with hydraulic fluid in an approved metal
safety can with a spring-closing lid and venting designed to contain a fire.
9. Only use hydraulic fluid in the pump. Do not substitute or mix brake fluid
or any other fluid with the hydraulic fluid. This can result in a pump failure
and injure the user or bystander. It may also damage the pump.

8667909 1/2 Ton Transmission Jack V4.0
6 For technical questions call 1-800-665-8685
INJECTION INJURY
DANGER! Seek immediate, professional medical treatment if fluid
penetrates your skin. It may feel like a pricking or sting. Do not wait for the
appearance of symptoms. A toxic reaction can occur from the exposure.
Delay in treatment can lead to amputation or death.
Inform the medical staff that you have a fluid penetration injury as soon as you
arrive at the medical facility. The severity of the symptoms will depend on the
type of fluid injected. Bring the Safety Data Sheet for the fluid with you to the
medical facility if possible.
INJECTION PRECAUTIONS
Fluid can penetrate the skin at 100 PSI pressure. Fluid escaping under pressure
from the tool has sufficient force to penetrate your clothing and skin. Follow the
precautions below to avoid an injection injury.
1. Always check for leaks wearing a face shield, safety goggles, rubberized
gloves and protective clothes.
2. Release all pressure from the system before you inspect it.
3. Do not use your hands to detect a fluid leak. Use a large piece of wood,
cardboard or paper and watch for discolouration.
4. Replace damaged parts with identical manufacturer's components to
ensure it is rated to handle the pressure.
UNPACKING
WARNING! Do not operate the tool if any part is missing. Replace the
missing part before operating. Failure to do so could result in a malfunction
and personal injury.
Remove the parts and accessories from the packaging and inspect for damage.
Make sure that all items in the parts list are included.
ASSEMBLY & INSTALLATION
Numbered references in parenthesis (#1) refer to the included Parts List.
1. Position a leg (#17) against the support post (#12) and align the bolt
holes.

V4.0 1/2 Ton Transmission Jack 8667909
Visit www.princessauto.com for more information 7
2. Insert an M10 x 100 bolt (#18) into each top bolt hole. Hold the bolts in
place and slide the other leg over the protruding bolts. Slide an Ø10
washer (#13) over each bolt and secure each with an M10 nut (#14).
3. Insert an M10 x 20 bolt (#22) through a bottom bolt hole. Secure it with a
washer (#13) and nut (#14). Repeat with the three remaining M10 x 20 bolts.
4. Attach a caster (#23) to the end of each leg and secure with a washer Ø12
(#7), spring washer Ø12 (#16) and an M12 nut (#15).
5. Attach the long ram (#10) to the support post. Drop an M10 x 30 bolt
(#11) through each set of bolt holes. Secure each bolt with a washer Ø10
(#13) and M10 nut (#14). Tighten the bolts enough to make sure the ram
does not shift or rotate in place.
6. Slide the transmission adapter (#5) onto the end of the ram. Make sure the
receiver is fully seated, then secure with an M10 x 15 Bolt (#9) through the
bolt hole in the receiver.
7. Install the angle clamps (#3) onto the transmission adapter. Drop an M12 x 25
bolt (#1) through the angle clamp’s slot. And insert the bolt into a corner bolt
hole in the transmission adapter. Secure the bolt with a washer Ø12 (#7) and
an M12 nut (#8). Secure the other angle clamps in the same manner.
8. Insert each fixed shaft Ø17 x 45 x M10 (#4) through the bolt hole on each
side of the transmission adapter. Make sure the hole in the shaft is vertical
and secure the shaft with an M10 washer (#13) and nut (#14).
9. Slide an M8 hook bolt (#6) through the shaft opening from the bottom. Secure
with an M8 wing nut (#2). Install the second M8 hook bolt in the same manner.
10. Hook the chain’s (#19) end links onto the hook bolts.
11. Insert the handle (#21) into the ram receiver.
OPERATION
LOWERING THE TRANSMISSION
Always transport the transmission in the lowered position with the chain
securely fastened.
1. This jack is limited to the removal, installation and transportation of
transmissions and differentials in the lowered position. Do not alter the
jack or adapters.

8667909 1/2 Ton Transmission Jack V4.0
8 For technical questions call 1-800-665-8685
2. Once the vehicle is secured and raised on a hoist, clear the area underneath
the vehicle of tools and people.
3. Wheel the transmission jack under the transmission. Chock the casters.
4. Unhook one end of the chain and allow the chain to hang to the floor.
5. Raise the transmission adapter by turning the handle clockwise to close
the ram’s hydraulic valve. Pump handle until the transmission adapter is at
the desired height.
6. Stop just below the transmission and level the transmission adapter with the
adjusting knobs. Adjust the position of the angle clamps to accommodate
the size of the transmission. Retighten to secure all clamps and plates.
7. Raise the unit again to make contact with the transmission.
8. Wrap the chain around the transmission and secure the chain to the hooks.
9. Once you are sure that the transmission is securely fastened, release the
bolts holding the transmission in place.
10. Make sure that the area is clear of people and tools and verify that the
transmission is securely held in place.
11. Lower the transmission adapter by very slowly turning the handle
counterclockwise to release the pressure. The ram may suffer a shock load
that will damage the tool if the pressure is release too quickly. Move the
release handle clockwise if the descent is too quick.
12. Remove the chocks. Wheel the transmission jack from under the vehicle
and perform your desired maintenance.
RAISING THE TRANSMISSION
1. Move the transmission jack so that the transmission is lined up properly
with its connection points.
2. Close the valve on the hydraulic unit. Pump the handle to raise the transmission
jack. Guide the transmission back into place and secure it to the chassis.
3. Release the chain, then slowly turn the release valve handle
counterclockwise.
4. Allow the transmission adapter to descend an inch and close the release
valve. Check that that transmission is secure. Open the release valve and
allow the jack to fully retract, then remove the jack.

V4.0 1/2 Ton Transmission Jack 8667909
Visit www.princessauto.com for more information 9
CARE & MAINTENANCE
1. Maintain the tool with care. A tool in good condition is efficient, easier to
control and will have fewer problems.
2. Inspect the tool components periodically. Repair or replace damaged or
worn components. Only use identical replacement parts when servicing.
3. Follow instructions for lubricating and changing accessories.
4. Only use accessories intended for use with this tool.
5. Keep the tool handles clean, dry and free from oil/grease at all times.
6. Maintain the tool’s labels and name plates. These carry important information.
If unreadable or missing, contact Princess Auto Ltd. for replacements.
WARNING! Only qualified service personnel should repair the tool. An
improperly repaired tool may present a hazard to the user and/or others.
HYDRAULIC RAM MAINTENANCE
Monthly maintenance is recommended for the hydraulic ram. Any restrictions due
to dirt, rust, etc. can cause the either slow movement or extremely rapid jerks,
damaging the internal components. The following steps are designed to keep the
pump maintained and operational.
1. Lubricate the cylinder and the pumping mechanism with light oil.
2. Visually inspect for cracked welds, bent, loose, missing parts or hydraulic
oil leaks.
3. Inspect the hydraulic ram immediately if it was subjected to an abnormal load
or shock load.
4. Remove any hydraulic pump from service that is damaged, worn down or
operates abnormally, until repaired by an authorized service technician.
5. Check and maintain the ram oil level.
6. Always store your tool with the hydraulic ram in the fully retracted position.
This will help protect critical areas from corrosion.
7. Do not use brake or transmission fluids or regular motor oil as they can
damage the seals. Always purchase and use products labeled Hydraulic Oil.

8667909 1/2 Ton Transmission Jack V4.0
10 For technical questions call 1-800-665-8685
BLEEDING THE HYDRAULIC SYSTEM
Bleed excess air from the hydraulic system as follows:
1. Open the release valve by turning it counterclockwise.
2. Remove the oil filler screw and fill the pump with hydraulic fluid.
3. Wait 5 minutes for trapped air to rise to the surface.
4. Pump the handle or pedal for several full strokes to eliminate any air in
the system.
5. Check the oil filler hole and if necessary, top off with more hydraulic oil.
6. Restore the oil filler screw. Close the release valve by turning clockwise.
7. Test the ram several times for proper operation before putting it into use. Do
not use the ram if it still does not appear to be working properly. Have a
qualified service technician service or repair the hydraulic system.
LUBRICATION
Inspect and lubricate the tool when required. Only use light oil to lubricate the
tool. Other lubricants may not be suitable and could damage the tool or cause a
malfunction during use.
DISPOSAL
Recycle a tool damaged beyond repair at the appropriate facility.
Contact your local municipality for a list of disposal facilities or by-laws for
electronic devices, batteries, oil or other toxic liquids.
IMPORTANT! DO NOT pollute the environment by allowing uncontrolled
discharge of waste oil.
DISPOSAL OF HYDRAULIC FLUID
Do not drain hydraulic oil into the sewer system or dispose in an uncontrolled
location. Hydraulic fluid may take up to a year to breakdown in the environment
and the ingredients may still be toxic. Contact your local municipality for proper
disposal instructions or locations.

V4.0 1/2 Ton Transmission Jack 8667909
Visit www.princessauto.com for more information 11
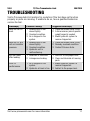
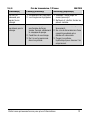
TROUBLESHOOTING
Visit a Princess Auto Ltd. location for a solution if the tool does not function
properly or parts are missing. If unable to do so, have a qualified technician
service the tool.
Problem(s) Possible Cause(s) Suggested Solution(s)
Jack will not lift
load.
1. Release valve is not
closed tightly.
2. Overload condition.
3. Air is trapped in the
system.
1. Close the release valve firmly.
2. A transmission jack of greater
weight capacity needed.
3. Bleed hydraulic system to
remove trapped air.
Jack will lift, but
will not maintain
pressure.
1. Release valve is not
closed tightly.
2. Overload condition.
3. Hydraulic unit is
malfunctioning.
1. Close the release valve firmly.
2. Remedy overload condition.
3. Contact Princess Auto.
Will not lower
after loading.
1. Reservoir is overfilled.
2. Linkages are binding.
1. Drain oil to the proper level.
2. Clean and lubricate all moving
parts.
Poor lift
performance.
1. Air is trapped in the
system.
2. Hydraulic oil level is too.
1. Bleed hydraulic system to
remove trapped air.
2. Add oil to the proper level.

8667909 1/2 Ton Transmission Jack V4.0
12 For technical questions call 1-800-665-8685
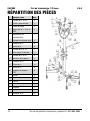
PARTS BREAKDOWN
# DESCRIPTION QTY
1 Bolt M12 x 25 4
2 Wing Nut M8 2
3 Angle Clamp 4
4 Fixed Shaft
Ø17 x 45 x M10
2
5 Transmission adapter 1
6 Hook Bolt M8 2
7 Washer Ø12 8
8
Nut M12
4
9 Bolt M10 x 15 1
10 8 Ton Long Ram 1
11 Bolt M10 x 30 4
12 Support Post 1
13 Washer Ø10 12
14 Nut M10 12
15 Nut M12 4
16 Spring Washer Ø12 4
17
Legs
2
18 Bolt M10 x 100 2
19 Chain 1
20 Handle Sleeve 1
21 Handle 1
22 Bolt M10 x 20 4
23 Caster Ø75 4

V4.0 1/2 Ton Transmission Jack 8667909
Visit www.princessauto.com for more information 13

8667909 1/2 Ton Transmission Jack V4.0
14 For technical questions call 1-800-665-8685

V 4,0 8667909
Vous devez lire et comprendre toutes les instructions avant d'utiliser l'appareil.
Conservez ce manuel afin de pouvoir le consulter plus tard.
Manuel d'utilisateur
Cric de transmission,
1/2 tonne

8667909 Cric de transmission, 1/2 tonne V 4,0
2 En cas de questions techniques, appelez le 1-800-665-8685
SPÉCIFICATIONS
Cap. de levage 1 100 lb
Hauteur de levage min. 51 po
Hauteur de levage max.
70 po
Fonctionnement Hydraulique
Taille de l’adaptateur de transmission 10 3/8 x 10 po
Inclinaison de l’adaptateur de transmission 30°
Type de manche Tube soudé
Taille de manche (D.E. x long.) 0,85 x 19,7 po
Taille de roue 3 po
Type de roue Pivotante
Dimension de base 21 x 22 13/16 po
Matériau Construction en acier.
INTRODUCTION
L’adaptateur de transmission s’incline afin de faciliter son alignement et
comprend des pattes de fixation ajustables et une chaîne de sécurité. Idéal pour
installer et déposer les transmissions et les différentiels des automobiles et des
camions légers.
SÉCURITÉ
AVERTISSEMENT ! Veuillez lire et comprendre toutes les instructions avant
d'utiliser cet outil. L'utilisateur doit respecter les précautions de base
lorsqu'il utilise cet outil afin de réduire le risque de blessure ou de
dommage à l'équipement.
Conservez ce manuel qui contient les avertissements de sécurité, les
précautions, les instructions de fonctionnement ou d'inspection et d'entretien.
Cric de transmission,
1/2 tonne

V 4,0 Cric de transmission, 1/2 tonne 8667909
Visitez www.princessauto.com pour plus d'informations 3
DÉFINITIONS DE DANGER
Veuillez-vous familiariser avec les avis de danger qui sont présentés dans ce
manuel. Un avis est une alerte indiquant qu'il existe un risque de dommage à la
propriété, de blessure ou de décès si on ne respecte pas certaines instructions.
DANGER ! Cet avis indique un risque immédiat et particulier qui
entraînera des blessures corporelles graves ou même la
mort si on omet de prendre les précautions nécessaires.
AVERTISSEMENT ! Cet avis indique un risque particulier ou une pratique non
sécuritaire qui pourrait entraîner des blessures
corporelles graves ou même la mort si on omet de
prendre les précautions nécessaires.
ATTENTION ! Cet avis indique une situation possiblement dangereuse qui
peut entraîner des blessures mineures ou modérées si on
ne procède pas de la façon recommandée.
AVIS ! Cet avis indique un risque particulier ou une pratique non
sécuritaire qui entraînera des dommages au niveau de
l'équipement ou des biens, mais non des blessures corporelles.
AIRE DE TRAVAIL
1. Travaillez dans un environnement de travail sécuritaire. Gardez votre aire
de travail propre, bien éclairée et exempte de toute distraction.
2. Assurez-vous que les personnes qui ne portent pas l'équipement de
sécurité approprié ne se trouvent pas à proximité de l'aire de travail.
3. Rangez les outils correctement dans un lieu sécurisé et sec. Gardez les
outils hors de la portée des enfants.
SÉCURITÉ PERSONNELLE
AVERTISSEMENT ! Portez de l'équipement de protection personnelle
homologué par l'Association canadienne de normalisation (CSA) ou
l'American National Standards Institute (ANSI).
ÉQUIPEMENT DE PROTECTION PERSONNELLE
1. Portez toujours des lunettes antiprojections qui offrent une protection
frontale et latérale pour les yeux. L'équipement de protection des yeux

8667909 Cric de transmission, 1/2 tonne V 4,0
4 En cas de questions techniques, appelez le 1-800-665-8685
devrait être conforme à la norme CSA Z94.3-07 ou ANSI Z87.1 fonction du
type de travail effectué.
2. Portez des gants qui protègent en fonction des matériaux de travail et pour
réduire les effets des vibrations de l'outil.
3. Portez des vêtements de protection conçus pour l'environnement de travail
et pour l'outil.
4. Les chaussures antidérapantes sont recommandées pour maintenir la
stabilité et l'équilibre au sein de l'environnement de travail.
5. Portez des chaussures à embout d'acier ou à coquilles d'acier pour éviter
les blessures aux pieds dues à la chute d'objets.
PRÉCAUTIONS PERSONNELLES
Gardez le contrôle de l'outil, de vos mouvements et de l'environnement de
travail pour éviter les blessures ou le bris de l'outil.
1. N'utilisez pas l'outil si vous êtes fatigué ou sous l'effet de drogues, d'alcool
ou de médicaments.
2. Évitez de porter des vêtements ou des bijoux pouvant se prendre dans les pièces
mobiles d'un outil. Gardez les cheveux longs recouverts ou attachés.
3. N'utilisez pas l'outil si vous devez étirer les bras pour vous en servir. Une
stabilité et un équilibre appropriés sont nécessaires afin d'avoir un meilleur
contrôle en cas de situations inattendues.
CONSIGNES DE SÉCURITÉ SPÉCIFIQUES
AVERTISSEMENT! Ne permettez PAS au confort ou à votre familiarisation avec
l'outil (obtenus après un emploi répété) de se substituer à une adhésion stricte
aux règles de sécurité de l'outil. Si vous utilisez cet outil de façon dangereuse
ou incorrecte, vous pouvez subir des blessures corporelles graves.
1. Utilisez le bon outil pour la tâche à effectuer. Cet outil a été conçu pour une
utilisation spécifique. Évitez de modifier ou d'altérer cet outil ou de l'utiliser
à une fin autre que celle pour laquelle il a été conçu.
2. Ce cric est conçu pour utilisation uniquement sur des surfaces dures et de
niveau capables de supporter le poids de l’outil et de la charge. Une
surface qui ne répond pas aux exigences peut entraîner une instabilité du
cric et possiblement une perte de charge.

V 4,0 Cric de transmission, 1/2 tonne 8667909
Visitez www.princessauto.com pour plus d'informations 5
3. Utilisez un cric de transmission de la taille et de la capacité prescrites pour
manier la charge prévue. Ne dépassez pas la capacité nominale du cric
(consultez Spécifications). Une surcharge peut causer des dommages ou
une faillite du cric.
4. Le véhicule doit être convenablement soutenu et retenu au moyen de cales
avant d’utiliser le cric. Appliquez le frein de stationnement pour l’empêcher
de bouger ou de se déplacer.
5. Gardez les mains, les doigts et les bras en tout temps à l’écart des pièces
mobiles du cric.
6. Fixez la charge au moyen de la chaîne de sécurité avant d’abaisser ou de
déplacer la charge.
7. Avant d’abaisser la charge, assurez-vous qu’aucune obstruction ne se
trouve en dessous et que tous les gens se trouvent à l’écart.
8. Abaissez la charge doucement pour éviter les démarrages ou les arrêts
brusques pouvant provoquer son déplacement.
9. N’utilisez que des accessoires certifiés pour supporter les forces exercées par cet
outil durant son fonctionnement. D’autres accessoires non conçus pour résister
aux forces produites risquent de se briser et de voler en éclats avec force.
10. Vérifiez que tous les boulons et les écrous sont serrés.
SÉCURITÉ HYDRAULIQUE
DANGER ! Contactez immédiatement un médecin si le liquide hydraulique
sous pression vous pénètre la peau. Consultez la rubrique Instructions en
cas de blessures par injection pour connaître la marche à suivre avant
d’utiliser un système hydraulique sous pression.
1. Ne touchez pas et ne manipulez pas les tuyaux hydrauliques ou les
composants sous pression. Une fuite de liquide hydraulique sous pression
peut avoir une force suffisante pour pénétrer la peau. Un trou d'aiguille
peut projeter du liquide hydraulique dans votre corps. Seek immediate
medical attention if this occurs (voir Blessure Par Injection).
2. Ne dépassez jamais la capacité de charge prescrite de l'appareil
hydraulique (voir Spécifications).
3. Ne réglez pas les ajustements de détente du système hydraulique. Les
réglages sont effectués au préalable en usine.

8667909 Cric de transmission, 1/2 tonne V 4,0
6 En cas de questions techniques, appelez le 1-800-665-8685
4. L’huile hydraulique sous pression est chaude et peut causer des blessures
par brûlure en cas de contact, de pulvérisation ou de déversement. Laissez
le système hydraulique refroidir avant de procéder à l’entretien.
5. Les composants hydrauliques doivent faire l'objet d'une inspection
régulière. Libérez toute la pression du système avant de procéder à son
inspection. Remplacez les pièces hydrauliques endommagées par des
composants provenant du même fabricant.
6. N'essayez pas de faire des réparations de fortune à un système
hydraulique. De telles réparations peuvent être sujettes à des défaillances
soudaines et causer une condition dangereuse.
7. Le liquide hydraulique présente un point d'inflammabilité de 93 °C
(200 °F). N'exposez le liquide à aucune source d'allumage.
8. Changez immédiatement vos vêtements s'ils ont été arrosés avec le liquide
hydraulique. Rangez les vêtements ou les chiffons contaminés par le liquide
hydraulique dans une boîte de sécurité en métal approuvée munie d'un couvercle
à ressort et d'un dispositif de mise à l'air libre capable de contenir un incendie.
9. Utilisez uniquement du liquide hydraulique dans la pompe. Ne remplacez
pas ou ne mélangez pas du liquide de frein ou tout autre liquide avec le
liquide hydraulique. Il pourrait en résulter le bris de la pompe et des
blessures pour l’utilisateur et les gens à proximité. La pompe pourrait
également subir des dommages.
BLESSURE PAR INJECTION
DANGER ! Demandez immédiatement un traitement médical par un
professionnel si le liquide hydraulique pénètre votre peau. Vous pourriez
ressentir une sensation de piqûre ou d'élancement. N'attendez pas que des
symptômes apparaissent. Une exposition peut entraîner une réaction toxique.
Tout délai dans le traitement pourrait entraîner l'amputation ou la mort.
Avisez le personnel médical que vous avez subi une pénétration de liquide
hydraulique dès que vous arrivez à l'installation médicale. La gravité des
symptômes dépendra du type de liquide injecté. Apportez la fiche signalétique
du liquide lorsque vous vous rendez à l'installation médicale.
La page est en cours de chargement...
La page est en cours de chargement...
La page est en cours de chargement...
La page est en cours de chargement...
La page est en cours de chargement...
La page est en cours de chargement...
La page est en cours de chargement...
La page est en cours de chargement...
-
 1
1
-
 2
2
-
 3
3
-
 4
4
-
 5
5
-
 6
6
-
 7
7
-
 8
8
-
 9
9
-
 10
10
-
 11
11
-
 12
12
-
 13
13
-
 14
14
-
 15
15
-
 16
16
-
 17
17
-
 18
18
-
 19
19
-
 20
20
-
 21
21
-
 22
22
-
 23
23
-
 24
24
-
 25
25
-
 26
26
-
 27
27
-
 28
28


Power Fist 8667909 Le manuel du propriétaire
- Taper
- Le manuel du propriétaire
dans d''autres langues
- English: Power Fist 8667909 Owner's manual
Documents connexes
-
Power Fist 8667883 Le manuel du propriétaire
-
-
-
-
-
-
-
-
-
Autres documents
-
Powerfist 8667909 Le manuel du propriétaire
-
-
-
PROPOINT 8819849 Le manuel du propriétaire
-
-
-
-
-
-
OTC 5130 Mode d'emploi