Signature Hardware 440636 Guide d'installation
- Taper
- Guide d'installation

11.855.715.1800
STONEHOUSE
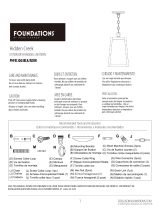
OUTDOOR HANGING PENDANT
LÁMPARA COLGANTE PARA EXTERIORES
LUMINAIRE SUSPENDU D’EXTÉRIEUR
SKU: 440636
REVISED: 11/29/2021
CODES: PHEL4804
BEFORE YOU BEGIN
We recommend consulting a professional if you are
unfamiliar with installing electric fixtures. Signature
Hardware accepts no liability for any damage to the
faucet, plumbing, sink, counter top, or for personal
injury during installation.
Observe all local plumbing and building codes.
Unpack and inspect the product for shipping damage.
If any damage is found, contact our Customer
Relations team via live chat at www.signaturehardware.
com or by emailing support@siganturehardware.
com.
ANTES DE COMENZAR
Le recomendamos que consulte a un profesional si no
sabe cómo instalar accesorios de plomería. Signature
Hardware no asume ninguna responsabilidad con
respecto a los daños causados al inodoro, sistema de
plomería, suelo o daños personales durante
la instalación.
Cumpla con todas las normas locales de plomería y
construcción.
Desempaque e inspeccione el producto para determinar
si tiene daños por el envío. Si tiene daños, comuníquese
con nuestro equipo de Relaciones con el Cliente por chat
en directo en www.signaturehardware.com o por correo
electrónico a [email protected].
AVANT DE COMMENCER
Nous vous recommandons de consulter un professionnel
si vous n’avez pas d’expérience dans l’installation
d’appareils de plomberie. Signature Hardware décline
toute responsabilité en cas de dommage au robinet, à la
plomberie, à l’évier, au comptoir ou de blessure corporelle
lors de l’installation.
Respectez tous les codes locaux de plomberie et de
construction.
Déballez et inspectez le produit pour vérifier qu’il n’a pas
été endommagé pendant le transport. Si un dommage
est constaté, communiquez avec notre équipe des
relations avec la clientèle au www.signaturehardware.com
ou par [email protected].
GETTING STARTED
Ensure that you have gathered all the required
materials that are needed for the installation.
CÓMO COMENZAR
Asegúrese de haber reunido todos los materiales
necesarios para la instalación.
PREMIERS PAS
Assurez-vous d’avoir réuni tout le matériel nécessaire
à l’installation.
ADDITIONAL QUESTIONS?
Still need help? Check out our Help Center at
www.signaturehardware.com for product and
warranty information, or contact us through live
chat or by emailing support@signaturehardware.
com.
¿MÁS PREGUNTAS?
Todavía necesita ayuda. Consulte nuestro Centro de
Ayuda en www.signaturehardware.com para obtener
información de productos y garantías o comuníquese
con nosotros por chat directo o enviando un correo
electrónico a [email protected].
D’AUTRES QUESTIONS?
Si vous avez encore besoin de l’ aide. Veuillez consultez
notre centre d'aide à l'adresse www.signaturehardware.
com pour obtenir des informations sur les
produits et la garantie ou veuillez nous contacter par
clavardage en direct ou par courriel à l'adresse
CARE AND MAINTENANCE:
SOINS ET ENTRETIEN:
CUIDADO Y MANTENIMIENTO:
To clean, wipe with damp cloth. Do not use abrasive
cleaners or cleaners that contain alcohol.
Pour nettoyer, essuyer avec un chiffon humide. Ne pas
utiliser de produits de nettoyage abrasifs ou contenant de
l'alcool.
Use un trapo húmedo para limpiar. No utilice limpiadores
abrasivos o limpiadores que contengan alcohol.
CAUTION:
MISE EN GARDE:
PRECAUCIÓN:
Shut off main power supply before cleaning product or
changing light bulbs. All glass is fragile. Use care when
handling glass shades and bulbs.
Couper l'alimentation électrique principale avant de
nettoyer ce produit ou de changer une ampoule. Pour
nettoyer, essuyer avec un chiffon humide. Ne pas utiliser
de produits de nettoyage abrasifs ou contenant de l'alcool.
Corte el suministro principal de energía antes de limpiar el
producto o cambiar las bombillas. Use un trapo húmedo
para limpiar. No utilice limpiadores abrasivos o limpiadores
que contengan alcohol.
RECOMMENDED TOOLS AND
ACCESSORIES
OUTILS ET MATÉRIAUX
RECOMMANDÉS
HERRAMIENTAS Y MATERIALES
RECOMENDADOS
SAVE THIS MANUAL: RETAIN FOR CONSUMER’S USE.
READ THESE INSTRUCTIONS COMPLETELY BEFORE
INSTALLING THE PRODUCT: FOR PRODUCT OR
INSTALLATIO QUESTIONS PLEASE CALL
CUSTOMER. SERVICE AT 1‐800‐221‐3379.
GUARDE ESTE MANUAL: CONSÉRVELO PARA USO DEL
CONSUMIDOR. LEA ESTAS INSTRUCCIONES POR
COMPLETO ANTES DE INSTALAR EL PRODUCTO: SI
TIENE PREGUNTAS SOBRE EL PRODUCTO O LA
INSTALACIÓN LLAME AL SERVICIO A A CLIENTES AL
1‐800‐221‐3379.
CONSERVEZ CE MANUEL : METTEZ‐LE À LA
DISPOSITION DES CONSOMMATEURS. LISEZ
COMPLÈTEMENT CES INSTRUCTIONS AVANT
D'INSTALLER LE PRODUIT : POUR TOUTE QUESTION
CONCERNANT LE PRODUIT OU SON INSTALLATION,
VEUILLEZ APPELER LE SERVICE À LA CLIENTÈLE AU
1‐800‐221‐3379.
1. Coupez le courantauniveau du disjoncteur et
retirezl'anciennelampe, y compris la barre transversale.
1. Corte la energía desde el disyuntor y quite el accesorio
viejo con todo y la barra.
2. Carefully unpack your new fixture and lay out all the
parts on a clear area. Take care not to lose any small
parts necessary for installation.
2.Déballezsoigneusementvotrenouvellelampem urale et
étaleztoutes les pièces sur une surfacedégagée. Faites
attention à ne pas perdre les petites pièces nécessaires
pour l'installation.
2. Desempaque cuidadosamente su nuevo accesorio y
extienda las partes en un área libre. Ponga cuidado en no
perder ninguna de las partes pequeñas necesarias para la
instalación.
3. Attach the cross bar (B) to the outlet box (A) (not
supplied) using the 2 screws provided with the outlet
box (A).
3. Fixez la barre transversale (B) à la boîte à prises (A) (non
fournie) à l'aide des 2 vis fournies avec la boîte à prises (A).
3. Adjunte la barra transversal (B) a la caja de
tomacorrientes (A) (no incluida) usando 2 tornillos que se
proporcionan con la caja de tomacorrientes (A).
4 . CONNECTING THE WIRES Now connect the
electrical wires as follows: Connect the smooth wire
from the fixture to the black or red (lead) supply wire.
Connect the ridged wire from the fixture to the white
(neutral) supply wire. Make sure all wire nuts are
secured. You may wrap the connections with electrical
tape. If your outlet has a ground wire (green or bare
copper), connect fixture’s ground wire to it. Otherwise,
connect fixture’s ground wire directly to the crossbar
using the green screw provided. Tuck the wire
connections neatly into the ceiling junction box.
4. BRANCHEMENTS : Connectez ensuite les fils
électriques comme suit : raccordez le fil noir du luminaire
au fil noir (phase) de la maison. Raccordez le fil blanc du
luminaireau fil blanc (neutre) de la maison. Veillez à ce que
tous les capuchons de connexionsoient bien serrés.
Vouspouvezenvelopper les raccordementsavec du
rubanisolant. Si votreprisepossède un fil de mise à la terre
(vertoucuivrenu), raccordez le fil de masse de la lampe à
ce fil. Sinon, raccordez le fil de masse du
luminairedirectement à la barre transversale en utilisant la
vis verte fournie. Rentrezsoigneusement les
filsraccordésdans le boîtierélectrique du plafond.
4 .CONECTANDO LOS CABLES Ahora conecte los cables
eléctricos como sigue: Conecte el cable negro desde el
accesorio al cable (corriente) que se suministra. Conecte
el cable blanco desde el accesorio al cable blanco que se
suministra. Revise que todos as tuercas de cable estén
aseguradas. Puede envolver las conexiones con cinta de
aislar. Si el tomacorrientes lleva un cable a tierra (verde o
de cobre sin revestimiento), conecte el cable a tierra del
accesorio. En caso contrario conecte el cable a tierra del
accesorio directamente a la barra transversal usando el
tornillo verde que se proporciona. Acomode las
conexiones del cable cuidadosamente dentro de la caja de
conexión del techo.
5 . Connect the screw collar L oop (D) with the chain (J )
by the quuick link (N) .
5. Raccordezl'anneaud'accouplementfileté (D) à la chaîne
(J) à l'aide du maillon de raccordrapide (N).
5 .Conecte el tornillo collar lazo (D) con la cadena (J ) por el
eslabón rápido (N) .
6 . Move up the canopy (E) to the ceiling and secured by
the screw collar ring (F) to the screw sollar loop (D).
6. Faitesmonter la monture (E) vers le plafond et fixez‐la
envissant la bagued'accouplementfiletée (F) sur
l'anneaud'accouplementfileté (D).
6. Mueva la marquesina (E) hacia arriba al techo y
asegúrela por el tornillo collar anillo (F) al tornillo collar de
lazo (D).
__
INSTALLATION (FIG 1)
INSTALLATION (FIG 1)
INSTALACIÓN (FIG 1)
1. Shut off the power at the circuit breaker and remove
old fixture, including the crossbar.

21.855.715.1800
STONEHOUSE
OUTDOOR HANGING PENDANT
LÁMPARA COLGANTE PARA EXTERIORES
LUMINAIRE SUSPENDU D’EXTÉRIEUR
SKU: 440636
CARE AND MAINTENANCE:
SOINS ET ENTRETIEN:
CUIDADO Y MANTENIMIENTO:
To clean, wipe with damp cloth. Do not use abrasive
cleaners or cleaners that contain alcohol.
Pour nettoyer, essuyer avec un chiffon humide. Ne pas
utiliser de produits de nettoyage abrasifs ou contenant de
l'alcool.
Use un trapo húmedo para limpiar. No utilice limpiadores
abrasivos o limpiadores que contengan alcohol.
CAUTION:
MISE EN GARDE:
PRECAUCIÓN:
Shut off main power supply before cleaning product or
changing light bulbs. All glass is fragile. Use care when
handling glass shades and bulbs.
Couper l'alimentation électrique principale avant de
nettoyer ce produit ou de changer une ampoule. Pour
nettoyer, essuyer avec un chiffon humide. Ne pas utiliser
de produits de nettoyage abrasifs ou contenant de l'alcool.
Corte el suministro principal de energía antes de limpiar el
producto o cambiar las bombillas. Use un trapo húmedo
para limpiar. No utilice limpiadores abrasivos o limpiadores
que contengan alcohol.
RECOMMENDED TOOLS AND
ACCESSORIES
OUTILS ET MATÉRIAUX
RECOMMANDÉS
HERRAMIENTAS Y MATERIALES
RECOMENDADOS
SAVE THIS MANUAL: RETAIN FOR CONSUMER’S USE.
READ THESE INSTRUCTIONS COMPLETELY BEFORE
INSTALLING THE PRODUCT: FOR PRODUCT OR
INSTALLATIO QUESTIONS PLEASE CALL
CUSTOMER. SERVICE AT 1‐800‐221‐3379.
GUARDE ESTE MANUAL: CONSÉRVELO PARA USO DEL
CONSUMIDOR. LEA ESTAS INSTRUCCIONES POR
COMPLETO ANTES DE INSTALAR EL PRODUCTO: SI
TIENE PREGUNTAS SOBRE EL PRODUCTO O LA
INSTALACIÓN LLAME AL SERVICIO A A CLIENTES AL
1‐800‐221‐3379.
CONSERVEZ CE MANUEL : METTEZ‐LE À LA
DISPOSITION DES CONSOMMATEURS. LISEZ
COMPLÈTEMENT CES INSTRUCTIONS AVANT
D'INSTALLER LE PRODUIT : POUR TOUTE QUESTION
CONCERNANT LE PRODUIT OU SON INSTALLATION,
VEUILLEZ APPELER LE SERVICE À LA CLIENTÈLE AU
1‐800‐221‐3379.
1. Coupez le courantauniveau du disjoncteur et
retirezl'anciennelampe, y compris la barre transversale.
1. Corte la energía desde el disyuntor y quite el accesorio
viejo con todo y la barra.
2. Carefully unpack your new fixture and lay out all the
parts on a clear area. Take care not to lose any small
parts necessary for installation.
2.Déballezsoigneusementvotrenouvellelampem urale et
étaleztoutes les pièces sur une surfacedégagée. Faites
attention à ne pas perdre les petites pièces nécessaires
pour l'installation.
2. Desempaque cuidadosamente su nuevo accesorio y
extienda las partes en un área libre. Ponga cuidado en no
perder ninguna de las partes pequeñas necesarias para la
instalación.
3. Attach the cross bar (B) to the outlet box (A) (not
supplied) using the 2 screws provided with the outlet
box (A).
3. Fixez la barre transversale (B) à la boîte à prises (A) (non
fournie) à l'aide des 2 vis fournies avec la boîte à prises (A).
3. Adjunte la barra transversal (B) a la caja de
tomacorrientes (A) (no incluida) usando 2 tornillos que se
proporcionan con la caja de tomacorrientes (A).
4 . CONNECTING THE WIRES Now connect the
electrical wires as follows: Connect the smooth wire
from the fixture to the black or red (lead) supply wire.
Connect the ridged wire from the fixture to the white
(neutral) supply wire. Make sure all wire nuts are
secured. You may wrap the connections with electrical
tape. If your outlet has a ground wire (green or bare
copper), connect fixture’s ground wire to it. Otherwise,
connect fixture’s ground wire directly to the crossbar
using the green screw provided. Tuck the wire
connections neatly into the ceiling junction box.
4. BRANCHEMENTS : Connectez ensuite les fils
électriques comme suit : raccordez le fil noir du luminaire
au fil noir (phase) de la maison. Raccordez le fil blanc du
luminaireau fil blanc (neutre) de la maison. Veillez à ce que
tous les capuchons de connexionsoient bien serrés.
Vouspouvezenvelopper les raccordementsavec du
rubanisolant. Si votreprisepossède un fil de mise à la terre
(vertoucuivrenu), raccordez le fil de masse de la lampe à
ce fil. Sinon, raccordez le fil de masse du
luminairedirectement à la barre transversale en utilisant la
vis verte fournie. Rentrezsoigneusement les
filsraccordésdans le boîtierélectrique du plafond.
4 .CONECTANDO LOS CABLES Ahora conecte los cables
eléctricos como sigue: Conecte el cable negro desde el
accesorio al cable (corriente) que se suministra. Conecte
el cable blanco desde el accesorio al cable blanco que se
suministra. Revise que todos as tuercas de cable estén
aseguradas. Puede envolver las conexiones con cinta de
aislar. Si el tomacorrientes lleva un cable a tierra (verde o
de cobre sin revestimiento), conecte el cable a tierra del
accesorio. En caso contrario conecte el cable a tierra del
accesorio directamente a la barra transversal usando el
tornillo verde que se proporciona. Acomode las
conexiones del cable cuidadosamente dentro de la caja de
conexión del techo.
5 . Connect the screw collar L oop (D) with the chain (J )
by the quuick link (N) .
5. Raccordezl'anneaud'accouplementfileté (D) à la chaîne
(J) à l'aide du maillon de raccordrapide (N).
5 .Conecte el tornillo collar lazo (D) con la cadena (J ) por el
eslabón rápido (N) .
6 . Move up the canopy (E) to the ceiling and secured by
the screw collar ring (F) to the screw sollar loop (D).
6. Faitesmonter la monture (E) vers le plafond et fixez‐la
envissant la bagued'accouplementfiletée (F) sur
l'anneaud'accouplementfileté (D).
6. Mueva la marquesina (E) hacia arriba al techo y
asegúrela por el tornillo collar anillo (F) al tornillo collar de
lazo (D).
INSTALLATION (FIG 1)
INSTALLATION (FIG 1)
INSTALACIÓN (FIG 1)
1. Shut off the power at the circuit breaker and remove
old fixture, including the crossbar.
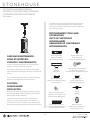
Wire Connector (3pcs)
Capuchons de connexion (3)
Conectores de cable (3 pzas)
Short Machine Screws (2pcs)
Vis de fixation courtes (2)
Tornillos cortos maquinados (2 pzas)
Hex Nut (2pcs)
Écrous hexagonaux (2)
Tuerca hexagonal (2 pzas)
Screw Collar Loop (1pc)
Anneau d'accouplement fileté (1)
Tornillo collar lazo (1 pza)
Screw Collar Ring
Bague d'accouplement filetée
Tornillo collar aro
Chain
Chaîne
Cadena
Screws Collar Loop
Vis de fixation (2)
Tornillos de montaje (2 pzas)
Mounting Bracket
Support de fixation
Abrazadera de montaje
GND
Quick Link (1pc)
Maillon de raccordrapide (1)
Eslabón rápido (1 pza)
Canopy
Monture
Marquesina

31.855.715.1800
STONEHOUSE
OUTDOOR HANGING PENDANT
LÁMPARA COLGANTE PARA EXTERIORES
LUMINAIRE SUSPENDU D’EXTÉRIEUR
SKU: 440636
CARE AND MAINTENANCE:
SOINS ET ENTRETIEN:
CUIDADO Y MANTENIMIENTO:
To clean, wipe with damp cloth. Do not use abrasive
cleaners or cleaners that contain alcohol.
Pour nettoyer, essuyer avec un chiffon humide. Ne pas
utiliser de produits de nettoyage abrasifs ou contenant de
l'alcool.
Use un trapo húmedo para limpiar. No utilice limpiadores
abrasivos o limpiadores que contengan alcohol.
CAUTION:
MISE EN GARDE:
PRECAUCIÓN:
Shut off main power supply before cleaning product or
changing light bulbs. All glass is fragile. Use care when
handling glass shades and bulbs.
Couper l'alimentation électrique principale avant de
nettoyer ce produit ou de changer une ampoule. Pour
nettoyer, essuyer avec un chiffon humide. Ne pas utiliser
de produits de nettoyage abrasifs ou contenant de l'alcool.
Corte el suministro principal de energía antes de limpiar el
producto o cambiar las bombillas. Use un trapo húmedo
para limpiar. No utilice limpiadores abrasivos o limpiadores
que contengan alcohol.
RECOMMENDED TOOLS AND
ACCESSORIES
OUTILS ET MATÉRIAUX
RECOMMANDÉS
HERRAMIENTAS Y MATERIALES
RECOMENDADOS
SAVE THIS MANUAL: RETAIN FOR CONSUMER’S USE.
READ THESE INSTRUCTIONS COMPLETELY BEFORE
INSTALLING THE PRODUCT: FOR PRODUCT OR
INSTALLATIO QUESTIONS PLEASE CALL
CUSTOMER. SERVICE AT 1‐800‐221‐3379.
GUARDE ESTE MANUAL: CONSÉRVELO PARA USO DEL
CONSUMIDOR. LEA ESTAS INSTRUCCIONES POR
COMPLETO ANTES DE INSTALAR EL PRODUCTO: SI
TIENE PREGUNTAS SOBRE EL PRODUCTO O LA
INSTALACIÓN LLAME AL SERVICIO A A CLIENTES AL
1‐800‐221‐3379.
CONSERVEZ CE MANUEL : METTEZ‐LE À LA
DISPOSITION DES CONSOMMATEURS. LISEZ
COMPLÈTEMENT CES INSTRUCTIONS AVANT
D'INSTALLER LE PRODUIT : POUR TOUTE QUESTION
CONCERNANT LE PRODUIT OU SON INSTALLATION,
VEUILLEZ APPELER LE SERVICE À LA CLIENTÈLE AU
1‐800‐221‐3379.
1. Coupez le courantauniveau du disjoncteur et
retirezl'anciennelampe, y compris la barre transversale.
1. Corte la energía desde el disyuntor y quite el accesorio
viejo con todo y la barra.
2. Carefully unpack your new fixture and lay out all the
parts on a clear area. Take care not to lose any small
parts necessary for installation.
2.Déballezsoigneusementvotrenouvellelampem urale et
étaleztoutes les pièces sur une surfacedégagée. Faites
attention à ne pas perdre les petites pièces nécessaires
pour l'installation.
2. Desempaque cuidadosamente su nuevo accesorio y
extienda las partes en un área libre. Ponga cuidado en no
perder ninguna de las partes pequeñas necesarias para la
instalación.
3. Attach the cross bar (B) to the outlet box (A) (not
supplied) using the 2 screws provided with the outlet
box (A).
3. Fixez la barre transversale (B) à la boîte à prises (A) (non
fournie) à l'aide des 2 vis fournies avec la boîte à prises (A).
3. Adjunte la barra transversal (B) a la caja de
tomacorrientes (A) (no incluida) usando 2 tornillos que se
proporcionan con la caja de tomacorrientes (A).
4 . CONNECTING THE WIRES Now connect the
electrical wires as follows: Connect the smooth wire
from the fixture to the black or red (lead) supply wire.
Connect the ridged wire from the fixture to the white
(neutral) supply wire. Make sure all wire nuts are
secured. You may wrap the connections with electrical
tape. If your outlet has a ground wire (green or bare
copper), connect fixture’s ground wire to it. Otherwise,
connect fixture’s ground wire directly to the crossbar
using the green screw provided. Tuck the wire
connections neatly into the ceiling junction box.
4. BRANCHEMENTS : Connectez ensuite les fils
électriques comme suit : raccordez le fil noir du luminaire
au fil noir (phase) de la maison. Raccordez le fil blanc du
luminaireau fil blanc (neutre) de la maison. Veillez à ce que
tous les capuchons de connexionsoient bien serrés.
Vouspouvezenvelopper les raccordementsavec du
rubanisolant. Si votreprisepossède un fil de mise à la terre
(vertoucuivrenu), raccordez le fil de masse de la lampe à
ce fil. Sinon, raccordez le fil de masse du
luminairedirectement à la barre transversale en utilisant la
vis verte fournie. Rentrezsoigneusement les
filsraccordésdans le boîtierélectrique du plafond.
4 .CONECTANDO LOS CABLES Ahora conecte los cables
eléctricos como sigue: Conecte el cable negro desde el
accesorio al cable (corriente) que se suministra. Conecte
el cable blanco desde el accesorio al cable blanco que se
suministra. Revise que todos as tuercas de cable estén
aseguradas. Puede envolver las conexiones con cinta de
aislar. Si el tomacorrientes lleva un cable a tierra (verde o
de cobre sin revestimiento), conecte el cable a tierra del
accesorio. En caso contrario conecte el cable a tierra del
accesorio directamente a la barra transversal usando el
tornillo verde que se proporciona. Acomode las
conexiones del cable cuidadosamente dentro de la caja de
conexión del techo.
5 . Connect the screw collar L oop (D) with the chain (J )
by the quuick link (N) .
5. Raccordezl'anneaud'accouplementfileté (D) à la chaîne
(J) à l'aide du maillon de raccordrapide (N).
5 .Conecte el tornillo collar lazo (D) con la cadena (J ) por el
eslabón rápido (N) .
6 . Move up the canopy (E) to the ceiling and secured by
the screw collar ring (F) to the screw sollar loop (D).
6. Faitesmonter la monture (E) vers le plafond et fixez‐la
envissant la bagued'accouplementfiletée (F) sur
l'anneaud'accouplementfileté (D).
6. Mueva la marquesina (E) hacia arriba al techo y
asegúrela por el tornillo collar anillo (F) al tornillo collar de
lazo (D).
INSTALLATION (FIG 1)
INSTALLATION (FIG 1)
INSTALACIÓN (FIG 1)
1. Shut off the power at the circuit breaker and remove
old fixture, including the crossbar.
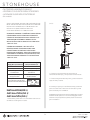
(FIG 1)
A
G
B
M
L
C
D
N
J
E
F
H
Connect Black or Red
Supply Wire (Lead Wire) to:
Connect White Supply
Wire (Neutral Wire) to:
Black wire White wire
*Parallel wire (round or smooth) *Parallel wire (square or ridged)
Clear, brown, gold or black
wire without tracer
Clear, brown, gold or black
wire with tracer
Insulated wire (other than green)
with copper conductor
Insulated wire (other than green)
with silver conductor
* When parallel wires are used, the neutral
wire is ridged down its length and the
other wire is round and smooth (see illus.).
Neutral Wire

41.855.715.1800
STONEHOUSE
OUTDOOR HANGING PENDANT
LÁMPARA COLGANTE PARA EXTERIORES
LUMINAIRE SUSPENDU D’EXTÉRIEUR
SKU: 440636
CARE AND MAINTENANCE:
SOINS ET ENTRETIEN:
CUIDADO Y MANTENIMIENTO:
To clean, wipe with damp cloth. Do not use abrasive
cleaners or cleaners that contain alcohol.
Pour nettoyer, essuyer avec un chiffon humide. Ne pas
utiliser de produits de nettoyage abrasifs ou contenant de
l'alcool.
Use un trapo húmedo para limpiar. No utilice limpiadores
abrasivos o limpiadores que contengan alcohol.
CAUTION:
MISE EN GARDE:
PRECAUCIÓN:
Shut off main power supply before cleaning product or
changing light bulbs. All glass is fragile. Use care when
handling glass shades and bulbs.
Couper l'alimentation électrique principale avant de
nettoyer ce produit ou de changer une ampoule. Pour
nettoyer, essuyer avec un chiffon humide. Ne pas utiliser
de produits de nettoyage abrasifs ou contenant de l'alcool.
Corte el suministro principal de energía antes de limpiar el
producto o cambiar las bombillas. Use un trapo húmedo
para limpiar. No utilice limpiadores abrasivos o limpiadores
que contengan alcohol.
RECOMMENDED TOOLS AND
ACCESSORIES
OUTILS ET MATÉRIAUX
RECOMMANDÉS
HERRAMIENTAS Y MATERIALES
RECOMENDADOS
SAVE THIS MANUAL: RETAIN FOR CONSUMER’S USE.
READ THESE INSTRUCTIONS COMPLETELY BEFORE
INSTALLING THE PRODUCT: FOR PRODUCT OR
INSTALLATIO QUESTIONS PLEASE CALL
CUSTOMER. SERVICE AT 1‐800‐221‐3379.
GUARDE ESTE MANUAL: CONSÉRVELO PARA USO DEL
CONSUMIDOR. LEA ESTAS INSTRUCCIONES POR
COMPLETO ANTES DE INSTALAR EL PRODUCTO: SI
TIENE PREGUNTAS SOBRE EL PRODUCTO O LA
INSTALACIÓN LLAME AL SERVICIO A A CLIENTES AL
1‐800‐221‐3379.
CONSERVEZ CE MANUEL : METTEZ‐LE À LA
DISPOSITION DES CONSOMMATEURS. LISEZ
COMPLÈTEMENT CES INSTRUCTIONS AVANT
D'INSTALLER LE PRODUIT : POUR TOUTE QUESTION
CONCERNANT LE PRODUIT OU SON INSTALLATION,
VEUILLEZ APPELER LE SERVICE À LA CLIENTÈLE AU
1‐800‐221‐3379.
1. Coupez le courantauniveau du disjoncteur et
retirezl'anciennelampe, y compris la barre transversale.
1. Corte la energía desde el disyuntor y quite el accesorio
viejo con todo y la barra.
2. Carefully unpack your new fixture and lay out all the
parts on a clear area. Take care not to lose any small
parts necessary for installation.
2.Déballezsoigneusementvotrenouvellelampem urale et
étaleztoutes les pièces sur une surfacedégagée. Faites
attention à ne pas perdre les petites pièces nécessaires
pour l'installation.
2. Desempaque cuidadosamente su nuevo accesorio y
extienda las partes en un área libre. Ponga cuidado en no
perder ninguna de las partes pequeñas necesarias para la
instalación.
3. Attach the cross bar (B) to the outlet box (A) (not
supplied) using the 2 screws provided with the outlet
box (A).
3. Fixez la barre transversale (B) à la boîte à prises (A) (non
fournie) à l'aide des 2 vis fournies avec la boîte à prises (A).
3. Adjunte la barra transversal (B) a la caja de
tomacorrientes (A) (no incluida) usando 2 tornillos que se
proporcionan con la caja de tomacorrientes (A).
4 . CONNECTING THE WIRES Now connect the
electrical wires as follows: Connect the smooth wire
from the fixture to the black or red (lead) supply wire.
Connect the ridged wire from the fixture to the white
(neutral) supply wire. Make sure all wire nuts are
secured. You may wrap the connections with electrical
tape. If your outlet has a ground wire (green or bare
copper), connect fixture’s ground wire to it. Otherwise,
connect fixture’s ground wire directly to the crossbar
using the green screw provided. Tuck the wire
connections neatly into the ceiling junction box.
4. BRANCHEMENTS : Connectez ensuite les fils
électriques comme suit : raccordez le fil noir du luminaire
au fil noir (phase) de la maison. Raccordez le fil blanc du
luminaireau fil blanc (neutre) de la maison. Veillez à ce que
tous les capuchons de connexionsoient bien serrés.
Vouspouvezenvelopper les raccordementsavec du
rubanisolant. Si votreprisepossède un fil de mise à la terre
(vertoucuivrenu), raccordez le fil de masse de la lampe à
ce fil. Sinon, raccordez le fil de masse du
luminairedirectement à la barre transversale en utilisant la
vis verte fournie. Rentrezsoigneusement les
filsraccordésdans le boîtierélectrique du plafond.
4 .CONECTANDO LOS CABLES Ahora conecte los cables
eléctricos como sigue: Conecte el cable negro desde el
accesorio al cable (corriente) que se suministra. Conecte
el cable blanco desde el accesorio al cable blanco que se
suministra. Revise que todos as tuercas de cable estén
aseguradas. Puede envolver las conexiones con cinta de
aislar. Si el tomacorrientes lleva un cable a tierra (verde o
de cobre sin revestimiento), conecte el cable a tierra del
accesorio. En caso contrario conecte el cable a tierra del
accesorio directamente a la barra transversal usando el
tornillo verde que se proporciona. Acomode las
conexiones del cable cuidadosamente dentro de la caja de
conexión del techo.
5 . Connect the screw collar L oop (D) with the chain (J )
by the quuick link (N) .
5. Raccordezl'anneaud'accouplementfileté (D) à la chaîne
(J) à l'aide du maillon de raccordrapide (N).
5 .Conecte el tornillo collar lazo (D) con la cadena (J ) por el
eslabón rápido (N) .
6 . Move up the canopy (E) to the ceiling and secured by
the screw collar ring (F) to the screw sollar loop (D).
6. Faitesmonter la monture (E) vers le plafond et fixez‐la
envissant la bagued'accouplementfiletée (F) sur
l'anneaud'accouplementfileté (D).
6. Mueva la marquesina (E) hacia arriba al techo y
asegúrela por el tornillo collar anillo (F) al tornillo collar de
lazo (D).
INSTALLATION (FIG 1)
INSTALLATION (FIG 1)
INSTALACIÓN (FIG 1)
1. Shut off the power at the circuit breaker and remove
old fixture, including the crossbar.
-
 1
1
-
 2
2
-
 3
3
-
 4
4


Signature Hardware 440636 Guide d'installation
- Taper
- Guide d'installation
dans d''autres langues
Documents connexes
-
Signature Hardware 440520 Eastland Pendant Manuel utilisateur
-
-
-
-
-
-
-
-
Signature Hardware 953461 Guide d'installation
-