Andrew James 4 Day Automatic Pet Feeder Manuel utilisateur
- Taper
- Manuel utilisateur

Please read the instrucon manual carefully and keep it for future reference.
4 Day Automac Pet Feeder

Baery Powered Products
Baery safety
Always use the correct size
and type of baery speci-
ed.
Use good quality alkaline
baeries. Follow any in-
strucons provided on the
baeries and packaging.
Do not mix baeries of
dierent chemistries or mix
old and new baeries. Re-
place baeries as a set and
of the same type.
Remove the baeries if the
appliance is not to be used
for several months.
Always insert baeries with
the correct polarity. Align
the + (posive) and –
(negave) terminals to the
appliance.
Do not aempt to recharge
a baery unless it is marked
as “rechargeable”
Under extreme condions
baeries may leak uid
which can cause damage to
the appliance and, irritaon
or burns if contacted on the
skin. Avoid contact, clean
surfaces aected to prevent
damage. Wash hands in wa-
ter.
Store and dispose of baer-
ies safely. Keep out of the
reach of children. Ensure the
baery terminals cannot be
shorted by coins or other
metal objects. Do not incin-
erate baeries.
Baeries are subject to sep-
arate disposal requirements
and should not be disposed
of in general household
waste. Follow local require-
ments for disposal.
Features
24 hour clock display.
6 second personal voice
message recorder.
Personal Voice message calls
your pet when its feeding
me.
Food Bowl rotates according
to your set me.
The 4 Feeding mes can be
set for any me of day or
night.
C size alkaline baeries
(4pc’s required) not re-
quired.
Red LED indicates low
baeries.

Extra compartment top for
ice-pack or water.
Control Panel
1. MODE - switches between
clock or feeding me display.
Also increases clock me dur-
ing clock / feeding me set
mode.
2. SET – enters sengs mode.
Also conrms the me you
enter and advances to next
seng.
3. START NOW – starts the feed-
ing mer immediately.
4. Lo Baery Indicator— Indi-
cates when baery has low
power.
5. LCD Display— Displays
sengs.
6. START TOMORROW- starts
the feeding mer the next day.
7. REC – records your personal
voice message.
8. PLAY – plays back your record-
ed voice message.
9. MIC—Microphone to record
personal message.
ON SWITCH – Located on under-
side of base. Turns the feeder
on / o.
Turn o when the feeder will not
be used for an extended period of
me. Turning this switch o will
RESET all me and feeding
sengs.

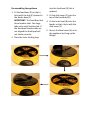
Appliance components illustraon
A. Bowl cover
B. Inner bowl cover
C. Slide cover
D. Food bowl
E. Hub
F. Feeder base

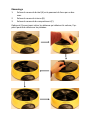
Disassemble
1. Remove the bowl cover (A) by
forcefully liing the lid from
underneath.
2. Remove the inner bowl (B).
3. Remove the slide cover (C).
Oponal: Remove the feedings trays
from the feeding base (D) the
appliance can be used with or
without the trays and rmly push
down.

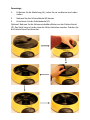
Re-assembling the appliance
1. Fit the food bowl (D) so that it
locks with the Hub (E) located in
the feeder base (F).
IMPORTANT: The Feed Bowl has
three locaon tabs. Two large
tabs and a small locaon tab. If
the feed bowl locaon tabs are
not aligned the feed bowl will
not locate correctly.
2. Place the Inner feeding trays
into the food bowl (D) this is
oponal.
3. Fit the slide cover (C) onto the
top of the food bowl (D).
4. Fit the inner bowl (B) onto the
feeder so that it locks with the
slide cover (C).
5. Secure the Bowl cover (A) onto
the appliance by lining up the
ngs.

Filling the bowl with food
1. Please disassemble the appliance
rst.
2. Fill the food bowl (D) with the
required amount of food (the
appliance can be used either with or
without the food trays).
3. Place the slide cover (C) onto the
appliance so that it ts the grooves.
4. Aach the Inner bowl (B) so that it
ts with the slide cover. You can
now ll the ice compartment if
required (C) .
5. Fit the bowl cover (A) accordingly.

Geng started
1. Carefully turn the pet feeder
upside down. Remove both
baery doors by squeezing the
two tabs and gently pull each
door away.
2. Keep the ON switch set to OFF.
Insert four C size alkaline
baeries into the baery tray.
Use Good quality alkaline
baeries.
3. Close the baery doors, rotate
the feeder right-side up and
switch ON The feeder will cycle
one me unl “12:00” is on the
LCD display.
Note: Your pet feeder makes the
food available in this sequence:
Tray 1, Tray 2, Tray 3 then Tray 4.
When only one feed is required
only ll Tray 1. For two feeds Tray
1 and 2. Connue the sequence on
for further feeds.
Seng the current Clock me
1. Press and hold the SET key for
(2 seconds) to enter Clock SET
mode. The hour number will
now begin to blink.
2. Press the MODE key to increase
the hour. Once you have set the
hour, press the SET key to
conrm the hour. The minute
number will now blink.
3. To change the minute number,
press the MODE key to increase
the minute. Once you have set
the minute, press the SET key
to conrm the minute. Both the
hour and minute numbers will
now blink.
4. If needed, Press the MODE key
to change between 12 or 24
hour me.
5. Press the SET key to conrm
your current me seng and
the numbers will stop blinking.
Seng the Feeding Time
1. Aer seng the clock me,
press the MODE key one me.
(1 1) will show on the display.
This is the feeding-me display
mode.
2. Now press and hold the SET key
for (2 seconds) to enter the
Feeding me SET mode.
Feeding will start from the rst
feeding number & me. The 1
st
digit shows the feeding number
(Food Tray 1).
3. The hour digit will now blink
(2
nd
and 3
rd
digit). Press the
MODE key to increase the

Program examples:
Feed once a day at 13:00hr (24hrs
display) and feed for 4 days
Feed me 1 & 2 & 3 & 4 =
13:00hr
Feed twice a day at 10:00 and 20:00
and feed for two days
Feed me 1 = 10, feed me 2 =
20, feed me 3 = 10 and feed
me 4 = 20
Feed four mes a day at 6:00,
11:00, 16:00 and 21:00
Feed me 1 = 06, feed me 2 =
11, feed me 3 = 16 and feed
me 4 = 20
Please note that the feeder will
start from the closest me for ex-
ample if its 13:00 and your feeder
has been set to feed at 8:00, 12:00,
15:00 and 18:00 it will start from
13:00.
Review and Start the feeding mer
1. Use the MODE key to cycle
through the clock and your set
feeding mes (clock - then 1st
feed me→2nd feed me→3rd
feed me→ 4th feed me→
back to clock…) The sequence
will repeat.
2. Press the START NOW key to
start the feeding mer immedi-
ately. The bowl will rotate to the
pre-set starng posion (Tray 4)
and your recorded message will
play once. The BELL icon will
now be seen in the LCD display.
3. Alternavely press the START
TOMORROW key and the feed-
ing mer will start at 0:00-
Midnight. The bowl will rotate to
the pre-set starng posion
(Tray 4) and your recorded mes-
sage will play once. The BELL and
Zz icon will now be visible in the
LCD display.
Display Mode
(to check feeding mes you have
set)
Use the MODE key to cycle through
clock and feeding sengs (clock -
then 1st feed me→2nd feed
me→3rd feed me→ 4th feed
me→ back to clock…) The se-
quence will repeat.
When the pet feeder runs out of
food, just rell it. You do not need
to go through the mer process
again.
Record Voice Message to be played
at feeding mes
1. Press and hold the REC key, the
Red LED will turn on.
2. Speak your message. You have
up to 20 seconds.

3. When nished release the REC
key.
4. Play back recorded Voice Mes-
sage.
Press the PLAY key.
Your recorded message will now
play.
At each Feeding your recorded
message will play back 3 mes.
Baery Replacement
Change all baeries when the Red
LED (Low baery indicator) ashes.
Use only new Alkaline baeries.
Notes and FAQ’S:
1. When the bowl is rotang both
the clock seng and mode
seng are not allowed.
2. Under clock display mode the
colon icon (:) will ash. The co-
lon icon (:) is turned O when in
feeding mer mode.
3. A PM icon will be displayed in
the aernoon under 12-hour
clock mode and turned o in the
AM. The PM icon will not be dis-
played under 24 hour clock
mode.
4. In feeding mer mode, three
numbers will show up, the rst
number is the feeding number
(1,2,3,or 4) and last two digits
indicate the feeding me in
hours.
5. When the feeding mer starts,
the BELL icon will turn on. Under
feeding-mer display mode a
solid BELL icon means the feed-
ing me has already passed. A
ashing BELL icon means the
feeding me has not been
reached. This lets the user know
how many feedings are le for
feeding.
6. If the me for the next feeding
is set earlier than the present
feeding me, the feeding will
start the next day.
7. If the Mode key is pressed and
held for more than 2 seconds
the number will rapidly increase
automacally unl you release
the key. When number reaches
its maximum, the number will
fall back to the minimum value
and start increasing again.
8. If the feeding mer has already
begun, pressing the START key
will reset the mer and begin
again from the 1
st
feeding-me
set.
9. If START TOMORROW key is
pressed, both the BELL and Zz
icon will be ON. The Zz icon will
turn OFF at 0:00 midnight to
indicate the mer has started.
10. START TOMORROW is used
should you want to set your
feeder up today and have it
start tomorrow. This is good for
when you have programmed
feeding mes that have yet to
pass so you can prepare in ad-
vance for a possible trip or just
being away the next day and not

Disposal of the appliance
Waste Electrical & Electronic
Equipment (WEEE) Waste &
Recycling
Disposal of Electrical and Electronic
Waste
Non-household waste. This product
must not be disposed of together
with ordinary household waste.
Separate collecon of used products,
baeries and packaging allows the
recovery and recycling of materials.
Reuse of materials helps prevent
environmental polluon and reduces
the demand for raw materials.
Local authories, retailers and
collecon organisaons may provide
for separate collecon of electrical
products, baeries and packaging.
UK and EU Guarantee
Your new Andrew James product
comes with a 24 month guarantee
and a 2 year xed warranty,
eecve from receipt conrmaon.
Your receipt or order number is
required as proof of purchase date
so it is imperave that you keep it
safe. This guarantee only applies if
the item has been used solely for
the use intended, and all
instrucons have been followed
accordingly. Please note this
product is only for domesc not
commercial use. Abuse of your
product will invalidate the
guarantee. Returned goods can only
be accepted if repackaged properly
within the original colour product
box, and presented with the
original receipt of sale/order
number. This does not aect your
statutory rights. Returned products
must be cleaned and returned to us
in as close to delivery condion as
possible. If your product develops a
problem within the rst 12 months
of the xed warranty, we will pay all
shipping costs to have it returned to
us. Aer 12 months the customer
will be liable for the cost of
returning the product to us. We will
then pay to have the repaired/
replaced item shipped back to the
customer. If you wish to return your
item for a full refund, you have the
right to do so within the rst 7 days.
For our returns policy please go to
www.andrewjamesworldwide.com
Customers are responsible for any
taxes applied to our products when
they are shipped outside of the EU.
All of our prices are inclusive of
VAT.
Once a product has been returned
to us, we will aim to repair or

replace it within 30 days of receipt.
The guarantee does not cover any
defect arising from improper use,
damage, build-up of lime scale or
repair aempts made by third-
pares. Also, the guarantee does not
cover normal wear and tear of
individual parts.
Contact details
Andrew James UK Ltd
Lighthouse View
Spectrum Business Park
Seaham, Durham
SR7 7PR
UK
Customer Service / Technical Support
Telephone 0844 335 8464
Email:
customerservices@andrewjamesworldwi
de.com
Customer Service/ Technical Support
Web:
www.andrewjamesworldwide.com
Twier: @andrewjamesltd
Facebook: Andrew James
Blog: www.thebishopskitchen.com
Copyright Andrew James
AJ0014121, AJ001055, AJ000284,
AJ000104 08/2016

Panneau de commande
MODE - alterne entre l’horloge et le temps d’alimentaon et pour
augmenter le temps indiqué sur l’horloge lorsque vous ulisez le
mode réglage de l’heure/temps d’alimentaon.
SET –pour accéder les réglages. On peut uliser ce bouton pour con-
rmer l’heure et aussi pour avancer au réglage suivant.
START NOW – La minuterie démarra automaquement.
START TOMORROW– La minuterie démarra le lendemain.
REC – Pour enregistrer un message vocal.
PLAY – Pour faire réécouter l’enregistrement.
ON SWITCH – Pour allumer/ éteindre l’appareil quand l’appareil ne
sera pas ulisé pendant une période prolongée. Cee foncon va
réinialiser tous les réglages de temps ou d’alimentaon.
Foncons
Achage 12 ou 24 heures.
Enregistreur pour enregistrer les messages vocaux de 6 secondes.
Le message vocal va appeler votre chien pour dîner.
Le récipient d’alimentaon tourne selon le temps prédéni.
les 4 périodes d’approvisionnement de nourriture peuvent être xé
pour n’importe quel moment de la journée ou de la nuit.
Piles alcalines de taille C (4 piles requises, non-inclus).
Le LED rouge indique baerie faible.
Un extra comparment au dessus pour les paquets de glace ou
d’eau.
Distributeur De Nourriture Automaque Pour
Animaux 4 Jours
Veuillez lire ce manuel d'ulisaon aenvement et le conser-
ver pour consultaons futures.

Illustraon des composants
A. Couvercle du bol D. Gamelle
B. Couvercle interne E. Moyeu
C. Couvercle du comparment F. Base

Démontage
1. Enlevez le couvercle du bol (A) en le poussant de force par en des-
sous.
2. Enlevez le couvercle interne (B).
3. Enlevez le couvercle du comparment (C).
Oponnel: On peut aussi rerer les plateaux qui réduisent le volume, l’ap-
pareil peut être ulisé sans les plateaux.

Remplir de nourriture et remonter l’appareil
1. Placez la gamelle (D) dans la base (F) et pousser jusqu'à ce qu'il s'en-
clenche avec le moyeu (E).
2. Si nécessaire, placez les plateaux dans la gamelle (D). Remplir la ga-
melle de croquees, avec ou sans les plateaux.
3. Meez le couvercle de comparment (C) sur la gamelle.
4. Meez le couvercle interne (B) sur la gamelle pour qu’il se verrouille
avec le couvercle de comparment (C).
5. Montez le couvercle du bol en alignant les bosses et les rainures.

Remontage de l'appareil
1. Installez le bol de nourriture (D) an
qu'il se verrouille avec le moyeu (E)
situé dans la base de l'alimentateur (F).
IMPORTANT: The Feed Bowl dispose de
trois onglets de localisaon. Deux
grands onglets et un pet onglet de lo-
calisaon. Si les onglets d'emplacement
du bol d'alimentaon ne sont pas
alignés, le bol d'alimentaon ne se trou-
ve pas correctement.
2. Placez les plateaux d'alimentaon
interne dans le bol de nourriture (D),
cela est facultaf.
3. Montez le couvercle coulissant (C) sur
le dessus de la cuvee (D).
4. Installez le bol intérieur (B) sur le
chargeur de manière à ce qu'il s'en-
clenche avec le cache coulissant (C).
Fixez le couvercle du bol (A) sur l'appa-
reil en alignant les raccords.

1. Tournez l’appareil à l’envers. Rerez les baeries en appuyant sur les deux
touches puis rerez chaque couvercle.
2. Assurez vous que le bouton ON est posionné à OFF.
3. Insérez quatre piles C dans le comparment. Ne jamais uliser lès piles usées
ou les piles au carbone ou de mauvaise qualité.
4. Replacer les couvercles et remere l’appareil à l’endroit puis allumer
l’appareil. L’appareil va tourner jusqu’à ce que “12:00” soit aché sur l’écran
LCD.
Note: Le mangeoire met la nourriture à disposion dans cee séquence: Plateau
1, Plateau 2, Plateau 3 puis Plateau 4. Lorsqu’une seule poron de nourriture est
requise remplissez seulement Plateau 1. Pour 2 Plateau 1 et 2. Connuez la
séquence pour plus de porons.
Pour régler l’horloge à l’heure actuelle
1. Appuyez le bouton SET et maintenez-le enfoncé pendant 2 secondes pour
séleconner le mode réglage de l’horloge. Maintenant l’heure va clignoter.
2. Appuyez sur le bouton MODE pour avancer l’heure. Lorsque vous avez réglé
l’heure appuyez de nouveau sur le bouton SET pour conrmer le nombres
d’heures. Maintenant le chire des minutes va clignoter.
3. Pour ajuster le chire des minutes, appuyez sur le bouton MODE pour
augmenter les minutes. Appuyer sur le bouton SET pour conrmer les
minutes. Maintenant les heures et les minutes clignoteront au même
moment.
4. Si nécessaire, on peut appuyer sur le bouton MODE pour alterner entre le
format 12h ou 24h.
5. Appuyez sur le bouton SET pour conrmer le temps. Les chires vont arrêter
de clignoter.
Pour commencer

Pour régler le temps de distribuon
Après avoir réglé l’horloge, appuyez une fois sur le bouton MODE . (1 1) sera
acher sur l’écran. Ceci est le mode d’achage du temps d’alimentaon.
1. Maintenant appuyez sur le bouton SET et maintenez-le enfoncé pendant 2
secondes pour séleconner le mode réglage de temps d’alimentaon.
L’appareil va rendre la nourriture disponible à parr du premier plateau et
temps d’alimentaon. Le premier chire représente le numéro de plateau.
2. L’heure va clignoter(2
ième
et 3
ème
chire). Appuyez sur le bouton MODE pour
augmenter le temps, puis appuyez sur le bouton SET pour séleconner le
temps.
3. Après avoir réglé le temps de distribuon 1, l’écran achera la prochaine
plateau et l’heure (le premier chie changera à la prochaine chire p. ex.
2,3,4 puis l’achage va revenir à 1). Pour réglez le temps de distribuon,
répétez la troisième étape.
4. Répétez la troisième étape jusqu’à ce que vous ayez réglé les quatre temps
de distribuon. Lorsque vous avez réglé tous les temps de distribuon
l’achage va revenir au mode horloge.
Exemplaire de cycles:
Une fois par jour à 13:00h (au format24h) pendant 4 jours
Temps de distribuon 1 & 2 & 3 & 4 = 13:00h
Deux fois par jour à 10:00h et 20:00h pendant 2 jours
Temps de distribuon 1 = 10, temps de distribuon 2 = 20, temps de
distribuon 3 = 10 & temps de distribuon 4 = 20
4 fois par jour à 6:00h, 11:00h, 16:00 & 21:00h
Temps de distribuon 1 = 06, temps de distribuon 2 = 11, temps de
distribuon 3 = 16 & temps de distribuon 4 = 20
euillez noter que l’appareil commencera au plus proche temps par exemple
s’il est 13.00h et votre appareil a été réglé pour 8:00h, 12:00h, 15:00h et
18:00, il déclencher à 13:00.
1
er
chiffre 2
ieme
chiffre 3
ieme
chiffre
Numéro de
plateau
Heure
d’alimentation

Révision et pour commencer le temps de distribuon
1. Appuyez sur le bouton MODE an de parcourir les réglages de l’horloge du
temps de distribuon (horloge - 1ière temps de distribuon→2ième temps
de distribuon →3ième temps de distribuon→ 4ième → horloge…) Cee
séquence va se répéter.
2. Appuyez sur le bouton START NOW pour démarrer la minuterie. Le bol va
tourner à la posion de démarrage prédénie (Plateau 4) et votre message
enregistré sera joué. Le symbole SONNERIE sera acher sur l’écran LCD.
3. Alternavement appuyez sur le bouton START TOMORROW et la minuterie
va démarrer à 0:00-Minuit. Le bol va tourner à la posion de démarrage pré-
dénie (Plateau 4) et votre message enregistré sera joué. La symbole SON-
NERIE et le symbole zZ seront achées sur l’écran LCD.
Mode d’achage (pour voir les heures que vous avez réglé
Appuyez sur le bouton MODE n de parcourir les réglages de l’horloge du temps de
distribuon (horloge - 1ière temps de distribuon→2ième temps de distribuon
→3ième temps de distribuon→ 4ième → horloge…) Cee séquence va se répéter.
Lorsque le mangeoire est vide, remplissez-le à nouveau. Il n’est pas nécessaire de
répéter le processus.
Enregistrer un message vocal à jouer pendant les temps de distribuon
1. Appuyez sur le bouton REC et maintenez-le enfoncé, le témoin rouge va s’al-
lumer.
2. Énoncez votre message. Vous avez jusqu’à vingt secondes.
3. Relâchez le bouton REC.
4. Faire réécouter le message en appuyant sur le bouton PLAY.
Maintenant votre message enregistré jouera.
Le message sera joué 3 fois avant chaque ulisaon.
Pour remplacer la baerie
Lorsque le LED rouge (indicateur de baerie faible) clignote veuillez remplacer
toutes les baeries. Ulisez uniquement les nouvelles baeries alcalines.
La page est en cours de chargement...
La page est en cours de chargement...
La page est en cours de chargement...
La page est en cours de chargement...
La page est en cours de chargement...
La page est en cours de chargement...
La page est en cours de chargement...
La page est en cours de chargement...
La page est en cours de chargement...
La page est en cours de chargement...
La page est en cours de chargement...
La page est en cours de chargement...
La page est en cours de chargement...
La page est en cours de chargement...
La page est en cours de chargement...
La page est en cours de chargement...
-
 1
1
-
 2
2
-
 3
3
-
 4
4
-
 5
5
-
 6
6
-
 7
7
-
 8
8
-
 9
9
-
 10
10
-
 11
11
-
 12
12
-
 13
13
-
 14
14
-
 15
15
-
 16
16
-
 17
17
-
 18
18
-
 19
19
-
 20
20
-
 21
21
-
 22
22
-
 23
23
-
 24
24
-
 25
25
-
 26
26
-
 27
27
-
 28
28
-
 29
29
-
 30
30
-
 31
31
-
 32
32
-
 33
33
-
 34
34
-
 35
35
-
 36
36


Andrew James 4 Day Automatic Pet Feeder Manuel utilisateur
- Taper
- Manuel utilisateur
dans d''autres langues
Documents connexes
Autres documents
-
Sera X-Feeder Information For Use
-
Trixie 24382 - TX4 Plus Le manuel du propriétaire
-
 EYENIMAL Small Pet Feeder Manuel utilisateur
-
PETKIT Fresh Element SOLO Manuel utilisateur
-
 Pet Mate FISH MATE P7000 Manuel utilisateur
-
Trixie TX4 Manuel utilisateur
-
JBL PROPOND AUTOFOOD Manuel utilisateur
-
-
ROSIERES RFV460EIX Manuel utilisateur
-
Canon WG7250 Multifunction Printer Guide de démarrage rapide

