Liebherr HW8000 Mode d'emploi
- Catégorie
- Cave à vin
- Taper
- Mode d'emploi

HW 3000, HW 4800, HW 8000
7085 007-00
Use and
Care Manual
for Wine Cooler
Manuel
d’utilisation
et d’entretien
de l’armoire à vin
réfrigérante
Page 20
Manual
de uso y
cuidado
del refrigerador de vino
Página 38

2
IMPORTANT
All types and models are subject to continuous
improvement. The manufacturer reserves the right
to make modifications to the shape, equipment and
technology.
Please Read and Follow These
Instructions
These instructions contain Danger, Warning and
Caution notes.
This information is important for safe and efficient
installation and operation.
Always read and comply with all Danger, Warning and
Caution notes!
DANGER!
Danger indicates a hazard which
will cause serious injury or death if
precautions are not followed.
WARNING!
Warning indicates a potentially hazardous
situation which, if not avoided, could
result in death or serious injury.
CAUTION!
Caution indicates a potentially hazardous
situation which, if not avoided, may result
in minor or moderate injury.
IMPORTANT
This indicates information that is especially relevant
to a problem-free installation and operation.
T
able
of
C
onTenTs
Contents Page
Please Read and Follow These Instructions ................ 2
California Proposition 65 ............................................... 2
Disposal of Old Appliance ............................................. 3
Disposal of this Appliance ............................................. 3
R600a Refrigerant ......................................................... 3
Important Safety Information ......................................... 4
Electrical Safety ............................................................. 4
Safety Regulations ......................................................... 5
Disposal of Carton ......................................................... 5
Setting Up ...................................................................... 5
The Right Environment for Your Wines ......................... 6
Description of the Appliance ......................................... 6
Operating and Control Elements ................................... 7
Switching the Appliance On and Off ............................. 7
Setting the Temperature ................................................ 7
Door Open Alarm ........................................................... 8
Temperature Alarm ........................................................ 8
Ventilation Button ........................................................... 8
Setup Mode .................................................................... 8
Interior Light ..................................................................11
Air Exchange with Activated Charcoal Filter ................11
Additional Features .......................................................12
Storage Diagram ...........................................................12
Cleaning ........................................................................15
Troubleshooting ............................................................16
Customer Service .........................................................16
Appliance Information ...................................................17
Turning Off the Appliance ............................................. 17
LIEBHERR WARRANTY PLAN....................................18
California Proposition 65
- This product contains chemicals known to the state
of California to cause cancer or reproductive harm.
- This product can expose you to chemicals including
Diisononyl Phthalate (DINP) which is known to the
State of California to cause cancer. For more infor-
mation go to www.P65Warnings.ca.gov.
- This product can expose you to chemicals includ-
ing Di-isodecyl Phthalate (DIDP) which is known to
the State of California to cause birth defects or other
reproductive harm. For more information go to
www.P65Warnings.ca.gov.

3
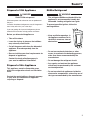
R600a Refrigerant
WARNING!
The refrigerant R600a contained within the
appliance is environmentally friendly, but
flammable. Leaking refrigerant can ignite.
To prevent possible ignition, follow the
warnings below:
•
Keep ventilation openings, in
the appliance enclosure or in
the built-in structure, clear of
obstruction.
• Donotusemechanicaldevicesorother
means to accelerate the defrosting process,
other than those recommended by the
manufacturer.
• Donotdamagetherefrigerantcircuit.
• Anyrepairsandworkontheappliance
should only be performed by the customer
service department.
• Donotuseelectricalappliancesinsidethe
wine cooler compartment, unless they are of
the type recommended by the manufacturer.
s
afeTy
Disposal of Old Appliance
DANGER!
Risk of child entrapment.
Child entrapment and suffocation are not problems of
the past.
Junked or abandoned refrigerators are still dangerous –
even if they will sit for “just a few days.”
If you are getting rid of your old refrigerator, please
follow these instructions to help prevent accidents.
Before you discard old appliances:
• Takeoffthedoors.
• Leavetheshelvesinplacesothatchildren
may not easily climb inside.
• Cutoffthepowercablefromthediscarded
appliance. Discard separately from the
appliance.
• Besuretofollowyourlocalrequirementsfor
disposal of appliances.
Contact the trash collection agency in
your area for additional information.
Disposal of this Appliance
This appliance contains flammable gases
within the refrigeration circuit and insulation
foam.
Contact the municipality or disposal company
in your area for information on approved
recycling or disposal.

4
Important Safety Information
• Topreventinjurytoyouordamagetotheunit,
the appliance should be unpacked and set up by
two people.
• Iftheapplianceisdamagedondelivery,contact
the supplier immediately before connecting it to
the power source.
• Toguaranteesafeoperation,ensurethatthe
appliance is set up and connected as described
in this manual.
• Disconnecttheappliancefromthepowersource
if a fault occurs. Pull out the plug, turn off or dis-
able the power source.
• Whendisconnectingtheappliance,alwayspullit
out by the plug; never pull on the cable.
• Anyrepairsandworkontheapplianceshould
only be performed by the customer service
department. Unauthorized work may be danger-
ous to the user. The power source cable should
only be changed or replaced by the customer
service department.
• Donotstoreexplosivesorspraysusingcom-
bustible propellants such as butane, propane,
pentane, etc. in the appliance. Electrical compo-
nents might cause leaking gas to ignite. You can
identify such sprays by the printed contents or a
flame symbol.
• Topreventpossibleinjuryduetoanelectric
shock, be sure to disconnect the power cord or
turn off the circuit breaker before cleaning the
appliance.
• Toavoidinjuryordamagetotheappliance,do
not use steam cleaning equipment to clean the
appliance.
• Donotoperatetheapplianceinthepresenceof
explosive fumes.
• Intheeventofapoweroutage,openthedoor
as infrequently as possible.
• Toprotecttheappliancefrompossibledamage,
allow it to stand 1/2 to 1 hour in place before
turning on the electricity. This allows the refriger-
ant and system lubrication to reach equilibrium.
s
afeTy
Electrical Safety
Connect this appliance to a 15 amp or 20 amp, 110-
120 VAC, circuit which is grounded and protected by a
circuit breaker or fuse.
We recommend using a dedicated circuit for this appli-
ance to prevent circuit overload and the chance of
interruption to the appliance.
This appliance is equipped with a three-prong (ground-
ing) polarized plug for your protection against possible
shock hazards.
Where a two-prong wall receptacle is encountered,
contact a qualified electrician and have it replaced with
a properly grounded three-prong receptacle in accor-
dance with all local codes and ordinances.
WARNING!
Electrocution hazard.
Electricalgroundingrequired.
•
Do not remove the round grounding
prong from the plug.
•
Do not use extension cords or
ungrounded (two-prong) adapters.
• Donotuseapowercordthatisfrayedor
damaged.
•
Do not use a power strip.
Failure to follow these instructions may
result in fire, electric shock or death.

5
U
npaCking
Safety Regulations
The appliance is designed to cool and store wine and
beverages. It is designed as a household appliance.
IMPORTANT
The appliance is not intended for outdoor use.
The appliance is manufactured to operate within spe-
cific ambient temperature limits according to its climate
rating.
The climate rating indicates the ambient temperature
at which the appliance may be operated in order to
deliver optimal refrigeration performance.
Climate Rating Ambient Temperature
SN-ST 50°F to 100°F (10°C to 38°C)
IMPORTANT
Do not operate the appliance outside the
specified ambient temperature range.
- The refrigerant circuit has been tested for leaks.
- The appliance complies with current safety regula-
tions
CAN/CSA C22.2 No.60335-1-11
UL 60335-1 Fifth Edition
CAN/CSA C22.2 No. 60335-2-24-06
UL 60335-2-24 First Edition
We recommend cleaning the appliance before turning it
on for the first time. See Cleaning.
Turn on the appliance several hours before filling it.
WARNING!
Do not allow children to play with the
appliance. Children must not climb, sit or
stand on the shelves or door.
Failure to follow these instructions may
result in death or serious injury.
Disposal of Carton
The packaging is designed to protect the appliance and
individual components during transport and is made of
recyclable materials.
WARNING!
Keep packaging materials away from
children. Polythene sheets and bags can
cause suffocation!
If possible, please recycle packaging material at a recy-
cling facility.
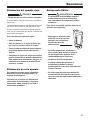
Setting Up
CAUTION!
To avoid risk of personal injury or property
damage, have two people unpack and
move this appliance into place.
IMPORTANT
Protect the finished floor surface before you uncrate
the unit.
Avoid placing the appliance in direct sunlight or near
the stove, range top, radiators and similar heat sources.
As soon as you uncrate the unit:
• Examinetheunitandpackagingforshippingdam-
age. Contact the carrier immediately if you suspect
there is any damage.
• Notethetype(modelnumber),servicenumber,
appliance / serial number, date of purchase and
where purchased in the space provided in the back
of this manual.

6
f
eaTUres
The Right Environment for Your Wines
A grapevine is an extremely sensitive plant. From the time it is planted until its maturing period and the time the
grapes are harvested and the wine is made, it is dependent on three factors: light, air humidity and ambient tempera-
ture.
This sensitivity continues even after the wine is bottled.
To allow the flavor of the wine to fully develop or to preserve the excellent aroma, the wine has to be stored at optimal
conditions. Your wine cooler offers the best conditions for this.
Wines only develop their full flavor and aroma when they are at the right temperature for drinking.
In your wine cooler, wines can be brought slowly and evenly to the ideal drinking temperature.
Red wines and white wines can be stored at the same time at the optimal drinking temperature in two separately
adjustable temperature zones.
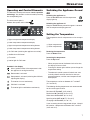
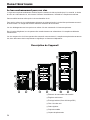
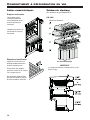
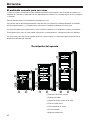
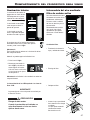
Description of the Appliance
1
Operating and control elements
2 Pull-out shelves
3 Interior light (LED light strip)
4 Activated charcoal filter
5 Adjustable-height feet
6 Type plate
7 Presentation shelf

7
o
peraTion
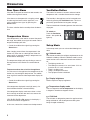
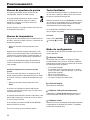
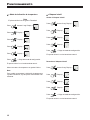
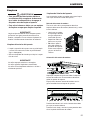
Operating and Control Elements
The electronic control panel features “touch capacitive
technology”. Any function can be activated by touching
the corresponding icon.
The exact contact point is
between the symbol and its label
1
Upper compartment temperature display
2
Lower compartment temperature display
3
Upper compartment temperature setting buttons
4
Lower compartment temperature setting buttons
5
On/Off button (switching the appliance on and off)
6
Audible alarm Off button
7
Fan switch
8
Interior light On/Off button
Symbols in the display
Alarm (symbol flashes if the temperature inside
the appliance is too high or too low)
Demo mode is activated
Setup mode is activated (activating the child lock,
adjusting the display)
The interior fan runs continuously
Child lock is activated
The interior light is switched on continuously
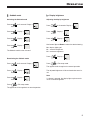
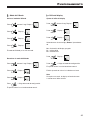
Setting the Temperature
The temperature of each compartment can be set sepa-
rately.
1
Upper compartment
2
Lower compartment
Reducing the temperature
Press the Down button.
Increasing the temperature
Press the Up button.
- When you press one of the buttons for the first time,
the display will start to flash.
- Pressing this button again enables you to change the
temperature setting.
- The electronic control system will switch over auto-
matically about 5 seconds after the last time you
pressed the button, and the actual temperature will
be displayed.
The temperature can be set between 41°F and 68°F
(5°C and 20°C).
The following drinking temperatures are recommended
for the various types of wine.
Red wines 57°F to 68°F (14°C to 20°C)
Rosé wines 50°F to 54°F (10°C to 12°C)
White wines 46°F to 54°F (8°C to 12°C)
Sparkling wines 44°F to 48°F (7°C to 9°C)
Champagne 41°F to 44°F (5°C to 7°C)
If you are storing wine for long periods of time, it should
be stored at a temperature of between 50°F and 54°F
(10°C and 12°C).
Switching the Appliance On and
Off
Switching the appliance on
Press the On/Off button until the temperature
display lights up.
Switching the appliance off
Keep the On/Off button pressed for approx. 3 seconds
until the temperature display goes out.

8
Ventilation Button
The interior fan ensures a constant and even interior
temperature and a suitable climate for wine storage.
The humidity in the appliance can be increased even
further by pressing the Ventilation button. This has a
particularly positive effect for long-term storage.
The increased level of humidity prevents the corks from
drying out.
To switch on
Press the Ventilation
button - the symbol
lights up.
o
peraTion
Door Open Alarm
If the door is left open for more than 180 seconds, the
audible alarm signal will sound.
If the door must be opened for a lengthy period
in order to place items into the appliance, can-
cel the audible alarm signal by pressing the
Alarm button.
The alarm switches back to standby when the door is
shut.
Temperature Alarm
If the temperatures in the interior are out of the permit-
ted range, the audible alarm signal will sound and the
temperature display will flash.
• Canceltheaudiblealarmsignalbypressingthe
Alarm button.
After a lengthy power failure, the temperature in the
interior may have risen to a too high level. After the
power supply is restored, the drop in temperature can
be watched on the display.
The temperature display will stop flashing as soon as
the temperature in the interior has reached the set
value.
Temperature alarm after a fault in the appliance
If a fault occurs in the appliance, the temperature in the
interior may rise too high or drop too low. The audible
alarm signal will sound and the temperature display will
flash.
• Canceltheaudiblealarmsignalbypressingthe
Alarm button.
If the temperature displayed is too high (warm), first
check whether the door is closed correctly.
If the temperature display continues to show a value
that is too high or too low after one hour, contact the
customer service department.
If F1, F8, E1, E2, E7 or E8 appears in the display, a
fault has occurred in the appliance.
In this case, contact the customer service department.
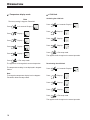
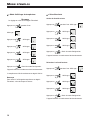
Setup Mode
In the setup mode, you can activate the following func-
tions:
= Sabbath mode
This feature considers the religious requirements on the
Sabbath or holidays. When the Sabbath mode is active,
some functions of the electronic controls are switched
off.
• Thelightingremainsoff.
• Thecoolingfanremainsinitsactualstate:Ifitison,
it remains on, if it is off, it remains off.
• Thereisnodooralarm.
• Thereisnotemperaturealarm.
• TheTipOpenfunctionisdisabled.
= Display brightness
Used to adjust the display brightness
= Temperature display mode
You can choose the unit of temperature for the display
in degrees Fahrenheit or degrees Celsius.
= Child lock
The child lock is designed to protect the appliance from
being switched off and the temperature setting from
being changed accidentally.

9
o
peraTion
= Display brightness
Adjusting the display brightness
Press
for 5 seconds. Display =
Press Display =
Press Display =
Use buttons Up and Down to select the desired setting.
h0 = display lighting off
h1 = minimum brightness
h5 = maximum brightness
Press
Display =
Press = Exit setup mode.
The appliance will change back to normal operation.
The adjusted brightness will be activated after one min-
ute.
Note
If a button is pressed, the display lights up for one min-
ute at maximum brightness.
= Sabbath mode
Activating the Sabbath mode
Press
for 5 seconds. Display =
Press Display =
Press Display =
Press Display =
The Sabbath mode is now activated.
Deactivating the Sabbath mode
Press
for 5 seconds. Display =
Press Display =
Press Display =
Press = Exit setup mode.
The appliance will change back to normal operation.

10
o
peraTion
= Child lock
Activating the child lock
Press
for 5 seconds. Display =
Press Display =
Press Display =
Press Display =
Press = Exit setup mode.
The appliance will change back to normal operation.
Deactivating the child lock
Press
for 5 seconds. Display =
Press Display =
Press Display =
Press Display =
Press = Exit setup mode.
The appliance will change back to normal operation.
= Temperature display mode
Note
The factory setting is degrees Fahrenheit.
Press
for 5 seconds. Display =
Press Display =
Press Display =
Press Display =
Press Display =
Press = Exit setup mode.
The appliance will change back to normal operation.
The temperature reading is now displayed in degrees
Celsius.
Note
To change the temperature display back to degrees
Fahrenheit, follow the steps above.

11
W
ine
C
ooler
C
omparTmenT
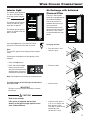
Interior Light
The interior of the appliance
is lit by an LED light strip
at the top of each compart-
ment.
The interior light will always
switch on when the appli-
ance door is opened.
The interior light will go out
approx. 5 seconds after the
door is closed.
Press the Light button if you want the interior
light to be on even when the door is closed.
Note
This function applies to the lighting of both compart-
ments.
Furthermore, the brightness of the lighting can be
adjusted.
• PresstheLight button.
• PressandholdtheLight
button and at the same
time press the temperature
setting buttons to increase
or decrease the brightness.
Note: The brightness will change in all compartments.
The light intensity of the LED light corresponds to
laser class 1/1M.
IMPORTANT
The light cover may only be removed by customer
service staff.
CAUTION!
Risk of eye damage.
If the cover is removed, do not look
directly at the light through optical lenses
from a close distance.
Air Exchange with Activated
Charcoal Filter
The way in which wines
continue to age depends on
the ambient conditions.
The quality of the air is
therefore decisive for pre-
serving the wine.
We recommend that you
replace the filter illustrated
here once a year. Filters
can be obtained from your
dealer.
Changing the filter
• Pushthecoverinand
release it again.
• Pulloutthefilter.
• Insertthefilter.
• Insertthecover,pushit
in as far as it will go and
then release it again.
The cover is automatically
locked into place.
You will hear a click.

12
Labels
The appliance is supplied with
one label for each wooden shelf.
Use these to label the type of
wine stored on each shelf.
Additional labels can be
obtained from your dealer.
Additional Features
Pull-out shelves
The pull-out shelves
allow bottles of wine to
be viewed and removed
more easily.
The control element
panel shelf cannot be
removed.
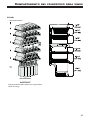
Total 30 bottles
Storage Diagram
for 0.75 l Bordeaux bottles
IMPORTANT
The maximum load per wooden shelf is
55 lbs (25 kg).
Number of bottles
W
ine
C
ooler
C
omparTmenT
HW 3000

13
Total 48 bottles
IMPORTANT
The maximum load per wooden shelf is
55 lbs (25 kg).
Number of bottles
W
ine
C
ooler
C
omparTmenT
HW 4800

14
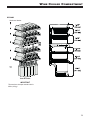
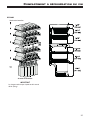
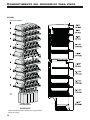
Total 80 bottles
IMPORTANT
The maximum load per wooden shelf is
55 lbs (25 kg).
Number of bottles
W
ine
C
ooler
C
omparTmenT
HW 8000

15
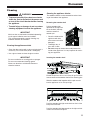
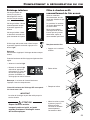
Removing the wooden shelf
Pull the wooden shelf
upwards on the right and
left at the back (release)
and then remove it
towards you.
• Cleantheinsideofthe
appliance with luke-
warm water and a little
detergent.
• Thoroughlydryall
parts with a cloth.
• Do not damage or remove the model plate on the
inside of the appliance. It is very important for servic-
ing your appliance.
Cleaning
WARNING!
• Topreventpossibleinjuryduetoanelectric
shock, be sure to disconnect the power cord
or turn off the circuit breaker before cleaning
the appliance.
• Toavoidinjuryordamage,donotusesteam
cleaningequipmenttocleantheappliance.
IMPORTANT
Mold can form on the bottles and labels depending
on the type of adhesive used on the labels.
This can be prevented by carefully cleaning any
adhesive residues off the bottles.
Cleaning the appliance outside
• Cleanthedoorsurfacewithacleanandsoftcloth.If
necessary, use a moist cloth (water + detergent).
• Useaglasscleanertocleantheglasssurface.
IMPORTANT
Do not use abrasive or scouring pads or sponges.
Do not use concentrated cleaning agents.
Never use abrasive or acid-based cleaners or
chemical solvents.
Cleaning the appliance interior
The wooden shelves can be removed for easier clean-
ing of the inside of the appliance.
Inserting the wooden shelf
Extend the pull-out rails as far as they will go. Place the
front recesses of the wooden shelf on the securing pins.
Slide the wooden shelf together with the pull-out rails
into the appliance as far as they will go.
Push the wooden shelf right to the back so that it clicks
into place at the front.
Push the wooden shelf downwards on the right and left
at the back and click into place.
C
leaning

16
T
roUbleshooTing
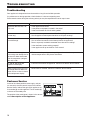
Customer Service
If none of the above possible causes apply, and you
can not rectify the fault yourself, contact the Liebherr
Service Center. Indicate the type (1) of appliance, ser-
vice number (2) and the appliance / serial number (3)
as shown on the model plate.
The position of the model plate is shown in the section
entitled Description of the Appliance.
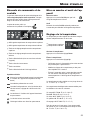
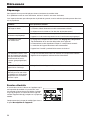
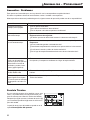
Troubleshooting
Your appliance is designed and manufactured for a long life and reliable operation.
If a problem occurs during operation, check whether it is due to an operating error.
Please note that even during the warranty period, you may be responsible for certain repair costs.
Problem Possible cause and remedy
Appliance does not work, dis-
play is off.
- Is the appliance turned on?
- Is the power cord properly inserted in the outlet?
- Is the circuit breaker or fuse in working order?
Motor seems to
run too long.
- Is the ambient temperature too hot? See Safety Regulations.
- Has the appliance been opened too often or left open too long?
The temperature is
not cold enough.
- Is the temperature setting correct? See Setting the Temperature.
- Has an excessive amount of wine been placed in the appliance?
- Does a separately installed thermometer show the correct reading?
- Is the ventilation system working properly?
- Is the appliance set up too close to a heat source?
The fans inside the appliance
are running even though the fan
function has been deactivated
and the compressor (refrigera-
tion unit) is idle.
- This is a normal operating state depending on the set interior temperature and
ambient temperature at the place of installation.
F1, F8, E1, E2, E7 or E8
appears in the display.
- A fault has occurred in the appliance. Contact the Liebherr Service Center.
When inserting the mains plug,
the refrigeration unit does not
switch on, but a value is shown
in the temperature display.
- Demo mode is activated. Contact the Liebherr Service Center.

17
a
pplianCe
i
nformaTion
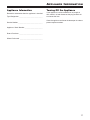
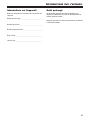
Appliance Information
Record this information when the appliance is installed.
Type Designation: _____________________________
Service Number: ______________________________
Appliance / Serial Number: ______________________
Date of Purchase: _____________________________
Where Purchased: ____________________________
Turning Off the Appliance
If your appliance is to be turned off for any length of
time, switch it off and disconnect the plug or switch off
or unscrew the fuse.
Clean the appliance and leave the door open in order to
prevent unpleasant odors.

18
LIEBHERR WARRANTY PLAN
FULL TWO YEAR WARRANTY
For two years from the date of original purchase, your Liebherr warranty covers all parts and labor to repair or
replace any part of the product which proves to be defective in materials or workmanship.
FULL FIVE YEAR WARRANTY
For five years from the date of original purchase, your Liebherr warranty covers all parts and labor to repair or
replace any components that prove to be defective in materials or workmanship in the sealed system. The “Sealed
System” means only the compressor, condenser, evaporator, drier and all connecting tubing.
LIMITED 6TH THROUGH 12TH YEAR WARRANTY
From the 6th through 12th year from the date of original purchase, your Liebherr warranty covers all parts that prove
to be defective in materials or workmanship in the Sealed System (parts only).
TERMS APPLICABLE TO EACH WARRANTY
All service provided by Liebherr under the warranty must be performed by authorized Liebherr service representa-
tives, unless otherwise specified by Liebherr. Service will be provided in the home during normal business hours.
This warranty applies only to products installed for normal residential use. Details regarding a non-residential war-
ranty are available on request.
The warranty applies only to products installed in Canada and any one of the fifty states of the United States or the
District of Columbia. This warranty does not cover any parts or labor to correct any defect caused by negligence,
accident or improper use, maintenance, installation, service or repair, including but not limited to improper removal
and reinstallation of the condensing unit.
THE WARRANTIES DESCRIBED ABOVE ARE MADE EXPRESSLY IN LIEU OF ANY OTHER WARRANTIES,
EXPRESSED OR IMPLIED, INCLUDING ANY IMPLIED WARRANTY OF MERCHANTABILITY OR FITNESS FOR
A PARTICULAR PURPOSE, AND OF ANY OTHER OBLIGATION OR LIABILITY ON THE PART OF LIEBHERR.
IN NO EVENT SHALL LIEBHERR BE LIABLE FOR SPECIAL, INCIDENTAL OR CONSEQUENTIAL DAMAGES
ARISING FROM THE BREACH OF THESE WARRANTIES OR ANY OTHER WARRANTIES, WHETHER
EXPRESS, IMPLIED OR STATUTORY.
Some states do not allow the exclusion or limitation of incidental or consequential damages so the above limitation
or exclusion may not apply to you. This warranty gives you specific legal rights and you may also have other rights
which vary from state to state.
To receive parts and/or service and the name of the Liebherr authorized service representative nearest you, contact
your Liebherr dealer or distributor or contact the Liebherr designated national service provider:
in the US: Service-appliances.us@liebherr.com, or call 1-866-LIEBHER or 1-866-543-2437
in Canada: www.euro-parts.ca, or call 1-888-LIEBHER, 1-888-543-2437.
W
arranTy

19

20
IMPORTANT
Tous les types et modèles d’appareil sont sujets à
des améliorations en permanence. Le fabricant se
réserve le droit d’apporter des modifications à la
conception, à l’équipement et à la technologie.
Veuillez lire et suivre ces
instructions
Ce manuel d’instructions contient des indications
de danger, des avertisse ments et des précautions à
prendre.
Ces informations sont importantes afin de garantir une
installation et un fonctionnement sûrs et efficaces.
Toujours lire les indications de dangers, les avertisse-
ments et les précautions à prendre et agir en consé-
quence!
DANGER!
Indiqueundangerquiprovoquerapoten-
tiellement des blessures graves, voire
la mort, si des précautions ne sont pas
prises.
AVERTISSEMENT!
Unavertissementindiqueunesituation
potentiellementdangereusequi,sielle
n’est pas évitée, pourrait entraîner la mort
ou de graves blessures.
ATTENTION!
Attentionindiqueunesituationpotentiel-
lementdangereusequi,siellen’estpas
évitée, pourrait entraîner des blessures
modérées ou mineures.
IMPORTANT
Ceci souligne l’information spécialement pertinente
à une installation et un fonctionnement sans
problème.
T
able
des
maTières
Table des matières Page
Veuillez lire et suivre ces instructions ......................... 20
California Proposition 65 ............................................. 20
Mise au rebut de votre appareil usagé ........................ 21
Évacuation de cet appareil .......................................... 21
Fluide frigorigène R600a ............................................. 21
Consigne importante de sécurité ................................ 22
La sécurité et l’électricité ............................................. 22
Contraintes de sécurité ................................................ 23
Évacuation du matériel d’emballage ........................... 23
Mise en place ............................................................... 23
Le bon environnement pour vos vins .......................... 24
Description de l’appareil .............................................. 24
Éléments de commande et de contrôle ...................... 25
Mise en marche et arrêt de l’appareil .......................... 25
Réglage de la température .......................................... 25
Alarme porte ouverte ................................................... 26
Alarme température ..................................................... 26
Touche Ventilation........................................................ 26
Mode Configuration ..................................................... 26
Éclairage intérieur ........................................................ 29
Filtre à charbon actif: renouvellement de l’air assuré . 29
Autres caractéristiques ................................................ 30
Schéma de stockage ................................................... 30
Nettoyage ..................................................................... 33
Dépannage .................................................................. 34
Service clientèle ........................................................... 34
Informations sur l’appareil ............................................ 35
Arrêt prolongé .............................................................. 35
GARANTIE LIEBHERR ............................................... 36
California Proposition 65
- Ce produit contient des produits chimiques reconnus
par l’état de la Californie comme causant le cancer
ou des troubles reproductifs.
- Ce produit contient des produits chimiques, y
compris du diisononyl phthalate (DINP), reconnus
par l‘État de Californie pour causer des cancers.
Pour plus d‘informations, consulter le site www.
P65Warnings.ca.gov.
- Ce produit contient des produits chimiques, y com-
pris du diisodecyl phthalate (DINP), reconnus par
l‘État de Californie pour provoquer des anomalies
congénitales ou des effets néfastes sur la reproduc-
tion. Pour plus d‘informations, consulter le site
www.P65Warnings.ca.gov.
La page est en cours de chargement...
La page est en cours de chargement...
La page est en cours de chargement...
La page est en cours de chargement...
La page est en cours de chargement...
La page est en cours de chargement...
La page est en cours de chargement...
La page est en cours de chargement...
La page est en cours de chargement...
La page est en cours de chargement...
La page est en cours de chargement...
La page est en cours de chargement...
La page est en cours de chargement...
La page est en cours de chargement...
La page est en cours de chargement...
La page est en cours de chargement...
La page est en cours de chargement...
La page est en cours de chargement...
La page est en cours de chargement...
La page est en cours de chargement...
La page est en cours de chargement...
La page est en cours de chargement...
La page est en cours de chargement...
La page est en cours de chargement...
La page est en cours de chargement...
La page est en cours de chargement...
La page est en cours de chargement...
La page est en cours de chargement...
La page est en cours de chargement...
La page est en cours de chargement...
La page est en cours de chargement...
La page est en cours de chargement...
La page est en cours de chargement...
La page est en cours de chargement...
La page est en cours de chargement...
La page est en cours de chargement...
-
 1
1
-
 2
2
-
 3
3
-
 4
4
-
 5
5
-
 6
6
-
 7
7
-
 8
8
-
 9
9
-
 10
10
-
 11
11
-
 12
12
-
 13
13
-
 14
14
-
 15
15
-
 16
16
-
 17
17
-
 18
18
-
 19
19
-
 20
20
-
 21
21
-
 22
22
-
 23
23
-
 24
24
-
 25
25
-
 26
26
-
 27
27
-
 28
28
-
 29
29
-
 30
30
-
 31
31
-
 32
32
-
 33
33
-
 34
34
-
 35
35
-
 36
36
-
 37
37
-
 38
38
-
 39
39
-
 40
40
-
 41
41
-
 42
42
-
 43
43
-
 44
44
-
 45
45
-
 46
46
-
 47
47
-
 48
48
-
 49
49
-
 50
50
-
 51
51
-
 52
52
-
 53
53
-
 54
54
-
 55
55
-
 56
56


Liebherr HW8000 Mode d'emploi
- Catégorie
- Cave à vin
- Taper
- Mode d'emploi
dans d''autres langues
- English: Liebherr HW8000 User guide
- español: Liebherr HW8000 Guía del usuario
Documents connexes
-
Liebherr WS17800 Mode d'emploi
-
-
-
-
-
-
-
-
Liebherr HC1540 Mode d'emploi
-