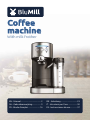
bluMill Coffee machine Manuel utilisateur
- Catégorie
- Cafetières
- Taper
- Manuel utilisateur

Coee
machine
With milk frother
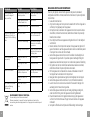
EN - Manual ...................................... 2
NL - Gebruiksaanwijzing ................ 9
FR - Mode d’emploi ......................16
DE - Anleitung ...............................23
IT - Istruzioni per l’uso .................30
ES - Instrucciones de uso ............37

2 3
IMPORTANT SAFEGUARDS
When using electrical appliances, basic safety precautions should always
be followed to reduce the risk of re, electric shock and/or injury to persons,
including the following:
1.
Read all instructions.
2.
Make sure that your outlet voltage corresponds to the voltage stated on the
rating label of the coffee maker.
3.
To protect against re, electric shock and injury to persons do not immerse
cord, plug or unit in water or other liquid.
4.
Close supervision is necessary when any appliance is used by or near
children.
5.
Unplug from outlet when not in use and before cleaning. Allow to cooling
before putting on or taking off parts, and before cleaning the appliance.
6.
Do not operate any appliance with a damaged cord or plug or after the
appliance malfunctions, or has been damaged in any manner. Return
appliance to an authorized service facility for examination, repair or
adjustment.
7.
The use of accessory not recommended by the appliance manufacturer may
result in re, electric shock or injury to persons.
8.
To disconnect, turn any control to the off position then remove plug from
wall outlet.
9.
Do not touch any hot surfaces, use handles or knobs.
10.
Do not use outdoors or for commercial purposes.
11.
Do not let cord hang over edge of table or counter, or touch hot surface.
12.
Use on a hard, at level surface only, to avoid interruption of airow
underneath the appliance.
13.
Always be sure to place the water reservoir tightly back in the unit with its lid
closed and ll with water on or above the minimum before turning appliance
on.
14.
Do not remove the porta-lter while brewing coffee. Please make sure the
three lights are on before you remove the porta-lter to make additional
coffee. Caution should also be taken while removing the porta-lter since the
metal parts will be hot. Please make sure to hold it by the handle and to use
the lter retention clip to dispose the grounds. Caution should be taken when
moving unit with hot liquids.
15.
Do not remove the water reservoir until unit is turned off.
16.
This appliance is not intended to be operated by means of an external timer or
separate remote-control system.
17.
The appliance can be used by children aged from 8 years and above and
persons with reduced physical, sensory or mental capabilities or lack of
experience and knowledge if they have been given supervision or instruction
concerning use of the appliance in a safe way and understand the hazards
involved. Children shall not play with the appliance. Cleaning and user
maintenance shall not be made by children unless they are older than 8 and
supervised.
18.
Keep the appliance and its cord out of reach of children less than 8 years.
19.
Before removing any of the parts and accessories, make sure the three
lights are on, press the power button to the off position “O” and unplug the
appliance.
20.
Do not remove the porta-lter at any time during the brewing process.
21.
Use caution when removing the porta-lter. The metal parts may still be very
hot. Also, there may be hot water oating on the top of the lter. Hold it only
by its handle and dispose of the brewed coffee ground by using the lter
retention clip.
22.
If coffee does not drip, the lter is blocked. Turn off the appliance and allow
it to cool down. The blockage may be caused by the coffee being too nely
ground. See the “PROBLEMS AND CAUSES” section.
23.
WHEN CLEANING THE FROTHED MILK DISPENSING TUBE: Place a large cup
under the tube. Fill the milk reservoir with water and place it back on the unit.
Turn the Froth Control Knob clockwise to the clean position “ ” then press the
latte/clean button for 3 seconds and release to activate the clean function. Let
the unit dispense the water through the tube for approximately 30 seconds
and then press the Latte/Clean Button once to stop the process.
24.
Do not place on or near a hot gas or electric burner, or in a heated oven.
EN EN

4 5
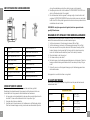
KNOW YOUR COFFEE MAKER
FOR THE FIRST USE
Cleaning and priming the unit prior to rst use.
Please refer to the “Description of the Appliance” section to familiarize with the
product and identify all parts.
1. Please make sure the unit is off “O” by pressing the power button located on
the side of the unit. Make sure it is unplugged from the electrical outlet.
2. Remove stickers and labels from the unit.
3. First remove and then wash the water reservoir, the milk reservoir, the por-
ta-lter, the three lters and measuring scoop in a mixture of mild detergent
EN EN
25.
Do not use appliance for other than intended use.
26.
Do not leave the appliance on unattended.
27.
This appliance is intended to be used in household and similar applications
such as:
– Staff kitchen areas in shops, oces and other working environments;
– Farm houses;
– By clients in hotels, motels and other residential type environments;
– Bed and breakfast type environments.
28.
Save these instructions.
CAUTION: PRESSURE
In order to avoid possible burns to body parts and/or other injury from hot
steam and water or damages to the unit, never remove the water reservoir or the
porta-lter while your espresso/cappuccino maker is brewing coffee or frothing.
Make sure the three lights are on before you can remove the porta-lter to make
additional cups of coffee. If you need to add more water or milk to the reservoirs,
please make sure the three lights are on and ensure to switch off the unit by
pressing the red button on the side of the unit to the off position “O”.
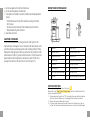
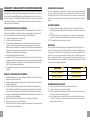
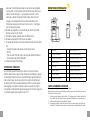
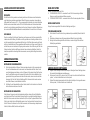
1 Indicator 9 Power switch
2Espresso button 10 Removable water tank
3 Cappuccino button 11 Water tank lid
4Latte button 12 Frothed milk dispensing tube
5Prota-lter 13 Frothing tube lever
6 Travelling cup 14 Froth control knob
7Cup height adjusting drawer 15 Milk reservoir lid
8 Drip tray 16 Removable/clear milk reservoir
1
2 3 4
5
6
78
9
11
10
14
13 15
16
12

6 7
and water. Rinse each thoroughly and place them back into the unit.
4. Refer to the instructions on “PLACING THE PORTA-FILTER” section before
placing or removing the porta-lter and lter from the unit.
5. To clean the inside of the appliance, follow the steps listed on the “PREPA-
RING CAPPUCCINO” section using water in both reservoirs and no coffee in
the lter. Do not immerse the appliance in water or attempt to reach any of
its internal parts.
NOTE: In order for your unit to work properly time after time, clean it after
every use.
IMPORTANT –PRIME THE UNIT
To prime unit, run the steam cycle for 90 seconds by following the steps below:
1. Fill water reservoir between the “Min” and “Max” levels.
2. Fill the milk reservoir with water between the “Min” and “Max” levels.
3. Select one of the lters and place it on the porta-lter. Place the porta-lter
in the unit ensuring it is properly locked and place a cup under it. Also, make
sure the tip of the frothed milk dispensing tube is inside the cup.
4. Plug the appliance into the appropriate outlet.
5. Turn the power button on “I”.
6. The three control panel lights will start blinking. Once these lights become
solid, press the cappuccino button twice.
7. Once this process is completed, the three control panels will turn on solid.
Now your unit has been primed and is ready to be used.
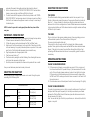
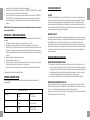
SELECTING THE RIGHT CUP
Before preparing your beverage, please make sure to select the right cup size
according to the following table:
SELECTING THE RIGHT COFFEE
THE COFFEE
The coffee should be freshly ground and dark roasted. You may want to try a
French or Italian roast ground for espresso. Pre-ground coffee will only retain its
avor for 7 – 8 days, provided it is stored in an airtight container and in a cool,
dark area. Do not store in a refrigerator or freezer. Whole beans are recommended
to be ground just before use. Coffee beans stored in an airtight container will keep
its avor for up to 4 weeks.
THE GRIND
This is a vital step in the espresso making process if you are grinding your own
coffee and takes practice. The coffee must be of a ne grind.
The correct grind should look like salt.
If the grind is too ne, the water will not ow through the coffee even under
pressure. These grinds look like powder and feel like our when rubbed between
ngers. If the grind is too coarse, the water ows through the coffee too fast,
preventing a full-avored extraction. Be sure to use a quality grinder for uniform
consistency.
OPERATING INSTRUCTIONS
FILLING THE WATER RESERVOIR
1. Fill the reservoir with water, you may either use a jar to ll it up or remove it
from the unit and then ll it up under the tap. If you have removed it from the
unit to ll up with water, please make sure to place it back tightly in its place.
Fill the reservoir with the desired amount of water ensuring it ranges within
the“MIN” and “MAX” markings on the tank. Never use warm or hot water to ll
the water reservoir
2. Close the water reservoir lid and place it back in the unit ensuring it ts tightly
FILLING THE MILK RESERVOIR
If you plan to prepare cappuccino or latte, remove the milk reservoir from the unit
and open the lid then pour the quantity of cold milk you estimate you will need
between the “Min” and“Max” levels. When done, place the milk reservoir back in
the unit ensuring it ts tightly.
Note: You can use the type of milk of your preference, i.e. whole milk, low fat milk,
organic or soy milk.
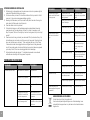
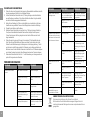
Caffé Barista Ratios
Espresso Single
Double
60 ml (2oz)
119 ml (4oz)
Cappuccino Single
Double
178 ml (6oz)
355 ml (12oz)
Latte Single
Double
296 ml (10oz)
474 ml (16oz)
EN EN

8 9
CHOOSE THE FILTER
Select the lter to be used as follows:
1. FOR A SINGLE SHOT– use the lter for a single shot of espresso if using
ground coffee
2. FOR A DOUBLE SHOT OR TWO SINGLE SHOTS- use lter for a double shot.
FILLING WITH COFFEE
Place selected lter on porta-lter as follows:
FOR GROUND COFFEE:
1. Fill the lter with fresh, ne ground espresso coffee (do not overll).
2. Tamp and compress rmly and evenly ground coffee.
3. Clean any excess coffee from the rim to ensure proper t under brew head.
PLACE THE PORTA-FILTER
1. Position porta-lter underneath the brew head, attach porta-lter by rst
moving retainer clip back.
2. Position handle so that the handle lines up with the open lock icon “ ” on the
unit and ts into the groove.
3. Then, slowly turn it to the right until the retention clip is aligned with the
closed lock symbol “ ” on the unit.
PLACING THE CUP(S)
1. Pull out the height adjustment tray if you are using a small “demitasse” cup to
brew espresso.
2. Keep the height adjustment tray inside its compartment if you are using a
larger cup to brew cappuccino.
3. Keep the height adjustment tray inside its compartment if you are using a
larger cup to brew latte.
CAUTION: When brewing cappuccino or latte, please make sure to adjust the fro-
thing tube lever in order to position the froth milk dispensing tube inside the cup
to be used.
TURNING THE UNIT ON
1. Make sure unit is plugged in.
2. Turn unit on “I”.
The three control panel lights will start blinking during heating and until the water
reaches the perfect temperature. Once these lights become solid, the unit is ready
to use.
SELECT THE FUNCTION
PREPARING ESPRESSO
1. Press the Espresso Button once to brew one single shot.
2. Press the Espresso Button twice to brew a double shot.
3. Press and hold the Espresso Button for 3 seconds to customize the brewing
to your preference. When done, press the Espresso Button once again to stop
it.
The unit will start brewing the espresso according to your selection. The unit will
turn off automatically and the lights will become solid indicating that the cycle has
been completed. Your delicious espresso is ready to be enjoyed.
NOTE: To brew less coffee than the preset serving, press the function button to
stop the brewing process when the amount of coffee desired is reached.
PREPARING CAPPUCCINO
Prior to preparing your cappuccino, adjust the quantity of frothed milk according
to your preference by turning the Froth Control Knob to the right for more foam
and to the left for less foam.
Note The foam intensity can be adjusted during the brewing cycle.
1. Press the Cappuccino Button once to brew a small cup of cappuccino.
2. Press the Cappuccino Button twice to brew a large cup of cappuccino.
EN EN

10 11
The unit will start brewing the cappuccino according to your selection. Your deli-
cious cappuccino is ready to be enjoyed.
PREPARING LATTE
Prior to preparing your cappuccino, adjust the quantity of frothed milk according
to your preference by turning the Froth Control Knob to the right for more foam
and to the left for less foam.
1. Press the Latte Button once to brew a small cup of latte.
2. Press the Latte Button twice to brew a large cup of latte.
PREPARING FROTH MILK
The unit also allows you to prepare froth milk only. Press and hold the Cappu-
ccino Button for 3 seconds if you wish to add more foam to your beverage or
to prepare froth milk for any other beverage, e.g. macchiato, hot chocolate, chai
latte, etc. When done, press the Cappuccino Button once again to stop it.
AFTER PREPARING YOUR BEVERAGES WITH MILK
Once you are done preparing your beverage with milk, you can either store the
unit’s milk reservoir directly in the refrigerator (ready to be used for the next time)
or dispose of the leftover milk.
INTRODUCTION
ESPRESSO
A unique method of coffee brewing in which hot water is forced through nely
ground coffee. Popular in Europe, it is a far richer and more full-bodied brew than
regular drip coffee. Because of its richness, espresso is usually served in 44 to
59 ml (1.5 to 2 oz.) portions, in demitasse cups.
CAPPUCCINO
A drink made with about 1/3 espresso, 1/3 steamed milk, and 1/3 frothed milk.
LATTE
A drink made with about 1/4 espresso and 3/4 steamed milk.
Please read ALL of the instructions, cautions, notes and warnings included in
this instruction manual carefully before you begin to use this appliance. When
this unit is used, some parts and accessories get hot and need to cool down.
Proper care and maintenance will ensure the long life of the Automatic Espresso,
Cappuccino, and Latte Maker and its trouble-free operation. Save these instructi-
ons and refer to them often for cleaning and care tips.
CORRECT USE OF GROUND COFFEE FOR ESPRESSO MAKER
Do not use sugar roasted ground coffee or sugar roasted coffee beans as these
will clog the lter and damage the appliance. If sugar roasted coffee is acciden-
tally used, stop using the unit and bring it to the closest service center for main-
tenance. We recommend descaling the machine periodically to keep it in good
working condition. Contact our service centers to learn about this process.
CLEANING THE MILK RESERVOIR AND FROTHING TUBE
Even though you can store the milk reservoir with left over milk in the refrigerator,
it is important to clean the reservoir and frothing tube regularly to avoid clog-
ging and building residues. In order to clean the milk reservoir, please follow the
instructions listed below:
1. Remove the milk reservoir from the unit
2. Remove the lid of the reservoir.
3. Pour any milk left and rinse and wash the milk reservoir and its lid thoroug-
hly with warm soapy water. Rinse and dry well. Do not use abrasive cleaners
and scouring pads, as they will scratch the nish. The milk reservoir is also
dishwasher safe (top rack). Do not place the lid of the milk reservoir on the
dishwasher.
4. Place a large empty cup under the frothing tube.
5. Press and hold the Latte/clean button for 3 seconds and then release it. The
unit will start releasing steam through the frothing tube, let it run for a few
seconds until you don’t see any milk in cup. When done press the Latte/ clean
button once to stop the process.
6. Dispose any water left on the milk reservoir and place it back in the unit.
CLEANING THE BREW HEAD, THE PORTA-FILTER AND FILTER
1. Switch the power button on the side of the unit to the off position “O” and
unplug the power cord from the electrical outlet.
2. Some of the metal parts might still be hot. Do not touch them with your hands
until they have cooled.
3. Remove the porta-lter and discard the coffee grounds or used pod. Wash
both the porta-lter and lter with warm soapy water and rinse them well. Do
not wash the porta-lter and lters in the dishwasher.
4. Wipe lower part of the brew head in the unit with a damp cloth or paper towel
to remove any coffee grounds that might have been left.
5. Place the porta-lter (without any lter) back in the brew head in the unit.
6. Place an empty large cup under the porta-lter.
7. Press the espresso button once and let the unit brew with water only until it
stops automatically.
EN EN

12 13
CLEANING THE WATER RESERVOIR
Discard the remaining water by removing the reservoir and turning it upside
down over the sink. It is recommended to empty the water reservoir between
uses. Wash the water reservoir with soapy water, rinse it well and wipe it dry. The
water reservoir is also dishwasher safe.
CLEANING THE UNIT
1. Wipe housing with a soft wet cloth. Do not use abrasive cleaners or scouring
pads, as they will scratch the nish.
2. Do not store the porta-lter in the brew head. This can adversely affect the
seal between the brew head and the porta-lter while brewing espresso.
CAUTION: Do not immerse appliance in water.
DELIMING
Mineral deposits built-up in the unit will affect the operation of the appliance.
Your appliance must be delimed when you begin to notice an increase in the
time required to brew espresso, or when there is excessive steaming. Also, you
may notice a build-up of white deposits on the surface of the brew head.
The frequency of cleaning depends upon the hardness of the water used. The
following table gives the suggested cleaning intervals.
TO DELIME THE WATER RESERVOIR:
1. Fill the reservoir with fresh, undiluted white household vinegar.
2. Allow appliance to sit overnight with the vinegar solution in the water reser-
voir.
3. Discard vinegar by removing the reservoir and turning it upside down over
the sink.
4. Rinse the water reservoir thoroughly with tap water by lling tank half full
with water and then pouring the water back out into the sink, repeating this
step twice.
TO DELIME INTERNAL PARTS:
1. Make sure you delime the inside of the water reservoir rst by following the
“Deliming” steps above.
2. Make sure to switch the power button to the “O” position and the power cord
is disconnected from the electrical outlet. Fill the reservoir with white vinegar
above the minimum level into reservoir.
3. Insert the porta-lter (with lter and no coffee) and place jar/carafe or regular
cup on top of the drip tray and under the porta-lter.
4. Plug the power cord into the electrical outlet.
5. Press the power button to switch the unit on “I”, once the 3 control panel lights
turn solid blue, press the Espresso/Custom Button twice. The vinegar will
start owing through the unit and it will stop automatically.
6. Place a pitcher or large cup (with at least 325 mL/ 11-ounce capacity) under
the tube. Fill the milk reservoir with water and place it back on the unit. Turn
the Froth control knob clockwise to the clean position “ ”, then press the latte/
clean button for 3 seconds to activate the clean function. Let the unit dispen-
se the water through the tube for approximately 30 seconds and then press
the Latte/clean button once to stop the process.
7. Repeat Steps 1 – 7 as necessary using only tap water to rinse any remaining
traces of vinegar out of the machine.
PROBLEMS AND CAUSES
Type of water Cleaning Frequency
Soft water (ltered water) Every 80 brew cycles
Hard water (Tap water) Every 40 brew cycles
EN EN
PROBLEM CAUSES SOLUTIONS
Coffee does not
come out.
No water in reservoir. Add water
Coffee grind is too ne. Grind medium ground
coffee.
Too much coffee in the
lter.
Fill lter with less coffee.
Appliance was not turned
on or plugged in.
Plug unit into electrical
outlet and turn it on.
Coffee has been tam-
ped/compressed too
much.
Rell lter basket with
coffee, do not tamp too
much.

14 15
PROBLEM CAUSES SOLUTIONS
Coffee comes out
around the edge of
the porta-lter.
Porta-lter not rotated to
full lock position.
Rotate lter holder to full
lock position.
Coffee grounds around
the lter basket rim.
Wipe off rim
Too much coffee in the
lter.
Fill with less coffee.
Milk is not foamy after
frothing or it is not co-
ming out of the frothing
tube
Ran out of steam Ensure there is enough
water in the reservoir.
Milk is not cold enough. Chill milk and frothing
pitcher prior to making
cappuccino.
Frothing tube is blocked. Follow the instructions to
clean the milk reservoirs
&frothing tube.
Coffee comes out
too quickly
Ground coffee is too
coarse.
Use a ner grind.
Not enough coffee in
lter.
Use more coffee.
Coffee is too weak. Using small lter for dou-
ble shot of espresso
Use large lter for double
shot of espresso
Ground coffee is too
coarse.
Add water to reservoir.
The three control panel
lights are ashing
alternatively
Water tank is out of
water
Add water to reservoir.
ENVIRONMENT FRIENDLY DISPOSAL
You can help protect the environment!
Please remember to respect the local regulations: hand in the
non-working electrical equipments to an appropriate waste disposal
center.
EN BELANGRIJKE WAARSCHUWINGEN
Houd u bij het gebruik van elektrische apparatuur altijd aan de standaard
veiligheidsvoorschriften om brand, elektrische schokken en/of persoonlijk letsel
te voorkomen.
1.
Lees alle instructies door.
2.
Zorg dat het voltage van het stopcontact overeenkomt met het voltage dat is
vermeld op het typeplaatje van het apparaat.
3.
Dompel het snoer, de stekker en het apparaat niet onder in water of andere
vloeistoffen, omdat zich anders brand, elektrische schokken of persoonlijk
letsel kunnen voordoen.
4.
Houd altijd toezicht als een apparaat wordt gebruikt door of in de nabijheid
van kinderen.
5.
Haal de stekker uit het stopcontact wanneer u het apparaat niet gebruikt of
gaat schoonmaken. Laat het apparaat afkoelen voordat u onderdelen plaatst
of verwijdert en voordat u het schoonmaakt.
6.
Gebruik het apparaat niet als het snoer of de stekker is beschadigd of als
het apparaat niet goed werkt of op andere wijze is beschadigd. Breng het
apparaat naar een erkend servicepunt voor onderzoek, reparatie of afstelling.
7.
Het gebruik van niet door de fabrikant aanbevolen accessoires kan brand,
elektrische schokken of persoonlijk letsel veroorzaken.
8.
Om het apparaat uit te schakelen zet u de aan-uitschakelaar in stand ‘O’.
Vervolgens haalt u de stekker uit het stopcontact.
9.
Raak geen hete oppervlakken aan; gebruik de handgrepen en de knoppen.
10.
Gebruik het apparaat niet buitenshuis of voor commerciële doeleinden.
11.
Laat het snoer niet over de rand van de tafel of het aanrecht hangen of in
aanraking komen met een heet oppervlak.
12.
Gebruik het apparaat uitsluitend op een harde, gelijkmatige ondergrond,
zodat de luchtstroming onder het apparaat niet wordt geblokkeerd.
13.
Plaats het waterreservoir met gesloten deksel stevig op het apparaat en
vul het tot het minimumniveau of hoger met water voordat u het apparaat
inschakelt.
14.
Verwijder de lterhouder niet tijdens de koebereiding. De drie lampjes
NL

16 17
moeten branden voordat u de lterhouder verwijdert om een volgende kop
koe te bereiden. Houd er bij het verwijderen van de lterhouder rekening
mee dat de metalen onderdelen heet zijn. Pak de lterhouder vast bij de
handgreep en gebruik de lterklem om het koedik te verwijderen. Let op als
u het apparaat met hete vloeistoffen verplaatst.
15.
Verwijder het waterreservoir niet voordat het apparaat is uitgeschakeld.
16.
Dit apparaat is niet bedoeld voor gebruik in combinatie met een externe timer
of aparte afstandsbediening.
17.
Dit apparaat mag worden gebruikt door kinderen van 8 jaar en ouder en door
personen met lichamelijke, zintuiglijke of geestelijke beperkingen of met
gebrek aan ervaring en kennis, op voorwaarde dat zij worden begeleid of
geïnstrueerd over het veilige gebruik van het apparaat en op de hoogte zijn
van de risico’s ervan. Dit apparaat is geen speelgoed. Reiniging en onderhoud
mag worden uitgevoerd door kinderen ouder dan 8 jaar, maar uitsluitend
indien er toezicht op hen wordt gehouden.
18.
Houd het apparaat en het snoer buiten bereik van kinderen jonger dan 8 jaar.
19.
Voordat u onderdelen of accessoires verwijdert moeten de drie lampjes
branden, moet de aan-uitknop in de stand ‘O’ staan en moet de stekker uit het
stopcontact zijn.
20.
Verwijder de lterhouder niet tijdens de koebereiding.
21.
Let op bij het verwijderen van de lterhouder. De metalen onderdelen kunnen
nog heet zijn. Ook kan er nog heet water over de bovenkant van het lter
lopen. Pak de lterhouder vast bij de handgreep en verwijder het koedik met
de lterklem.
22.
Als de koe niet doorloopt is het lter verstopt. Schakel het apparaat uit en
laat het afkoelen. De oorzaak van de verstopping kan te jn gemalen koe
zijn. Raadpleeg het onderdeel ‘PROBLEMEN EN OORZAKEN’.
23.
MELKUITLOOP REINIGEN: Zet een grote mok onder de uitloop. Vul het
melkreservoir met water en zet het weer op het apparaat. Draai de stoomknop
met de klok mee in de stand ‘ ’. Druk vervolgens de knop ‘Latte’/’Clean’ 3
seconden in en laat hem vervolgens los zodat de reinigingsfunctie wordt
geactiveerd. Laat gedurende circa 30 seconden water door de melkuitloop
lopen en druk daarna nogmaals op de knop ‘Latte’/’Clean’ om de
reinigingsfunctie te beëindigen.
24.
Zet het apparaat niet op of in de nabijheid van een heet fornuis of in een
verwarmde oven.
25.
Gebruik het apparaat uitsluitend voor het doel waarvoor het is bestemd.
26.
Laat het apparaat niet onbeheerd achter terwijl het aanstaat.
27.
Het apparaat is bedoeld voor gebruik in een woonhuis of vergelijkbare
locatie, zoals:
– de keukenruimte in een winkel, kantoor of andere werkomgeving;
– agrarische bedrijven;
– hotel- en motelkamers of andere verblijfsruimten;
– gastenkamers.
28.
Bewaar deze voorschriften goed.
LET OP: DRUK
Om brandwonden en overig letsel door hete stoom en heet water of om
beschadigingen aan het apparaat te voorkomen mag u het waterreservoir of de
lterhouder nooit verwijderen terwijl u koe bereidt of melk opschuimt. De drie
lampjes moeten branden voordat u de lterhouder verwijdert om een volgende
kop koe te bereiden. Als u de reservoirs bijvult met water of melk moeten de
drie lampjes branden en moet u het apparaat uitschakelen door de rode knop
aan de zijkant in stand ‘O’ te zetten.
NL NL

18 19
UW KOFFIEMACHINE LEREN GEBRUIKEN
VOOR HET EERSTE GEBRUIK
Reinigen en ontluchten voordat u het apparaat de eerste keer gebruikt
Raadpleeg het onderdeel waarin het apparaat wordt beschreven zodat u ver-
trouwd raakt met het apparaat en alle onderdelen kunt herkennen.
1. Het apparaat moet uitgeschakeld zijn: de aan-uitknop aan de zijkant moet in
de stand ‘O’ staan en de stekker moet uit het stopcontact zijn.
2. Verwijder alle stickers en etiketten.
3. Verwijder eerst het waterreservoir, het melkreservoir, de lterhouder, de drie
lters en het maatschepje en reinig ze met water en afwasmiddel. Spoel en
1 Indicator 9 Aan-uitschakelaar ‘I/O’
2Knop ‘Espresso’/’Custom’ 10 Afneembaar waterreservoir
3Knop ‘Cappuccino’/’Froth’ 11 Deksel waterreservoir
4Knop ‘Latte’/’Clean’ 12 Melkuitloop
5Filterhouder 13 Hendel melkuitloop
6 Meeneembek 14 Stoomknop
7 In hoogte verstelbare lade 15 Deksel melkreservoir
8Lekrooster 16 Doorzichtig melkreservoir
1
2 3 4
5
6
78
9
11
10
14
13 15
16
12
droog alle onderdelen grondig af en plaats ze weer op het apparaat.
4. Raadpleeg de instructies in het onderdeel ‘FILTERHOUDER PLAATSEN’ voor-
dat u de lterhouder plaatst of verwijdert.
5. Om de binnenkant van het apparaat te reinigen volgt u de instructies in het
onderdeel ‘CAPPUCCINO BEREIDEN’ met water in beide reservoirs en zonder
koe in het lter. Dompel het apparaat niet onder in water en probeer interne
onderdelen niet aan te raken.
OPMERKING: reinig het apparaat na elk gebruik, zodat uw apparaat steeds
goed blijft functioneren.
BELANGRIJK: HET APPARAAT VOOR GEBRUIK KLAARMAKEN
Om het apparaat voor gebruik klaar te maken, activeert u de stoomcyclus gedu-
rende 90 seconden aan de hand van onderstaande stappen:
1. Vul het waterreservoir tot halverwege de niveaus ‘Min’ en ‘Max’.
2. Vul het melkreservoir met water tot halverwege de niveaus ‘Min’ en ‘Max’.
3. Neem een van de lters en plaats deze in de lterhouder. Bevestig de lter-
houder zodanig op het apparaat dat hij stevig vastzit en plaats er een kop
onder. Het uiteinde van de melkuitloop moet zich in de kop bevinden.
4. Steek de stekker in het stopcontact.
5. Zet de aan-uitknop in de stand ‘I’.
6. De drie lampjes op het bedieningspaneel beginnen nu te knipperen. Zodra de
lampjes ononderbroken gaan branden drukt u twee keer op de knop ‘Cappu-
ccino’.
7. Zodra dit proces is voltooid gaan de lampjes op het bedieningspaneel onon-
derbroken branden.
Het apparaat is nu ontlucht en klaar voor gebruik.
DE JUISTE KOP KIEZEN
Kies voordat u koe gaat bereiden het juiste formaat kop aan de hand van de
onderstaande tabel:
Caffé Barista Ratios
Espresso Single
Double
60 ml (2oz)
119 ml (4oz)
Cappuccino Single
Double
178 ml (6oz)
355 ml (12oz)
Latte Single
Double
296 ml (10oz)
474 ml (16oz)
NL NL

20 21
DE JUISTE KOFFIE KIEZEN
DE KOFFIE
De koe moet versgemalen en donker gebrand zijn. Voor espresso kunt u het
beste Frans of Italiaans gebrande bonen gebruiken. Gemalen koe behoudt zijn
aroma slechts 7 tot 8 dagen, mits bewaard in een luchtdichte doos op een koele,
donkere plaats. Bewaar koe niet in de koelkast of diepvries. Hele bonen kunt u
het beste vlak voor gebruik malen. Als u koebonen bewaart in een luchtdichte
doos behouden ze hun aroma tot wel 4 weken.
DE MALING
Zelf koe malen is een essentiële stap in het proces van het bereiden van espres-
so en die vergt enige oefening. De koe moet jn worden gemalen.
De juiste maling moet de structuur hebben van tafelzout.
Als de maling te jn is, dringt het water er zelfs onder hoge druk niet doorheen. Te
jn gemalen koe ziet eruit als poeder en voelt aan als meel als u het tussen uw
vingers wrijft. Als de maling te grof is, loopt het water er te snel doorheen, waar-
door de koe niet zijn volle aroma krijgt. Gebruik een goede koemolen voor een
gelijkmatige consistentie.
GEBRUIKSAANWIJZING
WATERRESERVOIR VULLEN
1. Om het reservoir met water te vullen, kunt u een kan gebruiken of u kunt het
reservoir in zijn geheel van het apparaat wegnemen en onder de kraan vullen.
Als u het reservoir van het apparaat hebt verwijderd moet u het na het vullen
weer stevig bevestigen. Vul het reservoir zodanig met de benodigde hoeveel-
heid water dat het niveau zich binnen de aanduidingen ‘Min’ en ‘Max’ op het
reservoir bevindt. Vul het reservoir nooit met warm of heet water.
2. Sluit het deksel en zorg dat het reservoir stevig op het apparaat bevestigd is.
MELKRESERVOIR VULLEN
Wilt u cappuccino of latte bereiden, verwijder dan het melkreservoir van het appa-
raat, open het deksel en schenk tussen de aanduidingen ‘Min’ en ‘Max’ de hoeveel-
heid koude melk in het reservoir die u ongeveer denkt nodig te hebben. Vervolgens
plaatst u het melkreservoir weer op het apparaat, zodanig dat het stevig vastzit.
Opmerking: u kunt elke gewenste soort melk gebruiken, zoals al dan niet biologi-
sche volle of magere melk of sojamelk.
FILTER KIEZEN
Kies het lter als volgt:
1. VOOR EEN ENKELE ESPRESSO kiest u het kleine lter als u gemalen koe
gebruikt.
2. VOOR EEN DUBBELE ESPRESSO OF TWEE ENKELE gebruikt u het grote
lter.
VULLEN MET KOFFIE
Plaats het lter als volgt in de lterhouder:
VOOR GEMALEN KOFFIE:
1. Vul het lter met jngemalen espressokoe (doe het lter niet te vol).
2. Stamp de gemalen koe stevig en gelijkmatig aan.
3. Verwijder eventuele koeresten van de rand, zodat de lterhouder goed
onder de broeikop past.
FILTERHOUDER PLAATSEN
1. Plaats de lterhouder onder de broeikop en bevestig de lterhouder door
eerst de lterklem naar achteren te bewegen.
2. Plaats de handgreep zodanig dat hij zich ter hoogte van het icoontje van het
geopende hangslotje ‘ ’ op het apparaat bevindt en dat hij in de inkeping past.
3. Vervolgens beweegt u de handgreep langzaam naar rechts, totdat de lter-
klem zich ter hoogte van het icoontje van het gesloten hangslotje ‘ ’ op het
apparaat bevindt.
NL NL

22 23
EEN OF TWEE KOPPEN PLAATSEN
1. Trek de in hoogte verstelbare lade voor verschillende maten kopjes uit als u
espresso bereidt.
2. Trek de in hoogte verstelbare lade voor verschillende maten kopjes niet uit als
u cappuccino bereidt en een grotere kop gebruikt.
3. Trek de in hoogte verstelbare lade voor verschillende maten kopjes niet uit als
u latte bereidt en een grotere kop gebruikt.
LET OP: bij de bereiding van cappuccino of latte moet de hendel van de melkuit-
loop zodanig worden afgesteld dat de melkuitloop zich in de kop bevindt.
APPARAAT INSCHAKELEN
1. Steek de stekker in het stopcontact.
2. Schakel het apparaat in.
De drie lampjes op het bedieningspaneel knipperen tijdens het opwarmen van het
water totdat het water de juiste temperatuur heeft bereikt. Zodra de lampjes niet
meer knipperen is het apparaat klaar voor gebruik.
FUNCTIE KIEZEN
ESPRESSO BEREIDEN
1. Druk één keer op de knop ‘Espresso’ voor een enkele espresso.
2. Druk twee keer op de knop ‘Espresso’ voor een dubbele espresso.
3. Houd de knop ‘Espresso’ 3 seconden ingedrukt om uw persoonlijke voorkeur
in te stellen. Druk als u klaar bent nogmaals op de knop ‘Espresso’.
Het apparaat begint met de bereiding van espresso volgens uw persoonlijke voor-
keursinstelling. Het apparaat stopt automatisch en de lampjes blijven nu branden
om aan te geven dat de cyclus is beëindigd. Uw heerlijke espresso is klaar.
LET OP: als u minder koe wilt bereiden dan de standaardhoeveelheid, drukt u
nogmaals op de knop om het proces te beëindigen zodra de gewenste hoeveel-
heid koe is bereikt.
CAPPUCCINO BEREIDEN
Voordat u cappuccino bereidt, past u de hoeveelheid melkschuim aan uw voor-
keur aan door de stoomknop naar rechts te draaien voor meer schuim en naar
links voor minder schuim.
Let op: de hoeveelheid schuim kan tijdens de bereiding worden aangepast.
1. Druk één keer op de knop ‘Cappuccino’ voor een kleine cappuccino.
2. Druk twee keer op de knop ‘Cappuccino’ voor een grote cappuccino.
Het apparaat bereidt cappuccino volgens uw persoonlijke voorkeursinstelling. Uw
heerlijke cappuccino is klaar.
LATTE BEREIDEN
Voordat u latte bereidt, past u de hoeveelheid melkschuim aan uw voorkeur aan
door de stoomknop naar rechts te draaien voor meer schuim en naar links voor
minder schuim.
1. Druk één keer op de knop ‘Latte’ voor een kleine latte.
2. Druk twee keer op de knop ‘Latte’ voor een grote latte.
MELK OPSCHUIMEN
U kunt met het apparaat ook alleen melk opschuimen. Houd de knop ‘Cappucci-
no’ 3 seconden ingedrukt als u meer schuim in uw koe wilt of als u schuim wilt
maken voor een andere drank, zoals latte macchiato, warme chocolademelk of
chai latte. Druk nogmaals op de knop ‘Cappuccino’ als u klaar bent.
NA DE BEREIDING VAN KOFFIE MET MELK
Als u klaar bent met de bereiding van koe met melk kunt u het melkreservoir in
zijn geheel in de koelkast zetten (klaar voor een volgend gebruik) of de resteren-
de melk weggooien.
INLEIDING
ESPRESSO
Een unieke manier van koebereiding waarbij heet water onder druk door jn ge-
malen koe wordt geperst. De koe is sterker en voller van smaak dan gewone
lterkoe en espresso is dan ook in heel Europa populair. Vanwege zijn sterke
aroma wordt espresso doorgaans geserveerd in espressokopjes met een inhoud
van 44 to 59ml.
CAPPUCCINO
Koespecialiteit bestaande uit circa 1/3 espresso, 1/3 gestoomde melk en 1/3
melkschuim.
LATTE
Koespecialiteit bestaande uit circa 1/4 espresso en 3/4 gestoomde melk.
Lees ALLE instructies, waarschuwingen en opmerkingen in deze gebruikershand-
leiding zorgvuldig door voordat u dit apparaat gebruikt. Door het gebruik kunnen
sommige onderdelen en accessoires heet worden, zodat ze eerst moeten afkoe-
len. Als u het apparaat op de juiste manier gebruikt en onderhoudt, zijn een lange
levensduur en een probleemloze werking gegarandeerd. Bewaar deze instructies
en raadpleeg ze regelmatig voor tips op het gebied van reiniging en onderhoud.
NL NL

24 25
ZO GEBRUIKT U GEMALEN KOFFIE IN EEN ESPRESSOMACHINE
Gebruik geen met suiker gebrande gemalen koe of met suiker gebrande koebonen; hier-
door raakt het lter verstopt met schade aan het apparaat als gevolg. Hebt u per ongeluk
toch met suiker gebrande koe gebruikt, gebruik het apparaat dan niet meer en breng het
voor onderhoud naar het dichtstbijzijnde onderhoudsbedrijf. Wij raden aan om het apparaat
regelmatig te ontkalken voor een optimale werking. Neem voor meer informatie hierover
contact op met onze klantenservice.
MELKRESERVOIR EN MELKUITLOOP REINIGEN
U kunt het melkreservoir met overgebleven melk in de koelkast bewaren. Let op: maak het
reservoir en de melkuitloop wel regelmatig schoon om verstopping en aanslag te voorko-
men. Volg onderstaande instructies voor het reinigen van het melkreservoir:
1. Verwijder het melkreservoir van het apparaat.
2. Verwijder het deksel van het reservoir.
3. Giet eventueel overgebleven melk eruit en reinig het reservoir en het deksel grondig
met warm water en afwasmiddel. Spoel en droog het reservoir en deksel goed af.
Gebruik geen schuurmiddelen of schuursponsjes, omdat dat krassen veroorzaakt. Het
melkreservoir is ook geschikt voor de vaatwasser (bovenste rek). Het deksel van het
melkreservoir is niet geschikt voor de vaatwasser.
4. Zet een grote lege kop onder de melkuitloop.
5. Houd de knop ‘Latte’/’Clean’ 3 seconden ingedrukt en laat hem daarna los. Het appa-
raat geeft nu stoom af via de melkuitloop. Laat het water een paar seconden doorlopen
totdat u geen melk meer in de kop ziet. Als u klaar bent drukt u nogmaals op de knop
‘Latte’/’Clean’ om het proces te beëindigen.
6. Giet eventueel achtergebleven water weg en plaats het melkreservoir weer op het
apparaat.
BROEIKOP, FILTERHOUDER EN FILTER REINIGEN
1. Schakel het apparaat uit door de aan-uitknop aan de zijkant in stand ‘O’ te zetten en de
stekker uit het stopcontact te halen.
2. Sommige metalen onderdelen kunnen nog heet zijn. Raak ze niet aan met uw handen
voordat ze zijn afgekoeld.
3. Verwijder de lterhouder en gooi het koedik of de gebruikte portieverpakking weg.
Was de lterhouder en het lter af in warm water met afwasmiddel en spoel ze vervol-
gens goed schoon. De lterhouder en de lters zijn niet geschikt voor de vaatwasser.
4. Verwijder eventueel achtergebleven koeresten van de onderkant van de broeikop met
een vochtige doek of keukenpapier.
5. Bevestig de lterhouder (zonder lter) weer op de broeikop van het apparaat.
6. Plaats een grote lege kop onder de lterhouder.
7. Druk één keer op de knop ‘Espresso’ en laat het apparaat lopen met alleen water totdat
het vanzelf weer wordt uitgeschakeld.
WATERRESERVOIR REINIGEN
Giet het overgebleven water weg door het reservoir van het apparaat te verwijde-
ren en om te keren boven de gootsteen. Wij raden aan om het waterreservoir na
elk gebruik leeg te gieten. Was het waterreservoir af met water en afwasmiddel
en spoel en droog het goed af. Het waterreservoir is ook geschikt voor de vaat-
wasser.
APPARAAT REINIGEN
1. Veeg de buitenkant van het apparaat schoon met een zachte natte doek.
Gebruik geen schuurmiddelen of schuursponsjes, omdat dat krassen veroor-
zaakt.
2. Laat de lterhouder niet op de broeikop zitten. Hierdoor kan de afdichting
tussen de broeikop en de lterhouder beschadigen als u espresso bereidt.
LET OP: dompel het apparaat niet onder in water.
ONTKALKEN
De ophoping van minerale afzettingen in het apparaat beïnvloedt de juiste wer-
king ervan. Het apparaat moet worden ontkalkt als u merkt dat het langer duurt
om espresso te bereiden, of als het apparaat een overmatige hoeveelheid stoom
produceert. Ook op het oppervlak van de broeikop kunt u witte afzetting waarne-
men. De regelmaat waarmee u het apparaat moet schoonmaken hangt af van
de hardheid van het water dat u gebruikt. Onderstaande tabel geeft een overzicht
van de aanbevolen reinigingsfrequentie.
WATERRESERVOIR ONTKALKEN:
1. Vul het waterreservoir met schone, onverdunde witte azijn.
2. Laat het waterreservoir zo een nacht weken.
3. Giet de overgebleven azijn weg door het reservoir van het apparaat te verwij-
deren en om te keren boven de gootsteen.
4. Spoel het waterreservoir grondig schoon onder de kraan door het reservoir
voor de helft te vullen met water. Giet het water in de gootsteen en herhaal
deze procedure twee keer.
Type of water Cleaning Frequency
Soft water (ltered water) Every 80 brew cycles
Hard water (Tap water) Every 40 brew cycles
NL NL

26 27
INTERNE ONDERDELEN ONTKALKEN:
1. Ontkalk eerst de binnenzijde van het waterreservoir door de procedure bij het
onderdeel ‘Ontkalken’ hierboven te volgen.
2. Zet de aan-uitknop in stand ‘O’ en haal de stekker uit het stopcontact. Vul het
reservoir tot boven de minimumaanduiding met azijn.
3. Bevestig de lterhouder (met lter, zonder koe) en zet een kan of een grote
mok onder de lterhouder op het lekrooster.
4. Steek de stekker in het stopcontact.
5. Zodra de drie lampjes op het bedieningspaneel ononderbroken blauw zijn
gaan branden, zet u de aan-uitknop in stand ‘I’ en drukt u twee keer op de
knop ‘Espresso’/’Custom’. De azijn loopt nu door het apparaat; dit proces stopt
vanzelf.
6. Plaats een kan of een grote mok (van minimaal 325ml) onder de uitloop. Vul
het melkreservoir met water en zet het weer op het apparaat. Draai de stoom-
knop met de klok mee in de stand ‘ ’. Druk vervolgens de knop ‘Latte’/’Clean’
3 seconden in zodat de reinigingsfunctie wordt geactiveerd. Laat gedurende
circa 30 seconden water door de melkuitloop lopen en druk daarna nogmaals
op de knop ‘Latte’/’Clean’ om de reinigingsfunctie te beëindigen.
7. Herhaal indien nodig de stappen 1-7 met alleen kraanwater om eventueel
achterbleven resten azijn uit het apparaat te spoelen.
PROBLEMEN EN OORZAKEN
PROBLEEM OORZAAK OPLOSSING
De koe loopt niet door. Geen water in het reservoir. Voeg water toe.
De koe is te jn gemalen. Maal de koe minder jn.
Te veel koe in het lter. Doe minder koe in het
lter.
Het apparaat is niet inge-
schakeld of de stekker zit
niet in het stopcontact.
Steek de stekker in het
stopcontact en schakel het
apparaat in.
De koe is te hard aange-
stampt/samengedrukt.
Vul het lterbakje opnieuw
met koe en stamp die niet
te hard aan.
PROBLEEM OORZAAK OPLOSSING
De koe loopt langs de
randen van de lterhouder
uit het apparaat.
De lterhouder is niet
volledig in de vergrendelde
positie gedraaid.
Draai de lterhouder
volledig in de vergrendelde
positie.
Gemalen koe rond de rand
van het lterbakje.
Veeg de rand schoon.
Te veel koe in het lter. Doe minder koe in het
lter.
De melk schuimt niet of
komt niet uit de melkuit-
loop.
Geen stoomproductie Zorg dat het reservoir vol-
doende gevuld is met water.
De melk is niet koud ge-
noeg.
Zorg dat de melk en het
melkreservoir koud zijn
voordat u cappuccino
bereidt.
De melkuitloop is verstopt. Volg de instructies voor het
reinigen van het melkreser-
voir en de melkuitloop.
De koe loopt te snel door. De koe is te grof gemalen. Gebruik een jnere maling.
Te weinig koe in het lter. Gebruik meer koe.
De koe is te slap. Gebruik het kleine lter voor
een enkele espresso.
Gebruik het grote lter voor
een dubbele espresso.
De koe is te grof gemalen. Gebruik een jnere maling.
De drie lampjes op het
bedieningspaneel knipperen
afwisselend.
Het waterreservoir is leeg. AVul het reservoir bij.
MILIEUVRIENDELIJK AFVOEREN
U kunt helpen het milieu te beschermen!
Houd u aan de plaatselijke richtlijnen voor afvalinzameling. Lever
oude elektrische apparatuur in op de daarvoor bestemde inzame-
lingslocatie.
NL NL

28 29
PRÉCAUTIONS IMPORTANTES
Lors de l’utilisation d’appareils électriques, il convient de toujours respecter des
précautions de base pour réduire le risque d’incendie, de choc électrique, de
blessures corporelles, notamment:
1.
Lisez toutes les instructions.
2.
Assurez-vous que la tension électrique de votre réseau correspond à celle
gurant sur la che signalétique de l’appareil.
3.
Pour vous protéger des incendies, des chocs électriques et des blessures,
n’immergez pas l’appareil, le cordon ou la prise dans l’eau ou dans tout autre
liquide.
4.
Une surveillance étroite est nécessaire lorsque l’appareil est utilisé par ou à
proximité d’enfants.
5.
Débranchez la prise lorsque l’appareil n’est pas utilisé et avant le nettoyage.
Laissez-le refroidir avant de retirer ou de remettre des pièces et avant de le
nettoyer.
6.
De façon générale, n’utilisez pas d’appareil dont le cordon d’alimentation
est endommagé ou ne fonctionnant pas correctement, s’il est tombé ou a
été endommagé d’une quelconque manière. Renvoyez l’appareil au service
après-vente autorisé pour inspection, réglage ou réparation.
7.
L’utilisation d’accessoires autres que ceux recommandés par le fabricant
peut être à l’origine d’un incendie, d’un choc électrique ou blesser des
personnes.
8.
Pour le débrancher, mettez toutes les commandes en position «Off» puis
retirez la prise.
9.
Ne touchez pas les surfaces chaudes, utilisez les poignées.
10.
Ne pas utiliser l’appareil à l’extérieur ou à des ns commerciales.
11.
Ne laissez pas le l pendre du bord d’une table ou d’un comptoir ou bien
entrer en contact avec des surfaces chaudes.
12.
Utilisez uniquement sur une surface dure, plane et homogène an de ne pas
interrompre la circulation de l’air sous l’appareil.
13.
Veillez à toujours bien replacer le réservoir d’eau dans l’appareil avec son
couvercle. Remplissez-le d’eau au niveau de ou au-dessus de la ligne
minimale avant d’allumer l’appareil.
14.
Ne retirez pas le porte-ltre lorsque vous préparez du café. Assurez-vous que
les trois voyants sont allumés avant de retirer le porte-ltre pour préparer
davantage de café. Prenez également vos précautions en retirant le porte-
ltre car les pièces en métal seront chaudes. Veillez à le tenir par la poignée et
à utiliser le clip de maintien du ltre pour jeter le marc. Prenez vos précautions
lorsque vous déplacez l’appareil avec des liquides chauds.
15.
Ne retirez pas le réservoir d’eau avant que l’appareil soit éteint.
16.
Cet appareil n’est pas conçu pour être utilisé avec un minuteur externe ou une
télécommande séparée.
17.
Cet appareil peut être utilisé par des enfants à partir de 8 ans et des
personnes aux capacités physiques, sensorielles ou mentales réduites,
ou n’ayant pas susamment d’expérience ou de connaissances, si elles
sont surveillées ou ont été instruites du mode d’emploi de l’appareil par
une personne responsable et si elles ont compris les dangers encourus.
Les enfants ne doivent pas jouer avec l’appareil. Le nettoyage et l’entretien
ne doivent pas être réalisés par des enfants de moins de 8ans et sans
surveillance.
18.
Tenez cet appareil et son cordon d’alimentation hors de portée des enfants
de moins de 8ans.
19.
Avant de retirer toutes les pièces et accessoires, assurez-vous que les
trois voyants sont allumés, réglez le bouton marche en position «O» et
débranchez l’appareil.
20.
Ne retirez pas le porte-ltre à tout moment durant la préparation.
21.
Prenez vos précautions lors du retrait du porte-ltre. Les pièces en métal
peuvent être très chaudes. Il est également possible que de l’eau chaude
otte sur le dessus du ltre. Tenez-le uniquement par sa poignée et jetez le
marc en utilisant le clip de maintien du ltre.
22.
Si le café ne coule pas, le ltre est bloqué. Éteignez l’appareil et laissez-
le refroidir. Le blocage peut être causé par un café moulu trop nement.
Consultez la section «PROBLÈMES ET CAUSES».
23.
LORS DU NETTOYAGE DU TUBE À MOUSSE DE LAIT: Placez une grande
FR FR

30 31
KNOW YOUR COFFEE MAKER
AVANT LA PREMIÈRE UTILISATION
Nettoyer et préparer l’appareil avant la première utilisation.
Reportez-vous à la section avec la description de l’appareil pour vous familiariser avec le prod-
uit et identier toutes les pièces.
1. Assurez-vous que l’appareil est en position «O» en appuyant sur le bouton marche situé
sur le côté de l’appareil. Assurez-vous que l’appareil est débranché de la prise électrique.
2. Retirez les autocollants et les étiquettes de l’appareil.
3. Commencez par retirer et nettoyer le réservoir d’eau, le réservoir de lait, le porte-ltre, les
trois ltres et l’ustensile de mesure dans un mélange d’eau et de détergent doux. Rincez
FR FR
tasse sous le tube. Remplissez le réservoir à lait avec de l’eau et replacez-
le sur l’appareil. Tournez la poignée de contrôle de la mousse dans le sens
horaire en position nettoyage « » puis appuyez sur le bouton «Latte» /
«Nettoyage» pendant 3 secondes et lâchez-le pour activer la fonction
nettoyage. Laissez l’appareil fournir l’eau via le tube pendant environ
30secondes puis appuyez une fois sur le bouton «Latte» / «Nettoyage»
pour interrompre le processus.
24.
Ne placez pas l’appareil sur ou à proximité de gaz chaud ou d’un brûleur
électrique, ou dans un four chauffé.
25.
N’utilisez pas l’appareil à des ns autres que celles prévues.
26.
Ne laissez pas l’appareil fonctionner sans surveillance.
27.
Cet appareil est destiné à une utilisation intérieure dans des situations telles
que:
– Cantines de magasins, de bureaux et autres lieux de travail;
– Fermes;
– Pour les clients d’hôtel, de motel, ou autre type de résidence temporaire;
– Environnements de type Bed & Breakfast.
28.
Conserver le présent mode d’emploi.
ATTENTION: PRESSION
An d’éviter les risques de brûlures sur les parties du corps et/ou d’autres
blessures causées par les vapeurs et l’eau chaude, ou de dommages à l’appareil,
ne retirez jamais le réservoir d’eau ou le porte-ltre lorsque l’appareil prépare du
café ou de la mousse. Assurez-vous que les trois voyants sont allumés avant
de retirer le porte-ltre pour préparer davantage de café. Si vous devez ajouter
davantage d’eau ou de lait aux réservoirs, assurez-vous que les trois voyants
sont allumés et veillez à éteindre l’appareil en appuyant sur le bouton rouge situé
sur le côté de l’appareil pour le régler en position «O».
1
2 3 4
5
6
78
9
11
10
14
13 15
16
12
1 Indicateur 9 Bouton marche «I/O»
2Bouton «Espresso» 10 Réservoir d’eau amovible
3Bouton «Cappuccino» 11 Couvercle du réservoir d’eau
4Bouton «Latte» 12 Tube à mousse de lait
5Porte-ltre 13 Levier du tube à mousse
6 Mug de voyage 14 Poignée de la mousse
7 Tiroir de réglage 15 Couvercle du réservoir de lait
8Plateau anti-gouttes 16 Réservoir de lait transparent

32 33
chaque pièce correctement et replacez-les dans l’appareil.
4. Reportez-vous aux instructions de la section «INSTALLER LE PORTE-FILTRE» avant de
placer ou de retirer le porte-ltre et le ltre de l’appareil.
5. Pour nettoyer l’intérieur de l’appareil, suivez les instructions de la section «PRÉPARER
UN CAPPUCCINO» en utilisant de l’eau dans les deux réservoirs et non du café dans
le ltre.N’immergez pas l’appareil dans l’eau et n’essayez pas d’atteindre ses pièces
internes.
REMARQUE: Pour que votre appareil fonctionne correctement à chaque fois, nettoyez-le
après chaque utilisation.
IMPORTANT – PRÉPARER L’APPAREIL
Pour préparer l’appareil, lancez le cycle vapeur pendant 90secondes en suivant les étapes
suivantes:
1. Remplissez le réservoir d’eau entre les niveaux «Min» et «Max».
2. Remplissez le réservoir de lait avec de l’eau entre les niveaux «Min» et «Max».
3. Sélectionnez l’un des ltres et placez-le sur le porte-ltre. Placez le porte-ltre dans l’ap-
pareil en vous assurant qu’il est correctement installé et placez une tasse en-dessous.
Assurez-vous également que l’embout du tube à mousse de lait se trouve à l’intérieur de
la tasse.
4. Branchez l’appareil dans la prise appropriée.
5. Réglez le bouton marche sur «I».
6. Les trois voyants de commande commenceront à clignoter. Lorsque ceux-ci ne cligno-
tent plus, appuyez deux fois sur le bouton «Cappuccino».
7. Une fois ce processus terminé, les trois voyants de commande ne clignoteront plus.
Votre appareil est désormais prêt à être utilisé.
CHOISIR LA BONNE TASSE
Avant de préparer votre boisson, veillez à sélectionner la bonne taille de tasse selon le
tableau suivant:
CHOISIR LE BON CAFÉ
LE CAFÉ
Le café doit être fraîchement moulu et torréé. Nous vous conseillons un café français ou
italien pour l’espresso. Le café pré-moulu ne conservera sa saveur que pendant 7 à 8jours,
à condition d’être conservé dans un récipient hermétique dans un endroit sombre et frais.
Ne pas ranger dans le réfrigérateur ou le congélateur. Nous vous conseillons de moudre les
grains entiers juste avant utilisation. Les grains de café conservés dans un récipient herméti-
que conserveront leur saveur jusqu’à 4semaines.
MOUDRE LE CAFÉ
Il s’agit d’une étape essentielle dans la préparation de l’espresso si vous moulez votre propre
café. Elle nécessite de la pratique. Le café doit être nement moulu. La bonne moulure doit
être semblable à du sel. Si la moulure est trop ne, l’eau ne coulera pas à travers le café,
malgré la pression. Cette moulure ressemble à de la poudre et a une texture de farine entre
les doigts. Si la moulure est trop grossière, l’eau coulera trop vite à travers le café et empêche-
ra une bonne extraction des arômes. Veillez à utiliser un moulin de qualité pour obtenir une
texture homogène.
INSTRUCTIONS D’UTILISATION
REMPLISSAGE DU RÉSERVOIR D’EAU
1. Remplissez le réservoir d’eau, vous pouvez utiliser un pichet pour le remplir ou le déta-
cher de l’unité et le remplir sous le robinet. Si vous l’avez retiré de l’appareil pour le remplir
d’eau, veillez à le réinstaller correctement. Remplissez le réservoir avec la quantité d’eau
souhaitée en veillant à ce qu’elle soit placée entre les marquages «Min» et «Max» du
réservoir. N’utilisez jamais de l’eau chaude pour remplir le réservoir d’eau.
2. Fermez le couvercle du réservoir d’eau et replacez-le correctement dans l’appareil.
REMPLISSAGE DU RÉSERVOIR DE LAIT
Si vous prévoyez de préparer un cappuccino ou un latte, retirez le réservoir de lait de l’unité.
Ouvrez le couvercle puis versez la quantité de lait froid souhaitée entre les niveaux «Min.» et
«Max.». Ensuite, replacez correctement le réservoir de lait dans l’appareil.
Remarque: Vous pouvez utiliser le type de lait de votre préférence, par ex. lait entier, lait faible
en matières grasses, lait bio ou lait de soja.
Caffé Barista Ratios
Espresso Simple
Double
60 ml (2oz)
119 ml (4oz)
Cappuccino Simple
Double
178 ml (6oz)
355 ml (12oz)
Latte Simple
Double
296 ml (10oz)
474 ml (16oz)
FR FR

34 35
CHOISIR LE FILTRE
Sélectionnez le ltre à utiliser comme suit:
1. POUR UN ESPRESSO SIMPLE – utilisez le ltre pour un espresso simple si vous utilisez
du café moulu
2. POUR UN ESPRESSO DOUBLE OU DEUX ESPRESSOS SIMPLES – utilisez un ltre pour
un espresso double.
REMPLIR DE CAFÉ
Placez le ltre sélectionné sur le porte-ltre comme suit:
POUR LE CAFÉ MOULU:
1. Remplissez le ltre de café frais nement moulu (ne pas trop remplir).
2. Tassez le café moulu fermement et uniformément.
3. Nettoyez l’excédent de café du bord pour pouvoir le placer correctement sous la tête
d’infusion.
INSTALLER LE PORTE-FILTRE
1. Placez le porte-ltre sous la tête d’infusion, attachez le porte-ltre en reculant le clip de
maintien.
2. Placez la poignée de sorte que la poignée s’aligne avec le symbole déverrouillé « » de
l’unité et avec la rainure.
3. Ensuite, tournez-la vers la droite jusqu’à ce que le clip de maintien soit aligné avec le
symbole verrouillé « » sur l’appareil.
PLACER LES TASSES
1. Retirez le plateau de réglage de la hauteur si vous utilisez une «demi tasse» pour préparer
un espresso.
2. Laissez le plateau de réglage de la hauteur à l’intérieur de son compartiment si vous utili-
sez une tasse plus grande pour préparer un cappuccino.
3. Laissez le plateau de réglage de la hauteur à l’intérieur de son compartiment si vous utili-
sez une tasse plus grande pour préparer un latte.
ATTENTION: Lorsque vous préparez un cappuccino ou un latte, veillez à ajuster le levier du
tube à mousse an de placer le tube à mousse de lait à l’intérieur de la tasse à utiliser.
ALLUMER L’APPAREIL
1. Assurez-vous que l’appareil est branché.
2. Réglez l’appareil sur «I».
Les trois voyants de commande commenceront à clignoter durant le chauffage et jusqu’à ce
que l’eau atteigne la température idéale. Lorsque ces voyants arrêtent de clignoter, l’appareil est
prêt à être utilisé.
SÉLECTIONNER LE PROGRAMME
PRÉPARER UN ESPRESSO
1. Appuyez une fois sur le bouton «Espresso» pour préparer un espresso simple.
2. Appuyez deux fois sur le bouton «Espresso» pour préparer un espresso double.
3. Restez appuyé sur le bouton «Espresso» pendant 3secondes pour personnaliser votre
préparation. Ensuite, appuyez de nouveau sur le bouton «Espresso» pour l’arrêter.
L’appareil commencera à préparer l’espresso selon votre sélection. L’appareil s’éteindra
automatiquement et les voyants s’arrêteront de clignoter, ce qui indique que le cycle est
terminé. Vous pouvez désormais déguster votre délicieux espresso. REMARQUE: Pour
préparer une quantité de café inférieure à celle prédénie, appuyez sur le bouton fonction pour
interrompre la préparation lorsque vous avez atteint la quantité de café souhaitée.
PRÉPARER UN CAPPUCCINO
Avant de préparer votre cappuccino, réglez la quantité de mousse de lait selon votre préférence
en tournant la poignée de contrôle de mousse vers la droite pour obtenir plus de mousse et
vers la gauche pour moins de mousse.
Remarque: l’intensité de la mousse peut être réglée durant le cycle de préparation.
Note The foam intensity can be adjusted during the brewing cycle.
1. ppuyez une fois sur le bouton «Cappuccino» pour préparer une petite tasse de cappuccino.
2. Appuyez deux fois sur le bouton «Cappuccino»pour préparer une grande tasse de cappuccino.
L’appareil commencera à préparer le cappuccino selon votre sélection. Vous pouvez désormais
déguster votre délicieux cappuccino.
FR FR

36 37
PRÉPARER UN LATTE
Avant de préparer votre latte, réglez la quantité de mousse de lait selon votre préférence en
tournant la poignée de contrôle de mousse vers la droite pour obtenir plus de mousse et vers
la gauche pour moins de mousse.
1. Appuyez une fois sur le bouton «Latte»pour préparer une petite tasse de latte.
2. Appuyez deux fois sur le bouton «Latte»pour préparer une grande tasse de latte.
PRÉPARER LA MOUSSE DE LAIT
L’appareil vous permet également de préparer uniquement de la mousse de lait. Restez
appuyé sur le bouton «Cappuccino» pendant 3secondes si vous souhaitez ajouter davanta-
ge de mousse de lait à votre boisson ou an de préparer de la mousse de lait pour une autre
boisson, par ex. macchiato, chocolat chaud, chai latte, etc. Ensuite, appuyez de nouveau sur
le bouton «Cappuccino»pour l’arrêter.
APRÈS LA PRÉPARATION DE VOS BOISSONS AU LAIT
Lorsque vous avez ni de préparer vos boissons au lait, vous pouvez ranger le réservoir de lait
directement dans le réfrigérateur (an de l’utiliser ultérieurement) ou jeter le lait restant.
PRÉSENTATION
ESPRESSO
Une méthode unique de préparation du café dans laquelle l’eau chaude passe à travers un
café nement moulu. Populaire en Europe, ce café est bien plus riche et corsé que le café
ltre classique. En raison de sa richesse, l’espresso est généralement servi dans des portions
de 44 à 59ml, dans des demi-tasses.
CAPPUCCINO
Une boisson réalisée avec 1/3 espresso, 1/3 lait chaud et 1/3 mousse de lait.
LATTE
Une boisson réalisée avec 1/4 espresso et 3/4 mousse de lait.
Veuillez lire l’ENSEMBLE des instructions, avertissements et remarques comprises dans ce
mode d’emploi avant de commencer l’utilisation. Lorsque cet appareil est usagé, certaines
pièces et certains accessoires chauffent et doivent refroidir. Un bon entretien assurera une
longue vie et un fonctionnement sans problème à votre machine à espresso, cappuccino
et latte. Conservez ces instructions et consultez-les souvent pour obtenir des astuces de
nettoyage et d’entretien.
BIEN UTILISER LE CAFÉ MOULU POUR LES MACHINES À ESPRESSO
N’utilisez pas de café moulu sucré ou de grains de café sucré car ils boucheront le ltre et
endommageront l’appareil. Si vous utilisez accidentellement du café sucré, arrêtez l’utilisation
de l’appareil et emmenez-le au centre de service le plus proche. Nous vous recommandons de
détartrer l’appareil de façon périodique pour le maintenir en bon état. Contactez nos centres de
service pour en savoir plus sur ce procédé.
NETTOYER LE RÉSERVOIR DE LAIT ET LE TUBE À MOUSSE
Même si vous pouvez conserver le réservoir avec le lait restant dans le réfrigérateur, il est
important de nettoyer le réservoir et le tube à mousse régulièrement an d’éviter l’accumulation
de résidus et les bouchages. An de nettoyer le réservoir de lait, veuillez suivre les instructions
ci-dessous:
1. Retirez le réservoir de lait de l’appareil.
2. Retirez le couvercle du réservoir.
3. Versez le restant de lait, rincez et nettoyez le réservoir de lait et son couvercle à l’eau
chaude savonneuse. Rincez et séchez correctement. N’utilisez pas de nettoyants et de
tampons abrasifs qui causeront des égratignures. Le réservoir de lait est également
compatible lave-vaisselle (panier supérieur). Ne placez pas le couvercle du réservoir de lait
dans le lave-vaisselle.
4. Placez une grande tasse vide sous le tube à mousse.
5. Restez appuyé sur le bouton «Latte» / «Nettoyage» pendant 3secondes puis relâchez.
Le tube à mousse commencera à émettre de la vapeur, laissez agir pendant quelques
secondes, jusqu’à ce que vous ne voyiez plus de lait dans la tasse. Une fois le nettoyage
terminé, appuyez une fois sur le bouton «Latte» / «Nettoyage» pour interrompre le
processus.
6. Versez l’eau restante dans le réservoir de lait et replacez-le dans l’appareil.
NETTOYER LA TÊTE D’INFUSION, LE PORTE-FILTRE ET LE FILTRE
1. Mettez le bouton marche situé sur le côté de l’appareil en position «O» et débranchez le
câble d’alimentation de la prise.
2. Certaines des pièces en métal peuvent être encore chaudes. Ne les touchez pas avec vos
mains jusqu’à ce qu’elles aient refroidi.
3. Retirez le porte-ltre et jetez le marc de café ou la capsule usagée. Lavez le porte-ltre et le
ltre à l’eau chaude savonneuse et rinces-les correctement. Ne lavez pas le porte-ltre et
les ltres au lave-vaisselle.
4. Nettoyez la partie inférieure de la tête d’infusion avec un chiffon ou une serviette en papier
humide pour retirer les résidus de café.
5. Replacez le porte-ltre (sans ltre) dans la tête d’infusion.
6. Placez une grande tasse vide sous le porte-ltre.
7. Appuyez une fois sur le bouton «Espresso» et laissez l’appareil chauffer l’eau jusqu’à ce
qu’il s’arrête automatiquement.
FR FR

38 39
NETTOYER LE RÉSERVOIR D’EAU
Jetez le reste d’eau en retirant le réservoir et en le retournant au-dessus de l’évier. Il est
recommandé de vider le réservoir d’eau entre chaque utilisation. Lavez le réservoir d’eau à
l’eau savonneuse, rincez correctement et séchez à l’aide d’un chiffon. Le réservoir d’eau est
également compatible lave-vaisselle.
NETTOYER L’APPAREIL
1. Nettoyez le boîtier à l’aide d’un chiffon doux mouillé. N’utilisez pas de nettoyants et de
tampons abrasifs qui causeront des égratignures.
2. Ne rangez pas le porte-ltre dans la tête d’infusion. Cela peut impacter le joint situé entre
la tête d’infusion et le porte-ltre durant la préparation d’espresso.
ATTENTION: N’immergez pas l’appareil dans l’eau.
DÉTARTRAGE
Les dépôts minéraux s’accumulant dans l’appareil impacteront son fonctionnement. Votre
appareil doit être détartré lorsque vous commencez à remarquer que la préparation d’espres-
so prend plus de temps, ou en cas d’excès de vapeur. De plus, vous remarquerez peut-être
l’accumulation de dépôts blancs sur la surface de la tête d’infusion.
La fréquence de nettoyage dépend de la dureté de l’eau utilisée. Le tableau suivant vous
propose des suggestions d’intervalles de nettoyage..
POUR DÉTARTRER LE RÉSERVOIR D’EAU:
1. Remplissez le réservoir de vinaigre blanc ménager non dilué.
2. Laissez agir pendant la nuit.
3. Jetez le vinaigre en retirant le réservoir et en le retournant au-dessus de l’évier.
4. Rincez bien le réservoir d’eau en le remplissant à moitié d’eau du robinet puis versez l’eau
dans l’évier. Répétez deux fois.
POUR DÉTARTRER LES PIÈCES INTERNES:
1. Veillez à détartrer l’intérieur du réservoir d’eau en suivant les instructions de détartrage
ci-dessus.
2. Veillez à bien régler le bouton marche sur «O» et assurez-vous que le câble d’alimen-
tation est débranché de la prise électrique. Remplissez le réservoir de vinaigre blanc
au-dessus du niveau minimal du réservoir.
3. Insérez le porte-ltre (avec ltre et sans café) et placez une carafe ou une tasse normale
sur le plateau et sous le porte-ltre.
4. Branchez le câble d’alimentation à une prise électrique.
5. Appuyez sur le bouton marche pour régler l’appareil sur «I». Une fois les trois voyants de
commande s’allument en bleu et s’arrêtent de clignoter, appuyez deux fois sur le bouton
«Espresso» / «Personnaliser». Le vinaigre commencera à passer dans l’appareil qui
s’arrêtera automatiquement.
6. Placez un pichet ou une grande tasse (d’une capacité d’au moins 325ml) sous le tube.
Remplissez le réservoir à lait avec de l’eau et replacez-le sur l’appareil. Tournez la poignée
de contrôle de la mousse dans le sens horaire en position nettoyage « » puis appuyez sur
le bouton «Latte» / «Nettoyage» pendant 3 secondes pour activer la fonction nettoyage.
Laissez l’appareil fournir l’eau via le tube pendant environ 30secondes puis appuyez une
fois sur le bouton «Latte» / «Nettoyage» pour interrompre le processus.
7. Répétez les étapes 1 à 7 autant de fois que nécessaire en utilisant uniquement de l’eau du
robinet pour rincer les résidus de vinaigre.
PROBLÈMES ET CAUSES
Type d’eau Fréquence de nettoyage
Eau douce (eau ltrée) Toutes les 80utilisations
Eau dure (eau du robinet) Toutes les 40utilisations
PROBLÈMES CAUSES SOLUTIONS
Le café ne sort pas. Il n’y a pas d’eau dans le
réservoir.
Ajoutez de l’eau.
Le café est moulu trop n. Utilisez un café moyenne-
ment moulu.
Il y a trop de café dans le
ltre.
Mettez moins de café dans
le ltre.
L’appareil n’est pas allumé
ou branché.
Branchez l’appareil dans
une prise et allumez-le.
Le café est trop tassé. Remettez du café dans le
panier du ltre sans trop
tasser.
FR FR
La page est en cours de chargement...
La page est en cours de chargement...
La page est en cours de chargement...
La page est en cours de chargement...
La page est en cours de chargement...
La page est en cours de chargement...
La page est en cours de chargement...
La page est en cours de chargement...
La page est en cours de chargement...
-
 1
1
-
 2
2
-
 3
3
-
 4
4
-
 5
5
-
 6
6
-
 7
7
-
 8
8
-
 9
9
-
 10
10
-
 11
11
-
 12
12
-
 13
13
-
 14
14
-
 15
15
-
 16
16
-
 17
17
-
 18
18
-
 19
19
-
 20
20
-
 21
21
-
 22
22
-
 23
23
-
 24
24
-
 25
25
-
 26
26
-
 27
27
-
 28
28
-
 29
29


bluMill Coffee machine Manuel utilisateur
- Catégorie
- Cafetières
- Taper
- Manuel utilisateur
dans d''autres langues
- English: bluMill Coffee machine User manual
- Deutsch: bluMill Coffee machine Benutzerhandbuch
- Nederlands: bluMill Coffee machine Handleiding
Autres documents
-
Breville VCF146X Manuel utilisateur
-
BORETTI B400 Le manuel du propriétaire
-
KitchenAid 4KPES100ER1 Manuel utilisateur
-
-
-
Gaggia Milano RI9403/11 Manuel utilisateur
-
Hamilton Beach 40714 Manuel utilisateur
-
Gaggia RI9303 / 01 CLASSIC MANUELLE Manuel utilisateur
-
-
 Safecourt Kitchen MF300 Milk Frother Pro Manuel utilisateur
