Lightolier IHB Series Decorative High Bay Manuel utilisateur
- Taper
- Manuel utilisateur

Decorative High Bay
Cautions:
Attention:
Notice:
1. To avoid possibility of electrical shock or re, the installation personnel must have professional electric
knowledge.
2. Please wear gloves to avoid injury before installation.
3. If any smoke or spark of the wire happened, please turn off the power immediately and notify relevant
personnel.
1. Can not use the electric generator to test the LED light.
ture.
3. Please turn off the power before installation or maintenance.
4. Proper earth grounding is required to ensure safety.
5. This product is not suitable for cold storage areas where obvious temperature gradients are present,
such as ventilation opening, door, etc.
1. Please check if there is any damage during shipping. If so, please contact manufacturer timely.
2. Please read the installation instruction carefully to check whether all the accessories are complete.
3. After con rmation, then install the
5
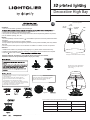
D/Detail
The xture has an integrated function of selectable
Power. The setting can be customized. Operation:
Take away the water-proof gasket, adjust dip
switch to choose Power (Figure 8)
All images are shown without shade for visibility.
Figure 8
Put the shade over the Lightmodule
before mounting the light module
to the ceiling
Installation Methods: Hook Mount, Ceiling Mount (Please choose the most suitable
installation method for the purchased products as per your needs)
1. Mark with a mark pen or sharp tool on the mounting surface
and drill. (gure 3)
2. Fix screws into the holes with a hammer. (gure 4)
3. Align the bracket hole with screw hole (gure 5), and
push the xture to one side (gure 6) and x it.
4. After installation, connect the wire of the xture to the mains
according to local wiring rules, ensure the connection is stable
and make good protection on the brackets screws.
5. The bracket is not included in the box.
4. For the top strain relief of power cord use standard 1/2" MNTP non metallic connector or equivalent
As for the wire color of DIM+ and DIM-,
pls check the light tabel
BLACK WHITE
GND
GREEN
DIM+
DIM-
AC Line
AC Neutral
Medium
Bell
Figure 5 Bracket mount will work with the following.
Layers
Barn
Yes Yes
Yes Yes
No No
Large

Signify Canada Ltd.
281 Hillmount Road,
Markham, ON, Canada L6C 253
Telephone: (905) 927-4900
Signify North America Corporation
400 Crossing Blvd Suite 600,
Bridgewater Township, NJ 08807
Telephone: (732) 563-3000
5
En ce qui concerne la couleur du fil de DIM + et
DIM-, veuillez vérifier l'étiquette lumineuse
All images are shown without shade for visibility.
Placez l'abat-jour sur le Lightmodule
avant de monter le module d'éclairage
au plafond
D/Detail
Figure 8
Le luminaire a une fonction intégrée de sélectionnable
Pouvoir. Le réglage peut être personnalisé. Opération:
Retirez le joint étanche à l'eau, ajustez le dip
commutateur pour choisir la puissance (Figure 8)
Méthodes d'installation : montagne sur crochet, montage au plafond (veuillez choisir la méthode
d'installation la plus appropriée pour les produits achetés selon vos besoins)
Pour une décharge de traction supérieure du câble d'alimentation utilisez
la norme un connecteur ou un équivalent non métallique MNTP 1/2 "
5. Le support n'est pas inclus dans la boîte.
4. Pour une décharge de traction supérieure du câble d'alimentation utilisez la norme un connecteur ou
un équivalent non métallique MNTP 1/2 "
BLACK/NOIR WHITE/BLANC
GND
GREEN/VERT
DIM+
DIM-
AC Line
AC Neutral
-
 1
1
-
 2
2


Lightolier IHB Series Decorative High Bay Manuel utilisateur
- Taper
- Manuel utilisateur
dans d''autres langues
Autres documents
-
Day-Brite CFI HCY LED High Bay Install Instructions
-
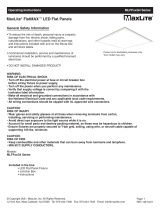 MaxLite FlatMAX Manuel utilisateur
-
Craftmade RGD52 Guide d'installation
-
 Stonco / Keene Adjustable Slim WP dual select EN Install Instructions
-
MaxLite MLVT Series Manuel utilisateur
-
 Kichler Lighting 35166 Manuel utilisateur
-
NOMA 052-6934-8 Manuel utilisateur
-
Stonco LED General Purpose Garage and Canopy DualSelect Round Install Instructions
-
Kichler 300317DBK Manuel utilisateur


