Aiwa AIWA NSX-V50 Le manuel du propriétaire
- Catégorie
- Lecteurs de cassettes
- Taper
- Le manuel du propriétaire

COMPACT DISC STEREO SYSTEM
SISTEMA ESTEREO CON REPRODUCT’OR DE DIS
COMPACTOS
CHAINE STEREO AVEC LECTEUR DE DISQUES COMFM
NSX-V5(D
NSX-V5mlG
NSX=V52
NSX=V54
cm
iCTS
NSX-V501V51 GN52N54 ~
NSX-V50 ~
(ilK3iE
DIGITAL AUDIO
dlm3iE
[ GRAPHICS ]

.—
.-. — —.- —.,
0
2
0
4
ml,”m,m w. “cm,, Wm
.-.. -..
w--- , . . .-..”---- -=.--_--’....
-------- ---
~+=. =-=:=_— -. —-------
=.-.-...—.
~..%. —,- .—. .——
r-- ~.--=y~,:s---: ~=>-+..--—.-=,
.-
.=-a,.-— -.
k=.-a_.~ ~_:
--.—
------
------
wi!&a@@#@Z!i6#i%4uaZ?Szwscy
vstgw2wv5@
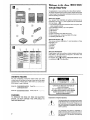
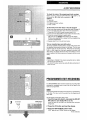
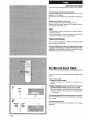
Congratulations on your purchase of an Aiwa Stereo System.
To optimize the performance of this system, please take the time
to read through these Operating Instructions and become familiar
with the operating procedures.
About your system
Your system NSX-V501NSX-V51 GlNSX-V52/NSX-V54 is
composed of the units @)-@and supplied with the accessories
@-@ as follows. +
❑
@ CX-NV501CX-NV51 GICX-NV521CX-NV54 Compact disc
stereo cassette receiver
@ SX-FNV50/SX-FNV54 (L,R) Front speakers
@ Remote control
@ FM antenna
@AM antenna
@ Video connecting cord (NSX-V51 G only)
@ CD-G sample disc, microphone (NSX-V51 G only)
@ Operating Instructions, etc.
About this manual +
❑
This manual contains illustrations @ and instructions in three
languages CM).
@ Illustration
@ English
@ Spanish
@)French
About the illustrations
w
%?
Capital letters, bold face numbers, smaller numbers and lower
}$$$ case letters in the instructions correspond to the letters and
:$
numbers in the illustration column.
%x?
,,<.)e..
For example, the”+
❑“ following “About this manual” above
@;
~e
is a reference to
❑ of the illustration.
~~
,.,&:J
g:~$
OWNER’S RECORD
For your convenience, record the model number and serial
number (you will find them on the rear of your set) in the space
provided below. Please refer to them when you contact your
AIWA dealer in case of difficulty.
Model No. CX-NV50/CX-NV51 G/ Serial No.
CX-NV521CX-NV54
Model No. SX-FNV50/SX-FNV54 Serial (Lot) No.
WARNING
TO REDUCE THE RISK OF FIRE OR ELECTRIC
SHOCK, DO NOT EXPOSE
RAIN OR MOISTURE.
2
THIS APPLIANCE TO
~m~
“CAUTION:TO REDUCE THE RISK OF
ELECTRIC SHOCK,
DO NOT REMOVE COVER (OR BACK).
NO USER-SERVICEABLE PARTS INSIDE.
REFER SERVICING TO QUALIFIED
SERVICE PERSONNEL.”
Explanation of Graphical Symbols:
A
The lightningflash witharrowhead symbol,within
anequilateraltriangle, isintendedto alertthe user
to the presence of uninsulated “dangerous volt-
age”withintheproduct’senclosurethat maybeof
sufficient magnitudeto constitute a riskof electric
shock to persons.
A
The exclamation point within an equilateral tri-
angle isintendedto alertthe userto the presence
of important operating and maintenance (servic-
●
ing) instructions in the literature accompanying
the appliance.

afi?w!wzzaha? A%uc%%s%”’250/
%S?9W5Z[VS4
Enhorabuena por haber adquirido un sistema estereo Aiwa.
F%raoptimizar Ias prestaciones de este sistema, tome el tiempo
necesario para leer este manual de instrucciones y familiarizarse
ccm Ios procedimientos de funcionamiento.
Acerca de su sistema
SIJ sistema NSX-V50/NSX-V51 G/NSX-V52/NSX-V54 esta
cc)mpuesto de Ias unidades @ y @, y ha sido suministrado con
10saccesorios @ a @ siguientes: +
❑
@ CX-NV!50/CX-NV51 G/CX-NV52/CX-NV54 Sintonizador,
amplificador, platina de cassette y reproductor de discos
compactos estereo
(~ SX-FNV50/S;X-FNV54 (izquierdo y derecho) Altavoces
delanteros
(~)Control remoto
@ Antena de FM
@ Antena de AM
@ Cable de conexion de vfdeo (NSX-V51G solamente)
@ Disco compacto con graficos de muestra, microfono (NSX-
V51G solamente)
@ Manual de instrucciones, etc.
Acerca de este manual + H
Este manual tiena ilustraciones @ e instrucciones en tres idiomas
Q)-(TJ.
6) Ilustracion ,
@ Ingles
@ Espai7cll
[~) Franc&
Acerca de Ias ilustraciones
Las Ietras maytisculas, Ios tirmeros en negrita, Ios numeros
pequeiios y Ias Ietras minusculas de Ias instrucciones
corresponded a Ias Ietras y numeros de Ias columnas de
ilustraciones.
F’or ejemlp[o, “-+
❑“ a continuation de “Acerca de este
manual”, que aparece mas arriba, se refiere a la
❑ de la
ilustracion.
NOTE
l-his equipment has been tested and found to comply with the
limits for a Class B digital device, pursuant to Part 15 of the FCC
Rules. These limits are designed to provide reasonable protec-
tion against harmful interference in a residential installation.
This equipment !]enerates, uses, and can radiate radio frequency
energy and, if not installed and used in accordance with the
instructions, may cause harmful interference to radio communi-
cations. I+owever, there is no guarantee that interference will not
occur in a particular installation. If this equipment does cause
harmful interference to radio ortelevision reception, which can be
determined by turning the equipment off and on, the user is
encouraged to try to correct the interference by one or more of the
following measures:
- Reorient or relocate the receiving antenna.
- Increase “the separation between the equipment and re-
ceiver.
- Connect the equipment into an outlet on circuit different
from that to which the receiver is connected.
- Consult the dealer or an experienced radio/TV technician
for help.
A@w42#44w4ud24zt%?ae-%
Felicitations pour votre achat d’une chaine stereo Aiwa.
La lecture de ce mode d’emploi vous permettra de maltriser
I’utilisation et d’optimiser Ies performances de cette chaine.
Au sujet de la chalne
Votre chalne NSX-V501NSX-V51 GINSX-V521NSX-V54 est
composee des appareils O et @ et est fournie avec Ies
accessoires @ a @ comme suit. +
❑
@)CX-NV50/CX-NV51 G/CX-NV52/CX-NV54 Radio magneto-
cassette Iecteur de disques compacts stereo
@ SX-FNV50/SX-FNV54 avant (G&D) Enceintes
@ Telecommande
@ Antenne FM
@ Antenne AM
@ Cordon de raccordement video (NSX-V51 G seulement)
@ Disque type CD-G, microphone (NSX-V51 G seulement)
@ Mode d’emploi, etc.
Au sujet de ce manuel +
❑
Ce manuel comporte des illustrations ~ et des instructions en
trois Iangues @ ~ @.
Q1Illustration
@ Anglais
@ Espagnol
@ Fran~ais
Au sujet des illustrations
Les Iettres majuscules, Ies num6ros en gras, Ies numeros plus
petits et Ies Iettres minuscule correspondent au Iettres et
numeros de la colonne des illustrations.
Par exemple, Ie “+
❑ “ qui suit “Au sujet de ce manuel” ci-
dessus renvoie a la partie E de I’illustration.
COPYRIGHT
Please check the laws on copyright relating to recordings from
discs, radio or external tape for the country in which the machine
is being used.
DERECHOS
DE AUTOR
Compruebe Ias Ieyes sobre derechos de autor, del pais en el
que se utilice el sistema, que est6n relacionadas con lagrabacion
de discos, programas de radio o cintas.
DROITS D’AUTEUR
Priere de verifier Ies lois sur la propriete artistique relatives a
I’enregistrement de disques, de la radio ou de cassettes clans Ie
pays d’utilisation de I’appareil.
CAUTIOIN
Modifications c}r adjustments to this product, which are not
expressly approved by the manufacturer, may void the user’s
right or authority to operate this product.
3

TABLE OF CONTENTS
PREPARATIONS
Precautions ................................................................... 6
CONNECTIONS .................................................................. 8
BEFORE OPERATION .....................................................l2
SETTING THE CLOCK ..................................................... 14
SOUND
ADJUSTING THE SOUND ...............................................
16
GRAPHIC EQUALIZER .................................................... 16
FRONT SURROUND SYSTEM ........................................ 18
RADIO RECEPTION
MANUAL TUNING ............................................................ 20
PRESETTING STATIONS ................................................. 22
PRESET NUMBER TUNING ............................................ 22
CD PLAYING
BASIC OPERATIONS ....................................................... 24
CD GRAPHICS (NSX-V51G only) ................................... 30
TAPE PLAYBACK
BASIC OPERATIONS ....................................................... 32
CONTINUOUS PLAY ........................................................ 34
RECORDING
BASIC RECORDING ........................................................ 36
DUBBING THE TAPE MANUALLY .................................. 38
DUBBING THE WHOLE TAPE ......................................... 40
Al EDIT RECORDING ....................................................... 42
PROGRAMMED EDIT RECORDING
...............................
44
KARAOKE
MICROPHONE MIXING .................................................... 48
VOCAL FADER/MULTIPLEX FUNCTION ....................... 50
KEY CONTROL FUNCTION (NSX-V51G only) ..............50
KARAOKE PROGRAM
..................................................... 52
TIMER
SETTING THE TiMER ..................................................s.... 54
SETTING THE SLEEP TIMER .......................................... 56
OTHER CONNECTIONS
CONNECTING OPTIONAL EQUIPMENT ........................ 58
LISTENING TO EXTERNAL SOURCES .......................... 58
GENERAL
CARE AND MAINTENANCE
............................................ 60
SPECIFICATIONS
............................................................. 62
TROUBLESHOOTING GUIDE ......................................... 66
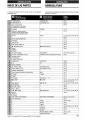
PARTS INDEX ................................................................... 68
4

INDICE
TABLE DES MATIERES
F)~EpAF~AT]vos
—
PRECAUCIONES ................................................................ 7
CONE)(IONES ..................................................................... 9
ANTES DE LA OPEFIACION ............................................ 13
PUESTA EN I-IORA DEL RELOJ ..................................... 15
PREPARATIONS
PRECAUTIONS ...................................................................
7
CONNEXIONS ..................................................................... 9
AVANT L’UTILISATION .................................................... 13
REGLAGE DE L’HORLOGE ............................................ 15
SON
AJUSTE DEL.SONIDO ............................m........................ 17
ECUAL.IZADOR GRAFICO ............................................... 17
SISTEMA DELANTERO DE SONIDO AMBIENTAL .......19
REGLAGE DU SON
. . . . . . . . . . . . . . . . . . . ..m . . . . . . . . . . . . . . . . . . . . . . . . . . . . . . . . . . . . 17
EGALISEUR GRAPHIQUE ............................................... 17
SYSTEME SURROUND AVANT. ..................................... 19
FU5CEPCION DE LA RADIO
RECEPTION RADIO
SINTONIZACION MANUAL .............................................. 21
PREAJUSTE DE EMiSORAS ........................................... 23
SINTONIZACION MEDIANTE NUMERO DE
PREAJUSTE ..................................................................... 23
ACCORD MANUEL ........................................................... 21
MEMORISATION DE STATIONS ..................................... 23
ACCORD SUR UNE STATION MEMORISEE ..................23
LECTURE DE DISQUES COMPACTS
OPERATIONS DE BASE . . . . . . . . . . . . ..m . . . . . . . . . . . . . . . . . . . . . . . . . . . . . . . . . . . 25
DISQUES COMPACTS AVEC GRAPHIQUES
(NSX-V51 G seulement)
................................................... 31
REPRO[)UCCION DE DISCOS COMPACTOS
—
OPERAClONES BASICAS ............................................... 25
DISCO:S COMPACT(3S CON GRAFICOS
(NSX-V51G solamente)
................................................... 31
LECTURE DE CASSETTES
REPRO[)UCC1ON DE CINTAS
—
OPERAClONES BASICAS ............................................... 33
REPRC)DUCCION CONTINUA ......................................... 35
OPERATIONS DE BASE .................................................. 33
LECTURE CONTINUE . . . . . . . . . ..m . . . . . . . . . . . . . . . . . . . . . . . . . . . . . . . . . . . . . . . . . . 35
GRABAC1ON
ENREGISTREMENT
GRABAC1ON BASICA ...................................................... 37
COPIADO MANUAL DE CINTAS ..................................... 39
COPIADO DE TODA LA CINTA ....................................... 41
GRABACION CON EDICION Al ....................................... 43
GRABACION CON EDICION PROGRAMADA ...............45
ENREGISTREMENT DE BASE
........................................ 37
DUPLICATION MANUELLE D’UNE CASSETTE ............39
DUPLICATION DE LA TOTALITE D’UNE CASSETTE ...41
ENREGISTREMENT AVEC MONTAGE ET CALCUL DU
TEMPs ...............................................................................43
ENREGISTREMENT AVEC MONTAGE PROGRAMME .45
KARAOKE
KARAOKE
MEZCL,A MICROFONICA ................................................. 49
FUNCION VOCAL FADER/MULTIPLEX .......................... 51
FUNCION DE CONTROL DE TONALIDAD
(NSX-V51G solamente) ................................................... 51
PROGFIAMA DE KARAOKE ............................................
53
MIXAGE AVEC MICROPHONE ........................................ 49
FONCTION VOCAL FADER/MULTIPLEX ....................... 51
FONCTION REGLAGE DE TON
(NSX-V51 G seulement) ................................................... 51
PROGRAMME DE KARAOKE ......................................... 53
TEMPORIZADOR
MINUTERIE
AJUSTE DEL,TEMPORIZADOR ...................................... 55
AJUSTE DEL.TEMPORIZADOR PARA DORMIR ...........57
REGLAGE DE LA MINUTERIE ........................................ 55
REGLAGE DE LA MINUTERIE D’ARRET ....................... 57
IOTRAS ICONEXIONES
AUTRES CONNEXIONS
CONNEXION D’UN APPAREIL OPTIONNEL .................59
ECOUTE DE SOURCES EXTERNES .............................. 59
CONEXION DE UN EQUIPO OPTIONAL ........................ 59
ESCUCHA DIEFUENTES DE SONIDO EXTERNAS ......59
GENERALIDADES
GENERALITIES
CUIDAIDOS Y MANTIENIMIENTO .................................... 61
ESPECIFICAICIONES ....................................................... 63
GUIA PIARALA SOLUJCION DE AVERIAS ...................... 67
SOINS ET ENTRETIEN ................................................... 61
SPECIFICATIONS ............................................................. 63
EN CAS DE PROBLEME
.................................................. 67
INDICE DE LAS PARTES ................................................. 69
NOMENCLATURE ............................................................ 69
5

(4
(2 inches)
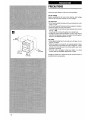
PRECAUTIONS
Follow the advice below for safe and correct operation.
On AC voltage
Before connecting the AC cord, check that the rated voltage
shown on the rear panel matches your local voltage.
On placement
● Do not use the system in places which are extremely hot, cold,
dusty or humid.
● Do not use the system in places which are subject to vibration.
● ‘Place the system on a flat, even surface.
● To prevent internal heat build up, keep adequate space around
the unit. +
❑
In particular, do not place the system in an airtight rack.
● If using the system near the television or radio, noise may be
heard from the television, radio or this system. Move this system
away from the affected television or radio.
On safety
● When disconnecting the AC cord, pull out by the plug. Do not
pull the cord itself.
● When the system is not used for an extended period of time,
disconnect the AC cord. When the cord is plugged in, a small
amount of current continues to flow to the system, even when
the power is turned off.
● If the AC cord is damaged, contact your dealer or an Aiwa
service center for immediate replacement or repair.
Should any trouble occur, disconnect the AC cord and contact a
qualified service representative.
6

PRECAUCIONES
PRECAUTIONS
Siga IOS consejos dados a continuation para que et
funcionamiento sea seguro y correcto.
Acerca de la tension de CA
Antes de conectar el cable de alimentacion de CA, compruebe
si la tensi6n nominal mostrada en el panel trasero concuerda
ccm la tension de su Iocalidad.
Acerca del Iugar de instaiacion
● INo utilice et sistema en lugares extremadamente calientes,
fries, polvorientos o htimedos,
~INoutilice el sistema en Iugares sometidos a vibraciones.
* lPonga el sistema sobre una superficie plana y nivelada.
* lParaevitar laacurnulacion termica en el interior, deje un espacio
Iibre suficiente alrededor del sistema. +
❑
lEnparticular, no ponga el sistema en un mueble cerrado.
. si Utiliza el sist,3ma Cerca de un televisor o de una radio! tal
vez se oigan ruidos en el televisor, en la radio o en este sistema.
!Separe este sistema de la radio o del televisor afectado.
Ikcerca de la seguridacf
. Cuando desconecte el cable de aliment acion de CA,
desconectelo sujetandolo por la clavija. No tire del propio cable.
. Cuando no utilice el sistema durante mucho tiempo, desconecte
el cable de alimentacion de CA. Cuando el cable este
conectado, una pequefia cantidad de corriente fluira de forma
continua hacial el sistema, aunque la alimentacion este
desconectada.
● Si el cable de alimentacion de CA esta estropeado, pongase
en contacto COIIsu concesionario o centro de reparaciones
Aiwa para que se 10cambien o reparen inmediatamente.
Si se produce algun problems, desconecte el cable de
alimentaci6n de CA y pongase en contacto con un representante
de servicio cualificado.
Priere de respecter Ies consignes suivantes pour une utilisation
silre et correcte.
Tension du secteur
Avant de brancher Ie cordon secteur, s’assurer que la tension
nominale indiquee sur Ie panneau arriere correspond a celle du
secteur local,
Emplacement
● Ne pas utiliser la chaine dams des endroits extr~mement
chauds, froids, poussiereux ou humides.
● Ne pas utiliser la chalne clans des endroits qui sent soumis a
des vibrations,
● Installer la chatne sur une surface plate et Iisse.
● Pour eviter une elevation de la temperature interne, garder un
espace adequat autour de I’appareil. -+
❑
En particulier, ne pas placer la chaine clans un meuble
completement ferme,
● Si la cha~ne est utilisee pres d’un poste de television ou de
radio, des parasites peuvent W: audibles par ce poste ou par
la chalne. Le cas echeant, eloigner cette chalne du poste de
television ou de radio affecte,
Securite
● Pour debrancher Ie cordon secteur, Ietirer par sa fiche. Ne pas
tirer sur Ie cordon proprement alit.
● Si la chaTne ne doit pas 6tre utilisee pendant Iongtemps,
debrancher Ie cordon secteur. Si on Iaisse ce cordon branche,
un courant de faible intensite continue de circuler clansla chaine
m6me si I’alimentation est toupee.
● Si Iecordon secteur est endommage, contacter immediatement
Ie revendeur ou un centre de service Aiwa pour Ie faire
remplacer ou reparer.
En cas de probleme, debrancher Ie cordon secteur et contacter
un technician quaiifie.
7

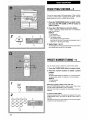
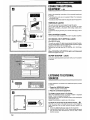
CONNECTIONS
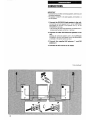
IMPORTANT
● Connect the AC cord after connecting speakers, antennas, and
all optional equipment.
● The speaker marked R is the right speaker, and marked L is
the left speaker.
1
2
3
4
Connect the SX-FNV50 right speaker to the unit.
Connect the surround speaker cord @ to the SURROUND
SPEAKERS R terminal, and speaker cord @ to the
SPEAKERS R terminals.
● The cord with the white stripe should be connected to the @
terminal and the black cord to the @terminal.
Connect the other SX-FNV50 left speaker to the
unit.
Connect the surround speaker cord to the SURROUND
SPEAKERS L terminal, and speaker cord to the SPEAKERS
L terminals in the same manner as step 1.
Connect the supplied AM antenna @ and
FM
antenna @.
Connect the AC cord to an AC outlet.
Tobe continued.
8

CONEXI(DNES
CONNEXIONS
IIVIPORTANTE
● Conecte el cable de alimentacion de CA despues de haber
conectado Ios altavoces, Ias antenas y todos 10sdemas equipos
opcionales.
● El altavoz marcado con la Ietra R es el altavoz derecho, y el
marcado con la Ietra L es el altavoz izquierdo.
Conecte el altavoz derecho SX-FNV50 a la unidad.
Conecte el cable de altavoz de sonido ambiental @lal terminal
SURROUND SPEAKERS R, y el cable de altavoz @ a Ios
terminals SF>EAKERS R.
● El cable de altavoz con la franja blanca debera conectarse
al terminal @, y el cable negro al terminal e.
Coneete el otro altavoz izquierdo SX-FNV50 a la
unidad.
Conecte el cable de altavoz de sonido ambiental al terminal
SURROUND SPEAKERS L, y el cable de altavoz a Ios
terminals SPEAKERS L, de igual forma que en el paso 1.
Conecte Ias antenas de AM @ y de FM @
suministradas.
Conecte el cable de alimentacion de CA a una
toma de C/A.
IMPORTANT
● Brancher Iecordon secteur aprt?savoir connecte Ies enceintes,
Ies antennes et tout autre appareil optionnel.
● L’enceinte marquee R est I’enceinte droite, et celle marquee L
est I’enceinte gauche.
1
2
3
4
Connecter I’enceinte dralite SX-FNV50 a I’appareil.
Connecter Ie cordon d’encf?inte surround @ a la borne
SURROUND SPEAKERS R et Ie cordon d’enceinte @ aux
bornes SPEAKERS R.
● Le cordon raye de blanc doit &re connecte a la borne @et
Ie cordon noir a la borne 6.
Connecter I’enceinte gauche SX-FNV50 a
I’appareil.
Connecter Ie cordon d’enceinte surround a la borne
SURROUND SPEAKERS L et Ie cordon d’enceinte aux
bornes SPEAKERS L de la msme maniere qu’~ I’etape 1.
Connecter I’antenne AM @ et I’antenne FM @
fournies.
Brancher Ie cordon secteur a une prise de
courant.
Contintia.
A suivre
a

CONNECTIONS
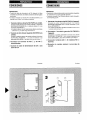
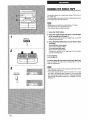
To stand the AM antenna on a surface + ❑
Fix the claw to the slot.
To position the antennas
AM loop antenna:
Position to find the best direction and position for radio reception.
FM feeder antenna:
Extend this antenna horizontally in a T-shape and fix its ends to
the wall with cellophane tape, etc.
● Do not leave objects generating magnetism near the speakers.
● Do not bring the FM antenna near metal objects or curtain rails.
● Do not bring the AM antenna near other optional equipment,
the stereo system itself, the AC cord or speaker cords, since
noise will be picked up.
● Do not unwind the AM antenna wire.
CONNECTING AN OUTDOOR ANTENNA
For better FM reception, use of an outdoor antenna is
recommended.
Connect the outdoor antenna to the FM 75 Q terminals. -+
❑
To connect aTV for CD graphics play (NSX-V51 G only)
+ page 30.
To connect other optional equipment+ page 58.
10

CONEXIONES
CONNEXIONS
P’ara poner la antena de AM en posici6n vertical sobre
ulna superficie +
❑
Fije el gancho en la ranura.
P’ara colocar Ias antenas
Amtena de cuadlro de AM:
Fongala en la direccion y en la position que ofrezcan la mejor
recepcion de la radio.
Amtena de FM:
Extienda horizontalmente esta antena formando una T y fije sus
extremes a una pared etmpieando cinta adhesiva, etc.
● No deje objetos que generen magnetism cerca de Ios
altavoces.
● No ponga la antena de FM cerca de objetos metalicos o rieles
de cortinas.
● No ponga la antena de AM cerca de otros equipos opcionales,
et propio sistema estereo, el cable de alimentacion de CA o
Ios cables de Ios altavoces, porque se captaran ruido.s.
c No desbobine el cable de la antena de AM.
CONE)(IONIDE UNA ANTENA EXTERIOR
F’ara obtener la mejor recepcion de FM se recomienda utilizar
una antena exterior.
Conecte la antena exterior a Ios terminals FM 75 Q.+ E
T
Para conectar un televisor para la reproduction de
discos compactos con graficos (NSX-V51 G solamente)
+ Pagina 31.
Para ccmectar otros equipos opcionales + pagina 59.
Pour poser I’antenne AM sur une surface +
❑
Fixer la griffe clans la rainure.
Pour positioner Ies antennes
Antenne cadre AM:
Orienter cette antenne de manier~?a obtenir la meilleure reception
possible.
Antenne FM interieure:
Deployer cette antenne horizontalement selon la forme d’un T
et fixer ses extremities a un mur avec de la bande adhesive ou
autre.
● Ne pas Iaisser d’objets produisant un champ magnetique pres
des enceintes.
● Ne pas mettre I’antenne FM plres d’objets metal liques ou de
tringles a rideaux.
● Ne pas mettre I’antenne AM pr&s d’un appareil optionnel, de la
chahe stereo proprement dite, du cordon secteur ou des
cordons d’enceinte; elle pourrait capter des parasites.
● Ne pas derouler Ie fil de I’antenne AM.
CONNEXION D’UNE ANTENNE
EXTERIEURE
Pour obtenir une meilleure reception FM, il est recommande
d’utiliser une antenne exterieure.
Connecter I’antenne exterieure aux bornes FM 75 Q. +
❑
Pour connecter un televi$eur pour I’utilisation de
disques compacts avec graphiques (NSX-V51G
seulement) + page 31.
Pour connecter un appareill optionnel + page 59.
11

POWER
PHONES
k_,
...—..-
(
~?>=- -..— . . ...=..................
)
VI —-‘-
... ...... ..............._
.... .... ..
)-- ~~~~~~~~~~~~~~---!
■ CLEAR
DEMO
R6(AA)
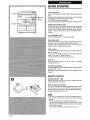
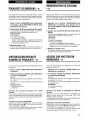
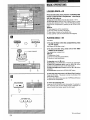
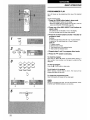
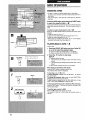
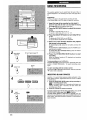
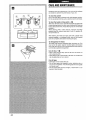
BEFORE OPERATION
To turn the unit on
Press one of the function buttons (TAPE, TUNER, VIDEO/AUX,
CD).
Playback of the inserted disc or tape begins, or the previously
tuned station is received (Direct Play Function).
The POWER button is also available.
The disc compartment may open and close for resetting the unit.
DEMO (Demonstration) mode
When the AC cord is connected for the first time, the display
window demonstrates the functions of the unit. When the power
is turned on, the DEMO display is overridden by the operation
display. When the power is turned off, the DEMO mode is
restored.
To cancel DEMO mode
Press the DEMO button. To reenter, press again.
Illumination guide
Whenever the AC cord is connected or one of the function buttons
is pressed, the buttons for that operation light up or flash.
Example: When connecting the AC cord, the II SET button
flashes to guide in setting the current time.
Flash window
The window on the top of the unit lights up or flashes while the
power is turned on.
To turn off, press the 1 CLEAR button while pressing the CD
button. To turn back on, repeat the above.
● Do not perform this operation during recording.
After use
Press the POWER button to turn off the power. The display
changes to the clock.
Using the headphones
Connect headphones to the PHONES jack with a stereo standard
plug (06.3 mm,
1/4 inch).
No sound is output from the speakers while the headphones are
plugged in.
REMOTE CONTROL
Inserting batteries + ❑
Detach the battery cover on the rear of the remote control and
insert two R6 (size AA) batteries.
When to replace the batteries
The maximum operational distance between the remote control
and the sensor below the POWER button should be
approximately 5 meters (16 feet). When this distance decreases,
replace the batteries with new ones.
● If the unit is not going to be used for an extended period of
time, remove the batteries to prevent possible electrolyte
leakage.
● The remote control may not operate correctly when:
- the line of sight between the remote control and the remote
sensor below the POWER button is exposed to intense light,
such as direct sunlight.
- other remote controls are used nearby (television, etc.).
12

ANTES DE LA OPERACION
AVANT L’UTILISATION
Para encender la unidad
Pulse uno de Ios botones de funcion (TAPE, TUNER, VIDEO/
AUX, CD).
Li~reproduction cfeldisco ode la cinta insertada empezara o se
rx?cibira la emisora previamente sintonizada (funcion de
reproduction directs).
Tambien podra utilizarse el boton POWER.
El compartimiento de discos puede abrirse o cerrarse para
reponer la unidaci
Mlorio de demostracion (DEMO)
Cuando el cable de alimentacion de CA se conecte por primers
W?Z,el visualizador mostrara Ias funciones de la unidad. Cuando
st?Conecte la alimentacickr, la visualization DEMO sera anulada
por la visualization de operation. Cuando se desconecte la
alimentacion, el modo DEMO se repondra.
Para cancelar el modo DEMO
Pulse el boton DEMO. Para volver al modo DEMO pulse de
nlJevo este boton.
Gufa de iluminacion
Siempre que se conecte el cable de alimentacion de CA o pulse
uno de Ios botones de funci&_r,
[OS botones para esa 0peraCi6n
se encenderan o parpadearan.
Ejemplo: Cuando conecte el cable de alimentacion de CA, el
boton II SET parpadear~ para servir de guia en la puesta de la
hors actual.
Ventanilla
La ventanilla de la parte superior de la unidad se encendera o
parpadeara mientras la alimentacion este conectada.
Para apagarla, pulse el boton ■ CLEAR mientras pulsa el boton
CD. Para encenderla, repita el mismo procedimiento que para
apagarla.
● No haga esta operation durante la grabacir5n.
Despues de la utilization
Pulse et boton POWER para desconectar la alimentacion. La
visualization pasara a ser la del reloj.
Lltilizacion de auriculares
Conecte Ios auriculares con clavija estereo estandar (6,3 mm 0)
a la toma PHONES.
Mientras Ios auriculares esten conectados no saldra sonido por
Ios altavoces.
CONTROL REMOTO
Insertion de Ias pilas + ❑
Quite la tapa de Ias pilas, ubicada en la parte trasera del control
remoto, e inserte dos pilas R6 (tamario AA).
Cu&rdo r’eemplazar Ias pilas
La distancia maxima de operation entre el control remoto y el
sensor de sefiales del control remoto ubicado debajo del boton
F’OWER debera. ser de 5 metros aproximadamente. Cuando
disminuya esta distancia, reemplace Ias pilas por otras nuevas.
● Si la unidad no va a ser utilizada durante mucho tiempo, quite
Ias pilas para evitar Ias posibles fugas de electrolito.
● El control remoto quiz~ no funcione correctamente cuando:
- la I[nea de vision entre el control remoto y el sensor de sefiales
del control remoto ubicado debajo del boton POWER esta
expuesta a r.maIuz intensa como, por ejemplo, la Iuz del sol.
- otros controles remotos (televisors, etc. ) esten siendo
utilizados cerca de esta unidad.
Pour mettre I’appareil sous tension
Appuyer sur une des touches de fonction (TAPE, TUNER,
VIDEO/AUX, CD).
La lecture du disque ou de la cassette en place commence, ou
la station ecoutee en dernier est regue (fonction de lecture
directe).
On peut aussi appuyer sur la touche POWER.
Le compartment a disques pel.Ms’ouvrir et se fermer pour
reinitialiser I’appareil.
Mode DEMO (Demonstrational
Quand on branche Ie cordon secteur, la fen~tre d’affichage
montre Ies fonctions de I’appareil. Lors de la mise sous tension,
I’affichage de demonstration (?st remplace par I’affichage
d’operation. Quand I’alirnentation est toupee, Ie mode DEMO
est retabli.
Pour annuler Ie mode DEMO
Appuyer sur la touche DEMO. Pour retablir Ie mode, appuyer de
nouveau sur cette touche.
Guide par eclairage
Chaque fois qu’on branche Ie cclrdon secteur ou qu’on appuie
sur une des touches de fonction, Ies touches correspondent a
cette operation s’allument ou clignotent.
Exemple: Quand on branche Iecordon secteur, la touche H SET
clignote pour guider clans Ie reglage de I’heure courante.
Fen&re clignotante
La feni%re situee au sommet de I’appareil s’allume ou clignote
quand I’appareil est sous tension.
Pour I’eteindre, appuyer sur la touche WCLEAR tout en appuyant
sur la touche CD. Pour la rallumf?r, repeter cette operation.
● Ne pas effectuer cette operation pendant I’enregistrement.
Apres I’utilisation
Appuyer sur la touche POWER pour couper I’alimentation.
!-’affichage passe a I’horloge.
Utilisation d’un casque
Brancher un casque muni d’une fiche stereo standard (6,3 mm
a) a la prise PHONES.
Aucun son ne sort par Ies enceintes quand un casque est
branche.
TELECOMMANDE
Mise en place des piles+ ❑
Enlever Ie couvercle des piles CIUdos de la telecommande et
mettre deux piles R6 (taille AA) f?nplace
Quand remplacer Ies piles
La distance maximale de foncticmnement de la telecommande
entre cette derniere et Ie capteur situe sous la touche POWER
doit 6tre d’environ cinq metres. Lorsque cette distance diminue,
remplacer Ies piles par des neuves.
~
● Si latelecommande ne doit pas &4reutilisee pendant Iongtemps,
enlever Ies piles pour eviter tout risque de fuite d’electrolyte.
● La telecommande risque de ne pas fonctionner correctement
quand:
- I’espace entre la telecomrnande et Ie capteur situe sous la
touche POWER est expose a une Iumiere intense, comme Ie
soleil.
- d’autres telecommandes (televiseur, etc.) sent utilisees a
proximite.
13

~ f4DOWN UPbFf
‘m
b
SET
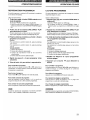
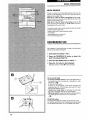
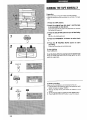
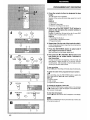
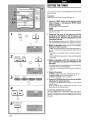
SETTING THE CLOCK
When the AC cord is connected for the first time, the II SET
button flashes.
Set the time as follows while the power is off.
1
2
3
4
5
Press the II SET button.
The hour flashes.
Press the M DOWN or H UP button to
designate the hour.
Press the II SET button to set the hour.
The hour stops flashing and the minute starts flashing.
Press the M DOWN or ~ UP button to
designate the minute.
Press the II SET button to set the minute and
complete setting.
The minute stops flashing on the display and the clock starts
from 00 second.
To correct the current time
Press the POWER button to turn the unit off. Press the II SET
button and carry out steps 1 to 5 above.
To
display the current time
Press the CLOCK button on the remote control. The clock is
displayed for 4 seconds.
However, the time cannot be displayed during recording.
To switch to the 24-hour standard
Press the CLOCK button on the remote control and then press
the ■ button within 4 seconds.
Repeat the same procedure to restore the 12-hour standard.
If the clock display flashes while the power is off
This is caused by a power interruption. The current time needs
to be reset.
If power is interrupted for more than approximately 24 hours, all
settings stored in memory after purchase need to be reset.

PUESTA EN HORA DEL RELOJ
REGLAGE DE L’HORLOGE
Cuando el cable de alimentacion de CA se conecte por primers
W?Z,el boton II SET parpadeara.
Ponga la hors como se indica a continuation, mientras la
allimentacion este desconectada.
1
2
3
4
5
Pulse el boton II SET.
La hors parpadeara.
Pulse el boton WI DOWN o H UP para designar
la hors.
Pulse el boton II SET para poner la hors.
La hors dejara de parpadear y empezara a parpadear el
minute.
Pulse el boton 1+ DOWN o ~
UP para designar
el minute.
Pulse el boton 1! SET para poner el minuto y
terminar la puesta de la hors.
El minuto dejara de parpadear en el visualizador y el reloj
empezara desde 00 segundos.
Piarti cambiar la hors actual
Pulse el boton POWER para apagar la unidad. Pulse el boton II
SET y siga Ios pasos 1 a 5 indicados mas arriba.
Piara visualizer la hors corrects
Pulse el boton CLOCK del control remoto. El reloj se visualizara
durante 4 segundos.
Sin embargo, la hors no se podra visualizer durante la grabacion.
Para cambiar al modo de 24 horas
Pulse el boton CLOCK del control remoto y Iuego pulse el boton
❑ antes de que pasen 4 segundos.
Repita el mismo procedimiento para reponer el modo de 12
hc]ras.
W la visualization del reloj parpadea inientras la
alimentacion esta desconectada
Esto se debera a un interruption en el suministro de alimentacion.
La hors tendra que ponerse de nuevo.
Si la alimentacion se interrumpe durante mas de 24 horas, todos
Ios ajustes almacenados en la memoria despues de adquirir la
unidad tendran que ajustarse otra vez.
Quand on branche Ie cordon secieur, la touche II SET clignote.
L’alimentation etant toupee, regler I’heure comme decrit ci-
dessous,
1
2
3
4
5
Appuyer sur la touche Ill SET.
Les heures clignotent.
Appuyer sur la touche 14<
DOWN ou M UP pour
specifier Ies heures.
Appuyer sur la touche II SET pour regler Ies
heures.
Les heures arretent de clignoter et Ies minutes se mettent a
clignoter.
Appuyer sur la touche l+< DOWN ou Wf UP pour
specifier Ies minutes.
Appuyer sur
la touche II SET pour specifier Ies
minutes et terminer Ie r6glage.
Les minutes arr~tent de clignc)ter sur I’affichage et I’horloge
demarre a 00 seconde.
Pour corriger I’heure courante
Appuyer sur la touche POWER pour mettre I’appareil hors
tension. Appuyer sur la touche II SET puis effectuer Ies etapes
1 a 5 ci-dessus.
Pour afficher I’heure courante
Appuyer sur la touche CLOCK de la telecommande. IJhorloge
est affichee pendant quatre secondes.
Toutefois, I’heure ne peut pas i5tre affichee pendant
I’enregistrement,
Pour passer au format de 24 heures
Appuyer sur latouche CLOCK de latelecommande puis appuyer
sur la touche ■ clans Ies quatre secondes qui suivent.
Pour revenir au format de 12 heures, proceder de la m6me
maniere.
Si I’affichage de I’horloge clignote quand I’alimentation
est toupee
Ceci est dti a une interruption d’alirnentation. IJheure courante
doit 6tre reglee de nouveau.
Si I’alimentation est interrompue pendant plus d’environ 24
heures, tous Ies reglages memorises apres I’achat doivent &re
faits de nouveau.
15

❑ “n “D”””“
VOLUME
(n
o
a
v’”
VOLUME
.,UAX
b
=7
T-BASS
7EEE
ELECTRONIC GRAPHIC EQUALIZER
“EEEJ
ELECTRONIC GRAPHIC EQUALIZER
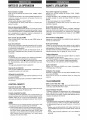
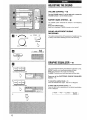
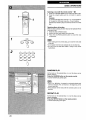
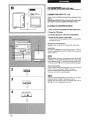
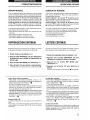
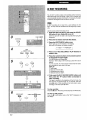
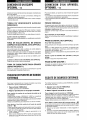
ADJUSTING THE SOUND
VOLUME CONTROL + El
Turn the VOLUME control @lon the main unit, or press the
VOLUME buttons @on the remote control.
SUPER T-BASS SYSTEM + EI
The T-BASS system enhances the realism of low-frequency
sound.
Press the T-BASS button.
Each time it is pressed, T-BASS is turned on (II,IIi)and off.
SOUND ADJUSTMENT DURING
RECORDING
The output volume and tone of the speakers or headphones may
be freely varied without affecting the level of the recording.
GRAPHIC EQUALIZER + E
This unit provides the following three different equalization curves.
ROCK: Powerful sound emphasizing treble and bass.
POP: More presence in the vocals and midrange.
CLASSIC: Enriched sound with heavy bass and fine treble.
Press one of the ELECTRONIC GRAPHIC EQUALIZER
buttons. + @
To cancel the selected mode -t ~
Press the selected button again. “EQ oFF is displayed,
To select with the remote control + @
Press the GEQ button repeatedly until the desired equalization
curve is displayed.
ROCK — POP — CLASSIC — EQ oFF
(Cancel)
16

AJUSTE DEL SONIDO
REGLAGE DU SON
CONTROL DE VOLUMEN ~ ❑
Gire el control VOLUME @ de la unidad principal o pulse
ICEbotones VOLUME @ del control remoto.
SISTEMA SUPER T-BASS + ❑
Elsistema T-BASS realza el realismo del sonido de baja
frscuencia.
Pulse el boton T-BASS.
Cada vez que 10pulse, T-BASS se encendera
(111111)y apagara.
AJUSTE DEL SONIDO DURANTE LA
GRABACION
El volumen de salida y el tono de Ios altavoces o de Ios
auriculares podra cambiarse Iibremente sin afectar en absoluto
al nivel de la grabacion.
ECUALIZADOIR GRAFICO + ❑
Esta unidad ofrece Ias tres curvas de ecualizacion diferentes
siguientes:
ROCK: Sonido potente que realza Ios agudos y Ios graves.
PIDP:Mas presenciaen Ias votes y en la gama de registro medio.
CLASSIC: Sonidoenriquecidocongravesfuertesyagudosfines,
Pulse uno de IOS botones ELECTRONIC GRAPHIC
EQUALIZER, + @
F?aracancelar el mods seleccionado + @
PIJlsede nuevo el boton seleccionado. Se visualizara ‘(EQoFF.
Par seleccionar con el control remoto II @
Pulse repetidamente el boton GEQ hasta que se visualice la
curva de ecualizacion deseada.
r
ROCK — POl” ~ CLASSIC —EQ oFF
7
(cancelacion)
COMMANDE DU VOLUME ~ F3
Tourner la commande VOLUME @ de I’appareil principal,
ou appuyer sur Ies touches VOL.UME @ de latelecommande.
SYSTEME SUPER T-BASS + EI
Le systeme T-BASS ameliore Ie realisme du son aux basses
frequencies.
Appuyer sur la touche T-BASS.
A chaque pression sur cette touche, Ie systeme T-BASS est mis
en service (IIIiII)ou hors service.
REGLAGE DU SON PENDANT
L’ENREGISTREMENT
On peut faire varier Iibrement Ie
des enceintes ou du casque
I’enregistrement,
volume de sortie et la tonalite
saris affecter Ie niveau de
EGALISEUR GRAP’HIQUE + ❑
Cet appareil possede Ies trois courbes d’egalisation differences
suivantes.
ROCK: Son puissant accentuant Ies aigus et Ies graves.
POP: Presence accrue des parties vocales et de la gamme
moyenne.
CLASSIC: Son enrichi par des graves puissants et des aigus
fins.
Appuyer sur une des touches ELECTRONIC GRAPHIC
EQUALIZER. + @
Pour annuler Ie mode selectionne + @
Appuyer de nouveau sur la touche selectionnee. “EQ oFF” est
affiche.
Pour selectionner avec la teldcommande + @
Appuyer sur la touche GEQ a plusieurs reprises jusqu’a ce que
la courbe d’egalisation souhaitee soit affichee.
r
ROCK — POP — CLASSIC — EQ oFF
7
(annulation)

❑
D
@
FRONTSURROUND
1=1=1=1
b
(.5,)
FRONTSURROUND
m
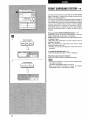
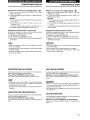
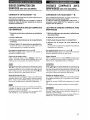
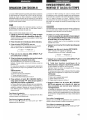
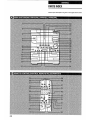
FRONT SURROUND SYSTEM + ❑
The front surround system is processed with the DSP (Digital
Signal Processor) to enhance the simulated surround sound
effect for your listening pleasure.
The front surround speakers are equipped inside the cabinet of
your speaker system and are directed outward at an angle of
35° and upward at an angle of 9° to provide an effective simulated
surround sound effect–without having to connect optional
surround speakers! In addition, by selecting a FRONT
SURROUND mode, the sound presence of a disco (DISCO),
live music performance (LIVE), or concert hall (HALL) can be
obtained.
Press one of the FRONT SURROUND button.+@
Equalization curves are selected automatically to match the
FRONT SURROUND modes shown in parentheses.
DISCO (ROCK) :Little reverberation and medium range surround
to resemble a disco.
LIVE (POP) :Little reverberation and wide range surround to
resemble a live stage.
HALL (CLASSIC) :Long reverberation and medium range
surround to resound like a hall.
● The GEQ curve can also be selected or turned off to suit your
preference.
To cancel the selected mode+@
Press the selected button again. “S-OFF is displayed.
When the music source is monaural
Select LIVE mode to obtain a simulated stereo effect.
m
● The sound is not heard from the front surround speakers when:
-the source is monaural.
-the FRONT SURROUND system is turned off.
●When a connected microphone is used, the FRONT
SURROUND system is automatically canceled.
18

SISTEMA DELANTERO DE SONIDO
AMBIENTAL -+
❑
SYSTEME SURROUND AVANT+ ❑
E4sonido del sistema delantero de sonido ambiental se process
rmediante el DSP (procesador de sefial digital), para realzar el
efecto del sonido ambiental simulado y aumentar su placer al
escuchar la reproduction,
Los altavoces delanteros de sonido ambiental se encuentran en
el interior de Ias cajas de sus sistemas de altavoces, y estan
clirigidos hacia el exterior con un angulo de 35° y hacia arriba
Con un &lguk3 de 9°, piara ofrecer un efecto eficaz de sonido
ambiental simulado sin tener que conectar altavoces de sonido
arnbiental opcionales. Actemas, seleccionando el modo FRONT
SURROUND, podra obtenerse el efecto del sonido de discotecas
(DISCO), de actuaciones musicales en directo (LIVE) ode salas
cle
concertos (HALL).
Pulse uno de Ios botones FRONT SURROUND. + @
Las curvas de ecualizacion se seleccionan automaticamente
para que se ajusten a Ios modos FRONT SURROUND mostrados
entre parenthesis.
DISCO (ROCK): Poca reverberation y sonido ambiental de gama
media para obtener un efecto parecido al de una discoteca,
LIVE (POP): Poca reverberation y sonido ambiental de gama
amplia para obterier un efecto parecido al de una actuacion en
clirecto.
HALL (CLASSIC): Reverberation prolongada y sonido ambiental
cle gama media para obtener un efecto parecido al de una sala
cje concertos.
● La curva GEQ tambi6n podra seleccionarse o desactivarse
segun sus preferencias.
Para cancelar el modo seleccionado -+ @
Pulse de nuevo el boton seleccionado. Se visualizara “S-OFF.
Cuando la fuente de :eonido sea mono
Seleccione el modo LIVE para obtener un efecto estereo
sim~lado.
Im
~,El sonicfo no se oira por Ios altavoces delanteros de sonido
ambiental cuando:
- la fuente de sonido sea mono.
- el sistema FRONT SURROUND este desactivado.
a,Cuando se conecte lrn micr~fono, el sistema FRONT
SURROUND se desactivara automaticamente.
Le systeme surround avant est rmunid’un processeur numerique
de signaux (DSP) pour ameliorer I’effet de son surround simule
et augmenter ainsi Ie plaisir d’ecoute.
Les haut-parleurs surround avant sent loges clans Ie coffret des
enceintes et sent orienk% vers I’exterieur selon un angle de 35°
et vers Ie haut selon un angle de 9° pour dormer un efficace
effet de son surround simule — saris avoir a connecter des
enceinte surround optionnelles ! En outre, en selectionnant un
mode FRONT SURROUND, on peut obtenir la presence sonore
d’une discotheque (DISCO), d’une representation musicale en
direct (LIVE) ou d’une sane de concert (HALL).
Appuyer sur une des touches FRONT SURROUND. + @
Les courbes d’egalisation indiquees entre parentheses sent
automatiquement selectionnees en fonctiondes modes FRONT
SURROUND,
DISCO (ROCK): Faible reverberation et surround de la gamme
moyenne pour obtenir I’effet d’une discotheque.
LIVE (POP): Faible reverberation et surround sur une large
gamme pour obtenir I’effet d’une scene en direct.
HALL (CLASSIC): Longue reverberation et surround de la
gamme moyenne pour obtenir une resonance comme clans une
sane.
c La courbe d’egalisation graphique peut aussi &re selectionnee
ou mise hors service, comme on prefere.
Pour annuler Ie mode selectionne + @
Appuyer de nouveau sur la touche sdectionnee. “S-OFF est
affiche.
Quand la source musicale est monophonique
Selectionner Ie mode LIVE pour obtenir un effet stereo simule.
~
● Le son ne sort pas par Ies haut-parleurs surround avant quand:
- la source est monophonique.
- Ie systeme FRONT SURROUND est hors service.
“ Quand un microphone connecte est utilise, Ie systeme FRONT
SURROUND est automatiquernent annule.
19

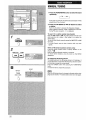
1
BAND
9
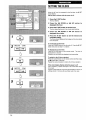
MANUAL TUNING
1
2
Press the TUNER/BAND button to select the band
repeatedly.
m
If the power is turned off, the previously tuned station will be
played (Direct Play Function).
Press the 1+ DOWN or W UP button to select
a station.
Each time the button is pressed, the frequency changes.
When a station is received, “TUNE is displayed for 2 seconds.
During FM stereo reception, {([~]))is displayed.
To search for a station quickly (Auto Search)
Keep the M DOWN or EM UP button pressed until the tuner
starts searching for a station. After tuning in to a station, the
search stops.
To stop the Auto Search manually, press the M DOWN or ~
UP button.
● The Auto Search may not stop at stations with very weak
signals.
When an FM stereo broadcast contains noise
Press the MONO TUNER button to display “MONO” on the
display. +
❑
Noise is reduced, although reception is monaural.
To restore stereo reception, press the button so that MONO
disappears.
To change the AM tuning interval
The default setting of the AM tuning interval is 10 kHz/step. If
you use this unit in an area where the frequency allocation system
is 9 kHz/step, change the tuning interval.
Press the POWER button while pressing the TUNER/BAND
button.
To reset the interval, repeat this procedure.
m
When the AM tuning interval is changed, all preset stations (see
page 22) are cleared. The preset stations have to be set again.
20
La page est en cours de chargement...
La page est en cours de chargement...
La page est en cours de chargement...
La page est en cours de chargement...
La page est en cours de chargement...
La page est en cours de chargement...
La page est en cours de chargement...
La page est en cours de chargement...
La page est en cours de chargement...
La page est en cours de chargement...
La page est en cours de chargement...
La page est en cours de chargement...
La page est en cours de chargement...
La page est en cours de chargement...
La page est en cours de chargement...
La page est en cours de chargement...
La page est en cours de chargement...
La page est en cours de chargement...
La page est en cours de chargement...
La page est en cours de chargement...
La page est en cours de chargement...
La page est en cours de chargement...
La page est en cours de chargement...
La page est en cours de chargement...
La page est en cours de chargement...
La page est en cours de chargement...
La page est en cours de chargement...
La page est en cours de chargement...
La page est en cours de chargement...
La page est en cours de chargement...
La page est en cours de chargement...
La page est en cours de chargement...
La page est en cours de chargement...
La page est en cours de chargement...
La page est en cours de chargement...
La page est en cours de chargement...
La page est en cours de chargement...
La page est en cours de chargement...
La page est en cours de chargement...
La page est en cours de chargement...
La page est en cours de chargement...
La page est en cours de chargement...
La page est en cours de chargement...
La page est en cours de chargement...
La page est en cours de chargement...
La page est en cours de chargement...
La page est en cours de chargement...
La page est en cours de chargement...
La page est en cours de chargement...
La page est en cours de chargement...
La page est en cours de chargement...
La page est en cours de chargement...
-
 1
1
-
 2
2
-
 3
3
-
 4
4
-
 5
5
-
 6
6
-
 7
7
-
 8
8
-
 9
9
-
 10
10
-
 11
11
-
 12
12
-
 13
13
-
 14
14
-
 15
15
-
 16
16
-
 17
17
-
 18
18
-
 19
19
-
 20
20
-
 21
21
-
 22
22
-
 23
23
-
 24
24
-
 25
25
-
 26
26
-
 27
27
-
 28
28
-
 29
29
-
 30
30
-
 31
31
-
 32
32
-
 33
33
-
 34
34
-
 35
35
-
 36
36
-
 37
37
-
 38
38
-
 39
39
-
 40
40
-
 41
41
-
 42
42
-
 43
43
-
 44
44
-
 45
45
-
 46
46
-
 47
47
-
 48
48
-
 49
49
-
 50
50
-
 51
51
-
 52
52
-
 53
53
-
 54
54
-
 55
55
-
 56
56
-
 57
57
-
 58
58
-
 59
59
-
 60
60
-
 61
61
-
 62
62
-
 63
63
-
 64
64
-
 65
65
-
 66
66
-
 67
67
-
 68
68
-
 69
69
-
 70
70
-
 71
71
-
 72
72


Aiwa AIWA NSX-V50 Le manuel du propriétaire
- Catégorie
- Lecteurs de cassettes
- Taper
- Le manuel du propriétaire
dans d''autres langues
- English: Aiwa AIWA NSX-V50 Owner's manual
- español: Aiwa AIWA NSX-V50 El manual del propietario
Documents connexes
-
Aiwa CX-N999 Operating Instructions Manual
-
-
-
-
-
Aiwa SX-A92 Manuel utilisateur
-
-
-
-
