Aiwa CX-N999 Operating Instructions Manual
- Catégorie
- Lecteurs de cassettes
- Taper
- Operating Instructions Manual

NSX-999
COMPACT DISC STEREO SYSTEM
SISTEMAESTEREOFONICODEDISCOCOMPACTO
COMPACT DISC STEREO CASSETTE RECEIVER
RADIOCASSETTE ESTEREO CON DISCO
COMPACTO
CX-N999U
SPEAKER SYSTEM
SISTEMA DE ALTAVOCES
SX=N999
tniit
DIGITALAUDIO
‘“:%;WARNING: TO REDUCE THERISKOFFIREOR ELECTRIC SHOCK,DONOTEXPOSE THISAPPLIANCE
;,
.~j“B;’j‘;
p-,:“y,-,
TO RAIN OR MOISTURE.
,;f-j~$
-.-”..~
. ‘....,,-=~ 8“s’.ww-----.-s’3...8,6,..-#------

,—.-. <-----
.—.
..-
,-A==. =,= ~.. -.--, ---
,=:=.._=
,=_..-..-v. ..=._., -
,-. -.-.,...
~-e:~;~:~
— .. .
.=... -....,--- .—, -
,-.,-.--,-.
~
*:.:A&___ ,,,
~--“ - ---
-.-”. -...
=
-“=, S-X .S ~~~~=_=_-==
--. -,
-------
y=------- ~-_.,. ,--,
, —--------
.M;YGT—..s... .._, _
. ..-— -
~
~.-y_.m.-.-=~=:=-T-_
.— -
.-..-.-—
=-=-=--
=---—” “=,.”-----TsT.-—
,—.-...&.—
. . . . . . . . . . . ,=. .-.. -—.
--- .—..
~--=-- .-.-, . .
~ ~:=.-=
.-. -.. -.—. — ,=?-.,=.-
-.—.
~;=L-,==----
~“”----
. . . ..-. -.. —- -----------
,.-_. _. —_, -. .--,-
----
~_&-:._-,_--.==
._=&e
==.--.—----
&_~.&y__.--_
~==r
..-.—.
~.. ._
~=.._ 7
.-&w__ ._”,_
.
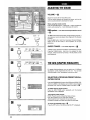
FOREWORD
Welcome to the Aiwa NSX-999
Congratulations on your purchase of an Aiwa Stereo System.
To optimize the performance of this system, please take the time
to read through these Operating Instructions and become fdmiliar
with the operating procedures.
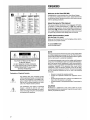
About the layout of this manual
This manual contains instructions in three languages (@ English,
@ Spanish, @ French) and illustrations O +
❑ .When following
the steps for each operation, refer to the illustration indicated bythe
capital letters (• ). Boldface numbers refer to steps in the opera-
tion. Smaller numbers and lowercase letters incircles(@) are used
to explain step procedures and identify parts and controls.
DEMO (Demonstration) mode
(See also page 16 for detail.)
When you first connect the AC cord, the display window demon-
strates the unit’s preset functions.
To cancel DEMO mode
Press the DEMO button.
AR!!!EMJ
‘iCAUTION:TO REDUCE THE RISK OF
ELECTRIC SHOCK,
DO NOT REMOVE COVER (OR BACK).
NO USER-SERVICEABLE PARTS INSIDE.
REFER SERVICING TO QUALIFIED
SERVICE PERSONNEL.”
Explanation of Graphical Symbols:
The lightning flash with arrowhead symbol,
A
within anequilateral triangle, isintended to alerl
the user to the presence of uninsulated ‘dang-
erous voltage” within the product’s enclosure
that may be of sufficient magnitude to consti-
tute a risk of electric shock to persons.
The exclamation point within an equilateral
A
triangle is intended to alert the user to the
presence of important operating and mainte-
●
nance (servicing) instructions in the literature
accompanying the appliance.
NOTE
This equipment has been tested and found to comply with the limits
for a Class B digital device, pursuant to Part 15 of the FCC Rules.
These limits are designed to provide reasonable protection against
harmful interference in a residential installation.
This equipment generates, uses, and can radiate radio frequency
energy and, if not installed and used in accordance with the instruc-
tions, may cause harmful interference to radio communications.
However, there is no guarantee that interference will not occur in
a pati[cular installation. If this equipment does cause harmful
interference to radio or television reception, which can be deter-
mined by turning the equipment off and on, the user is encouraged
to try to correct the interference by one or more of the following
measures:
– Reorient or relocate the receiving antenna.
- Increase the separation between the equipment and re-
ceiver.
– Connect the equipment into an outlet on circuit different from
that to which the receiver is connected.
– Consult the dealer or an experienced radio/TV technician for
help.
CAUTION
Modifications or adjustments to this product, which are not ex-
pressly approved by the manufacturer, may void the user’s right or
authority to operate this product.
2

PREFACIO
PREFACE
Bienvenido a Aiwa NSX-999
Muchas gracias porsu acertadacompra del Sistema Estereofonico
de Aiwa.
Para obtener el optimo funcionamiento de su sistema, skvase leer
detenidamente este manual instrucciones y familiaricese con Ios
procedimientos de operation.
Formato de este manual
Este manual contiene instrucciones en tres idiomas (@ Ingles, @
Espahol, @ Frances) e ilustraciones @ +
❑ . Cuando siga Ios
pasos para cada operation, refierase a la ilustracion encabezada
por la Ietra mayuscula (
❑ ). Los numeros en negrita se refieren a
Ios pasos de operation. Los numeros pequerlos y Ias Ietras
mintisculas en circulo (@) se usan paraexplicar Iosprocedimientos
por paso y para identificar Ias piezas y Ios controles.
Modo DEMO (Demostracion)
(Para Ios detalles, vease la pagina 17.)
Alconectarporprimera vezel cordon CA, Iaventanillavisual izadora
muestra Ias funciones memorizadas del aparato.
Para cancelar el modo DEMO
Presione ei boton DEMO.
Aiwa vous souhaite la bienvenue.
Felicitations pour votre achat d’une chaine stereo Aiwa.
La lecture de ce mode d’emploi vous permettra de maWiser
I’utilisation et d’optimiser Ies performances de cette chalne.
Disposition de ce manuel
Ce manuel comporte des instructions en trois Iangues (C3Anglais,
@ Espagnol, @ Frangais) et des illustrations @ +
❑. Quand on
suit Ies etapes pour chaque operation, se reporter aux illustrations
indiquees par Ies Iettres majuscules (
❑ ). Les numeros en gras
renvoient aux etapes de I’operation. Les numeros plus petits et Ies
Iettres mmuscules clans des cercles (@ ) sent employes pour
exphquer Ies procedures d’etape et pour identifier Ies pieces et Ies
commandes.
Mode DEMO (Demonstration)
(Pour plus de details, voir page 17.)
Quand on branche Ie cordon d’alimentation, la fenetre d’affichage
montre Ies fonctions memoris6es de I’appareil.
Pour annuler Ie mode DEMO
Appuyer sur la touche DEMO.
3

TABLE OF CONTENTS
FEATURES ...............................................................................6
PRECAUTIONS ..................................................................m.....8
CONNECTIONS .......................................................10
CONNECTING THE SPEAKERS ......................................10
CONNECTING THE AC CORD .........................................10
ANTENNA CONNECTIONS ..............................................12
OTHER CONNECTIONS ...................................................l4
PREPARATIONS .....................................................
16
DEMO (DEMONSTRATION) MODE ..................................18
BEFORE OPERATION ......................................................l6
SETTING THE CLOCK ......................................................2O
SOUND ....................................................................
22
ADJUSTING THE SOUND ............1...................................22
THE GEQ (GRAPHIC EQUALIZER) ..................................22
THE DSP (DIGITAL SIGNAL PROCESSOR) ....................24
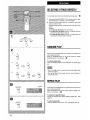
CD PLAYING ...........................................................
28
BASIC OPERATIONS .......................................................28
SELECTING A TRACK DIRECTLY ...................................32
RANDOM PLAY .................................................................32
REPEAT PLAY ..................................................................32
PROGRAMMED PLAY ......................................................34
TAPE PLAYBACK
...................................................
36
BASIC OPERATIONS .......................................................36
RADIO RECEPTION ................................................4O
MANUAL TUNING .............................................................4O
PRESETTING STATIONS .................................................4O
TUNING INTO A PRESET STATION ...............................42
OTHER SOURCES ..................................................44
LISTENING TO OTHER SOURCES ..................................44
RECORDING ...........................................................46
RECORDING FROM THE RADIO OR CONNECTED
EQUIPMENT ......................................................................46
RECORDING FROM TAPE TO TAPE MANUALLY ..........48
DUBBING THE WHOLE TAPE ..........................................5O
RECORDING FROM A CD
................................................52
Al EDIT RECORDING ........................................................54
PROGRAMMED EDIT RECORDING .................................58
TIMER
......................................................................62
SETTING THE TIMER .......................................................62
SETTING THE SLEEP TIMER ...........................................64
KARAOKE
...............................................................
66
MICROPHONE MIXING .....................................................66
USEFUL FUNCTIONS FOR KARAOKE
...........................68
CARE AND MAINTENANCE ..................................................7O
SPECIFICATIONS ..................................................................72
TROUBLESHOOTING GUIDE ................................................76
PARTS AND CONTROLS ......................................................78
4

TABLE DES MATIERES
CARACTERISTICAS ................................................................7
PRIECAUCIONES .....................................................................9
CONEXIONES .........................................................ll
CONEXION DE LOS ALTAVOCES ...................................11
CONEXION DEL CORDON DE ALIMENTACIONDECA 11
CONEXION DE LAS ANTENAS .,......................................13
OTRAS CONEXIONES ......................................................l5
PREPARATIVES .....................................................l7
MODO DEMO (DEMOSTRACION) ....................................17
ANTES DE LA OPERACION .............................................17
AJUSTE DEL RELOJ ........................................................2l
SONIDO ...................................................................23
AJUSTE DEL SONIDO ......................................................23
GEQ (ECUALIZADOR GRAFICO) ....................................23
t)SP (PROCESADOR DE SENAL DIGITAL) .....................25
REPRODUCTION DE DISCOS COMPACTOS .......29
OPERACIONES BASICAS ................................................29
SELECCION DIRECTA DE UNA CANCION .....................33
REPRODUCTION ALEATORIA ........................................33
F?EPRODUCCION REPETIDA ...........................................33
REPRODUCTION PROGRAMADA ..................................35
REPRODUCTION DE LA CINTA
.............................37
OPERAClONES BASICAS ................................................37
RECEPCION DE LA RADIO ....................................41
SINTONIZACION MANUAL ...............................................4l
MEMORIZATION DE EMISORAS .....................................41
SINTONIZACION DE UNA EMISORA MEMORIZADA .....43
OTRAS FUENTES ...................................................45
ESCUCHA DE OTRAS FUENTES SONORAS .................45
GRABACION
...........................................................47
GRABACION DE LA RADIO O DEL EQUIPO
CONECTADO ....................................................................47
GRABACION DE CINTA A CINTA MANUALMENTE .......49
COPIA DE LA CINTA COMPLETA ...................................51
GRABACION DE UN DISCO COMPACTO .......................53
GRABACION CON EDICION Al ........................................55
GRABACION CON EDICION PROGRAMADA .................59
TEMPORIZADOR ....................................................63
AJUSTE DEL TEMPORIZADOR .......................................63
AJUSTE DEL CRONODESCONECTADOR ......................65
KARAOKE ...............................................................67
MEZCLA DE MICROFONO ...............................................67
IWNCIONES UTILES PARA KARAOKE
..........................69
CUIDADO Y MANTENIMIENTO .............................................71
ESPECIFICACIONES .............................................................73
GUIA PARA LA SOLUCION DE PROBLEMAS .....................77
PIEZAS Y CONTROLES .........................................................79
CARACTERISTIQUES .............................................................7
PRECAUTIONS ........................................................................9
CONNEXIONS .........................................................ll
CONNEXIONS DES ENCEINTES .....................................11
CONNEXION DU CORDON SECTEUR ............................11
CONNEXIONS DES ANTENNES ......................................13
AUTRES CONNEXIONS ...................................................15
PREPARATIONS .....................................................17
MODE DEMO (DEMONSTRATION) ..................................17
AVANT L’UTILISATION ....................................................17
REGLAGE DE L’HORLOGE .............................................21
SON .........................................................................23
REGLAGE DU SON ...........................................................23
GEQ (EGALISEUR GRAPHIQUE) ....................................23
DSP (PROCESSEUR NUMERIQUE DE SIGNALIX) .........25
LECTURE DE DISQUES COMPACTS ....................29
OPERATIONS DE BASE ...................................................29
CHANGEMENT DE DISQUES PENDANT LA
LECTURE ..........................................................................33
LECTURE ALEATOIRE .....................................................33
LECTURE REPETEE .........................................................33
LECTURE PROGRAMMED ...............................................35
LECTURE DE CASSETTES
....................................37
OPERATIONS DE BASE ...................................................37
RECEPTION RADIO ................................................4l
ACCORD MANUEL ...........................................................4l
MEMORISATION DE STATIONS ......................................41
ACCORD SUR UNE STATION MEMORISEE ...................43
AUTRES SOURCES ................................................45
ECOUTE D’AUTRES SOURCES ......................................45
ENREGISTREMENT ................................................47
ENREGISTREMENT A PARTIR DE LA RADIO OU
DE L’APPAREIL CONNECTE
...........................................47
ENREGISTREMENT MANUEL DE CASSEITE
A CASSETTE .....................................................m...............49
DUPLICATION DE LA TOTAL!TE D’UNE CASSETTE ....51
ENREGISTREMENT A PARTIR D’UN DISQUE
COMPACT .........................................................m...............53
ENREGISTREMENT AVEC MONTAGE ET CALCUL
DU TEMPS .........................................................................55
ENREGISTREMENT AVEC MONTAGE PROGRAM ME ...59
MINUTERIE ..............................................................63
REGLAGE DE LA MINUTERIE .........................................63
REGLAGE DE LA MINUTERIE D’ARRET
........................65
KARAOKE ...............................................................67
MIXAGE AVEC MICROPHONE
.........................................67
FONCTIONS UTILES POUR KARAOKE
..........................69
SOINS ET ENTRETIEN ..........................................................7l
SPECIFICATIONS ..................................................................73
EN CAS DE PROBLEME ........................................................77
NOMENCLATURE ..................................................................79
5

FEATURES ~
Three CD changer system
Three compactdiscscan be placed inthe disc compartment at the
same time and played continuously. You can select any track on
any of the discs, either directly or in programmed play. You can
change two of the discs while the third is playing.
DSP (Digital Signal Processor) system
DSP circuits can recreate the effect of sounds reflected from walls
or ceilings, to obtain the sound presence of real environments
without the need to connect surround speakers.
There are 4 preset DSP modes, with matching equalization curves,
and 4 changeable DSP modes that can be preset manually.
GEQ (Graphic Equalizer) function
There are 4 preset equalization curves, and 4 changeable equal-
ization curves that can be preset manually.
Enjoying Karaoke
You can connecttwo microphonesforduets,echoyourvoice, and
record Karaoke singing.The followingfunctionsare available for
greater enjoyment.
VOCAL FADER function
This function makes the vocal parl on ordinarydiscs ortapes
softer, so you can enjoy Karaoke without special Karaoke
software.
You can also usethe AUTO VOCAL FADER functionto reduce
the vocal part only while you sing with the connected micro-
phone.
MULTIPLEX function
This function mutes the vocal part on multi audio discs or tapes,
so that the accompaniment is heard from both speakers.
You can also use the AUTO MULTIPLEX function to reduce the
vocal part only while you sing with the connected microphone.
Direct play function
If a disc or tape is inserted, you can turn the unit on and begin
playback by pressing one of the direct play buttons. This is a
convenient way to begin playback quickly.
Other features
Amplifier section
● BBE for clear and vivid high-frequency sound.
● T-BASS for realistic reproduction of low frequency sound with
compact speakers.
● Daily event /sleep timer
Tuner section
● Synthesizer tuner
Cassette deck section
● High-speed tape dubbing
CD player section
● Repeated playback of tracks or discs
● Playback of tracks in random order
● Playback of tracks in programmed order
● Two different CD edit functions
6

CARACTERISTICAS
CARACTERISTIQUES
Sistema de cambiadiscos de tres discos compactos
Pueden colocarse al mismotiempo tres discos compactos sobre el
compartimiento de discos y reproducirse continuamente. Usted
puede seleccionar cualquier cancion de cualquier disco,
directamente o en la reproduction programada. Ademas, puede
camblarlos dos prlmeros discos durante lareproduction del tercer
disco.
Sistema DSP (Digital Signal Processor “Procesador de
Sei3aies Digitales”)
Loscircuitos DSP pueden volveracrear elefecto sonoro repercutido
de Iasparedes otecho para obtener un ambiente de sonido real sin
la necesidad conectar Ios altavoces perimetricos.
Existen 4modosdel DSP programadoscon curvas deecualizacion
y 4 modos del DSP camblables que podran programarse
manualmente.
Funcion de ecualizador grafico (GEQ)
Existen 4 cutvas de ecualizacion preajustadas y 4 curvas de
ecualizacion cambiables, que podran preajustarse manualmente.
Entretenimiento con Karaoke
Usted puede conectar dos microfonos para cantar en duo, afladir
efecto del eco a su voz y para grabar la cancion de Karaoke. Las
siguientesfunciones estan disponibles para hacermas entretenido
el Karaoke.
Funcion de VOCAL FADER
Esta funcion atenua la parte vocal de Ios discos o cintas
c)rdinarios, por 10que usted podra disfrutar del Karaoke sin un
software de Karaoke especial. Usted puede usar tambien la
funcion de AUTO VOCAL FADER para reducir la parte vocal
solamente cuando este cantando con el mlcrofono conectado.
Funcion de MULTIPLEX
Esta funcion silencia la patie vocal de Ios discos o cintas de
audio multlple, y solo el acompahamlento musical se oye de
ambos altavoces.
Usted puede usar tambien la funcion de AUTO MULTIPLEX
para reducir la parte vocal solo cuando este cantando con el
microfono conectado.
Funcion de reproduction directs
Insertando un disco o una cinta, usted podra encender el aparato
e imciar la reproduction presionando uno de Ios botones de
reproduction directs. Esta funcion es convenience para iniciar
rapidamente la reproduction.
Otras caracteristicas
Seccion del ampllficador
● BBE para un sonido mas nitido yvfvido a niveles sonoros de alta
frecuencia.
● T-BASS para la reproduction realista aniveles de bajafrecuencia
con Ios altavoces compactos.
● Temporizador de programa diario/cronodesconectador
Seccion del sintonizador
● Sintonizador sintetizador
Seccion del deck de cassette
c Copia de cinta a alta velocidad
Seccion del reproductor de discos compactos
s Reproduction repetida de Ias canciones o discos
● Reproduction de Ias canciones en el orden aleatorio
● Reproduction de Ias canciones en el orden programado
. Dos diferentes funciones de edition de discos compactos
Systeme changeur a trois disques compacts
Trois disques compacts peuvent ~tre mis en m6me temps clansIe
cornpartirnent a disques et peuvent &re Ius en continu. On peut
selectionner n’importe quelle plage de n’importe quel disque,
directement ou en lecture programmed. On peut changer deux des
dlsques pendant que Ie troisieme est en lecture.
Systeme DSP (processeur numerique de signaux)
Les circuits DSP peuvent recrr5erI’effet des sons reflechis par Ies
murs ou Ieplafond, pour obtenir une ambiance sonore reelle saris
Ie besoin de connecter des encemtes surround,
II y a quatre modes DSP preregles possedant des courbes
d’egalisatlon correspondantes et quatre modes DSP changeables
et prereglables manuellement.
Fonction GEQ (Egaliseur graphique)
II y a quatre courbes d’egalisation prereglees et quatre courbes
d’egalisationchangeables et prereglables manuellement.
Fonctions Karaoke
Vous pouvez brancher deux microphones pour chanter en duo,
dormer de I’echo a votre voix et enregistrer pendant I’utilisation des
fonctions Karaoke. Les fonctions suivantes sent disponibles pour
un plus grand plaisir d’utilisation.
Fonction VOCAL FADER
Cettefonction attenue lapartievocale des disques ou cassettes
ordinaires, vous permettant ainsi d’obtenir un effet Karaoke
saris disques ou cassettes speciaux.
Vous pouvez egalement utiliser la fonction AUTO VOCAL
FADER pour attenuer la partie vocale seulement pendant que
vous chantez avec Ie microphone connecte.
Fonction MULTIPLEX
Cette fonction supprime la partie vocale des disques ou cas-
settes multi audio, si bien que I’accompagnement est audible
par [es deux enceintes.
Vous pouvez egalement utiliser lafonction AUTO MULTIPLEX
pour attenuer la partie vocale seulement pendant que vous
chantez avec Ie microphone connecte.
Fonction lecture directe
Si un disque ou une cassette est en place, on peut mettre I’appareil
sous tension et commencer la lecture en appuyant sur une des
touches de lecture directe. Ceci est pratlque pour commencer la
lecture rapidement.
Autres caracteristiques
Partie amplificateur
● Systeme BBE pour des sons de haute frequence clairs et vifs.
● Systeme T-BASS pour une reproduction realiste des sons de
basse frequence avec des enceintes compactes.
● Mmuterle interne quotidienne/d’arr6t
Partie tuner
● Tuner a synthetiseur
Partie magnetocassette
● Duplication de cassette a grande vitesse
Partie Iecteur de disques compacts
● Lecture repetee de plages ou de disques
● Lecture de plages clans un ordre aleatoire
c Lecture de plages clans un ordre programme
c Deux fonctions de montage de disques compacts differences
7

PRECAUTIONS
Follow the advice below for safe and correct operation.
On AC voltage
Before use, check that the rated voltage of your system matches
your local voltage.
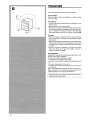
On placement
● Do not use the system in places which are extremely hot, cold,
dusty or humid.
● Place the system on a flat, even surface.
● Be careful not to obstruct the ventilation holes on the exterior of
the unit, as increased internal temperature may affect the electric
parts. In particular, do not place the system in an aiflight rack.
Keep enough space around the unit as shown in illustration
❑.
On safety
● When connecting and disconnecting the AC cord, grip the plug
and not the cord itself. Pulling the cord may damage it and thus
be hazardous.
● When you are not going to use the system fora long period of time,
disconnect the AC cord. Ifthe cord is plugged in, a small amount
of current keeps on flowing to the system even ifthe power switch
is not ON.
● Ifthe AC cord is broken or damaged, or if the wires are exposed,
contact your dealer or an Aiwa service station and have it
replaced or repaired immediately.
On condensation
When the room is heated, you sometimes see water drops on your
windows; this is called condensation.
This can occur inside the CD player unit when:
● it is moved from a cold spot to a warm spot.
● it isused ina room where the heating system has just been turned
on.
● it is used in a place with a lot of moisture.
● it is used where it has direct contact with cool air, such as near an
air-conditioner.
When it has condensation inside, the unit may not function nor-
mally. Let it stand for 1to 2 hours before turning the power on; or,
gradually heat the room and dry the unit before use.
Should any trouble occur, disconnect the AC cord and contact
a qualified service representative.
8

PRECAUCIONES PRECAUTIONS
Para obtener una operation segura y corrects, siga Ios consejos
descritos a continuaclon.
Voltaje de CA
Antes del USO,compruebe si el voltaje nominal de su sistema
coincide con el voltaje de su Iocalidad.
Colocacion
● No utilice el sistema en Iugares extremadamente calurosos, fries,
polvorientos o humedos.
● Coloque el sistema sobre una superficie plana.
● Tenga cuidado de no obstruir Ios orificios de ventilation del
exterior del aparato, ya que el aumento de latemperature interna
podrfa afectar Ias piezas electrical. En particular, no coloque el
aparato en un armario hermetico.
Deje espacio suficiente alrededor de la unidad, como se muestra
en la Ilustracion
❑.
Seguridad
● Para conectar y desconectar el cordon de alimentacion de CA,
tome elenchufe y no el propio cordon. Sitirase del cordon, podria
daharlo, 10que resultaria pellgroso.
● Cuando no vaya a emplear el sistema durante mucho tiempo,
desconecte el cordon de alimentaclon de CA. Cuando el cordon
de alimentacion de CA este conectado, circulara una pequefia
cantidad de corriente, aunque el interruptor de alimentacion este
desconectado.
● Si el cordon de alimentacion de CA esta roto o averiado, o si sus
hilos estan al descubierto, pongase inmediatamente en contacto
con un centro de reparaciones Aiwa para sohcltar reparation o
reemplazo.
Condensation
Al calentar una sala, a veces pueden verse gotitas de agua en Ias
ventanas; esto se denomina condensation.
Este fenomeno puede ocurrirtambien en el interior del reproductor
de discos compactos cuando:
● se traslade de un lugar frfo a otro calido.
● seemplee en unasaladonde acabade ponerse enfuncionamiento
el sistema de calefaccion.
● se emplee en un Iugar con mucha humedad.
● se emplee en un Iugar directamente en contacto con aire frio,
como cerca de un acondicionador de aire.
Cuando se haya producido condensation en el interior, es posible
que el aparato no funcione normalmente. Dejelo en reposo 1 a 2
horas antes de conectar la alimentacion, o caliente gradualmente
la sala para que se seque el aparato antes de su utilizaci6n.
Priere de respecter Ies consignes suivantes pour une utilisation
stire et correcte.
Tension du secteur
Avant I’utilisation, verifier que la tension nominale de la chatne
correspond a celle du secteur.
Emplacement
● Ne pas utiliser la chahe clansdes endroits extr~mement chauds,
froids, poussiereux ou humldes.
● Installer la chaine sur une surface plate et Iisse.
● Faire attention a ne pas obstruer Ies orifices de ventilation situes
sur l’exterieur de I’appareil; une elevatlon de la temperature
interne risqued’affecterlescomposants electriques. Enparticulier,
ne pas placer la chalne clans un meuble completement ferme.
Laissersuffisamment d’espace autourde I’appareil comme montre
sur I’illustration
❑.
Securite
● Pour brancher ou debrancher Ie cordon secteur, Ie tenir par sa
fiche et non pas par Ie cordon proprement alit.Toute traction sur
Ie cordon risque de I’endommager et de creer ainsi un danger.
●SiIachalne ne doit pas6tre utilisee pendant Iongtemps, debrancher
Ie cordon secteur. Si on Iaisse ce cordon branche, un courant de
faible intensite continue de circuler clans la chalne m6me si
I’mterrupteur d’alimentation est sur la position de repos.
● Si Iecordon secteur est coupe ou endommage, ou si Iesfils sent
exposes, contacter Immediatement Ie revendeur ou un centre de
service Aiwa pour Ie faire remplacer ou reparer.
Condensation
Lorsqu’une piece est chauffee, onvoit parfois des gouttesd’eau sur
Ies vitres; c’est ce qu’on appelle la condensation.
De la condensation peut se former a I’interieur du Iecteur de
disques compacts quand:
● il est deplace d’un endroit froid a un endroit chaud.
● iiest utilise clansune piece oh IeIechauffagevient juste d’~tre mis
en marche.
● il est utilise clans un endroit tres humide.
● il est utilise clans un endroit expose a un courant d’alr froid,
comme pres d’un climatiseur.
S’il y a de la condensation a I’mterieur de I’appareil, il risque de ne
pas fonctionner normalement. Le cas echeant, Ie Iaisser hors
tension pendant une a deux heures; ou chauffer la piece
progressivement pour faire secher I’appareil avant I’utilisation.
En cas de probleme, debrancher Iecordon secteur et contacter
un technician qualifle.
Si se presenta algun problems, desconecte el cord6n de
alimentacion de CA y solicite Ios servicios del personal
cualificado.
9

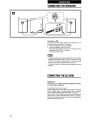
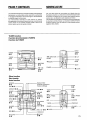
CONNECTING THE SPEAKERS
R
Connection +
❑
The cords with white stripes should be connected to the @
terminals and other cords to the @terminals.
1 Connect the speaker cords to the speakers.
2 Connect the speaker cords with the unit.
Connect the right speaker to the@ and @Rterminals, and the
left speaker to the @and @ L terminals.
Then, shut the lever to lock.
m
● The speaker systems are magnetically shielded. However, if the
speakers should affect the color on your TV screen, turn off the
TV and turn it on again 15-30 minutes later. If the TV screen still
has poor color, move the speakers away from the TV.
● Do not leave magnets or objects generating magnetism near the
speakers.
CONNECTING THE AC CORD
IMPORTANT
Connect the AC cord after connecting equipment, antennas,
and other optional equipment.
Connect the AC cord to an AC outlet.
A demonstration of the unit’s preset functions begins inthe display
window (DEMO mode). This demonstration can be canceled.
Refer to “DEMO (DEMONSTRATION) MODE” on page 16.
Also, the II SET DXton flashes to inform you that the current time
needs to be set. Refer to “SE17NG THE CLOCK on page 20.
Ifsetting up with optional equipment, connect the other equipment
before connecting the AC cord.
10

CONEXION DE LOS ALTAVOCES
CONNEXION DES ENCEINTES
Conexion +
❑
Los cables con Ias franjas blancas deberan conectarse a Ios
terminals @, y Ios otros cables a Ios terminals G.
1 Conecte Ios cables de Ios altavoces a Ios altavoces.
2 Conecte Ios cables de Ios altavoces a la unidad.
Conecte el altavoz derecho a Ios terminals R @ y @, y el
altavoz izquierdo a Ios terminals L @y G.
Luego, cierre Ias palancas para bloquear Ios cables.
● Los sistemas de altavoces estan magneticamente protegidos.
Sin embargo, si Iosaltavoces afectan el color de la pantalla de su
televisor, apague eltelevisor yvuelvalo aencender 15-30 minutes
despues. Si no mejora el color de la pantalla del televisor, aleje
Ios altavoces del televisor.
● No deje imanes u objetos que generan magnetism cerca de Ios
altavoces.
CONEXION DEL
ALIMENTACION
CORDON DE
DE CA
IMPORTANTE
Conecte el cordon de alimentacion CA despues de conectar el
aparato, Ias antenas y otros equipos opcionales.
Conecte elcordonde alimentacionde CA a unatoma de corriente
CA.
Iniciaunademostracionde Iasfuncionesmemorizadasdelaparato
en la ventanilla visualizadora (Modo DEMO). Esta demostracion
puede cancel arse.
Refierase al
“MODO DEMO
(DEMOSTRACION)” en la pagina 17.
Ademas de esto, parpadea el boton II SET para informarle que
debe ajustarse la hors. Refierase a “AJUSTE DEL RELOJ” pagina
21.
En caso del uso con un equipo optional, conecte el equipo antes
de la conexion del cordon CA.
Connexion +
❑
Les cordons avec des traits blancs doivent Stre connectes aux
bornes @et Ies autres cordons aux bornes G.
1 Connecter [es cordons d’enceinte aux enceintes.
2 Connecter Ies cordons d’enceinte a I’appareil.
Connecter I’enceinte droite aux bornes R @et ~, et I’enceinte
gauche aux bornes L @et ~.
Ensuite, fermer Ie levier pour verrouiller.
● Les enceintes sent dotees d’un blindage magnetique. Toutefois,
si elles affectent [escouleurs de I’ecran.d’un televiseur, mettre ce
dernier hors tension puis de nouveau sous tension au bout de 15
a 30 minutes. Si [escouleurs sent toujours affectees, eloigner Ies
enceintes du televiseur.
● Ne pas Iaisser d’aimant ou autre objet produisant un champ
magnetique pres des enceintes.
CONNEXION DU CORDON
SECTEUR
IMPORTANT
ConnecterIecordonsecteurapres avoir connecte la chalne, Ies
antennes et tout autre appareil optionnel.
Brancher Ie cordon secteur a une prise de courant.
Une demonstration des fonctions memorisees de I’appareil com-
mencesurlafen6tre daffichage (mode DEMO). Cettedemonstration
peut &re annulee. Se reporter a la partie “MODE DEMO (DEMON-
STRATION)”, page 17.
De plus, la touche H SET clignote pour vous signaler que I’heure
courante doit &tre reglee. Se reporter a la partie “REGLAGE DE
L’HORLOGE, page 21.
Dans Iecas d’une installation avec un appareil optionnel, connecter
cet appareil avant de connecter Ie cordon secteur.
11

ANTENNA CONNECTIONS
—
CONNECTING THE SUPPLIED ANTENNAS
Supplied antennas
AM antenna, FM feeder antenna
● AM antenna can be fixed. + ❑
Connection + H
FM: Connectthe FM feeder antenna@ to the FM 75f2 terminals.
AM: Connect the AM loop antenna@ to the AM LOOP terminals.
Positioning each antenna
. Extend the FM feeder antenna horizontally in a T-shape and
attach the ends to the wall with the cellophane tape.
● For AM reception, find the best position and fix this antenna
vertically.
● Do not bring the end of the FM antenna near metal objects or
curtain rails.
● Do not unwind the AM loop antenna wire.
● Do not bring the AM loop antenna near a turntable system, CD
player, TV monitor, or the stereo system itself, or close to the AC
cord or speaker cords, since noise will be picked up.
CONNECTING AN OUTDOOR ANTENNA
For better FM reception, use of an outdoor antenna is recom-
mended.
Connect the outdoor antenna to the FM 75.Qterminals. +
❑
12

C(INEXION DE LAS ANTENAS
CONNEXION DES ANTENNES
CC)NEXION DE LAS ANTENAS
SIJMINISTRADAS
Antenas suministradas
Antena de AM, antena de Ifnea de FM
● Es posible fijar una antena de AM. + ❑
Conexion + H
FM: Conecte la antena de Iinea FM ~ a Iosterminals FM 75Q.
AM: Conecte la antena de cuadro AM @ a Ios terminals AM
LOOP.
Ubicacion de cada antena
● Extiendahorizontalmentelaantena deFM enformadeTyfije sus
extremes a la pared con cinta plastica.
● Para la recepcion de AM, busque la mejor position y fije esta
antena verticalmente.
● No acerque el extremo de la antena de FM a ningun objeto
metalico o riel de cortinas.
● No desenrolle el hilo de la antena de cuadro AM.
● No acerque la antena de cuadro AM a un sistema de tocadiscos,
reproductor de discos compactos, monitor de TV o al sistema
estereofonico mismo, ni la acerque al cordon CA oa Ioscordones
de altavoz, ya que puede causar ruido.
CONEXION DE UNA ANTENA EXTERIOR
Para la optima recepcion de FM, se recomienda utilizar una antena
exterior.
Conecte la antena exterior a Ios terminals FM 75f2. +
❑
CONNEXION DES ANTENNES FOURNIES
Antennes fournies
Antenne AM, antenne FM intiwieure
● L’antenne AM peut 6tre fixee. + ❑
Connexion + ❑
FM: Connecter I’antenne FM interieure @ aux bornes FM 75Q.
AM: Connecter I’antenne cadre AM @ aux bornes AM LOOP.
Positionnement de chaque antenne
● Deployer l’antenne FM interieurehorizontalementselon la forme
d’un T etfixer ses extremities a unmur avec de la bande adhesive.
● Pour la reception AM, trouver la meilleure position et fixer
I’antenne verticalement.
● Nepas mettre I’extremite de I’antenne FMpresd’objets metalliques
ou de tringles a rideaux.
● Ne pas derouler Ie fil de I’antenne cadre AM.
. Ne pas mettre I’antenne cadre AM pres d’un tourne-disque, d’un
Iecteur de disques compacts, d’un televiseur ou de la chalne
stereo ni pres du cordon secteur ou des cordons d’enceinte; elle
pourrait capter des parasites.
CONNEXION D’UNE ANTENNE
EXTERIEURE
Pour obtenir une meilleure reception FM, I’utilisation d’une antenne
exterieure est recommandee.
Connecter I’antenne exterieure aux bornes FM 75.Q.+ E
13

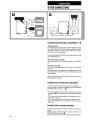
OTHER CONNECTIONS
CONNECTING OPTIONAL EQUIPMENT + ❑
VIDEO/AUX jacks
This unitcan inputthe soundsignalthroughtheVIDEO/AUX jacks.
Use a cable with an RCA phono plug (not supplied) to connect
equipment (turntables, LD players withoutdigitaloutputconnec-
tors, VCRs, etc.) for audio playback.
Connect the red plug to the Rjack, and the white plug to the Ljack
of the VIDEO/AUX jacks.
When connecting a turntable
Use turntable with a built-inequalizer amplifier (Aiwa PX-E850,
etc.).
CD DIGITAL OUT jack
This unit can output digital signal of CD through the CD DIGITAL
OUT jack.
Use an optical cable (not supplied) to output digital signals from this
unit to equipment such as DAT decks, a minidisc recorder, and
digital amplifiers,
Remove the dust cap from the CD DIGITAL OUT jack and connect
the optical cable to the jack.
CONNECTING SURROUND SPEAKERS
Connecting surround speakers increases the surround effect.
Connect the riaht and left surround sDeakers to the SURROUND
SPEAKERS ja~ks (R) and (L). +
❑‘
● Set the surround speakers behind your listening area as shown
in illustration
❑ , (The listening area is enclosed by the dotted
line.)
● The volume of the surround speakers is controlled by the VOL-
UME control on this unit.
● The surround effect will not be heard with monaural sources.
● Use surround speakers with an impedance of 16 ohms (Aiwa SX-
R220, etc.).
CONNECTING A SUPER WOOFER
Connecting a super woofer increases the realism of low-frequency
sounds.
Connect a super woofer speaker with a built-in amplifier to the
SUPER WOOFER terminal. +
❑
Refer to the operating manual ofthe connected speaker for details.
14

k.
CONEXION DE EQUIPOS OPCIONALES + El
Tomas VIDEO/AUX
Esta unidad podra introducerla sefial dei sonido a traves de Ias
tomas VIDEO/AUX.
Use un cable con clavija Phono RCA (no suministrado) para
conectar un equipo (tocadiscos, reproductor de discos compactos
sin conectores de salida digital, videograbadora, etc.) para la
reproducci6n de audio.
Conecte la clavija roja a la toma Ry la clavija blanca a la toma Lde
Ias tomas VIDEO/AUX.
Conexion de un tocadiscos
Utilice el tocadiscos equipado con un amplificador ecualizador
integrado (Aiwa PX-E850, etc.).
Touna CD DIGITAL OUT
Este aparato puede emitir Iassehales digitales del disco compacto
a traves de la toma CD DIGITAL OUT.
Utilice un cable optico (no suministrado) para emitir Ias sefiales
digitales de este aparato a Ios equipos tales como el deck DAT, la
grabadora de minidiscos y el amplificador digital.
Quite la tapa guardapolvo de la toma CD DIGITAL OUT y conecte
el cable optico a la toma.
CONEXION DEALTAVOCESPERIMETRICOS
La conexion de altavoces perimetricos aumentara el efecto
perimetrico.
Conecte altavoces perimetricos derecho e izquierdo a Ias tomas
SURROUND SPEAKERS (R) y (L). +
❑
● Coloque Iosaltavoces perimetricos detrasdesu zona deescucha,
como se muestra en la ilustracion E. (El area de escucha esta
encerrada por la Iinea discontinue.)
● El volumen de Ios altavoces perimetricos se regla con el control
VOLUME de esta unidad.
c El efecto perimetrico no se oira con fuentes monoaurales.
● Use Iosaltavoces perimetricos con una impedancia de 16ohmios
(Aiwa SX-R220, etc.).
CONEXION DE UN ALTAVOZ DE SUPER
GRAVE
La conexion de un altavoz de super grave aumenta el realismo de
Ios sonidos a baja frecuencia.
Conecte un altavoz de super grave con amplificador integrado al
terminal SUPER WOOFER. +
❑
Refierase al manual de instrucciones del altavoz conectado para
mayor
detalie.
CONNEXION D’UN APPAREIL OPTIONNEL
+~
Prises VIDEO/AUX
Cet appareil peut recevoir des signaux sonores par Ies prises
VIDEO/AUX.
Utiliserun cable a fiches phono RCA (pas fourni)pourconnecter
unappareil(tourne-disque,IecteurdedisqueIasersansconnecteurs
de sortie numerique, magnetoscope, etc.) pourlectureaudio.
Connecter la fiche rougea la prise Ret la fiche blanche a la prise
L des prisesVIDEO/AUX.
Pour connecter un tourne-disque
Utiliseruntourne-disquemunid’unamplificateura egaliseur(Aiwa
PX-E850, etc.).
Prise CD DIGITAL OUT
Cet appareilpeutsortirIesignalnumeriquede disquecompactpar
la prise CD DIGITAL OUT.
Utiliser un cable optique (pas fourni) pour sortir Ies signaux
numeriques de cet appareil vers un equipment tel qu’une platine
DAT, unenregistreurde minidisqueou unamplificateur numerique.
Enlever Iecapuchon antipoussiere de la prise CD DIGITAL OUT et
connecter Ie cable optique a la prise.
CONNEXION D’ENCEINTES SURROUND
La connexion d’enceintes surround augmente I’effet d’ambiance.
Connecter Ies enceintes surround droite et gauche aux prises
SURROUND SPEAKERS (R) et (L). + H
● Positioner Ies enceintes surround derriere la zone d’ecoute
comme montre surl’illustration H. (Lazone d’ecouteest entouree
de pointilles.)
● Le volume des enceintes surround se regle avec la commande
VOLUME de cet appareil.
. L’effet surround est inaudible avec Ies sources monophoniques.
● Utiliser des enceintes surround d’une impedance de 16 ohms
(Aiwa SX-R220, etc.).
CONNEXION D’UN CAISSON DE GRAVES
La connexion d’un caisson de graves augmente le realisme des
sons de basse frequence.
Connecter un caisson de graves a amplificateur integre
a la borne SUPER WOOFER. +
❑
Pour plus de details, se reporter au mode d’emploi du caisson
connecte.
15

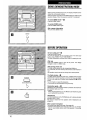
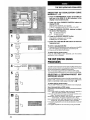
DEMO (DEMONSTRATION) MODE
When you first connect the AC cord, the display window demon-
strates the unit’s preset functions.
When the power is turned on, the DEMO display is hidden by the
operation display. When the power is turned off, it is restored.
To cancel DEMO mode+
❑
Press the DEMO button.
To reenter DEMO mode
Press the DEMO button again,
After a power interruption
The unit enters DEMO mode.
DEMO
o
b
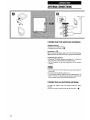
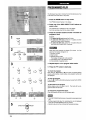
BEFORE OPERATION
13
.
m
POWER
~
w
(!) STANDBY/ON
h
❑
D
SET
To turn on the unit+ H
Press the POWER button.
You can also turn the unit on by pressing one of the direct play
buttons. (See “DIRECT PLAY FUNCTIONS.)
The disc compartment may open and close for resetting the unit.
After use
Press the POWER button to turn off the power. The display
changes to clock or DEMO mode.
After turning on the unit
The flash window above the disc compartment lights up.
For 4 seconds, the most recently used function button flashes in
red.
No operation maybe carried out during this 4-second period.
The flash window +
❑
The flash window shows the power is on. Itflashes when the disc
compartment is opened or closed, and when the trays are rotated.
To turn it off, press the CD button while pressing the ■ CLEAR
button.
To turn it back on, repeat the procedure.
● Do not carry out this operation during recording.
Illumination guide +
❑
Whenever on~of the function buttons is pressed, the buttons for
that operation light up or flash.
Example:
When connecting the AC cord, the II SET button flashes to guide
you in setting the current time.
Headphones
Connect headphones to the PHONES jack with a stereo standard
plug (06.3 mm/’/, inch).
No sound is heard from the speakers while headphones are
plugged in.
After a power interruption
The current time needs to be reset. (See page 20.)
● If power is interrupted for more than about 24 hours, you will also
have to reset preset stations and timer playback or recording
settings.
16

MODO DEMO (DEMOSTRACION)
MODE DEMO (DEMONSTRATION)
Al conectarporprimera vez elcordon CA, Iaventanillavisualizadora
muestra Ias funciones memorizadas del aparato.
Cuando la alimentacion esta conectada, la indication DEMO
queda oculta por la visualization de operation. Se visualiza al
desconectarse la alimentacion.
Para cancelar el modo DEMO+
❑
Presione el boton DEMO.
Para restablecer el modo DEMO
Presione nuevamente el botonDEMO.
Despues de una interruption electrica
El aparato entra en el modo DEMO.
ANTES DE LA OPERACION
Para encender el aparato +
❑
Presione el boton POWER.
Usted puede encendertambien el aparato, presionando uno de Ios
botones de reproduction directs. (Vease “FUNCIONES DE
REPRODUCTION DIRECTA.)
Elcompartimiento de discos puede abrirse ocerrarse para reponer
el aparato.
Despues del uso
Presione el boton POWER para desconectar la alimentaci6n. La
visualization cambia al modo de reloj o DEMO.
Despues de encender el aparato
Se enciende la ventanilla parpadeante sobre el compartimiento de
discos.
El boton de funcion mas recientemente usado parpadea en rojo
durante 4 segundos.
No puede efectuarse ninguna operation durante este periodo.
Ventanilla parpadente +
❑
La ventanilla parpadeante indica que la alimentacion esta
conectada. Parpadea al abriro cerrar el compartimiento de discos,
y cuando esten girando Ias bandejas.
Para apagarla, presione el boton CD mientras mantiene oprimido
el boton ■ CLEAR.
Para volver a encenderla, repita el mismo procedimiento.
● No realice esta operation durante la grabacion.
Guia de iluminacion +
❑
Siempreque presione uno de Iosbotones defuncion, seencendera
o parpadeara el boton correspondiente a tal operation.
Ejemplo:
Al conectar el cordon de alimentacion de CA, parpadea el boton
II SET para guiarle en el ajuste del reloj.
Uso de Ios auriculares
Conecte Ios auriculares a la toma PHONES con una clavija de
estereo estandard (96,3 mm).
Con esta conexion, no se oira el sonido proveniente de Ios
altavoces.
Despues de una interruption electrica
Se requiere ajuste del reloj. (Vease la pagina 21.)
● Si el tiempo de interruption es mas de 24 horas, deben
memorizarse nuevamente Ias emisoras y ajustar Ias fijaciones
de reproduction o grabacion del temporizador.
Cluand on branche Iecordon secteur, lafen~tre d’affichage montre
Ies fonctions memorisees de I’appareil.
Lors de la mise sous tension, I’affichage de demonstration est
cache par I’affichage d’operation. Quand I’alimentation est toupee,
il est retabli.
Pour annuler Ie mode DEMO+
❑
Appuyer sur la touche DEMO.
Pour repasser au mode DEMO
Appuyer de nouveau sur la touche DEMO.
Apres une interruption d’alimentation
L’appareil passe au mode DEMO.
AVANT L’UTILISATION
Pour mettre I’appareil sous tension + 13
Appuyer sur la touche POWER.
On peut aussi mettre I’appareil sous tension en appuyant sur une
des touches de lecture directe. (Voir “FONCTIONS DE LECTURE
DIRECTE.)
Lecompartimenta disquespeut s’ouvriret sefermerpourreinitialiser
I’appareil.
Apres I’utilisation
Appuyer sur la touche POWER pour couper I’alimentation.
L’affichage passe a I’horloge cmau mode DEMO.
Apres la mise sous tension de I’appareil
Lafen6tre clignotante situee au-dessus du compartment adisques
s’allume.
Pendant quatre secondes, la touche de fonction utilisee en dernier
clignote en rouge.
Aucune operation ne peut ~tre effectuee pendant cette periode de
quatre secondes.
Fen&re clignotante +
❑
La fen6tre clignotante indique que I’appareil est sous tension. Elle
clignote quand Ie compartment a disques est ouvert ou ferme, et
quand Ies plateaux tournent.
Pour I’eteindre, appuyer sur la touche CD tout en appuyant sur la
touche ■ CLEAR.
Pour la rallumer, proceder de la m~me maniere.
● Ne pas effectuer cette operation pendant I’enregistrement.
Guide par
eclakage+ ❑
Chaque fois qu’on appuie sur une des touches de fonction, Ies
touches correspondent a cette operation s’allument ou clignotent.
Exemple:
Quand on branche Ie cordon secteur, la touche II SET clignote
pour guider clans Ie reglage de I’heure courante.
Utilisation d’un casque
Brancher un casque muni d’une fiche stereo standard (6,3 mm @)
a la prise PHONES.
Aucun sent nesort par Iesenceintes quand uncasque est branche.
Apres une interruption d’alimentation
L’heure courante doit de nouveau ~tre reglee. (Voir page 21.)
● Si I’interruption dure plus d’environ 24 heures, ilfaudraegalement
effectuer la memorisation de stations etIes reglages de lecture ou
d’enregistrement command6 par la minuterie.
17

II
BEFORE OPERA TION
DIRECT PLAY FUNCTIONS
You can turn the unit on and starl playback immediately bypressing
one of the direct play buttons.
To listen to the tuner, a tape, or discs loaded in the disc compart-
ment, you have only to press the TUNEFUBAND button, the TAPE/
DECK 1/2 button or the CD button.
Pressing the CD button or the TAPE/DECK 1/2 button during
turning on the unit does not select direct play. Press the <›
button.
REMOTE CONTROL
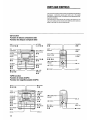
Inserting batteries
Detach the battery coveron the rear ofthe remote control and inserf
two R6 (size AA) batteries. +
❑
When to replace the batteries
The maximum operational distance of the remote control should be
approximately 5 meters(16 feet). When this distance decreases,
replace the batteries with new ones.
● Do not mix different types of batteries, or old batteries with new
ones.
● Ifyou are not going to usethe unit fora long period oftime, remove
the batteries to prevent possible electrolyte leakage.
Hints for correct operation
The remote control may not operate correctly when:
● the line of sight between the remote control and the unit’s remote
sensor is exposed to intense light, such as direct sunlight.
● other remote controls are used nearby (television etc.).
CASSEITE TAPES
Usable tapes
For playback, use normal (type I), CrO, (type U), and metal (type
IV) tapes.
For recording, use normal (type I) and CrOz (type II) tapes.
The proper bias and equalization to suit the type of tape are
selected automatically.
Tape slack
Take up slack in the tape with a pencil or similar tool before use.
Slack tape may break or jam in the mechanism. +
❑
120-minute or longer tapes
These are extremely thin and easily deformed or damaged. They
are not recommended.
To prevent accidental erasure
Break off the plastic tabs on the cassette tape after recording, with
a screwdriver or other pointed tool. +
❑
@ Side A
@ Tab for side A
To record on the tape again, cover the tab openings with cello-
phane tape. (On CrO, tapes, take care not to cover the CrO, tape
detection slot @.) +
❑
To demagnetize the heads
The heads may become magnetized after long-term use. This may
narrow the output range of recorded tapes and increase noise. In
this case, demagnetize the heads with a commercially avaliable
demagnetizer.
18

ANTES DE LA OPERACION
AVANT L‘UTILISATION
FUNCIONES DE REPRODUCTION DIRECTA
Usted podra conectar la alimentacion de la unidad e iniciar
inmediatamente la reproduction presionando uno de Ios botones
de reproduction directs.
Para escuchar programas de radiodifusion, una cinta, o discos
compactos cargados en el compartimiento de discos, solamente
tendra que presionar el boton TUNER/BAND, el boton TAPE/
DECK 1/2 o el boton CD.
Al presionar el boton CD o el boton TAPE/DECK 1/2 estando
conectada la alimentacion de la unidad no se seleccionara la
reproduction directs. Presione el boton + F.
CONTROL REMOTO
Insertion de Ias pilas
Abra la tapa del compartimiento de pilas situada en la trasera del
control remoto e inserte dos pilas R6 (tamaiio AA). +
❑
Reemplazo de Ias pilas
La distancia maxima de operation entre el control remoto y el
aparato debe ser de 5 metros. Cuando disminuya esta distancia,
reemplace Ias pilas con Ias nuevas.
● No mezcle diferentes tipos de pila, ni pilas viejas con Ias nuevas.
● Cuando no vaya a utilizar el aparato por Iargo tiempo, quite Ias
pilas para evitar posible fuga electrolitica.
Consejos utiles para la corrects operation
El control remoto puede operar incorrectamente cuando:
● la Ifnea de vision entre el control remoto y el sensor del control
remoto del aparato esta expuesta a la LIZintensa, tal como la Iuz
directs del sol.
● otroscontroles remotos estan usandose en Iacercania (televisor,
etc.).
CASSETTES DE CINTAS
Cintas utilizable
Para la reproduction, utilice Iascintas normales (tipo I), CrO, (tipo
II) y cinta metalica (tipo IV).
Para la grabacion, utilice Iascintas normales (tipo I) yCrO, (tipo II).
Se seleccionan automaticamente la polarization y la ecualizacion
adecuadas al tipo de la cinta.
Cinta floja
Tense la cinta floja con un Iapiz u otro objeto similar. La cinta floja
puede romperse o agarrotarse en el mecanismo de la cinta. + E
Cintas de 120 minutes o mayor
Estas cintas son muy delgadas y tienden a deformarse o darlarse,
por 10que se recomienda no utilizarlas.
Para evitar borraduras accidentals
Romps Ias Ienguetas de plastico del cassette despues de la
grabacion, con undestornillador u otra herramienta puntiaguda.
+E
@ Cara A
@ Lengueta para la cara A
Paragrabar sobre unacinta grabada,cubra Iasaberturas de Iengueta
con una cinta adhesiva. (En caso de Ias cintas CrOZ, ctiidese de no
tapar la ranura de deteccion @de la cinta CrO,.) +
❑
Para desmagnetizar Ias cabezas
Lascabezaspueden magnetizarsedespuesdelautilizacionprolongada.
Esto puede estrechar la gama de salida de Ias cintas grabadas y
aumentar el ruido. En este case, desmagnetice Iascabezas con un
desmagnetizador adquirido en una tienda del ramo.
FONCTIONS DE LECTURE DIRECTE
On peut mettre I’appareil sous tension et demarrer la
immediatement en appuyant sur une des touches de
directe.
lecture
lecture
Pour ecouter Ietuner, une cassette ou Iesdisques se trouvant clans
Iecompartment, ilsuffit d’appuyer sur la touche TUNER/BAND, la
touche TAPE/DECK 1/2 ou la touche CD.
Une pression sur la touche CD ou la touche TAPE/DECK 1/2
pendant la mise sous tension ne selectionne pas la lecture directe.
Appuyer sur la touche +>.
TELECOMMANDE
Mise en place des piles
Enlever Iecouvercle des piles du dos de Iatelecommande et mettre
deux piles R6 (taille AA) en place. +
❑
Quand remplacer Ies piles
La distance maximale de fonctionnement de latelecommande doit
&re d’envircm cinq metres. Lorsque cette distance diminue,
remplacer Ies piles par des neuves.
● Ne pas melanger different types de piles, ni des vieilles piles
avec des neuves.
● Si la telecommande ne doit pas 6tre utilisee pendant Iongtemps,
enlever Ies piles pour eviter tout risque de fuite d’electrolyte.
Conseils pour un fonctionnement correct
La telecommande risque de ne pas fonctionner correctement
quand:
● I’espace entre la telecommande et Ie capteur de I’appareil est
expose a une Iumiere intense, comme Ie soleil.
● dautrestelecommandes (televiseur, etc.)sentutiliseesa proximate.
CASSETTES
Cassettes utilisables
Pour la lecture, utiliser des cassettes normales (type I), CrOz(type
II) ou au metal (type IV).
Pour I’enregistrement, utiliser des cassettes normales (type I) ou
CrOz (type II).
La polarisation et I’egalisation adaptees au type de cassette sent
selectionnees automatiquement.
Tension du ruban
Avant d’utiliser une cassette, utiliser un crayon ou un objet similaire
pour tendre Ie ruban magnetique.
Un ruban magnetique detendu peut se rompre ou s’emm61er clans
Ie mecanisme. + E
Cassettes de 120 minutes ou plus
Le ruban magnetique de ces cassettes est extr~mement fin et se
deforme et s’endommage facilement. Ces cassettes ne sent pas
recommandees.
Pour eviter un effacement accidental
Utiliser untournevis ou tout autre objet effile pour casser Iesergots
en plastique apres I’enregistrement. + E
@ Face A
@ Ergot pour la face A
Pour enregistrerde nouveau sur une cassette, recouvrir Iescavites
des ergots avec du ruban adhesif. (Sur Ies cassettes CrOz, faire
attention a ne pas recouvrir Ies rainures de detection @.) +
❑
Pour demagnetiser Ies tetes
A la Iongue, Ies t6tes peuvent devenir magnetisees. Ceci peut
retrecir la plage de sortie des cassettes enregistrees et augmenter
[e bruit. Le cas echeant, demagnetiser Ies t&es avec un dispositif
de demagnetisation disponible clans Ie commerce.
19

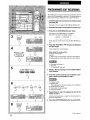
4“Ei5Ei!5
b
CLOCK
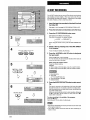
SETTING THE CLOCK
When you first connect the AC cord, the II SET button flashes to
inform you that the current time needs to be set. Set the time as
follows, while the power is still off.
1
2
3
4
5
Press the II SET button.
The hour flashes.
Pressthe 4 DOWNor W UPbutton to designate
the
hour.
Press the II SET
button to set the hour.
The hour stops flashing and the minute starts flashing.
Press the +4
DOWN or -UP button to designate
the minute.
Press the II SET button to set the minute and
complete setting.
The minute stops flashing in the display and the clock starts
running from 00 seconds.
To set the time more accurately, press the II SET button when
another clock or a time signal indicates that the current time is
00 seconds.
Each colon flash in the display indicates one second.
To correct the current time+
❑
Press the CLOCK button on the remote control. The clock is
displayed for 4 seconds.
Within this period, press the II SET button and continue by
folIowing steps 2 to 5.
To display the current time while the power is on
Press the CLOCK button on the remote control.
The current time
is displayed
for 4 seconds.
However, the time cannot be displayed, during recording.
To switch to the 24-hour standard
The clock is factory-set to the 12-hour standard. To switch to the
24-hour standard, press the CLOCK button on the remote control
and then press the 9 button within 4 seconds. Repeat the same
procedure to restore the 12-hour standard.
After a power interruption
If
you switch the display to clock, the clock flashes to remind you
that the current time needs to be reset.
20
La page est en cours de chargement...
La page est en cours de chargement...
La page est en cours de chargement...
La page est en cours de chargement...
La page est en cours de chargement...
La page est en cours de chargement...
La page est en cours de chargement...
La page est en cours de chargement...
La page est en cours de chargement...
La page est en cours de chargement...
La page est en cours de chargement...
La page est en cours de chargement...
La page est en cours de chargement...
La page est en cours de chargement...
La page est en cours de chargement...
La page est en cours de chargement...
La page est en cours de chargement...
La page est en cours de chargement...
La page est en cours de chargement...
La page est en cours de chargement...
La page est en cours de chargement...
La page est en cours de chargement...
La page est en cours de chargement...
La page est en cours de chargement...
La page est en cours de chargement...
La page est en cours de chargement...
La page est en cours de chargement...
La page est en cours de chargement...
La page est en cours de chargement...
La page est en cours de chargement...
La page est en cours de chargement...
La page est en cours de chargement...
La page est en cours de chargement...
La page est en cours de chargement...
La page est en cours de chargement...
La page est en cours de chargement...
La page est en cours de chargement...
La page est en cours de chargement...
La page est en cours de chargement...
La page est en cours de chargement...
La page est en cours de chargement...
La page est en cours de chargement...
La page est en cours de chargement...
La page est en cours de chargement...
La page est en cours de chargement...
La page est en cours de chargement...
La page est en cours de chargement...
La page est en cours de chargement...
La page est en cours de chargement...
La page est en cours de chargement...
La page est en cours de chargement...
La page est en cours de chargement...
La page est en cours de chargement...
La page est en cours de chargement...
La page est en cours de chargement...
La page est en cours de chargement...
La page est en cours de chargement...
La page est en cours de chargement...
La page est en cours de chargement...
La page est en cours de chargement...
-
 1
1
-
 2
2
-
 3
3
-
 4
4
-
 5
5
-
 6
6
-
 7
7
-
 8
8
-
 9
9
-
 10
10
-
 11
11
-
 12
12
-
 13
13
-
 14
14
-
 15
15
-
 16
16
-
 17
17
-
 18
18
-
 19
19
-
 20
20
-
 21
21
-
 22
22
-
 23
23
-
 24
24
-
 25
25
-
 26
26
-
 27
27
-
 28
28
-
 29
29
-
 30
30
-
 31
31
-
 32
32
-
 33
33
-
 34
34
-
 35
35
-
 36
36
-
 37
37
-
 38
38
-
 39
39
-
 40
40
-
 41
41
-
 42
42
-
 43
43
-
 44
44
-
 45
45
-
 46
46
-
 47
47
-
 48
48
-
 49
49
-
 50
50
-
 51
51
-
 52
52
-
 53
53
-
 54
54
-
 55
55
-
 56
56
-
 57
57
-
 58
58
-
 59
59
-
 60
60
-
 61
61
-
 62
62
-
 63
63
-
 64
64
-
 65
65
-
 66
66
-
 67
67
-
 68
68
-
 69
69
-
 70
70
-
 71
71
-
 72
72
-
 73
73
-
 74
74
-
 75
75
-
 76
76
-
 77
77
-
 78
78
-
 79
79
-
 80
80


Aiwa CX-N999 Operating Instructions Manual
- Catégorie
- Lecteurs de cassettes
- Taper
- Operating Instructions Manual
dans d''autres langues
- English: Aiwa CX-N999
- español: Aiwa CX-N999
Documents connexes
-
Aiwa NSX-MT720 Operating Instructions Manual
-
-
-
-
-
-
-
Aiwa RX-N737 U Le manuel du propriétaire
-
-