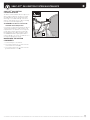
Weber 18501101 Le manuel du propriétaire
- Catégorie
- Barbecues
- Taper
- Le manuel du propriétaire
Ce manuel convient également à

58944
US - ENGLISH
02/09/16
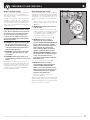
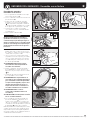
m DANGER
If you smell gas:
• Shut off gas to the appliance.
• Extinguish any open flames.
• Open lid.
• If odor continues, keep away from the appliance and
immediately call your gas supplier or your fire department.
Failure to follow these instructions could result in fire or
explosion which could cause property damage, personal injury
or death.
m DANGER
• Never operate this appliance unattended.
• Never operate this appliance within 2 ft (610 mm) of any
structure, combustible material or other gas cylinder.
• Never operate this appliance within 25 ft (7.5 m) of any
flammable liquid.
• If a fire should occur, keep away from the appliance and
immediately call your fire department. Do not attempt to
extinguish an oil or grease fire with water.
Failure to follow these instructions could result in fire, explosion
or burn hazard, which could cause property damage, personal
injury or death.
This instruction manual contains
important information necessary
for the proper assembly and safe
use of the appliance.
Read and follow all warnings and
instructions before assembling
and using the appliance.
Follow all warnings and
instructions when using the
appliance.
Keep this manual for future
reference.
Carefully follow all leak-check
procedures in this Owner’s Guide
prior to grill operation. Do this
even if the grill was dealer-
assembled.
Do not ignite this appliance
without first reading the burner
ignition sections of this manual.
THIS GAS APPLIANCE IS
DESIGNED FOR OUTDOOR
USEONL
Y.
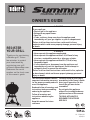
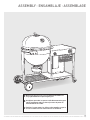
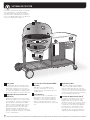
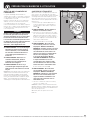
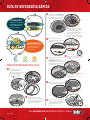
OWNER’S GUIDE
CHARCOAL GRILLING CENTER
33 51
REGISTER
YOUR GRILL
Thank you for purchasing
a Weber
®
grill. Take a
few minutes to protect
your investment by
registering your grill
online at www.weber.com.
Reference the serial
number on the front cover
of this owner’s guide.

2
SAFETY INFORMATION
Failure to follow the DANGERS,
WARNINGS, and CAUTIONS contained
in this owner’s guide may result in
serious bodily injury or death, or may
result in a fire or an explosion causing
damage toproperty.
DANGER:
Indicates a hazardous situation which, if not
avoided, will result in death or seriousinjury.
m Only use the grill outdoors in a well-
ventilated area. Do not use in a garage,
building, breezeway, tent, any other
enclosed area, or beneath overhead
combustibleconstruction.
m The grill is not intended for and should
never be used as a heater.
m Keep the cooking area clear of
flammable vapors and liquids
such as gasoline, alcohol, etc., and
combustiblematerials.
m Always open the lid before lighting the
gas burner, either manually or with
the igniter. Lid must remain open until
charcoal is fully ignited.
m Should a grease fire occur, turn off the
burner and leave lid closed until fire
isout.
m The grill should never be used by
children. Accessible parts of the grill
may be very hot. Keep children and pets
away while the grill is inuse.
m Do not attempt to disconnect the gas
cylinder while the grill is inoperation.
m Should the burner go out while the
grill is in operation, turn the gas valve
off. Open the lid and wait five minutes
before attempting to relight.
m Do not operate the grill if there is a gas
leakpresent.
m Do not use a flame to check for
gasleaks.
m Do not put a grill cover or anything
flammable on, or in the storage
area under the grill, while grill is in
operation or is hot.
m If you see, smell, or hear the hiss
of gas escaping from the liquid
propanecylinder:
1. Move away from liquid
propanecylinder.
2. Do not attempt to correct the
problemyourself.
3. Call your fire department.
m Liquid propane gas is not natural gas.
The conversion or attempted use of
natural gas in a liquid propane gas
unit or liquid propane gas in a natural
gas unit is dangerous and will void
yourwarranty.
m Do not enlarge burner ports when
cleaning the burner.
m Do not store an extra (spare) or
disconnected liquid propane cylinder
under or near thegrill.
WARNING:
Indicates a hazardous situation which, if not
avoided, could result in death or seriousinjury.
m The grill should never be left
unattended or moved while
inoperation.
m After a period of storage and/or nonuse,
the grill should be checked for gas
leaks and burner obstructions before
use. Seeinstructions in this owner’s
guide for correctprocedures.
m Do not use the grill unless all
parts are in place. Grill must be
properly assembled according to the
assemblyinstructions.
m Do not build this model of grill in any
built-in or slide-inconstruction.
m Never lean over an open grill while
igniting orcooking.
m Use heat-resistant barbecue
mitts or gloves at all times when
operatingthegrill.
m Use proper tools, with long, heat-
resistant handles.
m Do not place hands or fingers on the
front edge of the bowl while the grill is
hot or the lid isopen.
m Use the pressure regulator that is
supplied with thegrill.
m Keep any electrical supply cord and
the fuel supply hose away from any
heatedsurfaces.
m The use of alcohol, prescription drugs,
non-prescription drugs, or illegal drugs
may impair the consumer’s ability to
properly and safely assemble, move,
store, or operate thegrill.
m Always put charcoal on top of the fuel
grate. Do not put charcoal directly in the
bottom of the bowl or on the diffuser
plate.
m The grill should be thoroughly cleaned
on a regularbasis.
m Never dump hot charcoal where it might
be stepped on or be a fire hazard. Never
dump ashes or charcoal before they are
fully extinguished.
m When cooking, the grill must be on a
level, stable surface in an area clear of
combustiblematerial.
m Lining the bowl with aluminum foil will
obstruct the air flow. Instead, use a drip
pan to catch drippings from meat when
cooking using the indirect method.
m Grill brushes should be checked for
loose bristles and excessive wear on
a regular basis. Replace brush if any
loose bristles are found on cooking
grate or brush. Weber recommends
purchasing a new stainless steel bristle
grill brush at the beginning of every
spring.
m Do not wear clothing with loose flowing
sleeves while lighting or using the grill.
m Never touch the cooking or fuel grate,
ashes, charcoal, or the grill to see if
they arehot.
m This Weber
®
grill is not intended to be
installed in or on recreational vehicles
and/or boats.
m Do not use lighter fluid, gasoline,
alcohol, or other highly volatile fluids to
ignite or reignite charcoal.
CAUTION:
Indicates a hazardous situation which, if not
avoided, could result in minor or moderateinjury.
m Do not remove ashes until all charcoal
is completely burned out and fully
extinguished and grill is cool.
m Do not store grill until ashes and
charcoal are fully extinguished.
m The grill is not intended for
commercialuse.
m Do not use water to control flare-ups or
to extinguish charcoal.
m Do not use grill in high winds.
m Extinguish charcoal when finished
cooking. To extinguish, close bowl vent,
lid and Rapidfire
™
lid damper.
CALIFORNIA PROPOSITION 65:
m WARNING: Combustion byproducts
produced when using this product
contain chemicals known to the state
of California to cause cancer, birth
defects, or other reproductiveharm.
m WARNING: Handling the brass material
on this product exposes you to lead,
a chemical known to the state of
California to cause cancer, birth defects
or other reproductive harm. Wash
hands after handling thisproduct.

3
WARRANTY
Thank you for purchasing a WEBER
®
product. Weber-Stephen
Products LLC, 200 East Daniels Road, Palatine, Illinois 60067-6266
(“Weber”) prides itself on delivering a safe, durable, and reliable
product.
This is Weber’s Voluntary Warranty provided to you at no extra
charge. It contains the information you will need to have your
WEBER
®
product repaired in the unlikely event of a failure or defect.
Pursuant to applicable laws, the customer has several rights in
case the product is defective. Those rights include supplementary
performance or replacement, abatement of the purchasing price
and compensation. In the European Union, for example, this
would be a two-year statutory warranty starting on the date of the
handover of the product. These and other statutory rights remain
unaffected by this warranty provision. In fact, this warranty grants
additional rights to the Owner that are independent from statutory
warranty provisions.
WEBER’S VOLUNTARY WARRANTY
Weber warrants, to the purchaser of the WEBER
®
product (or in
the case of a gift or promotional situation, the person for whom
it was purchased as a gift or promotional item), that the WEBER
®
product is free from defects in material and workmanship for the
period(s) of time specified below when assembled and operated
in accordance with the accompanying Owner’s Guide. (Note: If
you lose or misplace your WEBER
®
Owner’s Guide, a replacement
is available online at www.weber.com, or such country-specific
website to which Owner may be redirected.) Under normal, private
single family home or apartment use and maintenance, Weber
agrees within the framework of this warranty to repair or replace
defective parts within the applicable time periods, limitations
and exclusions listed below. TO THE EXTENT ALLOWABLE BY
APPLICABLE LAW, THIS WARRANTY IS EXTENDED ONLY TO
THE ORIGINAL PURCHASER AND IS NOT TRANSFERABLE TO
SUBSEQUENT OWNERS, EXCEPT IN THE CASE OF GIFTS AND
PROMOTIONAL ITEMS AS NOTED ABOVE.
OWNER’S RESPONSIBILITIES UNDER THIS WARRANTY
To ensure trouble-free warranty coverage, it is important (but it
is not required) that you register your WEBER
®
product online at
www.weber.com, or such country-specific website to which Owner
may be redirected. Please also retain your original sales receipt
and/or invoice. Registering your WEBER
®
product confirms your
warranty coverage and provides a direct link between you and
Weber in case we need to contact you.
The above warranty only applies if the Owner takes reasonable
care of the WEBER
®
product by following all assembly instructions,
usage instructions, and preventative maintenance as outlined in the
accompanying Owner’s Guide, unless the Owner can prove that the
defect or failure is independent of non-compliance with the above
mentioned obligations. If you live in a coastal area, or have your
product located near a pool, maintenance includes regular washing
and rinsing of the exterior surfaces as outlined in the accompanying
Owner’s Guide.
WARRANTY HANDLING / EXCLUSION OF WARRANTY
If you believe that you have a part which is covered by this Warranty,
please contact Weber Customer Service using the contact
information on our website (www.weber.com, or such country-
specific website to which Owner may be redirected). Weber will,
upon investigation, repair or replace (at its option) a defective
part that is covered by this Warranty. In the event that repair or
replacement are not possible, Weber may choose (at its option)
to replace the grill in question with a new grill of equal or greater
value. Weber may ask you to return parts for inspection, shipping
charges to be pre-paid.
This WARRANTY lapses if there are damages, deteriorations,
discolorations, and/or rust for which Weber is not responsible
caused by:
• Abuse, misuse, alteration, modification, misapplication,
vandalism, neglect, improper assembly or installation, and failure
to properly perform normal and routine maintenance;
• Insects (such as spiders) and rodents (such as squirrels),
including but not limited to damage to burner tubes and/or gas
hoses;
• Exposure to salt air and/or chlorine sources such as swimming
pools and hot tubs/spas;
• Severe weather conditions such as hail, hurricanes, earthquakes,
tsunamis or surges, tornadoes or severe storms.
The use and/or installation of parts on your WEBER
®
product that
are not genuine Weber
®
parts will void this Warranty, and any
damages that result hereby are not covered by this Warranty. Any
conversion of a gas grill not authorized by Weber and performed by
a Weber authorized service technician will void this Warranty.
PRODUCT WARRANTY PERIODS
Bowl, and lid assembly:
10 years, no rust through/burn through
Stainless steel cooking grates:
5 years, no rust through/burn through
One-Touch
™
cleaning system:
5 years, no rust through/burn through
Plastic components:
5 years, excluding fading or discoloration
All remaining parts:
2 years
DISCLAIMERS
APART FROM THE WARRANTY AND DISCLAIMERS AS DESCRIBED
IN THIS WARRANTY STATEMENT, THERE ARE EXPLICITLY NO
FURTHER WARRANTY OR VOLUNTARY DECLARATIONS OF
LIABILITY GIVEN HERE WHICH GO BEYOND THE STATUTORY
LIABILITY APPLYING TO WEBER. THE PRESENT WARRANTY
STATEMENT ALSO DOES NOT LIMIT OR EXCLUDE SITUATIONS
OR CLAIMS WHERE WEBER HAS MANDATORY LIABILITY AS
PRESCRIBED BY STATUTE.
NO WARRANTIES SHALL APPLY AFTER THE APPLICABLE
PERIODS OF THIS WARRANTY. NO OTHER WARRANTIES
GIVEN BY ANY PERSON, INCLUDING A DEALER OR RETAILER,
WITH RESPECT TO ANY PRODUCT (SUCH AS ANY “EXTENDED
WARRANTIES”), SHALL BIND WEBER. THE EXCLUSIVE REMEDY
OF THIS WARRANTY IS REPAIR OR REPLACEMENT OF THE PART
OR PRODUCT.
IN NO EVENT UNDER THIS VOLUNTARY WARRANTY SHALL
RECOVERY OF ANY KIND BE GREATER THAN THE AMOUNT OF THE
PURCHASE PRICE OF THE WEBER
®
PRODUCT SOLD.
YOU ASSUME THE RISK AND LIABILITY FOR LOSS, DAMAGE, OR
INJURY TO YOU AND YOUR PROPERTY AND/OR TO OTHERS AND
THEIR PROPERTY ARISING OUT OF THE MISUSE OR ABUSE OF
THE PRODUCT OR FAILURE TO FOLLOW INSTRUCTIONS PROVIDED
BY WEBER IN THE ACCOMPANYING OWNER’S GUIDE.
PARTS AND ACCESSORIES REPLACED UNDER THIS WARRANTY
ARE WARRANTED ONLY FOR THE BALANCE OF THE ABOVE
MENTIONED ORIGINAL WARRANTY PERIOD(S).
THIS WARRANTY APPLIES TO PRIVATE SINGLE FAMILY HOME OR
APARTMENT USE ONLY AND DOES NOT APPLY TO WEBER
®
GRILLS
USED IN COMMERCIAL, COMMUNAL OR MULTI-UNIT SETTINGS
SUCH AS RESTAURANTS, HOTELS, RESORTS, OR RENTAL
PROPERTIES.
WEBER MAY FROM TIME TO TIME CHANGE THE DESIGN OF ITS
PRODUCTS. NOTHING CONTAINED IN THIS WARRANTY SHALL
BE CONSTRUED AS OBLIGATING WEBER TO INCORPORATE
SUCH DESIGN CHANGES INTO PREVIOUSLY MANUFACTURED
PRODUCTS, NOR SHALL SUCH CHANGES BE CONSTRUED AS AN
ADMISSION THAT PREVIOUS DESIGNS WERE DEFECTIVE.
WEBER-STEPHEN PRODUCTS LLC
Customer Service Center
1415 S. Roselle Road
Palatine, Illinois 60067
U.S.A.
The grills illustrated in this Owner’s Guide may vary
slightly from the model purchased.
TABLE OF CONTENTS
SAFETY INFORMATION ..................................... 2
WARRANTY ........................................................ 3
EXPLODED VIEW ............................................... 4
ASSEMBLY ......................................................... 6
COOKING SYSTEM ........................................... 18
FEATURES ....................................................... 19
USING THE SNAP-JET
™
GAS
IGNITION SYSTEM ........................................... 20
PREPARING TO USE YOUR GRILL .................. 21
GRILLING METHODS - Direct Heat ................. 22
GRILLING METHODS - Indirect Heat .............. 23
GRILLING METHODS - Smoking ..................... 24
BURNER IGNITION -
Lighting with Snap-Jet
™
Gas Ignition System 26
BURNER IGNITION - Lighting with a Match ... 27
ROUTINE MAINTENANCE ............................... 28
ANNUAL MAINTENANCE ................................ 30
SNAP-JET
™
GAS IGNITION SYSTEM
MAINTENANCE ............................................... 31
TROUBLESHOOTING ....................................... 32
33 51
Replacement Parts
If you need replacement parts or have
questions about the assembly, use, or
maintenance of your grill, please call Weber
Customer Service.
For purchases made in the U.S. and Canada
1-800-446-1071
For purchases made in Mexico
01800-00-Weber [93237] Ext. 105

4
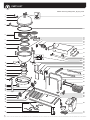
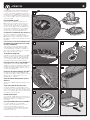
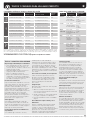
PARTS LIST
3
2
1
6
5
9
10
11
12
13
14
15
16
17
18
19
20
21
22
23
24
27
29
25
26
8
7
4
31
30
34
59
61
60
35
43
44
45
47
46
36
37
48
38
39
50
49
40
42
51
53
52
57
54
55
56
58
10
33
32
41
Summit
®
Charcoal_Grilling Center_XV_US_010116
28

5
PARTS LIST
EXPLODED VIEW LIST
1. Thermometer
2. Thermometer Bezel
3. Lid
4. Lid Handle
5. GBS
™
Cooking Grate
6. Diffuser Plate
7. Center Support Ring
8. Grate Support Bracket
9. Bowl
10. One-Touch
™
Cleaning System
11. Ash Catcher Ring
12. Ash Catcher Handle
13. High Capacity Ash Catcher
14. Bowl Spacer
15. Bowl Support Ring
16. Ring Support Bracket
17. Tool Holder
18. Ring Support Leg
19. Rear Wheel Bracket
20. Axle
21. Ring Support Mount
22. Left Frame Connector
23. Wheel
24. Wheel Cover
25. Front Wheel Bracket
26. Bottom Wire Rack
27. Front Frame Rail
28. Diffuser Plate Storage Bracket
29. Locking Caster
30. Rapidfire
™
Lid Damper Assembly
31. Lid Gasket
32. Char-Baskets
™
33. Fuel Grate
34. Lid Hinge Guard
35. Lid Hinge
36. Left Table Panel
37. Table
38. Right Table Panel
39. Table Handle
40. Logo Plate
41. Burner Control Knob Bezel
42. Burner Control Knob
43. Burner Assembly
44. Ignition Box Assembly
45. Ignition Box Door
46. Valve Bracket
47. Valve Assembly
(Hose & Regulator with Orifice & Clip)
48. Table Center Support
49. Rear Table Bracket
50. Front Table Bracket
51. Rear Leg Frame
52. Front Leg Frame
53. Wire Basket Bracket
54. Wire Basket
55. Matchstick Holder
56. Rear Frame Rail
57. Bottom Panel
58. Right Frame Connector
59. Char-Bin
™
Storage Container
60. Charcoal Cup
61. Disposable Drip Pan
LISTA DEL DIAGRAMA DE DESPIECE
1. Termómetro
2. Bisel del termómetro
3. Tapa
4. Asa de la tapa
5. Parrilla de cocción GBS
™
6. Placa difusora
7. Anillo de soporte central
8. Soporte de apoyo de la parrilla
9. Cuba
10. Sistema de limpieza One-Touch
™
11. Anillo del recogedor de cenizas
12. Asa del recogedor de cenizas
13. Recogedor de cenizas de gran capacidad
14. Espaciador de la cuba
15. Anillo de soporte de la cuba
16. Soporte de apoyo del anillo
17. Portautensilios
18. Pata de soporte del anillo
19. Soporte de rueda trasera
20. Eje
21. Montura de soporte del anillo
22. Conector izquierdo del chasis
23. Rueda
24. Embellecedor de la rueda
25. Soporte de rueda delantera
26. Bandeja inferior de alambre
27. Travesaño delantero del chasis
28. Soporte de almacenamiento de la placa difusora
29. Rueda orientable de bloqueo
30. Conjunto del regulador de tiro Rapidfire
™
de la
tapa
31. Junta de la tapa
32. Char-Baskets
™
33. Rejilla del carbón/madera
34. Protector de la articulación de la tapa
35. Articulación de la tapa
36. Panel izquierdo de la mesa
37. Mesa
38. Panel derecho de la mesa
39. Asa de la mesa
40. Emblema de la marca
41. Bisel del mando de control del quemador
42. Mando de control del quemador
43. Conjunto del quemador
44. Conjunto de la caja de encendido
45. Puerta de la caja de encendido
46. Soporte de la válvula
47. Conjunto de la válvula
(manguera y regulador con orificio y horquilla)
48. Soporte central de la mesa
49. Soporte trasero de la mesa
50. Soporte delantero de la mesa
51. Bastidor de las patas traseras
52. Bastidor de las patas delanteras
53. Soporte de la cesta de alambre
54. Cesta de alambre
55. Soporte para fósforo
56. Travesaño trasero del chasis
57. Panel inferior
58. Conector derecho del chasis
59. Recipiente de almacenamiento Char-Bin
™
60. Taza para carbón
61. Bandeja de goteo desechable
VUE ÉCLATÉE – LISTE DES PIÈCES
1. Thermomètre
2. Cadran du thermomètre
3. Couvercle
4. Poignée du couvercle
5. Grille de cuisson GBS
™
6. Plaque de diffusion
7. Support circulaire central
8. Support de grille
9. Cuve
10. Système de nettoyage One-Touch
™
11. Système d'attache du cendrier
12. Poignée du cendrier
13. Cendrier grand format
14. Espaceur de cuve
15. Support circulaire de la cuve
16. Support circulaire
17. Porte-ustensiles
18. Pied du support circulaire
19. Support de roue arrière
20. Essieu
21. Montant de support circulaire
22. Connecteur de cadre gauche
23. Roue
24. Enjoliveur de roue
25. Support de roue avant
26. Étagère grillagée inférieure
27. Rail de cadre avant
28. Support de stockage de la plaque de diffusion
29. Roulette verrouillable
30. Clapet de ventilation du couvercle Rapidfire
™
31. Joint du couvercle
32. Char-Baskets
™
33. Grille à combustible
34. Protège-charnière du couvercle
35. Charnière du couvercle
36. Tablette gauche
37. Tablette
38. Tablette droite
39. Poignée de tablette
40. Plaque du logo
41. Cadran du bouton du brûleur
42. Bouton du brûleur
43. Brûleur
44. Boîte d'allumage
45. Porte de la boîte d'allumage
46. Support de valve
47. Ensemble valve
(flexible et détendeur avec orifice et bride)
48. Support central de tablette
49. Support de tablette arrière
50. Support de tablette avant
51. Cadre de pieds arrière
52. Cadre de pieds avant
53. Support de panier métallique
54. Panier métallique
55. Porte-allumette
56. Rail de cadre arrière
57. Panneau inférieur
58. Connecteur de cadre droit
59. Boîte de stockage Char-Bin
™
60. Godet à charbon
61. Barquette jetable en aluminium

6
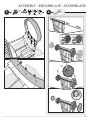
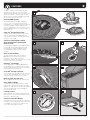
ASSEMBLY · ENSAMBLAJE · ASSEMBLAGE
1 .........................................................
1 ...................................................
1 .............................................................
1 ...............................................
1 ...............................................
1 ........................................................................
2 ...............................................................................
3 ............................................................................
1 ...........................................
1 ...............................................................
1 .......................................................................
1 ...........................................................................
1 ...........................................................................
1 ...........................................................................
1 ...........................................................................
1 ............................................................
1 ..........................
1 ........................
1 .......................
2 ....................................................................
2 .....................................................................................

7
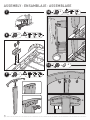
ASSEMBLY · ENSAMBLAJE · ASSEMBLAGE
7 ....................................................................................
2 ..............................................................................
7 ...............................................................................
7 ..................................................................................
2 ....................................................................................
1 ........................................................
2 ....................................................................
1 ........................................................................
2 ........................................................................
1 ......................................................
1 ...................................................
1 ..........................................................
1 ............................................
OUTILS NECESSAIRES:
TOOLS NEEDED:
HERRAMIENTAS REQUERIDAS:
2 ........................................................................
4 ...................................................................................
7 ....................................................................................
1 ...............................................................................
1 ............................................................................

ASSEMBLY · ENSAMBLAJE · ASSEMBLAGE
8
X 4
x2
1 3
4
2
- 2
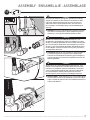
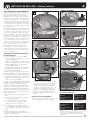
1. Gently tap into place

9
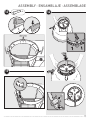
ASSEMBLY · ENSAMBLAJE · ASSEMBLAGE
X 2
5 6
- 3
- 2

10
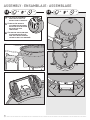
ASSEMBLY · ENSAMBLAJE · ASSEMBLAGE
7
8
9
10
11
- 2
- 2
- 2
- 2
- 4

11
ASSEMBLY · ENSAMBLAJE · ASSEMBLAGE
13
12 14
- 3

12
ASSEMBLY · ENSAMBLAJE · ASSEMBLAGE
15 16

13
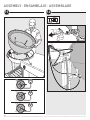
ASSEMBLY · ENSAMBLAJE · ASSEMBLAGE
A
17
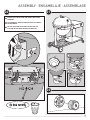
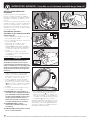
m DANGER
Do not use the Snap-Jet
™
gas ignition system if the retaining
clip (A) securing the gas line and orifice into the burner tube
is missing. A missing retaining clip can cause the gas hose
and orifice to move out of the burner tube. This can cause a
fire resulting in serious bodily injury or death and damage to
property.
m WARNING: Prior to use, pull the gas hose and orifice to make
sure that the retaining clip is in place and that the gas hose
and orifice is securely attached inside the burner tube.
m PELIGRO
No utilice el sistema de encendido de gas Snap-Jet
™
si la
horquilla de retención (A) que asegura el conducto y el orificio
del gas en el tubo del quemador no está instalada. Una horquilla
de retención faltante puede hacer que la manguera y el orificio
del gas se separen del tubo del quemador. Esto puede provocar
un incendio que ocasionará lesiones físicas graves o la muerte,
así como daños materiales.
m ADVERTENCIA: Antes de usar la barbacoa, hale la manguera
y el orificio del gas para asegurarse que la horquilla de
retención esté instalada correctamente y que la manguera y
el orificio del gas estén firmemente acoplados al interior del
tubo del quemador.
m DANGER
Ne pas utiliser le système d'allumage au gaz Snap-Jet
™
si la
bride de retenue (A) qui fixe le flexible de gaz et l'orifice dans
le brûleur est manquante. L'absence de bride de retenue peut
causer l'expulsion du flexible de gaz et de l'orifice du brûleur.
Ceci peut provoquer un départ de feu pouvant causer des
blessures graves, voire mortelles, et des dégâts matériels.
m AVERTISSEMENT: Avant utilisation, tirer sur le flexible de gaz
et l'orifice pour s'assurer que la bride de retenue est en place
et que le flexible de gaz et l'orifice sont solidement attachés à
l'intérieur du brûleur.

14
ASSEMBLY · ENSAMBLAJE · ASSEMBLAGE
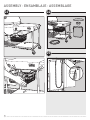
18 19
- 4- 3 - 4- 3
- 4- 3
m CAUTION: DO NOT REMOVE
SAFETY BOLTS UNTIL LID
INSTALLATION IS COMPLETE.
m PRECAUCIÓN: NO QUITE
LOS PERNOS DE SEGURIDAD
HASTA QUE LA INSTALACIÓN
DE LA TAPA SE HAYA
COMPLETADO.
m ATTENTION: NE PAS ENLEVER
LES BOULONS DE SÉCURITÉ
TANT QUE L'INSTALLATION DU
COUVERCLE N'EST PAS TERMINÉE.

15
ASSEMBLY · ENSAMBLAJE · ASSEMBLAGE
20 21
DO NOT LIFT THE LID UNTIL THE SAFETY BOLTS ARE
REMOVED.
NO LEVANTE LA TAPA SIN ANTES QUITAR LOS PERNOS
DE SEGURIDAD.
NE PAS SOULEVER LE COUVERCLE TANT QUE LES
BOULONS DE SÉCURITÉ NE SONT PAS ENLEVÉS.
22

16
ASSEMBLY · ENSAMBLAJE · ASSEMBLAGE
23 24
25

17
ASSEMBLY · ENSAMBLAJE · ASSEMBLAGE
Make sure that all parts are assembled and hardware is
fully tightened before operating the grill.
Asegúrese que todas las partes estén bien montadas y que
apretó totalmente todos los herrajes antes de poner en
funcionamiento el asador.
Veuillez à ce que toutes les pièces soient montées et que la
visserie est bien serrée avant d’utiliser le barbecue.

18
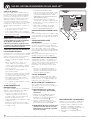
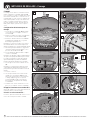
COOKING SYSTEM
A
A
B
B
C
D
E
F
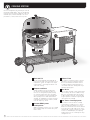
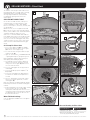
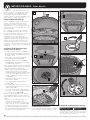
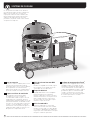
Extensive thought was put into how your charcoal
grill was designed. Weber
®
grills are designed so
that you never have to worry about flare-ups, hot
and cold spots, or burnt food. Expect excellent
performance, control, and results every time.
A
Bowland Lid
The air-insulated, double-wall bowl and lid
retain heat for longer cook times and excellent
temperature control. The unique kettle shape
of your Summit
®
charcoal grill allows for true
convection cooking.
B
Dampers and Vents
A major component in charcoal grilling is
air. The more air allowed into the grill, the
hotter the fire will grow (to a point) causing
the charcoal to burn much faster. The bowl
vent on the bottom of the grill should be open
while grilling or in the smoke position while
smoking. The top damper is used to control the
temperature within the grill; however, should
never be completely closed.
C
Gourmet BBQ System
™
CookingGrate
Made of heavy-duty stainless steel, the cooking
grate provides ample area to make all of your
favorite meals.
D
DiffuserPlate
The stainless steel diffuser plate is used to
maintain a consistent temperature and to
direct heat and smoke around the food. It
is always used while smoking. However, it
can also be used while cooking indirectly to
maximize grilling space.
E
Fuel Grate
The fuel grate has what it takes to withstand
the heat of any charcoal fire. Made of heavy-
duty steel, this durable grate will not warp
or burn through. The grate can be moved to
a higher position in the bowl for grilling and
lower position for smoking.
F
One-Touch
™
Cleaning System
The stainless steel One-Touch
™
cleaning
system makes cleanup hassle free. As you
move the handle back and forth, the three
blades in the bowl move ash from the bottom
of the grill into the high capacity ash catcher
for quick and clean ash removal. These same
vents act as a bowl damper, to help bring
oxygen up to the fire or to allow you to easily
extinguish the fire.

19
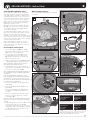
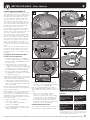
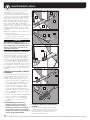
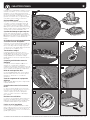
FEATURES
The Weber
®
Summit
®
Charcoal grill isn't your
typical grill. The top-of-the line features and
innovative design allow you to grill, or smoke, with
convenience and ease. From the Snap-Jet
™
gas
ignition system, to hinged cooking grates; grilling
has never been easier or more fun.
Gourmet BBQ System
™
The Gourmet BBQ System
™
(A) cooking grate
is the circular center grate within the hinged
cooking grate. It is removable and can be replaced
with any of the Weber
®
Gourmet BBQ System
™
inserts (sold separately). For a full product line of
Gourmet BBQ System
™
inserts, visit our website at:
www.weber.com.
Snap-Jet
™
Gas Ignition System
Lighting charcoal has never been easier with the
Snap-Jet
™
gas ignition system (B). Simply pile
charcoal above the burner tube and ignite it with
the burner control knob.
Stainless Steel Hinged Cooking
Grate and Stainless Steel Hinged
DiffuserPlate
The cooking grate and diffuser plate (C) are made
to easily add charcoal and wood while grilling
or smoking. The hinged cooking grate has an
extended handle to hang it from the edge of
thebowl.
Built-In Thermometer
The large, durable, built-in lid thermometer
(D) allows you to easily monitor your grill’s
temperature. The “smoke” zone on the
thermometer indicates when the grill has reached
the ideal temperature for smoking.
Rapidfire
™
Lid Damper
The hinged Rapidfire
™
lid damper (E) maximizes
airflow and increases temperature quickly to get
you up and grilling within 20minutes. It also aids in
a quick temperature recoveryrate.
Char-Bin
™
Storage Container
The removable Char-Bin™ (F) stores up to 20 lbs of
charcoal. The snap-tight lid ensures that the coal
stays dry and is protected from the elements.
Diffuser Plate Storage Area
Wire rack (G) designed to store the diffuser plate .
Easy-Open Lid Hinge
The lid of your grill was designed with a spring
hinge to make opening and closing the lid simple
and safe. The hinge prevents the lid from slamming
shut, preventing possible injury or damage to
thegrill. (Not pictured.)
Locking Casters
Industrial grade casters make moving around the
patio easy, while the locking mechanism keeps the
grill in place. (Not pictured.)
Stainless Steel Wire Basket
Removable stainless steel wire basket is great for
storing accessories and grilling tools. Conveniently
located under the stainless steel table for easy
access while grilling. (Not pictured.)
A
B
C
E
F
D
G

20
USING THE SNAP-JET
™
GAS IGNITION SYSTEM
U.S. INSTALLATION CODES
Installation must conform with local codes or, in
the absence of local codes, with the latest edition
of the National Fuel Gas Code, ANSI Z223.1/
NFPA54.
CANADIAN INSTALLATION CODES
These instructions, while generally acceptable,
do not necessarily comply with the Canadian
installation codes. In Canada, the installation of
this appliance must comply with local codes and/
or the latest edition of Standard CAN/CSA-B149.2
(Propane Storage and Handling Code).
NOTE: Your retailer can help you match a replacement
cylinder to your grill.
REGULATOR CONNECTIONS
Your Weber
®
gas grill is equipped with a pressure
regulator, which is a device to control and maintain
uniform gas pressure as gas is released from the
LP cylinder. Each Weber
®
pressure regulator is
designed for vapor withdrawal.
• The pressure regulator supplied with the
Weber
®
gas grill must be used. This regulator is
set for 11 inches of water column pressure.
BURNER USAGE
The gas burner feature on your Summit
™
charcoal
grill operates at 10,000 BTU’s. It is for igniting the
charcoal only. It should never be used for cooking.
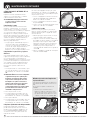
INSTALLING THE LP CYLINDER
Use disposable LP cylinders with a capacity of
either 14.1 oz. or 16.4 oz. equipped with a CGA #600
connection.
m CAUTION: Use cylinders that are
marked “Propane Fuel” only.
1. Make sure that the burner control knob is
turned off by pushing it in and turning it
clockwise to the off ( ) position.
2. Push the propane cylinder into the regulator
and turn clockwise until tight (A).
m WARNING: Do not use a wrench to
tighten the connection. Using a wrench
could damage the regulator coupling
and could cause a leak.
REMOVING THE LP CYLINDER
When your LP cylinder needs to be replaced, follow
these instructions to remove it.
1. Make sure that the burner control knob is
turned off by pushing it in and turning it
clockwise to the off ( ) position.
2. Unscrew propane cylinder from regulator.
WHAT IS LP GAS?
Liquefied petroleum gas, also called LP, LP gas,
liquid propane, or simply propane or butane, is the
flammable, petroleum-based product used to fuel
your grill. It is a gas at moderate temperatures and
pressure when it is not contained. But at moderate
pressure inside a container, such as a cylinder,
LP is a liquid. As pressure is released from the
cylinder, the liquid readily vaporizes and becomes
LP gas.
• LP has an odor similar to natural gas.
Youshould be aware of this odor.
• LP is heavier than air. Leaking LP gas may
collect in low areas and resist dispersion.
m DANGER
NEVER store a spare LP cylinder under
or near Weber
®
gas appliances. Failure to
follow this statement exactly may result in
a fire causing death or serious injury.
SAFE HANDLING TIPS FOR LP
GASCYLINDERS
There are various guidelines and safety factors
that you need to keep in mind when using LP gas.
Carefully follow these instructions before using
your Weber
®
gas grill.
• Do not use a damaged, dented, or rusty
LPcylinder.
• Handle “empty” LP cylinders with the same
care as you handle full cylinders. Even when an
LP cylinder is empty of liquid, there may still be
gas pressure inside the cylinder.
• LP cylinders should not be dropped or
handledroughly.
• Never store or transport the LP cylinder where
temperatures can reach 125°F (51.7°C) (the
cylinder will become too hot to hold by hand).
For example: do not leave the LP cylinder in a
car on a hot day.
• LP cylinders must be kept out of reach
ofchildren.
STORAGE AND/OR NONUSE
For grills that have been stored or left unused for a
while, it is important to follow these guidelines:
• Disconnect the cylinder if: 1) it is empty; 2)
the grill is being stored in a garage or other
enclosed area; 3) the grill is being transported;
4) the grill is not in use.
• Place dust cap on cylinder valve outlet when
cylinder is not in use.
• Do not store a disconnected LP cylinder in a
building, garage, or any other enclosed area.
• The Weber
®
gas grill should be checked for gas
leaks and any obstructions in the burner tube
before it is used. (Refer to “CHECKING FOR GAS
LEAKS” and “ANNUAL MAINTENANCE.”)
• Check that the bowl and the high capacity ash
catcher are free from debris that might obstruct
the flow of combustion or ventilationair.
• The burner tube should also be checked
for any obstructions. (Refer to “ANNUAL
MAINTENANCE.”)
A
La page est en cours de chargement...
La page est en cours de chargement...
La page est en cours de chargement...
La page est en cours de chargement...
La page est en cours de chargement...
La page est en cours de chargement...
La page est en cours de chargement...
La page est en cours de chargement...
La page est en cours de chargement...
La page est en cours de chargement...
La page est en cours de chargement...
La page est en cours de chargement...
La page est en cours de chargement...
La page est en cours de chargement...
La page est en cours de chargement...
La page est en cours de chargement...
La page est en cours de chargement...
La page est en cours de chargement...
La page est en cours de chargement...
La page est en cours de chargement...
La page est en cours de chargement...
La page est en cours de chargement...
La page est en cours de chargement...
La page est en cours de chargement...
La page est en cours de chargement...
La page est en cours de chargement...
La page est en cours de chargement...
La page est en cours de chargement...
La page est en cours de chargement...
La page est en cours de chargement...
La page est en cours de chargement...
La page est en cours de chargement...
La page est en cours de chargement...
La page est en cours de chargement...
La page est en cours de chargement...
La page est en cours de chargement...
La page est en cours de chargement...
La page est en cours de chargement...
La page est en cours de chargement...
La page est en cours de chargement...
La page est en cours de chargement...
La page est en cours de chargement...
La page est en cours de chargement...
La page est en cours de chargement...
La page est en cours de chargement...
La page est en cours de chargement...
La page est en cours de chargement...
La page est en cours de chargement...
La page est en cours de chargement...
La page est en cours de chargement...
La page est en cours de chargement...
La page est en cours de chargement...
La page est en cours de chargement...
La page est en cours de chargement...
-
 1
1
-
 2
2
-
 3
3
-
 4
4
-
 5
5
-
 6
6
-
 7
7
-
 8
8
-
 9
9
-
 10
10
-
 11
11
-
 12
12
-
 13
13
-
 14
14
-
 15
15
-
 16
16
-
 17
17
-
 18
18
-
 19
19
-
 20
20
-
 21
21
-
 22
22
-
 23
23
-
 24
24
-
 25
25
-
 26
26
-
 27
27
-
 28
28
-
 29
29
-
 30
30
-
 31
31
-
 32
32
-
 33
33
-
 34
34
-
 35
35
-
 36
36
-
 37
37
-
 38
38
-
 39
39
-
 40
40
-
 41
41
-
 42
42
-
 43
43
-
 44
44
-
 45
45
-
 46
46
-
 47
47
-
 48
48
-
 49
49
-
 50
50
-
 51
51
-
 52
52
-
 53
53
-
 54
54
-
 55
55
-
 56
56
-
 57
57
-
 58
58
-
 59
59
-
 60
60
-
 61
61
-
 62
62
-
 63
63
-
 64
64
-
 65
65
-
 66
66
-
 67
67
-
 68
68
-
 69
69
-
 70
70
-
 71
71
-
 72
72
-
 73
73
-
 74
74


Weber 18501101 Le manuel du propriétaire
- Catégorie
- Barbecues
- Taper
- Le manuel du propriétaire
- Ce manuel convient également à
dans d''autres langues
- English: Weber 18501101 Owner's manual
- español: Weber 18501101 El manual del propietario
Documents connexes
-
Weber PERFORMER PREMIUM GBS 57cm Black Le manuel du propriétaire
-
-
Weber 18105 Manuel utilisateur
-
Weber 14407001 Manuel utilisateur
-
-
-
-
-
-
Autres documents
-
 Naterial 3276000413653 Manuel utilisateur
-
 Naterial 84178234 Le manuel du propriétaire
-
 Naterial 84178225 Le manuel du propriétaire
-
 Grillerette Pro 52030 Guide d'installation
-
TrailFX 52301 Guide d'installation
-
LANDMANN 12302 Manuel utilisateur
-
 Brentwood Appliances BBF-21R Mode d'emploi
-
 Brentwood Appliances BBF-31G Mode d'emploi
-
Bodum 11450 Manuel utilisateur
-
Philips GCA1000/60 Product Datasheet


