Hoover LBHF7 14 IFR Manuel utilisateur
- Catégorie
- Machines à laver
- Taper
- Manuel utilisateur

®
Washing machine Instructions for use
Machine à laver Mode d’emploi
HF7 12 I
HF7 14 I
HF7 16 I
40000369.qxd 18/09/2003 11:42 Page 1

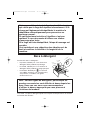
Introduction
Please read and follow these instructions carefully and operate the machine
accordingly. This booklet provides important guidelines for safe use, installation,
maintenance and some useful advice for best results when using your machine.
Keep all documentation in a safe place for future reference or for any future
owners.
2
Note: this machine is solely for domestic use, i.e. to
wash, rinse and spin dry household textiles and
garments.
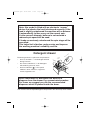
Notes on disposal
All packaging materials used are environmentally-friendly and recyclable. Please
help dispose of the packaging via environmentally-friendly means.
Your retailer or local council will be able to give you
details of current means of disposal.
Appliances that have reached the end of their useful life are not worthless
rubbish! Valuable materials can be salvaged from an old appliance via scrap
reprocessing.
Note: to ensure safety when disposing of an old
washing machine disconnect the mains plug from the
socket, cut the mains power cable and destroy this
together with the plug. To prevent children shutting
themselves in the machine break the door hinges or
the door lock.
40000369.qxd 18/09/2003 11:42 Page 2

English 2
Français 35
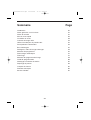
Contents Page
Introduction 2
General Delivery Notes 4
Safety Notes 4
Quick Start 5
Installation & Testing 6
Useful Washing Advice 11
Using Inter@ct for the first time 12
Description of Controls 15
Detergent Drawer 19
Detergents, washing aids & amounts to use 20
Programme Selector 22
Auto Half Load 24
Sorting the Laundry 24
Selecting the wash Progamme 26
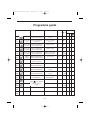
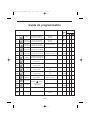
Programme Guide 27
Cleaning and Routine Maintenance 29
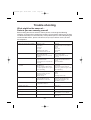
Trouble shooting 31
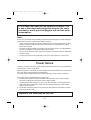
Power failure 32
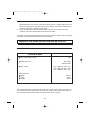
Technical data 33
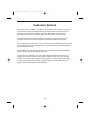
Customer service 34
3
40000369.qxd 18/09/2003 11:42 Page 3

General delivery notes
Please check that the following items are delivered with the appliance:
– Instruction manual
– Guarantee card
– Blanking plug
– Inlet hose & bracket
– Base panel and x2 push clips
Check that no damage has occurred during transit. If it has, call GIAS Service,
Hoover Service or an authorised Hoover dealer. Please see Customer Service.
4
Safety notes
Note: before carrying out any cleaning or maintenance
of the washing machine.
A) Disconnect the plug from the mains supply.
B) Turn off the water supply.
C) Ensure that the mains power supply is earthed, if not, seek assistance from a
qualified electrician. This appliance must be earthed.
D) Do not touch the appliance when hands or feet are wet or damp. Do not use
the appliance with bare feet.
E) The use of adapters, multiple connectors and/or extensions is not
recommended.
F) Caution: water temperature can reach 90°C during
the whites wash cycle and as a result the door
glass may get very hot.
G) Check there is no water visible in the drum before opening the door.
H) Do not allow children or unauthorised persons to use the appliance without
supervision.
I) Do not pull the power cable or the appliance itself to remove the plug from the
socket.
J) The appliance must not be exposed to weather conditions (rain, direct sun,
etc...).
40000369.qxd 18/09/2003 11:42 Page 4

5
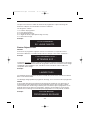
Quick Start
Washing
– Open the door with the Porte button
– Select laundry and put it in the machine
– Close the door
– Put detergent in the dispenser compartments
– Select programme by turning the programme knob (Your desired programme may be seen
on the display)
– Select any function buttons required and then press the Départ/Pause button
– There may be a short time delay from pressing the Départ/Pause button to the start of the
programme, while the machine senses the water required and sets the parameters for the
programme
After washing
– Wait about two minutes for the door locking device to
disengage. The Porte Sécurisée neon will go out.
– Switch off the machine by turning the control knob to the Arrêt
position.
– Open the door and remove the laundry.
K) When moving the appliance never lift it by the controls, the detergent drawer, the hoses or
the power cable.
To avoid damaging the door when moving the appliance never rest the door against objects
e.g a trolley.
L) IMPORTANT!
If the appliance is installed on a carpeted floor ensure that the ventilation through the base
of the appliance is not obstructed.
M) When lifting the machine always use two people to help avoid injuries.
N) If the appliance is not running properly or breaks down, switch it off, disconnect the plug
from the socket, turn off the water supply and do not tamper with the appliance.
Consult GIAS Service or Hoover Service for possible repair. Failure to comply with the
above can compromise the safety of the appliance.
O) If the appliance’s power cable is damaged it must be replaced by a special cord which is
only available from GIAS Service, Hoover Service or an authorised Hoover dealer.
P) After the machine has been installed, ensure that the mains plug and water supply valves
are easily accessible.
Q) Glass fibre curtains should never be put into this machine.
R) Lint or fluff must not be allowed to collect on the floor around the outside of this machine.
S) Always ensure that the door locked indicator neon has switched itself off before opening the
door. By doing so the machine is allowed to cool down before the laundry is handled.
T) Always ensure that the base panel is fitted to the machine.
Note: Please ensure that Inter@ct set-up, installation and testing
has been completed before referring to the Quick Start.
40000369.qxd 18/09/2003 11:42 Page 5

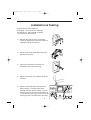
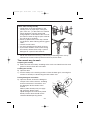
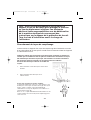
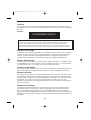
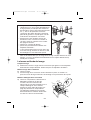
Remove the machine from the
packaging - close to where it will finally
be positioned - and proceed as follows:
On the back of the machine
1) Remove the central screw A and side
screws B and pull out the transit bracket C
complete with the red spacer.
2) Tilt the machine forward and remove the
polystyrene spacers.
3 Cover the central hole using the cap
enclosed in the instructions bag.
4) Adjust the two feet at the front to level the
machine.
5) Tilt the machine forward and locate the
base panel by ➀ removing the paper
backing from the adhesive tape, ➁ locate
the base panel in the front of the machine
➂ offer the base panel up to the base of the
washing machine and locate the two clips.
6
Installation & Testing
40000369.qxd 18/09/2003 11:42 Page 6

Note: we recommend you keep the transit bracket and
screws to protect the machine for future transit.
The Manufacturers will not be responsible for any
damage to the machine caused by not following the
instructions relating to releasing the transit protection.
The user is responsible for all installation costs.
7
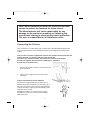
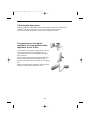
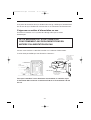
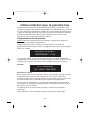
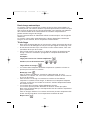
Connecting the fill hose
This machine has an inlet hose with a 19mm (3/4”) threaded ferrule fitted to the
end to attach between the threaded connector on the appliance and the water
supply.
Only use the new hose supplied to connect the machine and ensure that the
sealing washer is in place inside the hose connector.
Do not re-use old hoses which are attached to existing installations.
Do not over-tighten the connection. Hand tight is sufficient.
Do not trap or kink the hose.
1. Connect the elbow end of the hose to the back
of the machine.
2. Connect the straight end of the hose to the
stop taps.
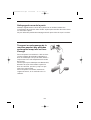
Acqua-stop (fitted to certain models)
The fill hose supplied with this machine has a
double skin and incorporates a water valve (A). If
the inner hose bursts the valve will automatically
shut off the water supply to prevent flooding. The
indicator turns red (B).
Should this happen, turn off the water supply
immediately and have a new fill hose fitted by
Hoover Service.
B
A
40000369.qxd 18/09/2003 11:42 Page 7

THIS MACHINE MUST BE CONNECTED IN
ACCORDANCE WITH THE WATER SUPPLY
REGULATIONS. WATER BYELAWS PROHIBIT
CONNECTION TO A SURFACE WATER DRAIN.
If the inlet hose’s connection point is changed, check that the 3/4” threaded ferrule
on the inlet hose is firmly attached to the electrovalve connector.
Water supply requirements
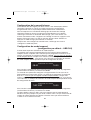
Connect the machine to the drainage system used by household sinks.
8
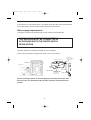
THIS MACHINE MUST BE CONNECTED IN
ACCORDANCE WITH THE WATER SUPPLY
REGULATIONS.
No other appliance should be plumbed into the standpipe.
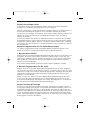
There are two possible arrangements which can be seen below :-
DRAIN HOSE
HOSE SUPPORT
CROOK
12-15cm
32mm
min
60-80cm
HOSE SUPPORT CROOK
ATTACH HOSE
SECURELY TO
WASTE OUTLET
DRAIN HOSE
FIX SECURELY
ABOVE OVERFLOW
OUTLET OF SINK
For the washing machine to function properly the outlet end of the drain
hose must be at a minimum of 60 cm and a maximum of 80 cm from the
ground.
40000369.qxd 18/09/2003 11:42 Page 8

9
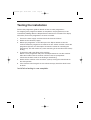
Testing the installation
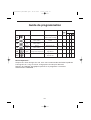
Refer to the programme guide for details of how to select programmes.
For stopping each programme before its completion, the programme must be
cancelled by holding down the Départ/Pause button for five seconds. The display
will inform you that the programme has been cancelled.
1. Turn on the water supply and check for leaks from the fill hose.
2. Switch on the electricity supply.
3. Select spin programme 15 and then press the Départ button to start the
machine. Allow the programme to continue for one minute and then cancel the
programme (Please see ‘Description of controls’ section for cancelling the
programme). This will remove any water remaining in the machine from factory
testing.
4. To check for cold water filling to the machine:
Select a rinse programme and press the Départ button to start the machine.
Allow the tumble action to continue until the water has pumped out.
Check that the drain outlet is not leaking or overflowing.
5. Switch off the machine at the end of the cycle by turning the control knob to
the Arrêt position.
6. If the machine takes longer than one minute to empty check the drain hoses
for kinks.
Installation testing is now complete.
40000369.qxd 18/09/2003 11:42 Page 9

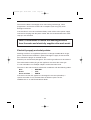
10
To ensure the drum is thoroughly clean after testing and storage, select
programme 2 and run the machine for a complete cycle using only wash
detergent and water.
If the machine is not to be used immediately, switch off the mains power supply
and remove the plug from the power socket. We also recommend that the water
stop taps are turned off.
Note: it is advisable to isolate the washing machine
from the water and electricity supplies after each wash.
Electricity supply and safety advice
Washing machines are supplied to operate at a voltage of 230V, 50 Hz single-
phase. Check that the conductor is powerful enough to supply at least 3.0 kW,
then connect the plug to an earthed socket.
Electricity can be extremely dangerous. This washing machine must be earthed.
The socket outlet and the plug on the appliance must be of the same type.
It is not advisable to use multiple adapters and/or extension leads.
The wires in the mains lead are coloured in accordance with the following codes:
Blue – NEUTRAL
Brown – LIVE
Green & Yellow – EARTH
If the mains cord on this appliance is damaged, it must be replaced by a
special cord which is only available from the Hoover spares service,
GIAS Service or an authorised Hoover dealer.
40000369.qxd 18/09/2003 11:42 Page 10

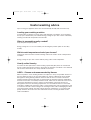
Useful washing advice
Tips on using your appliance in the most environmentally-friendly and economical way.
Loading your washing machine
To make further reductions of energy, water and detergent consumption, we recommend
that you put a full load into your machine. Energy savings of up to 50% can be achieved by
washing one full load compared to two half loads.
When is prewashing really needed?
Only with particularly dirty loads!
Energy savings of 5 to 15% are made by not selecting the prewash option for less dirty
laundry.
Which wash temperature should you choose?
Using stain removers before machine washing reduces the need to wash at temperatures
over 60°C.
Energy savings of up to 50% can be made by using a 40°C wash temperature.
Heavily soiled laundry
To ensure the best performance when washing a particularly dirty load, we recommend
that you reduce the amount of items to be put into the machine. If the drum is not crammed
full, the items will circulate more freely and will wash cleaner.
ARIEL - Chosen and recommended by Hoover
When we produce a new washing machine we subject it to every test possible. And one of
the most important tests is the one that enables our experts to identify the most suitable
detergent for solving laundry problems. Ariel was able to meet our needs: to make the
washing machine function efficiently, not compromise the machine’s lifespan and produce
the best wash results. Consistently excellent results, which was the main aim of the test we
carried out, determined our choice and our recommendation. The prime function of a
detergent that answers all washing requirements is to work with the water to remove dirt
from fabrics, holding it in suspension until it is removed when the water is pumped out, and
to control the amount of foam forming in the washing machine, without damaging the fibres
of the items being washed. Ariel fully satisfies all these requirements, as it contains high
quality elements, the result of the most advanced research, ensuring excellent results
under all conditions.
11
40000369.qxd 18/09/2003 11:42 Page 11

12
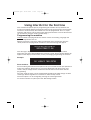
Using Inter@ct for the first time
This machine will operate prior to programming the Inter@ct set up. However, this
machine has Départ Différé and Programmation Fin De Cycle functions and for these
functions to work efficiently the Inter@ct set must be programmed. This is a simple
operation and special care has been taken during manufacture to ensure that the user
can operate this machine simply and effectively.
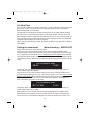
Programming the machine
Inter@ct needs to be programmed so that the correct clock setting, language and
personal requirements are set.
When the machine is turned on and the programme dial is moved away from the
“Arrêt” position to the programme selections a welcome message will appear.
This message is displayed for a short time while the machine recognises which
programme has been selected. When the machine is ready, the programme details will
appear on the display and from here you may now beging programming the machine.
Example
Enter the Menu
Prior to entering the Inter@ct menu please note you have 30 seconds per operation to
make your selection. Should you run out of time the display will return to the start
screen, and you simply have to re-enter the Inter@ct menu and continue with the
programming.
From this stage the menu can be programmed. Hold down the “Mini Charge” and the
“Prélavage” buttons together for 5 seconds or until the beep sounds.
The menu options can be changed by pressing the “Prélavage” button.
To confirm and enter an option press the “Mini Charge” button.
HOOVER INTER@CT
WELCOME 11:06
1 WHITE COTTON
90° HEAVY 1600 RPM
40000369.qxd 18/09/2003 11:42 Page 12

13
Set New Time
This function needs to be set for two reasons – firstly to display the current time of
day on the screen and secondly for the Programmation Fin De Cycle/Départ
Différé settings to work correctly.
You will notice in the display window that the hours on the clock will be flashing.
Set the hours by continually pressing the “Prélavage” button and then press the
“Mini Charge” button to enter the hour. Next the minutes on the clock will begin to
flash, again press the “Prélavage” button until the required minutes are displayed
and press “Mini Charge” to input the selection.
When you have Set the New Time, the display will then ask if you wish to “Set the
Time Mode”.
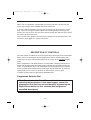
Setting the time mode (default setting – ABSOLUTE)
There are two ways to select the time mode.
The first is if you wish Programmation Fin De Cycle or Départ Différé to be
programmed by starting the actual time you want the programme to end or begin,
e.g., programme to end 08.00. This is called Absolute
Time Mode. When utilising
the Programmation Fin De Cycle function (or Départ Différé), an example can be
seen below when the Absolute Time Mode has been selected in the menu set-up
stage.
Therefore, when setting the Programmation Fin De Cycle the programme (as
shown above) will end at 08.00.
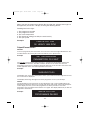
The second is if you wish Programmation Fin De Cycle or Départ Différé to be
programmed by adding hours; e.g., programme to end in 1
1
/2 hours. This is called
Relative Time Mode. When utilising the Programmation Fin De Cycle function (or
Départ Différé) an example can be seen below when Relative Time Mode has
been selected is the menu set-up stage.
Therefore, when setting the Programmation Fin De Cycle the programme (as
shown above) will end at 15:30.
Both options are very useful, but we feel that the Absolute Time Mode will be
more beneficial and easier to use since there will be no need to calculate how
many hours you will need to leave before you want the machine to end or start.
PROGRAMME END
08.00 14:00
PROGRAMME END
BY 1H 30M 14:00
40000369.qxd 18/09/2003 11:42 Page 13

On reaching the set time mode you will be asked if you would like to select
“Relative” time or – by scrolling through using the “Prélavage” button – “Absolute”
time. Enter the preferred setting by pressing the “Mini Charge” button.
When you have entered your preferred time-mode, the display will then ask for the
Enable Final Beeping to be set.
Enable Final Beeping (default setting – YES)
Here you have the option to have a beeping alarm to let you know the wash cycle
has finished. By pressing the “Prélavage” button you can scroll through the “yes”
and “no” options.
To enter your selection press the “Mini Charge” button and the screen will then
move to the next stage and ask you if you wish to “Enable Memory”.
Enable Memory (default setting – NO)
This is a useful feature if you frequently wash laundry using the same programme.
Selecting “Enable Memory” will tell the machine to remember the last programme/
functions used and set them in the memory. This function works only on cottons,
delicates, synthetics and woollens programme. The memory does not retain
settings within the special programme group.
Select “Yes” or “No” to this option by using the “Prélavage” and “Mini Charge”
buttons.
The display will then show a message that asks if you require demo mode to be
set. Please set this option to “No” if not done so already – as this is for SERVICE
use only. If the demo mode option is not set on “NO” when exiting the Inter@ct
menu the wash programme WILL NOT commence. Demo Mode must be set at
“NO” for the wash cycle to commence. On entering “NO” via the “Mini Charge”
button you will then be asked if you wish to “Exit Menu”.
Exit Menu
If you are happy with the settings you have selected, you can now exit the menu
by selecting “Yes” via the “Prélavage” and “Mini Charge” buttons.
However, if you are not happy with any of the settings selected you must select
“No” to the exit menu command and you can then commence the programming
from the beginning. By pressing the “Mini Charge” button you are able to enter and
bypass each option individually until you reach the option you would like to re-set.
14
40000369.qxd 18/09/2003 11:42 Page 14

When you are completely satisfied with your menu selection, you may exit the
menu and testing of the installation may now commence.
If, after the initial installation you may want to change any of the menu at a later
date, again run through the menu options from the beginning and change the
options you want to reset. This may be useful to change the “Set New Time” when
the clocks go forward or back.
Once set, the menu options will remain in the memory of the machine even if the
machine is unplugged or if a power cut occurs.
DESCRIPTION OF CONTROLS
All of the buttons and dials on the washing machine control panel are listed below.
When you have selected the desired programme and any option buttons, the
information you have selected will appear on the screen in the Inter@ct
display
panel.
When programmes and option buttons are compatible a beeping sound will be
heard and the light above the option button selected remains illuminated. If you
select an option button that is not compatible with the programme you require a
buzzing sound will be heard and the button light will not illuminate. To select an
option button press it once; to deselect an option button, press it again.
Carefully read the relevant descriptions detailed below:
Programme Selector Dial
15
Note: Do not press the Départ/Pause button before
selecting the programme. If this does happen, cancel the
programme (that you have set accidentally) by pressing the
Départ/Pause button for five seconds (See programme
cancelled description).
40000369.qxd 18/09/2003 11:42 Page 15

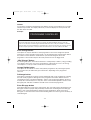
Départ/Pause Button
DEPART
To start a programme press this button once. The Porte Sécurisée light will illuminate. The
machine will now be sensing the wash load and ask you to please wait –
Example
The Inter@ct
panel will then display the time to complete the programme and then the
wash cycle will commence. Inter@ct calculates the time to the end of the selected
programme based upon a standard 7 Kg load, during the cycle, Inter@ct corrects the time
to that applicable to the size and composition of the load.
Example:
This display also shows the current phase of the cycle and in the bottom right hand corner,
the current time is displayed.
This display will change throughout the wash programme as the cycle develops.
PAUSE
The programme may be paused at any time during the wash cycle by holding down the
Départ/Pause button for about two seconds and a beep will sound. A message will appear
on the display to inform you that the programme has been paused. To restart the
programme press the Départ/Pause button once again. The display will inform you that the
programme will continue.
Example:
16
SETTING WASHING
PARAMETERS: PLS WAIT.
TIME TO END 1H:50M
WASHING 19:30
WHITE COTTON
PROGRAMME PAUSED
When you turn the programme selector dial and after the welcome message has
disappeared, you will see a display showing the following details:
Reading from left to right:
1. The programme number
2. The programme name
3. The wash temperature
4. The degree of soiling (how dirty the wash load is)
5. The spin speed
Example:
1 WHITE COTTON
90° HEAVY 1600 RPM
40000369.qxd 18/09/2003 11:42 Page 16

Extra Charge button
This option can only be utilised for cotton programmes. Hoover has designed a special
wash boost system specially for large loads - by selecting the Extra Charge option button,
the volume of water within the selected wash cycle and the length of time of the
programme is increased to improve the wash performance for the bigger load.
“Mini Charge” Button
By selecting this option, the machine will wash a small quantity of fabrics (1-2kg), avoiding
every kind of waste. Thus, the water consumption is reduced by up to 55%, the energy
consumption is cut by up to 60% and the time needed is halved.
Lavage Rapide button
This option can be utilised on cotton and synthetic programmes. By selecting the option,
the wash time may be reduced by up to 50 minutes, depending on the programme
selected.
Prélavage button
This option is particularly useful for heavily soiled loads and can be used before selecting
the main wash programme. Detergent for this programme should be added to the first
compartment of the soap drawer labelled “I” (Please refer to Detergent Drawer Section of
manual). We recommend you use only 20% of the recommended quantities shown on the
detergent pack and fabric conditioner should not be used for this programme.
Extra Rinçage button
This option adds more water at the rinsing stage. This can help prevent skin irritation from
detergent residue for people with particularly sensitive skin. Selecting the Extra Rinçage
button is also recommended when washing heavily soiled fabrics which need a lot of
detergent, or when the wash load contains towelling fabrics that have a greater tendency to
retain detergent.
17
Porte button:
A special safety device prevents the door from being operated immediately after the end of the
cycle. “Porte Sécurisée” indicator light is illuminated when the door is fully closed. Wait for 2 minutes
after the wash cycle has finished before opening the door. The Porte Sécurisée neon will go out and
the door may be opened. As a safety measure check that there is no water evident in the drum.
PROGRAMME CANCELLED
CANCEL
To cancel the programme the Départ/Pause buttton must be pressed down for 5 seconds
until the beep sounds. The display will inform you that the display has been paused and
has then been cancelled.
Example:
40000369.qxd 18/09/2003 11:42 Page 17

Verrouillage Clavier button
This is a useful feature to prevent children playing with the option buttons and tampering
with the programme you have set.
After you have set the programme and option buttons you require, press the start button.
Press the programme lock button and this “locks” the control panel.
After you have set the programme and option buttons you require, press start and then the
programme lock button. This “locks” the control panel.
You may cancel this function by pressing the programme lock button briefly until you see the
light above the button flash. While this light is flashing, press the “Fast Iron” button – the display
will inform you that the options are no longer locked and further changes can now be made.
Programmation Fin De Cycle/Départ Différé buttons
The Programmation Fin De Cycle/Départ Différé options can be used if you want the
washing to be ready at a later time (but within 24 hours).
1. Départ Différé button
Press Départ Différé/Programmation Fin De Cycle button once and press the hours and
minutes buttons (to the left and right) until the required time is set. The display returns to
the programme option if the button is pressed within 5 seconds. Once you have set the
required start delay/end time, press the start button.
To cancel Départ Différé, hold down the button for 5 seconds.
2. Programmation Fin De Cycle button
Press Départ Différé/Programmation Fin De Cycle button twice and press the hours and
minutes buttons (to the left and right) until the required time is set. When entering the
option, the display will show the minimum time which you can set the programme to end by.
This time may only be extended as you require.
NOTE: When using the Départ Différé/Programmation Fin De Cycle functions, only use
detergents via the dispenser drawer. Adding detergents etc. to the drum and then leaving
them to stand for a long period of time may damage your laundry.
Variateur d’Essorage button
On selecting the wash programme the display will inform you of the maximum spin speed
permitted for that programme. By repeatedly pressing the select spin button the speed will
decrease by increments of 100 rpm. By continuously pressing the spin speed option the
spin may be cancelled if desired. On selecting the required spin speed the display will then
inform you of the chosen programme, its temperature and the newly selected spin speed.
18
40000369.qxd 18/09/2003 11:42 Page 18

Note: this model is fitted with an electronic device that
checks the load is balanced correctly. If the load is
slightly unbalanced the machine will re-balance it
automatically to then carry out the normal spin.
If, after several attempts, balance is not restored, a
reduced spin speed will be used.
If loads are seriously unbalanced the spin stage will be
cancelled.
This helps limit vibration, reduce noise and improve
the washing machine’s reliability and life.
19
Note: this model is fitted with an electronic “sensor”
device that checks the load is balanced correctly. If the
load is slightly unbalanced the machine will re-balance
it automatically to then carry out the normal spin.
If, after several attempts, balance is not restored a
reduced spin speed will be used.
If loads are seriously unbalanced the spin stage will be
cancelled.
This helps limit vibration, reduce noise and improve
the washing machine’s reliability and life.
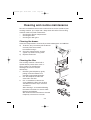
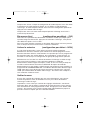
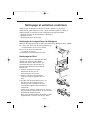
Detergent drawer
The detergent draw is split into 3 compartments:
– the first, labelled “I”, is for detergent utilised
during Prewash.
– the second, labelled “II”, is for detergent
utilised during the main wash.
– the third, labelled “ ” is for special
additives, fabric softeners, fragrances,
starch, brighteners etc.
Main wash
powder
Pre-wash
powder
Fabric conditioner
Note: some forms of detergents are difficult to
dispense from the drawer e.g. concentrated powders.
For these, we suggest you use the recommended
dispenser which is placed inside the drum.
This ensures that the liquid detergent is dispersed in the drum only when needed.
40000369.qxd 18/09/2003 11:42 Page 19

Special detergents
– Detergents for coloureds and delicates, without added bleach, also often
without any optical brightening agents, to preserve the colour.
– Detergents for a thorough wash, without added bleach or enzymes,
particularly suitable for handling woollen fibres.
– Detergents for curtains with optical brightening agents, resistant to light, to
prevent yellowing from sunlight.
– Special detergents for programmed use of chemical substances, depending
on fabric type, degree of soiling and water hardness.
Here basic detergents, softeners, bleaches/stain removers can be added
separately.
Additional laundry aids
– Water softener, means less detergent can be used where water hardness is
classed as hard to very hard.
– Prewash substances, for the programmed treatment of stains prior to the
main wash.
Using them means the subsequent wash can be at a low temperature or with
bleach-free detergents.
The machine is programmed to automatically take up additives during the final
rinse stage for all wash cycles.
20
Note: only put special additives, fabric softeners,
fragrances, starch, brighteners, etc., in the third
compartment.
Detergents, washing aids and amounts to use
Choice of detergent
General purpose detergents
– Powder detergents, for a thorough wash, with bleaching agents, are
particularly suitable for use in hot wash programmes (60°C and over), for
heavily soiled and stained laundry.
– Liquid detergents, are particularly suitable for grease stains, such as greasy
skin marks, cosmetics and oil.
These detergents are not suitable for washing stained laundry, as they do not
contain bleach.
– Biological detergents, not all the products available give a really thorough
wash.
40000369.qxd 18/09/2003 11:42 Page 20
La page est en cours de chargement...
La page est en cours de chargement...
La page est en cours de chargement...
La page est en cours de chargement...
La page est en cours de chargement...
La page est en cours de chargement...
La page est en cours de chargement...
La page est en cours de chargement...
La page est en cours de chargement...
La page est en cours de chargement...
La page est en cours de chargement...
La page est en cours de chargement...
La page est en cours de chargement...
La page est en cours de chargement...
La page est en cours de chargement...
La page est en cours de chargement...
La page est en cours de chargement...
La page est en cours de chargement...
La page est en cours de chargement...
La page est en cours de chargement...
La page est en cours de chargement...
La page est en cours de chargement...
La page est en cours de chargement...
La page est en cours de chargement...
La page est en cours de chargement...
La page est en cours de chargement...
La page est en cours de chargement...
La page est en cours de chargement...
La page est en cours de chargement...
La page est en cours de chargement...
La page est en cours de chargement...
La page est en cours de chargement...
La page est en cours de chargement...
La page est en cours de chargement...
La page est en cours de chargement...
La page est en cours de chargement...
La page est en cours de chargement...
La page est en cours de chargement...
La page est en cours de chargement...
La page est en cours de chargement...
La page est en cours de chargement...
La page est en cours de chargement...
La page est en cours de chargement...
La page est en cours de chargement...
La page est en cours de chargement...
La page est en cours de chargement...
La page est en cours de chargement...
La page est en cours de chargement...
-
 1
1
-
 2
2
-
 3
3
-
 4
4
-
 5
5
-
 6
6
-
 7
7
-
 8
8
-
 9
9
-
 10
10
-
 11
11
-
 12
12
-
 13
13
-
 14
14
-
 15
15
-
 16
16
-
 17
17
-
 18
18
-
 19
19
-
 20
20
-
 21
21
-
 22
22
-
 23
23
-
 24
24
-
 25
25
-
 26
26
-
 27
27
-
 28
28
-
 29
29
-
 30
30
-
 31
31
-
 32
32
-
 33
33
-
 34
34
-
 35
35
-
 36
36
-
 37
37
-
 38
38
-
 39
39
-
 40
40
-
 41
41
-
 42
42
-
 43
43
-
 44
44
-
 45
45
-
 46
46
-
 47
47
-
 48
48
-
 49
49
-
 50
50
-
 51
51
-
 52
52
-
 53
53
-
 54
54
-
 55
55
-
 56
56
-
 57
57
-
 58
58
-
 59
59
-
 60
60
-
 61
61
-
 62
62
-
 63
63
-
 64
64
-
 65
65
-
 66
66
-
 67
67
-
 68
68


Hoover LBHF7 14 IFR Manuel utilisateur
- Catégorie
- Machines à laver
- Taper
- Manuel utilisateur
Documents connexes
-
Hoover HF140L Manuel utilisateur
-
-
-
-
-
-
-
-
-
Hoover VHD 9163ZI-86S Manuel utilisateur