Zephyr ZPI-E36AG290 Manuel utilisateur
- Catégorie
- Hottes
- Taper
- Manuel utilisateur

Use, Care, and Installation Guide
www.zephyronline.com
Model number:
Serial Number:
APR19.0801 © Zephyr Ventilation LLC.
Pisa
ZPI-E24AG
ZPI-E24AG290
ZPI-E30AG
ZPI-E30AG290
ZPI-E36AG
ZPI-E36AG290
ZPI-E24AW
ZPI-E24AW290
ZPI-E30AW
ZPI-E30AW290

www.zephyronline.com

1
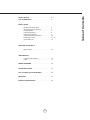
SAFETY NOTICE .......................................................................... 2-3
LIST OF MATERIALS
................................................................. 4
INSTALLATION
Ducting Calculation Sheet
....................................... 5
Mounting Height & Clearance
................................ 6
Ducting Options
........................................................... 7
+RRG6SHFL¿FDWLRQV
................................................... 8
Preparing the Cabinet
............................................... 9
Horizontal Ducting Conversion
.............................. 10
Installing the Hood
...................................................... 11 - 13
Recirculation Kit
........................................................... 14
FEATURES & CONTROLS
Slide Controls
................................................................ 15
MAINTENANCE
Hood and Filter Cleaning
......................................... 16
Lights
................................................................................ 17
WIRING DIAGRAMS ................................................................... 18
TROUBLESHOOTING
................................................................ 19
LIST OF PARTS AND ACCESSORIES
.............................. 20
WARRANTY .................................................................................... 21
PRODUCT REGISTRATION
.................................................... 22
Table of Contents

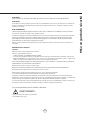
Important Safety Notice
READ AND SAVE THESE INSTRUCTIONS
2
www.zephyronline.com
WARNING
TO REDUCE THE RISK OF FIRE OR ELECTRIC SHOCK, DO NOT USE THIS FAN WITH ANY SOLID-STATE CONTROL DEVICE.
WARNING
TO REDUCE THE RISK OF FIRE ELECTRIC SHOCK, OR INJURY TO PERSONS, OBSERVE THE FOLLOWING:
a. Use this unit only in the manner intended by the manufacturer, if you have questions, contact the manufacturer.
E %HIRUHVHUYLFLQJRUFOHDQLQJXQLWVZLWFKSRZHURႇDWVHUYLFHSDQHODQGORFNSDQHOWRSUHYHQWSRZHUIURPEHLQJVZLWFKHGRQDFFLGHQWDOO\
:KHQWKHVHUYLFHGLVFRQQHFWLQJPHDQVFDQQRWEHORFNHGVHFXUHO\IDVWHQDSURPLQHQWZDUQLQJGHYLFHVXFKDVDWDJWRWKHVHUYLFH
panel.
CAUTION
)RUJHQHUDOYHQWLODWLQJXVHRQO\'RQRWXVHWRH[KDXVWKD]DUGRXVRUH[SORVLYHPDWHULDOVDQGYDSRUV7DNHFDUHZKHQXVLQJFOHDQLQJ
DJHQWVRUGHWHUJHQWV6XLWDEOHIRUXVHLQKRXVHKROGFRRNLQJDUHD
WARNING
TO REDUCE THE RISK OF RANGE TOP GREASE FIRE:
D 1HYHUOHDYHVXUIDFHXQLWVXQDWWHQGHGDWKLJKVHWWLQJV%RLORYHUVFDXVHVPRNLQJDQGJUHDV\VSLOORYHUVWKDWPD\LJQLWH+HDWRLOVVORZO\
on low or medium settings.
E $OZD\VWXUQKRRG21ZKHQFRRNLQJDWKLJKKHDWRUZKHQÀDPLQJIRRG
F &OHDQYHQWLODWLQJIDQVIUHTXHQWO\*UHDVHVKRXOGQRWEHDOORZHGWRDFFXPXODWHRQIDQRU¿OWHU
G 8VHSURSHUSDQVL]H$OZD\VXVHFRRNZDUHDSSURSULDWHIRUWKHVL]HRIWKHVXUIDFHHOHPHQW
H .HHSIDQ¿OWHUVDQGJUHDVHODGHQVXUIDFHVFOHDQ
f. Use high setting on hood only when necessary.
J 'RQ¶WOHDYHKRRGXQDWWHQGHGZKHQFRRNLQJ
K $OZD\VXVHFRRNZDUHDQGXWHQVLOVDSSURSULDWHIRUWKHW\SHRIDQGDPRXQWRIIRRGEHLQJSUHSDUHG
WARNING
TO REDUCE THE RISK OF INJURY TO PERSONS IN THE EVENT OF A RANGE TOP FIRE, OBSERVE THE FOLLOWING:
D 6027+(5)/$0(6ZLWKDFORVH¿WWLQJOLGFRRNLHVKHHWRUPHWDOWUD\WKHQWXUQRႇWKHEXUQHU%(&$5()8/7235(9(17%8516
,IWKHÀDPHVGRQRWJRRXWLPPHGLDWHO\(9$&8$7($1'&$//7+(),5('(3$570(17
b. NEVER PICK UP A FLAMING PAN – You may be burned.
c. DO NOT USE WATER, including wet dishcloths or towels – a violent steam explosion will result.
d. Use an extinguisher ONLY if:
<RXNQRZ\RXKDYHD&ODVV$%&H[WLQJXLVKHUDQG\RXDOUHDG\NQRZKRZWRRSHUDWHLW
7KH¿UHLVVPDOODQGFRQWDLQHGLQWKHDUHDZKHUHLWVWDUWHG
7KH¿UHGHSDUWPHQWLVEHLQJFDOOHG
<RXFDQ¿JKWWKH¿UHZLWK\RXUEDFNWRDQH[LW
WARNING
TO REDUCE THE RISK OF FIRE, ELECTRIC SHOCK OR INJURY TO PERSONS, OBSERVE THE FOLLOWING:
D ,QVWDOODWLRQZRUNDQGHOHFWULFDOZLULQJPXVWEHGRQHE\TXDOL¿HGSHUVRQVLQDFFRUGDQFHZLWKDOODSSOLFDEOHFRGHVDQGVWDQGDUGV
,QFOXGLQJ¿UHUDWHGFRQVWUXFWLRQ
E 6XႈFLHQWDLULVQHHGHGIRUSRZHUFRPEXVWLRQDQGH[KDXVWLQJRIJDVHVWKURXJKWKHÀXHFKLPQH\RIIXHOEXUQLQJHTXLSPHQWWRSUHYHQW
EDFNGUDIWLQJ)ROORZWKHKHDWLQJHTXLSPHQWPDQXIDFWXUHU¶VJXLGHOLQHDQGVDIHW\VWDQGDUGVVXFKDVWKRVHSXEOLVKHGE\WKH1DWLRQDO
)LUH3URWHFWLRQ$VVRFLDWLRQ1)3$DQGWKH$PHULFDQ6RFLHW\IRU+HDWLQJ5HIULJHUDWLRQDQG$LU&RQGLWLRQLQJ(QJLQHHUV$6+5$(DQG
the local code authorities.
c. When cutting or drilling into wall or ceiling, do not damage electrical wiring and other hidden utilities.
d. Ducted fans must always vent to the outdoors.
e. NEVER place a switch where it can be reached from a tub or shower.
I 0DNHVXUHWKHSRZHULVRႇEHIRUHLQVWDOOLQJZLULQJRUPDLQWHQDQFLQJ

Important Safety Notice
3
WARNING
TO REDUCE THE RISK OF FIRE, USE ONLY METAL DUCTWORK.
CAUTION
7RUHGXFHULVNRI¿UHDQGWRSURSHUO\H[KDXVWDLURXWVLGH'RQRWYHQWH[KDXVWDLULQWRVSDFHVZLWKLQZDOOVFHLOLQJV
attics, crawl spaces or garages. Hood not intended for installation over an outdoor grill.
OPERATION
$OZD\VOHDYHVDIHW\JULOOHVDQG¿OWHUVLQSODFH:LWKRXWWKHVHFRPSRQHQWVRSHUDWLQJEORZHUVFRXOGFDWFKRQWRKDLU¿QJHUV
and loose clothing.
The manufacturer declines all responsibility in the event of failure to observe the instructions given here for installation,
maintenance and suitable use of the product. The manufacturer further declines all responsibility for injury due to
negligence and the warranty of the unit automatically expires due to improper maintenance.
*NOTE: Please check www.zephyronline.com for revisions before doing any custom work.
ELECTRICAL REQUIREMENTS
Important:
Observe all governing codes and ordinances.
It is the customer’s responsibility:
7RFRQWDFWDTXDOL¿HGHOHFWULFDOLQVWDOOHU
- To assure that the electrical installation is adequate and in conformance with National Electrical Code, ANSI/NFPA 70
latest edition* or CSA standards C22.1-94, Canadian Electrical Code, Part 1 and C22.2 No.0-M91 - latest edition** and
all local codes and ordinances.
,IFRGHVSHUPLWDQGDVHSDUDWHJURXQGZLUHLVXVHGLWLVUHFRPPHQGHGWKDWDTXDOL¿HGHOHFWULFLDQGHWHUPLQHWKDWWKH
ground path is adequate.
Do not ground to a gas pipe.
&KHFNZLWKDTXDOL¿HGHOHFWULFLDQLI\RXDUHQRWVXUHWKHUDQJHKRRGLVSURSHUO\JURXQGHG
Do not have a fuse in the neutral or ground circuit.
1DWLRQDO)LUH3URWHFWLRQ$VVRFLDWLRQ%DWWHU\PDUFK3DUN4XLQF\0DVVDFKXVHWWV
** CSA International 8501 East Pleasant Valley Road, Cleveland, Ohio 44131-5575
This appliance requires a 120V 60Hz electrical supply and connected to an individual properly grounded branch circuit
SURWHFWHGE\DRUDPSHUHFLUFXLWEUHDNHURUWLPHGHOD\IXVH:LULQJPXVWEHZLUHZLWKJURXQG3OHDVHDOVRUHIHUWR
Electrical Diagram on product.
$FDEOHORFNLQJFRQQHFWRUQRWVXSSOLHGPLJKWDOVREHUHTXLUHGE\ORFDOFRGHV&KHFNZLWKORFDOUHTXLUHPHQWVSXUFKDVH
and install appropriate connector if necessary.
Cancer and Reproductive Harm - www.P65Warnings.ca.gov
WARNING:
Prop. 65 Warning for California Residents

4
www.zephyronline.com
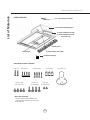
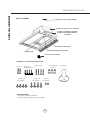
(3) Wire Nuts
(1) Suction Cup
(1) 6” round damper (pre-installed)
(1) hardware package
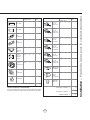
PARTS SUPPLIED
HARDWARE PACKAGE CONTENTS
PARTS NOT SUPPLIED
- Ducting, conduit and all installation tools
- Cable connector (if required by local codes)
- Recirculation Kit
(2) halogen lights, GU-10 50W
(1) mesh filter
(2) M4 x 1”
(1) hood body with sliding glass
(1) filler panel
(4) M3.5x10
(4) M4 x 16mm
(2) upper installation brackets
(2) lower installation brackets
(24” model only)
(2) M4 x 8
(4) 3/16 x 3/8”
(4) 3/16 x 40
(24” model only)
(24” model only)
(24” model only)
List of Materials

5
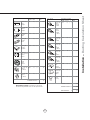
Duct pieces
Tot a l
Equivalent number
length x used =
3- 1/4” x 10”
Rect.,
straight
1 Ft. x ( ) =
Ft.
3- 1/4” x 10”
Rect. to
6” round
transition
5 Ft. x ( ) =
Ft.
3- 1/4” x 10”
Rect. to
6” round
transition
90
0
elbow
20 Ft. x ( ) =
Ft.
6”, 7”, 8”, 10”
Round,
90
0
15 Ft.
x ( ) =
Ft.
6”, 7”, 8”, 10”
Round,
45
0
9 Ft. x ( ) =
Ft.
Ft.
6”, 7”, 8”, 10”
Round,
straight
1 Ft. x ( ) =
Ft.
Subtotal column 1 =
Duct pieces
Tot a l
Equivalent number
length x used =
6”, 7”, 8”, 10”
Round, wall
cap with
damper
30 Ft. x ( ) =
Ft.
Ft.
Ft.
Ft.
6”, 7”, 8”, 10”
Round
roof cap
30 Ft. x ( ) =
Ft.
Subtotal column 2 =
Subtotal column 1 =
Total ductwork =
Maximum Duct Length: For satisfactory air movement,
the total duct length
should not exceed 100 equivalent feet.
6” round to
3- 1/4” x 10”
rect.
transition
1 Ft. x ( ) =
Ft.
6” round to
3- 1/4” x 10”
rect.
transition
90
0
elbow
16 Ft. x ( ) =
Ft.
7” round to
3 1/4” x 10”
rect.
transition
8 Ft. x ( ) =
Ft.
7” round to
3- 1/4” x 10”
rect.
transition
90
0
elbow
23 Ft. x ( ) =
Ft.
elbow
elbow
7” to 6” or
8” to 7” Round
tapered
reducer
25 Ft. x ( ) =
Ft.
3- 1/4” x 10”
Rect. 90
0
elbow
15 Ft. x ( ) =
Ft.
3- 1/4” x 10”
Rect. 45
0
elbow
9 Ft. x ( ) =
Ft.
3- 1/4” x 10”
Rect. 90
0
flat elbow
24 Ft. x ( ) =
Ft.
3- 1/4” x 10”
Rect.
wall cap
with damper
30 Ft. x ( ) =
Ft.
Ft. x ( ) =
Ft.
15
6”, 7“, 8”
Round
in-line
damper
Installation – Ducting Calculation Sheet

6
www.zephyronline.com
DUCTING
A minimum of 6” round ducting must be used to
PDLQWDLQPD[LPXPDLUÀRZHႈFLHQF\
Always use rigid type metal ducts only. Flexible
GXFWVFRXOGUHVWULFWDLUÀRZE\XSWR
8VHFDOFXODWLRQZRUNVKHHWWRFRPSXWHWRWDOGXFW
ZRUN
ALWAYS, when possible, reduce the number of
transitions and turns. If a long duct run is required,
increase duct size from 6” to 7” or 8”.
If turns or transitions are required: Install as far
away from opening and as far apart, between 2,
as possible.
36”
24” min.
32” max.
0RXQWLQJKHLJKWIURPWRSRIFRRNLQJVXUIDFHWR
bottom of hood should be no less than 24” and no
more than 32”.
It is important to install the hood at the proper
mounting height. Hoods mounted too low could
UHVXOWLQKHDWGDPDJHDQG¿UHKD]DUGZKLOHKRRGV
mounted too high will be hard to reach and will
ORVHSHUIRUPDQFHDQGHႈFLHQF\
If available, also refer to range manufacturer’s
height clearance requirements and recommended
KRRGPRXQWLQJKHLJKWDERYHUDQJH$OZD\VFKHFN
\RXUORFDOFRGHVIRUDQ\GLႇHUHQFHV
DAMAGE-SHIPMENT / INSTALLATION:
• Please fully inspect unit for damage before
installation.
• If the unit is damaged in shipment, return
the unit to the store in which it was bought
for repair or replacement.
• If the unit is damaged by the customer,
repair or replacement is the responsibility
of the customer.
• If the unit is damaged by the installer
(if other than the customer), repair of
replacement must be made by arrangement
between customer and installer.
Installation – Mounting Height & Clearance

7
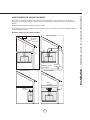
WARNING FIRE HAZARD
1(9(5H[KDXVWDLURUWHUPLQDWHGXFWZRUNLQWRVSDFHVEHWZHHQZDOOVFUDZOVSDFHVFHLOLQJDWWLFVRUJDUDJHV
All exhaust must be ducted to the outside.
8VHVLQJOHZDOOULJLG0HWDOGXFWZRUNRQO\
)DVWHQDOOFRQQHFWLRQVZLWKVKHHWPHWDOVFUHZVDQGWDSHDOOMRLQWVZFHUWL¿HG6LOYHU7DSHRU'XFW7DSH
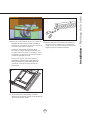
Ducting Options Example
Installation – Ducting Options
soffit or crawl space
roof pitch w/
flashing & cap
ductless
recirculating
w/ gravity damper
side wall cap
ductless
recirculating
soffit

8
www.zephyronline.com
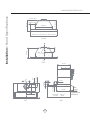
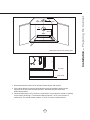
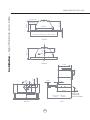
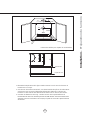
Installation – +RRG6SHFL¿FDWLRQV
TOP
FRONT
SIDE
6
CL
"
3
7/16”
3/4”
23 7/8”(24”), 29 7/8”(30”), 35 7/8”(36”)
19
1
1/2”
9
9/16”
11
1/4”
9/16”
5
3/16” (30”)
11-
15/16
” - 18-
3/4
”
11
1/8”
13/16”
9 7/8”
1
1/8”
4
/15 16”
closed open
3 7/16”
3/8” -
2 1/4"*
*adjustable rear
filler panel
C/L
3
7/16”
11
1/4”
Ø6”
BACK
8
3/16” (36”)
11/16”1
2
3/16” (24”)

9
7 3/4”
7”
10-
1/8”
19-
7/8”
C/L
1-
15/16”
*11-
1/2”
*6-
3/16”
7”
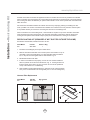
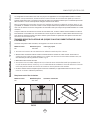
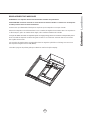
Installation – Preparing the Cabinet
Fig.2
front edge
glass handle
1. 'HWHUPLQHDQGPDUNFHQWHUOLQHRQZDOODQGFDELQHWERWWRPZLWKDSHQFLO
,IWKHFDELQHWERWWRPLVUHFHVVHGZRRGEORFNLQJPXVWEHLQVWDOOHGWRHQVXUHSURSHU
DOLJQPHQWRIWKHKRRGZLWKWKHFDELQHWERWWRP:RRGEORFNLQJVKRXOGEHÀXVK
within cabinet bottom.
3. Follow the dimensions in Fig.1 and cut-out the bottom of your cabinet to create an opening
IRUWKHKRRGWR¿WWKURXJK)RUIUDPHOHVVFDELQHWPHDVXUH´IURPWKHIURQWRI
cabinet door. For framed cabinet measure 1-15/16” from front of cabinet bottom.
Fig.1
* Dimension used for rear ducting option

10
www.zephyronline.com
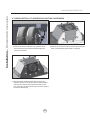
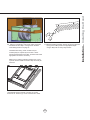
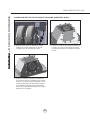
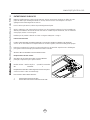
6” ROUND VERTICAL TO HORIZONTAL DUCTING CONVERSION
Installation – Horizontal Conversion
5HPRYHDOXPLQXPPHVK¿OWHU)URPLQVLGHWKHKRRG
disconnect blower plug located toward the right side
interior of hood body.
5HPRYHVFUHZVIURPWRSRIKRRGDQGVFUHZVIURP
EDFNRIKRRGDWWDFKLQJEORZHUSODWHWRKRRGERG\
5HPRYHEORZHUDQGEORZHUSODWHIURPKRRGERG\DQG
reposition blower to hood body so blower collar protrudes
IURPEDFNRIKRRGERG\5HLQVWDOOEORZHUSODWHWRKRRG
ERG\XVLQJWKHVFUHZVSUHYLRXVO\UHPRYHGIURPVWHS
Re-connect blower plug.

11
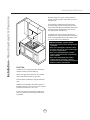
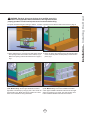
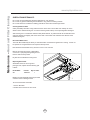
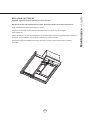
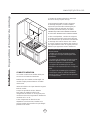
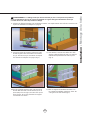
Installation – Installing the Hood
WARNING: Electrical wiring must be done by a qualified person(s) in
accordance with all applicable codes and standards. This range hood must be
properly grounded. Turn off electrical power at service entrance before wiring.
!
3UHSDUHHOHFWULFDOZLULQJDQGGXFWLQJLQFDELQHW/RFDWLRQRIMXQFWLRQER[DQGEORZHURXWOHWFDQEHIRXQGRQSDJH
Fig.3
2SHQFDELQHWGRRUV/LIWUDQJHKRRGDQGVOLGHLWWKURXJK
the opening located in the bottom of the cabinet, Fig.3.
0DNHVXUHRSHQLQJPDWFKHVWKHGLPHQVLRQVRQSDJH
Fig.1.
7KHUHDUHVSULQJFOLSVORFDWHGRQWKHOHIWDQGULJKWVLGHV
of the hood body which will temporarily hold the hood in
place, Fig.4.
Fig.4
Fig.5
24” Models Only6HFXUHXSSHUEUDFNHWVWROHIWDQG
ULJKWVLGHVRIKRRGERG\E\XVLQJ[´VFUHZVIRU
HDFKEUDFNHW)LJ0DNHVXUHWKHFDSWLYHQXWVFUHZV
KROHVRQWKHEUDFNHWDUHIDFLQJGRZQZDUG
24” Models Only3ODFHORZHULQVWDOODWLRQEUDFNHWV
XQGHUXSSHULQVWDOODWLRQEUDFNHWVORFDWHGRQOHIWDQGULJKW
sides of hood body, Fig.6. Note: The wider portion of the
ORZHULQVWDOODWLRQEUDFNHWVKRXOGEHDWWKHERWWRP
Fig.6

12
www.zephyronline.com
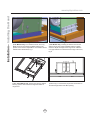
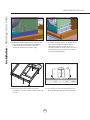
Installation – Installing the Hood
30” & 36” Models Only. Secure hood body to cabinet
EDVHE\0[PPVFUHZVWKURXJKWKHERWWRPRI
range hood.
A
6HFXUH´ZRRGVFUHZV$LQWRWKHVFUHZKROHVRQ
WKHOHIWDQGULJKWVLGHVRIWKH¿OWHURSHQLQJ
Fig.7
24” Models Only)URPLQVLGHWKHKRRGVHFXUH
0[VFUHZLQWRHDFKORZHULQVWDOODWLRQEUDFNHW7KH
position of this screw is adjustable to accomodate various
FDELQHWERWWRPWKLFNQHVVHV)LJ
24” Models Only,QVWDOO[VFUHZVLQWRWKH
FDSWLYHQXWVRIHDFKXSSHULQVWDOODWLRQEUDFNHW7LJKWHQ
screws to adjust the height of the range hood until there
is no gap between the cabinet and front edge of the hood,
Fig.8.
Fig.8

Installation – Installing the Hood
13
3ODFH´URXQGGXFWLQJRYHUEORZHUFROODUDQGVHFXUH
with aluminum duct tape. If using hood in ductless
recirculating mode turn to page 14.
,QVWDOOHOHFWULFDOZLULQJ1RWH$FDEOHORFNQRW
LQFOXGHGPD\EHUHTXLUHGE\ORFDOFRGHV&KHFN
with local requirements and codes, purchase and install
appropriate connector if necessary.
0DNHVXUHQRSDFNLQJPDWHULDOLVLQVLGHKRRG3RZHU
XSKRRGFKHFNIRUOHDNVDURXQGGXFWWDSHDQGYHULI\DOO
functions.
Fig.9
0HDVXUHGLVWDQFHEHWZHHQEDFNRIUDQJHKRRGDQGZDOO
LIDQ\DQGFXW¿OOHUSDQHOWRWKHDSSURSULDWHGHSWK
XVLQJDXWLOLW\NQLIHRUKHDY\GXW\VFLVVRUV
,QVWDOO¿OOHUSDQHOWRERWWRPRIKRRGE\[
VFUHZVIRU´PRGHORU[VFUHZVIRU´PRGHO

14
www.zephyronline.com
'XFWOHVVUHFLUFXODWLRQLVLQWHQGHGIRUDSSOLFDWLRQVZKHUHDQH[KDXVWGXFWZRUNLVQRWSRVVLEOHWREHLQVWDOOHG
When converted, the hood functions as a recirculating hood rather than an exhaust hood. Fumes and exhaust
IURPFRRNLQJDUHGUDZQDQG¿OWHUHGE\DQRSWLRQDOFKDUFRDO¿OWHU7KHDLULVWKHQSXUL¿HGDQGUHFLUFXODWHGEDFN
within the home.
We recommend to ALWAYS exhaust air outside of the home by employing existing or installing new duct
ZRUNLISRVVLEOH7KHKRRGLVPRVWHႇHFWLYHDQGHႈFLHQWDVDQH[KDXVWKRRG2QO\ZKHQWKHH[KDXVWRSWLRQ
is not possible should you recourse to converting the hood into a recirculating hood.
:KHQFRQYHUWHGWREHDUHFLUFXODWLQJKRRGDFKDUFRDO¿OWHULVUHTXLUHGRQWRSRIWKHGHFRUDWLYHPHVK¿OWHU
2UGHUDFFRUGLQJWRLWVSDUWQXPEHUEHORZ7KHGHFRUDWLYHPHVK¿OWHULVLQWHQGHGWRFDSWXUHUHVLGXHIURP
FRRNLQJDQGWKHRSWLRQDOFKDUFRDO¿OWHUKHOSVWRSXULI\IXPHVH[KDXVWHGIURPFRRNLQJIRUUHFLUFXODWLRQ
RECIRCULATING KIT (REQUIRED IF NOT DUCTED OUTSIDE THE HOME)
.LWLQFOXGHVFKDUFRDO¿OWHUEUDFNHWVDQGUHWXUQDLUYHQW
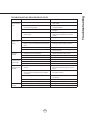
Hood Model Part No. Filters in Pkg.
ZPI ZRC-00PI 1
3XUFKDVHUHFLUFXODWLQJNLWSHUWKHSDUWQXPEHUDERYH
5HPRYHGHFRUDWLYHPHVK¿OWHUIURPKRRGDQGSODFHFKDUFRDO¿OWHURQWRSRI
PHVK¿OWHU6HFXUHFKDUFRDO¿OWHUE\&FOLSVIURP=5&3,UHFLUFXODWLRQ
NLW&FOLSVIRUHDFKHQORQJDWHGVLGHRIFKDUFRDO¿OWHU)LJ
5HLQVWDOOGHFRUDWLYHPHVK¿OWHU
Charcoal Filter Replacement
Hood Model Part No. Qty to Order
ZPI Z0F-C0PI 1
4. In order to recirculate the air properly, a return air vent must be installed to
DOORZUHF\FOHGDLUWREHUHWXUQHGWRWKHNLWFKHQ)LJ'XFWLQJPXVWEHUXQ
from the blower to the return air vent. The return air vent can be positioned
RQWRSRIWKHFDELQHWRULQDVRႈWFHLOLQJ
&KDUFRDO¿OWHUPXVWEHUHSODFHGDIWHUHYHU\KRXUVRIXVHRUDSSUR[LPDWHO\
HYHU\WRPRQWKVEDVHGRQDQDYHUDJHGDLO\XVHRIKRXURIFRRNLQJWLPH
Fig.12
Fig.11
Installation – Recirculating Kit

15
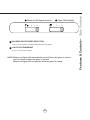
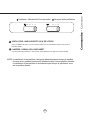
0 I II III
Blower On/Off Speed Selection
1
Lights Off/Dim/Bright
2
0 I II
BLOWER ON/OFF/SPEED SELECTION
0 is off, I is low speed, II is medium speed and III is high speed.
LIGHTS OFF/DIM/BRIGHT
0 is off, I is dim, and II is bright.
1
2
NOTE: Blower and lights will automatically shut off when the glass is closed
and turn back on when the glass is opened.
Blower and lights will not operate when the glass is closed.
Features & Controls – Slide Controls

16
www.zephyronline.com
SURFACE MAINTENANCE:
Do not use corrosive detergents, abrasive detergents or oven cleaners.
Do not use any product containing chlorine bleach or any product containing chloride.
Do not use steel wool or abrasive scrubbing pads which will scratch and damage surface.
Cleaning Stainless Steel
&OHDQSHULRGLFDOO\ZLWKZDUPVRDS\ZDWHUDQGFOHDQFRWWRQFORWKRUPLFUR¿EHUFORWK$OZD\VUXELQWKH
direction of the stainless steel grain. To remove heavier grease build up use a liquid degreaser detergent.
$IWHUFOHDQLQJXVHDQRQDEUDVLYHVWDLQOHVVVWHHOSROLVKFOHDQHUVWRSROLVKDQGEXႇRXWWKHVWDLQOHVVOXVWHU
DQGJUDLQ$OZD\VVFUXEOLJKWO\ZLWKFOHDQFRWWRQFORWKRUPLFUR¿EHUFORWKDQGEXႇLQWKHGLUHFWLRQRIWKH
stainless steel grain.
Decorative Mesh Filters
7KHPHVK¿OWHULQVWDOOHGE\WKHIDFWRU\LVLQWHQGHGWR¿OWHURXWUHVLGXHDQGJUHDVHIURPFRRNLQJ,WQHHGQRW
EHUHSODFHGRQDUHJXODUEDVLVEXWLVUHTXLUHGWREHNHSWFOHDQ
Filter should be cleaned after every 30 hours of use or once a month.
Remove and clean by hand or in dishwasher
on low heat. Spray degreasing detergent and
OHDYHWRVRDNLIKHDYLO\VRLOHG
'U\¿OWHUDQGUHLQVWDOOEHIRUHXVLQJKRRG
Replacing Mesh Filter
6KRXOG¿OWHUZHDURXWGXHWRDJHDQG
prolonged use, replace with the following part
number:
Hood Model: Part No. Qty. to Order.
ZPI 50200054 1
5HSODFHDQ\GDPDJHG¿OWHUWKDWKDVSXQFWXUHG
RUEURNHQPHVKRUGDPDJHGIUDPH
7RUHPRYHGHFRUDWLYHPHVK¿OWHU
3XVKLQ¿OWHUODWFK
7LOW¿OWHUGRZQDQGUHPRYHIURPKRRG
1
2
Maintenance – Hood and Filter Cleaning

17
REPLACING LIGHT BULBS
CAUTION: Light bulb becomes extremely hot when turned on.
'2127WRXFKEXOEXQWLOVZLWFKHGRႇDQGFRROHG7RXFKLQJKRWEXOEVFRXOGFDXVHVHULRXVEXUQV
0DNHVXUHDOOSRZHULVWXUQHGRႇDQGEXOEVDUHQRWKRW
5HPRYHE\WXUQLQJEXOEFRXQWHUFORFNZLVH1RWH%XOEGRHVQRWXQVFUHZLWWXUQVGHJUHHV
stops and falls out.
,IEXOEVDUHGLႈFXOWWRWXUQGXHWRSURORQJHGXVH¿UPO\DWWDFKDJODVVVXFWLRQFXSDSSUR[LPDWHO\WKHGLDPHWHURI
WKHEXOERUXVHDUXEEHUODWH[JORYHWRJULSWKHEXOEDQGWXUQFRXQWHUFORFNZLVH
Replacement bulbs are available at the zephyr parts store. See parts and accessory page for ordering
information.
Maintenance – Lights

18
www.zephyronline.com
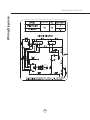
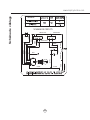
Wiring Diagrams
VOLTS
La page est en cours de chargement...
La page est en cours de chargement...
La page est en cours de chargement...
La page est en cours de chargement...
La page est en cours de chargement...
La page est en cours de chargement...
La page est en cours de chargement...
La page est en cours de chargement...
La page est en cours de chargement...
La page est en cours de chargement...
La page est en cours de chargement...
La page est en cours de chargement...
La page est en cours de chargement...
La page est en cours de chargement...
La page est en cours de chargement...
La page est en cours de chargement...
La page est en cours de chargement...
La page est en cours de chargement...
La page est en cours de chargement...
La page est en cours de chargement...
La page est en cours de chargement...
La page est en cours de chargement...
La page est en cours de chargement...
La page est en cours de chargement...
La page est en cours de chargement...
La page est en cours de chargement...
La page est en cours de chargement...
La page est en cours de chargement...
-
 1
1
-
 2
2
-
 3
3
-
 4
4
-
 5
5
-
 6
6
-
 7
7
-
 8
8
-
 9
9
-
 10
10
-
 11
11
-
 12
12
-
 13
13
-
 14
14
-
 15
15
-
 16
16
-
 17
17
-
 18
18
-
 19
19
-
 20
20
-
 21
21
-
 22
22
-
 23
23
-
 24
24
-
 25
25
-
 26
26
-
 27
27
-
 28
28
-
 29
29
-
 30
30
-
 31
31
-
 32
32
-
 33
33
-
 34
34
-
 35
35
-
 36
36
-
 37
37
-
 38
38
-
 39
39
-
 40
40
-
 41
41
-
 42
42
-
 43
43
-
 44
44
-
 45
45
-
 46
46
-
 47
47
-
 48
48


Zephyr ZPI-E36AG290 Manuel utilisateur
- Catégorie
- Hottes
- Taper
- Manuel utilisateur
dans d''autres langues
- English: Zephyr ZPI-E36AG290 User manual
Documents connexes
-
Zephyr AK9134AS-BF Hood User Manual
-
-
Essentials ZPIE30AG290 Le manuel du propriétaire
-
-
Zephyr Twister ES Manuel utilisateur
-
-
Zephyr ZGE-E30AS290 Manuel utilisateur
-
-
-
Autres documents
-
-
Monogram ZV830SMSS Guide d'installation
-
GE ZV830SMSS Guide d'installation
-
-
-
-
 GE Monogram GEZV950SDSS DL 5d7bc61df13207f0d1d3b946cc81
-
-
GE ZV30HSRSS Guide d'installation
-
Faber Scirocco Plus 36 SS NB-B Guide d'installation
