Generac Portable Products 4000EXL Le manuel du propriétaire
- Catégorie
- Groupes électrogènes
- Taper
- Le manuel du propriétaire
Ce manuel convient également à

l
de
Before usingthis produce, read [hismanuaHand foHHowaHH
Safety RuHesand Operating Instructions,
Avant d'utiHiser ce produi[, veuiHHezHireHemanueHe[ suivre
routes Hesdirectives rehcives _ Has6curit6 et _ H'utiHisation.
Questions_ Help is iust a moment away!
Vous avez des questions_Vous n'avez pas besoin d'aller loin pour trouver de I'aide!
CaHH:Generac C;enerator Hempmine/ Appemez mamigned'assistance de C;enerac Motor ° m°so@°27o°m4@8 H-F 8-5 CT
Oenerac Portable Products is a licensed trademark of Briggs & Stratton Power Products,
Generac Portable Products est une marque d6pos6ee autoris_e de Briggs & Stratton Power Products,
BRJGGS & STRATTON POWER PRODUCTS GROUP, LLC
JEFFERSON,WiSCONSiN, LLSoAo
0

TABLE OF CONTENTS
Safety RuHes .................................. 2:4
Know Your Generator ........................... S
AssembHy .................................... 6-7
Operation .................................. 8- H4
Product Specifications ........................... H5
Maintenance ................................ HS-H6
Storage ...................................... H6
Troubleshooting ............................... H7
Notes ....................................... H8
V_/arranty ..................................... H9
EQUmPNENT
Read this manuam carefummyand become famimiar
....... with your generator. Know its appmications, its
mimitations _d any h_ds invomved°
This generator is an engine-driven, revoHving fieHd,
alternating current (AC) generator. It was designed to
suppHy eHectricaH power for operating compatibHe eHectricaH
Highting, appHiances, tooHs and motor Hoads.The generator's
revolving fieHd is driven at about 3_600 rpm by a singHe-
cyHinder engine.
CAUTION! DO NOT exceed the generator's
wattage/amperage capacity. See "Don't Overload
Generator*'.
Every effort has been made to ensure that information in
this manuaHisaccurate and current. However, we reserve
the right to change, alter or otherwise improve the product
and this document at any time without prior notice.
The Emission ControH System for this generator is
warranted for standards set by the Environmental
Protection Agency. For warranty information refer to the
engine owner's manuaH.
Copyright © 2005 Bri&_s & Stratton Power Products
Group, LLC. AHHrights reserved. No part of this materiaH
may be reproduced or transmitted in any form by any
means without the express written permission of Bri&!_s&
Stratton Power Products Group, LLC.
SAFETY RULES
This is the safety amert symbom, mtis used to
amert you to potentiam personam iniuryhazards.
Obey atomsafety messages that fommowthis
symbol to avoid possible injuryor death.
The safety aHert symboH(_k) is used with a signaHword
(DANGER, CAUTION,WARNING), a pictoriaH and/or a
safety message to aHert you to hazards. DANGER indicates
a hazard which, if not avoided, will resuHtin death or
serious injury. WARNmNG indicates a hazard which, if not
avoided, could resuHt in death or serious injury.
CAUTmON indicates a hazard which, if not avoided, might
resuHt in minor or moderate injury. CAUTmON, when used
without the aHert symboH,indicates a situation that couHd
resuHt in equipment damage. FoHHowsafety messages to
avoid or reduce the risk of injury or death.
Hazard Symbols and Meanings
EHectrocution EHectricaHShock EHectricaHShock
Toxic Fumes ExpHosion Fire
ExpHosive Pressure ChemicaH Burn
Hot Surface Kickback

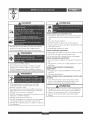
DANGER
DO NOT aiIow any open flame, spark, heat, or lit cigarette
during and for several minutes after charging a battery.
Wear protective go_ies, rubber apron, and rubber gloves.
WANNING
Operate generator ONLY outdoors.
Keep exhaust gas fl'om entering a confined area through
windows, doors, ventilation intakes or other openings.
DO NOT operate generator inside an}, building or enclosure,
including the generator compartment of a recreational vehicle (RV).
WARNING
When using generator for backup pow,en notify utility
company. Use approved transfer equipment to isolate
generator from electric utility.
Use a ground fault circuit interrupter (GFCI) in any damp or
highly conductive area, such as metal decking or steel work.
DO NC)T touch bare wires or receptacles.
DO NOT use generator with electrical cords which are worn,
frayed, bare or otherwise damaged.
DO NC)T operate generator in the rain.
DO NOT handle generator or electrical cords while standing
in water, while barefoot, or while hands or feet are wet.
DO NOT allow unqualified persons or children to operate or
service generator:
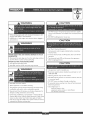
WHEN ADDING OR DRAINING FUEL
Turn generator OFF and let it cool at least 2 minutes before
removing fuel cap. Loosen cap slowly to relieve pressure in
tank.
Fill or drain fuel tank outdoors.
DO NOT overfill tank.AIIow space for fuel expansion.
Keep fuel away from sparks, open flames, pilot lights, heat, and
other ignition sources.
DO NOT light a cigarette or smoke.
_fHEN STARTING EQUIPHENT
Ensure spark phJg, muffier_ fuel cap and air cleaner are in place.
• DO NOT crank engine with spark plug removed.
If fuel spills, wait until it evaporates before starting engine.
WHEN OPERATING EQUIPNENT
Do not tip engine or equipment at angle which causes fuel to
spill
This generator is not for" use in mobile equipment or marine
applications.
9'HEN TRANSPORTING OR REPAIRING
EQUIPNENT
iN TANK
Store away from furnaces, stoves, water heaters, clothes
dryers or other" appliances that have pilot light or other"
ignition source because they can ignite fuel vapors.
This generator does not meet U, S, Coast Guard Regulation
33CFR-183 and should not be used on marine applications.
Failure to use the appropriate U. S.Coast Guard approved
generator could result in bodily injury and/or property
damage.

WARNING
When starting engine, pull cord slowly until resistance is felt
and then pull rapidly to avoid kickback.
NEVER start or stop engine with electrical devices plugged in
and mr'ned on.
WARNING
WHEN ADJUSTING OR MAKING REPAiRSTOYOUR
GENERATOR
Disconnect the spark plug wh'e from the spark plug and place
the wire where it cannot contact spark plug.
WHENTESTING FOR ENGINE SPARK
Use approved spark plug tester
DO NOT check for spark with spark plug removed.
WARNING
DO NOT touch hot surfaces.
Allow equipment to cool before touching.
The generator must be at least S feet from structures having
combustible wails and/or other combustible materials.
Keep at least 3 feet of clearance on all sides of generator for
adequate cooling, maintenance and servicing.
In the State of California a spark arrester is required by law
(Section 4442 of the California PuNic Resources Code). Other
states may have similar laws. Federal laws apply on federal
lands. If you equip the muffler with a spark arresten it must be
maintained in effective working order:
w
l
CAUTION
DO NOT tamper with governed speed. Generator supplies
correct rated frequency and voltage when running at governed
speed.
DO NOT modify generator in any WaT:
See "Don't Overload Generator".
Start generator and let engine stabilize before connecting
electrical loads.
Connect electrical loads in OFF position, then turn ON for
operatiom
Turn electricaI loads OFF and disconnect from generator
before stopping generator.
Use generator only for intended uses.
If you have questions about intended use, ask dealer or call
1-800-270-1408.
Operate generator only on level surfaces.
DO NOT expose generator to excessive moisture, dust, dirt,
or" corrosive vapors.
DO NOT insert any obiects through cooling slots.
If connected devices overheat, turn them off and disconnect
them from generator:
Shut off generator if:
-electrical output is lost;
-equipment sparks, smokes, or emits flames;
-unit vibrates excessively.
I

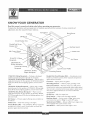
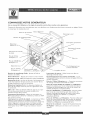
KNOWYOU P,GENERATOR
Read this owner's manuam and safety fumes before operating your generator,
Compare the illustrations with ),our generator, to familiarize yourseff with the locations of various controls and
adjustments. Save ths manuaHfor future reference.
FueHTank
Recoil Starter
OH FHHCap
Circot Breaker (AC)
DoubHe Porte Circot
Breaker (AC)
Run/Stop Switch
[dHeCon[roll Switch
H2VoHtDC, HOAmp
Receptacle
H20/240 Vok AC,
20 Amp Receptacle
H20 VoHtAC, 30 Amp
Receptacle
H20 Vok AC, 20 Amp
Duplex Receptacle
[ 2 Vomt DC, I 0 Amp Receptacle -- Recharge a discharged
[ 2 Volt automotive type battery through this receptacle.
[ 20 Vo[t AC, 20 Amp Duplex Receptacle -- Hay be used to
supply electrical power for the operation of H20Volt AC, 20Amp,
single phase, 60 Hz electrical lighting, appliance, tool and motor
loads.
[ 20 Vomt AC_ 30 Amp Receptacle -- Hay be used to supply
electrical power for the operation of [20 Vok AC, 30 Amp, single
phase, 60 Hz electrical lighting, appliance, too[ and motor loads.
1201240 Volt AC, 20 Amp Receptacle- Hay be used to
supply electrical power for the operation of H20 and/or 240Vok
AC, 20 Am D single phase, 60 Hz electrical lighting, appliance, tool
and motor loads.
Air CJeaner -- Protects engine by filtering dust and debris out
of intake air:
Choke Lever -- Used when starting a cold engine.
Circuit Breaker (AC) --The H20VoltAC, 30 Amp receptacle is
provided with a "push to reset" circuit breaker to protect the
generator" against electrical overload.
Lever
Air Cleaner
Spark Attester Huffler
Grounding Fastener
Double Pole Circuit Breaker (AC) --A double pole circuit
breaker is provided to protect all the receptacles and generator
against electrical overload.
Fuem Tank -- Capacity of 4.5 U.S. gallons.
(3rounding Fastener -- Used for proper grounding of unit.
[die Control Switch --With this switch set to ON, printed
circuit board in control panel automatically reduces engine speed
when no load is connected and increases engine to proper speed
when load is applied. However. be stare switch is OFF when
starting engine.
Oil Fill Cap --Add oil to engine here.
Recoil starter -- Used to start the engine manually.
Run/gtop Switch -- Set this switch to "Run" before using
recoil starter: Set switch to "Stop" to switch OFF engine.
Spark Attester Muffler- Exhaust muffler lowers engine noise
and is equipped with a spark attester screen.
Start Button --When pressed, cranks engine to start.

ASSEMBLY
[MPORTANT: Read entireowner'smanuai beforeyou
attempt to assembie or operate your new generator.
Carton Contents
Parts incmuded:
Generator
Wheei kit
Battery
Battery charge cabies
Battery float charger
Locking 20 Amp piug
Locking 30 Amp piug
Engine oii
Two packets of fuei stabilizer
Owner's manuaH
Engine manuaH
ff any of the above parts are missing or damaged_cali the
generator heipiine at 1-800-270-m 408.
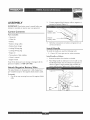
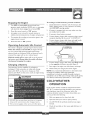
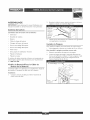
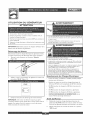
Attach Negative Battery Wire
The sealed battery on the generator is fuliy charged and
pre-installed except for the negative (biack) battery cabie.
To instamm:
I. Cut off tie wrap securing Hoose end of negative (bHack)
cable.
2. Connect negative (black) battery cable to negative (-)
terminal on battery (Figure I).
Negative
battery cable
Positive
battery cable
3. Verify that connections to battery and generator are
correct and secure.
Install Handle
To instali the handie you need the following tools:
o 2 o H3 mm (i/2") box, open end, or socket wrenches
Install handle as follows:
i. Remove hardware from bracket on handie.
2. Piace iifqng handie on aiternator end of cradie so that
handle fails between the two twistiock receptacles as
shown in Figure 2.Attach handle with provided cap
screws and hex nuts.Tighten with 13mm wrenches.
Capscrew
Hex
Nut
Handle

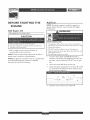
BEFORE STARTING THE
ENGINE
Add Engine 0il
° Place generator on a level surface.
, Refer to engine manual for oil tiff information.
. Damage to equipment resulting from failure to follow this
instruction will void warranty.
° Refer m engine owner's manual and follow oil
recommendations and ins[rucdons.
NOTE: Check oil often during engine break-in. Refer to
engine owner's manual for recommendations.
NOTE: The generator assembly rotates on a prehbricated
and sealed ball bearing that requires no additional
lubrication for the life of the bearing,
Add Fuel
NOTE: This gasoline engine is certified to operate on
gasoline. Exhaust Emission Control System:EH (Engine
Hodifications).
WARNING
WHEN ADDING FUEL
Turn generator OFF and let it cool at least 2 minutes before
removing fuel cap. Loosen cap slowly to relieve pressure in tank.
Fill fuel tank outdoors,
DO NOT overfill tank.Allow space for fuet expansion.
Keep fuel away from sparks, open flames, pilot lights, heat, and
other ignition sources.
DO NOT light a cigarette or smoke.
Use clean, fresh, regular UNLEADED fuel with a
minimum of 85 octane with equipment. DO NOT use
fuel which contains Hethanol. DO NOT mix oil with
fuel.
2. Clean area around fuel fill cap, remove cap.
3. Slowly add regular unleaded fuel to fuel tank. Be careful
not to fill above the baffle.This allows adequate space
for fuel expansion (Figure 3),
TANK

USING THE GENERATOR
System Ground
The generator has a system ground that connects the
generator frame components to the ground terminals on
the AC output receptacles.The system ground is connected
to the AC neutra[ wire (the neutra[ is bonded to the
generator frame).
Special Requirements
There may be Federal or State Occupational Safety and
Health Administration (OSHA) regulations, local codes, or
ordinances that apply to the intended use of the generator.
Please consult a qualified eIectriciam electrical inspector, or
the local agency having jurisdiction.
o In some areas_generators are required to be registered
with local utility companies.
o If the generator is used at a construction site, there may
be additional regulations which must be observed.
Connecting to a guild[rig's Electrical
Connections forstandby power to a building's electrical
system must be made by a qualified electrician.The
connection must isolate the generator power from utility
power, and must comply with all applicable laws and
electrical codes.
WARNING
When using generator for backup power, notify utility
company. Use approved transfer equipment to isolate
generator from electric utilit>;
Use a ground fault circuit interrupter (GFC[) in any damp or
highly conductive arem such as metal decking or steel work.
DO NOT touch bare wires or receptacles.
DO NOT use generator with eJectricaI cords which are worn,
frayed, bare or otherwise damaged.
DO NOT operate generator in the rain.
DO NOT handle generator or electrical cords whiIe standing
in waten while barefoot, or while hands or feet are wet.
DO NOT allow unqualified persons or children to operate or
service generatoK
Operate generator ONLY outdoors.
Keep exhaust gas from entering a confined area through
windows, doors, ventilation intakes or other openings_
DO NOT operate generator inside any building or enclosure_
including the generator comparnnent of a recreationa[ vehicle (RV).
The generator must be at least 5 ft. (I 52 cm) from
structures having combustible walls and/or other
combustible materials. Leave at least 3 ft. (92 cm) all around
generator including overhead, for adequate cooling,
maintenance and servicing.
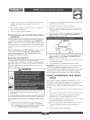
Place generator in a well ventilated arem which will allow
for removal of deadly exhaust gas. DO NOT place
generator where exhaust gas could accumulate and enter
inside or be drawn into a potentially occupied building.
Ensure exhaust gas is kept away from any windows_ doors_
ventilation intakes or other openings that can allow
exhaust gas to collect in a confined area (Figure 4).
Prevailing winds and air currents should be taken into
consideration when positioning generator.
Typical Generator Shown
Exhaust Port

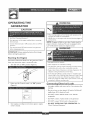
OPERATmNG THE
G EN E RATO R
See"Don't Overload Generator".
Start generator and let engine stabilize before connecting
electrical loads.
Connect electrical loads in OFF position, then turn ON for
operation.
"Furn electrical loads OFF and disconnect from generator
before stopping generator:
iMPORTANT: AHwaysunpHugthe battery float charger
before starting the generator.
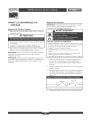
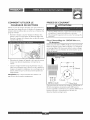
Stardng the Engine
Disconnect all electrical loads from the generator. Follow
these start instruction steps in numerical order:
I. Turn fuel valve to"On" position (Figure 5).
2. Make sure Idle Control switch is in "Off' position
(Figure 6).
IDLE
3_
Start engine according to instructions given in engine
owner's manual.
WARNING
When starting engine, pull cord sJow.ly until resistance is feJt
and then pull rapidly to avoid kickback.
NEVER start or stop engine with electrical devices plugged in
and turned on.
NOTE: If engine still fails to start after 3 pulls, check for
proper oil level in crankcase.This unit is equipped with a
Low Oil Shutdown System. See engine manual.
WANNING
DO NOT touch hot surfaces.
Allow equipment to cool before touching.
The generator must be at least 5 feet from structures having
combustible walls and/or other combustible materials.
Keep at least 3 feet of clearance on all sides of generator for
adequate cooJing, maintenance and servicing.
In the State of California a spark attester is required by law
(Section 4442 of the California Public Resources Code). Other
states may have similar laws. Federal Iaw.s apply on federal
lands. If you equip the muffler with a spark arresten it must be
maintained in effective working order.
Connectin_ Electrical Loads
o Let engine stabilize and warm up for a few minutes after
starting.
o Plug in and turn on the desired 120 and/or 240VoltAC,
single phase, 60 Hz electrical loads.
o DO NOT connect 240Volt loads to the 120Volt
receptacles.
o DO NOT connect 3-phase loads to the generator.
o DO NOT connect S0 Hz loads to the generator.
* DO NOT OVERLOADTNE GENERATOR. See
"Dofft Overload Generator".

H. Turn OFF and unphg ALL eHectricaHHoadsfrom
generator paneHreceptacles. NEVER start or stop engine
with eHectricaHdevices plugged in and turned ON.
2. Move idHecontrol switch to"Off' position.
3. Let engine run at noqoad for severaHminutes to
stabilize internaH temperatures of engine and generator.
4. Turn engine off according to instructions given in the
engineowner's manual.
S. Move fuelvalveto"Off' position.
Operating Automatic Idle Control
This switch is designed to greatly improve fuel economy.
When this switch is turned ON_ the engine will only
run at its normal high governed engine speed when
electrical loads are connected.VVhen an electrical load is
remove& the engine will run at a reduced speed.
With the switch off, the engine will run at the normal
high engine speed. Always have the switch off when
startingand stopping the engine,
Charging a Battery
Your generator has the capability of recharging a
discharged 12VoN automotive or utility style storage
battery. DO NOT use the unit to charge any 6VoN
batteries. DO NOT use the unit to crank an engine having
discharged battery.
DANGER
DO NOT ailow anyopen flame, spark,heat, or lit cigarette
during and for several minutes after charginga battery.
Wear protective goggJes, rubber apron, and rubber gloves.
w
To recharge m2 Vomt batteries, proceed as follows:
I. Check fluid level in all battery cells. If necessary, add
ONLY distilled water to cover separators in battery
cells. DO NOT use tap waters
2. If battery is equipped with vent caps, make sure they
are installed and are tight.
3. If necessary, clean battery terminals.
4. Connect battery charge cable connector plug to panel
receptacle identified by the words "12oVOLTS D.C.".
5. Connect battery charge cable clamp with red handle
to the positive (+) battery terminal (Figure 7).
12VOLT DoCo
POS NEG
6. Connect battery charge cable clamp with bmack handle
to the negative (-) battery terminal (Figure 7).
7. Start engine. Let engine run while battery recharges.
8. When battery has charged, shut down engine.
NOTE: Use an automotive hydrometer to test battery state
of charge and condition. Follow the hydrometer
manufacturer's instructions carefully. Generally, a battery is
considered to be at 100% state of charge when specific gravity
of its fluid (as measured by hydrometer) is 1.260 or higher.
COLD WEATHER
OPERATION
Under certain weather conditions (temperatures below
40°F [4°C] combined with high humidity), your generator
may experience icing of the carburetor and/or the
crankcase breather system.To reduce this problem_ you
need to perform the following:
I. Make sure generator has dean_ fresh fuel.
2. Open fuel valve (turn valve to open position).
3. Use SAE SWo30 oil (synthetic preferred, see engine
manual).
4. Check oil level daily or after every eight (8) hours of
operation.

5. Maintain generator following"Maintenance Schedule"
in engine manual
6. Sheker unitfrom elements.
Inan emergency, use the oMginaH shipping carton as a
7. Cut off ali carton flaps.
8. Cut out one iong side of carton to expose muffler side
of unit as shown in Figure 8.
Wi
IMPORTANT: The generator must be at Heast 5 ft.
(152 cm) from structures having combustible wails and/or
other combustible materials. Leave at least 3 ft. (92 cm) aiI
around generator including overhead_ for adequate cooling_
maintenance and servicing.
WANNING
DO NOT touch hot surfaces.
Allow equipment to cool before touching.
The generator must be st bast 5 feet from structures having
combustible waIIsand/or other combustible materiaIs.
Keep at least 3 feet of clearance on aIIsides of generator for
adequatecoolin D maintenance and servicing.
Remove shelter when temperatures are above 40°F [4°C].
9. Cut appropriate shots to access receptacies of unit.
i0. Start unit, then place carton over it.
IMPORTANT: Remove sheker when temperatures are
above 40°F [4°C].
For a more permanent sheker, build a structure that wii[
enclose three sides and the top of the generator,
7. Make sure entire muffler-side of generator is exposed_
as shown in Figure 8.
IMPORTANT: The generator must be at least 5 ft.
(152 cm) from structures having combustibie walis and/or
other combustibie materiais. Leave at [east 3 ft. (92 cm) all[
around generator inciuding overhead, for adequate cooling,
maintenance and servicing.
8. Face exposed end away from wind and elements.
9. Structure shouid hoid enough heat created by the
generator to prevent icing probiem.
10. Start and run engine outdoors.
[ 1. Keep exhaust gas from entering a confined area
through windows, doors, ventilation intakes or other
openings.
WANNING
Operate generator ONLY outdoors.
Keep exhaust gas from entering a confined area through
windows, doors, ventilation intakes or other openings.
DO NOT operate generator" inside any building or encIosure,
inchding the generator compartment of a recreational vehicle
(w).
12. DO NOT enclose generator any more than shown in
Figure 8.
13. Remove shelter when temperatures are above 40°F
[4°c1.
14. Turn engine OFF and let cool two (2) minutes before
refueling.

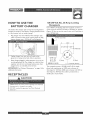
HOWTO USE THE
BATTERY CHARGER
Use battery float charger jack to keep the starting battery
charged and ready for use. Battery charging shouH be done
in a dry iocaqon, such as inside a garage.
i. Piug charger into unit's"Battery Fbat Charger" jack,
which is iocated on the starter switch (Figure 9). Piug
battery charger into a i20Vok AC wall receptacle.
2. Unphg charger from unit and wall oudet when
generator is being started and while in operation.
3. Keep charger plugged in when generator is not in use
to prolong battery life.The charger has a built in float
equalizer and will not overcharge battery, even when
plugged in for an extended period of time.
IMPORTANT: See "Battery Maintenance" on page 16 for
additional information.
i
CAUTION
1
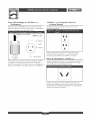
1201240 Volt AC, 20 Amp Locking
Use a NEHA LI4=20 plugwith this receptacle. Connect a
4-wire cord set rated for 250Volts at 20 Amps (or greater)
(Figure I0).You canuse the same 4-wire cord if you plan to
run a 120Volt load.
4-Wire Cord Set
__i
(Neutral)
Y (Hot) _ X (Hot)
NEMA LI 4_20 /-7 [-7 Ground (Green)
This receptacle powers 120/240Volt AC, 60 Hz, single
phase loads requiring up to 2,000 watts of power at
16.6Amps for 120Volts; 4,000 watts of power (4.0 kW) at
16.6 Amps for 240Volts.The outlet is protected by a
double pole circuit breaker.
, NEVER attempt to power a device requiring more amperage
than generator or receptacle can supply.
* DO NOT overload the generator. See "Don't Overload
Generator',

120 Volt AC, 30 Amp Locking 120 Volt AC, l S Amp Duplex
Use a NEMA L5-30 pHugwith this receptacHe. Connect a
3-wire cord set rated for H25Volts AC at 30 Amps to the
pHug(Figure HH).
3:Wire Cord Set
I._ NEMA L5-30
NeutraH
1 120V
__ .........Hot
Ground (Green)
Use this receptacle to operate H2OVoHtAC, 60 Hz, singHe
phase Hoadsrequiring up to 3,600 watts (3.6 kW) of power
at 30 Amps.The outHet is protected by a doubHe porte circuit
breaker and a 30 Amp push-to-reset circuit breaker.
Each of these outlets is protected against overHoad by a
doubHe porte circuit breaker (Figure H2).
H
H
H
H
Use each outlet to operate H20 VoHt,60 Hz, singHephase
Hoadsrequiring H,800(H.8 kW) watts at H5Amps of current.
12Volt De, lO Amp Receptacle
This receptacle aHHowsyou to recharge a H2VoHt
automotive or utility style storage battery with the battery
charge cabHes provided (Figure H3).
This receptacle can not recharge 6VoHt batteries and can
not be used to crank an engine havinga discharged battery.
See the section "Charging a Battery" (page HO) before
attempting to recharge a battery.

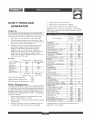
DON'T OVERLOAD
G EN ERATO R
You must make sure your generator can suppHyenough
rated (running) and surge (starting) watts for the items you
wiHHpower at the same time. FoHHow these simpHe steps:
H. SeHect the items you wiHHpower at the same time.
2. Total the rated (running) watts of these items.This is
the amount of power your generator must produce to
keep your items running. See Figure H4.
3. Estimate how many surge (starting) watts you wHH
need. Surge wattage is the short burst of power
needed to start eHectricmotor=drNen tools or
appHiances such as a drcuHar saw or refrigerator.
Because not aHHmotors start at the same time, total
surge watts can be estimated by adding onHy the
item(s) with the highest additionaH surge watts to the
torah rated watts from step 2.
Tool or Appliance
Window Air
Conditioner
Refrigerator
Deep Freezer
Tdevision
Light (7S Watts)
Rated (Running)
Watts
H200
8OO
5OO
5OO
75
3075 Total
RunningWatts
Total Rated (Running)_Watts = 3075
HighestAdditionaH SurgeWatts = H800
Total Generator Output Required = 4875
Additional Surge
G_ardn _V_G_s
H800
1600
5OO
H$00 Highest
Surge Watts
To proHong the life of your generator and attached devices,
it is important to take care when adding eHectricaH Hoads to
your generator.There shouHd be nothing connected to the
generator outHets before starting it's engine.The correct
and safe way to manage generator power is to sequentiaHHy
add Hoads as follows:
I. With nothing connected to the generator, start the
engine as described in this manual
2. PHug in and turn on the first Hoad, preferably the Hargest
Hoad you have.
3. Permit the generator output to stabiHize (engine runs
smoothHy and attached device operates properly.
4. PHugin and turn on the next Hoad.
5. Again, permit the generator to stabiHize.
6. Repeat steps 4 and 5 for each additionaH Hoad.
NEVER add more Hoads than the generator capacity.Take
speciaH care to consider surge Hoads in generator capacity,
as described above.
Tool or Appliance
Essentials
Light Bulb - 75 watt
Deep Freezer
Sump Pump
Refrigerator/Freezer - H8 Cu. Ft,
Water Well Pump - H/3 HP
Heating/Coo[[ng
Window AC - H0,000 BTU
Window Fan
Furnace Fan Blower - H/2 HP
Kitchen
Hicrowave Oven - HO00Watt
Coffee Maker
Electric Stove - Single Element
Hot Plate
Family Room
DVD/CD Pbyer
VCR
Stereo [Receiver
Color Television - 17"
Personal Computer w/H 7" monitor
Other
Security System
AH/FM Clock Radio
Garage Door Opener - H/2 HP
Electric Water Heater - 40 Gallon
Bra!!Job Site
Quartz Halogen Work Light
Airless Sprayer - H/3 HP
Reciprocating Saw
Electric DrilI- H/2 HP
Circular Saw - 7 I/4"
Miter Saw - HO"
PJaner/!ointer - 6"
Table Saw/Radial Arm Saw - [ 0"
Air Compressor - Hal/2 HP
Rated s
(Running)
Watts
75
5OO
8OO
8OO
IO00
H200
300
800
HO00
[500
[500
2500
IO0
IO0
450
500
800
180
300
480
4000
IO00
600
960
IO00
1500
1800
1800
2000
2500
SWattages Histedare approximate onHy.Check tool
appliance for actual wattage.
Additional
Surge
(Starting)
Watts
5OO
1200
1600
2000
1800
600
1300
52O
1200
960
IO00
1500
1800
1800
2000
2500
or

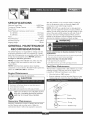
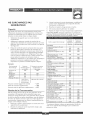
SPECmF[CATmONS
Haximum SurgeWatts .................. 6,600VVatts
Continuous VVattage Capacity ............ 4,000 _A[atts
Power Factor ................................. H.O
Rated Haximum Continuous Load Current
At H20 Voks ......................... 33.3 Amps
At 240 Voks ......................... H6.6 Amps
Phase .................................... H-phase
Rated Frequency ......................... 60 Hertz
Furl Tank Capacity .................... 4.5 U.S. gallons
Shipping _A/oght ............................ H29 Hbs.
GENERAL MAmNTENANCE
The Owner/Operator is responsibHe for making sure that
aHperiodic maintenance tasks are compHeted on a timeHy
basis; that aHdiscrepancies are corrected; and that the unit
is kept dean and property stored. NEVER operate a
damaged or defective generators
NOTE: If equipped with inflatable tires, make sure tires
are inflated to the value marked on the tire or within
15 and 40 psi.
NOTE: Should you have questions about replacing
components on your Generac Portable Products generator,
please call [-800-270- [408 for assistance.
Engine Maintenance
See engine owner's manual for instructions.
[ cAuTIoN m
dust, dirt, moisture or any corrosive vapors. Cooling air
slots in the generator must not become clogged with
snow, leaves or any other foreign material.
NOTE: DO NOT use a garden hose to clean generator.
VVater can enter engine fuel system and cause problems. In
addition, if water enters generator through cooling air slots,
some of the water will be retained in voids and cracks of
the rotor and stator winding insuhtion.VVater and dirt
buildup on the generator internal windings will eventually
decrease the insulation resistance of these windings.
WARNING
WHEN ADJUSTHNG OR MAKHNG REPAiRSTOYOUR
GENERATOR
• Disconnect the spark plug wire from the spark plug and place
the wire where it cannot contact spark plug.
WHEN TESTING FOR ENGINE SPARK
Use approved spark plug tester.
DO NOT check for spark with spark plug removed,
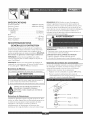
Fuel Valve Maintenance
The fuel valve is equipped with a fuel sediment cup, screen,
retaining ring and o-ring that need to be cleaned every
6 months or 100 hours (whichever occurs first).
I. Hove fuel valve to"Off' position.
2. Remove sediment cup from fuel valve. Remove o-ring,
retaining ring and screen from fuel valve (Figure [5).
. Used motor oil has been shown to cause skin cancer in
certain laboratory animals.
. Thoroughly wash exposed areas with soap and water.
KEEP OUT OF REACH OF CHILDREN. DON'T
POLLUTE. CONSERVE RESOURCES. RETURN
USED OILTO COLLECTION CENTERS.
Generator Maintenance
Generator maintenance consists of keeping the unit clean
and dry. Operate and store the unit in a clean dry
environment where it will not be exposed to excessive
.... Screen
_ Retaining Ring
_ _"_--_--_-_ O=ring
@_ Sediment Cup

3+ Wash sediment cup+ o:ring+ retaining ring, and screen in
a nonfiammabHe soHvent. Dry them thoroughHy.
4. PHace screen, retaining ring, and o°ring into fueH valve.
Install sediment cup and tighten securely.
S. Hove fueH valve to"On" position+ and check for Heaks.
RepHace o-ring ifthere isany Heakage.
Battery Maintenance
Other than float chargin& described eHsewhere+ no
maintenance is required for the battery. Keep the battery
and terminaHs dean and dry.
IMPORTANT: Battery charging shouHd be performed in a
dry Hocation+ such as inside a garage.
Generator Cieanin_
o Use a damp cHothto wipe exterior surfaces dean.
1
+ DO NOT expose generator !:o excessive moisture, dust, dirt,
OF corrosive vapors.
+ DO NOT insert any obiects through cooling slots.
° Use a soft bristle brush to Hoosen caked on dirt or oil
o Use a vacuum cHeaner to pick up Hoose dirt and debris.
o Use How pressure air (not to exceed 25 psi) to Now
away dirt. Inspect cooHing air shots and opening on
generator.These openings must be kept dean and
unobstructed.
The generator shouHd be started at Heast once every seven
days and allowed to run at Heast 30 minutes. If this cannot
be done and you must store the unit for more than
30 days, use the foHHowing guideHines to prepare it for
storage.
Generator Storage
o CHean the generator as outlined in "Generator CHeaning".
o Check that cooHing air shots and openings on generator
are open and unobstructed.
DO NOT place a storage cover over a hot generator,
Let equipment cool for a sufficient time before placing the
cover on the equipment.
Engine Storage
See engine owner's manuaH for instructions.
Other Storage Tips
o To prevent gum from forming in fuel system or on
essentiaH carburetor parts+ empty aHHtwo suppHied fuel
stabiHizer containers into fueH tank and firthwith fresh
gasoHine. Run the unit for severaH minutes to circulate the
additive through the carburetonThe unit and fuel can
then be stored for up to 24 months.AdditionaH fuel
stabiHizer can be purchased locally.
o DO NOT store gasoHine from one season to another
unHess it has been treated as described above.
o RepHace fuel container if it starts to rust. Rust and/or dirt
in fuel can cause probHems if it's used with this unit.
o Store in dean and dry area.

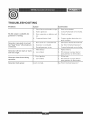
TROU B LES HOOT! NG
Problem
No AC output is avaHabme, but
generator is running.
Generator runs good at no-moad
but "bogs" down" when moads are
connected,
GenePatoP will not staPt_ oP staPts
and runs rough_
Gene_'ato_" shuts down during
operation.
Generator lacks power°
Cause
I. One of the circuit breakers is open.
2. Fault in generaton
3. Poor connection or defective cord
set.
4. Connected device is bad.
I. Short circuit in a connected load.
2. Generator is overloaded.
3. Shorted generator circuit.
I. Failed battery.
2. Low oil level.
I. Out of gasoline.
2. Low oil level.
Load is too high.
Correction
I. Reset circuit breaker.
2. ContactAuthorized service facility.
3. Check and repair.
4. Connect another device that is in
good condition.
I. Disconnect shorted electrical load.
2. See "Don't Overload Generator".
3. ContactAuthorized service facility.
I. Replace battery.
2. Fill crankcase to proper level or
place generator on level surface.
I. Fill fuel tank.
2. Fill crankcase to proper level or
place generator on levelsurface.
See "Don't Overload Generator".

i
w

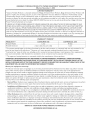
GENERAC PORTABLE PRODUCTS OWNER EQUmPNENT WARRANTY POLICY
Effective November [, 2004
LIMITED WARRANTY
"Generac Portable Products is a licensed trademark of Briggs & Stratton Power Products. Brigs & Stratton Power Products will
repair or rep[ace_ free of charge_ any part, or parts of the equipment :_ that are defective in material or workmanshp or both.
Transportation charges on parts submitted for repair or replacement under this warranty must be borne by purchaser_This
warranty is effective for the time periods and sub]ect to the conditions provided for in this policy. For warranty service, find your
nearestAuthorized service dealer by calling 1o800o270o1408.VVarranty service may only be performed by a Briggs & Stratton
Power Products Authorized service dealer.
THERE IS NO OTHER EXPRESSWARRANTY. IMPLIED WARRANTIES, INCLUDING THOSE OF MERCHANTABILITY AND
FITNESS FORA PARTICULAR PURPOSE,ARE L[MITEDTOTHETIME PERIOD SPECIFIED, ORTOTHE EXTENT PERMITTED
BY LAW.ANY AND ALL IMPLIED WARRANTIES ARE EXCLUDED. LIABILITY FOR CONSEQUENTIAL DAMAGES UNDER
ANY AND ALL_A/ARRANTIES ARE EXCLUDED TO THE EXTENT EXCLUSION IS PERMITTED BY LAW. Some countries or
states do not allow limitations on how long an implied warranty lasts, and some countries or states do not allow the exclusion or
[imitation of incidental or consequential damages, so the above [imitation and exclusion may not apply to you.This warranty gives
you spedfic legal rights and you may also have other rights that vary from country to country or state to state:'
WARRANTY PERmOD*
PRODUCTS** CONSUMER USE COMMERCmAL USE
PressureVVasher [ year 90 days
PortableGenerator 2 years (2nd year parts only) I year
_The warranty period begins on the date of purchase by the first retail consumer or commercial end user, and continues for the
period of time stated in the table above. "Consumer use" means personal residential household use by a retail consumer.
"Commercial use" means all other uses, including use for commercial income producing or rental purposes. Once equipment has
been used commercially, it shall thereafter be considered to be in commercial use for purposes of this warranty.
_<_Theengine and starting batteries are warranted solely by the manufacturers of those products.
WARRANTY REGiSTRATiON iS NOT NECESSARYTO OBTAiNWARRANTY ON BRiGGS & STRATTON POWER
PRODUCTS EQUmPNENT. SAVEYOUR PROOF OF PURCHASE RECEmPTo mFYOU DO NOT PROVmDE PROOF OFTHE
iNiTiAL PURCHASE DATE ATTHETiNE WARRANTY SERVICE iS REQUESTED, THE MANUFACTURING DATE OFTHE
EQUiPNENTWiLL BE USEDTO DETERNINETHE WARRANTY PERIOD.
About your equipment warranty:
VVe welcome warranty repair and apologize to you for being inconvenienced.Any Authorized service dealer may perform warranty
repairs. Most warranty repairs are handled routinely, but sometimes requests for warranty service may not be appropriate. For
example, warranty service would not apply if equipment damage occurred because of misuse, lack of routine maintenance, shipping,
handling, warehousing or improper installation. Similarly, the warranty is void if the manufacturing date or the serial number on the
equipment has been removed or the equipment has been altered or modified. During the warranty period, the Authorized service
dealer, at its option, will repair or replace any part that, upon examination, is found to be defective under normal use and service.This
warranty will not cover following repairs and equipment:
Normal Wear: Outdoor power equipment, like all mechanical devices, needs periodic parts, service and replacement to perform
well.This warranty does not cover repair when normal use has exhausted the life of a part or the equipment.
Installation and Naintenance:This warranty does not apply to equipment or parts that have been subjected to improper or
unauthorized installation or alteration and modification, misuse, negligence, accident, overloading, overspeeding, improper
maintenance, repair or storage so as,in our judgment, to adversely affect its performance and reliability.This warranty also does not
cover normal maintenance such asadjustments, fuel system cleaning and obstruction (due to chemical, dirt, carbon or lime, etc.).
Other Exclusions:Also excluded from this warranty are wear items such as quick couplers, oil gauges, belts, oorings, fitters,
pump packing, etc., pumps which have been run without water supplied or damage or maffunctions resulting from accidents,
abuse, modifications, alterations, or improper servicing or freezing or chemical deterioration.Accessory parts such as guns,
hoses, wands and nozzles are excluded from the product warranty.This warranty excludes failures due to acts of God and other
force majeure events beyond the manufacturers control.Also excluded is used, reconditioned, and demonstration equipment;
equipment used for prime power in place of utility power and equipment used in life support applications.
BRmGGS & STRATTON POWER PRODUCTS GROUP, LLC
JEFFERSON,WmSCONSmN, U.S.A.

TABLE DES MATI :RES
R_gles de S6curit6 .................................. 20-22
Connaissez Votre G6n@ateur ........................... 23
Assemblage ....................................... 24-25
Op@adon ........................................ 26-32
Caract@istiques du Produit ............................. 33
Entretien ......................................... 33-34
Rangement .......................................... 34
D6pannage .......................................... 35
Garantie ............................................ 36
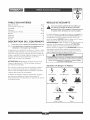
DESCRIPTION DE L ¢;QUIPEMENT
Lisez avec soin ce manuel et famiIiarisez-vous avec
votre g_n_rateuro Connaissez ses appJications,ses
[imitations et les dangers qu'i[ implique,
Ce g_n6rateur est un ggn@ateur entrain6 par un moteur & champ
magn6tique rotatif produisant du courant akernadf (c,a,), [[ a 6t6
con_u pour fournir du courant 6[ectrique pour faire marcher des
charges compatibles d'6dairage, d'apparei[s m6nagers, d'outi[ et de
moteun Le champ tournant du g6n@ateur est entrain6 _,
3,600T/H par un moteur seu[ cylindrique.
ATTENTION! NE PAS d6passer la capacit6 en watts ou en
Amp@es du g6n@ateu_:Voir "Ne Pas Surcharger G_n6rateur"
pour I'informadon sp6cifique.
Tout a 6t6 mis en oeuvre pour que les informations contenues
dans ce manuel soient exactes et _.iour. Cependant, nous se
r6serve Ie droit de changer; d'alt6rer ou d'am_liorer Ie produit _,
n'importe quel moment sans avis pr6alabIe.
Le Syst@me de contr6le de P6mission du g6n6rateur est garand
pour des normes 6tablies par L'Agence de protection de
J'environnement. Pour des informadons sur la garantie, se reporter
au manueJ du moteut:
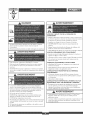
REGLES DE S¢:CURITE
Ceci est la s_ret_ le symboIe vif, II est uti[is_ pour
vous aJerter aux dangers de bmessure personnels
potentiems, Ob_ir tous messages de sOret_ qui suivent
ce symbole _viter [a blessure ou la mort possibles.
Le symbole indiquant un message de s6curit6 est accompagn6 d'un
mot indicateur (DANGER,ATTENTION,AVERTISSEHENT), d'un
message i[lustr6 edou d'un message de s6curit6 visant & vous
avertir des dangers. DANGER indique un danger quL s'i[ n'est pas
6vit6, pmvoquem des bJessures graves, voire fatales.
AVERTISSEMENT indique un danger qui, s'il n'est pas 6vit6, peut
provoquer des blessures graves, voire fatales. ATTENTION
indique un danger qui, s'i[ n'est pas 6vit6, peut provoquer des
blessures mineures ou I6g_res, Le mot ATTENTION, Iorsqu'il est
udlis6 sans le symbole d'alerte, indique une situation pouvant
endommager l'6quipement. Suivez les messages de s6curit6 pour
_viter ou r_duire Jes risques de blessures ou de mort.
AVERTlSSENENT
L'_chappernent du rnoteur de ce produit contient des produits
chimiques que PEtat de Califorlr_ie colr_sid_re comme causalr_t [e
calr_cer,des d6formatiolr_s _ [a Ir_aissanceou d'autres dalr_gers
concernant [a reproduction°
Symboles de Danger et Moyens
Electrocudon Choc Electrique Choc Electrique
Emanations Toxiques
Explosion Feu
Pression Explosive BrOlures Chimiques
Surface Chaude Recul
La page charge ...
La page charge ...
La page charge ...
La page charge ...
La page charge ...
La page charge ...
La page charge ...
La page charge ...
La page charge ...
La page charge ...
La page charge ...
La page charge ...
La page charge ...
La page charge ...
La page charge ...
La page charge ...
-
 1
1
-
 2
2
-
 3
3
-
 4
4
-
 5
5
-
 6
6
-
 7
7
-
 8
8
-
 9
9
-
 10
10
-
 11
11
-
 12
12
-
 13
13
-
 14
14
-
 15
15
-
 16
16
-
 17
17
-
 18
18
-
 19
19
-
 20
20
-
 21
21
-
 22
22
-
 23
23
-
 24
24
-
 25
25
-
 26
26
-
 27
27
-
 28
28
-
 29
29
-
 30
30
-
 31
31
-
 32
32
-
 33
33
-
 34
34
-
 35
35
-
 36
36


Generac Portable Products 4000EXL Le manuel du propriétaire
- Catégorie
- Groupes électrogènes
- Taper
- Le manuel du propriétaire
- Ce manuel convient également à
dans d''autres langues
Documents connexes
Autres documents
-
Briggs & Stratton 040248 Le manuel du propriétaire
-
Simplicity 01655-1 Manuel utilisateur
-
-
-
-
-
-
-
-