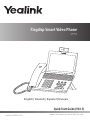
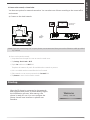
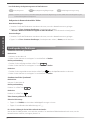
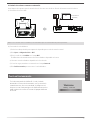
Yealink SIP-VP59 Guide de démarrage rapide
- Catégorie
- Téléphones IP
- Taper
- Guide de démarrage rapide

Flagship Smart Video Phone
VP59
English | Deutsch | Español | Français
Quick Start Guide (V83.5)
www.yealink.com
Applies to firmware version 91.83.0.5 or later.


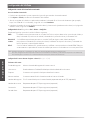
Table of Contents
English ............................................................1
Deutsch.........................................................12
Español..........................................................23
Français .........................................................34


1
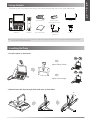
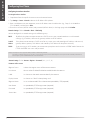
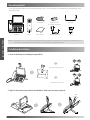
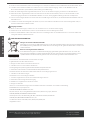
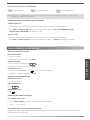
Package Contents
The following items are included in your package. If you find anything missing, contact your system administrator.
Handset Cord
Ethernet Cable
(2m CAT5E FTP cable)
IP Phone
Handset
Quick Start Guide
Power Adapter
(Optional)
Camera
Note: We recommend that you use the accessories provided or approved by Yealink. The use of unapproved third-party accessories
may result in reduced performance.
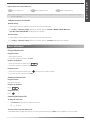
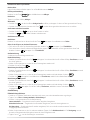
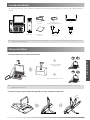
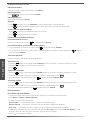
Assembling the Phone
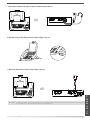
1. Insert the camera, as shown below:
2. Attach the stand and adjust the angle of the touch screen, as shown below:
Stand
E
N
G
L
I
S
H
Adjust Shutter Switch
Adjust Camera Angle
40
51

2
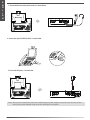
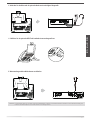
3. Connect the handset and optional headset, as shown below:
4. Connect the optional USB flash drive, as shown below:
E
N
G
L
I
S
H
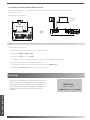
5. Connect the AC power, as shown below:
Note: The IP phone should be used with Yealink original power adapter (12V/1A) only. The use of the
third-party power adapter may cause the damage to the phone.

3
b) Connect to the wireless network:
1) Swipe down from the top of the screen to enter the control center.
2) Tap
Settings
->
Basic Settins
->
Wi-Fi
.
3) Tap the
On
radio box in the
Wi-Fi
field.
The phone will automatically search for available wireless networks in your area.
4) Select an available wireless network from the list of networks.
5) If the network is secure, enter its password in the
Password
field.
6) Tap
Connect
to connect to the wireless network.
E
N
G
L
I
S
H
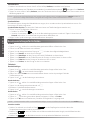
You have two options for network connection. You can select one of them according to the current office
environment.
6. Connect to the network, as shown below:
a) Connect to the wired network:
PC Connection
(Optional)
PC
Note:
If you are connecting a PC to your phone, we recommend that you use the Ethernet cable provided
by Yealink.
After the IP phone is connected to the network
and supplied with power, it automatically begins
the initialization process. After startup, the
phone is ready for use. You can configure the
phone via web user interface or phone user
interface.
Startup
Welcome
Initializing... Please wait

4
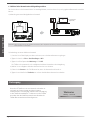
Configuring Your Phone
Configuring via web user interface
Accessing the web user interface:
1. Swipe down from the top of the screen to enter the control center.
2. Tap
Settings
->
Status
->
General
to obtain the IP address of the phone.
3. Open a web browser on your computer, enter the IP address into the address bar (e.g., "http://192.168.0.10" or
"192.168.0.10"), and then press
Enter
.
4. Enter the user name (default: admin) and password (default: admin) in the login page and click
Confirm
.
Network Settings:
Click on
Network
->
Basic
->
IPv4 Config
You can configure the network settings in the following ways:
DHCP:
By default, the phone attempts to contact a DHCP server in your network to obtain its valid network
settings, e.g., IP address, subnet mask, gateway address and DNS address.
If the phone cannot contact a DHCP server for any reason, you need to configure IP address, subnet mask,
gateway address, primary DNS address and secondary DNS address for the phone manually.
PPPoE:
If you are using an xDSL modem, you can connect your phone to the Internet via PPPoE mode. Contact the
ITSP for the PPPoE user name and password.
Static IP
Address:
Note: The IP phone also supports IPv6, but IPv6 is disabled by default.
The wrong network settings may result in inaccessibility of your phone and may have an impact on the network performance.
Contact your system administrator for more information.
Account Settings:
Click on
Account
->
Register
->
Account X
(X=1, 2, 3...15, 16)
Parameters of the account:
Register Status: It shows the register status of the current account.
Line Active: You can select Enabled/Disabled to enable/disable the account.
Label: It is shown on the touch screen to identify the account.
Display Name: It is shown as Caller ID when placing a call.
Register Name: It is an authenticated ID for authentication provided by ITSP (required).
User Name: It is provided by ITSP for registration (required).
Password: It is provided by ITSP for registration (required).
Server Host: It is provided by ITSP for registration (required).
E
N
G
L
I
S
H

5
Register status icons on the touch screen:
(Green) Registered
(Gray) Register Failed
(Yellow) Registering
Note: Check with your system administrator if any error appears during the registration process or a specific configuration is required
for your registration.
Configuring via phone user interface
Network Settings:
1. Swipe down from the top of the screen to enter the control center.
2. Tap Settings->Advanced Settings (default password: admin)->Network->WAN Port/VLAN /Webserver
Type/802.1x/VPN/LLDP/CDP/NAT to configure the network.
Account Settings:
1. Swipe down from the top of the screen to enter the control center.
2. Tap Settings->Advanced Settings (default password: admin)->Accounts to configure the account.
Basic Call Features
Placing a Video/Voice Call
Using the handset:
1. Pick up the handset.
2. Enter the number, and then tap Send.
Using the speakerphone:
1. With the handset on-hook, press .
2. Enter the number, and then tap Send.
Using the headset:
1. With the headset connected, press to activate the headset mode.
2. Enter the number, and then tap Send.
Answering a Video/Voice Call
Using the handset:
Pick up the handset.
Using the speakerphone:
Press .
Using the headset:
Press .
Controlling Video During a Call
To change the video view:
Tap Full Screen to display the video in full screen.
Tap to return.
To turn on/off near-site video during a call:
Swipe down from the top of the screen to enter the control center, tap Video to turn on/off the near-site video.
E
N
G
L
I
S
H

Ending a Video/Voice Call
Using the handset:
Hang up the handset or tap the End Call soft key.
Using the speakerphone:
Press or tap the End Call soft key.
Using the headset:
Tap the End Call soft key.
Redial
Press to enter the Placed Calls list, and then tap the desired entry.
Press twice when the phone is idle to dial out the last dialed number.
Call Mute and Un-mute
Press to mute the microphone during a call.
Press again to un-mute the call.
Call Hold and Resume
To place a call on hold:
Press or tap the Hold soft key during an active call.
To resume the call, do one of the following:
If there is only one call on hold, press or tap the Resume soft key.
If there is more than one call on hold, tap the call you want to resume, and press or tap the Resume soft key.
Call Transfer
You can transfer a call in the following ways:
Blind Transfer
1. Press or tap the Transfer soft key during a call. The call is placed on hold.
2. Enter the number you want to transfer to.
3. Press .
Semi-Attended Transfer
1. Press or tap the Transfer soft key during a call. The call is placed on hold.
2. Enter the number you want to transfer to, and then press .
3. Press or tap the Transfer soft key when you hear the ring-back tone.
Attended Transfer
1. Press or tap the Transfer soft key during a call. The call is placed on hold.
2. Enter the number you want to transfer to, and then press .
3. Press or tap the Transfer soft key when the second party answers.
Call Forward
To enable call forward:
1. Swipe down from the top of the screen to enter the control center.
2. Tap Setting->Features->Call Forward.
3. Select the desired forward type:
Always Forward----Incoming calls are forwarded unconditionally.
Busy Forward----Incoming calls are forwarded when the phone is busy.
No Answer Forward----Incoming calls are forwarded if not answered after a period of time.
4. Enter the number you want to forward to. For No Answer Forward, tap the After Ring Time field, and then tap the
desired ring time to wait before forwarding.
5. Tap to accept the change.
6
E
N
G
L
I
S
H

Call Conference
1. Tap the Conference soft key during an active call. The call is placed on hold.
2. Enter the number of the second party, and then tap Conference.
3. Tap the Conference soft key again when the second party answers. All parties are now joined in the conference.
Voice Message
Message waiting indicator on the idle screen indicates that one or more voice messages are waiting at the message
center. The power indicator LED slowly flashes red.
To listen to voice messages: (Ensure the voice mail code is already configured on the phone.)
1. Do one of the following:
Press .
Swipe down from the top of the screen to enter the notification center, tap Voice Mail and then select the desired
item.
2. Follow the voice prompts to listen to your voice messages.
Volume Adjustment
Press during a call to adjust the receiver volume of the handset/speakerphone/headset.
Press when the phone is idle or ringing to adjust the ringer volume.
Press to adjust the media volume in the corresponding screen.
Call History
1. Tap , and then select the desired call list on the left.
2. Drag up and down to scroll.
3. Tap after the desired entry, and then you can do the following:
Tap Send to place a call.
Tap Add to add the entry to the local directory.
Tap Edit to edit the phone number of the entry before placing a call.
Tap Blacklist to add the entry to the blacklist.
Tap Delete to delete the entry from the list.
Contact Directory
To add a contact:
1. Tap , and then select the desired group on the left.
2. Tap to add a contact.
3. Enter a unique contact name in the Name field and contact numbers in the corresponding fields.
4. Tap to accept the change.
To edit a contact:
1. Tap , and then select the desired group on the left.
2. Tap after the desired contact.
3. Edit the contact information.
4. Tap to accept the change.
To delete a contact:
1. Tap , and then select the desired group on the left.
2. Tap after the desired contact and then tap Delete.
3. Tap OK when the touch screen prompts "Delete selected item?"
7
Note: You can split the conference call into two individual calls by tapping the
Split
soft key.You can create 3-way video
conferencing or 5-way video/audio mixed conferencing.
Customizing Your Phone
Note: You can add contacts from call history easily. For more information, refer to
Call History
above.
E
N
G
L
I
S
H

8
E
N
G
L
I
S
H
Safety instructions
Operating Ambient Temperatures
Operating temperature: +32 to 104°F (0 to 40°C)
Relative humidity: 5% to 90%, noncondensing
Storage temperature: -22 to +160°F (-30 to +70°C)
Warranty
Our product warranty is limited only to the unit itself, when used normally in accordance with the operating instructions and the system
environment. We are not liable for damage or loss resulting from the use of this product, or for any claim from a third party. We are not
liable for problems with Yealink device arising from the use of this product; we are not liable for financial damages, lost profits, claims
from third parties, etc., arising from the use of this product.
DC symbol
is the DC voltage symbol.
Restriction of Hazardous Substances Directive (RoHS)
This device complies with the requirements of the EU RoHS Directive. Statements of compliance can be obtained by contacting
support@yealink.com.
Safety Instructions
Save these instructions. Read these safety instructions before use!
The following basic safety precautions should always be followed to reduce risk of fire, electrical shock, and other personal injury.
General Requirements
Before you install and use the device, read the safety instructions carefully and observe the situation during operation.
During the process of storage, transportation, and operation, please always keep the device dry and clean.
During the process of storage, transportation, and operation, please avoid collision and crash of the device.
Please attempt not to dismantle the device by yourself. In case of any discrepancy, please contact the appointed maintenance
center for repair.
Without prior written consent, no organization or individual is permitted to make any change to the structure or the safety design
of the device. Yealink is under no circumstance liable to consequences or legal issues caused by such changes.
lease refer to the relevant laws and statutes while using the device. Legal rights of others should be respected as well.
Environmental Requirements
Place the device at a well-ventilated place. Do not expose the device under direct sunlight.
Keep the device dry and free of dusts.
Place the device on a stable and level platform.
Please place no heavy objects on the device in case of damageand deformation caused by the heavy load.
Keep at least 10 cm between the device and the closest object for heat dissipation.
Do not place the device on or near any inflammable or fire-vulnerable object, such as rubber-made materials.
Keep the device away from any heat source or bare fire, such as a candle or an electric heater.
Keep the device away from any household appliance with strong magnetic field or electromagnetic field, such as a microwave
oven or a refrigerator.
Operating Requirements
Do not let a child operate the device without guidance.
Do not let a child play with the device or any accessory in case of accidental swallowing.
Please use the accessories provided or authorized by the manufacturer only.
The power supply of the device shall meet the requirements of the input voltage of the device. Pleaseusethe provided surge
protection power socket only.
Before plugging or unplugging any cable, make sure that your hands are completely dry.
Do not spill liquid of any kind on the product or use the equipment near water, for example, near a bathtub, washbowl, kitchen
sink, wet basement or near a swimming pool.
Addr: 309, 3rd Floor, No.16, Yun Ding North Road, Huli District,
Xiamen City, Fujian, P.R. China
Tel: +86-592-5702000
Fax: +86-592-5702455

9
Addr: 309, 3th Floor, No.16, Yun Ding North Road,
Huli District, Xiamen City, Fujian, P.R. China
Addr: 309, 3th Floor, No.16, Yun Ding North Road,
Huli District, Xiamen City, Fujian, P.R. China
Tel: +86-592-5702000
Fax: +86-592-5702455
E
N
G
L
I
S
H
ENVIRONMENTAL RECYCLING
Never dispose of the device with domestic waste
Ask your Town Council about how to dispose of it in an environmentally friendly way. The cardboarc
box, plastic packaging and player components may be recycled in accordance with prevailing
recycling regulations in your country.
Always adhere to prevailing regulations
Those who fail to do so may be fined or prosecuted in accordance with the law. The crossed out
garbage can that appears on the device means that when it has reached the end of its useful life, it
should be taken to a special waste disposal centre and treated separately to general urban waste.
Do not tread on, pull, or over-bend any cable in case of malfunction of the device.
During a thunderstorm, stop using the device and disconnect it from the power supply. Unplug the power plug and the
Asymmetric Digital Subscriber Line (ADSL) twisted pair (the radio frequency cable) to avoid lightning strike.
If the device is left unused for a rather long time, disconnect it from the power supply and unplug the power plug.
When there is smoke emitted from the device, or some abnormal noise or smell, disconnect the device from the power supply,
and unplug the power plug immediately. Contact the specified maintenance center for repair.
Do not insert any object into equipment slots that is not part of the product or auxiliary product.
Before connecting a cable, connect the grounding cable of the device first. Do not disconnect the grounding cable until you
disconnect all other cables.
Cleaning Requirements
Before cleaning the device, stop using it and disconnect it from the power supply.
Use a piece of soft, dry and anti-static cloth to clean the device.
Keep the power plug clean and dry. Using a dirty or wet power plug may lead to electric shock or other perils.
Troubleshooting
The unit cannot supply power to Yealink device.
There is a bad connection with the plug.
1. Clean the plug with a dry cloth.
2. Connect it to another wall outlet.
The usage environment is out of operating temperature range.
1. Use in the operating temperature range.
The cable between the unit and the Yealink device is connected incorrectly.
1. Connect the cable correctly.
You cannot connect the cable properly.
1. You may have connected a wrong Yealink device.
2. Use the correct power supply.
Some dust, etc., may be in the port.
1. Clean the port.
Contact your dealer or authorized service facility for any further questions.
Contact Information
YEALINK NETWORK TECHNOLOGY CO.,LTD.
309, 3rd Floor, No.16, Yun Ding North Road, Huli District, Xiamen City, Fujian, P.R. China
YEALINK (EUROPE) NETWORK TECHNOLOGY B.V.
Strawinskylaan 3127, Atrium Building, 8th floor, 1077ZX Amsterdam, The Netherlands
YEALINK (USA) NETWORK TECHNOLOGY CO., LTD.
999 Peachtree Street Suite 2300, Fulton, Atlanta, GA, 30309, USA
Made in China

YEALINK (XIAMEN) NETWORK TECHNOLOGY CO.,LTD
WWW.YEALINK.COM
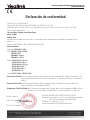
Declaration of Conformity
Date of Issue: 28/March/2019
We: YEALINK (XIAMEN) NETWORK TECHNOLOGY CO., LTD,
Address: 309, 3th Floor, No.16, Yun Ding North Road, Huli District, Xiamen City, Fujian, P.R. China
Declare that the product
Type:
Flagship Smart Video Phone
Model: VP59
meets the essential requirements and other relevant provisions according to the following EC directive
Directive: 2014/30/EU, 2014/35/EU,RED 2014/53/EU
Conformity
The product complies with the following standards:
Safety:
EN 62368-1:2014
EMC: EN 55032:2015+AC:2016
EN 55035:2017
EN61000-3-2: 2014
EN61000-3-3: 2013
Radio:
ETSI EN 301 489-1 V2.2.0,
ETSI EN 301 489-3 V2.1.1,
ETSI EN 301 489-17 V3.2.0,
ETSI EN 300 328 V2.1.1
ETSI EN 301 893 V2.1.1
EN 300 440 V2.1.1
Health:
EN 62311:2008EN62479:2010
Directive 2011/65/EU
of the European Parliament and of the Council of 8 June 2011 on the restriction of the
use of certain hazardous substances in electrical and electronic equipment (RoHS)
Directive 2012/19/EU
of the European Parliament and of the Council of 24.July.2012 on Waste electrical and
electronic equipment (WEEE)
Regulation (EC) No.1907/2006
of the European Parliament and of the Council of 18.December.2006 on
Registration, Evaluation, Authorization, and Restriction of Chemicals (REACH)
YEALINK (EUROPE) NETWORK TECHNOLOGY B.V.
Address: Strawinskylaan 3127, Atrium Building, 8th floor,
1077ZX Amsterdam, the Netherlands
Telephone: +31 (0) 64 61 11 373
Email: [email protected]
Addr: 309, 3th Floor, No.16, Yun Ding North Road,
Huli District, Xiamen City, Fujian, P.R. China
Tel: +86-592-5702000
Fax: +86-592-5702455
10
NAME: Stone Lu
DATE: 28/March/2019
TITLE: Vice President

About Yealink
Yealink is a global leading provider of enterprise communication and collaboration solutions, offering video conferencing service to worldwide
enterprises. Focusing on research and development, Yealink also insists on innovation and creation. With the outstanding technical patents of cloud
computing, audio, video and image processing technology, Yealink has built up a panoramic collaboration solution of audio and video conferencing
by merging its cloud services with a series of endpoints products. As one of the best providers in more than 140 countries and regions including the
US, the UK and Australia, Yealink ranks No.1 in the global market share of SIP phones shipments.
Technical Support
Visit Yealink WIKI (http://support.yealink.com/) for the latest firmware, guides, FAQ, Product documents, and more. For better service, we sincerely
recommend you to use Yealink Ticketing system (https://ticket.yealink.com) to submit all your technical issues.
YEALINK (XIAMEN) NETWORK TECHNOLOGY CO.,LTD.
Web: www.yealink.com
Addr: 309, 3rd Floor, No.16, Yun Ding North Road, Huli
District, Xiamen City, Fujian, P.R. China
Copyright©2019 YEALINK(XIAMEN) NETWORK
TECHNOLOGY CO.,LTD. All rights reserved.

12
Verpackungsinhalt
Nachstehende Artikel befinden sich in Ihrer Verpackung. Setzen Sie sich mit Ihrem Systemadministrator in Verbindung, wenn
etwas fehlen sollte.
Hörerkabel
Ethernet-Kabel
(2 m CAT5E-FTP-Kabel)
IP-Telefon
Hörer
Erste Schritte
Netzteil (optional)
Hinweis: Wir empfehlen Ihnen, nur durch Yealink bereitgestellte oder zugelassene Zubehörteile zu verwenden. Die Verwendung von
nicht zugelassenem Drittanbieter-Zubehör kann zu verminderter Leistungsfähigkeit führen.
Installation des Telefons
1. Setzen Sie die Kamera wie nachfolgend dargestellt ein:
Blendenschalter anpassen
Kamerawinkel einstellen
2. Fügen Sie den Ständer an und stellen Sie den Winkel des Touchscreens wie unten gezeigt ein:
Standfuß
Camera
D
E
U
T
S
C
H
40
51

13
3. Verbinden Sie den Hörer und das optionale Headset wie nachfolgend dargestellt:
4. Schließen Sie das optionale USB-Flash-Laufwerk wie unten dargestellt an:
Hinweis: Das IP-Telefon darf nur mit dem originalen Netzadapter (12V/1A) von Yealink betrieben werden. Durch die Verwendung von
Drittanbieter-Netzadaptern kann das Telefon beschädigt werden.
D
E
U
T
S
C
H
5. Wie unten dargestellt an Wechselstrom anschließen:

14
6. Schließen Sie das Netzwerk wie nachfolgend dargestellt an:
Für den Anschluss an das Netzwerk haben Sie zwei Möglichkeiten, zwischen denen Sie je nach gegebener Büroumwelt auswählen
können.
a) Verbindung mit einem kabelgebundenen Netzwerk:
Hinweis: Wenn Sie einen PC an das Telefon anschließen, dann empfehlen wir Ihnen, hierfür ein von Yealink bereitgestelltes
Ethernetkabel zu verwenden.
Wenn das IP-Telefon mit einem Netzwerk verbunden ist
und auch mit Strom versorgt wird, dann beginnt
automatisch der Startvorgang. Nach diesem Startvorgang
ist das Telefon betriebsbereit. Sie können nun das Telefon
entweder über die Web-Benutzerschnittstelle oder die
Telefon-Benutzerschnittstelle konfigurieren.
Welcome
Initializing... Please wait
Startvorgang
b) Verbindung mit einem drahtlosen Netzwerk:
1) Streichen Sie auf dem Display von oben nach unten, um in das Kontrollzentrum zu gelangen.
2) Tippen Sie danach auf Einst.->Basis Einstellungen->Wi-Fi.
3) Tippen Sie auf die Optionsbox Aktivierung im Feld Wi-Fi.
Das Telefon sucht automatisch nach verfügbaren drahtlosen Netzwerke in ihrer Umgebung.
4) Wählen Sie ein verfügbares drahtloses Netzwerk aus der Liste der Netze.
5) Geben Sie das Passwort in das Feld Password ein, wenn das Netzwerk verschlüsselt ist.
6) Tippen Sie anschließend auf Verbinden, um sich mit dem kabellosen Netzwerk zu verbinden.
D
E
U
T
S
C
H
PC Connection
(Optional)
PC

15
Konfiguration Ihres Telefons
Hinweis: Das IP-Telefon unterstützt auch IPv6, dieses ist jedoch standardmäßig deaktiviert.
Falsche Netzwerkeinstellungen können sich negativ auf die Netzwerkleistung auswirken und außerdem dazu führen, dass Ihr
Telefon unerreichbar ist. Setzen Sie sich für weitere Informationen mit Ihrem Systemadministrator in Verbindung.
Kontoeinstellungen: Klicken Sie auf Account
->
Registrieren
->
Konto X (X = 1, 2, 3...15, 16)
Einstellungen des Kontos:
Registrierungsstatus: Zeigt den Status der Registrierung des aktuellen Kontos an.
Leitung aktiv: Wählen Sie Enabled/Disabled, um das Konto zu aktivieren/deaktivieren.
Label: Anzeige erscheint im Touchscreen für die Identifizierung des Kontos.
Anzeigename: Erscheint während eines Anrufs als Anrufer-ID.
Registrierungsname: Dies ist eine von ITSP bereitgestellte bestätigte ID für die Authentifizierung (erforderlich).
Benutzername: Wird von ITSP für die Registrierung bereitgestellt (erforderlich).
Passwort: Wird von ITSP für die Registrierung bereitgestellt (erforderlich).
Server-Host: Wird von ITSP für die Registrierung bereitgestellt (erforderlich).
Statische
IP-Adresse:
Konfiguration über die Web-Benutzerschnittstelle
Zugriff auf die Web-Benutzerschnittstelle:
1. Streichen Sie auf dem Display von oben nach unten, um in das Kontrollzentrum zu gelangen.
2. Tippen Sie auf Einst.->Status, um die IP-Adresse Ihres Telefons zu ermitteln.
3. Öffnen Sie an Ihrem Computer den Webbrowser, geben Sie die IP-Adresse in die Adresszeile ein (z.B.
„http://192.168.0.10“ oder „192.168.0.10“) und drücken Sie dann Eingabe.
4. Geben Sie auf der Login-Seite den Benutzernamen (werksseitig: admin) und das Passwort (werksseitig: admin) ein
und klicken Sie auf Bestätigen.
Netzwerkeinstellungen: Klicken Sie auf Netzwerk->Basic->IPv4 Config
Sie können die Netzwerkeinstellungen wie folgt konfigurieren:
DHCP: Per Standardeinstellung kontaktiert das Telefon einen DHCP-Server in Ihrem Netzwerk, um die gültigen
Netzwerkeinstellungen zu beziehen, z.B. IP-Adresse, Subnetzmaske, Gateway-Adresse und DNS-Adresse.
Falls das Telefon aus irgendeinem Grund keinen DHCP-Server kontaktieren kann, müssen Sie die IP-Adresse,
Subnetzmaske, Gateway-Adresse, primäre DNS-Adresse und sekundäre DNS-Adresse für das Telefon manuell
konfigurieren.
PPPoE: Wenn Sie ein xDSL-Modem verwenden, dann können Sie Ihr Telefon über den PPPoE-Modus mit dem
Internet verbinden. Setzen Sie sich hierfür bezüglich Ihres PPPoE-Benutzernamens und Ihres
PPPoE-Passworts mit Ihrem ITSP in Verbindung.
D
E
U
T
S
C
H

Durchführen eines Video-/Sprachanrufs
Mit dem Hörer:
1. Nehmen Sie den Hörer ab.
2. Geben Sie die Nummer ein und tippen Sie anschließend auf Anrufen.
Mit Freisprecheinrichtung:
1. Drücken Sie bei aufgelegtem Hörer auf die Taste .
2. Geben Sie die Nummer ein und tippen Sie anschließend auf Anrufen.
Mit Headset:
1. Drücken Sie bei angeschlossenem Headset auf die Taste , um den Kopfhörermodus zu aktivieren.
2. Geben Sie die Nummer ein und tippen Sie anschließend auf Anrufen.
Annehmen eines Video-/Sprachanrufs
Mit dem Hörer:
Nehmen Sie den Hörer ab.
Mit Freisprecheinrichtung:
Drücken Sie auf die Taste .
Mit Headset:
Drücken Sie auf die Taste .
Video-Steuerung während eines Anrufs
Ändern der Videoanzeige:
Tippen Sie auf Vollbild, um das Video in Vollbildgröße anzeigen zu lassen.
Tippen Sie zum Beenden der Vollbildanzeige auf .
Ein- oder Aus-Schaltung des Vor-Ort-Videos während eines Anrufes:
Um das Vor-Ort-Video ein oder aus zu schalten, streichen Sie vom oberen Bildschirmbereich nach unten, um das
Kontrollzentrum zu öffnen, und tippen „Kamera“ an.
Icons für die Anzeige des Registrierungsstatus auf dem Touchscreen:
(Grün) Registriert
(Grau) Registrierung fehlgeschlagen
(Gelb) Registrierung im Gang
Hinweis: Wenden Sie sich an Ihren Systemadministrator, falls während der Registrierung ein Fehler auftritt oder für Ihre Registrierung eine
bestimmte Konfiguration benötigt wird.
Konfiguration via Benutzerschnittstelle des Telefons
Netzwerkeinstellungen:
1. Streichen Sie auf dem Touchscreen von oben nach unten, um in das Kontrollzentrum zu gelangen.
2. Tippen Sie auf Einst.->Erweiterte Einstellungen (Standardpasswort: admin)
->Netzwerk->WAN-Port/VLAN/Webservertyp/802.1x/VPN/LLDP/CDP/NAT, um Ihr Netzwerk zu konfigurieren.
Kontoeinstellungen:
1. Streichen Sie auf dem Touchscreen von oben nach unten, um in das Kontrollzentrum zu gelangen.
2. Tippen Sie auf Einst.->Erweiterte Einstellungen (Standardpasswort: admin) ->Konten, um Ihr Konto zu
16
Grundlegende Anruffunktionen
D
E
U
T
S
C
H
La page est en cours de chargement...
La page est en cours de chargement...
La page est en cours de chargement...
La page est en cours de chargement...
La page est en cours de chargement...
La page est en cours de chargement...
La page est en cours de chargement...
La page est en cours de chargement...
La page est en cours de chargement...
La page est en cours de chargement...
La page est en cours de chargement...
La page est en cours de chargement...
La page est en cours de chargement...
La page est en cours de chargement...
La page est en cours de chargement...
La page est en cours de chargement...
La page est en cours de chargement...
La page est en cours de chargement...
La page est en cours de chargement...
La page est en cours de chargement...
La page est en cours de chargement...
La page est en cours de chargement...
La page est en cours de chargement...
La page est en cours de chargement...
La page est en cours de chargement...
La page est en cours de chargement...
La page est en cours de chargement...
La page est en cours de chargement...
-
 1
1
-
 2
2
-
 3
3
-
 4
4
-
 5
5
-
 6
6
-
 7
7
-
 8
8
-
 9
9
-
 10
10
-
 11
11
-
 12
12
-
 13
13
-
 14
14
-
 15
15
-
 16
16
-
 17
17
-
 18
18
-
 19
19
-
 20
20
-
 21
21
-
 22
22
-
 23
23
-
 24
24
-
 25
25
-
 26
26
-
 27
27
-
 28
28
-
 29
29
-
 30
30
-
 31
31
-
 32
32
-
 33
33
-
 34
34
-
 35
35
-
 36
36
-
 37
37
-
 38
38
-
 39
39
-
 40
40
-
 41
41
-
 42
42
-
 43
43
-
 44
44
-
 45
45
-
 46
46
-
 47
47
-
 48
48


Yealink SIP-VP59 Guide de démarrage rapide
- Catégorie
- Téléphones IP
- Taper
- Guide de démarrage rapide
dans d''autres langues
- English: Yealink SIP-VP59 Quick start guide
- español: Yealink SIP-VP59 Guía de inicio rápido
- Deutsch: Yealink SIP-VP59 Schnellstartanleitung
Documents connexes
-
Yealink SIP-T56A Guide de démarrage rapide
-
-
-
-
-
Yealink CP960 Guide de démarrage rapide
-
-
-
-
Yealink SIP-T57W Guide de démarrage rapide