Fanimation LK8530 Le manuel du propriétaire
- Taper
- Le manuel du propriétaire

LK8530** Light Kit Installation Instructions
READ AND SAVE THESE INSTRUCTIONS
Weight: 1.43 lbs (0.65 kgs)
NOTE: This ceiling fan light kit is only meant to be used with Wrap™ Custom ceiling fans.
Do NOT install as a light fixture.
NOTE: Installation shall be in accordance with the National Electrical Code, ANSI/NFPA 70
and local codes.
WARNING:
To reduce the risk of fire or electric shock, do not use this fan/light kit with any
solid-state speed control device.
WARNING: To reduce the risk of fire or electric shock, or injury to persons, unplug or disconnect
the appliance from the power supply before cleaning, user maintenance and servicing.
the light kit.
To reduce the risk of fire and electric shock, this kight kit
should be used only with the Wrap™ Custom Fanimation
Fan Models.
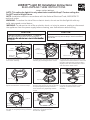
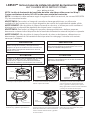
1. Remove the plastic cap assembly
from motor assembly.
2. Remove the finial plate from the motor
assembly by removing the three screws.
3. Remove one of the three screws in the
support bracket at the bottom of the motor
assembly and retain the screw for Step 5.
Slightly loosen the remaining two screws
and remove the switch cover.
6. Connect the 2 single pin connectors
from the LED plate assembly to the 2
single pin connectors from motor
assembly.
LED Plate
Assembly
LED Plate
Assembly
Motor
Assembly
Plastic Cap
Assembly
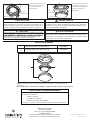
4. Remove the three screws from the
light kit and retain the screws for Step 7.
5. Assemble the light kit to the support
bracket using the two key slots in the light
kit, replacing the previously removed
screw and securely tightening all three
screws.
7. Assemble the LED plate assembly to
the light kit using the previously removed
screws.
8. Secure the glass to the light kit by
twisting in a clockwise direction.
Do not over-tighten.
CAUTION
risk of fire and electrical shock, be sure electricity is
CAUTION
Light Kit
Light Kit
Light Kit
Glass
Light Kit
Motor
Assembly
Motor
Assembly
Motor
Assembly
Motor
Assembly
Finial Plate
Switch Cover

CAUTION
WARNING
Copyright 2019 Fanimation
2019/01 V.01
10983 Bennett Parkway
Zionsville, IN 46077
(888) 567-2055 • FAX (866) 482-5215
Outside U.S. call (317) 733-4113
WWW.FANIMATION.COM
The light source is designed for this specific application
and can overheat if serviced by untrained personnel. If
any servicing is required, the product should be
returned to an authorized service facility for
examination or repair.
To avoid possible fire or shock, make sure that the electrical
wires are completely inside the fan housing and not pinched
between the switch cup housing and the switch cup flange.
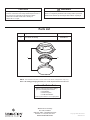
Parts List
1
2
Light Kit/Glass Assembly
LED Plate Assembly AP853011**
1
2
AP853007**
Before discarding packaging materials, be certain all parts have been removed
NOTE:
The illustration shown is not to scale or its actual configuration may vary.
How To Order Parts
When ordering repair parts, always
give the following information:
• Part Number
• Part Description
• Fan Model Number
Contact your retail store for repair parts.

Extraiga la tapa de plástico del motor.
PRECAUCIÓN
Apagar el interruptor de pared no es suficiente. A fin de
reducir el riesgo de incendios y descargas eléctricas,
asegúrese de que la electricidad esté desconectada en la
caja de fusibles principal al kit de iluminación antes de
instalar el accesorio.
PRECAUCIÓN
le risque d’incendie ou de choc, assurez-vous que
l’électricité est coupée au niveau de la boîte à fusibles
principale du ventilateur avant d’installer le kit d’éclairage.
ATTENTION
ATTENTION
Afin de réduire le risque d’incendie ou de choc, utilisez
seulement ce kit d’éclairage avec le modèle de ventilateur
Wrap™ Custom Fanimation.
Para reducir el riesgo de incendios o descargas eléctricas,
utilice este kit de iluminación de Fanimation solo con los
modelos de ventilador Wrap™ Custom.
AVERTISSEMENT: Afin de réduire le risque d’incendie, de choc ou de blessure, débranchez ou
déconnectez l’appareil de l’alimentation électrique avant le nettoyage, l’entretien et la mainte-
nance par l’utilisateur.
AVERTISSEMENT: Afin de réduire le risque d’incendie ou de choc, n’utilisez pas ce kit ventilateur/
éclairage avec un dispositif de régulation de vitesse à semi-conducteur.
NOTA: Los kits de iluminación del ventilador de techo solo deben utilizarse con los Wrap™
Custom ventiladores de techo. NO LOS instale como unidad de iluminación.
NOTA: La instalación debe realizarse según la regulación eléctrica nacional, las normas ANSI/NFPA
70 y las normativas locales.
ADVERTENCIA:
Para reducir el riesgo de incendios o descargas eléctricas, no utilice este
ventilador/kit de iluminación con ningún dispositivo de control de la velocidad de estado sólido.
ADVERTENCIA: Para reducir el riesgo de incendios, descarga eléctricas o daños a personas,
desconecte o desenchufe el dispositivo de la fuente de alimentación antes de limpiarlo o repararlo.
LEA Y GUARDE ESTAS INSTRUCCIONES
LK8530** Instrucciones de instalación del kit de iluminación
Peso: 0.65 kgs (1.43 lbs)
1.
2. Quite los tres tornillos del motor para
extraer la placa del remate.
6.
Placa de LED
Motor
Tapa de
plástico
4. Extraiga los tres tornillos del kit de
iluminación y guárdelos para el Paso 7.
5.
Kit de
iluminación
Kit de
iluminación
Motor
Motor
Motor
Motor
Placa del
remate
Cubierta del
interruptor
3.
Extraiga uno de los tres tornillos de la
zona de soporte en la parta inferior del
motor y guarde el tornillo para el paso 5.
Afloje ligeramente los dos tornillos restantes
y extraiga la cubierta del interruptor.
Instale el kit de iluminación en el
soporte usando las dos ranuras principales
del kit de iluminación, vuelva a colocar el
tornillo extraído anteriormente y fije bien
los tres tornillos.
Una los conectores de 2 pines de la
placa LED a los conectores de 2 pines
de la unidad del motor.

10983 Bennett Parkway
Zionsville, IN 46077
Llame sin cargo al (888) 567-2055
FAX (866) 482-5215
Desde fuera de los EE.UU., llame al (317) 733-4113
Visite nuestro sitio Web en www.fanimation.com
NOTA: la ilustración que se muestra no está hecha a escala y su configuración real
puede variar.
Antes de desechar los materiales de embalaje, asegúrese de haber extraído todas las piezas
Cómo hacer un pedido de piezas
Al hacer un pedido de piezas de repuesto, proporcione siempre
la siguiente información:
• Número de pieza
• Descripción de la pieza
• Número de modelo del ventilador
Póngase en contacto con su tienda para obtener las piezas de repuesto.
Lista de piezas
PRECAUCIÓN
ADVERTENCIA
Para evitar un posible incendio o descarga eléctrica, asegúrese de que
los cables eléctricos estén completamente dentro de la carcasa del
ventilador y no estén pisados entre la carcasa del conmutador y el
borde de la unidad del conmutador.
AVERTISSEMENT
ATTENTION
La source lumineuse est conçue pour cette application spécifique
un entretien est nécessaire, le produit doit être retourné à un
centre de service agréé pour examen ou réparation.
La fuente de luz está diseñado para esta aplicación específica y
puede recalentarse si reparado por personal no capacitado. Si se
requiere ningún tipo de servicio, el producto debe ser devuelto a
un centro de servicio autorizado para su revisión o reparación.
Pour éviter tout risque d’incendie ou de choc, assurez-vous que les
fils électriques sont complètement à l’intérieur du boîtier du ventila-
teur et qu’ils ne sont pas pincés entre le boîtier du compartiment de
l’interrupteur et le rebord du compartiment.
Copyright 2019 Fanimation
2019/01 V.01
1
2 Ensamble de la placa de iluminación AP853011**
1
2
AP853007**
7. 8.
Unidad de cristal/kit de iluminación
Instale la placa LED en el
kit de iluminación usando
los tornillos extraídos
anteriormente.
Fije el cristal en el kit de
iluminación girándolo en
el sentido de las agujas del
reloj. No la presione
demasiado.
Placa de LED
Kit de
iluminación
Kit de
iluminación
Cristal
-
 1
1
-
 2
2
-
 3
3
-
 4
4


Fanimation LK8530 Le manuel du propriétaire
- Taper
- Le manuel du propriétaire
dans d''autres langues
- English: Fanimation LK8530 Owner's manual
- español: Fanimation LK8530 El manual del propietario
Documents connexes
-
Fanimation FP8519BL Le manuel du propriétaire
-
-
-
-
Fanimation FP8003BPN Le manuel du propriétaire
-
-