Numark X9 Guide de démarrage rapide
- Catégorie
- Microphones
- Taper
- Guide de démarrage rapide


3
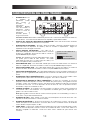
INTRODUCTION
Welcome to the X9 professional 3-channel mixer. Here are some of the features that you will come to love
about your new X9:
24-bit digital signal path, ensuring pristine, crystal-clear audio performance
Record and Booth RCA outputs for mix recording / monitoring
Balanced and unbalanced Master outputs for maximum connectivity with a variety of amplifiers,
speaker or home stereo systems.
2 Line inputs for connecting CD players, samplers, or other line-level devices
3 switcheable Phono / Line inputs
3-band EQ on each input channel
EQ Kill switches on each crossfader channel
2 microphone inputs
Comprehensive, easy-to-use digital effects processor
High-quality, user-replaceable crossfader
Flexible effects and crossfader assignments
Headphone output with Split / Blend cueing
We hope that the X9 serves you well for many years to come.
Sincerely,
The People of Numark
BOX CONTENTS
X9
9V-1.5A AC Power Adapter
Quickstart Guide
Safety & Warranty Information Booklet
REGISTRATION
Please go to http://www.numark.com to register your X9. Registering your product ensures that we can keep
you up-to-date with any last-minute product developments and provide you with world-class technical
support, should you run into any problems.
GROUND RULES
1. Make sure all items listed in the “Box Contents” section are included in the box.
2. READ SAFETY & WARRANTY INFORMATION BOOKLET BEFORE USING THE PRODUCT.
3. Study the connection diagram in this guide.
4. Place mixer in an appropriate position for operation.
5. Make sure all devices are turned off and all faders and gain knobs are set to “zero”
6. Connect all stereo input sources as indicated in the diagram.
7. Connect the stereo outputs to power amplifier(s), tape decks, and/or other audio sources.
8. Plug all devices into AC power.
9. Switch everything on in the following order.
• audio input sources (i.e. turntables, CD players, etc.)
• mixer
• last, any amplifiers or output devices
10. When turning off, always reverse this operation by,
• turning off amplifiers
• mixer
• last, any input devices

4
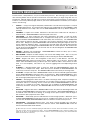
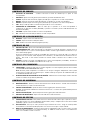
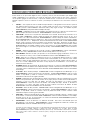
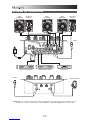
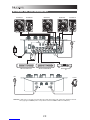
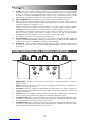
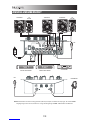
CONNECTION DIAGRAM
OR
Please Note: Channels 1/2/3 can accept line-level devices (i.e. CD players, samplers, line-level turntables) in the PHONO
inputs, as long as the corresponding PHONO / LINE switch is set to LINE.
TURNTABLE TURNTABLE TURNTABLE
CD
PLAYER
CD
PLAYER
CD BURNER
HOUSE AMPLIFIFER BOOTH AMPLIFIFER
MIC HEADPHONES
MIC

5
How do I know if my ¼”
cables are balanced?
BALANCED
UNBALANCED
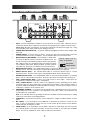
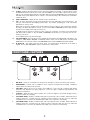
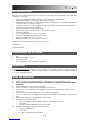
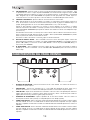
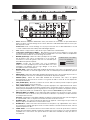
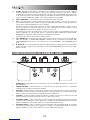
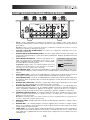
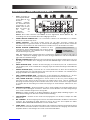
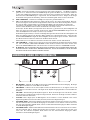
REAR PANEL FEATURES
1
23
45 6 7888
10
9 9 9
10
11 11
12
13
1. AC IN – Use the included power adapter to connect the mixer to a power outlet. While the power is
switched off, plug the power supply into the mixer first, then plug the power supply into a power outlet.
Please note: The mixer is designed to work with the included 9V-1.5A AC power supply only. Using
an incompatible power supply could result in damage to the unit.
2. POWER ADAPTER CABLE CLIP – To prevent accidental unplugging, secure the power adapter cable
to this clip.
3. POWER SWITCH – Turns the mixer on and off. Turn on the mixer after all input devices have been
connected and before you turn on amplifiers. Turn off amplifiers before you turn off the mixer.
4. MASTER OUTPUT (BALANCED) – Use balanced ¼” (TRS) cables
to connect this Master output to a speaker or amplifier system. The
level of this output is controlled by the Master knob on the top panel.
Tip: When possible, we recommend using these balanced outputs
for your Master audio output. Balanced outputs are better suited for
long cable runs and are less susceptible to noise and interference.
5. MASTER OUTPUT (RCA) – Use standard RCA cables to connect this Master output to a speaker or
amplifier system. The level of this output is controlled by the Master knob on the top panel.
6. BOOTH OUTPUT (RCA) – Use standard RCA cables to connect this Booth output to a booth
monitoring system. The level of this output is controlled by the Booth knob on the top panel.
7. RECORD OUTPUT (RCA) – Use standard RCA cables to connect this Record output to a recording
device, such as a CD recorder or tape deck. The level of this output is based upon pre-master levels.
8. LINE | PHONO INPUTS (RCA) – Connect your audio sources to these inputs. These inputs can
accept both line and phono-level signals. See #9 below.
9. LINE | PHONO SWITCH – Flip this switch to the appropriate position, depending on the device
connected to the Line | Phono inputs (#8). If using phono-level turntables, set this switch to “Phono” to
provide the additional amplification needed for phono-level signals. If using a line-level device, such as
a CD player or sampler, set this switch to “Line”.
10. GROUNDING TERMINAL – If using phono-level turntables with a grounding wire, be sure to connect
the grounding wire to these terminals. If you experience a low “hum” or “buzz”, this could mean that
your turntables are not grounded.
Note: Some turntables have the grounding wire built into the RCA connection and, therefore, nothing
needs to be connected to the grounding terminal.
11. LINE INPUTS – Connect line-level devices, such as CD players, samplers or audio interfaces, to these
inputs.
12. MIC 2 INPUT – If you would like to use an additional ¼” microphone on Channel 2, connect it to this
input. To route the microphone signal to the mix, you will need to flip the Channel 2 Input Selector
switch, located on the top panel, to “Mic”.
13. FADER START – If you would like to use the mixer’s fader-start to automatically start and cue music
from external devices via the mixer crossfader, connect these outputs to your fader-start compatible
device. You can use standard 1/8” stereo cables to make these connections.


7
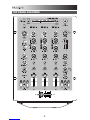
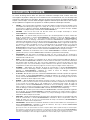
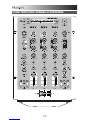
CHANNEL CONTROLS
1. INPUT SELECTOR – Selects the input source to be routed to the corresponding channel.
2. GAIN – Adjusts the channel audio pre-fader and pre-EQ gain level.
3. TREBLE – Adjusts the high (treble) frequencies of the audio playing on the corresponding channel,
4. MID – Adjusts the mid-range frequencies of the audio playing on the corresponding channel.
5. BASS – Adjusts the low (bass) frequencies of the audio playing on the corresponding channel.
6. CUE – Sends pre-fader audio to the Cue Channel for headphone monitoring.
7. CROSSFADER ASSIGN – Routes the audio playing on the corresponding channel to either side of the
crossfader (CFA/CFB), or bypasses the crossfader and sends the audio directly to the Master Mix (OFF).
8. VOLUME – Adjusts the audio level on the corresponding channel.
9. PFL – Monitors the pre-fader audio level on the corresponding channel.
MASTER CONTROLS
10. MASTER – Adjusts the Master output level.
11. BOOTH – Adjusts the Booth output level.
12. PGM – Monitors the Program (Master) mix audio level.
CUE CONTROLS
13. CUE GAIN – Adjusts the level of the headphone audio.
14. CUE BLEND – Turn to mix between Cue and Program in the Headphone channel. When all the way to the left,
only channels routed to CUE will be heard. When all the way right, only the Program mix will be heard.
Push the knob to engage Split Cue mode which sends all audio channels with the CUE Assign button engaged
to the left side of the headphones and the MASTER output to the right side of the headphones. This mode is
an excellent way to mix when booth monitoring is not available.
15. SPLIT – When lit, this LED indicates that Split Cue mode has been enabled. See Cue Blend (#14) for details
on Split Cue mode.
CROSSFADER CONTROLS
16. CROSSFADER – Blends audio between the channels assigned to the left and right side of the crossfader (see
ASSIGN KNOB below).
Note: The crossfader is user-replaceable if it should ever wear out. Simply remove the facepanel, then remove
the screws holding it in position. Replace the fader with a quality authorized replacement from your local
Numark retailer only.
17. EQ KILL SWITCHES – Eliminate the bass, mid, or high frequencies of the audio on the corresponding
crossfader channel (CFA/CFB).
MICROPHONE CONTROLS
18. MIC ON / OFF – Mutes and unmutes the microphone signal. When muted, the microphone signal will not be
routed to the Master mix.
19. MIC TREBLE – Adjusts the high (treble) frequencies of the microphone channel.
Tip: If you experience feedback when using a microphone at loud levels, try turning down the high frequencies.
20. MIC BASS – Adjusts the low (bass) frequencies of the microphone channel.
21. MIC GAIN – Adjusts the audio level of the microphone signal.
EFFECTS CONTROLS
22. FX ASSIGN – This knob selects the audio source on which the effects will be applied. You can address
individual mixer channels (1/2/3), either side of the crossfader (CFA/CFB) or you can apply the effect on the
Master mix.
23. FX ON – Turns effects processing on and off. Note that you will also have to raise the Intensity Mix control to
be able to hear the effects once they have been turned on.
24. INTENSITY MIX – Controls the amount of effected (wet) vs. non-effected (dry) sound in the mix. With the fader
down, no effected sound will be audible. With the fader up, only the effected sound will be heard.

8
25. FX CUE – Sends the effected sound to the Cue channel for headphone monitoring. To preview effects: set the
FX ASSIGN knob to the desired source, make sure that FX ON is off (so the audience will not hear the effects
while you are previewing them) and turn on FX CUE. Make sure that the CUE BLEND control is adjusted such
that CUE can be heard. Adjust the effects controls to your desired settings. Once satisfied, turn on FX ON to
activate the effect.
26. RATE / FREQUENCY – Adjusts the rate / frequency of the selected effect.
27. TAP – In order to align tempo-synced effects with the beat, press the TAP button on the beat 3-4 times. The
beat sync often works best when tapping half the tempo. For example, try tapping just on the snare drums
(typically the “2” and “4” count).
When beat sync has been enabled, effects denoted with an asterisk (*) will have rates / frequencies related to
the tempo (see “Effects Descriptions” section). You can use the RATE / FREQUENCY knob to adjust the beat-
synced rate as a multiple of the tempo (1x, 2x, 4x, etc.)
To disable beat sync and have continuous control over the rate / frequency of an effect, press and hold trhe
TAP button until it remains lit. Now the RATE / FREQUENCY knob allows you to precisely tune the rate /
frequency of an effect.
To re-enable beat sync, tap out the beat again.
28. TOP / BOTTOM FX – Selects between the top and bottom effect from the group illuminated on the display. For
example, if “TAPE ECHO / REVERB” is illuminated and this switch is in the TOP position, then the TAPE
ECHO effect is selected; if the switch is in the BOTTOM position, then the REVERB effect will be applied.
29. SELECT – This switch selects the effects group. The selected group will illuminate as the switch is
toggled. Use the TOP / BOTTOM FX switch to select the top or bottom effect.
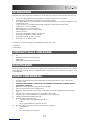
FRONT PANEL FEATURES
1 2
34
5 6
1. MIC INPUT – Connect a ¼” microphone to this input. The microphone controls are located on the top panel.
2. HEADPHONES – Connect your ¼” headphones to this output for cueing and mix monitoring. Headphone
output controls are located on the top panel.
3. CUE TONE – Adjusts the tone of the audio in the headphones. Turn to the left to attenuate high (treble)
frequencies and emphasize low (bass) frequencies. Turn to the right to emphasize high frequencies and
attenuate low frequencies.
4. CF SLOPE – Adjusts the slope of the crossfader curve. Turn to the right for a smooth fade (mixing) or turn to
the left for a sharp cut (scratching).
5. CFA FADER START – Enables or disables fader-start on the left side of the crossfader. When fader-start is
enabled, moving the crossfader from the right-most position toward the left will cause any fader-start
compatible device, connected to the CFA fader-start output on the rear panel, to start playing.
6. CFB FADER START – Enables or disables fader-start on the right side of the crossfader. When fader-start is
enabled, moving the crossfader from the left-most position toward the right will cause any fader-start
compatible device, connected to the CFB fader-start output on the rear panel, to start playing.

9
EFFECTS DESCRIPTIONS
The X9 features a comprehensive, easy-to-use multi-effects processor. We encourage you to spend some
time becoming familiar with the operation and sound of each effect before you begin using them out at a
performance. Although effects can add a level of interest and surprise to musical material, it is often easy to
overdo it. Learn how to judiciously apply effects to your music and remember that sometimes your crowd just
wants to hear the song.
2XCOPY * – A copy of the signal is delayed by a defined time. DJs will often keep 2 copies of a record
for juggling tricks like this. Try using this effect with beat sync enabled and move the INTENSITY / MIX
fader up and down to the tempo. Now use the RATE/FREQUENCY knob to try different multiples of
the tempo.
VOCODER – A square wave vocoder, reminiscent of the robot voice sounds from the early days of
electronic music. RATE/FREQUENCY controls the pitch of the voice.
TAPE ECHO * – A much sought-after echo effect, developed in the 1960s. In beat-sync mode,
RATE/FREQUENCY controls the delay time as a multiple of the tempo (1x, 2x, 4X, etc). If beat sync
has been disabled, RATE/FREQUENCY will control delay time continuously. The INTENSITY/MIX
fader controls the input into the echo. This makes it very useful for selecting a phrase, vocal word or
beat to echo. Simply turn up the INTENSITY/MIX fader momentarily during the snippet of music you
wish to emphasize and bring it down. You’ll notice how the audio which was playing during that time
will echo away. Now try turning up the INTENSITY/MIX fader for a whole measure, then cut the music
out with the channel VOLUME fader. Let the music echo for a bit, then bring down the INTENSITY/MIX
fader and cut the music back in.
REVERB – Simulates hall reverberation. RATE/FREQUENCY controls the decay (size of room).
INTENSITY/MIX controls the wet/dry mix.
REV. REVERB – Samples the audio and plays it in reverse while adding reverb. This is a very cool
effect if you stab into the effect then immediately cut the sound using the channel VOLUME fader.
ECHO – Regular echo effect. The configuration of this echo is a little different. This time, the
INTENSITY/MIX fader controls the output of echo. When the fader is up, it will echo. Push the fader
further, and it will feedback heavily, just like the tape echo. When the fader is at the bottom, the echo
effect is cut out completely. This effect is very useful for juggling beats and emphasizing musical
phrases.
FLANGER * – Sweeping flanger effect. In beat sync mode, the RATE/FREQUENCY controls the
sweep rate as a multiple of the tempo. When beat synch is disabled, the RATE/FREQUENCY will
continuously control the sweep rate. The INTENSITY/MIX controls the intensity of the flange effect.
LP FILTER – Low-pass filter effect. INTENSITY/MIX controls the amount of filtered signal which will be
heard. RATE/FREQUENCY controls the filter’s cut-off frequency. When RATE/FREQUENCY is at its
maximum value, there will be no filtering; as you begin to turn down the knob, the effect will begin to
filter out the high (treble) frequencies of the audio.
PHASER * – Sweeping phase shifter effect. It is similar to the flanger effect, except that a flanger has
a more pronounced harmonic sound, reminiscent of a jet engine passing overhead. A phase shifter is
enharmonic, and has a “swooshing” sound. In beat sync mode, the RATE/FREQUENCY controls the
sweep rate as a multiple of the tempo. When beat sync is disabled, the RATE/FREQUENCY will
continuously control the sweep rate. The INTENSITY/MIX controls the intensity of the phase shifter
effect.
HP FILTER – High-pass filter effect. INTENSITY/MIX controls the amount of filtered signal which will
be heard. RATE/FREQUENCY controls the filter’s cut-off frequency. When RATE/FREQUENCY is at
its minimum value, there will be no filtering; as you begin to turn up the knob, the effect will begin to
filter out the low (bass) frequencies of the audio.
AUTO PAN * – Automatically pans the audio between the left and right speakers. When beat sync is
enabled, RATE/FREQUENCY controls the pan rate as a multiple of the tempo (1x, 2x, 4x, etc). If beat
sync has been disabled, RATE/FREQUENCY allows for continuous control over the pan rate.
LMT+DISTORT – Band-limited distortion effect. This effect is mainly intended to be used with a
microphone. RATE/FREQUENCY controls the distortion amount, while INTENSITY/MIX controls the
amount of distortion which will be mixed in.
(*) When beat sync has been enabled by tapping the TAP button to the beat, effects denoted with an asterisk (*) will
have rates or times which are related to the tempo. Use the RATE/FREQUENCY knob to adjust the multiple of the
tempo (1x, 2x, 4x, etc). To disable beat sync and have continuous control over rate/frequency, press and hold the TAP
button until it remains lit continuously.


11
INTRODUCCIÓN
Bienvenido al mezclador profesional de tres canales X9. He aquí algunas de las características que seguramente
disfrutará con su nuevo X9.
Trayecto de señal digital de 24 bits, que asegura un audio prístino y de claridad cristalina
Salidas RCA de grabación y cabina para grabar y monitorear la mezcla
Salidas maestras balanceada y no balanceada para máxima conectividad con una variedad de amplificadores
y sistemas de altavoces y estéreos hogareños.
2 entradas de línea para conectar reproductores de CD, muestreadores u otros dispositivos de nivel de línea
3 entradas fonográficas/de línea conmutables
Ecualizador de 3 bandas en cada canal de entrada
Interruptores de supresión de ecualización en cada canal de crossfader
2 entradas de micrófono
Procesador digital de efectos completo y fácil de usar
Crossfader de alta calidad, reemplazable por el usuario
Asignaciones flexibles de efectos y crossfader
Salida para auriculares con cue de división /combinación
Esperamos que el X9 le brinde un buen servicio por muchos años.
Atentamente,
La Gente de Numark
CONTENIDO DE LA CAJA
X9
Adaptador de CA de 9 V – 1.5 A
Guía de inicio rápido
Folleto de información sobre la seguridad y la garantía
REGISTRO
Visite http://www.numark.com y registre su X9. El registro de su producto asegura que podamos mantenerle
actualizado con los desarrollos de productos de último momento y brindarle apoyo técnico de categoría mundial en
caso de que tenga algún problema.
REGLAS BÁSICAS
1. Asegúrese de que todos los artículos indicados en “Contenido de la caja" estén incluidos en la caja.
2. LEA EL FOLLETO DE INFORMACIÓN SOBRE LA SEGURIDAD Y LA GARANTÍA ANTES DE UTILIZAR EL
PRODUCTO.
3. Estudie el diagrama de conexión incluido en esta guía.
4. Coloque el mezclador en una posición adecuada para su funcionamiento.
5. Asegúrese que todos los dispositivos estén apagados y que todos los faders y perillas de ganancia estén en
posición «cero».
6. Conecte todas las fuentes de entrada estéreo como se indica en el diagrama.
7. Conecte las salidas estéreo a los amplificadores de potencia, bandejas de cinta magnética y/o otras fuentes de
audio.
8. Enchufe todos los dispositivos al suministro de corriente alterna.
9. Encienda todo en el siguiente orden:
• fuentes de entrada de audio (por ejemplo, giradiscos, reproductores de CD, etc.)
• el mezclador
• por último, cualquier amplificador o dispositivo de salida
10. Al apagar, realice siempre esta operación en sentido inverso:
• apague los amplificadores
• el mezclador
• por último, cualquier dispositivo de entrada

12
DIAGRAMA DE CONEXIÓN
OR
Para tener en cuenta: Los canales 1/2/3 pueden aceptar dispositivos de nivel de línea (por ej. reproductores de CD,
muestreadores, giradiscos de nivel de línea) en las entradas PHONO, siempre que el conmutador PHONO / LINE
correspondiente esté colocado en LINE.
GIRADISCOS GIRADISCOS
GIRADISCOS
REPRODUCTOR
DE CD
REPRODUCTOR
DE CD
QUEMADOR
DE CD
AMPLIFICADOR DE AUDITORIO AMPLIFICADOR DE CABINA
MICRÓFONO AURICULARES
MICRÓFONO

13
¿Cómo sé si mis cables de ¼”
son balanceados?
BALANCEADO
NO BALANCEADO
1
23
45 6 7888
10
9 9 9
10
11 11
12
13
CARACTERÍSTICAS DEL PANEL TRASERO
1. ENTRADA DE CA - Use
el adaptador de
alimentación incluido
para conectar el
mezclador a un
tomacorriente
alimentado. Mientras
está desconectada la
alimentación eléctrica,
enchufe la fuente de
alimentación al
mezclador primero, y
luego al tomacorriente.
Para tener en cuenta: El mezclador está diseñado para funcionar con la fuente de alimentación de CA de 9 V-
1.5 únicamente . Si usa una fuente de alimentación incompatible se puede dañar la unidad.
2. PRESILLA DEL CABLE DEL ADAPTADOR DE ALIMENTACIÓN – Para evitar la desconexión accidental,
sujete el cable del adaptador de alimentación a esta presilla.
3. INTERRUPTOR DE ENCENDIDO – Enciende y apaga el mezclador. Encienda el mezclador después de
desconectar todos los dispositivos de entrada y antes de encender los amplificadores. Apague los
amplificadores antes de apagar el mezclador.
4. SALIDA MAESTRA (BALANCEADA) – Use cables de ¼”
balanceados (TRS) para conectar esta salida maestra a un sistema
de altavoces o amplificador. El nivel de esta salida se controla con
la perilla MASTER del panel superior.
Consejo: Recomendamos usar estas salidas balanceadas, cuando
sea posible, para la salida de audio maestra. Las salidas
balanceadas funcionan mejor con tramos largos de cables y son
menos susceptibles al ruido y la interferencia.
5. SALIDA MAESTRA (RCA) – Use cables RCA estándar para conectar esta salida maestra a un sistema de
altavoces o amplificador. El nivel de esta salida se controla con la perilla MASTER del panel superior.
6. SALIDA PARA CABINA (RCA) – Use cables RCA estándar para conectar esta salida a un sistema de
monitoreo de cabina. El nivel de esta salida se controla con la perilla BOOTH del panel superior.
7. SALIDA PARA GRABACIÓN (RCA) – Use cables RCA estándar para conectar esta salida a un dispositivo de
grabación, tal como un grabador de CD o bandeja de cinta. El nivel de esta salida se basa en los niveles pre-
master.
8. ENTRADAS DE LÍNEA | FONOGRÁFICA (RCA) – Conecte sus fuentes de audio a estas entradas. Estas
entradas pueden aceptar señales de nivel de línea y fonográfico. Vea el Nº 9 a continuación.
9. INTERRUPTOR DE ENTRADA DE LÍNEA | FONOGRÁFICA – Coloque este conmutador en la posición
apropiada, en función del dispositivo conectado a las entradas Line | Phono (Nº 8). Si usa giradiscos de nivel
fonográfico, coloque este conmutador en “Phono” para proporcionar la amplificación adicional necesaria para
las señales de este nivel. Si usa un dispositivo de nivel de línea, tal como un reproductor de CD o
muestreador, coloque este conmutador en “Line”.
10. TERMINAL DE TIERRA – Si usa giradiscos de nivel fonográfico con cable de conexión a tierra, asegúrese de
conectar dicho cable a estos terminales. Si se experimenta un zumbido grave, puede significar que sus
giradiscos no están conectados a tierra.
Nota: Algunos giradiscos tienen el cable de conexión a tierra incorporado a la conexión RCA y, por lo tanto, no
es necesario conectar nada al terminal de tierra.
11. ENTRADAS DE LÍNEA – Estas entradas se usan para conectar dispositivos de nivel de línea, tales como
reproductores de CD, muestreadores o interfaces de audio.
12. ENTRADA DE MICRÓFONO 2 – Si desea usar un micrófono de ¼” adicional en el canal 2, conéctelo a esta
entrada. Para aplicar la señal de micrófono a la mezcla, debe colocar el conmutador selector de entrada del
canal 2, ubicado en el panel superior, en “Mic”.
13. FADER START – Si desea usar el fader-start del mezclador para iniciar y buscar automáticamente el punto
inicial de música de dispositivos externos a través del crossfader del mismo, conecte estas salidas a su
dispositivo compatible con fader-start. Puede usar cables estéreo estándar 1/8” para efectuar estas
conexiones.


15
CONTROLES DE CANALES
1. SELECTOR DE ENTRADAS - Permite seleccionar la fuente de entrada que se aplica al canal
correspondiente.
2. GANANCIA - Ajusta el nivel de ganancia preecualización y pre-fader del audio del canal.
3. TREBLE – Ajusta las altas frecuencias (agudos) del audio que se reproduce en el canal correspondiente.
4. MEDIOS – Ajusta las frecuencias medias del audio que se reproduce en el canal correspondiente.
5. GRAVES – Ajusta las bajas frecuencias (graves) del audio que se reproduce en el canal correspondiente.
6. CUE – Envía el audio pre-fader al canal de Cue para monitoreo con los auriculares.
7. ASIGNACIÓN DE CROSSFADER – Aplica el audio que se reproduce en el canal correspondiente a
cualquiera de los lados del crossfader (CFA/CFB), o puentea el crossfader y envía el audio directamente a la
mezcla maestra (OFF).
8. VOLUMEN – Ajusta el nivel de audio en el canal correspondiente.
9. PFL – Monitorea el nivel de audio pre-fader en el canal correspondiente.
CONTROLES DE LA SALIDA MAESTRA
10. MAESTRA – Ajusta el nivel de la salida maestra.
11. CABINA – Ajusta el nivel de la salida para cabina.
12. PGM – Monitorea el nivel de audio del programa (maestro).
CONTROLES DE CUE
13. GANANCIA DE CUE – Ajusta el nivel del audio para auriculares.
14. COMBINACIÓN DE CUE – Gírelo para mezclar cue y programa en el canal de auriculares. Cuando está en el
extremo izquierdo, sólo se oyen los canales aplicados a CUE. Cuando se gira totalmente a la derecha, se oye
sólo la mezcla del programa.
Presione la perilla para activar el modo de cue dividido que envía todos los canales de audio con el botón de
asignación de “cue” activado al lado izquierdo de los auriculares y la salida maestra al lado derecho de los
mismos. Este modo es una manera excelente de mezclar cuando el monitoreo de la cabina no está
disponible.
15. DIVISIÓN – Cuando se enciende, este LED indica que se activó el modo Split Cue (cue dividido). Consulte los
detalles del modo de cue dividido en Combinación de cue (Nº 14).
CONTROLES DEL CROSSFADER
16. CROSSFADER - Combina el audio entre los canales asignados a los lados izquierdo y derecho del crossfader
(consulte PERILLA DE ASIGNACIÓN más abajo).
Nota: El usuario puede reemplazar el crossfader en caso de que se desgaste. Simplemente, retire el panel
frontal y luego los tornillos que lo mantienen sujeto. Cambie el fader por un repuesto de calidad autorizado por
su vendedor de Numark más cercano.
17. INTERRUPTORES DE SUPRESIÓN DE ECUALIZACIÓN – Eliminan las frecuencias bajas, medias o altas del
canal de crossfader correspondiente (CFA/CFB).
CONTROLES DE MICRÓFONO
18. MICRÓFONO SÍ/NO – Silencia y anula el silenciamiento de la señal de micrófono. Cuando está silenciada, la
señal de micrófono no se aplica a la mezcla maestra.
19. AGUDOS DE MICRÓFONO – Ajusta las altas frecuencias (agudos) del canal de micrófono.
Consejo: Si experimenta realimentación cuando usa un micrófono con niveles altos, pruebe disminuyendo las
altas frecuencias.
20. GRAVES DE MICRÓFONO – Ajusta las bajas frecuencias (graves) del canal de micrófono.
21. GANANCIA DE MICRÓFONO – Ajusta el nivel de audio de la señal de micrófono.
CONTROLES DE EFECTOS
22. ASIGNACIÓN DE EFECTOS – Esta perilla selecciona la fuente de audio sobre la que se aplican los efectos.
Puede direccionarlo a los canales individuales del mezclador (1/2/3), a cualquiera de los lados del crossfader
(CFA/CFB) o aplicar el efecto a la mezcla maestra.
23. EFECTOS SÍ/NO - Hace que se active y desactive el procesamiento de efectos. Tenga en cuenta que debe
elevar también el control Intensity Mix para poder oír los efectos una vez que se hayan activado.
24. MEZCLA DE INTENSIDADES – Controla la relación entre la magnitud del sonido con efectos (wet) y el sonido
sin efectos (dry) en la mezcla. Con el fader hacia abajo, es audible el sonido sin efectos. Con el fader hacia
arriba, sólo es audible el sonido con efectos.

16
25. CUE DE EFECTOS – Envía el sonido con efectos al canal de Cue para monitoreo con los auriculares. Para
oír previamente los efectos: coloque la perilla FX ASSIGN en la fuente deseada, asegúrese de que FX ON
esté apagado (para que la audiencia no oiga los efectos mientras usted los oye previamente) y encienda FX
CUE. Asegúrese que el control CUE BLEND esté ajustado de modo que pueda oírse el CUE. Ajuste los
controles de efectos a los valores que desee. Una vez satisfecho, encienda FX ON para activar el efecto.
26. CADENCIA / FRECUENCIA – Ajusta la cadencia / frecuencia del efecto seleccionado.
27. TAP – A fin de alinear los efectos sincronizados con el tempo con el beat, pulse el botón TAP en el beat 3 ó 4
veces. El sincronismo con el beat con frecuencia funciona mejor cuando se golpea a la mitad del tempo. Por
ejemplo, pruebe golpeando sólo en los snare drums (habitualmente el “2” y “4” de la cuenta).
Cuando se haya activado el sincronismo con el beat, los efectos indicados con un asterisco (*) tendrán
cadencias / frecuencias relacionadas con el tempo (consulte la sección “Descripciones de los efectos”). Puede
usar la perilla RATE / FREQUENCY para ajustar la cadencia sincronizada con el beat como múltiplo del tempo
(1x, 2x, 4x, etc.)
Para desactivar el sincronismo con el beat y tener control continuo sobre la cadencia / frecuencia de un efecto,
pulse y retenga el botón TAP hasta que quede encendido. Ahora la perilla RATE / FREQUENCY le permite
afinar con precisión la cadencia / frecuencia de un efecto.
Para volver a activar el sincronismo con el beat, golpee en el beat nuevamente.
28. EFECTO DE ARRIBA / ABAJO - Este conmutador selecciona el efecto de la parte superior e inferior del
grupo iluminado en la pantalla. Por ejemplo, si se ilumina “TAPE ECHO / REVERB” y el conmutador está en la
posición TOP (Arriba), se selecciona el efecto TAPE ECHO; si está en la posición BOTTOM (Abajo), se
selecciona el efecto REVERB.
29. SELECCIÓN – Este conmutador selecciona el grupo de efectos. El grupo seleccionado se ilumina a
medida que se acciona el conmutador. Use el conmutador TOP / BOTTOM FX para seleccionar el efecto de
arriba o abajo.
CARACTERÍSTICAS DEL PANEL FRONTAL
1 2
34
5 6
1. ENTRADA DE MICRÓFONO – Conecte un micrófono de 1/4” a esta entrada. Los controles de micrófono se
encuentran en el panel superior.
2. AURICULARES – Conecte sus auriculares de ¼” a esta salida para búsqueda de punto inicial (cue) y
monitoreo de la mezcla. Los controles de la salida para auriculares se encuentran en el panel superior.
3. TONO DE CUE – Ajusta el tono del audio de los auriculares. Gire este control a la izquierda para atenuar los
agudos (altas frecuencias) y resaltar los graves (bajas frecuencias). Gírelo a la derecha para resaltar los
agudos (altas frecuencias) y atenuar los graves (bajas frecuencias).
4. PENDIENTE DE CROSSFADER – Ajusta la pendiente de la curva del crossfader. Gire este control a la
derecha para una fusión suave (mezcla) o a la izquierda para un corte abrupto (rayado).
5. FADER START DE CFA – Activa o desactiva el fader-start del lado izquierdo del crossfader. Cuando el fader-
start está activado, al mover el crossfader desde el extremo derecho hacia la izquierda, hace que cualquier
dispositivo compatible con fader-start conectado a la salida de fader-start de CFA del panel trasero comience a
reproducir.
6. FADER START DE CFB – Activa o desactiva el fader-start del lado derecho del crossfader. Cuando el fader-
start está activado, al mover el crossfader desde el extremo izquierdo hacia la derecha, hace que cualquier
dispositivo compatible con fader-start conectado a la salida de fader-start de CFB del panel trasero comience a
reproducir.

17
DESCRIPCIONES DE LOS EFECTOS
El X9 cuenta con un procesador digital de efectos completo y fácil de usar. Recomendamos que dedique algún
tiempo a familiarizarse con la operación y el sonido de cada efecto antes de usarlo en una sesión. Si bien los
efectos pueden agregar un nivel de interés y sorpresa al material musical, con frecuencia es fácil sobrepasarse.
Aprenda a aplicar los efectos a su música con criterio y recuerde que su audiencia a veces sólo desea escuchar el
tema.
2XCOPY * – Una copia de la señal se retarda un tiempo definido. Los DJ guardan con frecuencia 2 copias de
una grabación para hacer trucos como éste. Pruebe usando este efecto con el sincronismo con el beat
activado y mueva el fader INTENSITY / MIX hacia arriba y abajo según el tempo. Use también la perilla
RATE/FREQUENCY para probar distintos múltiplos del tempo.
VOCODER – Codificador de voz de onda cuadrada, una reminiscencia de los sonidos de voz de robot de los
primeros tiempos de la música electrónica. RATE/FREQUENCY controla el pitch de la voz.
TAPE ECHO * – Efecto de eco muy buscado, desarrollado en los años 60. En el modo de sincronismo con el
beat, RATE / FREQUENCY controla el tiempo de retardo como múltiplo del tempo (1x, 2x, 4x, etc.) Si el
sincronismo con el beat está desactivado, RATE/FREQUENCY controla el tiempo de retardo continuamente.
El fader INTENSITY/MIX controla la entrada al eco. Esto lo hace muy útil para seleccionar una frase, palabra
vocal o beat para el eco. Simplemente, mueva momentáneamente hacia arriba el fader INTENSITY/MIX
durante el trazo de música que desea enfatizar y luego muévalo hacia abajo. Notará que el audio que se
estaba reproduciendo durante ese momento se escuchará con eco. Ahora pruebe mover hacia arriba el fader
INTENSITY/MIX por una medida completa y luego corte la música con el fader VOLUME del canal. Permita
que la música haga eco un momento y luego lleve hacia abajo el fader INTENSITY/MIX y vuelva a introducir la
música.
REVERB – Simula la reverberación de la sala de conciertos. RATE/FREQUENCY controla el decaimiento
(tamaño de la sala). INTENSITY/MIX controla la mezcla wet/dry (música con y sin efectos).
REV. REVERB – Muestrea el audio y la reproduce en reversa mientras agrega reverberación. Éste es un
efecto excelente si lo activa y corta el sonido inmediatamente usando el fader VOLUME del canal.
ECHO - Efecto de eco normal. La configuración de este eco es ligeramente diferente. Esta vez, el fader
INTENSITY/MIX controla la salida del eco. Cuando el fader está hacia arriba, el eco está activo. Lleve el fader
más allá y sufrirá una gran realimentación, igual que el eco de cinta. Cuando el fader está hacia abajo, el
efecto eco se anula completamente. Este efecto es muy útil para hacer malabarismos con los beats y dar
énfasis a las frases musicales.
FLANGER*: Barrido del efecto flanger. En modo de sincronización con el beat, la perilla RATE/FREQUENCY
controla la frecuencia de barrido como múltiplo del tiempo. Cuando se desactiva la sincronización con el beat,
esta perilla controla continuamente la frecuencia de barrido. El fader INTENSITY/MIX controla la intensidad del
efecto flanger.
LP FILTER – Efecto de filtro pasabajos. INTENSITY/MIX controla la magnitud de señal filtrada que se oye.
RATE/FREQUENCY controla la frecuencia de corte del filtro. Cuando RATE/FREQUENCY está en su valor
máximo, no hay filtrado y, cuando se comienza a mover la perilla hacia abajo, el efecto comienza a filtrar
eliminando las altas frecuencias (agudos) del audio.
PHASER* - Barrido del efecto de desfasador. Es similar al efecto flanger, salvo que el flanger tiene un sonido
armónico mas pronunciado, que recuerda al motor de un jet que pasa por encima nuestro. El desfasador es
enarmónico y tiene un sonido más “de silbido”. En modo de sincronización con el beat, la perilla
RATE/FREQUENCY controla la frecuencia de barrido como múltiplo del tempo. Cuando se desactiva la
sincronización con el beat, esta perilla controla de forma continua la frecuencia de barrido. El fader
INTENSITY/MIX controla la intensidad del efecto de desfasador.
HP FILTER – Efecto de filtro pasaaltos. INTENSITY/MIX controla la magnitud de señal filtrada que se oye.
RATE/FREQUENCY controla la frecuencia de corte del filtro. Cuando RATE/FREQUENCY está en su valor
mínimo, no hay filtrado, cuando se comienza a mover la perilla hacia arriba, el efecto comienza a filtrar
eliminando las bajas frecuencias (graves) del audio.
AUTO PAN * – Balancea automáticamente el audio entre los altavoces izquierdo y derecho. Cuando el modo
de sincronismo con el beat está activado, RATE / FREQUENCY controla la cadencia de balance como múltiplo
del tempo (1x, 2x, 4x, etc.) Si el sincronismo con el beat está desactivado, RATE/FREQUENCY permite el
control continuo de la cadencia del balance.
LMT+DISTORT – Efecto de distorsión con limitación de banda. Este efecto está diseñado para usar
principalmente con un micrófono. RATE/FREQUENCY controla la magnitud de la distorsión, mientras que
INTENSITY/MIX controla la cantidad de distorsión que se mezcla.
(*) Cuando se activa el modo de sincronismo con el beat pulsando el botón TAP al ritmo del beat, los efectos marcados
con un asterisco (*) tendrán cadencias o tiempos que están relacionados con el tempo. Utilice la perilla
RATE/FREQUENCY para ajustar los múltiplos del tempo (1x, 2x, 4x, etc). Para desactivar el sincronismo con el beat y
tener control continuo sobre la cadencia / frecuencia, pulse y retenga el botón TAP hasta que quede encendido
continuamente.


19
INTRODUCTION
Voici la console de mixage à 3 canaux X9. Voici quelques-uns des caractéristiques que vous apprécierez de la
nouvelle console de mixage X9 :
Cheminement numérique 24 bits, assurant une reproduction audio de grande qualité.
Sorties RCA enregistrement et cabine pour l’enregistrement des mix et la pré-écoute.
Sorties maîtres symétriques et asymétriques permettant une meilleure connectivité avec une large gamme
d’amplificateurs, enceintes et systèmes stéréo.
2 entrées à niveau ligne permettent de brancher des lecteurs de disques compacts, échantillonneurs ou autres
appareils à niveau ligne.
Entrées phono/ligne commutables.
Égalisation 3 bandes sur chaque canal d’entrée.
Coupure d’égalisation sur chaque canal crossfader.
2 entrées microphone.
Processeur d’effets numérique facile à utiliser
Crossfader remplaçable de grande qualité
Flexibilité des assignations des effets et du crossfader
Sortie casque d’écoute dotée de la fonction de répartition/mixage du casque d'écoute (Split/Blend)
Nous espérons que la console de mixage X9 vous servira bien pendant plusieurs années.
Cordialement,
Toute l’équipe de Numark
CONTENUE DE LA BOÎTE
X9
Adaptateur CA 9 V 1,5 A
Guide d'utilisation simplifié
Le livret des consignes de sécurité et des informations concernant la garantie.
ENREGISTREMENT
Veuillez visiter le site internet http://www.numark.com pour enregistrer votre nouvelle console X9.L'enregistrement
des produits vous permet d'être informé sur les toutes dernières nouveautés concernant les produits et de vous offrir
un soutien technique de niveau international, si vous en aviez besoin.
RÈGLES DE BASE
1. Assurez-vous que tous les articles énumérés dans le contenu de la boîte de ce guide sont inclus dans la boîte.
2. VEUILLEZ LIRE LE LIVRET DES CONSIGNES DE SÉCURITÉ ET DES INFORMATIONS SUR LA
GARANTIE AVANT D'UTILISER LE PRODUIT.
3. Examinez le schéma de connexion de ce guide.
4. Placez la console de mixage en position de fonctionnement.
5. Assurez-vous que tous les appareils sont hors tension et que tous les atténuateurs et le gain sont réglés à
« zéro ».
6. Connectez toutes les sources d'entrées stéréo tel qu'indiqué sur le schéma.
7. Branchez toutes les sorties aux amplificateurs de puissance, aux lecteurs de cassette et aux sources audio.
8. Branchez tous les appareils à une prise de courant alternatif (AC).
9. Mettre tous les appareils sous tension dans l'ordre suivant.
• sources d'entrée audio (c.-à-d.tourne-disques, lecteurs de disques compacts, etc.)
• Consoles de mixage
• en dernier, tous amplificateurs ou appareils de sortie
10. Pour mettre hors tension, toujours inverser l'opération :
• Éteindre les amplificateurs
• Consoles de mixage
• En dernier, tous les appareils d'entrée

20
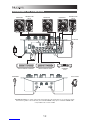
SCHÉMA DE CONNEXION
OR
Veuillez noter : Les canaux 1/2/3 permettent de brancher des appareils à niveau ligne tels que lecteurs de disques compacts,
échantillonneurs et tables tournantes dans les entrées PHONO si le commutateur PHON/LINE est en position LINE.
TABLE
TOURNANTE TABLE
TOURNANTE TABLE
TOURNANTE
LECTEUR DE
DISQUES
LECTEUR DE
DISQUES
GRAVEUR CD
AMPLIFICATEUR MAISON AMPLIFICATEUR CABINE
MICRO CASQUE D'
É
COUTE
MICRO
La page charge ...
La page charge ...
La page charge ...
La page charge ...
La page charge ...
La page charge ...
La page charge ...
La page charge ...
La page charge ...
La page charge ...
La page charge ...
La page charge ...
La page charge ...
La page charge ...
La page charge ...
La page charge ...
La page charge ...
La page charge ...
La page charge ...
La page charge ...
La page charge ...
La page charge ...
La page charge ...
La page charge ...
-
 1
1
-
 2
2
-
 3
3
-
 4
4
-
 5
5
-
 6
6
-
 7
7
-
 8
8
-
 9
9
-
 10
10
-
 11
11
-
 12
12
-
 13
13
-
 14
14
-
 15
15
-
 16
16
-
 17
17
-
 18
18
-
 19
19
-
 20
20
-
 21
21
-
 22
22
-
 23
23
-
 24
24
-
 25
25
-
 26
26
-
 27
27
-
 28
28
-
 29
29
-
 30
30
-
 31
31
-
 32
32
-
 33
33
-
 34
34
-
 35
35
-
 36
36
-
 37
37
-
 38
38
-
 39
39
-
 40
40
-
 41
41
-
 42
42
-
 43
43
-
 44
44


Numark X9 Guide de démarrage rapide
- Catégorie
- Microphones
- Taper
- Guide de démarrage rapide
dans d''autres langues
- italiano: Numark X9 Guida Rapida
- English: Numark X9 Quick start guide
- español: Numark X9 Guía de inicio rápido
- Deutsch: Numark X9 Schnellstartanleitung