NutriBullet NBP50100 Mode d'emploi
- Catégorie
- Robots culinaires
- Taper
- Mode d'emploi

FOOD PROCESSOR
ENGLISH
Page 2
NEDERLANDS
Pagina 12
FRANÇAIS
Page 23
User
guide. Gebruikers
handleiding. Manuel
d’utilisation.
2022-07-26 NB Food-Processor UG V03.indd 12022-07-26 NB Food-Processor UG V03.indd 1 18-08-2022 15:1518-08-2022 15:15

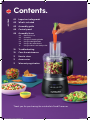
Contents.
Thank you for purchasing the nutribullet® Food Processor.
03 Important safeguards
05 What’s included
05 Assembly guide
06 Control panel
06 Assembly & use
06 Before first use
06 Assembly
07 Using the chopping blade
08 Using the dough blade
09 Using a disc attachment
10 Using the dual-size food pusher
10 Troubleshooting
10 Care & maintenance
11 How to store
11 Accessories
11 Warranty registration
ENGLISH
2022-07-26 NB Food-Processor UG V03.indd 22022-07-26 NB Food-Processor UG V03.indd 2 18-08-2022 15:1518-08-2022 15:15

GENERAL SAFETY INFORMATION
WARNING! AVOID CONTACT WITH MOVING
PARTS.
Blades and discs are sharp. Handle carefully.
Do not leave the appliance unattended when
in use.
• Do not overfill the bowl. Make sure to stay
at or below the LIQUID MAX line when
using liquid ingredients to reduce the
risk of injury or damage to the machine.
Overfilling the bowl can cause damage
to the bowl or cover and cause the
ingredients to leak.
• Always make sure the unit is properly and
completely assembled before connecting
to power outlet and operating. Always
make sure the bowl is securely locked in
place (with lid on and locked) before the
motor is turned on. Do not attempt to
remove the bowl or lid while the unit is
in operation.
• Do not attempt to defeat the lid interlock
mechanism.
• This appliance shall not be used by
children. Keep the appliance and its cord
out of reach of children.
• Children shall not play with the appliance.
• Appliances can be used by persons with
reduced physical, sensory or mental
capabilities or lack of experience and
knowledge if they have been given
supervision or instruction concerning use
of the appliance in a safe way and if they
understand the hazards involved.
• Do not immerse the appliance, motor
base, cord, or plug in water or any other
liquid.
• Always disconnect the appliance from
the power supply if it is left unattended
and before assembling, disassembling or
cleaning.
• Switch o the appliance and disconnect
from power supply before changing
accessories or handling moving parts.
• Never store the blade attachments in the
bowl without the lid in place. Exposed
blades can present a dangerous hazard.
• Do not use this appliance if any parts
appear to be damaged. If you have any
questions or concerns, please contact
customer service.
• Do not use outdoors.
• Never continuously operate for longer than
one minute intervals. Allow at least a minute
before starting another processing cycle.
FEED CHUTE
• Never push food into the feed chute with
your fingers or utensils. Only use the food
pusher provided. If food becomes lodged
in the feed chute, ONLY use the food
pusher provided to push it down. Do not
place hand or fingers into the feed chute.
• Keep hands and utensils out of the feed
chute and bowl and away from moving
blades or discs while processing food, to
reduce the risk of severe injury to persons
or property damage. A scraper may be
used BUT ONLY WHEN THE APPLIANCE IS
OFF.
• Do not overload the feed chute with
ingredients.
• When using the food pusher, never use
excessive force to push food down the
feed chute. Wait until food naturally moves
down the feed chute and into the bowl
before adding more food.
!
Save these instructions!
FOR HOUSEHOLD USE ONLY
Important safeguards.
Warning! To avoid the risk of serious injury, carefully read all instructions before operating
your nutribullet® Food Processor.
When using any electrical appliance, basic safety precautions should always be observed,
including the following important information.
3
2022-07-26 NB Food-Processor UG V03.indd 32022-07-26 NB Food-Processor UG V03.indd 3 18-08-2022 15:1518-08-2022 15:15

ELECTRICAL SAFETY
Do not use this product in locations with
dierent electrical specifications or plug
types. Do not operate with any type of plug
adapter or voltage converter device, as
these may cause electrical shorting, fire,
electric shock, personal injury or product
damage. This appliance has important
markings on the plug blade. The cord is not
suitable for replacement. If damaged, the
appliance must be replaced.
• CAUTION: In order to avoid a hazard due
to inadvertent resetting of the thermal cut-
out, this appliance must not be supplied
through an external switching device, such
as a timer, or connected to a circuit that is
regularly switched on and o by the utility.
• Do not modify the plug in any way.
• To unplug, grasp the plug and pull from the
outlet. Never pull from the power cord.
• Do not let the power supply cord hang over
the edge of a table or countertop.
• Do not let the power supply cord touch
hot surfaces, including stove, or become
knotted or tangled.
• If the supply cord is damaged, it must be
replaced by the manufacturer, its service
agent or similarly qualified persons in
order to avoid a hazard.
• Regularly inspect the power cord, plug, and
appliance for any damage. Do not operate
any appliance with a damaged cord or
plug or if the appliance malfunctions, or
is dropped or damaged in any manner.
Contact Customer Service for assistance at
service@nutribulletretail.com.
ADDITIONAL SAFEGUARDS
• Remove and safely discard any packaging
material or promotional labels before using
the appliance for the first time.
• Do not put any non-food items in any of the
appliance pieces, as doing so may damage
the unit and or cause severe personal injury or
property damage.
• This appliance is not intended to be an ice
crusher. Attempting to crush ice may cause
permanent damage to the blades or cause
WARNING!
the unit to malfunction, resulting in personal
injury or property damage.
• Make sure you have removed any rind from
fruit prior to adding to the bowl. Do not use
fruits that contain seeds or pits unless they
have been completely removed.
• Do NOT attempt to use blade, cup or bowl
attachments from another nutribullet® or a
magic bullet® product with the nutribullet®
Food Processor. Only use the bowl and
blade attachments that come with your unit.
• The use of attachments not recommended
or sold by the manufacturer or distributor
Nutribullet Retail may cause personal injury
or property damage.
• Ensure that the surface where the appliance
operates is stable, level, clean, and dry.
• Vibration may occur during normal
operation.
• Any significant spillage onto the surface
under or around the appliance, or onto
the appliance itself, should be cleaned
and dried before continuing to use the
appliance.
• When using this appliance, provide
adequate air space above, below, and on
all sides for circulation.
• Periodically inspect all nutribullet®
components for damage or wear that
may impair proper function or present an
electrical hazard. Make sure that the power
cord and plug are undamaged. Discontinue
use and replace if you detect damage to the
motor body, work bowl, or any attachments.
Ensure that the blades rotate freely and
that the structure is undamaged. Follow
the recommended procedures in the Care
and Maintenance section of this guide,
and never operate your nutribullet® with
damaged components.
• If your nutribullet® malfunctions in any way,
immediately discontinue use and contact
customer service via info@nutribulletretail.com.
• If you have any comments, questions, or
concerns, please go to info@nutribulletretail.
com or service@nutribulletretail.com.
Save these
instructions!
!
4
2022-07-26 NB Food-Processor UG V03.indd 42022-07-26 NB Food-Processor UG V03.indd 4 18-08-2022 15:1518-08-2022 15:15

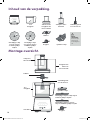
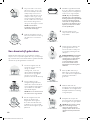
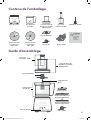
spiralizer disc
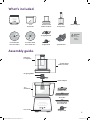
What’s included.
Assembly guide.
motor base dual-size
food pusher
reversible thin
slice/shred disc
blade adaptor
reversible thick
slice/shred disc
1.7 L
work bowl
work bowl lid
with feed chute
chopping blade
OFF LOW HIGH PULSE
7-cup work bowl
OFF LOW HIGH PULSE
Base Unit
spiralizer disc
dough blade
OFF LOW HIGH PULSE
motor base
1.7 L
work bowl
dual-size
food pusher
chopping blade
work bowl lid
with feed chute
blade adaptor
CAUTION:
Blades
are sharp.
Handle
carefully.
reversible thin slice/
shred disc
reversible thick
slice/shred disc
spiralizer disc
dough blade 5
2022-07-26 NB Food-Processor UG V03.indd 52022-07-26 NB Food-Processor UG V03.indd 5 18-08-2022 15:1518-08-2022 15:15

Before fi rst use.
Before using your nutribullet® Food
Processor for the fi rst time, please take a
moment to perform the steps below.
1. UNPACK
Open box. Remove the Motor Base and all
attachments. Place all parts on a fl at, dry
surface.
2. CLEAN
Rinse all detachable parts and accessories. All
parts except the Motor Base are dishwasher
safe, or can be cleaned by rinsing with warm,
soapy water. Clean the Motor Base with a
clean, damp cloth.
WARNING: Never submerge the Motor Base in
water or any other liquid. See Care & Maintenance
instructions on page 10-11 for more detailed clean-
ing instructions.
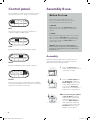
1 Place the Work Bowl on a
clean, dry, fl at surface, like a
countertop or table.
Assembly.
Review all warning and caution statements in the
Important Safeguards section (pages 2-5) and
above before proceeding to Step 1.
Assembly & use.
The nutribullet® Food Processor features a multi-
speed control panel for all types of food prep.
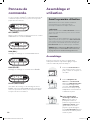
Control panel.
OFF:
Stops the Food Processor when operating on
continuous LOW or HIGH speeds.
HIGH:
Continuous HIGH-speed chopping or mixing.
PULSE:
A burst of chopping or mixing that runs at HIGH
speed. PULSE must be held to activate; motion will
stop when the button is released.
LOW:
Continuous LOW-speed chopping or mixing.
LOW HIGH PULSE OFF
LOW HIGH PULSE OFF
LOW HIGH PULSE OFF
LOW HIGH PULSE OFF
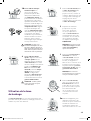
2 Place the Blade Adaptor in
the Work Bowl. Lower the
Blade Adaptor onto the top
of the shaft located in the
center of the Work Bowl.
Push down so the adaptor is
fi rmly and securely in place.
7-cup work bowl
place the blade adaptor in the work bowl
3a If using the Chopping Blade
3aIf using the Chopping Blade
or Dough Blade: Hold the
plastic center of the blade,
and carefully place it on
top of the Blade Adaptor.
Slide the blade down until
it reaches the bottom of the
Work Bowl. Press it down
fi rmly to set it in place.
6
2022-07-26 NB Food-Processor UG V03.indd 62022-07-26 NB Food-Processor UG V03.indd 6 18-08-2022 15:1518-08-2022 15:15

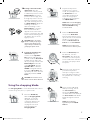
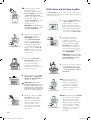
4If using the Spiralizer disc
attachment: Align the
notches on the Spiralizer
Disc with the tabs that are
located inside the Work Bowl
towards the top. Once the
disc is properly seated on the
Blade Adaptor and inside
of the Work Bowl, turn the
Spiralizer Disc so that the
'FRONT' is aligned with the
front of the Motor Base. The
spiralizer part of the disc will
sit directly under the Feed
Chute.
CAUTION: Never run the motor
with more than 1 blade attached.
3c If using the Spiralizer disc
1 Place the Work Bowl,
with the Chopping Blade
attached, on a clean,
dry, fl at surface like a
countertop. Refer to the
assembly instructions
on page 12 for how to
properly attach the
Chopping Blade.
2 Prepare food (cut into
smaller pieces, remove
seeds, etc.) and place into
the Work Bowl. Do not
overload bowl with food.
If you are using liquid
ingredients do not fi ll past
the LIQUID MAX line.
NOTE: Make sure the Chopping
Blade has been attached to the
Work Bowl BEFORE adding
food to the bowl.
Using the chopping blade.
The Chopping Blade is a versatile blade that can be
used to chop, mix, mince, or purée foods.
3a If using the Chopping Blade
2 Prepare food (cut into smaller pieces, remove seeds, etc.)
3b If using a Slice/Shred
thin/thick shred disc
3bIf using a Slice/Shred disc
attachment: The disc
attachments can be placed
in 2 di erent positions on the
Blade Adaptor. The lower
position is for storage, and
the higher position is for use.
Hold the center knob of the
disc, and carefully place it on
the Blade Adaptor. Align the
markings on the disc
with the markings on the
Blade Adaptor, so that the
lines connect. If the disc
appears to be in the lower
position, remove the disc and
rotate until the markings line
up and the disc sits in the
higher position.
CAUTION: Blades are sharp!
Handle carefully. Keep fi ngers
away from the blade’s sharp
edges. Always hold blades by
grasping the plastic areas.
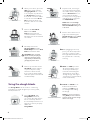
4 Place the Work Bowl, with
lid attached, onto the
Motor Base. Turn the bowl
clockwise to lock into place.
You should hear a click when
the bowl is properly locked
into place.
3 Place the Work Bowl Lid
on top of the Work Bowl.
Turn the lid clockwise, lining
up the arrows on the lid and
handle, to lock into place.
Place the Dual-Size Food
Pusher into the Feed Chute.
NOTE: The motor will not run
unless the lid is locked into place.
5b If you need to add liquid
while processing, unlock
the Inner Pusher by
turning the Pusher Cap
clockwise. Once unlocked, lift
the Inner Pusher and drizzle
liquid through the narrow
chute.
NOTE: Do not fi ll liquid
ingredients past the LIQUID
MAX line.
5a Plug in the unit, then press
your desired speed to
start processing food. The
blue light will illuminate over
the speed that is currently
running.
HIGH PULSEOFF LOW
OFF LOW HIGH PULSE
7
2022-07-26 NB Food-Processor UG V03.indd 72022-07-26 NB Food-Processor UG V03.indd 7 18-08-2022 15:1518-08-2022 15:15

6 When you’re done, press the
OFF button. Wait until the
Chopping Blade has come
to a complete stop. Remove
the Work Bowl by turning
the handle counterclockwise
to unlock it from the Motor
Base. Lift the bowl up o
the base and set it on a fl at
surface.
7 Remove the Work Bowl
Lid from the Work
Bowl by turning the lid
counterclockwise to unlock.
Carefully remove the lid and
set it aside.
OFF LOW HIGH PULSE
8 Carefully remove the
Chopping Blade and the
Blade Adaptor from the Work
Bowl and set them aside.
CAUTION: Blades are sharp!
Handle carefully. Keep fi ngers
away from the blade’s sharp
edges. Always hold blades by
grasping the plastic areas.
9 Remove your food from the
Work Bowl using a spatula
or spoon. Dispose of any
leftover food in the bowl,
then clean the bowl, blades,
and other parts to avoid food
residue buildup.
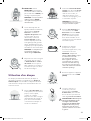
Using the dough blade.
The Dough Blade can be used for combining
ingredients to make dough for pie crusts, pizza,
bread, and more!
3 Refer to the instructions on
page 14 for attaching the
Work Bowl Lid and the Work
Bowl to the Motor Base.
4a After plugging in the unit,
press your desired speed to
start processing food. The
blue light will illuminate over
the speed that is currently
running.
OFF LOW HIGH PULSE
1 Place Work Bowl, with
Dough Blade attached,
on a clean, dry, fl at surface
like a countertop. Refer to
the assembly instructions on
page 12 for how to properly
attach the
Dough Blade.
2 Prepare food, ensuring to
chop ingredients like butter
into small chunks, and place
into the Work Bowl. Do not
overload the bowl with
food. If you are using liquid
ingredients do not fi ll past
the LIQUID MAX line.
NOTE: Make sure the Dough
Blade has been attached to the
Work Bowl BEFORE adding food
to the bowl.
2 Prepare food (cut into smaller pieces, remove seeds, etc.)
4bLOW: Use LOW speed for
all dough making. Using
a lower speed will help
to avoid overworking the
dough which can lead to
a tough dough. If dough is
cold and not overly blended,
it will remain fl aky.
OFF LOW HIGH PULSE
4cPULSE: Use PULSE to cut
butter into fl our before
switching to LOW speed
for mixing and kneading
the dough.
NOTE: We do not recommend
using HIGH speed as it will over
work the dough, and the dough
will become tough.
OFF LOW HIGH PULSE
8
2022-07-26 NB Food-Processor UG V03.indd 82022-07-26 NB Food-Processor UG V03.indd 8 18-08-2022 15:1518-08-2022 15:15

6 Refer to the instructions
on page 15 for removing
the Work Bowl from the
Motor Base once dough
has reached your desired
consistency and you are
done mixing.
5 If you need to add liquid
while processing, unlock
the Inner Pusher by turning
the Pusher Cap clockwise.
Once unlocked, lift the Inner
Pusher and drizzle liquid
(like ice water) through the
narrow chute. Process just
long enough to bring dough
together in a loose ball.
NOTE: Do not fi ll liquid
ingredients past the LIQUID MAX
line.
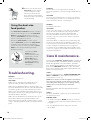
1 Place the Work Bowl, with
disc attached, on a clean,
dry, fl at surface like a
countertop. Refer to the
assembly instructions on
page 12 for how to properly
attach a disc for use.
2 Place the Work Bowl Lid on
top of the Work Bowl. Turn
the lid clockwise, lining up the
arrows on the lid and handle,
to lock into place.
NOTE: The motor will not run
unless the lid is locked in place.
Using a disc attachment.
The disc attachments are for slicing, shredding, or
spiralizing your ingredients. The Slice/Shred Discs
are reversible and labeled on either side. Place the
side you want to use with its name facing up.
4 Prepare food (cut into
smaller pieces, remove seeds,
etc.) and set aside.
3 Place the Work Bowl, with
lid attached, onto the Motor
Base. Turn the Work Bowl
clockwise to lock in place.
You should hear a click when
the bowl is properly locked in
place.
NOTE: When using the Spiralizer
Disc, cut the produce into
pieces that will easily fi t in the
chute. We recommend to cut
foods vertically along the sides
creating a 'square' shape for best
spiralizing results.
6 With the motor running, place
food into the Feed Chute,
carefully guiding it down
using the Food Pusher.
7 When you’re done, or when
your processed ingredients
have fi lled the work bowl,
press the OFF button. Wait
until the blade has come to a
complete stop.
8 Remove the Work Bowl
Lid from the Work Bowl
by turning the lid
counterclockwise to unlock.
Carefully remove the lid and
set it aside.
5 Plug in the unit and press the
HIGH speed button.
HIGH PULSEOFF LOW
OFF LOW HIGH PULSE
WARNING: always use the Food
Pusher, not fi ngers or utensils,
to push food down chute. Do
not insert too much food at one
time. Never force stuck food
down chute.
9 Carefully remove the Disc
Blade and Blade Adaptor
from the bowl and set
them aside.
OFF LOW HIGH PULSE CAUTION: Blades are sharp! Handle
carefully. Keep fi ngers away from
the blades sharp edges. Always hold
blades by grasping the plastic areas.
9
2022-07-26 NB Food-Processor UG V03.indd 92022-07-26 NB Food-Processor UG V03.indd 9 18-08-2022 15:1518-08-2022 15:15

10 Remove your food from the
Work Bowl using a spatula
or spoon. Dispose of any
leftover food in the bowl,
then clean the bowl, blades,
and other parts to avoid food
residue buildup.
Using the dual-size
food pusher.
The Dual-Size Food Pusher features a smaller
pusher inside a larger one. Use the Full-Sized
Pusher for guiding bigger pieces of food
down the Feed Chute — like when shredding
lettuce or a big block of cheese.
Unlock the Inner Pusher to create a more
narrow Feed Chute, and use the Inner Pusher
for better control with thinner ingredients,
such as zucchini or carrots. The narrow Feed
Chute is also ideal for drizzling in liquids
during processing.
Separate the Inner
Pusher from the
outer pusher piece by
gripping the circular
Pusher Cap. Twist
the top of the pusher
clockwise and lift the
Inner Pusher from the
outer piece.
OFF LOW HIGH PULSE
HIGH PULSEOFF LOW
Troubleshooting.
PROBLEM
Unit does not power on.
SOLUTIONS
Make sure the Power Cord is plugged into an
electrical outlet, and that outlet has power.
Make sure the Work Bowl Lid is locked into place on
top of the Work Bowl. The arrow on the lid and handle
should line up when properly locked in place. If the
lid becomes unlocked at any time while the motor is
running, the unit will stop running and the blue lights
around the buttons will fl ash.
Make sure the Work Bowl is locked into place on the
Motor Base. When placing the Work Bowl on the
Motor Base, turn the handle clockwise until you hear
a click – indicating that the bowl is properly locked in
place.
PROBLEM
The Food Processor stopped in the middle of
processing, and the control panel lights fl ashed three
times.
SOLUTION
You have exceed 10 minutes of continuous running
time. Unplug the Food Processor and keep the unit
o for 15 minutes before continuing use.
PROBLEM
Feed Chute is blocked.
SOLUTIONS
If you notice that a piece or cluster of food appears
to be stuck in the Feed Chute, blocking food fl ow,
turn the motor OFF. Unlock the Work Bowl Lid
from the Work Bowl, and use the Food Pusher, a
spatula, or spoon to remove the stuck food before
reassembling.
If the Work Bowl is nearly full of food, that may stop
the fl ow of food down the Feed Chute. If the food
has reached to just below the disc attachment, you’ll
need to empty the bowl before processing more
food. Turn the motor OFF, wait until the blades have
come to a complete stop and disassemble the unit to
empty the Work Bowl.
Care & maintenance.
Cleaning the nutribullet®Food Processor is quick and
easy. All detachable parts (Blade Adaptor, Chopping
Blade, Dough Blade, Slice/Shred Discs, Spiralizer
Disc, Work Bowl, Work Bowl Lid, and Dual-Size Food
Pusher) are TOP RACK dishwasher-safe. The Motor
Base can be quickly hand-washed with a damp cloth.
Read on for best practices.
STEP 1:
The most important thing — ALWAYS POWER OFF THE
UNIT and UNPLUG the Motor Base from the power
outlet when it is not in use.
NOTE: Do not attempt to handle the appliance until all parts
have stopped moving! This includes during assembly and
disassembly, while changing accessories, during cleaning,
and any time you leave the machine unattended
STEP 2:
Detach the blades and other attachments from the
Motor Base.
STEP 3:
Clean the individual components as recommended in
the following sections.
MOTOR BASE:
• To avoid risk of injury, NEVER attempt to clean the
actuator system on the Motor Base while the unit is
plugged in.
• Do not attempt to remove any pieces from the
Motor Base.
10
2022-07-26 NB Food-Processor UG V03.indd 102022-07-26 NB Food-Processor UG V03.indd 10 18-08-2022 15:1518-08-2022 15:15

• Use a sponge or dish cloth dampened with warm
soapy water to wipe down the Motor Base until
clean.
• If necessary, you may use a small brush to scrub the
actuator system area to ensure it’s clean.
• To clean leakage residue from the Motor Base, wipe
with a damp sponge and warm water.
WARNING: Never submerge the Motor Base in water.
ALL DETACHABLE PARTS:
WARNING: Blades are sharp! Handle all blade
attachments with care when cleaning!
• The Blade Adaptor, Blade Attachments, Work Bowl,
Work Bowl Lid, and Dual-Size Food Pusher are all
TOP RACK dishwasher-safe. These parts may also
be cleaned by hand with warm soapy water.
• We recommend cleaning all removable parts after
each use to reduce the buildup of residue.
WARNING: NEVER use the sanitize cycle — heat this high
can warp the plastic.
WARNING: Do not clean the Work Bowl, Work Bowl Lid,
or other parts of the appliance with steel wool pads/
balls or other hard material that might scratch your Food
Processor.
The blade attachments conveniently store within
the Work Bowl when not in use. Make sure the
unit is powered o and unplugged before placing
attachments in the Work Bowl for storage. Read on
for details:
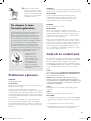
How to store.
the Spiralizer Disc, align the
notches on the Spiralizer
Disc with the tabs that are
located inside of the Motor
Base towards the top. Ensure
the disc is properly seated on
the blade and adapter, inside
of the Motor Base, and turn
the Spiralizer Disc so that the
'FRONT' is aligned with the
front of the Motor Base.
STEP 5:
Place the Work Bowl Lid onto the Work Bowl and lock
into place, with the Dual-Size Pusher nestled in the
Feed Chute.
NOTE: The power cord wraps under the bottom of the Motor
Base – keeping it neatly tucked away when stored.
Accessories.
To order accessories, please visit our website at
nutribullet.nu or nutriliving.shop.
NOTE: All included blades and discs will not store in the work
bowl together, you will have two storage options:
OPTION 1: Chopping Blade, Dough Blade, 2 Slice/Shred Discs
OPTION 2: Chopping Blade, Dough Blade, 1 Slice/Shred Disc,
Spiralizer Disc
STEP 1:
Place the Blade Adaptor on the center shaft.
STEP 2:
Lower the Chopping Blade onto the Lower the
Chopping Blade onto the blade shaft, and then lower
the Dough Blade onto the blade shaft so that it sits
above the Chopping Blade on the shaft.
STEP 3:
Lower the disc attachments onto the adaptor, on top of
the Chopping Blade. In storage mode, the discs should
sit in the lower position on the adaptor than when used
in normal operation. In storage mode, the lines on the
disc will NOT be aligned with the lines on the adaptor.
STEP 4:
The Spiralizer Disc should be the last disc stored, if
storing with one of the Slice/Shred Discs. When storing
Warranty registration.
Please visit nutriliving.shop to register your new
nutribullet® Food Processor. You will be asked to enter
the Serial Number* of your product, along with the
purchase date and name of the shop of purchase.
The registration will enable us to contact you in the
unlikely event of a product safety notifi cation. By
registering your product you acknowledge to have
read and understood the instructions for safety and
use, and the warnings set forth in the accompanying
instructions.
*To find the serial number, check under the
Motor Base.
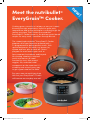
Are you happy with your
nutribullet®?
Share your recipes, posts, tips & tricks! Like & follow us
@nutribullet.nordics
Tag your blends #nutribullet #nutribullet.nordics
#nutrilovers #healthy #healthylifestyle
How to fi nd the serial
number under the
engine base.
12345678910110
11
2022-07-26 NB Food-Processor UG V03.indd 112022-07-26 NB Food-Processor UG V03.indd 11 18-08-2022 15:1518-08-2022 15:15

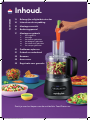
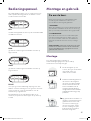
Inhoud.
Dank je voor het kopen van de nutribullet® Food Processor.
13 Belangrijke veiligheidsinstructies
16 Inhoud van de verpakking
16 Montage overzicht
17 Bedieningspaneel
17 Montage en gebruik
17 Eerste gebruik
17 Montage
18 Het hakmes gebruiken
19 Het deegmes gebruiken
20 Een draaischijf gebruiken
21 De stamper gebruiken
21 Problemen oplossen
21 Gebruik en onderhoud
22 Bewaren
22 Accessoires
22 Registratie voor garantie
NEDERLANDS
2022-07-26 NB Food-Processor UG V03.indd 122022-07-26 NB Food-Processor UG V03.indd 12 18-08-2022 15:1518-08-2022 15:15

ALGEMENE VEILIGHEIDSINFORMATIE
WAARSCHUWING! RAAK BEWEGENDE
ONDERDELEN NIET AAN.
Messenbladen en snijschijven zijn scherp. Ga
er voorzichting mee om.
Laat de foodprocessor niet onbeheerd
achter terwijl het in gebruik is.
• Vul de mengkom met vloeibare
ingrediënten tot aan de MAX-aanduiding
of minder om het risico op letsel of schade
aan het apparaat te verminderen. Een
te volle kom kan beschadigd raken en tot
lekkage van ingrediënten leiden.
• Zorg ervoor dat de Foodprocessor
compleet en correct is gemonteerd
voordat je de stekker in het stopcontact
steekt en het apparaat inschakelt.
Verzeker jezelf ervan dat de mengkom
stevig op zijn plek zit (met het deksel erop
en goed afgesloten) vóórdat je de
Foodprocessor inschakelt. Probeer de kom
of het deksel niet te verwijderen terwijl het
apparaat in gebruik is.
• Je mag het vergrendelingsmechanisme van
het deksel niet forceren.
• Dit apparaat mag NIET door kinderen
worden gebruikt. Houd het apparaat én
het snoer buiten bereik van kinderen.
• Dit apparaat is geen speelgoed.
• Dit apparaat mag worden gebruikt door
personen met lichamelijke, zintuiglijke of
geestelijke beperkingen of met gebrek aan
ervaring en kennis, op voorwaarde dat zij
worden begeleid of geïnstrueerd over het
veilige gebruik van het apparaat en op de
hoogte zijn van de risico’s ervan.
• Nooit het apparaat, de motorbasis, het
snoer en de stekker in water of andere
vloeistof dompelen.
• Schakel het apparaat eerst altijd uit én
haal de stekker uit het stopcontact als
je het apparaat niet gebruikt, voordat
je onderdelen demonteert en voor
schoonmaak.
• Schakel het apparaat uit en haal de stekker
uit het stopcontact voordat je accessoires
verwisselt of met je vingers in de buurt
komt van bewegende onderdelen.
• Berg de messen NIET op in de kom
zonder deze af te sluiten met het deksel.
Losliggende messen vormen een gevaar.
• Gebruik dit apparaat niet als er onderdelen
beschadigd lijken te zijn. Heb je vragen of
zorgen, neem dan contact op met onze
klantenservice: info@nutribulletretail.com
• Gebruik het apparaat alleen binnenshuis.
• Laat de Foodprocessor nooit langer dan
één minuut aaneengesloten draaien.
Wacht minimaal een minuut voordat je
een nieuwe cyclus start.
INVOERSCHACHT
• Gebruik uitsluitend de meegeleverde
stamper om voedsel in de invoerschacht te
duwen. Gebruik hiervoor nooit je vingers,
keukengerei of andere materialen. Blijft
een ingrediënt in de invoerschacht
steken, gebruik dan ook dan uitsluitend
de stamper. Nooit je hand of vingers in de
invoerschacht doen.
• Houd handen, vingers, haar en kleding,
maar ook spatels en ander keukengerei
uit de buurt van het apparaat als het is
ingeschakeld om het risico op ernstig letsel
aan personen en zaken te vermijden. Je
mag een schraper gebruiken maar alléén
als het apparaat uitgeschakeld is.
!
Bewaar deze instructies!
UITSLUITEND VOOR
HUISHOUDELIJK GEBRUIK
Belangrijke veiligheidsinstructies.
Let op! Lees alle instructies aandachtig door om het risico op ernstig letsel te beperken
alvorens je de nutribullet® Foodprocessor in gebruik neemt. Houd je bij het gebruik van
elektrische apparatuur altijd aan de standaard veiligheidsvoorschriften, waaronder de
volgende belangrijke informatie.
13
2022-07-26 NB Food-Processor UG V03.indd 132022-07-26 NB Food-Processor UG V03.indd 13 18-08-2022 15:1518-08-2022 15:15

• Stop de invoerschacht niet te vol.
• Gebruik geen overmatige kracht met
de stamper om ingrediënten in de
invoerschacht te duwen. Wacht totdat
de ingrediënten zelf geleidelijk door de
invoerschacht in de kom zakken alvorens
nieuw voedsel in de schacht te doen.
ELEKTRISCHE VEILIGHEID
Gebruik dit product niet op een locatie
waar de stroomvoorziening anders is of
andere stekkers worden gebruikt. Gebruik
het apparaat niet met een adapter
of omvormer om kortsluiting, brand,
elektrische schokken, letsel en schade te
voorkomen. Dit apparaat is voorzien van
belangrijke aanduidingen op de stekker.
Het netsnoer kan niet worden vervangen.
Bij schade moet het apparaat worden
vervangen.
• LET OP: Om gevaar als gevolg van een
onbedoelde reset van de thermische
beveiliging te voorkomen, mag dit
apparaat niet worden aangesloten op
externe schakelapparatuur, zoals een
timer, of op een elektrisch circuit dat
periodiek wordt in- en uitgeschakeld.
• De stekker mag niet verandert worden.
• Om het apparaat van de stroom te halen
pak je de stekker en haal je die uit het
stopcontact. Trek nooit aan het snoer om
de stekker uit het stopcontact te halen.
• Laat het snoer niet over de rand van de
tafel of het aanrecht hangen.
• Het snoer mag niet in aanraking komen
met hete oppervlakken, zoals een
kookplaat, en het mag niet in de knoop
raken.
• Als het snoer of de stekker beschadigd is,
moet het onderdeel worden vervangen
door www.nutribulletoutlet.nl of een
vergelijkbaar erkend onderhoudsbedrijf
om gevaarlijke situaties te voorkomen.
• Controleer het snoer, de stekker en het
apparaat zelf regelmatig op eventuele
gebreken. Nooit een elektrisch apparaat
gebruiken met een beschadigde stekker
of snoer, als het apparaat niet goed
werkt, gevallen is of op andere wijze is
WAARSCHUWING!
beschadigd. Neem contact op met de
klantenservice voor advies via
service@nutribulletretail.com.
AANVULLENDE WAARSCHUWINGEN
• Verwijder verpakkings- en reclamemateriaal
en gooi ze op een veilige manier weg voordat
je het apparaat voor de eerste keer gebruikt.
• Doe geen niet-eetbare zaken in de mengkom
en bekers; deze zouden het apparaat
beschadigen en persoonlijk letsel of schade
aan eigendommen veroorzaken.
• Dit apparaat is níet bedoeld voor het malen
van ijsblokjes. Als je probeert ijsblokjes te
malen, kan dat het messenblad onherstelbaar
beschadigen of storingen aan het apparaat
veroorzaken met mogelijk persoonlijk letsel of
schade aan eigendommen tot gevolg.
• Zorg dat je voor gebruik de schil van fruit
verwijdert. Gebruik geen fruit dat pitten of
zaden bevat, tenzij je de pitten en zaden
vantevoren compleet verwijdert.
• Bekers en messen van andere nutribullet
of magic bullet-apparaten kunnen
NIET worden gebruikt in de nutribullet
Foodprocessor! Gebruik uitsluitend de kom
en messen die bij de originele nutribullet
Foodprocessor horen.
• Het gebruik van accessoires en onderdelen
die NIET door de leverancier van deze
nutribullet Foodprocessor worden
aanbevolen of verkocht kunnen leiden tot
persoonlijk letsel of beschadiging van de
Foodprocessor en het vervallen van recht
op garantie.
• Gebruik het apparaat uitsluitend op
een stevige, egale, schone en droge
ondergrond.
• Tijdens normaal gebruik kunnen er
trillingen optreden.
• Als je onder, rondom of op het apparaat
morst, maak dat dan meteen schoon en
droog voordat je verdergaat.
• Tijdens het gebruik van het apparaat
moet er onder, boven en rondom de
Foodprocessor voldoende ruimte zijn voor
luchtcirculatie.
14
2022-07-26 NB Food-Processor UG V03.indd 142022-07-26 NB Food-Processor UG V03.indd 14 18-08-2022 15:1518-08-2022 15:15

• Controleer het snoer, de stekker en
hetapparaat zelf regelmatig op eventuele
gebreken of slijtage dat het goed
functioneren van de Foodprocessor
negatief kan beïnvloeden of een gevaar
kan opleveren.
• Verzeker jezelf ervan dat het snoer en de
stekker onbeschadigd zijn.
• Staak het gebruik en vervang
het accessoire, onderdeel als je
beschadigingen ontdekt.
• Gebruik je nutribullet NOOIT met
beschadigde onderdelen of accessoires.
Je kunt originele nieuwe kopen op www.
nutribullet.nl en nutribullet.be.
• Zorg ervoor dat de messenbladen vrij
kunnen ronddraaien.
• Als het snoer of de stekker beschadigd
is, moet het worden vervangen door een
reparatiedienst als www.nutribulletoutlet.
nl of een vergelijkbaar erkend
onderhoudsbedrijf.
• Volg de instructies in de schoonmaak- en
onderhoudssectie van deze handleiding op
pagina 21 en 22.
• Als je nutribullet Foodprocessor door
welke oorzaak dan ook niet meer goed
functioneert, staak het gebruik en neem
contact op met onze klantenservice, zie
nutribullet.nl of nutribullet.be. Daar kan je
ook terecht voor het kopen van accessoires
of andere nutribullet producten.
• Het je vragen, tips of opmerkingen over
onduidelijkheden in deze handleiding,
neem dan contact op met
info@nutribulletretail.com.
Bewaar deze
instructies!
!
15
2022-07-26 NB Food-Processor UG V03.indd 152022-07-26 NB Food-Processor UG V03.indd 15 18-08-2022 15:1518-08-2022 15:15

spiralizer disc
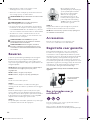
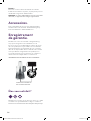
Inhoud van de verpakking.
Montage overzicht.
motor basis stamper in twee
formaten
tweezijdige schijf
voor fi jn raspen
en dunne plakjes
snijden
verbindingsstuk
voor de messen
tweezijdige schijf
voor grover raspen
en dikkere plakjes
snijden
1.7 L
mengkom
deksel van de
mengkom met
invoerschacht
hakmes
OFF LOW HIGH PULSE
7-cup work bowl
OFF LOW HIGH PULSE
Base Unit
spiralizer schijf
deegmes
OFF LOW HIGH PULSE
motorbasis
1.7 L
mengkom
stamper in
twee formaten
mengkom met
deksel en
invoerschacht
hakmes
verbindingsstuk
voor de messen
WAAR-
SCHUWING:
de messen zijn
scherp. Ga er
voorzichtig mee
om.
tweezijdige schijf voor fi jn raspen
en dunne plakjes snijden
tweezijdige schijf voor grover
raspen en dikkere plakjes snijden
spiralizer schijf
deegmes
16
2022-07-26 NB Food-Processor UG V03.indd 162022-07-26 NB Food-Processor UG V03.indd 16 18-08-2022 15:1518-08-2022 15:15

De eerste keer.
Neem een momentje om onderstaand te lezen
voordat je jouw nutribullet® Food Processor
voor de allereerste keer gaat gebruiken.
1. UITPAKKEN
Open de verpakking en neem het apparaat met de
verschillende onderdelen uit de doos en zet of leg
alles op een vlak, horizontaal en droog oppervlak.
2. SCHOONMAKEN
Spoel alle accessoires en losse onderdelen (dus
niet de motorbasis) af met een warm sopje om
ze schoon te maken of was ze in de vaatwasser.
Reinig de motorbasis met een schone, vochtige
doek.
WAARSCHUWING: dompel de motorbasis nooit onder
in water of een andere vloeistof. Zie de onderhouds-
en schoonmaakinstructies op pagina 21 voor meer
gedetailleerde instructies.
1 Zet de mengkom op een
schoon, droog en horizontaal
oppervlak, zoals een
aanrecht of een tafel.
Montage.
Lees alle veiligheidsvoorschriften en
waarschuwingen (pagina 14 - 16) voordat je
verder leest en met stap 1 begint.
Montage en gebruik.
De nutribullet® Food Processor is uitgerust met een
multi-speed bedieningspaneel om allerlei soorten
voedsel te kunnen bereiden.
Bedieningspaneel.
OFF:
schakelt het apparaat uit als het op de snelheden LOW
en HIGH functioneert.
HIGH:
geschikt voor aaneengesloten hakken en mixen op
hoge snelheid.
PULSE:
een op hoge snelheid krachtig impuls geven aan
hakken of mixen. Handig voor een grovere structuur
of als je perfecte controle wilt hebben over de
textuur van je ingrediënten.
De PULSE knop moet ingedrukt worden om te
activeren; het pulseren zal stoppen als je de knop
loslaat.
LOW:
geschikt voor aaneengesloten hakken en mixen op
lage snelheid.
LOW HIGH PULSE OFF
LOW HIGH PULSE OFF
LOW HIGH PULSE OFF
LOW HIGH PULSE OFF
2 Plaats het verbindingsstuk voor
de messen in de mengkom
door hem over de bovenkant
van de schacht te zetten die
zich in het midden van de
mengkom bevindt. Druk nu
stevig naar beneden totdat de
verbindingsstuk stevig op zijn
plaats zit.
7-cup work bowl
place the blade adaptor in the work bowl
3a If using the Chopping Blade
3a Bij gebruik van het hakmes of
deegmes: Houd het kunststof
gedeelte van het mes vast
en zet het voorzichtig op
de messenhouder. Schuif
het mes omlaag tot op de
bodem van de mengkom.
Druk het stevig vast.
17
2022-07-26 NB Food-Processor UG V03.indd 172022-07-26 NB Food-Processor UG V03.indd 17 18-08-2022 15:1518-08-2022 15:15

4 Bij gebruik van de
spiraalsnijder: Lijn de
inkepingen op de spiraalsnijder
uit met de lipjes boven in
de mengkom. Wanneer de
schijf goed is bevestigd op
de messenhouder en in de
mengkom, draai je de schijf tot
de aanduiding ‘FRONT’ naar
de voorkant van de basisunit is
gericht. De spiraalsnijder van
de schijf bevindt zich nu recht
onder de invoerschacht.
LET OP: Zet de motor nooit aan
met meer dan één mes op de
houder.
3c If using the Spiralizer disc
1 Zet de mengkom met daarin
het hakmes op een schone,
droge en vlakke ondergrond,
zoals een aanrechtblad.
Raadpleeg de instructies op
pagina 12 voor het goed
plaatsen van het hakmes.
2 Maak de ingrediënten
klaar (door ze in kleinere
stukken te snijden, pitten te
verwijderen enzovoort) en
doe ze in de mengkom. Zorg
ervoor dat de kom niet te vol
wordt. Als je ook vloeibare
ingrediënten gebruikt,
mogen die niet hoger komen
dan het indicatiestreepje.
LET OP: Bevestig EERST het
hakmes in de mengkom en voeg
daarna pas ingrediënten toe.
Het hakmes gebruiken.
Met het veelzijdige hakmes kun je snijden, mengen,
fi jnhakken en pureren.
3a If using the Chopping Blade
2 Prepare food (cut into smaller pieces, remove seeds, etc.)
3b If using a Slice/Shred
thin/thick shred disc
3b Bij gebruik van een draaischijf
voor snijden of raspen:
Deze draaischijven kunnen
op twee manieren op de
messenhouder worden
bevestigd. De onderste
positie is voor wanneer
je het apparaat opbergt,
de bovenste positie voor
wanneer je het apparaat
gebruikt. Houd de schijf aan
het knopje in het midden vast
en schuif hem voorzichtig op
de messenhouder. Zorg dat
de markeringen op de schijf
aansluiten op de markeringen
op de messenhouder. Als
de schijf zich in de onderste
positie bevindt, haal je de
schijf er weer uit en draai je die
totdat de markeringen goed
zijn uitgelijnd en de schijf zich
in de bovenste positie bevindt.
LET OP: De messen zijn scherp!
Wees voorzichtig. Houd je vingers
uit de buurt van de scherpe
randen. Houd messen uitsluitend
vast bij de kunststof delen.
4 Zet de mengkom met het
deksel op de basisunit. Draai
de kom rechtsom vast. Je
hoort een klik wanneer de
mengkom op zijn plaats zit.
3 Doe het deksel op de
mengkom. Vergrendel het
deksel door het met de klok
mee te draaien tot de pijltjes
op het deksel en handvat
naar elkaar wijzen. Zet de
stamper in twee formaten in
de invoerschacht.
LET OP: De motor werkt niet als
het deksel niet is vergrendeld.
5b Als je tussendoor vloeistof
wilt toevoegen, open je de
binnenste stamper door de
stamperdop rechtsom te
draaien. Haal de binnenste
stamper omhoog en voeg
vloeistof toe via de smalle
invoerschacht.
LET OP: Laat vloeibare
ingrediënten niet hoger komen
dan het indicatiestreepje.
5a Steek de stekker in het
stopcontact en druk op de
knop met de gewenste
snelheid om je eten te
bereiden. Boven de gekozen
snelheid brandt een blauw
lampje.
HIGH PULSEOFF LOW
OFF LOW HIGH PULSE
18
2022-07-26 NB Food-Processor UG V03.indd 182022-07-26 NB Food-Processor UG V03.indd 18 18-08-2022 15:1518-08-2022 15:15

6 Druk op OFF wanneer je
klaar bent. Wacht tot het
hakmes volledig tot stilstand
is gekomen. Verwijder de
mengkom van de basisunit
door het handvat tegen de
klok in te draaien. Til de kom
van de basisunit en zet hem
op een vlakke ondergrond.
7 Haal het deksel van de
mengkom door het tegen
de klok in te draaien en te
ontgrendelen. Verwijder het
deksel voorzichtig en leg het
apart.
OFF LOW HIGH PULSE
8 Verwijder het hakmes en de
messenhouder voorzichtig uit
de mengkom en leg ze apart.
LET OP: De messen zijn scherp!
Wees voorzichtig. Houd je vingers
uit de buurt van de scherpe
randen. Houd messen uitsluitend
vast bij de kunststof delen.
9 Haal het voedsel uit de
mengkom met een spatel of
lepel. Verwijder alle restjes
uit de kom en maak daarna
de kom, messen en andere
onderdelen schoon.
Het deegmes gebruiken.
Met het deegmes kun je ingrediënten combineren
om deeg te maken voor taarten, pizza, brood en nog
veel meer!
3 Raadpleeg de instructies
op pagina 18-19 voor het
bevestigen van de deksel en
mengkom op de basisunit.
4a Steek de stekker in het
stopcontact en druk op
de knop met de gewenste
snelheid om je eten te
bereiden. Boven de gekozen
snelheid brandt een blauw
lampje.
OFF LOW HIGH PULSE
1 Zet de mengkom met
daarin het deegmes op een
schone, droge en vlakke
ondergrond, zoals een
aanrechtblad. Raadpleeg
de instructies op pagina 18-
19 voor het goed plaatsen
van het deegmes.
2 Maak de ingrediënten klaar
(door bijvoorbeeld boter in
kleinere stukken te snijden)
en doe ze in de mengkom.
Zorg ervoor dat de kom
niet te vol wordt. Als je ook
vloeibare ingrediënten
gebruikt, mogen die niet
hoger komen dan het
indicatiestreepje.
LET OP: Bevestig EERST het
deegmes in de mengkom en
voeg daarna pas ingrediënten
toe.
2 Prepare food (cut into smaller pieces, remove seeds, etc.)
4bLOW: De snelheid LOW is
geschikt voor het maken van
alle soorten deeg. Een lage
snelheid helpt te voorkomen
dat je het deeg te lang
kneedt en het te stevig
wordt. Deeg blijft luchtig als
het koud is en je het niet te
lang kneedt.
OFF LOW HIGH PULSE
4cPULSE: Met PULSE kun je
boter aan meel toevoegen
voordat je overschakelt naar
LOW voor het mengen en
kneden van het deeg.
LET OP: Als je de snelheid HIGH
gebruikt, kneed je het deeg te
veel en wordt het te stevig.
OFF LOW HIGH PULSE
19
2022-07-26 NB Food-Processor UG V03.indd 192022-07-26 NB Food-Processor UG V03.indd 19 18-08-2022 15:1518-08-2022 15:15

6 Haal de mengkom van de
basisunit wanneer het deeg
de gewenste consistentie
heeft.
5 Als je tussendoor vloeistof
wilt toevoegen, open je de
binnenste stamper door de
stamperdop rechtsom te
draaien. Haal de binnenste
stamper omhoog en voeg
vloeistof (zoals ijswater) toe
via de smalle invoerschacht.
Kneed net zolang tot het
deeg een luchtige bol vormt.
LET OP: Laat vloeibare
ingrediënten niet hoger komen
dan het indicatiestreepje.
1 Zet de mengkom met de
schijf erin op een schone,
droge en vlakke
ondergrond, zoals een
aanrechtblad. Raadpleeg
de instructies op pagina
18-19 voor het goed
plaatsen van een draaischijf.
2 Doe het deksel op de
mengkom. Vergrendel het
deksel door het met de klok
mee te draaien tot de pijltjes
op het deksel en handvat
naar elkaar wijzen.
LET OP: De motor werkt niet als
het deksel niet is vergrendeld.
Een draaischijf gebruiken.
Met de draaischijven kun je ingrediënten snijden,
raspen of in een spiraal snijden. De snij- en raspschijf
zijn omkeerbaar en aan beide kanten gelabeld. Plaats
de kant die je wilt gebruiken naar boven.
4 Maak de ingrediënten klaar
door ze in kleinere stukken te
snijden, pitten te verwijderen
enzovoort en leg ze apart.
3 Zet de mengkom met het
deksel op de basisunit.
Vergrendel de mengkom
door deze met de klok mee
te draaien. Je hoort een klik
wanneer de mengkom op zijn
plaats zit.
LET OP: Als je de spiraalsnijder
gebruikt, moet je de ingrediënten
zodanig snijden dat ze gemakkelijk
in de invoerschacht passen. We
raden aan om de ingrediënten in
de lengte in een vierkante vorm te
snijden, voor het beste resultaat
met de spiraalsnijder.
6 Terwijl de motor draait, doe
je de ingrediënten in de
invoerschacht en duw je ze
voorzichtig omlaag met de
stamper.
7 Druk op OFF wanneer je
klaar bent of de mengkom
vol is. Wacht tot het apparaat
volledig tot stilstand is
gekomen.
8
Haal het deksel van de
mengkom door het tegen de klok
in te draaien en te ontgrendelen.
Verwijder het deksel voorzichtig
en leg het apart.
5 Steek de stekker in het
stopcontact en druk op de
knop HIGH.
HIGH PULSEOFF LOW
OFF LOW HIGH PULSE
WAARSCHUWING: gebruik altijd
de stamper en nooit je vingers
of keukengerei om ingrediënten
omlaag te duwen. Doe niet
te veel ingrediënten tegelijk
in de invoerschacht. Forceer
ingrediënten niet omlaag als ze
vastzitten.
9 Verwijder de schijf en de
messenhouder voorzichtig uit
de mengkom en leg ze apart.
OFF LOW HIGH PULSE
LET OP: De messen zijn scherp!
Wees voorzichtig. Houd je
vingers uit de buurt van de
scherpe randen. Houd messen
uitsluitend vast bij de kunststof
delen.
20
2022-07-26 NB Food-Processor UG V03.indd 202022-07-26 NB Food-Processor UG V03.indd 20 18-08-2022 15:1518-08-2022 15:15
La page charge ...
La page charge ...
La page charge ...
La page charge ...
La page charge ...
La page charge ...
La page charge ...
La page charge ...
La page charge ...
La page charge ...
La page charge ...
La page charge ...
La page charge ...
La page charge ...
La page charge ...
La page charge ...
-
 1
1
-
 2
2
-
 3
3
-
 4
4
-
 5
5
-
 6
6
-
 7
7
-
 8
8
-
 9
9
-
 10
10
-
 11
11
-
 12
12
-
 13
13
-
 14
14
-
 15
15
-
 16
16
-
 17
17
-
 18
18
-
 19
19
-
 20
20
-
 21
21
-
 22
22
-
 23
23
-
 24
24
-
 25
25
-
 26
26
-
 27
27
-
 28
28
-
 29
29
-
 30
30
-
 31
31
-
 32
32
-
 33
33
-
 34
34
-
 35
35
-
 36
36


NutriBullet NBP50100 Mode d'emploi
- Catégorie
- Robots culinaires
- Taper
- Mode d'emploi
dans d''autres langues
- English: NutriBullet NBP50100 User guide
- Nederlands: NutriBullet NBP50100 Gebruikershandleiding
Documents connexes
Autres documents
-
Hamilton Beach 70815 Mode d'emploi
-
Ninja NN210C Manuel utilisateur
-
-
-
Hamilton Beach 70825 Manuel utilisateur
-
Breville BFP800XL Mode d'emploi
-
-
Hamilton Beach 70585 Mode d'emploi
-
-
Black & Decker FP2510SKT Manuel utilisateur