Hamilton Beach 70825 Manuel utilisateur
- Catégorie
- Robots culinaires
- Taper
- Manuel utilisateur

English ....................... 2
Français .................... 33
Español .................... 64
READ BEFORE USE
LIRE AVANT UTILISATION
LEA ANTES DE USAR
Visit www.hamiltonbeach.com for our
complete line of products and Use and
Care Guides – as well as delicious recipes,
tips, and to register your product online!
Rendez-vous sur www.hamiltonbeach.ca
pour notre liste complète de produits et de
nos manuels utilisateur – ainsi que nos
délicieuses recettes et nos conseils !
¡Visite www.hamiltonbeach.com (
EE. UU.)
o
www.hamiltonbeach.com.mx (México)
para ver otros productos de Hamilton Beach
o para contactarnos!
Questions?
Please call us – our friendly
associates are ready to help.
USA: 1.800.851.8900
¿Preguntas?
Por favor llámenos – nuestros
amables representantes están
listos para ayudar.
EE. UU.: 1.800.851.8900
MEX: 01 800 71 16 100
Le invitamos a leer cuidadosamente este
instructivo antes de usar su aparato.
Questions ?
N’hésitez pas à nous appeler –
nos associés s’empresseront
de vous aider.
CAN : 1.800.267.2826
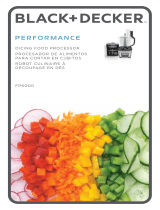
Dicing Food Processor
Robot culinaire/
coupe en dés
Procesador de
Alimentos
para Cortar
en Cubos

2
IMPORTANT SAFEGUARDS
1. Read all instructions.
2. This appliance is not intended for use by persons (including
children) with reduced physical, sensory, or mental
capabilities, or lack of experience and knowledge, unless they
are closely supervised and instructed concerning use of the
appliance by a person responsible for their safety.
3. Close supervision is necessary when any appliance is used by
or near children. Children should be supervised to ensure that
they do not play with the appliance.
4. To protect against risk of electrical shock, do not immerse
base, motor, cord, or plug in water or other liquid.
5. Unplug cord from outlet when not in use, before putting on or
taking off parts, and before cleaning.
6. Avoid contacting moving parts.
7. Do not operate any appliance with a damaged supply cord or
plug, or after the appliance malfunctions or has been dropped
or damaged in any manner. Supply cord replacement and
repairs must be conducted by the manufacturer, its service
agent, or similarly qualified persons in order to avoid a hazard.
Call the provided customer service number for information on
examination, repair, or adjustment.
8. The use of attachments not recommended or sold by the
appliance manufacturer may cause fire, electric shock, or
injury.
9. Do not use your food processor if any part is broken.
10. Do not use appliance outdoors.
11. Do not let cord hang over edge of table or counter, or touch
hot surfaces.
12. Keep hands and utensils away from moving blade and disc
while processing food to reduce the risk of severe personal
injury and/or damage to the food processor. A rubber scraper
may be used but ONLY when the food processor is not
running.
13. The blades and discs are sharp. Handle carefully. Store out of
reach of children.
14. To reduce the risk of injury, never place cutting blade or disc
on base without first putting work bowl properly in place.
15. Be certain lid is securely locked in place before operating
appliance.
16. Never feed food into food chute by hand. Always use the food
pushers.
17. Do not attempt to defeat the lid interlock mechanism.
18. Make sure the blade or disc has come to a full stop before
removing lid.
19. To reduce the risk of injury, be sure to insert or remove blade
and disc using hubs provided for this purpose. Use caution
when removing blade and disc from the work bowl, when
emptying the work bowl, and when cleaning.
20. Check that controls are clear of objects and hands before
plugging cord into wall outlet. To disconnect, press “STOP”;
then remove plug from wall outlet.
21. Always use the pushers to clear the food chute. When
this method is not possible, unplug cord from outlet and
disassemble unit to remove the remaining food.
When using electrical appliances, basic safety precautions should always be followed to reduce the risk of fire, electric shock, and/or
injury to persons, including the following:

3
Other Consumer Safety Information
This appliance is intended for household use only.
w WARNING
Electrical Shock Hazard: This appliance is
provided with a grounded (3-prong) plug to reduce the risk
of electric shock. The plug fits only one way into a grounded
outlet. Do not defeat the safety purpose of the plug by
modifying the plug in any way or by using an adapter. If the
plug does not fit into the outlet, have an electrician replace the
outlet.
The length of the cord used on this appliance was selected
to reduce the hazards of becoming tangled in or tripping
over a longer cord. If a longer cord is necessary, an approved
extension cord may be used. The electrical rating of the
extension cord must be equal to or greater than the rating of
the appliance. The extension cord must be a grounding-type,
3-wire cord. Care must be taken to arrange the extension cord
so that it will not drape over the countertop or tabletop where
it can be pulled on by children or accidentally tripped over.
To avoid an electrical circuit overload, do not use another high-
wattage appliance on the same circuit with this appliance.
SAVE THESE INSTRUCTIONS!
22. The appliance is not intended for commercial, professional,
or industrial use. It is designed and built exclusively for
household use only.
23. Never use appliance for a longer period or with a larger
amount of ingredients other than that recommended by
appliance manufacturer.
24. The maximum rating of this unit is based on using the
chopping/mixing blade. Using the slicing/shredding disc
may draw significantly less power.
25. Do not place on or near a hot gas or electric burner or in a
heated oven.
26. Do not use appliance for other than intended use.

4
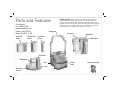
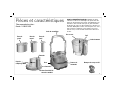
Parts and Features
Removable
Lid Seal*
Large Food
Pusher*
Medium Food
Pusher*
Small Food
Pusher*
Food Chute
BEFORE FIRST USE: Unpack processor and remove protective
covers from the blades and discs to prevent damage and
scratches to work bowl. Note that the removable dicing grid
will fall out of the dicing disc when turned upside down. Handle
blades and discs carefully; they are very sharp. Wash all parts
except base in hot, soapy water. Rinse; then dry.
*To order parts:
US: 1.800.851.8900
www.hamiltonbeach.com
Canada: 1.800.267.2826
Mexico: 01 800 71 16 100
Pour Spout
Work Bowl*
Locking Arm
Base
Control
Panel
MAX Fill Line
Dicing Cleaning Tool*
Motor Shaft
Lid*

5
Dicing Disc* With
Removable Grid*
Adjustable Slicing Disc*
Use to slice carrots, cucumbers,
potatoes, pepperoni, onions, peppers,
tomatoes, and chilled cheeses.
Dough Blade*
Use to mix bread, pizza,
and cookie doughs.
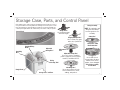
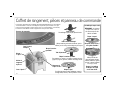
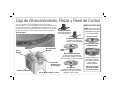
Storage Case, Parts, and Control Panel
Chopping/Mixing Blade*
Use to coarsely chop, grate,
mince, mix, or puree food.
Storage Case* and Parts
Control Panel
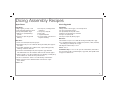
Dicing Assembly
Shredding Disc*
Use to shred a variety of foods
such as chilled cheese, carrots,
cabbage, and potatoes.
Use to make 1/2-inch
(12-mm) cubes of potatoes,
tomatoes, beets, onions,
peppers, carrots and apples.
Adjustment
Post
Shredding
Disc*
Dough Blade*
Chopping/Mixing
Blade*
Adjustable
Slicing Disc*
Dicing
Cleaning Tool*
Cutting Disc*
Store dicing assembly
in work bowl.
NOTE: The cutting disc and
dicing disc must always
be used together as one
assembly.
If the lights on the control panel are flashing, then the food processor is
not yet assembled correctly. Either the locking arm is not in place or the
large food pusher is missing. When all parts are properly installed, the
control panel lights will be lit continuously. The unit is ready to operate.

6
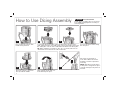
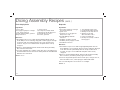
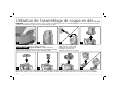
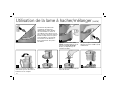
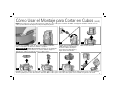
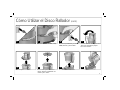
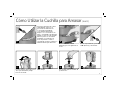
How to Use Dicing Assembly
7
1
Place large food pusher in
food chute. Add food and use
medium or small food pushers
for dicing.
NOTE: Unit will not work unless
locking arm is snapped into place
on bowl and large food pusher is
inserted.
w WARNING
Laceration Hazard:
Handle blades carefully; they are very sharp.
Press STOP and unplug before inserting or
removing blades.
4
5
Secure four latches of the dicing
disc into place.
Place lid on bowl so the chute
lines up with the handle.
2
To insert the dicing assembly, lower the dicing disc onto the motor
shaft, making sure the removable grid is next to the handle. Then lower
the cutting disc onto the motor shaft until it sits flush to the dicing disc.
TIP: When using the feed chute to dice, slice, or shred, make sure no
other blades are in the bottom of the work bowl.
Place work bowl on base with
handle facing forward.
3
6
Raise locking arm up and over
bowl and snap into place.

7
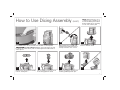
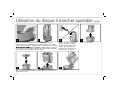
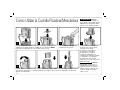
How to Use Dicing Assembly (cont.)
15
1110
When finished, press STOP and
unplug. Push locking arm back to
unsnap and lower onto counter.
Remove lid from bowl.
8
Press DICE button. For best results use medium or small pusher.
w WARNING
Laceration Hazard: Always use food pusher to feed
food into the chute. Never push food through chute with hands or
other objects.
13
Use cleaning tool to press food
from dicing grid into bowl.
NOTE: Dicing parts are color-
coded green to remind you to
use the medium pusher when
dicing and the green cleaning
tool to clean out the grid.
9
12
Unlatch four metal clips. Carefully
remove cutting disc.
14
Remove dicing disc from motor
shaft by grabbing metal clips.

8
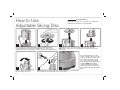
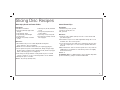
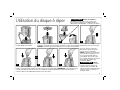
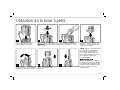
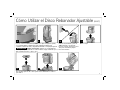
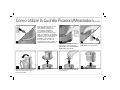
How to Use
Adjustable Slicing Disc
21
Place work bowl on base with handle facing forward. Adjust disc
to desired thickness by turning the adjustment post. There are 14
adjustment positions, ranging from 1/32” to 1/4” (0.8 to 6 mm) thickness.
w WARNING
Laceration Hazard:
Handle disc carefully; it is very sharp. Press STOP and
unplug before inserting or removing blades.
4
Carefully place disc onto motor shaft. Place lid on work bowl.
TIP: Check to make sure no other blades are in the bottom of the
work bowl.
6
NOTE: Unit will not work unless the large food pusher is inserted and
the locking arm is snapped into place on the bowl.
7
For smaller, thinner foods: Put
large food pusher into place. Place
food into smaller open tube and
use small food pusher to push
in food. For larger foods: Keep
large, medium, and small pushers
together. NOTE: Unit will not
operate until large food pusher
engages the protective interlock.
Do not add food above the MAX
fill line.
5
Raise locking arm up and over
bowl and snap into place.
3

9
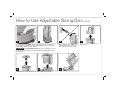
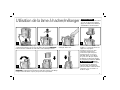
How to Use Adjustable Slicing Disc (cont.)
8
Press SLICE button. NOTE: If the large pusher is removed, the last
setting will be remembered. This setting will blink. To start slicing
again, simply insert the large pusher.
w WARNING
Laceration Hazard: Always use food pusher to feed
food into the chute. Never push food through chute with hands or
other objects.
10
When finished, press STOP and
unplug. Push locking arm back to
unsnap and lower onto counter.
12 13
Carefully remove disc from motor shaft using the finger holes.
14
119
Remove lid.

10
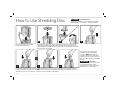
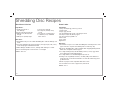
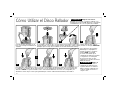
How to Use Shredding Disc
For larger foods: Keep large,
medium, and small pushers
together. NOTE: Unit will not
operate until large food pusher
engages the protective interlock.
Do not add food above the MAX
fill line.
w WARNING
Laceration
Hazard: Always use food pusher
to feed food into the chute.
Never push food through chute
with hands or other objects.
4
4
w WARNING
Laceration Hazard:
Handle disc carefully; it is very sharp. Press STOP
and unplug before inserting or removing blades.
2
Place work bowl on base with
handle facing forward.
3
Carefully place disc onto motor shaft. Place lid on work bowl so the
chute lines up with the handle. Raise locking arm up and over bowl
and snap into place. TIP: Check to make sure no other blades are in the
bottom of the work bowl.
55
For smaller, thinner foods: Put large food pusher into place. Place food into smaller open tube and use
small food pusher to push in food. NOTE: Soft cheese like mozzarella should be placed in the freezer for
30 minutes prior to processing to ensure it is firm enough for shredding.
OR

11
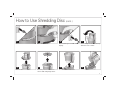
How to Use Shredding Disc
(cont.)
98
When finished, press STOP and
unplug.
7
Push locking arm back to unsnap
and lower onto counter.
12
Carefully remove blade from
motor shaft using finger holes.
11
6
Press SHRED button.
1310
Remove lid.

12
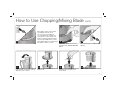
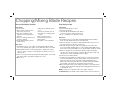
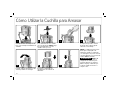
How to Use Chopping/Mixing Blade
Place food pushers in food
chute. Unit will not operate until
large food pusher engages the
protective interlock. Do not add
food above the MAX fill line.
w WARNING
Laceration
Hazard: Always use food pusher
to feed food into the chute.
Never push food through chute
with hands or other objects.
7
4
Place lid on work bowl so the
chute lines up with the handle.
w WARNING
Laceration Hazard:
Handle blade carefully; it is very
sharp. Press STOP and unplug
before inserting or removing blades.
2
1
Place work bowl on base with
handle facing forward.
Carefully slide blade straight
down onto the motor shaft.
NOTE: Operate using only one
blade or disc at a time.
3
Place food to be chopped/mixed
in bowl.
65
Raise locking arm up and over bowl and snap into place. NOTE: Unit
will not work unless locking arm is snapped into place on bowl and
large food pusher is inserted.

13
How to Use Chopping/Mixing Blade (cont.)
11
10
13
When finished, press STOP and
unplug.
9
Press MIX/PUREE, or for more
control use the PULSE TO CHOP
button.
Carefully remove blade from
motor shaft.
Push locking arm back to unsnap
and lower onto counter.
12
8
If the lights on the control panel
are flashing, then the food
processor is not assembled
correctly. Either the locking arm
is not in place or the large food
pusher is missing. When all parts
are properly installed, the control
panel lights will be lit continuously.
The unit is ready to operate.
14
Remove lid.

14
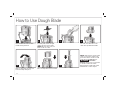
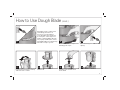
How to Use Dough Blade
NOTE: Unit will not operate until
large food pusher engages the
protective interlock. Do not add
food above the MAX fill line.
w WARNING
Laceration
Hazard: Always use food pusher
to feed food into the chute.
Never push food through chute
with hands or other objects.
7
4
Place lid on work bowl so the
chute lines up with the handle.
2
Place work bowl on base with
handle facing forward.
Carefully slide blade straight
down onto the motor shaft.
NOTE: Operate using only one
blade or disc at a time.
3
65
Raise locking arm up and over
bowl and snap into place.
1
Place food pushers in food chute.

15
How to Use Dough Blade
(cont.)
11
10
14
When finished, press STOP and
unplug.
9
Press KNEAD button and process
following your recipe.
Carefully remove blade from
motor shaft.
Push locking arm back to unsnap
and lower onto counter.
13
8
If the lights on the control panel
are flashing, then the food
processor is not assembled
correctly. Either the locking arm
is not in place or the large food
pusher is missing. When all parts
are properly installed, the control
panel lights will be lit continuously.
The unit is ready to operate.
12
Remove lid.

16
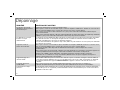
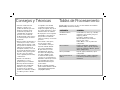
Tips and Techniques
• For a more uniform consistency,
start with pieces of food that
are similar in size. Cut food
into 1-inch (2.5-cm) pieces
before processing with
chopping/mixing blade and
leave room in work bowl for
the food to be tossed around.
• This food processor is
excellent to chop, dice, mix,
slice, or shred most foods.
However, to maintain peak
performance, do not use
your food processor for the
following: grinding coffee
beans or spices, slicing frozen
meats, or crushing ice.
• When chopping foods, pulsing
on and off will produce the
best results.
• Operating time will depend
on quantity of food being
processed. Most foods can
be sliced, diced, chopped, or
shredded in seconds. If unit is
operated continuously for an
extended period of time, let the
processor rest about 4 minutes
before continuing.
• Do not puree or mash starchy
vegetables like potatoes as
they are easily overprocessed
and will become gummy.
• To slice or shred cheese, use
only firm cheese like Cheddar
or Swiss that has been chilled
for at least 30 minutes.
Cheese should be processed
immediately after being
removed from the refrigerator.
Soft cheese like mozzarella
should be placed in the
freezer for 30 minutes prior to
processing to ensure it is firm
enough for shredding.
• The adjustable slicing disc can
slice foods as thin as 1/32 inch
(0.8 mm) and as thick as
1/4 inch (6 mm).
Processing Charts
When using attachments, do not process past the MAX LEVEL on the
work bowl.
ATTACHMENT FOODS
Chopping/Mixing Blade Chop: nuts, meat, garlic, onions,
peppers, celery, herbs, bread (for
crumbs), crackers
Mince/Puree: vegetables, fruit
Mix: salad dressings
Puree: soups, sauces
Grate: cheese, such as Parmesan
(chilled)
Slicing Disc Cucumbers, apples, mushrooms,
carrots, potatoes, cabbage, tomatoes,
pepperoni, peppers, radishes, firm
cheeses (chilled)
Shredding Disc Cabbage, potatoes, carrots, cheese
(chilled)
Dicing Disc Potatoes, tomatoes, onions, peppers,
beets, carrots, cucumbers, and apples

17
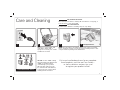
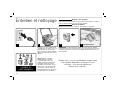
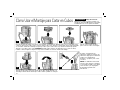
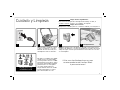
Care and Cleaning
Wipe base, control panel, and
cord with a damp cloth or
sponge. If necessary, use a mild
nonabrasive cleanser.
NOTE: If food particles get trapped in the back of the food chute,
place openings on sides of enclosure under running water to rinse
out pieces before putting in the dishwasher.
DO NOT use the “SANI” setting
when washing in the dishwasher.
“SANI” cycle temperatures
could damage your product.
All removable parts may also
be cleaned in the sink with hot,
soapy water. Use caution when
washing blades and discs.
2 3
DISHWASHER-SAFE
1
w WARNING
Electrical Shock Hazard:
Disconnect power before cleaning. Do not immerse cord, plug, or
base in water or any other liquid.
w WARNING
Laceration Hazard:
Handle blades and discs carefully; they are very sharp.
Visit www.hamiltonbeach.com for our complete
line of products and Use and Care Guides –
as well as delicious recipes, tips, and
to register your product online!
4

18
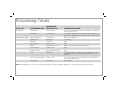
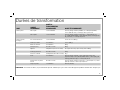
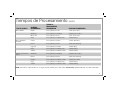
BLADE TYPE RECOMMENDED FOOD
RECOMMENDED
PROCESSING TIME RECOMMENDED AMOUNT
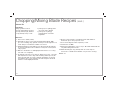
Dough Blade Bread dough 1 1/2–2 minutes 3 cups (375 g) bread flour, 2 tablespoons (30 ml) oil, 1 cup (237 ml)
water, 1 pkg (21 g) yeast
Pizza dough 1 1/2–2 minutes 3 cups (360 g) all-purpose flour, 1 tsp (5 ml) sugar, 2 tablespoons
(30 ml) oil, 1 cup (237 ml) water, 1 pkg (21 g) yeast, 1 tsp (5 ml) salt
Chopping/Mixing Blade Chickpeas/hummus 1 1/2–2 minutes One 15-ounce (425-g) can
Grains for flour 2–3 minutes 1 cup (200 g)
Nut butter 5–7 minutes 250 g
Nuts (chopped) 20–25 seconds 250 g
Onions 5 pulses (10–15 seconds) One 3- to 4-inch diameter onion, approx. 200 g
Parmesan cheese 60–75 seconds 140 g
Parsley or cilantro 10 pulses (20–30 seconds) 20 g
Pesto 2–3 minutes 4 cups (210 g) basil, 1 cup (140 g) pine nuts, 4 garlic cloves, 1 cup
(237 ml) olive oil, 1 cup (110 g) grated parmesan cheese, 1 tsp
(5 ml) salt
Pie crust or biscuit dough 45–60 seconds 3 cups (375 g) all-purpose flour, 1 tsp (5 ml) salt, 1 cup (237 ml)
butter, 1/4 cup (59 ml) water
Pureed soup 1–2 minutes 4 cups (946 ml)
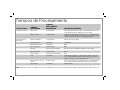
Processing Times
NOTE: For all blade types, do not exceed 3 minutes per processing cycle. Allow appliance to cool for 1 minute between each cycle.

19
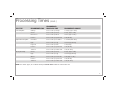
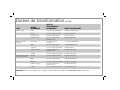
DISC TYPE RECOMMENDED FOOD
RECOMMENDED
PROCESSING TIME RECOMMENDED AMOUNT
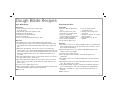
Shredding Disc Cabbage 5–10 seconds per wedge 1 wedge, approx. 100 g
Carrots 5–10 seconds per carrot 2 large, approx. 140 g
Hard cheese 5–10 seconds per block 1 block, approx. 140 g
Potatoes 5–10 seconds per potato half 1 half, 75–80 g
Adjustable Slicing Disc Cucumbers 5–10 seconds per cucumber 1 cucumber, 250–300 g
Eggs 5–10 seconds per egg 1 boiled egg (60–70 g)
Pepperoni 5–10 seconds per stick 1 stick, 227 g
Potatoes 5–10 seconds per potato half 1 half, 75–80 g
Tomatoes 5–10 seconds per tomato half 1 half, 90–100 g
Dicing Assembly Carrots 5–10 seconds per carrot 2 large, approx. 140 g
Eggs 5–10 seconds per egg 1 boiled egg (60–70 g)
Onions 5–10 seconds per onion half 1 half, approx. 100 g
Potatoes 5–10 seconds per potato half 1 half, 75–80 g
Tomatoes 5–10 seconds per tomato half 1 half, 90–100 g
Processing Times (cont.)
NOTE: For all disc types, do not fill the bowl past DICING MAX indicated on the work bowl.

20
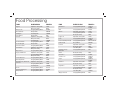
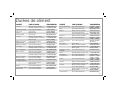
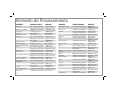
Food Processing
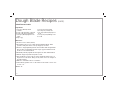
FOOD BLADE OR DISC PROCESS
Apples Adjustable Slicing Disc SLICE
Dicing Assembly DICE
Baby Foods Chopping/Mixing Blade PUREE
Bread Dough Dough Blade KNEAD
Cabbages Shredding Disc SHRED
Cake Batters Dough Blade MIX
Carrots Adjustable Slicing Disc SLICE
Dicing Assembly DICE
Shredding Disc SHRED
Cookie Crumbs Chopping/Mixing Blade CHOP
Cookie Doughs Dough Blade MIX
Cracker Crumbs Chopping/Mixing Blade CHOP
Cucumbers Adjustable Slicing Disc SLICE
Dicing Assembly DICE
Dips/Sauces Chopping/Mixing Blade PULSE
Eggs, Hard-Boiled Adjustable Slicing Disc SLICE
Chopping/Mixing Blade CHOP
Dicing Assembly DICE
Frozen Desserts Chopping/Mixing Blade MIX
Grinding Grains Chopping/Mixing Blade CHOP
Hard Cheeses, Parmesan
Cheeses
Adjustable Slicing Disc SLICE
Chopping/Mixing Blade CHOP
Shredding Disc SHRED
Herbs Chopping/Mixing Blade PULSE
Hummus/Chickpeas Chopping/Mixing Blade PUREE
Mayonnaises Chopping/Mixing Blade MIX
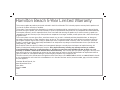
FOOD BLADE OR DISC PROCESS
Nut Butters Chopping/Mixing Blade CHOP or
PUREE
Nuts Chopping/Mixing Blade PULSE
Onions Adjustable Slicing Disc SLICE
Chopping/Mixing Blade PULSE
Dicing Assembly DICE
Pepperoni Adjustable Slicing Disc SLICE
Pesto Chopping/Mixing Blade CHOP or
PUREE
Pie Crusts/Pastry Dough Chopping/Mixing Blade MIX or PULSE
Pizza Dough Dough Blade KNEAD
Potatoes Adjustable Slicing Disc SLICE
Dicing Assembly DICE
Shredding Disc SHRED
Salad Dressings/
Marinades
Chopping/Mixing Blade MIX
Salsas Dicing Assembly DICE
Smoothies Chopping/Mixing Blade PUREE
Soft Cheeses Chopping/Mixing Blade CHOP or
PUREE
Soups Chopping/Mixing Blade CHOP or
PUREE
Tomatoes Adjustable Slicing Disc SLICE
Dicing Assembly DICE
Vegetables Adjustable Slicing Disc SLICE
Chopping/Mixing Blade CHOP
Dicing Assembly DICE
Shredding Disc SHRED
Whipped Cream Chopping/Mixing Blade MIX
La page charge ...
La page charge ...
La page charge ...
La page charge ...
La page charge ...
La page charge ...
La page charge ...
La page charge ...
La page charge ...
La page charge ...
La page charge ...
La page charge ...
La page charge ...
La page charge ...
La page charge ...
La page charge ...
La page charge ...
La page charge ...
La page charge ...
La page charge ...
La page charge ...
La page charge ...
La page charge ...
La page charge ...
La page charge ...
La page charge ...
La page charge ...
La page charge ...
La page charge ...
La page charge ...
La page charge ...
La page charge ...
La page charge ...
La page charge ...
La page charge ...
La page charge ...
La page charge ...
La page charge ...
La page charge ...
La page charge ...
La page charge ...
La page charge ...
La page charge ...
La page charge ...
La page charge ...
La page charge ...
La page charge ...
La page charge ...
La page charge ...
La page charge ...
La page charge ...
La page charge ...
La page charge ...
La page charge ...
La page charge ...
La page charge ...
La page charge ...
La page charge ...
La page charge ...
La page charge ...
La page charge ...
La page charge ...
La page charge ...
La page charge ...
La page charge ...
La page charge ...
La page charge ...
La page charge ...
La page charge ...
La page charge ...
La page charge ...
La page charge ...
La page charge ...
La page charge ...
La page charge ...
La page charge ...
-
 1
1
-
 2
2
-
 3
3
-
 4
4
-
 5
5
-
 6
6
-
 7
7
-
 8
8
-
 9
9
-
 10
10
-
 11
11
-
 12
12
-
 13
13
-
 14
14
-
 15
15
-
 16
16
-
 17
17
-
 18
18
-
 19
19
-
 20
20
-
 21
21
-
 22
22
-
 23
23
-
 24
24
-
 25
25
-
 26
26
-
 27
27
-
 28
28
-
 29
29
-
 30
30
-
 31
31
-
 32
32
-
 33
33
-
 34
34
-
 35
35
-
 36
36
-
 37
37
-
 38
38
-
 39
39
-
 40
40
-
 41
41
-
 42
42
-
 43
43
-
 44
44
-
 45
45
-
 46
46
-
 47
47
-
 48
48
-
 49
49
-
 50
50
-
 51
51
-
 52
52
-
 53
53
-
 54
54
-
 55
55
-
 56
56
-
 57
57
-
 58
58
-
 59
59
-
 60
60
-
 61
61
-
 62
62
-
 63
63
-
 64
64
-
 65
65
-
 66
66
-
 67
67
-
 68
68
-
 69
69
-
 70
70
-
 71
71
-
 72
72
-
 73
73
-
 74
74
-
 75
75
-
 76
76
-
 77
77
-
 78
78
-
 79
79
-
 80
80
-
 81
81
-
 82
82
-
 83
83
-
 84
84
-
 85
85
-
 86
86
-
 87
87
-
 88
88
-
 89
89
-
 90
90
-
 91
91
-
 92
92
-
 93
93
-
 94
94
-
 95
95
-
 96
96


Hamilton Beach 70825 Manuel utilisateur
- Catégorie
- Robots culinaires
- Taper
- Manuel utilisateur
dans d''autres langues
- English: Hamilton Beach 70825 User manual
Documents connexes
-
Hamilton Beach 70760 Mode d'emploi
-
Hamilton Beach 70820 Mode d'emploi
-
-
-
Hamilton Beach 70670 Mode d'emploi
-
Hamilton Beach Stack and Snap Food Processor Mode d'emploi
-
Hamilton Beach 70585 Mode d'emploi
-
-
-
Autres documents
-
Black & Decker Power Pro II FP1500 Series Manuel utilisateur
-
Breville the Breville Sous Chef 16 Peel & Dice Manuel utilisateur
-
Proctor Silex 70810 Manuel utilisateur
-
Black & Decker FP6010 Manuel utilisateur
-
 Black and Decker Appliances FP6000 Mode d'emploi
-
KitchenAid KFP1466CU Mode d'emploi
-
KitchenAid KFP1642 Instructions Manual
-
-
-
Waring WFP14SC Manuel utilisateur
