REOLINK FE-W Mode d'emploi
- Catégorie
- Accessoires pour appareil photo
- Taper
- Mode d'emploi

Jan 2023
QSG1_A_EN
Apply to: FE-W
Quick Start Guide
@ReolinkTech https://reolink.com
58.03.001.0309

English English1 2
What's in the Box 2
Camera Introduction 3
Set up the Camera 5
Mount the Camera 7
Troubleshooting 12
Specifications 13
NotificationofCompliance 14
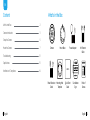
What's in the Box
EN
Content
Mount BaseCamera
Power Extension
Cable
Mounting Hole
Template
Quick Start
Guide
Surveillance
Sign
Pack of
Screws
Power Adapter 1m Ethernet
Cable

English English3 4
VGAHDMIUSB
AUDIO
OUT
DC 48V
ON
2 4 6 8
1 3 5 7
OFF
LAN
eSATA
Devices
Cloud
You haven't added any device. Please click
the"+"button in the top right corner to add
VGAHDMIUSB
AUDIO
OUT
DC 48V
ON
2 4 6 8
1 3 5 7
OFF
LAN
eSATA
Devices
Cloud
You haven't added any device. Please click
the"+"button in the top right corner to add
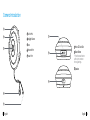
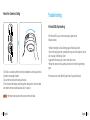
Camera Introduction
1
1
2
2
3
3
4
5
Built-in Mic
Micro SD Card Slot
Ethernet Port
Lens
Speaker
* Press the reset button
with a pin to restore
factorysettings.
Daylight Sensor
Reset Button
Power Port
1
1
2
2
3
3
4
5

English English5 6
VGAHDMIUSB
AUDIO
OUT
DC 48V
ON
2 4 6 8
1 3 5 7
OFF
LAN
eSATA
Devices
Cloud
You haven't added any device. Please click
the"+"button in the top right corner to add
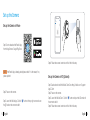
Set up the Camera
Set up the Camera on Phone
NOTE:IftheReolinkAppisalreadyexisted,pleasecheckifitisthenewest;ifno,
pleaseupdateit.
Step1ScantodownloadtheReolinkApp
fromtheAppStoreorGooglePlayStore.
Step2Poweronthecamera.
Step3LaunchtheReolinkApp.Clickthe“”buttoninthetoprightcornerandscan
theQRcodeonthecameratoaddit.
Step1DownloadandinstalltheReolinkClient.Gotohttps://reolink.com>Support>
App&Client
Step2Poweronthecamera.
Step3LaunchtheReolinkClient.Clickthe“”buttonandinputtheUIDnumberof
thecameratoaddit.
Step4Followtheonscreeninstructionstofinishtheinitialsetup.
Set up the Camera on PC (Optional)
Step4Followtheonscreeninstructionstofinishtheinitialsetup.

English English7 8
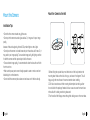
Mount the Camera
•Donotfacethecameratowardsanylightsources.
•Donotpointthecameratowardsaglasswindow.Or,itmayresultinpoorimage
quality
becauseofthewindowglarebyinfraredLEDs,ambientlightsorstatuslights.
•Donotplacethecamerainashadedareaandpointittowardsawell-litarea.Or,it
mayresultinpoorimagequality.Toensurebestimagequality,thelightingcondition
forboththecameraandthecaptureobjectshallbethesame.
•Toensurebetterimagequality,it’srecommendedtocleanthelenswithasoftcloth
fromtimetotime.
•Makesurethepowerportsarenotdirectlyexposedtowaterormoistureandnot
blockedbydirtorotherelements.
•Donotinstallthecameraatplaceswhererainandsnowcanhitthelensdirectly.
Installation Tips
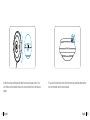
1.Beforedrillingtherequiredholes,markthedirectionofthelockprintedonthe
mountingbase.Makesurethelockisfacingup,asshowninthediagram.Thiswill
helpyoualignthemountbaseinthesameorientationwheninstalling.
2.Drillholesinaccordancewiththemountingholetemplate.Usethedrywallan-
chorsincludedinthepackageifneeded.Andusescrewstosecurethemountbase
tothewallwithitscablegroovefacingdownward.
3.Runthecableofthefisheyecamerathroughthecablegrooveonthemountbase.
Mount the Camera to the Wall
VGAHDMIUSB
AUDIO
OUT
DC 48V
ON
2 4 6 8
1 3 5 7
OFF
LAN
eSATA
Devices
Cloud
You haven't added any device. Please click
the"+"button in the top right corner to add
VGAHDMIUSB
AUDIO
OUT
DC 48V
ON
2 4 6 8
1 3 5 7
OFF
LAN
eSATA
Devices
Cloud
You haven't added any device. Please click
the"+"button in the top right corner to add

English English9 10
4.Attachthecameratothebaseandrotatethecameraclockwisetolockitinpo-
sition.Makesuretheorientationarrowonthecameraandthelockonthebaseare
aligned.
5.Ifyouwanttoremovethecamerafromthemountbase,pressthereleasemecha-
nismandrotatethecameracounterclockwise.
VGAHDMIUSB
AUDIO
OUT
DC 48V
ON
2 4 6 8
1 3 5 7
OFF
LAN
eSATA
Devices
Cloud
You haven't added any device. Please click
the"+"button in the top right corner to add
VGAHDMIUSB
AUDIO
OUT
DC 48V
ON
2 4 6 8
1 3 5 7
OFF
LAN
eSATA
Devices
Cloud
You haven't added any device. Please click
the"+"button in the top right corner to add

English English11 12
Mount the Camera to Ceiling
1.Drillholesinaccordancewiththemountingholetemplate.Usethedrywallanchors
includedinthepackageifneeded.
2.Securethemountbasetotheceilingwithscrews.
3.Runthecableofthefisheyecamerathroughthecablegrooveonthemountbase,
androtatethecameracounterclockwisetolockitinposition.
VGAHDMIUSB
AUDIO
OUT
DC 48V
ON
2 4 6 8
1 3 5 7
OFF
LAN
eSATA
Devices
Cloud
You haven't added any device. Please click
the"+"button in the top right corner to add
VGAHDMIUSB
AUDIO
OUT
DC 48V
ON
2 4 6 8
1 3 5 7
OFF
LAN
eSATA
Devices
Cloud
You haven't added any device. Please click
the"+"button in the top right corner to add
NOTE: Fitthethreemountingholesofthecameraintothemountbase.
Troubleshooting
IftheInfraredLEDsofyourcamerastopworking,pleasetrythe
followingsolutions:
•EnableinfraredlightsonDeviceSettingspageviaReolinkApp/Client.
•CheckiftheDay/Nightmodeisenabledandsetupautoinfraredlightsatnighton
LiveViewpageviaReolinkApp/Client.
•Upgradethefirmwareofyourcameratothelatestversion.
•Restorethecameratofactorysettingsandcheckouttheinfraredlightsettings
again.
Ifthesewon’twork,contactReolinkSupporthttps://support.reolink.com/.
Infrared LEDs Stop Working

English English13 14
Specifications
Night Vision: 8 Meters
Day/NightMode:AutoSwitchover
Ifyoufailtoupgradethefirmwareforthecamera,trythefollowingsolutions:
•Checkoutthecurrentcamerafirmwareandseeifitisthelatestone.
•MakesurethatyoudownloadthecorrectfirmwarefromDownloadCenter.
•MakesurethatyourPCisworkingonastablenetwork.
Ifthesewon’twork,contactReolinkSupporthttps://support.reolink.com/.
Hardware Features
Failed to Upgrade the Firmware
OperatingTemperature:-10°Cto55°C(14°Fto131°F)
OperatingHumidity:10%-90%
Formorespecifications,visithttps://reolink.com/.
General
Notification of Compliance
FCC Compliance Statement
ThisdevicecomplieswithPart15oftheFCCRules.Operationissubjecttothefollow-
ing two conditions:
thisdevicemaynotcauseharmfulinterference,andthisdevicemustacceptany
interferencereceived,includinginterferencethatmaycauseundesiredoperation.
NOTE: Thisequipmenthasbeentestedandfoundtocomplywiththelimitsfora
ClassBdigitaldevice,pursuanttopart15oftheFCCRules.Theselimitsaredesigned
toprovidereasonableprotectionagainstharmfulinterferenceinaresidential
installation.Thisequipmentgeneratesusesandcanradiateradiofrequency
energyand,ifnotinstalledandusedinaccordancewiththeinstructions,maycause
harmfulinterferencetoradiocommunications.However,thereisnoguaranteethat
interferencewillnotoccurinaparticularinstallation.Ifthisequipmentdoescause
harmfulinterferencetoradioortelevisionreception,whichcanbedetermined
byturningtheequipmentoandon,theuserisencouragedtotrytocorrectthe
interferencebyoneormoreofthefollowingmeasures:
•Reorientorrelocatethereceivingantenna.

English English15 16
Thismarkingindicatesthatthisproductshouldnotbedisposedwithotherhouse-
holdwastesthroughouttheEU.Topreventpossibleharmtotheenvironmentor
humanhealthfromuncontrolledwastedisposal,recycleitresponsiblytopromote
thesustainablereuseofmaterialresources.Toreturnyouruseddevice,pleaseuse
thereturnandcollectionsystemsorcontacttheretailerwheretheproductwaspur-
chased.Theycantakethisproductforenvironmentsaferecycling.
Correct Disposal of This Product
•Increasetheseparationbetweentheequipmentandreceiver.
•Connecttheequipmentintoanoutletonacircuitdierentfromthattowhichthe
receiverisconnected.
•Consultthedealeroranexperiencedradio/TVtechnicianforhelp.
Changesormodificationsnotexpresslyapprovedbythepartyresponsiblefor
compliancecouldvoidtheuser’sauthoritytooperatetheequipment.
ThisequipmentcomplieswithFCCradiationexposurelimitssetforthforanuncon-
trolledenvironment.Thisequipmentshallbeinstalledandoperatedwithminimum
distance20cmbetweentheradiator&body.
FCC RF Exposure Warning Statements
ReolinkdeclaresthattheWiFicameraisincompliancewiththeessentialrequire-
mentsandotherrelevantprovisionsofDirective2014/53/EU,thePoEcameraand
NVRisincompliancewithDirective2014/30/EU.
Simplied EU Declaration of Conformity
Thisproductcomeswitha2-yearlimitedwarrantythatisvalidonlyifpurchased
fromReolinkOcialStoreoraReolinkauthorizedreseller.Learnmore:
https://reolink.com/warranty-and-return/.
Limited Warranty
NOTE: Wehopethatyouenjoythenewpurchase.Butifyouarenotsatisfiedwith
theproductandplantoreturn,westronglysuggestthatyouresetthecamerato
factorydefaultsettingsandtakeouttheinsertedSDcardbeforereturning.

English English17 18
UseoftheproductissubjecttoyouragreementtotheTermsofServiceandPrivacy
Policyatreolink.com.Keepoutofreachofchildren.
Terms and Privacy
ByusingtheProductSoftwarethatisembeddedontheReolinkproduct,youagree
tothetermsofthisEndUserLicenseAgreement(“EULA”)betweenyouandReolink.
Learnmore:https://reolink.com/eula/.
End User License Agreement
undesiredoperationofthedevice.
L’émetteur/récepteurexemptdelicencecontenudansleprésentappareilest
conformeauxCNRd’Innovation,SciencesetDéveloppementéconomiqueCanada
Thisdevicecontainslicence-exempttransmitter(s)/receiver(s)thatcomplywith
Innovation,ScienceandEconomicDevelopmentCanada’slicence-exemptRSS(s).
Operationissubjecttothefollowingtwoconditions:
(1) Thisdevicemaynotcauseinterference.
(2) Thisdevicemustacceptanyinterference,includinginterferencethatmaycause
ISED Statements
applicablesauxappareilsradioexemptsdelicence.L’exploitationestautoriséeaux
deux conditions suivantes :
(1) L’appareilnedoitpasproduiredebrouillage;
(2) L’appareildoitacceptertoutbrouillageradioélectriquesubi,mêmesilebrouil-
lageestsusceptibled’encompromettrelefonctionnement.
Radio Frequency Exposure Statement for IC
This transmitter must not be co-located or operating in conjunction with any other antenna
ortransmitter. This equipment should be installed and operated with a minimum distance of
20centimeters between the radiator and your body.
Cet émetteur ne doit pas être Co-placé ou ne fonctionnant en même temps qu'aucune autre
antenne ouémetteur. Cet équipementdevrait être installé et actionné avec une distance
minimum de 20 centimètres entre le radiateur et votre corps.
NOTE:5150-5250MHzforindooruse
Remarque:utilisationintérieure5150-5250MHz

English English19 20
OPERATING FREQUENCY(For WiFi Version)
(the maximum transmitted power)
Technical Support
Ifyouneedanytechnicalhelp,pleasevisitourofficialsupport
siteandcontactoursupportteambeforereturningtheproducts,
https://support.reolink.com.
-
 1
1
-
 2
2
-
 3
3
-
 4
4
-
 5
5
-
 6
6
-
 7
7
-
 8
8
-
 9
9
-
 10
10
-
 11
11


REOLINK FE-W Mode d'emploi
- Catégorie
- Accessoires pour appareil photo
- Taper
- Mode d'emploi
dans d''autres langues
- English: REOLINK FE-W User guide
Documents connexes
-
REOLINK E1 Outdoor Manuel utilisateur
-
REOLINK Duo 2 LTE Manuel utilisateur
-
REOLINK Video Doorbell PoE Video Doorbell WiFi Manuel utilisateur
-
-
-
REOLINK 2012A Manuel utilisateur
-
REOLINK RLC-523WA Mode d'emploi
-
-
REOLINK Argus 3 Series Mode d'emploi
-