Sony RHT-S10 Le manuel du propriétaire
- Catégorie
- Lecteurs DVD
- Taper
- Le manuel du propriétaire

Theatre Stand
System
©2008 Sony Corporation
3-218-865-11(2)
RHT-S10
Operating Instructions
Mode d’emploi
Manual de instrucciones
GB
US
FR
ES

2
US
3
To reduce the risk of fire or electric
shock, do not expose this apparatus to
rain or moisture.
The unit is not disconnected from the AC power source
(mains) as long as it is connected to the wall outlet,
even if the unit itself has been turned off.
Batteries or batteries installed apparatus shall not be
exposed to excessive heat such as sunshine, fire or the
like.
Do not install the appliance in a confined space, such as
a bookcase or built-in cabinet.
For the customers in the U.S.A
This symbol is intended to alert the user to
the presence of uninsulated “dangerous
voltage” within the product’s enclosure that
may be of sufficient magnitude to constitute a risk of
electric shock to persons.
This symbol is intended to alert the user to
the presence of important operating and
maintenance (servicing) instructions in the
literature accompanying the appliance.
For the customers in Canada
To prevent fire or shock hazard, do not place objects
filled with liquids, such as vases, on the apparatus.
This Class B digital apparatus complies with Canadian
ICES-003.
Important Safety Instructions
1) Read these instructions.
2) Keep these instructions.
3) Heed all warnings.
4) Follow all instructions.
5) Do not use this apparatus near water.
6) Clean only with dry cloth.
7) Do not block any ventilation openings. Install in
accordance with the manufacturer’s instructions.
8) Do not install near any heat sources such as
radiators, heat registers, stoves, or other apparatus
(including amplifiers) that produce heat.
9) Do not defeat the safety purpose of the polarized or
grounding-type plug. A polarized plug has two
blades with one wider than the other. A grounding
type plug has two blades and a third grounding
prong. The wide blade or the third prong are
provided for your safety. If the provided plug does
not fit into your outlet, consult an electrician for
replacement of the obsolete outlet.
10) Protect the power cord from being walked on or
pinched particularly at plugs, convenience
receptacles, and the point where they exit from the
apparatus.
11) Only use attachments/accessories specified by the
manufacturer.
12) Use only with the cart, stand, tripod, bracket, or
table specified by the manufacturer, or sold with the
apparatus. When a cart is used, use caution when
moving the cart/apparatus combination to avoid
injury from tip-over.
13) Unplug this apparatus during lightning storms or
when unused for long periods of time.
14) Refer all servicing to qualified service personnel.
Servicing is required when the apparatus has been
damaged in any way, such as power-supply cord or
plug is damaged, liquid has been spilled or objects
have fallen into the apparatus, the apparatus has
been exposed to rain or moisture, does not operate
normally, or has been dropped.
WARNING

3
US
US
WARNING
This equipment has been tested and found to comply
with the limits for a Class B digital device, pursuant to
Part 15 of the FCC Rules. These limits are designed to
provide reasonable protection against harmful
interference in a residential installation. This
equipment generates, uses, and can radiate radio
frequency energy and, if not installed and used in
accordance with the instructions, may cause harmful
interference to radio communications. However, there
is no guarantee that interference will not occur in a
particular installation. If this equipment does cause
harmful interference to radio or television reception,
which can be determined by turning the equipment off
and on, the user is encouraged to try to correct the
interference by one or more of the following measures:
– Reorient or relocate the receiving antenna.
– Increase the separation between the equipment and
receiver.
– Connect the equipment into an outlet on a circuit
different from that to which the receiver is
connected.
– Consult the dealer or an experienced radio/TV
technician for help.
CAUTION
You are cautioned that any changes or modifications
not expressly approved in this manual could void your
authority to operate this equipment.
Note to CATV system installer:
This reminder is provided to call the CATV system
installer’s attention to Article 820-40 of the NEC that
provides guidelines for proper grounding and, in
particular, specifies that the cable ground shall be
connected to the grounding system of the building, as
close to the point of cable entry as practical.
Owner’s Record
The model and serial numbers are located at the rear of the
unit. Record the serial numbers in the spaces provided
below. Refer to them whenever you call upon your Sony
dealer regarding this product.
Model No. RHT-S10
Serial No.
This unit incorporates Dolby* Digital and Pro Logic
Surround and the DTS** Digital Surround System.
* Manufactured under license from Dolby
Laboratories.
Dolby, Pro Logic, and the double-D symbol are
trademarks of Dolby Laboratories.
** Manufactured under license under U.S. Patent #’s:
5,451,942; 5,956,674; 5,974,380; 5,978,762;
6,487,535 & other U.S. and worldwide patents
issued & pending. DTS and DTS Digital Surround
are registered trademarks and the DTS logos and
Symbol are trademarks of DTS, Inc. © 1996-2007
DTS, Inc. All Rights Reserved.
This unit incorporates High-Definition
Multimedia Interface (HDMI™) technology.
HDMI, the HDMI logo and High-Definition
Multimedia Interface are trademarks or
registered trademarks of HDMI Licensing LLC.
“BRAVIA” is a trademark of Sony Corporation.

4
US
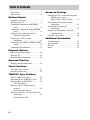
Precautions...............................................5
Main features ...........................................6
Getting Started
Supplied accessories ................................7
Installing the unit .....................................8
Connecting components with HDMI
jacks...................................................9
Connecting components without HDMI
jacks.................................................11
Setting up the sound output of the
connected component ......................12
Connecting a VCR or audio
component .......................................13
Connecting the DIGITAL MEDIA PORT
adapter .............................................14
Connecting the subwoofer .....................15
Playback Options
Index to parts and controls.....................16
Enjoying TV...........................................19
Enjoying other components ...................20
Surround Function
Enjoying the surround effect..................22
Tuner Functions
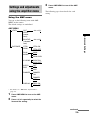
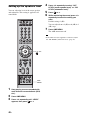
Presetting radio stations.........................24
Listening to the radio .............................25
“BRAVIA” Sync Features
What is “BRAVIA” Sync?.....................27
Preparing for the “BRAVIA” Sync........27
Enjoying Blu-ray Disc/DVD..................29
(One-Touch Play)
Enjoying the TV sound from the
speakers ...........................................29
(System Audio Control)
Turning off the TV, unit and connected
components......................................30
(System Power Off)
Advanced Settings
Changing the TV’s video input together
with the unit’s input
(Input SYNC: Sony TV only)......... 31
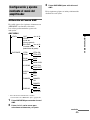
Programming the remote for other
components ..................................... 32
Controlling the connected
components ..................................... 35
Settings and adjustments using the
amplifier menu................................ 39
Using the sleep timer............................. 46
Additional Information
Troubleshooting .................................... 47
Specifications ........................................ 49
Glossary................................................. 51
Index...................................................... 52
Table of Contents

5
US
On safety
Should any solid object or liquid fall into the unit,
unplug the unit and have it checked by qualified
personnel before operating it any further.
On power sources
• Before operating the unit, check that the operating
voltage is identical to your local power supply. The
operating voltage is indicated on the nameplate at the
rear of the unit.
• If you are not going to use the unit for a long time, be
sure to disconnect the unit from the wall outlet
(mains). To disconnect the AC power cord (mains
lead), grasp the plug itself; never pull the cord.
• One blade of the plug is wider than the other for the
purpose of safety and will fit into the wall outlet
(mains) only one way. If you are unable to insert the
plug fully into the outlet, contact your dealer.
• AC power cord (mains lead) must be changed only at
the qualified service shop.
• Install this unit so that the power cord can be
unplugged from the wall socket immediately in the
event of trouble.
On heat buildup
Although the unit heats up during operation, this is not
a malfunction. If you continuously use this unit at a
large volume, the unit temperature of the top, side and
bottom rises considerably. To avoid burning yourself,
do not touch the unit.
On placement
• Place the unit in a location with adequate ventilation
to prevent heat buildup and prolong the life of the
unit.
• Use caution when placing the unit on surfaces that
have been specially treated (with wax, oil, polish, etc.)
as staining or discoloration of the surface may result.
• The floor may be damaged if sand, trash, etc., gets
caught under the legs of the unit.
On operation
Before connecting other components, be sure to turn off
and unplug the unit.
If you encounter color irregularity on
a nearby TV screen
The unit is magnetically shielded to allow it to be
installed near a TV set. However, color irregularities
may still be observed on certain types of TV sets.
If color irregularity is observed...
Turn off the TV set, then turn it on again after 15 to 30
minutes.
If color irregularity is observed
again...
Place the unit further away from the TV set.
On cleaning
Clean the unit with a soft dry cloth. Do not use any type
of abrasive pad, scouring powder or solvent such as
alcohol or benzine.
If you have any question or problem concerning your
unit, please consult your nearest Sony dealer.
Precautions

6
US
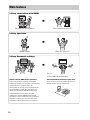
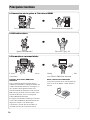
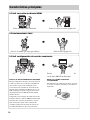
Main features
B Easy connection with HDMI
b
The cords are all tangled up. Neat connections (page 9).
B Easy operation
b
Which remote? Only one! (page 32)
B Easy Surround settings
b
I need lots of cords and speakers. Easy set-up and high quality sound with
S-Force PRO Front Surround.
About S-Force PRO Front Surround
Sony’s long-term involvement in surround
technology (and the vast amounts of acoustic data
accumulated as a result) has led to the
development of all-new processing method and
advanced DSP to handle this task effectively,
which we call S-Force PRO Front Surround.
Compared with previous front surround
technologies, S-Force PRO Front Surround
reproduces a more convincing sense of distance
and space, resulting in a true surround sound
experience without the need for rear speakers.
Recommended surround-sound area
You can enjoy surround sound in the areas in
which sound is spread as illustrated.

7
US
Getting Started
Please check the following accessories in the
package.
Optical cable (1 m) (39
3
/
8
inches) (1)
Remote commander (RM-ANP009) (1)
Size AA (R6) batteries (2)
FM wire antenna (aerial) (1)
Wall Mounting Bracket (WS-S10WA) (1)
Operating Instructions (1)
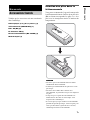
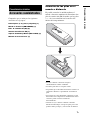
Inserting batteries into the
remote
You can control the unit using the supplied
remote. Insert two size AA (R6) batteries by
matching the + and – ends on the batteries to the
markings inside the compartment.
• Do not leave the remote in an extremely hot or humid
place.
• Do not use a new battery with an old one.
• Do not drop any foreign object into the remote casing,
particularly when replacing the batteries.
• Do not expose the remote sensor to direct light from
the sun or lighting apparatus. Doing so may cause a
malfunction.
• If you do not intend to use the remote for an extended
period of time, remove the batteries to avoid possible
damage from battery leakage and corrosion.
Getting Started
Supplied accessories
Notes

8
US
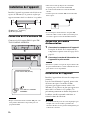
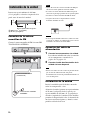
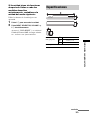
Install the unit after allowing for a space of 300
mm (11
7
/
8
inches) or more on the right and left
from the wall.
A 300 mm (11
7
/
8
inches)
B 50 mm (2 inches)
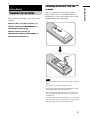
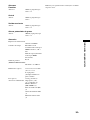
Connecting the FM wire
antenna (aerial)
Connect the FM wire antenna (aerial) to the FM
75Ω COAXIAL ANTENNA jack.
• Adjust the direction of the FM wire antenna (aerial)
for best FM broadcast sound.
• If you attach the FM wire antenna (aerial) to a wall,
select a wall for best reception.
• Do not use the FM wire antenna (aerial) rolled up.
• Be sure to insert the FM wire antenna (aerial) fully
into the jack.
• If you have poor FM reception, use a 75-ohm coaxial
cable (not supplied) to connect the unit to an outdoor
FM antenna (aerial).
Connecting the power cord
1 Connect the components to this unit.
For details of connecting the components,
see page 9 to page 13.
2 Connect the power cord of this unit to
the wall outlet.
• Install this system near the wall outlet so that the AC
power cord (mains lead) can be unplugged from the
wall socket immediately in the event of trouble.
Installing this unit
Install the unit after connecting all the
components to the unit.
When installing the unit, allow for a space of at
least 50 mm (2 inches) from the wall and 300
mm (11
7
/
8
inches) or more on the right and left
when you install the unit. This is to allow for heat
dissipation, a sufficient surround effect, and to
prevent the TV from falling.
• Do not put a magnetic card (such as a cash card or
commuter pass) close to the speaker. The card may
become unusable because of the magnetism of the
speaker’s magnet.
Installing the unit
POWER / HDMI POWER
+
VOLUME
-
+
PRESET
MULTI CH
INPUT
SELECTOR
-
POWER / HDMI POWER
+
VOLUME
-
+
PRESET
MULTI CH
INPUT
SELECTOR
-
Subwoofer
B
AA
FM 75
COAXIAL
SAT IN
BD/DVD IN
TV OUT
HDMI
ANTENNA
FM wire antenna (aerial) (supplied)
FM 75Ω COAXIAL ANTENNA
jack
Notes
Tip
Note
Note
FM 75
COAXIAL
ANTENNA

9
US
Getting Started
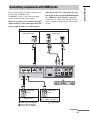
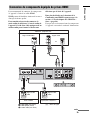
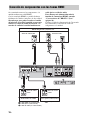
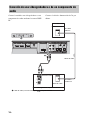
We recommend that you connect components to
the unit using an HDMI cable.
With HDMI, you can easily enjoy both high
quality sound and high quality images.
However, it is necessary to connect the audio
output of the TV to the audio input of the unit
using an optical cable or an audio cord in
order listen to the TV’s sound from the unit.
For details on the Control for HDMI function,
see ““BRAVIA” Sync Features” (page 27).
Connect the AC power cord (mains lead) after
you have finished connecting all components to
the unit.
Connecting components with HDMI jacks
OUTPUT OUTPUT
INPUT
OUTPUT
OUTPUT
DMPORT
FM 75
COAXIAL
LINE
ANALOG IN DIGITAL IN
LL
RR
OPTICAL
TV
OPTICAL
COAXIAL
OPTICAL
TV SAT
BD/DVD
SAT IN
BD/DVD IN
TV OUT
HDMI
SUB WOOFER
OUT
ANTENNA
DC 5V
0.7A MAX
TV monitor, projector, etc.
A HDMI cable (not supplied)
B Optical cable (supplied)
C Audio cord (not supplied)
Audio/video signal
Blu-ray Disc player (recorder), DVD
player (recorder), “PlayStation 3”
Satellite tuner
Audio/video
signal
C
BA
Audio signal
or
: Signal flow
AA
Audio/video
signal
continued

10
US
• Refer to page 11 for how to connect a component
without an HDMI jack.
• The HDMI jack has priority when you connect the
component to the unit using HDMI, DIGITAL IN
COAXIAL, DIGITAL IN OPTICAL and ANALOG
IN together.
• The DIGITAL IN OPTICAL jack has priority when
you connect both the audio output of the TV to the
DIGITAL IN OPTICAL and ANALOG IN jack of the
system.
Notes on HDMI connections
• You can enjoy high quality images using an
HDMI cable with an HDMI logo. We
recommend that you use a Sony HDMI cable.
• Check the setup of the connected component if
an image is poor or the sound does not come
out of a component connected via the HDMI
cable.
• Audio signals (sampling frequency, bit length,
etc.) transmitted from an HDMI jack may be
suppressed by the connected component.
• Sound may be interrupted when the sampling
frequency or the number of channels of audio
output signals from the playback component is
switched.
• When the connected component is not
compatible with copyright protection
technology (HDCP), the image and/or the
sound from the HDMI TV OUT jack may be
distorted or may be not output.
In this case, check the specification of the
connected component.
• We do not recommend using an HDMI-DVI
conversion cable.
• No matter what input is selected for the unit,
video signals from the HDMI input jack (BD/
DVD IN, SAT IN) that was selected last time
are output from the HDMI TV OUT jack.
• This unit supports x.v.Color transmission
extended by HDMI ver1.3.
Notes

11
US
Getting Started
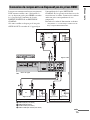
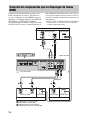
When you connect a DVD player (recorder),
satellite tuner, “PlayStation 2”, etc., that has no
HDMI jacks, connect to the unit using the
DIGITAL IN OPTICAL or DIGITAL IN
COAXIAL jack.
If the satellite tuner does not have the OPTICAL
OUT jack, connect the unit using the DIGITAL
IN COAXIAL jack. In this case, it is not
necessary to connect all the cables. Connect the
audio cords according to the jacks of your
components.
Connect the AC power cord (mains lead) last.
* “PlayStation 2” is a trademark of Sony Computer
Entertainment Inc.
Connecting components without HDMI jacks
OUTPUT
OUTPUT
OUTPUT
OUTPUT
OUTPUT
DMPORT
FM 75
COAXIAL
LINE
ANALOG IN DIGITAL IN
LL
RR
TV
OPTICAL
TV SAT
BD/DVD
SAT IN
BD/DVD IN
TV OUT
HDMI
SUB WOOFER
OUT
OPTICAL OPTICAL
COAXIAL
ANTENNA
DC 5V
0.7A MAX
OUTPUT
INPUT
OUTPUT
DVD player (recorder), “PlayStation 2”, etc.
TV monitor, projector, etc.
D
A Optical cable (not supplied)
B Optical cable (supplied)
C Audio cord (not supplied)
D Coaxial digital cord (not supplied)
or
Video signal
: Signal flow
Video signal
AA
Audio signal
Satellite tuner
Video signal
CB
or
Audio signal
Audio signal Video signal
continued

12
US
• The DIGITAL IN OPTICAL jack has priority when
you connect both the audio output of the TV to the
DIGITAL IN OPTICAL and ANALOG IN jack of the
system.
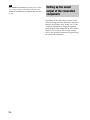
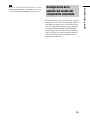
Depending on the audio output settings of the
connected component, the sound may output in 2
channel sound format only. In this case, set the
connected component to output the sound in
multi channel sound format (PCM, DTS, Dolby
Digital). For details on audio output settings,
refer to the operating instructions supplied with
the connected component.
Note
Setting up the sound
output of the connected
component

13
US
Getting Started
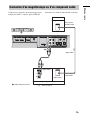
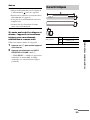
Connect this unit to a VCR or audio component
using the LINE IN jacks.
Connect the AC power cord (mains lead) last.
Connecting a VCR or audio component
OUTPUT
DMPORT
FM 75
COAXIAL
DC 5V
0.7A MAX
LINE
ANALOG IN DIGITAL IN
LL
RR
TV
OPTICAL
TV SAT
BD/DVD
SAT IN
BD/DVD IN
TV OUT
HDMI
SUB WOOFER
OUT
OPTICAL OPTICAL
COAXIAL
ANTENNA
OUTPUT
INPUT
VCR, CD player
Audio signal
A
A Audio cord (not supplied)
TV
To Video
In jack
To Video
Out jack
Video signal
Video signal
Video signal
: Signal flow

14
US
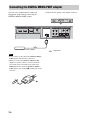
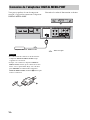
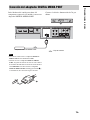
You can enjoy sound from the connected
component on the unit by connecting the
DIGITAL MEDIA PORT adapter.
Connect the AC power cord (mains lead) last.
• Do not connect or disconnect the DIGITAL MEDIA
PORT adapter while the unit is turned on.
• When you connect the DIGITAL MEDIA PORT
adapter, be sure the connector is inserted with the
arrow mark facing toward the arrow mark on the
DMPORT jack. To detach the DIGITAL MEDIA
PORT adapter, press and hold
A and then pull out the
connector.
Connecting the DIGITAL MEDIA PORT adapter
DMPORT
FM 75
COAXIAL
LINE
ANALOG IN DIGITAL IN
LL
RR
TV
OPTICAL
TV SAT
BD/DVD
SAT IN
BD/DVD IN
TV OUT
HDMI
SUB WOOFER
OUT
OPTICAL OPTICAL
COAXIAL
ANTENNA
DC 5V
0.7A MAX
DIGITAL MEDIA PORT adapter
: Signal flow
Notes
A

15
US
Getting Started
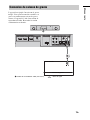
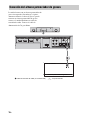
The unit has a built-in subwoofer. However, for
even more extended bass, connect an external
subwoofer to this unit using an audio connecting
cord. Connect the AC power cord (mains lead)
last.
Connecting the subwoofer
DMPORT
FM 75
COAXIAL
LINE
ANALOG IN DIGITAL IN
LL
RR
TV
OPTICAL
TV SAT
BD/DVD
SAT IN
BD/DVD IN
TV OUT
HDMI
SUB WOOFER
OUT
OPTICAL OPTICAL
COAXIAL
ANTENNA
DC 5V
0.7A MAX
: Signal flow
Input jack
Subwoofer
A Audio connecting cord (not supplied)

16
US
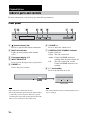
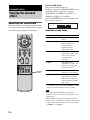
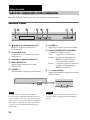
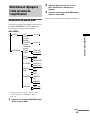
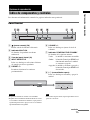
For more information, refer to the pages indicated in parentheses.
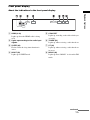
Front panel
A (remote sensor) (48)
Receives signals from remote commander.
B MULTI CH indicator
Lights up when playing multi-channel
sauce.
C Front panel display (17)
D INPUT SELECTOR
Press to select the input source to play back.
E PRESET +/–
Selects the preset stations.
F VOLUME +/–
Press to adjust the volume level.
G POWER/ACTIVE STANDBY indicator
Lights as follows:
Green: The unit is turned on.
Amber: Control for HDMI function is
working while the unit is turned off.
Off: The unit is turned off, and the
Control for HDMI function is not
working.
H ?/1 (on/standby)
Press to turn the unit on or off.
• The touch panel is functional when lit.
• The touch panel lights up momentarily when touched,
or when the power is turned on. When you operate,
touch the panel at first. The touch panel becomes unlit
when it is not touched for about 10 seconds.
• The touch panel functions by touching lightly. Do not
press it strongly.
Playback Options
Index to parts and controls
MULTI CH
POWER/ ACTIVE STANDBY
INPUT
SELECTOR
PRESET VOLUME
MULTI CH
POWER/
ACTIVE STANDBY
INPUT
SELECTOR
PRESET VOLUME
INPUT
SELECTOR
PRESET VOLUME
INPUT
SELECTOR
PRESET VOLUM E
Touch panel
Tips Note

17
US
Playback Options
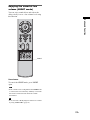
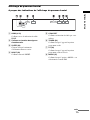
Front panel display
About the indications in the front panel display
A HDMI (9, 48)
Lights up when the HDMI cable is being
used.
B Lights up according to the audio input
signals.
C SLEEP (46)
Flashes when the sleep timer function is
active.
D NIGHT (23)
Lights up in NIGHT mode.
E COAX/OPT
Lights up according to the cable which you
are using.
F TUNED (24)
Lights up when receiving a radio broadcast.
G ST (24)
Lights up when receiving a radio broadcast
in stereo.
H MONO (26)
Lights up when “MONO” is selected in FM
mode.
MONOSTTUNEDOPTCOAXNIGHTSLEEP
PL
PCM
HDMI
continued

18
US
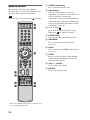
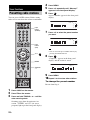
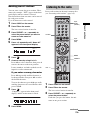
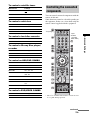
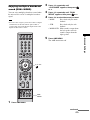
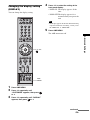
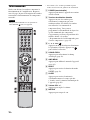
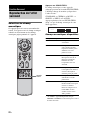
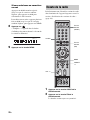
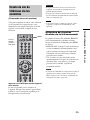
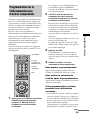
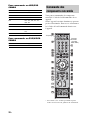
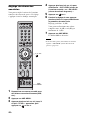
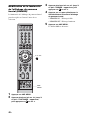
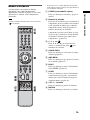
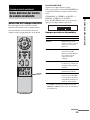
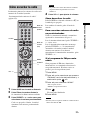
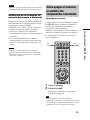
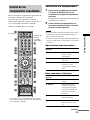
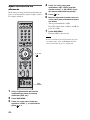
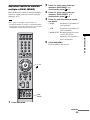
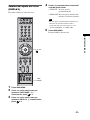
Remote control
Here describes the buttons for amplifier
operation only. See page 35 for the buttons for
operation of the connected components.
• Point the remote at the remote sensor on the unit.
* The 5, H and CH + buttons have a tactile dot. Use
it as a guide during operation.
A POWER (on/standby)
Press to turn the unit on or off.
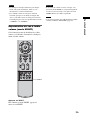
B Input buttons
Press one of the buttons to select the
component you want to use. The buttons are
factory assigned to control Sony
components. You can program the remote to
control non-Sony components following the
steps in “Programming the remote for other
components” (page 32).
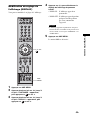
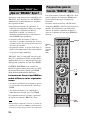
C C, X, x, c or
Press C, X, x or c to select the settings.
Then press to enter the selection.
D SOUND FIELD
Press to select the sound field (page 22).
E AMP MENU
Press to display the menu of the unit
(page 39).
F NIGHT
Press to activate the NIGHT mode function
(page 23).
G SLEEP
Press to activate the Sleep Timer function
and the duration which the unit turns off
automatically (page 46).
H VOL +/– - Volume
Press to adjust the volume.
I MUTING
Press to turn off the sound.
Note
S
L
O
O
T
U
N
E
M
S
N
O
I
T
P
O
G
U
I
D
E
D
I
S
P
L
A
Y
E
M
O
H
N
R
U
T
E
R

19
US
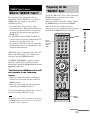
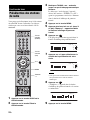
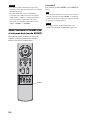
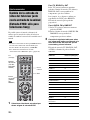
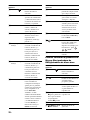
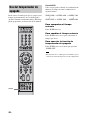
Playback Options
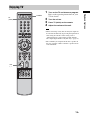
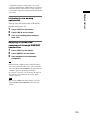
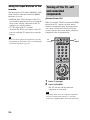
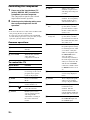
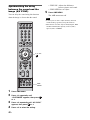
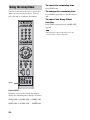
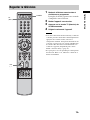
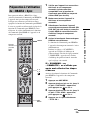
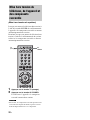
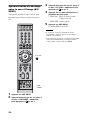
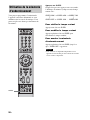
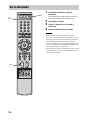
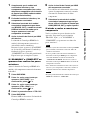
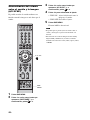
1 Turn on the TV and choose a program.
Refer to the operating instructions of your
TV for details.
2 Turn the unit on.
3 Press TV (white) on the remote.
4 Adjust the volume of the unit.
• When connecting a Sony TV, the Sony TV input can
be selected automatically by pressing the input button
after setting. For details on the setting, refer to
“Changing the TV’s video input together with the
unit’s input (Input SYNC: Sony TV only)” (page 31).
• The sound may be output from the TV’s speaker. In
this case, turn the volume of the TV’s speaker down
to the minimum.
Enjoying TV
S
L
O
O
T
U
N
E
M
S
N
O
I
T
P
O
G
U
I
D
E
D
I
S
P
L
A
Y
E
M
O
H
N
R
U
T
E
R
POWER
VOL
+, –
TV
(white)
Tips

20
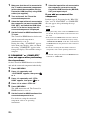
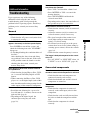
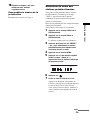
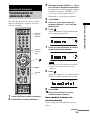
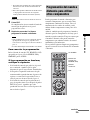
US
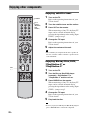
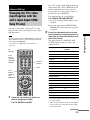
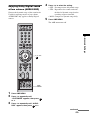
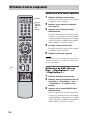
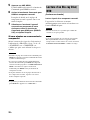
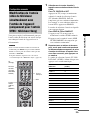
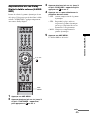
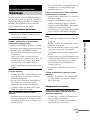
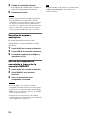
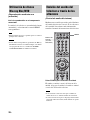
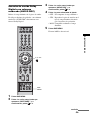
Enjoying satellite tuner
1 Turn on the TV.
Refer to the operating instructions of your
TV for details.
2 Turn the satellite tuner and the unit on.
3 Press SAT on the remote.
When connecting a Sony TV, the Sony TV
input can be selected automatically by
pressing the input button after setting (Input
SYNC) - jump to step 5.
4 Change the TV input.
Refer to the operating instructions of your
TV for details.
5 Adjust the volume of the unit.
• The sound may be output from the TV’s speaker. In
this case, turn the volume of the TV’s speaker down
to the minimum.
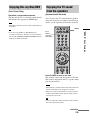
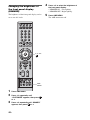
Enjoying Blu-ray Disc, DVD,
“PlayStation 2” or
“PlayStation 3”
1 Turn on the TV.
2 Turn the Blu-ray Disc/DVD player
(recorder), “PlayStation 2” or
“PlayStation 3” and the unit on.
3 Press BD/DVD on the remote.
When connecting a Sony TV, the Sony TV
input can be selected automatically by
pressing the input button after setting (Input
SYNC) - jump to step 5.
4 Change the TV input.
Refer to the operating instructions of your
TV for details.
5 Play back the disc.
• Even if you play back Dolby true HD, Dolby Digital
plus or DTS HD with a connected component
Enjoying other components
S
L
O
O
T
U
N
E
M
S
N
O
I
T
P
O
G
U
I
D
E
D
I
S
P
L
A
Y
E
M
O
H
N
R
U
T
E
R
Input
buttons
(BD/DVD,
SAT,
AUDIO)
POWER
VOL
+, –
Tip
Tip
La page charge ...
La page charge ...
La page charge ...
La page charge ...
La page charge ...
La page charge ...
La page charge ...
La page charge ...
La page charge ...
La page charge ...
La page charge ...
La page charge ...
La page charge ...
La page charge ...
La page charge ...
La page charge ...
La page charge ...
La page charge ...
La page charge ...
La page charge ...
La page charge ...
La page charge ...
La page charge ...
La page charge ...
La page charge ...
La page charge ...
La page charge ...
La page charge ...
La page charge ...
La page charge ...
La page charge ...
La page charge ...
La page charge ...
La page charge ...
La page charge ...
La page charge ...
La page charge ...
La page charge ...
La page charge ...
La page charge ...
La page charge ...
La page charge ...
La page charge ...
La page charge ...
La page charge ...
La page charge ...
La page charge ...
La page charge ...
La page charge ...
La page charge ...
La page charge ...
La page charge ...
La page charge ...
La page charge ...
La page charge ...
La page charge ...
La page charge ...
La page charge ...
La page charge ...
La page charge ...
La page charge ...
La page charge ...
La page charge ...
La page charge ...
La page charge ...
La page charge ...
La page charge ...
La page charge ...
La page charge ...
La page charge ...
La page charge ...
La page charge ...
La page charge ...
La page charge ...
La page charge ...
La page charge ...
La page charge ...
La page charge ...
La page charge ...
La page charge ...
La page charge ...
La page charge ...
La page charge ...
La page charge ...
La page charge ...
La page charge ...
La page charge ...
La page charge ...
La page charge ...
La page charge ...
La page charge ...
La page charge ...
La page charge ...
La page charge ...
La page charge ...
La page charge ...
La page charge ...
La page charge ...
La page charge ...
La page charge ...
La page charge ...
La page charge ...
La page charge ...
La page charge ...
La page charge ...
La page charge ...
La page charge ...
La page charge ...
La page charge ...
La page charge ...
La page charge ...
La page charge ...
La page charge ...
La page charge ...
La page charge ...
La page charge ...
La page charge ...
La page charge ...
La page charge ...
La page charge ...
La page charge ...
La page charge ...
La page charge ...
La page charge ...
La page charge ...
La page charge ...
La page charge ...
La page charge ...
La page charge ...
La page charge ...
La page charge ...
La page charge ...
La page charge ...
La page charge ...
La page charge ...
La page charge ...
La page charge ...
La page charge ...
La page charge ...
La page charge ...
La page charge ...
La page charge ...
La page charge ...
La page charge ...
-
 1
1
-
 2
2
-
 3
3
-
 4
4
-
 5
5
-
 6
6
-
 7
7
-
 8
8
-
 9
9
-
 10
10
-
 11
11
-
 12
12
-
 13
13
-
 14
14
-
 15
15
-
 16
16
-
 17
17
-
 18
18
-
 19
19
-
 20
20
-
 21
21
-
 22
22
-
 23
23
-
 24
24
-
 25
25
-
 26
26
-
 27
27
-
 28
28
-
 29
29
-
 30
30
-
 31
31
-
 32
32
-
 33
33
-
 34
34
-
 35
35
-
 36
36
-
 37
37
-
 38
38
-
 39
39
-
 40
40
-
 41
41
-
 42
42
-
 43
43
-
 44
44
-
 45
45
-
 46
46
-
 47
47
-
 48
48
-
 49
49
-
 50
50
-
 51
51
-
 52
52
-
 53
53
-
 54
54
-
 55
55
-
 56
56
-
 57
57
-
 58
58
-
 59
59
-
 60
60
-
 61
61
-
 62
62
-
 63
63
-
 64
64
-
 65
65
-
 66
66
-
 67
67
-
 68
68
-
 69
69
-
 70
70
-
 71
71
-
 72
72
-
 73
73
-
 74
74
-
 75
75
-
 76
76
-
 77
77
-
 78
78
-
 79
79
-
 80
80
-
 81
81
-
 82
82
-
 83
83
-
 84
84
-
 85
85
-
 86
86
-
 87
87
-
 88
88
-
 89
89
-
 90
90
-
 91
91
-
 92
92
-
 93
93
-
 94
94
-
 95
95
-
 96
96
-
 97
97
-
 98
98
-
 99
99
-
 100
100
-
 101
101
-
 102
102
-
 103
103
-
 104
104
-
 105
105
-
 106
106
-
 107
107
-
 108
108
-
 109
109
-
 110
110
-
 111
111
-
 112
112
-
 113
113
-
 114
114
-
 115
115
-
 116
116
-
 117
117
-
 118
118
-
 119
119
-
 120
120
-
 121
121
-
 122
122
-
 123
123
-
 124
124
-
 125
125
-
 126
126
-
 127
127
-
 128
128
-
 129
129
-
 130
130
-
 131
131
-
 132
132
-
 133
133
-
 134
134
-
 135
135
-
 136
136
-
 137
137
-
 138
138
-
 139
139
-
 140
140
-
 141
141
-
 142
142
-
 143
143
-
 144
144
-
 145
145
-
 146
146
-
 147
147
-
 148
148
-
 149
149
-
 150
150
-
 151
151
-
 152
152
-
 153
153
-
 154
154
-
 155
155
-
 156
156
-
 157
157
-
 158
158
-
 159
159
-
 160
160
-
 161
161
-
 162
162
-
 163
163
-
 164
164


Sony RHT-S10 Le manuel du propriétaire
- Catégorie
- Lecteurs DVD
- Taper
- Le manuel du propriétaire
dans d''autres langues
- English: Sony RHT-S10 Owner's manual
- español: Sony RHT-S10 El manual del propietario
Documents connexes
-
Sony HT-CT500 Mode d'emploi
-
Sony HT-CT350 Manuel utilisateur
-
-
Sony HT-CT150HP Manuel utilisateur
-
-
Sony RHT-G1000 Guide d'installation
-
-
Sony RHT-G800 Mode d'emploi
-
-