
Allworx
®
Tx 92/24 Telephone Expander
Installation Guide

No part of this publication may be reproduced, stored in a retrieval system, or transmitted, in any
form or by any means, electronic, mechanical, photocopy, recording, or otherwise without the prior
written permission of Allworx.
© 2008 Allworx, a wholly owned subsidiary of PAETEC. All rights reserved. Allworx is a registered
trademark of Allworx Corp. All other names may be trademarks or registered trademarks of their
respective owners.

Tx 92/24 Telephone Expander Installation Guide
300 Main Street • East Rochester, NY 14445 • Toll Free 1-866-ALLWORX • 585-421-3850 • www.allworx.com
© 2008 Allworx. All rights reserved
Version 2. Revised: October 31, 2008
Page i
Table of Contents
1
Installation Overview.....................................................................................................................................1
1.1 What is in the box?......................................................................................................................................1
2 Setting up the Telephone Expander..............................................................................................................2
2.1 Connecting the Telephone Expander to an Allworx Phone.........................................................................2
2.2 Base Assembly and Adjusting the Angle (optional) ....................................................................................4
2.3 Connecting the Phone.................................................................................................................................4
2.4 Changing the Labels for the PFKs (Programmable Function Keys) ...........................................................4
2.5 Connecting Additional Telephone Expanders.............................................................................................5
3 Wall Mounting (Optional)...............................................................................................................................6
4 Regulatory Notices........................................................................................................................................7

Tx 92/24 Telephone Expander Installation Guide
1 Installation Overview
The Allworx
®
Tx 92/24 Telephone Expander increases the power of your Allworx phone by adding 24
Programmable Function Keys. This guide will make it easy for you to connect the telephone expander.
The Allworx Tx 92/24 Telephone Expander is supported by the Allworx 9224 VoIP Phone.
1.1 What is in the box?
Check the contents of the box your telephone expander came in. You should have:
• Allworx Tx 92/24 Telephone Expander
• Base assembly
• Wall mount assembly
• Bag with 3 screws
• This guide
Not included but also needed:
• Small phillips head screwdriver
A power supply is not included. The connected phone provides power to the telephone expander.
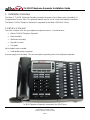
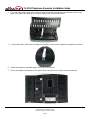
Tx 92/24 Telephone Expander connected to the 9224 Phone
300 Main Street • East Rochester, NY 14445 • Toll Free 1-866-ALLWORX • 585-421-3850 • www.allworx.com
© 2008 Allworx. All rights reserved
Version 2. Revised: October 31, 2008
Page 1

Tx 92/24 Telephone Expander Installation Guide
2 Setting up the Telephone Expander
Warning: to prevent electrical shocks from damaging the phone or telephone expander, use either an
antistatic (or ESD) wrist strap or floor mat when connecting the telephone expander to the phone.
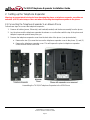
2.1 Connecting the Telephone Expander to an Allworx Phone
Follow these steps to connect the telephone expander:
1. Remove all cables (power, Ethernet(s) and handset/headset) and the base assembly from the phone.
2. Lay the phone and the telephone expander face down on a soft surface with the top of the phone and
telephone expander pointed away from you.
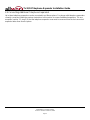
3. Remove the telephone expander cover from the back side of the phone. (see picture below):
a. Remove the two (2) screws that secure the telephone expander cover to the phone. (1) and (2)
b. Remove the telephone expander cover. This will expose the phone’s telephone expander
connector and a third screw hole.
Assembling the TX 92/24 Telephone Expander to the 9224 Phone
300 Main Street • East Rochester, NY 14445 • Toll Free 1-866-ALLWORX • 585-421-3850 • www.allworx.com
© 2008 Allworx. All rights reserved
Version 2. Revised: October 31, 2008
Page 2

Tx 92/24 Telephone Expander Installation Guide
4. To connect the ribbon cable, place the right edge of telephone expander perpendicular into the right
edge of the expander opening on the back of the phone (see picture below).
5. Connect the ribbon cable from the telephone expander to the phone’s telephone expander connector.
6. Rotate the telephone expander down until it sits on the phone.
7. Secure the telephone expander to the phone back using the three screws (see picture below).
300 Main Street • East Rochester, NY 14445 • Toll Free 1-866-ALLWORX • 585-421-3850 • www.allworx.com
© 2008 Allworx. All rights reserved
Version 2. Revised: October 31, 2008
Page 3

Tx 92/24 Telephone Expander Installation Guide
300 Main Street • East Rochester, NY 14445 • Toll Free 1-866-ALLWORX • 585-421-3850 • www.allworx.com
© 2008 Allworx. All rights reserved
Version 2. Revised: October 31, 2008
Page 4
8. Repeat steps 4 through 6 for each additional telephone expander to be connected, where each
additional telephone expander will be connected to the previous expander.
9. Attach the telephone expander cover to the back side of the last telephone expander. Secure with two
(2) screws.
2.2 Base Assembly and Adjusting the Angle (optional)
You can adjust the angle of the phone and telephone expander(s) on their bases so that it is easy to use and
easy to read the screen.
1. Lay the connected phone and telephone expander(s) face down on a soft surface with top of the phone
pointed away from you.
2. Each of the bases will connect to the back of the phone and telephone expander(s) in one of three
positions, thus allowing the phone with the telephone expander(s) to be adjusted at different angles
when sitting on a desktop. The nearest set of holes to you provides the steepest angle.
3. Notice that the bases have both fixed and flexible tabs. Hold the base with the tabs pointed away, fixed
tabs down and flexible tabs up.
4. Place the fixed tabs in the desired holes on the back of the phone and telephone expander(s).
5. Rotate the base until the flexible tabs click into place.
To remove the bases:
1. Press down on the flexible tabs and release them from their holes.
2. Rotate the base until the fixed tabs easily lift out of their holes.
2.3 Connecting the Phone
After completing the assembly of the telephone expander, connect all cables to the phone. See the phone
user’s guide for instructions on connecting cables to the phone. After the phone has been powered up and
registered to an Allworx server, configure the telephone expander’s Programmable Function Keys from the
Phone System>Handset page of the System Administrator.
2.4 Changing the Labels for the PFKs (Programmable Function Keys)
To avoid misdialing, update the PFK labels whenever a PFK configuration is changed. To add or change a
label:
1. Remove the paper from beneath the plastic label cover by lifting the bottom tab of the plastic cover to
release it.
2. Add text in the space corresponding to the desired PFK.
3. Place the label onto the phone and snap the cover back into place.
A blank label Microsoft Word™ template can be obtained at our website
(www.allworx.com/support/downloads/default.asp
, select the Documentation link).

Tx 92/24 Telephone Expander Installation Guide
300 Main Street • East Rochester, NY 14445 • Toll Free 1-866-ALLWORX • 585-421-3850 • www.allworx.com
© 2008 Allworx. All rights reserved
Version 2. Revised: October 31, 2008
Page 5
2.5 Connecting Additional Telephone Expanders
Up to three telephone expanders can be connected to an Allworx phone. For phones with telephone expanders
currently connected, follow the previous instructions in this section to connect additional expanders. The one
exception (section 2.1, step 3) is that the telephone expander cover must be removed from the last connected
expander rather than from the phone.

Tx 92/24 Telephone Expander Installation Guide
3 Wall Mounting (Optional)
Phones connected to Telephone Expander(s) can be mounted on a wall. This requires two wall mounting
plates (not included), one for the phone and one for the last connected telephone expander. Mounting plates
should meet the requirements of standard TIA-570-B, Section 5. The mounting plates are available from your
local telephone company or your local retailer.
Caution: If using a standard telephone wall mounting plate, DO NOT make any connection to the RJ11
jack. This connection is intended for an analog phone and may cause damage to the Allworx
phone, voiding your warranty.
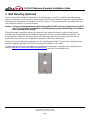
If the phone and/or expander(s) base(s) are attached, then remove the base(s). Attach the wall mount
assembly that was provided with the telephone expander to the last connected telephone expander. The
mounting plates, similar to those shown below, have mounting studs to receive the phone base and are
positioned to secure the phone and telephone expander(s) flush to the wall surface.
Mount the phone and telephone expanders over the mounting plate studs. The back sides of the phone and
telephone expander provides wire channels for power and network (RJ45) cables.
To make mounting the phone and telephone expander to the wall easier, a template can be obtained at our
website (www.allworx.com/support/downloads/default.asp
, select the Documentation link).
Leviton 4108W-0SP
300 Main Street • East Rochester, NY 14445 • Toll Free 1-866-ALLWORX • 585-421-3850 • www.allworx.com
© 2008 Allworx. All rights reserved
Version 2. Revised: October 31, 2008
Page 6

Tx 92/24 Telephone Expander Installation Guide
300 Main Street • East Rochester, NY 14445 • Toll Free 1-866-ALLWORX • 585-421-3850 • www.allworx.com
© 2008 Allworx. All rights reserved
Version 2. Revised: October 31, 2008
Page 7
4 Regulatory Notices
This equipment has been tested and found to comply with the limits for a Class B digital device, pursuant to
Part 15 of the FCC rules. These limits are designed to provide reasonable protection against harmful
interference in a residential installation. This equipment generates, uses, and can radiate radio frequency
energy and, if not installed and used in accordance with the instructions, may cause harmful interference to
radio communications. There is no guarantee, however, that interference will not occur in a particular
installation. If this equipment causes harmful interference to radio or television reception, which can be
determined by turning the equipment off and on, the user is encouraged to try to correct the interference by
one or more of the following measures:
• Reorient or relocate the receiving antenna.
• Increase the separation between the equipment and the receiver.
• Connect the equipment into an outlet on a circuit different from that to which the receiver is connected.
• Consult the dealer or an experienced radio/TV technician for help.
You may also find helpful the following booklet, prepared by the FCC: "How to Identify and Resolve Radio-TV
Interference Problems." This booklet is available from the U.S. Government Printing Office, Washington D.C.
20402.
Changes and Modification not expressly approved by the manufacturer or registrant of this equipment can void
your authority to operate this equipment under Federal Communications Commissions rules.
This digital apparatus does not exceed the Class B limits for radio noise emissions from digital apparatus set
out in the Radio Interference Regulations of the Canadian Department of Communications.
Le present appareil numerique n'emet pas de bruits radioelectriques depassant les limites applicables aux
appareils numeriques de la class B prescrites dans le Reglement sur le brouillage radioelectrique edicte par le
ministere des Communications du Canada.
-
 1
1
-
 2
2
-
 3
3
-
 4
4
-
 5
5
-
 6
6
-
 7
7
-
 8
8
-
 9
9
-
 10
10


dans d''autres langues
- English: Allworx Tx 92/24 Installation guide
Autres documents
-
Sixnet IPm Guide d'installation
-
Tapco 6100 SERIES Manuel utilisateur
-
Alarm Lock Trilogy Networx AL-IME2-PIE Installation Instructions Manual
-
dbx 286A Le manuel du propriétaire
-
Yamaha MBS-10 Le manuel du propriétaire
-
-
Oracle SAS-2 Upgrade Manual
-
ClearOne CONVERGE Pro 2 Guide de démarrage rapide
-
-
Nuvo NV-I8GMS Manuel utilisateur