Tefal 0500106 Manuel utilisateur
- Catégorie
- Autocuiseurs
- Taper
- Manuel utilisateur

CLIPSO
®
+
CLIPSO
®
+ gourmet
www.tefal.com
EN
FR
EL
TR
AR
FA
User's Guide - Guide de l'utilisateur
Οδηγίες χρήσης - Kullanım kılavuzu
b≠∑d Çë ¸«≥øMLU - b∞¥‰ «ùߢFLU‰

max
2/3
1/2
1/3
max
2/3
1/2
1/3
J*
K*
O
P
F
G
I
L*
H*
J*
L*
E
M*
N*
A
C
D
B
* depending on model - *selon modèle - * ανάλογα με το μοντέλοr - * Modele göre değişir -
*•ºV «∞Luœ¥q -
* °d ©∂o ±b‰

fig. 1 fig. 2 fig. 3 fig. 4
fig. 5* fig. 6* fig. 8
fig. 9
fig. 14
fig. 15 fig. 16
fig. 17 fig. 18 fig. 19 fig. 20
fig. 7*
fig. 11fig. 10 fig. 12
fig. 13
mini 25 cl
max
2/3
* depending on model - *selon modèle - * ανάλογα με το μοντέλοr - * Modele göre değişir -
*•ºV «∞Luœ¥q -
* °d ©∂o ±b‰

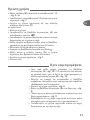
IMPORTANT SAFEGUARDS
For your safety, this device complies with the applicable standards and regulations:
- Pressure vessel appliance
- Materials in contact with food
- Environment
• This product has been designed for domestic use only.
• Any commercial use, inappropriate use or failure to comply with the instructions, the manufacturer
accepts no responsibility and the guarantee will not apply.
• Take time to read all of the instructions and always refer back to the “User's Guide”.
• As with any cooking appliance, ensure close supervision if you are using the pressure cooker with
children nearby.
• Do not put your pressure cooker into a hot oven.
• When the pressure cooker is under pressure, take great care when moving it. Do not touch the hot
surfaces. Use the handles and knobs. Wear gloves if necessary.
• Regularly check that the pan handles are fixed properly. Tighten if necessary.
• Do not use your pressure cooker for any purpose other than that for which it is designed.
• Your pressure cooker cooks under pressure. Burns could result from boiling over if not used properly.
Make sure that the pressure cooker is properly closed before bringing it up to pressure. Refer to
section “Closing”.
• Always make sure that the valve is in the decompression position before opening your pressure
cooker.
• Never force the pressure cooker open. Make sure that the internal pressure has returned to normal.
Refer to section “Safety”.
• Never use your pressure cooker without liquid: this could cause serious damage. Always make sure
that there is enough liquid in it during cooking.
• Use heat source(s) that are compatible with your pressure cooker, in line with the instructions for
use.
• Never make milk-based recipes (such as rice pudding, semolina pudding ...) in your pressure cooker.
• Do not use rock salt in your pressure cooker, but rather add table salt when the cooking is nearly
finished.
• Never fill your pressure cooker more than two-thirds full (maximum fill mark).
• For food that expands during cooking, like rice or dried vegetables or stewed fruit, etc., never fill your
pressure cooker more than half full. For certain soups like pumpkin or courgette, give your pressure
cooker a few minutes to cool down, then cool it down fully by placing it under cold running water.
• After cooking meat which has an outer layer of skin (such as ox tongue), which could swell due to
the effects of pressure, do not pierce the skin after cooking if it appears swollen: you could get burnt.
Pierce it before cooking.
• When cooking food with a thick texture (chick peas, rhubarb, stewed fruit, etc.) the pressure cooker
should be shaken slightly before opening to ensure that the food does not spurt out.
• Always check that valves are clear before use. Refer to section “Before cooking”.
• Do not use the pressure cooker to fry under pressure using oil.
• Do not interfere with the safety systems, except for cleaning and maintenance in accordance with
instructions.
• Use only original TEFAL spare parts suitable for your model. Particularly, use a TEFAL pan and lid.
• Alcohol vapours are flammable. Bring to a boil for about 2 minutes before placing the lid. Watch
your appliance when preparing alcohol-based recipes.
• Do not use your pressure cooker to store acidic or salty food before and after cooking to avoid
damaging your pan.
• You can use the pan to cook food without the lid. Do not use the lid if you do not intend the food
to be cooked under pressure.
• If you notice that your pressure cooker is broken or cracked, do not attempt to open it under any
circumstances; wait for it to cool down completely before moving it. Do not use it again and take
it to a TEFAL Approved Service Centre for repair.
KEEP THESE INSTRUCTIONS
* depending on model

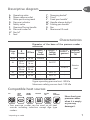
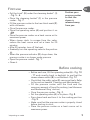
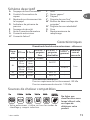
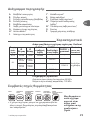
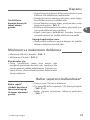
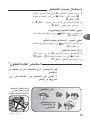
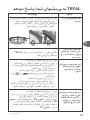
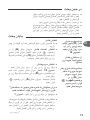
Descriptive diagram
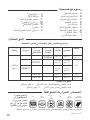
Characteristics
Diameter of the base of the pressure cooker -
references
Standards information
Upper operating pressure limit: 80 kPa
Maximum safety pressure limit: 120 kPa
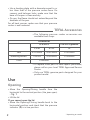
Compatible heat sources
• Your pressure cooker can be used on all heat
sources including induction except Aga type
cookers.
A. Operating valve
B. Steam release outlet
C. Valve positioning mark
D. Pressure indicator
E. Safety valve
F. Opening/Closing handle
G. Pressure cooker lid
H*. Pan lid*
I. Seal
J*. Steaming basket*
K*. Trivet*
L*. Fixed pan handle*
M*. Handle release button*
N*. Folding pan handle*
O. Pan
P. Maximum fill mark
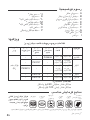
Capa-
city
Ø
Cooker
Ø Base
CLIPSO
®
+
fixed
handles
CLIPSO
®
+
folding
handles
CLIPSO
®
+
gourmet
Material
body and
lid
4,5 L 22 cm 18 cm P43606 - -
Stainless
steel
6 L
CLIPSO
®
+
22 cm
CLIPSO
®
+
18 cm
- P43707 -
CLIPSO
®
+
Gourmet
25 cm
CLIPSO
®
+
Gourmet
20 cm
- - P43813
8 L 25 cm 20 cm - P43714 -
10 L 25 cm 20 cm - P43715 -
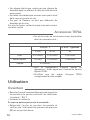
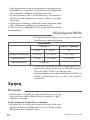
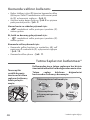
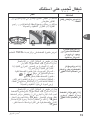
USING
POTHOLDERS
GAS SEALED
PLATE
ELECTRIC
CERAMIC
HALOGEN
INDUCTION
ELECTRIC
COIL
EN
1
* depending on model
Never heat your
pressure cooker
when it is empty
or you may
damage it.

• Use a heating plate with a diameter equal to or
less than that of the pressure cooker base. On
ceramic and halogen hobs, make sure that the
base of the pan is clean and dry.
• On gas, the flame should not extend beyond the
diameter of the pan.
For all heat sources, make sure that your pressure
cooker is well centered.
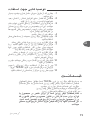
TEFAL Accessories
• The following pressure cooker accessories are
available from shops:
• To replace other parts or have repairs performed,
please call on your local TEFAL Approved Service
Centre.
• Only use TEFAL genuine parts designed for your
product model.
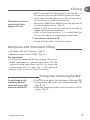
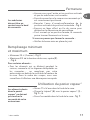
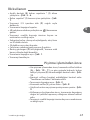
Use
Opening
• Move the Opening/Closing handle from the
horizontal to the vertical position (the jaws open)
- fig. 1.
• Lift the lid.
If you cannot open the lid:
• Move the Opening/Closing handle back to the
horizontal position and check that the pressure
indicator (D) is in low position.
Accessories
CLIPSO
®
+ CLIPSO
®
+ gourmet
4,5/6L 8/10L 6L
Seal X1010004 X1010003 X1010003
Steaming basket* 792185 X1030002 X1030002
Trivet X1030007 -
2
* depending on model

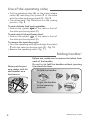
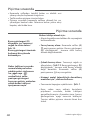
Closing
• Make sure that the Opening/Closing handle is in
the vertical position and that the jaws are open.
• Place the lid on the pressure cooker, taking care to
ensure that it is correctly positioned.
• Move the Open/Close handle from the vertical to
the horizontal position - fig. 2.
• Apply a little force at the end when closing to
trigger the locking mechanism.
• Once in the closed position, it is normal that the
lid can turn freely on the pressure cooker pan.
If you cannot close the lid:
• Check that the seal is in place properly.
Minimum and maximum filling
• Minimum 250 ml (2 glasses) - fig. 3.
• Maximum two-thirds full (P) - fig. 4.
For some food:
• For food that expands during cooking, like rice or
dried vegetables or stewed fruit, never fill the
pressure cooker more than half full. For soups, we
recommend
you to carry out a fast pressure
release (refer to section "End of cooking").
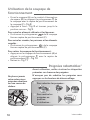
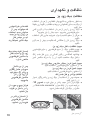
Using the steaming basket*
• Pour 750 ml of water into the base of the pan (O).
• Put the trivet* (K) under the steaming basket* (J)
- fig. 5 - 6.
• Place the steaming basket into the bottom of the
cooker - fig. 7.
EN
3
* depending on model
The jaws must be in
contact with the
edge of the lid.
Food placed in the
steaming basket*
must not touch the
pressure cooker lid.

Use of the operating valve
• Put the operating valve (A) on the steam release
outlet (B) matching the symbol • of the valve
with the valve positioning mark (C) - fig. 8.
• Press down hard - fig. 8 and turn it to the cooking
position - fig. 9.
To cook delicate food and vegetables:
• Position the symbol of the valve in front of
the valve positioning mark (C).
To cook meat, fish and frozen food:
• Position the symbol of the valve in front of
the valve positioning mark (C).
To remove the operating valve:
• Press the operating valve (A) and align the symbol
• with the valve positioning mark (C) - fig. 10.
• Remove the operating valve - fig. 11.
Folding handles*
Before use, make sure to remove the labels from
each of the handles.
Do not try to fold the handles without pressing
the release buttons.
4
* depending on model
To fold the handles:
To put the handles
in the operating
position:
“CLICK”
Never put the pres-
sure cooker with fol-
ded handles on a
heat source.

First use
• Put the trivet* (K) under the steaming basket* (J)
- fig. 5 - 6.
• Place the steaming basket* (J) in the pressure
cooker - fig. 7.
• Fill the pressure cooker to the two-thirds mark (P)
with cold water.
• Close the pressure cooker.
• Place the operating valve (A) and position it on
.
• Place the pressure cooker on a heat source set to
maximum power.
• When steam starts to escape from the valve,
reduce the heat source and set a timer for 20
minutes.
• After 20 minutes, turn off the heat.
• Gradually turn the operating valve to the position
.
• When the pressure indicator (D) drops down, the
pressure cooker is no longer under pressure.
• Open the pressure cooker - fig. 1.
• Clean it.
Before cooking
• Before each use, lift the operating valve (A) - fig. 10
- 11 and visually check, in daylight, to see that the
steam release outlet (B) is not blocked - fig. 12.
• Check that the safety valve (E) can move freely: Refer
to the section headed “Cleaning and Maintenance”.
• Fill the pressure cooker with the food and the
necessary amount of liquid for cooking (see Minimum
and Maximum filling' section).
• Close the pressure cooker - fig. 2.
• Put the operating valve (A) in its place - fig. 8.
• Press down hard and turn it to the cooking position
- fig. 9.
• Make sure that the pressure cooker is properly closed
before starting to use it.
• Place the pressure cooker on a heat source set to
maximum power.
EN
5
* depending on model
Position your
pressure cooker
so that the
steam is
released away
from you.

During cooking
• When steam escapes through the operating
valve continuously, and a regular hissing
sound (PSCHHHT) is heard, reduce the heat
source.
• Set a timer for the cooking time stated in your
recipe.
• During cooking, check that the valve murmurs
regularly. If there is not enough steam,
increase the heat source slightly; if there is too
much steam, reduce the heat source.
Finishing cooking
To release the steam:
• Once the heat is turned off, you have two options:
•
Slow pressure release: Turn the operating valve
(A) to the position . When the pressure indicator
(D) drops down, the pressure cooker is no longer
under pressure. Make sure that your pressure
cooker is positioned so that the steam is directed
away from you.
• Fast pressure release: put your pressure cooker
into a sink, under cold running water. - fig. 13.
When the pressure indicator (D) drops down, the
pressure cooker is no longer under pressure. Turn
the operating valve (A) to the position .
• You can open the pressure cooker - fig. 1.
• For models with pan equipped with metal
handles*, use potholders.
• When cooking frothy or starchy foods, do not
release the pressure by turning the operating valve
(A). Instead lift the pressure cooker away from the
heat source, leave the operating valve (A) in the
cooking position and let the cooker cool slowly at
room temperature (takes about 15 minutes) until
the pressure indicator drops down. Reduce the
recommended cooking time a little.
6
* depending on model
The pressure indicator
(D) prevents you from
opening the pressure
cooker if it still under
pressure.
If the pressure
indicator (D) does not
drop, place the base
of your pressure
cooker into a sink
filled with cold water -
fig. 13.
Never interfere with
the pressure indicator.
If food or liquid starts
to spray out while you
are releasing the
steam, return the
operating valve (A) to
cooking position
or then release
the steam using the
fast pressure release
method described
opposite.
The pressure indicator (D)
prevents the pressure cooker
from increasing in pressure if
it is not properly closed.
As with any cooking
appliance, watch over it
carefully especially if you are
using your pressure cooker
around children.
Steam is very hot as it exits
the steam release outlet.

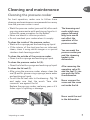
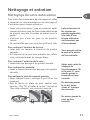
Cleaning and maintenance
Cleaning the pressure cooker
For best operation, make sure to follow these
cleaning and maintenance recommendations every
time the pressure cooker is used.
• Wash the pressure cooker (pan and lid) after each
use using warm water with washing-up liquid in it.
Follow the same procedure for the basket*.
• Never use bleach or chlorine products.
• Do not overheat your cooker when it is empty.
To clean the inside of the pressure cooker:
• Wash with a sponge pad and washing-up liquid.
• If the interior of the steel pan has an iridescent
sheen, clean it using white vinegar or a special
stainless steel cleaning product.
To clean the outside of the pressure cooker:
• Clean it with a sponge and washing-up liquid.
To clean the pressure cooker lid
(G):
• Clean the lid with a sponge and washing-up liquid.
To clean the lid seal (I):
• After using the pressure cooker, always clean the
seal (I) and its groove using a sponge, warm water
and washing-up liquid.
• To refit the lid seal, refer to the drawing - fig. 14
and make sure that the words “face côté
couvercle” are against the lid.
Replace the pressure cooker seal every year or if it
shows signs of splitting or damage.
EN
7
* depending on model
The browning and
marks which may
appear following
long term use do
not affect the
operation of the
pressure cooker.
You can wash the
pressure cooker pan
and the steaming
basket in the
dishwasher.
After removing the
operating valve (A)
and the seal (I), you
can wash the lid in
the dishwasher.
Never unscrew the
screw and the screw
nut inside the lid.
Never wash the seal
in the dishwasher.

To clean the operating valve (A):
• Remove the operating valve (A) - fig. 10 - 11.
• Wash the operating valve (A) under running tap
water - fig. 15.
• Check its mobility: see figure on the right.
To clean the steam release outlet (B) located on the
lid:
• Remove the
operating valve (A) - fig. 10 - 11.
• Visually check, in daylight, to see that the steam
release outlet is round and not blocked - fig. 12. If
necessary, clean with a toothpick - fig. 16 and rinse.
To clean the safety valve (E):
• Wash the part of the safety valve located inside the
lid under running water.
• Check that it is moving freely by pressing hard with
a cotton swab on the
pin - fig. 17.
To replace the pressure cooker seal:
• Replace the pressure cooker seal every year or if it
shows any signs of splitting or damage.
• Always use an original TEFAL seal suitable for your
model.
To store the pressure cooker:
• Turn the lid upside down on the pressure cooker
- fig. 18.
If the pressure cooker has folding handles*:
•Press the handle release button (M). Refer to the
section headed “Folding Handles.”
8
* depending on model
For a longer
pressure cooker life,
do not overheat
your pressure
cooker pan when it
is empty.
You must have your
pressure cooker
checked in a TEFAL
Approved Service
Centre after 10
years of use.

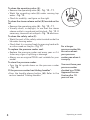
Safety
Your pressure cooker is provided with a number of
safety mechanisms:
•
Closing safety:
- The jaws must be in contact with the rim of the lid.
If this is not the case, there is steam leakage from
the pressure indicator and the pressure cooker will
not build up pressure.
• Opening safety:
- If the pressure cooker is under pressure, the
Opening/Closing handle (F) cannot be operated.
- Never try to force the pressure cooker open.
- Above all do not interfere with the pressure indicator
(D).
- Make sure that the internal pressure has fallen.
- If you have put the Opening/Closing handle (F) in
vertical position, while the pressure cooker was still
under pressure, you cannot open it.
- Move the Opening/Closing handle back to the
horizontal position and wait until the pressure
indicator (D) is in low position.
• Two safety devices operate to prevent
overpressure:
- First device: the safety valve (E) releases the pressure
- fig. 19.
- Second device: the seal allows the pressure to be
released between the lid and the pan - fig. 20.
If one of the two overpressure safety systems is
triggered:
• Turn off the heat.
• Allow the pressure cooker to cool down completely.
• Open it up.
• Check and clean the operating valve (A), the steam
release outlet (B), the safety valve (E) and the seal
(I)
- fig. 15 - 16 - 17.
• If after checking and cleaning your product leaks or
does not work, have your pressure cooker checked
by a TEFAL Approved Service Centre.
EN
9

Recommendations for use
1 - The steam is very hot when it comes out of the
pressure cooker. Beware of the steam jet.
2 - When the pressure indicator rises, you cannot open the
pressure cooker.
3 - As with any cooking appliance, supervise cooking
closely if using the pressure cooker with children
nearby.
4 - To move the pressure cooker, always use both of the
carrying handles on the side. Use panholders if
necessary.
5 - Never leave food in your pressure cooker.
6 - Never use bleach or chlorine products as they could
affect the finish of the stainless steel.
7 - Never leave the lid to soak in water.
8-
Replace the seal every year or if it shows any splits or
is damaged.
9 - Clean the pressure cooker only when it is absolutely
cold, and the pressure cooker is empty.
10 - Have your pressure cooker checked by a TEFAL
Approved Service Centre after ten years of use.
11 - Never carry the pressure cooker by the
Opening/Closing handle.
Guarantee
• Your new TEFAL pressure cooker comes with a ten year
guarantee on the pressure cooker pan provided that
the appliance has been used according to these
instructions. This guarantee covers:
- Any defects relating to the metal structure of the
pressure cooker pan,
- Any premature deterioration of the metal base.
• All other parts of your pressure cooker are
guaranteed against defects in workmanship or
materials, for the period of guarantee defined in
valid legislation in force in the country where the
product was purchased from the date of purchase.
For full details of the guarantee terms and
conditions please refer to www.tefal.com
• The guarantee is only valid on presentation of a
proof of purchase showing its date of purchase.
10

This guarantee does not cover:
• Any damage caused by misuse or improper handling
of the product, especially:
- Dropping, falls, placing in an oven*...
• Only TEFAL Approved Service Centres are authorised
to provide service under guarantee.
*Only pots which have a stainless steel handle and the stainless steel stew
pot lid may be used in the oven.
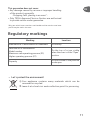
Regulatory markings
Marking Location
Manufacturer's identification or trademark. On the top
Year and lot of manufacture
Model number
Maximum safe operating pressure (PS)
Higher operating pressure (PF)
On the top of a jaw, visible
when the cover is in the “Open”
position
Capacity
On the outside of the pressure
cooker pan
EN
11
• Let's protect the environment!
i Your appliance contains many materials which can be
recovered or recycled.
‹ Leave it at a local civic waste collection point for processing.

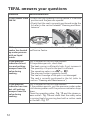
TEFAL answers your questions
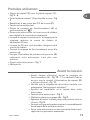
12
Problems Recommendations
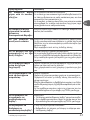
If you cannot close
the lid:
• Check that the Opening/Closing handle is in vertical
position and the jaws are opened.
• Check that the seal is properly positioned inside the
lid, refer to the section headed “Cleaning and Main-
tenance”.
If the pressure
cooker has heated
up under pressure
with no liquid
inside:
Have your pressure cooker checked by a TEFAL Appro-
ved Service Centre.
If the pressure
indicator did not
rise and nothing
escapes from the
valve during
cooking:
This is normal for the first few minutes.
If the problem persists, check that:
- The heat source is sufficiently high; if not, increase it.
- The quantity of liquid in the pan is sufficient.
- The operating valve is on or .
- The pressure cooker is properly closed.
- The seal or the edge of the pan is not damaged.
- The seal is correctly positioned in the lid, (refer to
section “Cleaning and Maintenance”).
If the pressure
indicator has risen
but still nothing
escapes from the
valve during
cooking:
This is normal for the first few minutes.
If the problem persists, put the pressure cooker under
cold running water until the pressure indicator drops
down.
Clean the operating valve - fig. 15 and the steam re-
lease outlet - fig. 16 and check that the safety valve
is moving freely by pressing hard with a cotton swab
on the ball - fig. 17.

EN
13
* depending on model
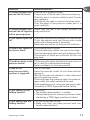
Problems
Recommendations
If steam escapes from
around the lid, check:
That the lid is properly closed.
The position of the lid seal is the correct way up.
That the seal is in good condition, and if neces-
sary, replace it.
That the lid, the seal, its seat in the lid are clean.
That the edge of the pressure cooker pan is in
good condition.
If steam escapes from
around the lid together
with a piercing noise:
Check that the seal is not caught between the
body and the lid.
If you cannot open the
lid:
Check that the pressure indicator is in low position.
If not, decompress and cool the pressure cooker
under cold running water if necessary.
Never take any action on the pressure indicator.
If food is not cooked or
has burnt, check:
The cooking time is correct.
The heat level was neither too low nor too high.
That the operating valve was in the right position.
The amount of liquid was sufficient for the coo-
king time.
If food has burnt in the
pressure cooker:
Fill the pan with water and leave the pressure coo-
ker to soak for a while before washing.
Never use bleach or chlorine products.
If one of the
overpressure safety
systems is triggered:
Turn off the heat.
Leave the pressure cooker to cool down without
moving it.
Wait for the pressure indicator to drop down and
open the pressure cooker.
Check and clean the operating valve, the steam re-
lease outlet, the safety valve and the seal.
If the problem persists, have your pressure cooker
checked by a TEFAL Approved Service Centre.
If you cannot fix the
folding handles*:
Check that:
• The handle release button* is mobile.
• If the problem persists, have your pressure cooker
checked by a TEFAL Approved Service Centre.
If you cannot fold the
folding handles*:
• Do not force them to fold.
• Make sure that you have pressed hard the
handle release button*.

14
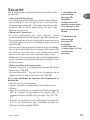
Précautions importantes
Pour votre sécurité, cet appareil est conforme aux normes et réglementations applicables :
- Directive des Équipements sous Pression
- Matériaux en contact avec les aliments
- Environnement
• Cet appareil a été conçu pour un usage domestique.
• Prenez le temps de lire toutes les instructions et reportez-vous toujours au “Guide de l’utilisateur”.
• Comme pour tout appareil de cuisson, assurez une étroite surveillance surtout si vous utilisez
votre autocuiseur à proximité d’enfants.
• Ne mettez pas votre autocuiseur dans un four chaud. Seuls la cuve équipée de poignées en inox
et le couvercle faitout en inox peuvent passer au four.
• Déplacez votre autocuiseur sous pression avec un maximum de précautions. Ne touchez pas les
surfaces chaudes
(en particulier les pièces métalliques). Utilisez les poignées et boutons. Utilisez
des gants, si nécessaire.
• Vérifiez régulièrement que les poignées de la cuve sont correctement fixées. Revissez-les si besoin.
• N’utilisez pas votre autocuiseur dans un autre but que celui auquel il est destiné.
• Votre autocuiseur cuit sous pression. Des blessures par ébouillantage peuvent résulter d’une
utilisation inadéquate. Assurez-vous que votre autocuiseur est convenablement fermé avant de
le mettre en service. Voir paragraphe “Fermeture”.
• Assurez-vous que la soupape est en position de décompression avant d’ouvrir votre
autocuiseur.
• N’ouvrez jamais votre autocuiseur en force. Assurez-vous que la pression intérieure est retombée.
Voir paragraphe “Sécurité”.
• N’utilisez jamais votre autocuiseur sans liquide, cela le détériorerait gravement. Assurez-vous
qu’il y a toujours suffisamment de liquide pendant la cuisson.
• Utilisez la(les) source(s) de chaleur compatible(s), conformément aux instructions d’utilisation.
• Ne réalisez jamais de recette à base de lait dans votre autocuiseur.
• N’utilisez pas de gros sel dans votre autocuiseur, ajoutez du sel fin en fin de cuisson.
• Ne remplissez pas votre autocuiseur au-delà des 2/3 (repère maximum de remplissage).
• Pour les aliments qui se dilatent pendant la cuisson, comme le riz, les légumes déshydratés, ou
les compotes, ... ne remplissez pas votre autocuiseur au-delà de la moitié de sa capacité. Pour
certaines soupes à base de potirons, courgettes…, laissez refroidir votre autocuiseur quelques
minutes, puis effectuez un refroidissement sous eau froide.
• Après cuisson de viandes qui comportent une peau superficielle (ex. langue de bœuf…), qui
risque de gonfler sous l’effet de la pression, ne pas piquer la viande tant que la peau présente
un aspect gonflé ; vous risqueriez d’être ébouillanté.
Veillez à piquer la viande avant cuisson.
• Dans le cas d’aliments pâteux (pois cassés, rhubarbe…), votre autocuiseur doit être légèrement
secoué avant ouverture pour que ces aliments ne giclent pas à l’extérieur.
• Vérifiez que les soupapes ne sont pas obstruées avant chaque utilisation. Voir paragraphe “Avant
la cuisson”.
• N’utilisez pas votre autocuiseur pour frire sous pression avec de l’huile.
• N’intervenez pas sur les systèmes de sécurité au-delà des consignes de nettoyage et d’entretien.
• N’utilisez que des pièces d’origine TEFAL correspondant à votre modèle. En particulier, utilisez
une cuve et un couvercle TEFAL.
• Les vapeurs d’alcool sont inflammables. Portez à ébullition environ 2 minutes avant de mettre
le couvercle. Surveillez votre appareil dans le cadre des recettes à base d’alcool.
• N’utilisez pas votre autocuiseur pour stocker des aliments acides ou salés avant et après cuisson
au risque de dégrader votre cuve.
• Ne placez jamais votre autocuiseur poignées rabattues* sur une source de chaleur.
• Si vous constatez qu'une partie de votre cocotte est cassée ou fissurée, n'essayez en aucun cas
de l'ouvrir si elle est fermée, attendez qu'elle refroidisse complètement avant de la déplacer, ne
l'utilisez plus et rapportez la à un Centre de Service Agréé TEFAL pour réparation.
Conservez ces instructions
* selon modèle

FR
15
* selon modèle
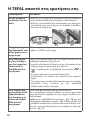
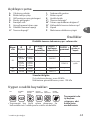
Schéma descriptif
Caractéristiques
Diamètre du fond de votre autocuiseur - références
Informations normatives :
Pression supérieure de fonctionnement : 80 kPa
Pression maximum de sécurité : 120 kPa
Sources de chaleur compatibles
• Votre autocuiseur s’utilise sur tous les modes de
chauffage y compris induction.
A. Soupape de fonctionnement
B. Conduit d’évacuation de
vapeur
C. Repère de positionnement de
la soupape
D. Indicateur de présence de
pression
E. Soupape de sécurité
F. Anse d’ouverture/fermeture
G. Couvercle autocuiseur
H*. Couvercle faitout*
I. Joint
J*. Panier vapeur*
K*. Trépied*
L*. Poignée de cuve fixe*
M*. Bouton de déverrouillage des
poignées*
N*. Poignée de cuve rabattable*
O. Cuve
P. Repère maximum de
remplissage
Capa-
cité
Ø Cuve Ø Fond
CLIPSO
®
+
poignées
fixes
CLIPSO
®
+
poignées
rabattables
CLIPSO
®
+
gourmet
Matériau
cuve et
couvercle
4,5 L 22 cm 18 cm P43606 - -
Inox
6 L
CLIPSO
®
+
22 cm
CLIPSO
®
+
18 cm
- P43707 -
CLIPSO
®
+
Gourmet
25 cm
CLIPSO
®
+
Gourmet
20 cm
- - P43813
8 L 25 cm 20 cm - P43714 -
10 L 25 cm 20 cm - P43715 -
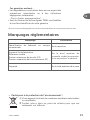
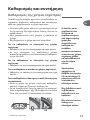
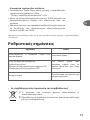
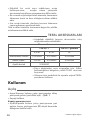
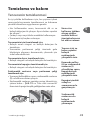
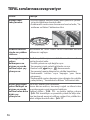
UTILISATIONUTILISATION
DE MANIQUESDE MANIQUES
GAGAZ ELECTRIQUELECTRIQUE HAHALOGÈNOGÈNE INDUCTIOINDUCTION RADIANTRADIANT
Ne faites pas
chauffer votre cuve
lorsqu’elle est vide,
au risque de
détériorer votre
produit.

16
* selon modèle
• Sur plaque électrique, employez une plaque de
diamètre égal ou inférieur à celui du fond de votre
autocuiseur.
• Sur table vitrocéramique, assurez-vous que le fond
de la cuve est propre et net.
• Sur gaz, la flamme ne doit pas déborder du
diamètre de la cuve.
Sur tous les foyers, veillez à ce que votre autocuiseur
soit bien centré.
Accessoires TEFAL
• Les accessoires de votre autocuiseur disponibles
dans le commerce sont :
• Pour le changement d’autres pièces ou
réparations, faites appel aux Centres de Service
Agréés TEFAL.
• N’utilisez que des pièces d’origine TEFAL
correspondant à votre modèle.
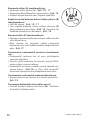
Utilisation
Ouverture
• Basculez l’anse d’ouverture/fermeture de la position
horizontale à la position verticale (les mâchoires
s’écartent) - fig 1.
• Soulevez le couvercle.
Si vous ne pouvez pas ouvrir le couvercle :
• Rebasculez l'arche en position horizontale et
vérifiez que l'indicateur de présence de pression
(D) est en position basse.
Accessoires
CLIPSO
®
+ CLIPSO
®
+ gourmet
4,5/6L 8/10L 6L
Joint X1010004 X1010003 X1010003
Panier vapeur* 792185 X1030002 X1030002
Trépied X1030007 -
La page est en cours de chargement...
La page est en cours de chargement...
La page est en cours de chargement...
La page est en cours de chargement...
La page est en cours de chargement...
La page est en cours de chargement...
La page est en cours de chargement...
La page est en cours de chargement...
La page est en cours de chargement...
La page est en cours de chargement...
La page est en cours de chargement...
La page est en cours de chargement...
La page est en cours de chargement...
La page est en cours de chargement...
La page est en cours de chargement...
La page est en cours de chargement...
La page est en cours de chargement...
La page est en cours de chargement...
La page est en cours de chargement...
La page est en cours de chargement...
La page est en cours de chargement...
La page est en cours de chargement...
La page est en cours de chargement...
La page est en cours de chargement...
La page est en cours de chargement...
La page est en cours de chargement...
La page est en cours de chargement...
La page est en cours de chargement...
La page est en cours de chargement...
La page est en cours de chargement...
La page est en cours de chargement...
La page est en cours de chargement...
La page est en cours de chargement...
La page est en cours de chargement...
La page est en cours de chargement...
La page est en cours de chargement...
La page est en cours de chargement...
La page est en cours de chargement...
La page est en cours de chargement...
La page est en cours de chargement...
La page est en cours de chargement...
La page est en cours de chargement...
La page est en cours de chargement...
La page est en cours de chargement...
La page est en cours de chargement...
La page est en cours de chargement...
La page est en cours de chargement...
La page est en cours de chargement...
La page est en cours de chargement...
La page est en cours de chargement...
La page est en cours de chargement...
La page est en cours de chargement...
La page est en cours de chargement...
La page est en cours de chargement...
La page est en cours de chargement...
La page est en cours de chargement...
La page est en cours de chargement...
La page est en cours de chargement...
La page est en cours de chargement...
La page est en cours de chargement...
La page est en cours de chargement...
La page est en cours de chargement...
La page est en cours de chargement...
La page est en cours de chargement...
La page est en cours de chargement...
La page est en cours de chargement...
La page est en cours de chargement...
La page est en cours de chargement...
La page est en cours de chargement...
La page est en cours de chargement...
-
 1
1
-
 2
2
-
 3
3
-
 4
4
-
 5
5
-
 6
6
-
 7
7
-
 8
8
-
 9
9
-
 10
10
-
 11
11
-
 12
12
-
 13
13
-
 14
14
-
 15
15
-
 16
16
-
 17
17
-
 18
18
-
 19
19
-
 20
20
-
 21
21
-
 22
22
-
 23
23
-
 24
24
-
 25
25
-
 26
26
-
 27
27
-
 28
28
-
 29
29
-
 30
30
-
 31
31
-
 32
32
-
 33
33
-
 34
34
-
 35
35
-
 36
36
-
 37
37
-
 38
38
-
 39
39
-
 40
40
-
 41
41
-
 42
42
-
 43
43
-
 44
44
-
 45
45
-
 46
46
-
 47
47
-
 48
48
-
 49
49
-
 50
50
-
 51
51
-
 52
52
-
 53
53
-
 54
54
-
 55
55
-
 56
56
-
 57
57
-
 58
58
-
 59
59
-
 60
60
-
 61
61
-
 62
62
-
 63
63
-
 64
64
-
 65
65
-
 66
66
-
 67
67
-
 68
68
-
 69
69
-
 70
70
-
 71
71
-
 72
72
-
 73
73
-
 74
74
-
 75
75
-
 76
76
-
 77
77
-
 78
78
-
 79
79
-
 80
80
-
 81
81
-
 82
82
-
 83
83
-
 84
84
-
 85
85
-
 86
86
-
 87
87
-
 88
88
-
 89
89
-
 90
90


Tefal 0500106 Manuel utilisateur
- Catégorie
- Autocuiseurs
- Taper
- Manuel utilisateur
dans d''autres langues
- English: Tefal 0500106 User manual
- Türkçe: Tefal 0500106 Kullanım kılavuzu
Documents connexes
-
Tefal P44247 Clipso Essential Le manuel du propriétaire
-
-
-
-
Tefal P4442065 Manuel utilisateur
-
-
Tefal P4101449 Manuel utilisateur
-
Tefal P4090731 Manuel utilisateur
-
-
Tefal Clipso Oasis - P43514 Le manuel du propriétaire