
VIQUA Water Filters Installation
Section 1 Safety Information
Please read this entire instruction sheet before operating this equipment. Pay attention to all danger, warning, and caution
statements in this instruction sheet. Failure to do so could result in serious personal injury or damage to the equipment.
Make sure that the protection provided by this equipment is not impaired. Do not use or install this equipment in any manner
other than that specified in the instruction sheet.
1.1 Safety Precautions
Section 2 Installation
WA R N I N G
WARNING: This product can expose you to chemicals including phthalates, which is known to the state of California to cause cancer, and mercury,
which is known to the State of California to cause birth defects or other reproductive harm. For more information go to www.P65Warnings.ca.gov.
C A U T I O N
If water pipes are used to ground electrical system, appliances, or phone, install a jumper wire.
N O T I C E
Read and understand this Instruction Sheet before operating and performing any maintenance on this equipment.
WA R N I N G
•DO NOT install on line pressures above 100 psi (6.9 bar).
•DO NOT overtighten pipe fittings.
•DO NOT use wicking or sealer, Teflon™ tape is recommended.
•DO NOT use torch near plastic housing. All sweated joints should be made prior to assembling piping to the filter head.
•Replace O-ring seal, if there is visible damage.
•Maximum temperature allowed is 38 °C (100 °F). Special hot water filters are available for higher temperatures.
•Protect the filters from freezing temperatures.
•DO NOT install in direct sunlight.
•Allow minimum of 2” clear space under filter to facilitate cartridge change.
•DO NOT use with water that is microbiologically unsafe or of unknown quality without adequate disinfection before or after the system.
Instruction Sheet
AWP40B-V, AWP42B-V, AWP50B-V
and AWP52B-V are Tested and
Certified by NSF International against
NSF/ANSI standard 42 for material
and structural integrity requirements.
COMPONENT
520094_RevH

Installation
2
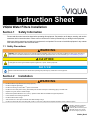
2.1 Installing Filter on Water Line
Note: Filter can be adapted to various pipes using reducing adapters on either end. Installation fittings can be sweated or
threaded. Use galvanized fittings for installation on galvanized pipe.
Procedure:
N O T I C E
Before starting, shut off the main water supply and drain pipes.
1
100/150
mm
15/30
mm
• Install the filters at a minimum
distance of 15-30 mm from
the wall and 100-150 mm
from the ground.
2
• Loosen all parts and calculate
length of pipe to be removed.
• Cut the pipe and install
fittings onto pipe.
3
• Screw filter to the adapter
after covering the threads
with Teflon™ tape and make
a tight connection but do not
over tighten.
Note: If space is limited
remove sump from head
while making connection.
4
• Connect and tighten, making
sure filter is in a straight
vertical position.
5
Jumper Wire
Note: If water pipes are used
to ground electrical system,
appliances, or phone, install a
jumper wire.
6
By-pass section:
• Use either threaded or
sweated fittings for bypass
section (optional).

Maintenance
3
Section 3 Maintenance
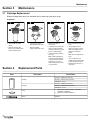
3.1 Cartridge Replacement
Replace cartridge when there is a noticeable drop in water flow at the faucet or tap.
Procedure:
Section 4 Replacement Parts
Parts Description Part Number
Cartridge
Sediment - CMB510-HF, Grooved
Sediment - CMB-110-HF, Ungrooved
Taste/Odour - C2-01
Two-High
Sediment - CMB520-HF, Grooved
Sediment - CMB-120-HF, Ungrooved
Taste/Odour - C2-02
O-ring 1 OR40-50W for Filters AWP40B-V, AWP42B-V,
AWP50B-V, AWP52B-V.
2 OR40-50C for Filters AWP40C-V.
Wrench WR40-50
1
•Shut off inlet and outlet
valves.
•Depress pressure relief
button on top of filter head to
relieve pressure in filter.
2
•Unscrew ring nut and
separate from outer head.
•Remove cartridge
emptying water from sump.
3
•Clean and inspect all
components.
•Lubricate O-rings with a light
coating of a silicone based
lubricant. Replace O-ring seal
if there is visible damage.
•Install new VIQUA cartridge
into sump.
Note: VIQUA cartridges are
designed and manufactured
to provide the best possible
performance. Use of non
VIQUA cartridges may result
in system failure.
4
• Place lubricated O-ring on the
sump.
•Using supplied wrench,
tighten sump firmly onto the
head until a definite stop is
felt and the cartridge is
sealed.
Note: Do not overtighten the
sump.
•Turn on inlet valve and
depress pressure relief button
until air is purged from filter.
•Release button and turn on
outlet valve.

425 Clair Rd. W, Guelph, Ontario, Canada N1L 1R1
t. (+1) 519.763.1032 • tf. (+1) 800.265.7246 (US and Canada only)
t. (+31) 73 747 0144 (Europe only) • f. (+1) 519.763.5069
e-mail: [email protected]
www.viqua.com
À DÉPOSER
Cet appareil
se recycle
Points de collecte sur www.quefairedemesdechets.fr
Privilégiez la réparaon ou le don de votre appareil !
OU
FR À DÉPOSER
EN DÉCHÈTERIE
EN MAGASIN
-
 1
1
-
 2
2
-
 3
3
-
 4
4


Viqua AWP42B-V Mode d'emploi
- Taper
- Mode d'emploi
dans d''autres langues
Documents connexes
Autres documents
-
Tandem T:Slim X2 Insulin Pump Manuel utilisateur
-
Pelican Trojan IHS12-D4 Le manuel du propriétaire
-
Pelican Water THD-PUV-16-Lamp Manuel utilisateur
-
-
STIEBEL ELTRON SCALE TAC-LER Manuel utilisateur
-
US Water Trojan UV Manuel utilisateur
-
3M 5592003 Guide d'installation
-
GE GXWH08C Guide d'installation