Intermec Trakker Antares 2420 Guide de démarrage rapide
- Taper
- Guide de démarrage rapide


32
Intermec Technologies Corporation
6001 36th Avenue West
Everett, WA 98203
U.S. service and technical support:
1-800-755-5505
U.S. media supplies ordering information:
1-800-227-9947
Canadian service and technical support:
1-800-668-7043
Canadian media supplies ordering information:
1-800-268-6936
Outside U.S.A. and Canada:
Contact your local Intermec service supplier.
The information contained herein is proprietary
and is provided solely for the purpose of allowing
customers to operate and/or service Intermec
manufactured equipment and is not to be released,
reproduced, or used for any other purpose without
written permission of Intermec.
Information and specifications in this manual are
subject to change without notice.
© 2002 by Intermec Technologies Corporation
All Rights Reserved
The word Intermec, the Intermec logo, INCA
(under license), MobileLAN, JANUS, IRL,
Trakker Antares, EZBuilder, TE 2000, Data
Collection Browser, dcBrowser, Universal Access
Point, UAP, Duratherm, EasyCoder, Precision
Print, PrintSet, Virtual Wedge, and CrossBar are
either trademarks or registered trademarks of
Intermec.
Throughout this manual, trademarked names may
be used. Rather than put a trademark (™ or ®)
symbol in every occurrence of a trademarked name,
we state that we are using the names only in an
editorial fashion, and to the benefit of the
trademark owner, with no intention of
infringement.
There are U.S. and foreign patents pending.
Contents
Introducing the Trakker Antares
Oracle-Ready Terminal 5
Installing the 2455, 2475, and 2481/6
(Overview of Steps) 5
Installing and Connecting
Power and Battery Packs 6
Turning on the Terminal 7
Configuring the Operations Parameters 7
Configuring the Network Parameters 8
Configuring the Radio Parameters 10
Keyboard Shortcuts 11

54
Introducing the Trakker Antares
Oracle-Ready Terminal
This guide describes how to start using your
Trakker Antares
®
Oracle-Ready terminal: 2415,
2425, 2455, 2475, 2481, or 2486.
To use your Trakker Antares Oracle-Ready
terminal, you need to perform these steps:
1. (2455, 2475, and 2481/6) Install the terminal.
2. Install/connect power and install/charge
battery packs.
3. Turn on the terminal.
4. Configure the operations parameters.
5. Configure the network parameters.
6. Configure the radio parameters.
These steps are outlined in the next sections.
For more detail, see the getting started guide or
quick start guide that ships with your terminal.
Trakker Antares 2415,
2425, 2435, 2455, 2475,
and 2486 terminals with an
IEEE 802.11b radio installed are Wi-Fi certified
for interoperability with other 802.11b wireless
LAN devices.
Installing the 2455, 2475, and
2481/6 (Overview of Steps)
1. Attach the antenna.
2. Install the mounting bracket on the
mounting surface.
3. (2481/6) Connect to power, input, and serial
devices and charge the backup battery.
4. (2455) Install the keyboard.
5. Attach the terminal to the mounting
bracket.
1

76
6. (2455, 2475) Install and connect the DC
power supply and charge the backup
battery.
7. (2455, 2475) Connect to input devices and
serial devices.
For help, see the getting started guide or quick
start guide that ships with the terminal.
Installing and Connecting
Power and Battery Packs
The 2415, 2425, and 2435 use a lithium-ion
battery pack as the main power source. These
terminals also have a backup battery or power
source. You must charge and install the battery
packs before using the terminal.
The 2455, 2475, and 2481/6 use an external
power supply and a backup battery. You need
to connect and install power and charge the
backup battery before using the terminal.
To charge and install the battery packs
for the 2415, 2425, and 2435
Caution
The lithium-ion battery pack that is
used in this device may present a
fire or chemical burn hazard if it is
mistreated. Do not disassemble it, heat it
above 100ºC (212ºF), or incinerate it.
Conseil
Le paquet de piles d’ions de lithium qui
est utilisé dans cet appareil peut presenter
un risque feu ou un risque chimique de
brûlure s’il est maltraité. Il ne faut pas le
désassembler, le réchauffer à une température
plus élevée que 100
o
C (212
o
F), ou l’incinérer.
1. Charge the battery pack by placing it in an
empty slot in the battery charger.
2. (2425) Open the battery door and connect
the backup battery.
3. Install the battery pack.
To connect and install power for the 2455
and the 2475
•
Refer to the Trakker Antares 2455/2475
DC Power Supply Installation Instructions
(Part No. 067362).
To connect and install power for the 2481/6
1. Remove the back panel.
2. Connect the power supply to the power
source and the terminal and charge the
backup battery.
Turning on the Terminal
1. Press the 1/0 key. The terminal runs POST
(power-on self test), and then the Boot
Menu appears.
2. Press the appropriate key to boot the
terminal and initialize the firmware. The
Oracle-Ready screen appears.
Configuring the
Operations Parameters
Before you can start using the terminal, you
need to configure the Time and Date command
and the Preamble command.
2
3
24XXOR001.eps
4

98
To set the time and date
1. Scan this bar code to access the TRAKKER
Antares 2400 Menu System:
TRAKKER Antares 2400 Menu System
*..-.*
*..-.*
2. Select the System Menu and press the
Enter key. Select the Set Time and Date
command and press the Enter key.
3. Enter the current time in the format
HH:MM:SS (hours, minutes, seconds),
and enter the current date in the format
YYYY:MM:DD (year, month, day). You
must enter the colon character (:).
4. Press the Enter key, and then press the
Esc key.
To configure the preamble
1. From the Main Menu, choose
Configuration Menu, Terminal Menu,
and then choose Preamble/Postamble.
2. Enter \x1C in the Preamble field. Oracle
recognizes the data as bar code data based
on this preamble.
3. Press the Enter key, and then press the
Esc key twice.
Configuring the
Network Parameters
1. From the Main Menu in the TRAKKER
Antares 2400 Menu System, choose
Configuration Menu, Communication
Menu, and then choose Primary Network or
Advanced Network.
5
2. Configure the Primary Network parameters:
•
Activate field set to 2.4 GHz RF or
802.11 DS. If you are using a WTP
network, this is the only Primary
Network parameter you need to set.
•
(TCP/IP) Host IP Address field set to
the IP address of the host that you
want the terminal to communicate with.
(UDP Plus) Controller IP Address field
set to the IP address of the DCS 30X.
•
Terminal IP Address field set to the IP
address of the terminal. If the terminal is
a DHCP client, use the default value of
0.0.0.0.
3. Configure the Advanced Network
parameters:
Note: You do not need to configure the
Advanced Network parameters for WTP.
•
(TCP/IP) Network Port set to the
appropriate port for the application
on the terminal. The default value 23
enables VT/ANSI Telnet
communications.
•
(UDP Plus) Network Port set to the
network port on the DCS 30X. The
default value 5555 matches the default
value set on the DCS 30X.
Note: If you are using the terminal as a
DHCP client, you do not need to set the
subnet mask and default router.
•
Subnet Mask field set to the mask that
separates the subnetwork address from
the terminal IP address.
•
Default Router field set to the IP
address of the default router.
4. Press the Esc key twice to return to the
Main Menu.

1110
Configuring the Radio Parameters
The terminal ships with one of these two radio
options:
•
WLI Forum OpenAir
•
IEEE 802.11b
To configure the radio parameters
1. From the Main Menu in the TRAKKER
Antares 2400 Menu System, choose
Configuration Menu, Communication
Menu, and then Radio.
2. Configure the radio parameters:
•
(OpenAir) Domain field set to a number
from 0 to 15. Security ID field contains
up to 20 case-sensitive alphanumeric
characters or left blank.
•
(802.11b) Network Name field contains
up to 32 case-sensitive alphanumeric
characters. WEP encryption enabled,
WEP transmit key selected, and WEP
key value entered.
3. Exit the TRAKKER Antares 2400 Menu
System, and save all changes. The terminal
restarts and connects to the Oracle Mobile
Applications.
Keyboard Shortcuts
Use the following table to learn keyboard
shortcuts for certain functions. You can also
use the included labels to create a bar code
quick reference card.
Function Key Description
Help F1 Displays the keys that
functions are mapped to.
Press F3 to exit this screen.
Menu F2 Returns to the last menu and
cancels transactions that have
not been committed.
Back F3 Returns to previous page
displayed within a transaction.
Also exits from the Help Menu.
Forward F4 Goes to next page displayed
within a transaction.
Clear Ctl-K Clears input from the field.
LOV Ctl-L Displays the list of validated
values for a field.
Main Ctl-N Returns to the main menu of
Menu a responsibility and cancels
transactions that have not been
committed.
Message Ctl-B Displays the long description of
a message that appears on the
status bar.
Toggle Ctl-Z Toggles between options in a list
field.
Show Ctl-A Displays the current field on the
Field entire page if the field runs off
the screen.
Hot Key Esc With a button’s accelerator key,
enables the button to be pressed
from anywhere on the page.
Page Up Ctl-D Displays the next page up on
the screen.
Page Ctl-C Displays the next page down on
Down the screen.
24XXOR002.eps
6

12
Trakker Antares 2400 Family
Oracle-Ready Terminal Quick Start Guide
*072389-002*
*072389-002*
Keyboard Shortcuts (continued)
Function Key Description
Generate Ctl-G Creates a new number for
particular fields in Inventory
and WMS, such as lot number,
serial number, and license plate
number.
Skip Ctl-S Skips the current task on the
Task task page.
About Ctl-X Displays the ‘About’ page that
lists details about the current
connection that may be useful
for solving problems.
Flex Ctl-F Displays the segment by
Popup segment entry screen for a key
flexfield on the mobile user
interface.
6001 36th Avenue West
Everett, WA 98203
© 2002 Intermec Technologies Corp.
All Rights Reserved

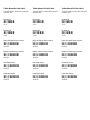
Trakker Antares Bar Code Labels
Use these labels to create a bar code quick
reference card.
Trakker Antares Bar Code Labels
Use these labels to create a bar code quick
reference card.
Trakker Antares Bar Code Labels
Use these labels to create a bar code quick
reference card.
Backlight On
*%.1*
*%.1*
Backlight On
*%.1*
*%.1*
Backlight On
*%.1*
*%.1*
Backlight Off
*%.0*
*%.0*
Backlight Off
*%.0*
*%.0*
Backlight Off
*%.0*
*%.0*
Darker or Brighter Display Contrast
*$+DJ9*
*$+DJ9*
Darker or Brighter Display Contrast
*$+DJ9*
*$+DJ9*
Darker or Brighter Display Contrast
*$+DJ9*
*$+DJ9*
Brighter or Darker Display Contrast
*$+DJ8*
*$+DJ8*
Brighter or Darker Display Contrast
*$+DJ8*
*$+DJ8*
Brighter or Darker Display Contrast
*$+DJ8*
*$+DJ8*
Raise Beep Volume
*$+BV9*
*$+BV9*
Raise Beep Volume
*$+BV9*
*$+BV9*
Raise Beep Volume
*$+BV9*
*$+BV9*
Lower Beep Volume
*$+BV8*
*$+BV8*
Lower Beep Volume
*$+BV8*
*$+BV8*
Lower Beep Volume
*$+BV8*
*$+BV8*

Enter Accumulate Mode
*+/*
*+/*
Enter Accumulate Mode
*+/*
*+/*
Enter Accumulate Mode
*+/*
*+/*
Exit Accumulate Mode
*-/*
*-/*
Exit Accumulate Mode
*-/*
*-/*
Exit Accumulate Mode
*-/*
*-/*
TRAKKER Antares 2400 Menu System
*..-.*
*..-.*
TRAKKER Antares 2400 Menu System
*..-.*
*..-.*
TRAKKER Antares 2400 Menu System
*..-.*
*..-.*
Boot Terminal
*-.1*
*-.1*
Boot Terminal
*-.1*
*-.1*
Boot Terminal
*-.1*
*-.1*
Reset Firmware
*-.*
*-.*
Reset Firmware
*-.*
*-.*
Reset Firmware
*-.*
*-.*
Default Configuration
*.+0*
*.+0*
Default Configuration
*.+0*
*.+0*
Default Configuration
*.+0*
*.+0*
Save Configuration in Flash Memory
*.+1*
*.+1*
Save Configuration in Flash Memory
*.+1*
*.+1*
Save Configuration in Flash Memory
*.+1*
*.+1*
-
 1
1
-
 2
2
-
 3
3
-
 4
4
-
 5
5
-
 6
6
-
 7
7
-
 8
8
-
 9
9


Intermec Trakker Antares 2420 Guide de démarrage rapide
- Taper
- Guide de démarrage rapide
dans d''autres langues
Documents connexes
-
Intermec 9189 Manuel utilisateur
-
Intermec Trakker Antares 2420 Quick Reference Manual
-
-
-
-
-
Intermec Trakker Antares 2485 Manuel utilisateur
-
-
Intermec Trakker Antares 2410 Manuel utilisateur
-