
Physical and Environmental
Specifications
Electrical requirements: xw12V 750mA
Interface: 9-pin D RS-232
Optical interface: 2 IR receivers and 2 IR
transmitters
Optical RS-232 interface: Converted RS-232 bipolar
signals to optical signals
and vice versa
Interface speeds: Baud rate up to
38400 baud
Operating environment
Charge Temperature: 32°F to 104°F (0°C to 40°C)
Operating Temperature: -4°F to 122°F (-20°C to 50°C)
Humidity: 0 to 95%, non-condensing
Storage environment
Temperature: -4°F to 158°F ( -20°C to 70°C)
Humidity: 0 to 95%, non-condensing
Note: The lithium-ion battery pack in the terminal will
not charge below 32°F (0°C).
Design and specifications are subject to change without
notice.
Warning
To prevent fire or electric shock, do
not expose the TD2400 to rain or
moisture.
Avertissement
Pour éviter des risques d’incendie
ou de choc électrique, ne pas exposer
le TD2400 à la pluie ou à l’humidité.
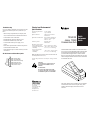
The TRAKKER
Antares TD2400 Communications Dock
is an accessory for the TRAKKER Antares 2420 and 2425
(T2420 and T2425) hand-held terminals. The dock lets
you transfer data and applications to and from another
device by using RS-232 serial communications. The dock
will also charge the batteries inside a T2420 or T2425 that
is inserted into the dock.
This guide describes how to install and use the TD2400
communications dock. Before using the dock, please
read this guide thoroughly and retain it for future
reference.
TRAKKER
®
Antares
™
TD2400
Communications Dock
Quick
Reference
Guide
P/N 065555-004
2425
2400Q.006
Troubleshooting
If you are unable to establish a good connection or the
green Power Status Light is not on, make sure you
have:
• Set the serial port parameters (for example, baud
rate) to match between the terminal and the device.
• Connected the correct serial cable.
• Ensured that the electrical outlet has power.
• Inserted the terminal firmly in the dock.
• Connected the external power supply to AC
power.
• Cleaned the optical interface windows and ports on
both the terminal and the dock.
• Cleaned the three pins on the dock where you insert
the terminal.
RS-232 Connector Pinout Description
RXD (Receive data)
TXD (Transmit data)
DTR (Data terminal ready
)
GND (Signal ground)
RTS (Request to send)
CTS (Clear to send)
2
3
4
5
7
8
J1
2400Q.005
6001 36th Avenue West
P.O. Box 4280
Everett, WA 98203-9280
© 1998 Intermec
All Rights Reserved

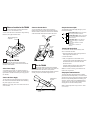
Choose a Location for the TD2400
Choose a flat, stable, and clean surface that is
within 5 ft (1.5 m) of an electrical source.
You can secure the dock to a flat surface using mounting
hardware (not supplied with the dock).
Set Up the TD2400
Connect the cables to the dock. Both the
RS-232 and power supply connectors are located on the
underside of the TD2400.
Order a Power Supply
You order the power supply as a separate accessory. If
you have not already done so, contact your Intermec sales
representative and order an Intermec power supply (Part
No. 065236).
Connect the Power Supply
To connect the power supply, attach the power supply to
the connector located on the underside of the dock. Plug
the power supply into an AC outlet.
Note: The power supply must be connected at all times to
use the TD2400.
Interpret the Status Lights
The TD2400 has three status lights that give you the
following information:
Transmit and Receive Data
To communicate with the terminal and any other
device connected to the dock:
1. Insert the terminal into the dock. The green Power
Status Light on the dock turns on.
2. Turn the terminal on.
3. Start your application on the terminal or host
computer. Data can begin transmitting between the
terminal and the device connected to the dock
RS-232 connector.
Transmit and Receive Status Lights will indicate
that data is being transmitted and received.
Note: You must have a battery pack installed in the
terminal for all operations.
Charging the Terminal Batteries
The dock will trickle charge the lithium-ion battery
pack and the NiCad backup battery. You must have the
external power supply connected to charge the terminal
batteries. A fully discharged lithium-ion battery pack
charges in 16 hours. Refer to the TRAKKER Antares
2420 and 2425 User’s Manual for information about
charging rates for the NiCad backup battery.
Note: Charging temperature range is 32°F to 104°F
(0°C to 40°C).
Connect to Another Device
You connect the dock to a device (host computer or
modem) using an RS-232 serial cable (Intermec Part No.
047569 or 059167). Attach the connector to the underside
of the dock and the other end of the cable to the device.
Use the TD2400
To insert the T2420 or T2425 into the TD2400,
position the terminal on the cradle surface of the dock and
slide the terminal into the dock. To verify that the
terminal batteries are charging and the terminal is inserted
correctly, the green Power Status Light must be on.
2400Q.001
#10 Pan head screw
(2 places)
2425
2
1
3
2400Q.004
To devic
e
9-pin D
connector
To power
source
Power supply
Power Status Light: On only when the
external power supply is connected to
AC power.
• Green when a terminal is inserted
in the dock.
• Amber when no terminal is in
the dock.
Transmit Status Light: Flashes green when
data is being transmitted from the T2420 or
T2425 to the host.
Receive Status Light: Flashes green when
data is being received from the host.
Cradle surface
of dock
Slide termina
l
into dock
2400Q.008
-
 1
1
-
 2
2


Intermec Trakker Antares 2420 Quick Reference Manual
- Taper
- Quick Reference Manual
- Ce manuel convient également à
dans d''autres langues
- English: Intermec Trakker Antares 2420
Documents connexes
-
Intermec TZ2400 Quick Reference Manual
-
-
-
-
-
-
-
-
Intermec Trakker Antares 2410 Manuel utilisateur
-