Pit Boss PBK22 Manuel utilisateur
- Catégorie
- Barbecues
- Taper
- Manuel utilisateur

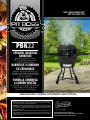
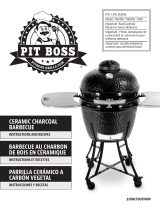
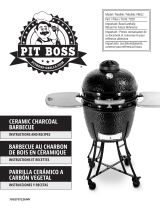
CERAMIC CHARCOAL
BARBECUE
IMPORTANT, READ CAREFULLY, RETAIN
FOR FUTURE REFERENCE. MANUAL MUST
BE READ BEFORE OPERATING!
BARBECUE À CHARBON
EN CÉRAMIQUE
IMPORTANT, PRENEZ CONNAISSANCE DE CE
DOCUMENT ET CONSERVEZ-LE POUR RÉFÉRENCE
ULTÉRIEURE VOUS DEVEZ LIRE CE GUIDE AVANT
D’UTILISER LE BARBECUE !
PARRILLA CERÁMICA
A CARBÓN VEGETAL
IMPORTANTE, LEA DETENIDAMENTE, CONSERVE
PARA REFERENCIA FUTURA. ¡DEBE LEER EL
MANUAL ANTES DE LA OPERACIÓN!
WARNING: PLEASE READ THE ENTIRE MANUAL BEFORE INSTALLATION AND USE. FAILURE TO FOLLOW THESE INSTRUCTIONS
COULD RESULT IN PROPERTY DAMAGE, BODILY INJURY OR EVEN DEATH. CONTACT LOCAL BUILDING OR FIRE OFFICIALS ABOUT
RESTRICTIONS AND INSTALLATION INSPECTION REQUIREMENTS IN YOUR AREA.
AVERTISSEMENT : VEUILLEZ LIRE L’INTÉGRALITÉ DU MANUEL AVANT L’INSTALLATION ET L’UTILISATION. LE NON-RESPECT
DE CES INSTRUCTIONS PEUT ENTRAÎNER DES DOMMAGES AUX BIENS, DES BLESSURES OU MÊME LA MORT. COMMUNIQUEZ
AVEC LES AUTORITÉS LOCALES EN MATIÈRE D’INCENDIE ET DE BÂTIMENT CONCERNANT LES RESTRICTIONS ET LES EXIGENCES
D’INSTALLATION DANS VOTRE RÉGION.
ADVERTENCIA: LEA EL MANUAL COMPLETO ANTES DE INSTALAR Y UTILIZAR. INCUMPLIR ESTAS INSTRUCCIONES PODRÍA
CAUSAR DAÑOS MATERIALES, LESIONES CORPORALES, E INCLUSO LA MUERTE. CONSULTE A SUS FUNCIONARIOS LOCALES DE
CONSTRUCCIÓN Y CONTROL DE INCENDIOS PARA INFORMARSE SOBRE LAS RESTRICCIONES Y LOS REQUISITOS DE INSPECCIÓN
DE INSTALACIONES EN SU REGIÓN.
FOR OUTDOOR AND HOUSEHOLD USE ONLY. NOT FOR COMMERCIAL USE.
RÉSERVÉ À L'USAGE EXTÉRIEUR ET RÉSIDENTIEL UNIQUEMENT. NON DESTINÉ À UN USAGE COMMERCIAL.
SOLO PARA USO EN EXTERIORES Y EN EL HOGAR. NO ES PARA USO COMERCIAL.
ASSEMBLY AND OPERATION | ASSEMBLAGE ET FONCTIONNEMENT | MONTAJE Y OPERACIÓN
MODEL / MODÈLE / MODELO: PBK22
PART / PIÈCE / PARTE: 71220
22

ENGLISH
2
.
.
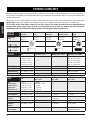
Please read and understand this entire manual before attempting to assemble, operate or install the product. This will ensure you
receive the most enjoyable and trouble-free operation of your new grill. Retain this manual for future reference.
DANGERS AND WARNINGS
You must contact your local home association, building or fire officials, or authority having jurisdiction,
to obtain the necessary permits, mission or information on any installation restrictions, such as any grill
being installed on a combustible surface, inspection requirements or even ability to use, in your area.
1. A minimum clearance of 2m (78 inches) from combustible constructions to the sides of the grill must be maintained. Do
not install appliance on non-combustible floors, or floors protected with non-combustible surfaces unless proper
permits and permissions are obtained by authorities having jurisdiction. This appliance must not be placed under
overhead combustible ceiling, overhang, awnings, parasol or gazebo. Do not use on decking or any other combustible surfaces
such as dry grass, wood chips, leaf mulch, or decorative bark. Do not use this product in a tent, caravan, car, cellar, loft or
boat. Keep your grill in an area clear and free from combustible materials, gasoline and other flammable vapors and liquids.
Should a grease fire occur, close the lid until the fire is out. Do not throw water on the unit. Do not try to
smother the fire. Use of an all-class (class ABC) approved fire extinguisher is valuable to keep on site. If an
uncontrolled fire does occur, call the Fire Department.
2. Do not use this ceramic unit as a furnace. This product is intended for outdoor use only. Do not use indoors.
: May emit hot embers while in use. Do not transport your grill while in use or while the grill
is hot. Ensure the fire is completely out and that the grill is completely cool to the touch before moving.
3. This product will become very hot, and serious injury may occur. Never leave a burning fire unattended. Keep young children
and pets away while in use. It is recommended to use heat-resistant barbecue mitts or gloves when operating the grill. Do
not use accessories not specified for use with this appliance.
This appliance is not recommended for children, persons with reduced physical, sensory or mental
capabilities, or lack of experience and knowledge, unless they are under direct supervision or instruction
by a person responsible for their safety.
4. After a period of storage, or non-use, inspect the unit prior to use for fatigue and damage, and replace as and when necessary.
Clean before use. If the grill is stored outside during the rainy season or seasons of high humidity, unit should be dried out
before performing any service or maintenance. Use a grill cover, if available.
5. It is highly recommended that you use lump charcoal in your ceramic barbecue. It burns for longer and produces less ash,
which can restrict the airflow. Do not use coal in this product. Charcoal not included.
Do not use spirit, petrol, gasoline, lighter-fluid or kerosene for lighting or refreshing a fire in your grill.
Keep all such liquids well away from the appliance when in use.

ENGLISH
3
DISPOSAL OF ASHES
Ashes should be placed in a metal container with a tight-fitting lid. The closed container of ashes should be placed on a non-
combustible floor or on the ground, well away from all combustible materials, pending final disposal. When ashes are disposed by
burial in soil, or otherwise locally dispersed, they should be retained in a closed container until all cinders have thoroughly cooled.
CARBON MONOXIDE (“ ”)
Carbon monoxide is a colorless, odorless, tasteless gas produced by burning gas, wood, propane, charcoal or other fuel. Carbon
monoxide reduces the blood’s ability to carry oxygen. Low blood oxygen levels can result in headaches, dizziness, weakness,
nausea, vomiting, sleepiness, confusion, loss of consciousness or death. Follow these guidelines to prevent this colorless, odorless
gas from poisoning you, your family, or others:
• See a doctor if you or others develop cold or flu-like symptoms while cooking or in the vicinity of the appliance. Carbon
monoxide poisoning, which can easily be mistaken for a cold or flu, is often detected too late.
• Alcohol consumption and drug use increase the effects of carbon monoxide poisoning.
Carbon monoxide is especially toxic to mother and child during pregnancy, infants, the elderly, smokers, and people with blood
or circulatory system problems, such as anemia, or heart disease.
COPYRIGHT NOTICE
Copyright 2021. All rights reserved. No part of this manual may be
copied, transmitted, transcribed, stored in a retrieval system, in any
form or by any means without expressed written permission of,
Dansons
8877 North Gainey Center Drive, Scottsdale, Z, A 85258
sales@pitboss-grills.com | service@pitboss-grills.com
www.pitboss-grills.com
USA: (480) 923-9630 | CANADA (TOLL FREE): 1-877-942-2246

ENGLISH
4
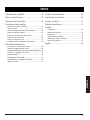
Safety Information ..........................................................2
Parts & Specs ...................................................................... 5
Assembly Preparation ...................................................... 6
Assembly Instructions
Attaching The Caster Wheels ....................................................6
Assembling The Cart .................................................................... 6
Lifting The Ceramic Body Onto The Cart ................................ 7
Attaching The Top Damper ........................................................ 7
Installing The Side Shelf Brackets ............................................ 7
Mounting The Side Shelves ....................................................... 7
Attaching The Lid Handle ...........................................................8
Placing The Cooking Components ............................................ 8
Operating Instructions
Introduction To Ceramic Grilling ...............................................9
Grill Temperature Ranges ........................................................... 9
Understanding Airflow and Damper Control ......................... 9
First Use - Grill Burn-Off ............................................................. 9
Lighting Procedure.....................................................................10
Refuelling Procedure ................................................................. 10
Extinguishing The Grill ..............................................................10
Care & Maintenance ........................................................ 11
Cooking Guidelines ..........................................................12
Tips & Techniques ...........................................................14
Troubleshooting ..............................................................15
Warranty
Conditions ....................................................................................16
Void of Warranty ........................................................................ 16
Exceptions .................................................................................... 16
Ordering Replacement Parts ....................................................17
Contact Customer Care ..............................................................17
Warranty Service ........................................................................17
Recipes .............................................................................. 18

ENGLISH
5
1
2
3
4
5
7
8
9
10
11
12
14
13
15
16
6
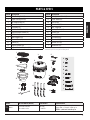
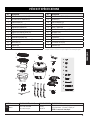
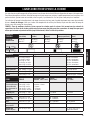
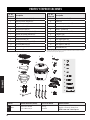
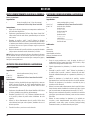
MODEL UNIT ASSEMBLED (WxHxD) UNIT WEIGHT COOKING AREA
22
1,330 x 1,185 x 800 mm
/ 52.3 x 46.6 x 31.4 in
105.0 kg
/ 231.48 lb
Main
- 2,126.2 cm / 329.10 sq. in.
Upper Rack
- 1,771.9 cm / 274.65 sq. in.
TOTAL
- 3,898.1 cm / 603.75 sq. in.
Part# Description
1 Main Cooking Grid (x1)
2 Upper Cooking Grid (x1)
3 Top Damper Vent (x1)
4 Ceramic Body (x1)
5 Lid Handle (x1)
6 Left Side Shelf Bracket (x2)
7 Right Side Shelf Bracket (x2)
8 Side Shelf (x2)
9 Heat Deflector (x1)
10 Charcoal Plate (x1)
11 Firebox (x1)
12 Support Bracket (x4)
13 Support Bracket Crosspiece (x2)
Part# Description
14 Locking Caster Wheel (x2)
15 Caster Wheel (x2)
16 Ash Tool (x1)
Nut - Small (x16)
Nut - Large (x4)
Locking Washer (x16)
D Washer (x16)
E Screw (x16)
F Flat Wrench (x1)
G Wrench 9/11 (x1)
H Wrench 16/19 (x1)
I Screwdriver (x1)
NOTE: Due to ongoing product development, parts are subject to change without notice. Contact
Customer Care if parts are missing when assembling the unit.

ENGLISH
6
Parts are located throughout the shipping carton, including underneath the grill. Inspect the grill, parts, and hardware blister
pack after removing from the protective shipping carton. Before assembly of product, review all parts and reference the parts
list. If any part is missing or damaged, do not attempt to assemble. Shipping damage is not covered under warranty. Contact your
dealer or Customer Care for parts.
service@pitboss-grills.com | USA: (480) 923-9630 | CANADA (TOLL FREE): 1-877-942-2246
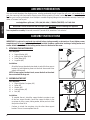
IMPORTANT: To ease installation and avoid injury, use two people when assembling this appliance.
Tools required for assembly: flat wrench, wrench 9/11, wrench 16/19, screwdriver.
Tools included.
IMPORTANT: It is advised to read each step entirely before starting assembly on instructions. Do not tighten screws
completely until all screws for that step have been installed. Hardware combination involving a locking washer and
washer should be installed with the locking washer closest to the head of the screw.
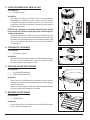
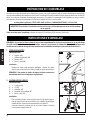
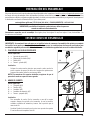
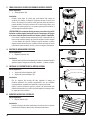
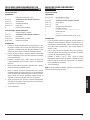
1.
Parts Required:
4 x Support Bracket
(#12)
2 x Locking Caster Wheel
(#14)
2 x Caster Wheel
(#15)
4 x Large Nut
(#B)
Installation:
• Attach the four pre-threaded caster wheels to each of the four support
brackets by hand-tightening them into the hole. Secure each caster
wheels with large nut.
NOTE: To keep support brackets level, ensure the bolt on the wheel
does not extend the large nut.
2.
Parts Required:
2 x Support Bracket Crosspiece
(#13)
16 x Screw
(#E)
16 x Washer
(#D)
16 x Locking Washer
(#C)
16 x Nut
(#A)
Installation:
• To assemble the cart, attach the support bracket crosspiece to one
of the four support brackets. Secure the support brackets to the
crosspieces by using a screw, locking washer, washer, and nuts. Note
the position shown in 2.
• Continue to attach the crosspieces into the other three support
brackets. The cart is now complete. Note 2.
114
12
12
比例 1.000
2
2
13

ENGLISH
7
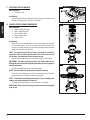
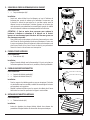
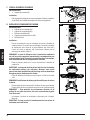
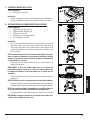
3.
Parts Required:
1 x Ceramic Body
(#4)
Installation:
• First, remove all of the parts that are inside of the ceramic body to
make lifting easier. Make sure the cart is secure, and all of the bolts
are tight before placing the ceramic body into it. Press down on the
caster levers to lock the castor wheels to ensure the ceramic charcoal
barbecue cannot move.
CAUTION: Use a minimum of two people when lifting the ceramic
body onto the cart. Failure to comply may result in serious injury or
damage to the product.
• To place the ceramic body on the cart, place one of your hands in the
bottom vent of the ceramic body and the other under the grill. Place
the ceramic charcoal barbecue on the cart with the bottom vent facing
to the front of the cart, allowing the vent to open and close without
any interruption.
4.
Parts Required:
1 x Top Damper Vent
(#3)
Installation:
• Align the side notch of the top damper vent with the thermometer on
the front of the ceramic body, and set over the top opening. Secure
with pre-attached screws, washers, and nuts.
5.
Parts Required:
2 x Left Side Shelf Bracket
(#6)
2 x Right Side Shelf Bracket
(#7)
Installation:
• Attach the left side shelf brackets to the ceramic body using the pre-
attached screws with their corresponding washers, locking washers,
and nuts on the trim.
• Repeat the same installation for the right side shelf brackets. Tighten
all screws securely once all brackets are installed.
6.
Parts Required:
2 x Side Shelf
(#8)
Installation:
• Insert the hinges of each side shelf into each of the side shelf brackets
on both sides of the ceramic body.
比例 1.000
3
4
4
3
5
6
7
6
8

ENGLISH
8
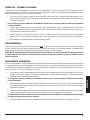
7.
Parts Required:
1 x Lid Handle
(#5)
Installation:
• Attach the lid handle to the ceramic body use the pre-attached screws
washers, locking washers, and nuts on the trim.
8.
Parts Required:
1 x Upper Cooking Grid
(#2)
1 x Main Cooking Grid
(#1)
1 x Heat Deflector
(#9)
1 x Charcoal Plate
(#10)
1 x Firebox
(#11)
Installation:
• Open the lid of the ceramic body and insert the firebox into the base
of the ceramic body. The front of the firebox with the arch of the
bottom rim should face the front of the unit, aligning with the bottom
damper for ash clean out. Note 8.
NOTE: The expansion joint in the firebox is created to account for
expansion of the ceramic in extreme heat. This crack is not a fault in
the ceramic, but intentional in the structure design.
• Place the charcoal plate to rest on the interior base of the firebox.
IMPORTANT: The charcoal plate must be in the firebox while in use.
Missing this part could result in lighting failure due to lack of oxygen to
the charcoal once lit.
• Place the heat deflector to rest inside the firebox.
NOTE: The heat deflector can be used for indirect cooking.
• Place the main cooking grid inside of the ceramic body. Place the
upper cooking grid on top of the main cooking grid.
NOTE: To maintain the grilling performance of your cooking grids,
regular care and maintenance is required.
• The ceramic charcoal barbecue is now ready to use. Note 8.
IMPORTANT: Ensure that unit curing instructions are read thoroughly
prior to use.
8
7
5
比例 1.000
8 2
1
9
10
11

ENGLISH
9
Ceramic charcoal barbecues are extremely versatile. Not only can they be used for grilling or smoking, but also pizzas, bread,
pies and cookies can be baked effortlessly inside them. Due to their excellent heat-retention properties, high temperatures can
be achieved and maintained by precise control of airflow via the top and bottom vents. High temperatures are ideal for quickly
cooking burgers and sausages, while low heats can cook larger cuts over a longer period of time. Try adding some wood chips to
the charcoal, or try combining different flavor wood chips to make your meats even more flavorful.
All temperatures listed below are approximate and are affected by the following factors: outside ambient
temperature, the amount and direction of wind, the quality of fuel being used, the lid being opened, and the
quantity of food being cooked.
TIP: When smoking, open the bottom vent fully and leave the lid open for about 10 minutes to build a small bed of
hot embers. Monitor the ceramic charcoal barbecue until it has risen to the desired temperature, leave the bottom
vent slightly open. Close the top vent and continue to check the temperature for a few more minutes.
The key is to experiment with the length of time you allow for smoking, before the meal is finished cooking. Some outdoor chefs
prefer to smoke at the end of a cook, allowing the food to keep warm until ready to serve. Practice makes perfect!
The heart of your grill lies in the relationship between the top and bottom ventilation dampers. Opening the dampers, allowing
more air to flow through the system, allows the charcoal to burn very hot and create firey embers. To cook at lower temperatures,
keep the dampers open only a small distance, allowing for minimal airflow and maximum heat retention in the ceramic chamber.
To ensure the grill performs correctly, proper maintenance and clean out of the firebox are essential. If the grill is not achieving
the desired temperature, check to ensure that there is proper airflow to the fuel and that none of the dampers are blocked.
TIP: The grill can run efficiently over extended periods of time as long as there is dry and sufficient fuel, proper airflow, and
the cooking components are clean.
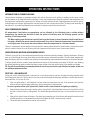
Curing your ceramic charcoal barbecue is important for its long-term operation and care. Avoiding the curing procedure could
lead to damage on the unit. If the first burns are too hot, they could damage the felt gasket seal before it has had the chance to
mature with use. To start your first fire:
1. Place one lighter cube, or solid firelighters and one handful of lump charcoal on top of the charcoal plate. Open the
bottom vent and light the lighter cube using a long-nosed lighter or safety matches.
Do not use gasoline, white spirit, lighter fluid, alcohol or other similar chemicals for lighting or relighting.
2. Once the lump charcoal has caught, cure the unit by closing the lid, and leaving both vents mostly closed. Burn until all
the fuel is used and the fire is extinguished. This should take approximately two hours. Do not overload the unit with
fuel.
3. After grill has cooled, inspect all fasteners. The metal band connecting your lid to the base will expand from the heat and
could become loose. It is recommended you check and tighten the band, if necessary, with a wrench.
4. The ceramic charcoal barbecue can now be used as normal.

ENGLISH
10
When using the ceramic charcoal barbecue, push down on both of the locking wheels to stop the unit from moving around during
use. Ensure the ceramic barbecue is positioned on a permanent, flat, level, heat-resistant non-flammable surface, away from
flammable items. Position the ceramic charcoal barbecue with a minimum of 2 m / 78 in overhead clearance and at least 2 m / 78
in clearance from other surrounding items.
1. To start a fire, place rolled-up newspaper and some lighter cubes or solid firelighters on the charcoal plate, in the base of
the ceramic charcoal barbecue. Then, place two or three handfuls of lump charcoal over the top of the newspaper.
Do not use gasoline, white spirit, lighter fluid, alcohol or other similar chemicals for lighting or relighting.
2. Open the bottom vent and light the newspaper using a long-nosed lighter or safety matches. Once it has caught, leave
the bottom vent and lid open for about 10 minutes to build a small bed of hot embers.
3. Allow the charcoal to heat up and keep it red hot for at least 30 minutes prior to the first cooking on the ceramic charcoal
barbecue. Do not cook before the fuel has a coating of ash.
It is recommended that you do not stoke or turn the coals once they are alight. This allows the charcoals to burn
more uniformly and efficiently.
4. Once alight, only use heat-resistant gloves when handling hot ceramics or cooking surfaces.
With the top and bottom vent closed, the ceramic charcoal barbecue will stay at a high temperature for several hours. If you
require a longer cooking time (e.g. when roasting a whole cut or slow-smoking), it may be necessary to add more charcoal.
1. Open the lid, and remove the cooking grids and heat deflector using heat-resistant gloves or a spatula.
2. Add additional charcoal to the fire box
3. Replace heat deflector and cooking grids and continue to cook as normal.
IMPORTANT: Do not use spirit, petrol, gasoline, lighter-fluid or kerosene for lighting or refreshing a fire in your grill. Also,
do not attempt to add more fire starter into a fire that is already burning or into a hot burn grate. This may cause injury.
1. When finished cooking and extinguish unit, stop adding fuel. Close all the vents and the lid to allow the fire to die
naturally by lack of oxygen.
IMPORTANT: Do not use water to extinguish the charcoal as this could damage the ceramic charcoal barbecue.

ENGLISH
11
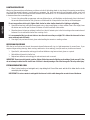
Any Pit Boss® unit will give you many years of flavorful service with minimum cleaning. An important step is allowing the grill
and cooking grids to self-clean by running the grill at a high temperature after each use. Follow these cleaning and maintenance
tips to service your grill:
1.
• It is recommended to clean the interior of the unit after every few uses. This will ensure proper lighting and avoid
any hard build-up of debris or ash on the cooking components. Heat it up to 260ºC / 500ºF for 30 minutes and it will
scorch off all food and debris.
NOTE: Do not use water or any other types of cleaning product to clean the inside of your ceramic charcoal
barbecue. The walls are porous and will absorb any fluids used, which could cause the ceramic charcoal
barbecue to crack.
• Use a long-handled grill cleaning brush, remove any food or build-up from the cooking grids. Best practice is to do
this while they are still warm from a previous cook. Grease fires are caused by too much fallen debris on the cooking
components of the grill. Clean the inside of your grill on a consistent basis. In the event you experience a grease fire,
keep the grill lid closed to choke out the fire. If the fire does not go out quickly, carefully remove the food, turn the
grill off, and shut the lid until the fire is completely out. Lightly sprinkle baking soda, if available.
• The chrome-plated charcoal plate is not dishwasher safe; use a mild detergent with warm water.
• After the unit has completely cooled, use the ash tool to scrape out carbon remnants through the bottom damper
vent. Carefully open the slide plate and rake the ash into a small waste container under the vent opening. Dispose
of container, or store for future use.
2.
• Upon close inspection, the finish of your ceramic charcoal barbecue may appear to have crack lines. This is not cracking
of the ceramic. This is known as crazing and is caused by the different expansion rates between the glaze finish and
the clay. The spider-web pattern of cracking is different from a break in the aspect that it cannot be felt on the surface,
unless using a fingernail; however, it does become more visually apparent when the surface is dusty or magnified.
• Wipe your grill down after each use. Use warm soapy water to cut the grease. Do not use oven cleaner, abrasive
cleansers or abrasive cleaning pads on the outside surfaces.
• Check and tighten the metal rings of the ceramic body and lid, and oil the hinges, twice a year or more if needed. You
should not be able to easily turn a hex key while holding the nut in place.
• Use a grill cover to protect your grill for complete protection! A cover is your best protection against weather and
outside pollutants. When not in use or for longterm storage, keep the unit under a cover in a garage or shed.
CLEANING FREQUENCY TIME TABLE (NORMAL USE)
ITEM
CLEANING FREQUENCY
CLEANING METHOD
Bottom of Firebox Every 5-6 grill sessions Scoop out, shop-vac ash and excess debris
Cooking Grids After each grill session Burn off excess, grill cleaning brush
Lid Hinge Twice a year Oil hinge components
Metal Rings Twice a year Tighten using hex key
Charcoal Plate Every 5-6 grill sessions Warm water & mild detergent
Interior Ceramic Body Every 2-3 grill sessions Heat to 260ºC / 500ºF for 30 minutes
Exterior Ceramic Body After each grill session Soapy water

ENGLISH
12
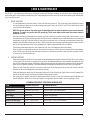
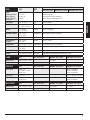
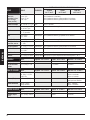
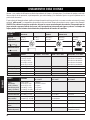
Smoking and grilling styles of cooking can give you different results based on time and temperature. For best results, keep a
record of what you cooked, at what temperature, how long you cooked for, and the results. Adjust to your taste for the next time.
Practice makes perfect.
The culinary art of hot smoking refers to longer cooking times, but results in more natural infused flavor (and a sought-after
smoke ring
) on your meats. Higher cooking temperatures result in a shorter cooking time, locking in less smoke flavor.
TIP: For best results, allow time for meats to rest after cooking. This allows the natural juices to migrate back into
the meat fiber, giving a much juicer, flavorful cut. Resting times can be as little as 3 minutes and up to 60 minutes,
depending on the size of the protein. Always use heat-resistant gloves when using this unit.
(Very Low)
(Low)
(Medium)
/
(Medium/High)
(High)
Temperature
Range
93-135°C /
199-275°F
135-162°C /
275-323°F
162-190°C /
323-374°F
190-232°C /
374-449°F
260-330ºC /
500-625ºF
Top Damper Vent
Bottom Damper Vent
Size Rare - 54°C / 130°F Medium - 60°C / 140°F Well Done - 77°C / 170°F
Turkey
(whole)
4.5-5.0 kg / 10-11 lbs.
5.3-6.4 kg / 12-14 lbs.
6.8-7.7 kg / 15-17 lbs.
8.2-10.0 kg / 18-22 lbs.
10.4-11.3 kg / 23-25 lbs.
Grill 90 - 120 minutes
Grill 110 - 140 minutes
Grill 130 - 160 minutes
Grill 140 - 170 minutes
Grill 150 - 180 minutes
Chicken
(whole)
1.36-2.26 kg / 3-5 lbs. Grill 1 - 1.5 hours
Drumsticks, Breasts 0.45 - 0.86 kg / 1 - 1½ lbs. Grill 30-60 minutes
Small Game Birds 0.45 - 0.86 kg / 1 - 1½ lbs. Grill 30-45 minutes
Duck 1.36-2.26 kg / 3-5 lbs. Roast or grill 2 - 2.5 hours
Precooked to Reheat
60°C / 140°F
Medium
66°C / 150°F
Well Done
71°C / 160°F
Ham
(Fully Cooked &
Boneless Portion,
Smoked Picnic
Whole & Bone-In)
2.5 cm / 1"
1.36-1.81 kg / 3-4 lbs.
1.81-2.72 kg / 4-6 lbs.
2.26-3.62 kg / 5-8 lbs.
4.53-5.44 kg / 10-12 lbs.
12 minutes
50 minutes - 1 hour
1 - 2 hours
1 - 2½ hours
2 - 2¾ hours
Loin Roast 1.36-1.81 kg / 3 - 4 lbs. 1 - 2 hours 2 - 3 hours
Rib Crown Roast 1.81-2.26 kg / 4 - 5 lbs. 1½ - 2 hours 2 - 3 hours
Chop
(loin, rib)
1.9-2.5 cm / ¾" - 1"
3.1-3.9 cm / 1¼" - 1½"
10 - 12 minutes
14 - 18 minutes
Tenderloin 1.9-2.5 cm / ¾" - 1" 20 - 30 minutes 30 - 45 minutes
Loin Roast,
boneless
1.36-2.26 kg / 3-5 lbs. 1¼ - 1¾ hours 1¾ - 2½ hours
Boston Butt
(Pork Shoulder)
3.62-4.53 kg / 8-10 lbs. 93 - 98°C / 200 - 210°F
Internal Temperature
OPEN CLOSED
OPEN CLOSED

ENGLISH
13
Rare - 54°C / 130°F Medium - 60°C / 140°F Well Done - 65°C / 150°F
Steak
(New York, Porter-
house, Rib-eye,
Sirloin, T-bone, or
Tenderloin)
1.9 cm / ¾"
2.5 cm / 1"
3.8 cm / 1½"
5 cm / 2"
High Sear 8-10 minutes
Sear 10-12 minutes
Sear 10 minutes, grill 8-10 minutes
Sear 10 minutes, grill 10-14 minutes
Skirt Steak 0.6 - 12.7 cm / ¼" - ½" High Sear 5-7 minutes
Flank Steak 0.45 - 0.86 kg
/ 1 - 1½ lbs., 1.9 cm / ¾"
Medium Sear 4 minutes, grill 8-10 minutes
Kabob 2.5 - 3.8 cm
/ 1 - 1½" cubes
Medium Grill 10 - 12 minutes
Tenderloin, whole 1.58 - 1.81 kg
/ 3½ - 4 lbs.
High/Medium Sear 10 minutes, grill 15-20 minutes
Ground Beef Patty 1.9 cm / ¾" High/Medium Sear 4 minutes, grill 4-6 minutes
Rib-eye Roast,
boneless
2.26 - 2.72 kg
/ 5 - 6 lbs.
Medium Grill 1½ - 2 hours
Tri-tip Roast 0.9 - 1.13 kg / 2 - 2½ lbs. High/Medium Sear 10 minutes, grill 20-30 minutes
Rib Roast 5.44 - 6.35 kg
/ 12 - 14 lbs.
Medium 2½ - 2¾ hours
Veal Loin Chop 2.5cm / 1" Medium 10 - 12 minutes direct
Brisket 7.25 - 3.62 kg / 16 -18 lbs. Hot Smoke Cook until internal temperature reaches 91°C / 195°F
Size Rare - 54°C / 130°F Medium - 60°C / 140°F Well Done - 71°C / 160°F
Roast
(fresh)
2.26 - 2.72 kg / 5 - 6 lbs. 1 - 2 hours
Rib Crown Roast 1.36-2.26 kg / 3-5 lbs. 1 - 1½ hours 1½ hours
Size Rare - 54°C / 130°F Medium - 60°C / 140°F Well Done - 82°C / 180°F
Fish
(whole)
0.5 kg / 1 lb.
0.9 - 1.1 kg / 2 - 2½ lbs.
1.4 kg / 3 lbs.
Grill 10 - 20 minutes
Grill 20 - 30 minutes
Grill 30 - 45 minutes
Fish
(filets)
0.6-1.3 cm / ¼” - ½” Grill 3 - 5 minutes, until flaky
Lobster Tail 0.15 kg / 5 oz.
0.3 kg / 10 oz.
Grill 5 - 6 minutes
Grill 10 - 12 minutes
Size Rare - 60°C / 140°F Medium - 71°C / 160°F Well Done - 77°C / 170°F
Roast
(fresh)
2.26 - 2.72 kg / 5 - 6 lbs. 1 - 1½ hours 1½ - 2 hours
Large Cuts
(fresh)
3.62-4.53 kg / 8-10 lbs. 1 hours 1½ hours

ENGLISH
14
Follow these helpful tips and techniques, passed on from Pit Boss® owners, our staff, and customers just like you, to become more
familiar with your grill:
1.
• Keep everything in the kitchen and cooking area clean. Use different platters and utensils for the cooked meat than
the ones you used to prepare or transport the raw meat out to the grill. This will prevent cross contamination of
bacteria. Each marinade or basting sauce should have its own utensil.
• Keep hot foods hot (above 60ºC / 140ºF), and keep cold foods cold (below 3ºC / 37ºF).
• A marinade should never be saved to use at a later time. If you are going to use it to serve with your meat, be sure
to bring it to a boil before serving.
• Cooked foods should not be left out in the heat for more than an hour. Do not leave hot foods out of refrigeration
for more than two hours.
• Defrost and marinade meats by refrigeration. Do not thaw meat at room temperature or on a counter top. Bacteria
can grow and multiply rapidly in warm, moist foods. Wash hands thoroughly with hot, soapy water before starting
any meal preparation and after handling fresh meat, fish and poultry.
2.
• Be prepared, or
Mise en Place
. This refers to preparing the cooking recipe, fuel, accessories, utensils, and all
ingredients you require at grill side before you start cooking. Also, read the entire recipe, start to finish, before
lighting the grill.
• A BBQ floor mat is very useful. Due to food handling accidents and cooking spatter, a BBQ floor mat would protect
a deck, patio, or stone platform from the possibility of grease stains or accidental spills.
3.
• To infuse more smoke flavor into your meats, cook longer and at lower temperatures (also known as
low and slow
).
Meat will close its fibers after it reaches an internal temperature of 49ºC / 120ºF. Misting, or mopping, are great ways
to keep meat from drying out.
• While searing your meats, cook with the lid down. Always use a meat thermometer to determine the internal
temperature of the foods you are cooking. Smoking foods can turn meats and poultry pink. The band of pink (after
cooking) is referred to as a
smoke ring
and is highly prized by outdoor chefs.
• Sugar-based sauces are best applied near the end of cooking to prevent burning and flare-ups.
• Leave open space between the foods for proper heat flow. Food on a crowded grill will require more cooking time.
• Use a set of long-handled tongs for turning meats, and a spatula for turning burgers and fish. Using a piercing
utensil, such as a fork, will prick the meat and allow the juices to escape.
• Foods in deep casserole dishes will require more time to cook than a shallow baking pan.
• It’s a good idea to put cooked food onto a heated platter, keeping the food warm. Red meats, such as steak and
roasts, benefit from resting for several minutes before serving. It allows the juices that were driven to the surface
by heat to ease back to the center of the meat, adding more flavor.

ENGLISH
15
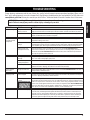
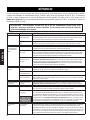
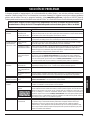
Proper cleaning, maintenance and the use of clean, dry, quality fuel will prevent common operational problems. When your Pit
Boss® grill is operating poorly, or on a less frequent basis, the following troubleshooting tips may be helpful. For FAQ, please visit
www.pitboss-grills.com
. You may also contact your local Pit Boss® authorized dealer or contact Customer Care for assistance.
WARNING: Ensure the grill is completely cooled prior to any inspection, cleaning, maintenance or service
work. Failure to comply may result in serious injury or damage to your unit.
PROBLEM CAUSE SOLUTION
Grill Will Not Light Damper Vents Are
Closed, Lack of Air
Ensure that both the top and bottom vents are open. The fire needs oxygen to catch. Once it has
caught, leave the bottom vent and lid open for about 10 minutes to build a small bed of hot embers.
Incorrect Fuel Used This grill requires the use of lump charcoal. Follow
Lighting Procedure
to continue use of grill;
however, call Customer Care for assistance if required.
Grill Will Not Achieve
Or Maintain Stable
Temperature
Grill Gets Too Hot Close the lid, mostly close both vents, and allow the barbecue to smother with lack of oxygen. For low
temperature cooking, use less fuel.
Grill Does Not Get Hot
Enough
Check fuel level. The grill may quickly lose fire if there is not enough charcoal in the ceramic body. The
recommended use of lump charcoal is a maximum of 1.81kg / 4lbs per burn. Add more fuel and leave both
vents completely open. More oxygen flow will allow the fire to increase, burning more lump charcoal.
Insufficient Air Flow
Through Ceramic Body
Check bottom damper vent for ash build-up or obstructions. Follow
Care and Maintenance
instructions for ash build-up. Check top damper vent, and ensure it is working properly and airflow is
not blocked. Follow
Care and Maintenance
instructions if dirty. Once all the above steps have been
done, light the grill and perform a burn-off.
Flare-Ups Cooking Temperature
Too High
Attempt cooking at a lower temperature. Grease does have a flash point. Keep the temperature under
176°C / 350°F when cooking highly greasy food.
Grease Build-Up On
Cooking Components
Follow
Care and Maintenance
instructions.
Need to Burp The Grill To prevent any back-draft or flare-ups that may cause injury, it is well advised to lift the lid only
slightly (also known as burping), which allows air to enter slowly and safely.
Bottom Damper
Won’t Slide
Damper Stuck On Ash Tap the damper lightly with a rubber hammer to loosen. Follow
Care and Maintenance
instructions. If
no improvement, call Customer Care.
Finishing on Unit Finish is chipped The finish of your unit may chip on the ceramic, but this does not affect the performance or lifespan of
your unit. If chipping is substantial, call Customer Care.
Spider-web pattern of
cracking
This is not cracking of the ceramic. This is known as crazing and is caused by the different expansion
rates between the glaze finish and the clay. The spider-web pattern of cracking is different from a
break in the aspect that it cannot be felt on the surface, unless using a fingernail; however, it does
become more visually apparent when the surface is dusty or magnified. Follow
Care and Maintenance
instructions. While these cracks may appear as imperfections, crazing does not affect the performance
or life span of your ceramic charcoal barbecue; therefore, it is not a warranty issue.
Lid Is Stuck Unit Not Cured Properly Curing your ceramic charcoal barbecue is important for its long-term operation and care. If the first burns
are too hot, they could damage the felt gasket seal before it has had the chance to mature with use. If
the lid gets stuck, or sealed, together with the base, use a knife to carefully unseal and cut off the felt
gasket that trims the lid opening. Once removed, you will be able to open the lid. Before continuing to
use the unit, replace the high-heat felt gasket, which can be purchased at your local fireplace store.

ENGLISH
16
CONDITIONS
All ceramic grills by Pit Boss® Grills, manufactured by Dansons, carry a limited warranty from the date of sale by the original
owner. The warranty coverage begins on the original date of purchase and proof of date of purchase, or copy of original bill of
sale, is required to validate the warranty. Customers will be subject to parts, shipping, and handling fees if unable to provide
proof of purchase or after the warranty has expired.
Dansons carries a Limited Lifetime Warranty on all ceramic parts used to manufacture the ceramic charcoal barbecue. Dansons
warrants that all part(s) are free of defects in material and workmanship, for the length of use and ownership of the original
purchaser. Warranty does not cover damage from wear and tear, such as scratches, dents, dings, chips or minor cosmetic cracks.
These aesthetic changes of the grill do not affect its performance. Upon close inspection, the finish of your ceramic charcoal
barbecue may appear to have crack lines. This is not cracking of the ceramic. This is known as crazing and is caused by the
different expansion rates between the glaze finish and the clay. The spider-web pattern of cracking is different from a break in
the aspect that it cannot be felt on the surface, unless using a fingernail; however, it does become more visually apparent when
the surface is dusty or magnified. While these may appear as imperfections, crazing does not affect the performance or life span
of your ceramic charcoal barbecue; therefore, it is not a warranty issue.
Dansons carries a five-year warranty on all metal and cast-iron parts used to manufacture the ceramic charcoal barbecue.
Dansons warrants that all part(s) are free of defects in material and workmanship, for the length of use and ownership of the
original purchaser. High temperatures, excessive humidity, chlorine, industrial fumes, chemicals, fertilizers, lawn pesticides and
salt are some of the substances that can affect metal parts. For these reasons, the warranty does not cover rust or oxidization.
Dansons recommends that you cover your grill when not in use. Even with these safeguards, the ceramic charcoal barbecue can
be compromised by various substances and conditions beyond Dansons’ control.
Dansons carries a one-year warranty on all plastic and composite components, thermometer, and caster wheels used to
manufacture the ceramic charcoal barbecue. Warranty does not cover cosmetic or colour changes, weathering or cracks, unless
there is a loss of structural integrity. Warranty does not cover damage from wear and tear, such as scratches, dents, dings, chips
or minor cosmetic cracks. These aesthetic changes of the grill do not affect its performance. Repair or replacement of any part
does not extend past the limited warranty. During the term of the warranty, Dansons’ obligation shall be limited to furnishing
a replacement for defective and/or failed components. As long as it is within the warranty period, Dansons’ will not charge for
repair or replacement for parts returned, freight prepaid, if the part(s) are found by Dansons’ to be defective upon examination.
Dansons’ shall not be liable for transportation charges, labor costs, or export duties. Except as provided in these conditions of
warranty, repair or replacement of parts in the manner and for the period of time mentioned heretofore shall constitute the
fulfillment of all direct and derivate liabilities and obligations from Dansons to you.
This warranty is based on normal domestic use and service of the grill, and neither limited warranty coverage’s apply for a grill
which is used in commercial applications.
The use or abuse of this product for purposes other than that for which it is designed will void the warranty. Damage caused
by lack of proper use, assembly, maintenance or installation is not covered. The pouring of lighter fluid or other liquids on your
grill will void this warranty. This could result in damage or serious injury to the user of the ceramic charcoal barbecue, and result
in excessive damage to the grill and its many parts and components. This warranty is only applicable if the ceramic charcoal
barbecue is purchased through an authorized dealer. The purchase of any product by a third party, or unauthorized dealer, voids
the warranty. Only select dealers and retailers have permission, by Dansons, to sell Ceramic series products.
There is no written or implied performance warranty on Pit Boss® Grills units, as the manufacturer has no control over the
installation, operation, cleaning, maintenance or the type of fuel burned. This warranty will not apply nor will Dansons assume
responsibility if your appliance has not been installed, operated, cleaned and maintained in strict accordance with this owner’s
manual. Burning other than quality lump charcoal may void the warranty. The warranty does not cover damage or breakage due
to misuse, improper handling or modifications.

ENGLISH
17
Neither Dansons, or authorized Pit Boss® Grills dealer, accepts responsibility, legal or otherwise, for the incidental or consequential
damage to the property or persons resulting from the use of this product. Whether a claim is made against Dansons based on
the breach of this warranty or any other type of warranty expressed or implied by law, the manufacturer shall in no event be
liable for any special, indirect, consequential or other damages of any nature whatsoever in excess of the original purchase of this
product. All warranties by manufacturer are set forth herein and no claim shall be made against manufacturer on any warranty
or representation.
Some states do not allow the exclusion or limitation of incidental or consequential damages, or limitations of implied warranties,
so the limitations or exclusions set forth in this limited warranty may not apply to you. This limited warranty gives you specific
legal rights and you may have other rights, which vary from state to state.
Our goods come with guarantees that cannot be excluded under the Australian Consumer Law. You are entitled to a replacement or
refund for a major failure and for compensation for any other reasonably foreseeable loss or damage. You are also entitled to have
the goods repaired or replaced if the goods fail to be of acceptable quality and the failure does not amount to a major failure.
To order replacement parts, please contact your local authorized dealer or visit our online store at: www.pitboss-grills.com
If you have any questions or problems, contact Customer Care.
service@pitboss-grills.com | USA: (480) 923-9630 | CANADA (TOLL FREE): 1-877-942-2246
Contact your nearest Pit Boss® Grills dealer for repair or replacement parts. Dansons requires proof of purchase to establish a
warranty claim; therefore, retain your original sales receipt or invoice for future reference. The serial and model number of your
grill unit can be found on the back of the lid hinge. Record numbers below as the label may become worn or illegible.
MODEL SERIAL NUMBER
DATE OF PURCHASE AUTHORIZED DEALER

ENGLISH
18
GRILLED FLANK STEAK FAJITAS
Makes 4–6 servings
Ingredients:
1 flank steak (450 g / 16 oz.)
30 ml / 2 tbsp
Pit Boss Sweet Heat Rub & Grill seasoning
45 ml / 3 tbsp olive oil, divided
1 red pepper
halved, stems and seeds removed
1 yellow pepper
halved, stems and seeds removed
1 green pepper
halved, stems and seeds removed
1 sweet onion
large, sliced thick along base
8 corn tortillas
Extra Fixings:
salsa
guacamole
sour cream
cheddar cheese, shredded
iceberg lettuce, thinly sliced
Instructions:
6. Rub flank steak with 1 tbsp olive oil and Pit Boss Sweet Heat
Rub & Grill seasoning. Cover and marinate in the refrigerator for
1 hour.
7. Lightly brush peppers and onion with olive oil.
8. Light your ceramic charcoal barbecue to 205°C / 400°F. Place
pepper and onion on grill and cook 5 minutes per side. Watch
carefully to ensure the peppers and onion do not burn.
9. Remove peppers and onion from grill and toss lightly with
remaining olive oil in a medium sized bowl. Transfer peppers and
onions to a cutting board and slice into strips. Set aside.
10. Place flank steak directly on grill. Cook until medium rare, about
4 minutes per side, or until meat reaches an internal temperature
of 74°C / 165°F.
11. Remove flank steak from the grill and transfer to cutting board.
Let meat rest for 5 minutes then slice against the grain into
strips.
12. Place flank steak, peppers, and onions in a platter and serve
immediately with warm tortillas, salsa, guacamole, sour cream,
shredded cheese, thinly sliced iceberg lettuce, or your favorite
fajita toppings.
PERFECTLY GRILLED STEAKS
Makes 2–4 servings
Ingredients:
2 rib-eye steaks (3cm / 1¼ inch thick)
Pit Boss Chop House Steak Rub seasoning
Instructions:
1. No more than an hour before grilling, let steaks come to room
temperature.
2. Generously sprinkle Pit Boss Chop House Steak Rub to both sides
of each steak, allowing time for the rub to melt into the meat.
3. Light your ceramic charcoal barbecue to 205°C / 400°F. Place
steaks directly on the grill. For a medium-done steak, sear each
side for 5–7 minutes, flipping the steaks only once. Adjust time
to your desired doneness.
4. Remove steaks from the grill, cover with tin foil, and let sit 10
minutes before slicing and serving.
Use tongs to flip steaks. Do not flip the steaks with a fork or
cut into the meat until ready to serve. Any cuts or punctures in the
meat will cause juices to escape and dry out your steak.
GRILLED SWEET HEAT CHICKEN WINGS
Makes 2–4 servings
Ingredients:
16 whole chicken wings (510 g / 18 oz.)
75 ml / 5 tbsp lime juice
45 ml / 3 tbsp
Pit Boss Sweet Heat Rub & Grill seasoning
Instructions:
1. Rinse the chicken wings under cold running water and blot dry
with paper towels. Arrange the wings lengthwise on a baking
dish. Drizzle lime juice evenly over wings.
2. Shake Pit Boss Sweet Heat Rub & Grill seasoning over the wings,
turning the wings to coat evenly.
3. Light your ceramic charcoal barbecue to 177°C / 350°F. Place the
heat deflector in the barbecue and place grate over top heat
deflector.
4. Place the wings directly on the grate. Grill over indirect heat
until crispy, about 20–25 minutes per side.
5. Transfer wings to a platter and serve with your favourite dipping
sauce.

ENGLISH
19
BLACKENED MAHI-MAHI TACOS WITH
MANDARIN HABANERO MANGO SALSA
Makes 4–6 servings
Ingredients:
4 mahi-mahi fillets (170 g / 6 oz.)
30 ml / 2 tbsp
Pit Boss Mandarin Habanero seasoning
30 ml / 2 tbsp olive oil
475 ml / 2 cups shredded red cabbage
235 ml / 1 cup sour cream
12 small corn tortillas
Mandarin Habanero Mango Salsa:
2 mangos, peeled and diced
15 ml / 1 tbsp
Pit Boss Mandarin Habanero seasoning
30 ml / 2 tbsp lime juice
80 ml / 1/3 cup red onion, diced
60 ml / 1/4 cup fresh cilantro, chopped
Instructions:
1. Rinse mahi-mahi fillets under cold water and blot dry with paper
towel. Rub fillets with olive oil, then sprinkle Pit Boss Mandarin
Habanero seasoning over both sides of the fillets, rubbing the
seasoning in. Set aside.
2. Prepare Mandarin Habanero Mango Salsa by combining all
ingredients in a medium sized bowl, tossing lightly to mix. Set
aside.
3. Light your ceramic charcoal barbecue to 205°C / 400°F. Place
mahi-mahi fillets directly on the grill and cook 5–7 minutes on
each side.
4. Remove mahi-mahi from grill and let rest 5 minutes before
pulling apart into small pieces.
5. Carefully remove cooking grate from barbecue using oven mitts
or grill grippers. Replace grill grate with heat deflector and place
tortillas on heat deflector, heating for 30 seconds–1 minute or
until warm, but not hot.
6. Stack the tortillas in twos. Distribute the fish evenly between
each set of tortillas. Top with red cabbage, sour cream, and
mango salsa.
7. Serve immediately.
RASPBERRY CHIPOTLE PORK KEBABS
Makes 4–8 servings
Ingredients:
450 g / 15.8 oz boneless pork loin
cut into cubes (2.5 cm / 1 inch)
30 ml / 2 tbsp Pit Boss Raspberry Chipotle seasoning
15 ml / 1 tbsp olive oil
15 ml / 1 tbsp honey
30 ml / 2 tbsp apple cider vinegar
3 bell peppers
variety of color, in pieces (2.5 cm / 1 in)
1 red onion
cut into chunks
8 wood or metal skewers (30 cm / 12 inch)
Instructions:
1. In a medium bowl, whisk together apple cider vinegar, Pit Boss
Raspberry Chipotle seasoning, olive oil, and honey. Add the
cubed pork loin to marinade and toss to coast. Cover with plastic
wrap and let marinate for 30 minutes–1 hour.
2. Once meat is marinated, remove from marinade and thread
cubed pork loin onto the skewers, alternating with pieces of bell
pepper and red onion.
3. Light your ceramic charcoal barbecue to 205°C / 400°F. Grill
kebabs directly on the grill, turning often, until all sides of
the meat is well browned and vegetables are tender (about 15
minutes).
4. Serve immediately.
If using wood skewers, soak in water for 30–45 minutes prior
to use.

FRANÇAIS
20
’ ’
’
. ’
.
Veuillez lire et comprendre ce manuel avant d’assembler, d’utiliser ou d’installer le produit. Cela vous assurera de profiter au
mieux et sans soucis de votre nouveau gril à charbon en céramique. Nous vous conseillons également de conserver ce manuel
pour référence ultérieure.
DANGERS ET AVERTISSEMENTS
Vous devez communiquer avec votre municipalité, vos autorités locales en matière de feu ou de construction
ou toute autre autorité compétente afin d’obtenir les permis nécessaires, la permission ou des renseignements
sur toutes les restrictions d’installation, y compris ceux relatifs à l’installation d’un gril sur une surface
combustible, aux règles d’inspection ou encore aux permis d’utilisation dans votre région.
1. Un dégagement minimum de 2m (78 inches) des constructions combustibles sur les côtés du grill doit être maintenu. Ne pas
installer l’appareil sur des planchers non combustibles ou des planchers protégés par des surfaces non combustibles
à moins que des permis et autorisations adéquates n’aient été obtenues par les autorités compétentes. Cet appareil
ne doit pas être placé sous un plafond, un surplomb combustible, un auvent, un parasol ou un gazebo combustible. Ne pas
utiliser sur le platelage ou toute autre surface combustible telle que l’herbe sèche, les copeaux de bois, le paillis de feuilles
ou l’écorce décorative. N’utilisez pas ce produit dans une tente, une caravane, une voiture, une cave, un loft ou un bateau.
Gardez votre gril dans une zone dégagée et exempte de matières combustibles, d’essence et d’autres vapeurs et liquides
inflammables.
En cas d’incendie de graisse, laissez le couvercle fermé jusqu’à ce que le feu soit éteint. Ne pas jeter d’eau
sur l’appareil. Ne pas essayer d’étouffer le feu. L’utilisation d’un extincteur approuvé toutes classes (classe
ABC) est précieuse à conserver sur place. Si un incendie non contrôlé se produit, appelez les pompiers.
2. N’utilisez pas cette unité céramique comme four. Ce produit est destiné à un usage extérieur uniquement. Ne pas utiliser à
l’intérieur.
’: Peut émettre des braises chaudes en cours d’utilisation. Ne transportez pas votre gril
en cours d’utilisation ou lorsque le gril est chaud. Assurez-vous que le feu est complètement éteint et que
le gril est complètement froid au toucher avant de bouger.
3. Ce produit deviendra très chaud et des blessures graves peuvent survenir. Ne laissez jamais un feu allumé sans surveillance.
Tenez les jeunes enfants et les animaux domestiques à l’écart pendant l’utilisation. Il est recommandé d’utiliser des gants ou
des gants de barbecue résistant à la chaleur lors de l’utilisation du gril. Ne pas utiliser d’accessoires n’ayant pas été conçus
pour être utilisés avec cet appareil.
Cet appareil n’est pas conçu pour être utilisé par des enfants, des personnes à capacités physiques,
sensorielles ou intellectuelles réduites ou sans expérience ni connaissances, à moins qu’elles soient
surveillées directement par une personne responsable de leur sécurité.
4. Après une période de stockage ou de non-utilisation, inspectez l’appareil avant de l’utiliser pour vous assurer de la fatigue et
des dommages et remplacez-le au besoin. Nettoyer avant utilisation. Si le gril est entreposé à l’extérieur durant la saison des
pluies ou pendant les saisons de forte humidité, l’appareil doit être séché avant d’effectuer toute opération d’entretien ou de
maintenance. Utilisez une couverture de gril, si disponible.
La page est en cours de chargement...
La page est en cours de chargement...
La page est en cours de chargement...
La page est en cours de chargement...
La page est en cours de chargement...
La page est en cours de chargement...
La page est en cours de chargement...
La page est en cours de chargement...
La page est en cours de chargement...
La page est en cours de chargement...
La page est en cours de chargement...
La page est en cours de chargement...
La page est en cours de chargement...
La page est en cours de chargement...
La page est en cours de chargement...
La page est en cours de chargement...
La page est en cours de chargement...
La page est en cours de chargement...
La page est en cours de chargement...
La page est en cours de chargement...
La page est en cours de chargement...
La page est en cours de chargement...
La page est en cours de chargement...
La page est en cours de chargement...
La page est en cours de chargement...
La page est en cours de chargement...
La page est en cours de chargement...
La page est en cours de chargement...
La page est en cours de chargement...
La page est en cours de chargement...
La page est en cours de chargement...
La page est en cours de chargement...
La page est en cours de chargement...
La page est en cours de chargement...
La page est en cours de chargement...
La page est en cours de chargement...
La page est en cours de chargement...
La page est en cours de chargement...
-
 1
1
-
 2
2
-
 3
3
-
 4
4
-
 5
5
-
 6
6
-
 7
7
-
 8
8
-
 9
9
-
 10
10
-
 11
11
-
 12
12
-
 13
13
-
 14
14
-
 15
15
-
 16
16
-
 17
17
-
 18
18
-
 19
19
-
 20
20
-
 21
21
-
 22
22
-
 23
23
-
 24
24
-
 25
25
-
 26
26
-
 27
27
-
 28
28
-
 29
29
-
 30
30
-
 31
31
-
 32
32
-
 33
33
-
 34
34
-
 35
35
-
 36
36
-
 37
37
-
 38
38
-
 39
39
-
 40
40
-
 41
41
-
 42
42
-
 43
43
-
 44
44
-
 45
45
-
 46
46
-
 47
47
-
 48
48
-
 49
49
-
 50
50
-
 51
51
-
 52
52
-
 53
53
-
 54
54
-
 55
55
-
 56
56
-
 57
57
-
 58
58


Pit Boss PBK22 Manuel utilisateur
- Catégorie
- Barbecues
- Taper
- Manuel utilisateur
dans d''autres langues
- English: Pit Boss PBK22 User manual
- español: Pit Boss PBK22 Manual de usuario
Documents connexes
Autres documents
-
 Louisiana Grills K24US Le manuel du propriétaire
-
Kamado Joe KJ15041123 Digital Charcoal Grill and Smoker Le manuel du propriétaire
-
Kamado Joe KJ15041123 Manuel utilisateur
-
CharGriller 06620 Le manuel du propriétaire
-
NAPOLEON PRO450RSIB Le manuel du propriétaire
-
Masterbuilt MB20040919 Manuel utilisateur
-
NAPOLEON LA400RSIBP Mode d'emploi
-
NAPOLEON P500NK-2 Le manuel du propriétaire
