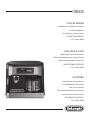
DeLonghi COM530M Le manuel du propriétaire
- Catégorie
- Cafetières
- Taper
- Le manuel du propriétaire

COM53X
COFFEE MAKER
Instructions for use. Keep these instructions
Visit www.delonghi.com
for a list of service centers near you.
ELECTRIC CHARACTERISTICS
115 V~ 60 Hz 1500 W
MACHINE À CAFÉ
Mode d’emploi . Conservez cette notice
Visitez www.delonghi.com pour y voir une liste des
centres de réparation proches de chez vous.
CARACTÉRISTIQUES ÉLECTRIQUES
115 V~ 60 Hz 1500 W
CAFETERA
Repase y guarde estas instrucciones.
Lea cuidadosamente este instructivo
antes de usar su aparato.
Visite www.delonghi.com para ver la lista de
centros de servicios cercanos a usted.
CARACTERISTICAS ELECTRICAS:
115 V~ 60 Hz 1500 W

3
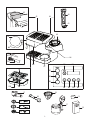
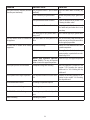
A1
A2
A3
A5
A8
A14
A10
A9
A6
A7
A15
A4
C8
B1
B4B5
B9
B2
B3
C6
C7
C1
C8
C9
B6
B8
B7
A12
A11*
A13
C3
C2
C4
C5

4
11
1 2
8
9
10
13
12
15
14
16
7
34
10*
MAX
*1 cup = 125 ml - 4,15 oz
5
6
1
2

5
17 18 19
21 23 24
26
29 30
32
20
22
25
31
2827
Adjustable Capuccino system*

6
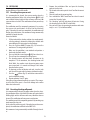
1. IMPORTANT SAFEGUARDS
When using electrical appliances, basic safety precautions should always be followed, including the following:
• Read all instructions.
• Do not touch hot surfaces. Use handles and knobs.
• To protect against re, electrical shock and personal injury, do not immerse cord, plug or appliance in water or other
liquid.
• Never allow the appliance to be used by children.
• Unplug from the outlet when not in use and before cleaning. Allow to cool before tting or taking o parts, and
before cleaning the appliance.
• Do not operate with a damaged cord or plug, or after the appliance malfunctions, or has been damaged in any
manner. Return the appliance to the nearest authorized service facility for examination, repair or adjustment.
• The use of accessory attachments or spare parts not recommended by the appliance manufacturer may result in
re, electrical shock or personal injury.
• Do not use outdoors.
• Do not let the cord hang over the edge of the table or counter, or touch hot surfaces.
• Do not place on or near a hot gas or electrical burner, or in a heated oven.
• Plug cord into the wall outlet. To disconnect, turn any control to “o”, then remove plug from wall outlet.
• Do not use the appliance for other than the intended use. This appliance is to be utilized for domestic use only. Any
other use is to be considered improper and, therefore, dangerous.
• For machines with glass carafe:
A. The carafe is an accessory to be used exclusively with this appliance. Never use it on a cooking surface.
B. Do not set the hot container on a damp or cold surface.
C. Do not use the carafe if it is cracked or the handle is not completely sturdy.
D. Do not use abrasive detergents or sponges to clean.
WARNING: To reduce the risk of re or electric shock, do not remove the cover. Don’t attempt to repair
or modify the machine, doing so will void the warranty. Repair should be done by authorized service
personnel only!
SAVE THESE INSTRUCTIONS
THIS PRODUCT IS FOR HOUSEHOLD USE ONLY
2. SHORT CORD INSTRUCTIONS
- A short power cord is provided to reduce risks resulting from becoming entangled in or tripping over a longer
cord.
- Longer, detachable power supply cords or extension cords are available and may be used if care is exercised in
their use.
- If an extension cord is used, the marked electrical rating should be at least as great as the electrical rating of the
appliance. If the appliance is provided with 3- wire, grounding type cord, the extension should be a GROUNDING
TYPE 3 - WIRE CORD. The longer cord should be arranged so that it will not drape over the counter-top or table top
where it can be pulled on by children or tripped over.
- Your product is equipped with a polarized alternating current line plug (a plug having one blade wider than the
other). This plug will t into the power outlet only one way. This is a safety feature. If you are unable to insert the
plug fully into the outlet, try reversing the plug. If the plug should still fail to t, contact your electrician to replace
your obsolete outlet. Do not defeat the safety purpose of the polarized plug.

7
Read this instruction booklet carefully before installing and using the machine. This is the only way to ensure the best
results and maximum safety for the user.
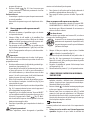
4.2 Description of control panel
Espresso section
B1. “Espresso ON/OFF” button with integrated light
B2. Espresso coee/hot water button with integrated
light
B3. Steam button with integrated light
Drip coee section
B4. Display
B5. “Coee ON/OFF” button
B6. BOLD button
B7. AUTO button
B8. HOUR button
B9. MIN button
4.3 Description of the accessories
C1. Espresso portalter
C2. One-cup espresso lter
C3. Two-cups espresso lter
C4. Filter for espresso pods
C5. Coee measuring scoop with tamper
C6. Permanent gold tone lter
C7. Drip Coee Carafe
C8. Antichlorine lter
C9. Descaler 100ml (1 use)
4.4 Installation
• Place the machine on a work surface away from water fau-
cets and sinks.
• Check that the voltage of the outlet corresponds to the val-
ue indicated on the machine rating plate.
Connect the machine to an eciently grounded electrical
socket with a minimum rating of 10A only. The manufac-
turer declines all liability for any accidents caused by the
absence of an ecient ground system.
• If the plug tted to the machine does not match the elec-
trical socket, have the outlet replaced with a suitable type
by a qualied electrician.
• Never install the machine in environments where the tem-
perature may reach 0°C (32°F) or lower (the machine may
be damaged if the water freezes).
3. SAFETY WARNINGS
• This machine is designed to “make coee” and “hot drinks”.
Use with care to avoid scalds from the water and steam jets
or through incorrect use.
• Never touch hot parts.
• After removing the packaging, make sure the product is
complete. If in doubt, do not use the machine and contact
a De’Longhi customer service representative.
• The packing elements (plastic bags, polystyrene foam,
etc.) should be kept out of reach of children as they are a
safety hazard.
• This machine is intended for domestic use only. Any other
use is considered improper and thus dangerous.
• The manufacturer cannot be held responsible for any dam-
age caused through incorrect, wrong or unreasonable use.
• Never touch the machine with wet or damp hands.
• Never let children use the machine without supervision.
• Never allow children to play with the machine.
• Should the machine break or not function correctly, turn
it o and do not tamper with it. For all repairs, contact au-
thorized service centers only and insist on the use of orig-
inal spare parts. Failure to respect the above could reduce
the safety of the machine.
• The power cord for this machine must not be replaced by
the user as this operation requires the use of special tools.
In the event of damage, contact an authorized service
center only to avoid all risks.
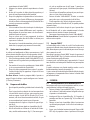
4. DESCRIPTION (pag. 3)
The terminology below will be used on subsequent pages.
4.1 Description of the machine
A1. Espresso water tank lid
A2. Espresso removable water tank
A3. Antichlorine lter extraction handle
A4. Antichlorine lter support
A5. Filter-holder for drip coee
A6. Water ll compartment
A7. Drip coee warming plate
A8. Espresso cup tray
A9. Drip tray water level indicator
A10. Drip tray
A11. Frother
A12. Frother selection ring (Adjustable Cappuccino System only)
A13. Steam connection nozzle (COM532)
A14. Steam dial for cappuccino
A15. Boiler outlet

8
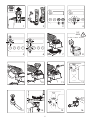
5. ANTICHLORINE FILTER
The lter eliminates the taste of chlorine in the water. To install
the lter, proceed as follows:
• Release the lter support from its slot by pulling it upwards
(g. 1).
• Remove the Antichlorine lter from the plastic sachet and
rinse it under a running tap (g. 2).
• Open the lter support and carefully put the lter in place
as shown in g. 2.
• Close the lter container carefully (g. 2), and reposition it
in its slot, pushing it rmly downwards.
•
The Antichlorine lter should be replaced after 80 cycles, and
at least after every 6 months of operation.
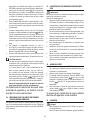
6. FIRST USE
When using the machine for the rst time, all the accessories
and the internal circuits must be washed as follows:
DRIP COFFEE MAKER:
• Run the coee machine without using ground coee for 2
full cycles.
ESPRESSO MAKER:
• Open the lid and remove the water tank.
• Fill the water tank up to the max level.
• Insert the water tank in its housing by pushing the water
tank down until the botton and close the lid (it is also pos-
sible to ll the tank using a carafe).
• Insert the required coee lter in the portalter and attach
the empty portalter onto the machine.
• Place a large container under the spouts (34 /oz, 1l capa-
city).
• Press the “Espresso ON/OFF” and buttons and di-
scharge half the tank from the boiler outlet.
• Turn the steam dial to and discharge the remaining
water from the cappuccino maker then turn the steam dial
back to OFF.
• Empty the container and put it back under the spouts and
proceed with a second rinse.
7. PREPARATION OF DRIP COFFEE
7.1 Setting the clock
When the coee machine is connected to the outlet for the rst
time, “AM 0:00” will ash on the display.
To set the time, proceed as follows:
1. Press and hold the “HOUR” button (Fig. 3) for three seconds
until the number of hours ashes on the display.
2. Before the display stops ashing (about 5 seconds), set the
hour by pressing the “HOUR” button repeatedly.
3. Set the minutes by pressing the “MIN” button (Fig. 3)
repeatedly. (To speed up the operation, hold the button
down.)
4. After setting the time, wait 5 seconds. When the display
stops ashing, the time set is saved.
To reset the time, press and hold the HOUR button for three
seconds, and then follow the procedure as described start-
ing from point 2.
Please note: In the event of a temporary power failure, the
time set does not remain saved in the memory.
7.2 Programming the automatic start (AUTO
BUTTON)
The machine can be programmed to make drip coee automati-
cally. First, make sure that the time is set correctly.
To set the delayed start (i.e. the time you want the coee to be
made), proceed as follows:
1. Press and hold the AUTO button (Fig. 4) for about three
seconds until 0:00 ashes on the display.
2. Before the display stops ashing (about 5 seconds), set the
desired hour by pressing the “HOUR” button repeatedly.
3. Set the minutes by pressing the “MIN” button repeatedly.
4. After 5 seconds, the display will stop ashing and the pro-
grammed time will be saved.
5. After you have programmed the machine as described
above, just press the AUTO button to have coee made at
the time set (The AUTO Button will turn illuminated and
will stay illuminated).
Please note:
• If you want to change the start time after it has been set,
press the AUTO button for about 2 seconds and then set a
new time as described starting from point 2.
• Keep in mind that at the time set, the machine will start to
make drip coee only. The espresso maker does not come
on.
• To cancel the automatic start, you have to press the Auto
button again (it will turn o and will not stay illuminated).
7.3 Keep warming set
The machine is factory-set to keep the coee warm for two
hours after brewing.
However, this setting can be changed as follows:
1. Press and hold the “Coee ON/OFF” button (Fig. 5) for three
seconds until 0:00 ashes on the display.
2. Modify the time by repeatedly pressing the HOUR button
(and also the MIN button if required).
3. After setting the time, wait 5 seconds. When the display
stops ashing, the time will be saved.
Please note: If 0:00 is set, the machine switches o. (You can
set a time between 1 minute and 11hours and 59 minutes).

9
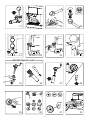
7.4 Making drip coee
• Open the lter-holder door, rotating it towards the right
(g. 7).
• Fill the carafe to the level indicator relative to number of
cups of coee you wish to prepare, taking care not to ex-
ceed the MAX level of 10 cups (g. 8), otherwise, in order
to not overll the machine, the excess water will spill out
from the back of the unit.
• Then
pour the water into the water-ll compartment of the
machine (g. 9).
• Position the gold tone lter into the lter-holder (g. 10).
• Put the ground coee in the lter using the measuring
spoon supplied and level it o evenly (g. 11). As a gener-
al rule, use a level measure of coee (approx 7 grams) for
every cup of coee required (for example, 10 measures to
obtain 10 cups).
• Close the lter-holder door and place the carafe, with cover
in place, onto the warming plate.
• Press the “Coee ON/OFF” button. The button illumin-
mates to indicate that the drip coee-maker is brewing.
• The coee will begin to dispense after a short time.
It is perfectly normal for the machine to emit steam while the
coee is percolating.
To keep the coee hot after the unit is nished percolating it will
automatically switch to keep warm for up to the selected time.
• To turn o the machine press the “Coee ON/OFF” button.
Please note: At the end of coee dispensing the appliance
emits a beep.
7.5 “BOLD” function
The Bold function enhances the avor of your coee. This fea-
ture activates a unique brewing process, slowly releasing water
into the lter basket; saturating coee grounds a little at a time
extracting the best avor and aroma from your coee.
To activate, press the “BOLD” button after having pressed the
“Coee ON/OFF” button (g. 6); the button will illuminate. Press
the button again to turn the selection o.
This function is recomended when preparing 1 to 4 cups. Do not
use this button if brewing an entire carafe of coee.
You can select this function even when using the auto function
(see paragraph 7.2).
If you want to activate the bold function for delayed brewing,
after you program the timer you need to activate the bold func-
tion by pressing the button.
8. ESPRESSO
8.1 Preheating the espresso unit
To make espresso coee at the right temperature, the coee
maker should be preheated as follows:
1. Press the “Espresso ON/OFF”button (g. 12) to turn the ma-
chine on. The integrated light ashes to indicate that the
machine is heating up.
2. Insert the lter to the portalter (g. 13). Attach the por-
talter with lter to the machine (g. 14) without adding
pre-ground coee.
2. Place a cup under the portalter. Use the same cup that
will be used to prepare the coee in order to preheat it.
3. Wait until the “Espresso ON/OFF” integrated light stops
ashing: now the machine is ready to make espresso.
4. Press the button (g. 15). Continue delivering wa-
ter until you ll the cup and then interrupt the delivery by
pressing the same button and empty the cup.
Please note:
• It is normal for a small and harmless pu of steam to be
given o when removing the portalter.
• Never operate the appliance without water in the tank or
without the tank.
8.2 How to make espresso using pre-ground
coee
1. Preheat the machine and portalter as described in the
previous paragraph.
2. Place the ground coee lter in the portalter To make
one espresso, use the lter with the symbol on
the bottom, to make two espressos, use the lter with the
symbol on the bottom.
3. To make just one espresso, place one level measure with
the scoop provided of pre-ground coee (about 7 g/0,25
oz) in the lter (g. 16). To make two espressos, place two
level measured scoops with the scoop provided.
Important:
For correct operation, before lling with pre-ground coee,
make sure there are no coee residues left in the lter from the
last time you made coee.
4. Distribute the pre-ground coee evenly and press with the
tamper (g. 17).
Correct pressing of the pre-ground coee is essential to ob-
tain a good espresso. If pressing is excessive, coee delivery
will be slow and the crema will be dark. If pressing is too
light, coee delivery will be too fast and the crema will be
weak and light in color.
5. Remove any excess coee from the rim of the portalter
and attach to the machine. Turn as far as it will go (g. 14)
to avoid water leaking out.
6. Place the cup or cups under the portalter spouts (g. 18).
You are recommended to warm the cups before making
coee by rinsing them with a hot water.
7. Make sure the “Espresso ON/OFF” integrated light is solid (if

10
it ashes wait until it stops), then press the button
(g. 15). When the desired amount of espresso has been
delivered, press the same button to interrupt the ow.
8. To remove the portalter, turn the handle from right to left.
Danger of burns!
To avoid splashes, never remove the portalter while the ma-
chine is delivering coee.
9. To dispose of the used coee empty the grounds by turning
the portalter upside down and tapping it rmly (g. 19).
10. To turn the machine o, press the “Espresso ON/OFF” but-
ton.
How to prepare espresso using pods
1. Preheat the machine as described in the section “PREHEAT-
ING THE COFFEE UNIT (8.1)”, making sure the portalter is
attached. This obtains a hotter coee.
Please note:
Use pods conforming to the ESE standard, indicated on the pack
by the following symbol.
The ESE standard is a system accepted by leading
pod producers and enables espresso to be pre-
pared simply and cleanly.
2. Place the lter for espresso pods (with the symbol on
the bottom) in the portalter (g. 13).
3. Insert the pod, centering it as far as possible on the lter
(g. 20). Always follow the instructions on the pod pack to
position the pod on the lter correctly.
4. Attach the portalter to the machine. Always turn as far as
it will go (g. 14).
5. Proceed as in points 6, 7 and 8 in the previous section.
9. HOW TO MAKE CAPPUCCINO OR LATTE
1. Prepare the espresso as described in the previous sections,
using suciently large cups. Ensure that the unit is on by
pressing the Espresso On/o button.
2. Press the button: the integrated light ashes to indi-
cate that the machine is heating up (g. 21).
3. In the meantime, ll a pitcher with about 3.5 oz/100 grams
for each cappuccino or 6 oz/170 grams for each latte to be
prepared. In choosing the size of the pitcher, keep in mind
that the milk doubles or triples in volume.
Please note:
It is recommended to use whole or 2% milk at refrigerator tem-
perature.
4. Models with Adjustable Cappuccino System only:
Make sure the ring on the cappuccino maker is positioned
downwards in the CAPPUCCINO position and place the
pitcher containing the milk under the cappuccino maker.
5. Wait until the light stops ashing to indicate that the
boiler has reached the ideal temperature for steam produc-
tion. As the boiler heats up, it is normal for a little water
and steam to be given o into the drip tray.
6. Extract the frother by rotating to the left (g. 22). During
this operation, avoid touching the boiler outlet as it is hot.
Then place the milk pitcher under the frother.
7. Make sure the frother is immersed in the milk. (g. 23).
Turn the steam dial counterclockwise to the ON po-
sition (g. 24). Steam is delivered from the frother, giving
the milk a creamy frothy texture. For a creamier froth, im-
merse the frother in the milk and move the container with
slow up/down movements.
8. When the required temperature (the ideal is 60°C/140°F)
and froth density is reached, interrupt steam delivery by
turning the steam dial clockwise to the OFF position and
press the button.
9. Pour the frothed milk into the cups containing the espresso
prepared previously. The cappuccino is ready.
Please note:
• To prepare more than one cappuccino, rst make all the
espressos then at the end prepare the frothed milk for all
the cappuccinos.
• To make espresso again after the milk has been frothed,
cool down the boiler rst or the espresso will be burnt.
To cool the boiler, place a container under the boiler outlet,
press the button and deliver water until the “Espres-
so ON/OFF” ashes. Then prepare the espresso as described
previously.
• Clean the frother every time you use it, to avoid milk
residue or clogging.
You are recommended to deliver steam for a
maximum of 60 seconds and never to froth
milk more than three times consecutively.
10. MAKING HOT MILK WITHOUT FROTH
ONLY
SOME MODELS
To make hot milk without froth, proceed as described in the pre-
vious section, making sure the ring on the frother is positioned
upwards in the “HOT MILK” position.
11. CLEANING THE FROTHER AFTER USE
Important:
For hygiene and performance reasons, the frother should always

11
be cleaned after each use.
Proceed as follows:
1. Deliver a little steam for a few seconds by turning the
steam dial counterclockwise (g. 24). This causes the froth-
er to discharge any milk left inside. Turn the machine o by
pressing the “Espresso ON/OFF” button.
2. With one hand, hold the frother spout rmly, with the oth-
er, release the frother by turning it counterclockwise, then
pull o downwards (g. 27).
3. Remove the steam connection nozzle from the spout by
pulling it downwards.
4. Wash the frother and steam connection nozzle thoroughly
with warm water.
5. Make sure the two holes shown by the arrows in g. 28 are
not blocked. If necessary, clean with a pin.
6. Put the steam connection nozzle back, pressing forcefully
upwards to insert it onto the steam tube.
7. Replace the frother by pushing upwards and turning clock-
wise.
12. HOT WATER
1. Press the “Espresso ON/OFF” button(g. 12) to turn the ma-
chine on, the integrated light ashes to indicate that the
machine is heating up.
2. In the meantime, place a mug under the frother.
3.
“Espresso ON/OFF” integrated light stops ashing, press the
button (g. 15) and at the same time turn the steam
dial counterclockwise to ON (g. 24). Water comes
out of the frother.
4. To interrupt hot water delivery, press the button
again and turn the steam dial clockwise to OFF.
You should not deliver hot water for more
than 60 seconds.
13. CLEANING
Danger!
• While cleaning, never immerse the coee maker in water.
It is an electrical machine.
• Before cleaning the outside of the machine, turn it o, un-
plug from the mains socket and allow to cool.
13.1 Cleaning the drip tray
Important!
The drip tray is tted with a level indicator (red) showing the le-
vel of water it contains. As soon as the indicator begin to protru-
de from the cup tray, the drip tray must be emptied and cleaned,
otherwise the water may overow the edge and damage the
machine, the surface it rests on or the surrounding area.
1. Remove the drip tray.
2. Remove the cup tray, empty the water and clean the drip
tray with a cloth, then reassemble the drip tray.
3. Put the drip tray back in place.
13.2 Espresso lter cleaning and maintenance
Clean the coee lters weekly:
1 and 2 cup lters
1. Extract the perforated lter by pulling the tab (g. 29);
2. Rinse the lters under running water (g. 30);
3. Make sure the holes are not blocked. If necessary, clean
with a pin (gs. 30 and 31);
4. Place the perforated lter in the lter housing and press as
far as it will go.
Pod lter
Rinse under running water. Make sure the holes are not blocked.
If necessary, clean with a pin (gs. 30 and 31).
13.3 Cleaning the boiler outlet
About every 300 espressos, the boiler outlet must be cleaned
as follows:
• Make sure the machine is not hot and that it is unplugged
from the mains;
• Use a screwdriver to release the screw xing the espresso
boiler outlet (g. 32);
• Remove the boiler outlet;
• Clean the boiler with a damp cloth (g. 32);
• Clean the outlet thoroughly with hot water using a brush.
Make sure the holes are not blocked. If necessary, clean
with a pin.
• Rinse under running water, brushing all the time.
• Replace the boiler outlet, making sure it is correctly posi-
tioned on its gasket.
Failure to clean as described above voids the warranty.
13.4 Other cleaning operations
1. Do not use solvents or abrasive detergents to clean the cof-
fee maker. Use a soft damp cloth only.
2. Clean the portalter, lters and water tank regularly.
Danger!
While cleaning, never immerse the coee maker in water. It is
an electrical machine.

12
14. DESCALING
Over time, calcium in the water may cause obstructions, reduc-
ing the eciency of the coee maker.
14.1 Descaling the espresso unit
It is recommended to descale the espresso maker when the
descaling notication ashes (the steam button (B3) will
emit a double ashing light) and this will occur with every 200
espressos that are brewed. This notication will not prevent any
function.
The notication could be temporarily postponed by pressing
the espresso side push buttons. At the end of the next brew
cycle, if descaling has not been completed, the notication will
ash on the steam button. We recommend using commercially
available De’Longhi descaler.
Proceed as follows:
1. Fill the tank with the descaler solution (use sample provid-
ed in the package), obtained by diluting the descaler with
water following the instructions on the package.
2. Press the “Espresso ON/OFF” button (g. 12) to turn the
machine on. The integrated light ashes.
3. Make sure the portalter is not attached and position a
bowl under the boiler outlet.
4. Press and hold the steam button (B3) for at least 6 sec.
This will start the automated Descaling Process.
5. The descaling process will take about 30 minutes to be
completed. In the meantime, the descaling button will
blink. While the machine starts dispensing water, open
once steam knob 2-3 seconds to discharge a little water
from the frother system.
6. To eliminate residues of solution and scale, rinse the tank
well, then ll it again with fresh water (without descaler).
7. Press the button (g. 15) and deliver water until the
tank is completely empty.
8. Repeat operations 6 and 7 again.
If descaling is not performed regularly as required. The warran-
ty will be void if the repair is a result of damage to the coee
maker due to limescale.
14.2 Descaling the drip coee unit
It is recommended to descale the coee maker when the desca-
ling notication ashes (the Bold LED button will emit a double
ashing light) and this will occur with every 40 coees that are
brewed. This notication will not prevent any function.
The notication could be temporarily postoned by touching any
touch icon of the drip side.
At the end of the next brew cycle, if descaling has not been com-
pleted, the notication will ash on the BOLD LED.
We recommend using commercially available DeLonghi descal-
er.
1. Remove the antichlorine lter and pour the descaling
product into the tank;
2. Fill the tank with water up to the “max” level for the correct
dilution;
3. Place the carafe on the warming plate;
4. Press and hold the “BOLD” touch icon for at least 6 seconds
to start the “descaling” cycle.
5. The “descaling” cycle will take about 30 minutes. During
the descaling cycle the “BOLD“ led will blink.
6. Rinse at least 3 times by operating the machine with water
only (i.e. as in 7.5, but without coee)

13
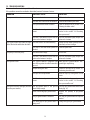
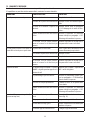
PROBLEM POSSIBLE CAUSE SOLUTION
No espresso is delivered No water in the tank Fill the tank with water
The holes in the lter holder are blocked Clean the lter holder spout holes
The espresso boiler outlet is blocked Clean as described in the section “13.3
Cleaning the boiler outlet”
Scale/hard water deposits in the water
circuit
Perform the descaling procedure as de-
scribed in the section “14.1 Descaling
the espresso unit”
The tank is not correctly in place and the
valve on the bottom is not open
Press the tank down lightly to open the
valve on the bottom
The espresso coee drips from the edges
of the lter holder rather than the holes
The lter holder is inserted incorrectly Attach the lter holder correctly and ro-
tate rmly as far as it will go
The holes in the lter holder spouts are
blocked
Clean the spout holes.
The pump is excessively noisy The water tank is empty Fill the tank
The tank is not correctly in place and the
valve on the bottom is not open
Press the tank down lightly to open the
valve on the bottom
The espresso is cold The “Espresso ON/OFF” integrated light
was ashing when the coee button was
pressed
Wait until the “Espresso ON/OFF” inte-
grated light stop ashing
No preheating was done Preheat as described in the section “8.1
Preheating the coee unit”
The cups were not preheated Heat the cups by rinsing them in hot
water
Scale/hard water deposits in the water
circuit
Perform the descaling procedure as de-
scribed in the section “14.1 Descaling
the espresso coee unit”
The espresso crema is too light (delivered
from the spout too fast)
The pre-ground coee is not pressed
down rmly enough
Press the pre-ground coee down more
rmly (g. 18)
There is not enough pre-ground coee Increase the quantity of pre-ground
coee
The pre-ground coee is too coarse Use only pre-ground coee for espresso
makers
The wrong type of pre-ground coee is
being used
Change the type of pre-ground coee
15. TROUBLESHOOTING
Below is a list of some of the possible malfunctions.
If the problem cannot be resolved as described, contact Customer Services.

14
PROBLEM POSSIBLE CAUSE SOLUTION
The espresso crema is too dark (delivered
from the spout too slowly)
The pre-ground coee is pressed down
too rmly
Press the coee down less rmly (g.
17)
There is too much pre-ground coee Reduce the quantity of pre-ground cof-
fee
The espresso boiler outlet is blocked Clean as described in the section “13.3
Cleaning the boiler outlet”.
The pre-ground coee is too ne or damp Use pre-ground coee for espresso cof-
fee makers only and make sure it is not
too damp
The wrong type of pre-ground coee is
being used
Use a dierent type of pre-ground coee
The lter holder cannot be attached to
the appliance
Too much coee has been placed in the
lter
Use the measuring scoop included and
make sure you are using the correct lter
for the type of preparation
No milk froth is formed when making
cappuccino
Milk not cold enough Always use semi-skimmed milk at refri-
gerator temperature
Milk frother not clean Thoroughly clean the holes in the cap-
puccino maker, in particular those indi-
cated in g. 26-28
Models with adjustable capuccino
sytem (COM532): The ring of capuccino
maker in not in the cappuccino position
Place the ring in the cappuccino position
The drip or espresso has an acid avor Inadequate rinsing after descaling Rinse the appliance as described in the
section ““14.1 Descaling the espresso
coee unit” or “14.2 Descaling the drip
coee unit”
The drip coee takes longer to percolate The drip coee maker needs to be desca-
led
Perform the descaling procedure as de-
scribed in the section “14.2 Descaling
the drip coee unit”
Steam button double ashes Descaling is required for espresso
The steam button is blinking Descaling is in process
The BOLD LED is double ashing Descaling is required for the drip coee
unit
BOLD led blinking Descaling is in process

25
1. ADVERTENCIAS DE SEGURIDAD IMPORTANTES
Cuando use un aparato eléctrico, cumpla siempre las precauciones básicas de seguridad, incluyendo las siguientes:
• Lea todas las instrucciones.
• No toque las supercies calientes. Use asas o pomos.
• Para protegerse de fuego, descargas eléctricas y lesiones personales, no sumerja el cable, enchufe o artefacto en
agua o cualquier otro líquido.
• Mantenga el aparato fuera del alcance de los niños.
• Desconecte la toma de corriente cuando no se está utilizando el aparato y antes de limpiarlo. Deje enfriar el aparato
antes de montar o retirar piezas del mismo, y antes de limpiarlo.
• No haga funcionar el aparato si el cable o un enchufe está dañado, después de un funcionamiento incorrecto o si ha
sufrido algún daño. Devuelva el aparato al centro de servicio autorizado más cercano para su revisión reparación o
ajuste.
• El uso de accesorios o repuestos no recomendados por el fabricante del aparato podría causar incendio, descarga
eléctrica o lesiones personales.
• No utilice el aparato en el exterior.
• No deje que el cable cuelgue del borde de una mesa o mostrador, o toque supercies calientes.
• No coloque el aparato sobre o cerca de un quemador eléctrico o a gas que esté caliente o en un horno caliente.
• Conecte el cable en la toma de corriente de pared. Para desconectarlo, coloque cualquier mando en “o”, luego retire
el enchufe de la tomacorriente de pared.
• No use este aparato para cualquier otro propósito que no sea su uso previsto. Este aparato es solo para uso doméstico.
Cualquier uso diferente se considerará impropio y, por consiguiente, peligroso.
• Para máquinas con jarra de cristal:
A. La jarra es un accesorio que debe ser utilizado exclusivamente con este aparato. Nunca lo use sobre una supercie
de cocción.
B. No coloque el recipiente caliente sobre una supercie mojada o fría.
C. No use la jarra si estuviese agrietada o si el asa no está jada correctamente.
D. No use detergentes o esponjas abrasivas para limpiar.
ADVERTENCIA: Para prevenir el riesgo de fuego o descarga eléctrica, nunca remueva su cubierta. No intente
reparar ni modicar el aparato, puesto que ello anularía la garantía. ¡Cualquier reparación necesaria
deberá ser realizada únicamente por personal de servicio autorizado!
GUARDE ESTAS INSTRUCCIONES
ESTE PRODUCTO ESTÁ DESTINADO EXCLUSIVAMENTE AL USO DOMÉSTICO
2. INSTRUCCIONES CABLE CORTO
- Se suministra un cable de alimentación corto para reducir el riesgo que resulta de enredarse o tropezarse con un
cable más largo.
- Están disponibles cables eléctricos desmontables más largos o cables de extensión que se pueden usar si se tiene
cuidado al usarlos.
- Cuando se usa un cable alargador, la capacidad eléctrica marcada del cable deberá ser por lo menos igual a la
capacidad eléctrica del aparato. Si el aparato está equipado con un cable con conexión a tierra de 3 hilos, el cable
alargador debe ser un cable con CONEXIÓN A TIERRA, DE 3 HILOS. El cable más largo deberá estar instalado de
manera tal que no cuelgue del borde del mostrador o encimera donde los niños pueden tirar de este o tropezarse.

26
- Su producto está equipado con un conector polarizado para corriente alterna (un enchufe que tiene una espiga
más ancha que la otra). Este enchufe podrá introducirse en la toma de corriente solo en una posición. Esta es una
medida de seguridad. Si no puede introducir el enchufe hasta el fondo, intente invirtiendo el enchufe. Si aún no
puede introducir el enchufe correctamente, póngase en contacto con un electricista para reemplazar el enchufe
obsoleto. No elimine el dispositivo de seguridad del enchufe polarizado.
4. DESCRIPCIÓN (pág. 3)
La terminología que gura a continuación será utilizada en las
páginas siguientes.
4.1 Descripción del aparato
A1. Tapadera del depósito de agua espresso
A2. Depósito de agua extraíble espresso
A3. Mango de extracción ltro anticloro
A4. Soporte ltro anticloro
A5. Portaltro para café ltro
A6. Depósito de agua
A7. Placa térmica para café ltro
A8. Bandeja apoyatazas espresso
A9. Indicador de nivel de agua bandeja de goteo
A10. Bandeja de goteo
A11. Vaporizador de leche
A12. Anillo de selección vaporizador (solamente en Sistema Ca-
ppuccino Ajustable)
A13. Boquilla de racor vapor (COM532)
A14. Botón de vapor para cappuccino
A15. Salida caldera
4.2 Descripción del panel de control
Sección Espresso
B1. Botón “Espresso ON/OFF” con indicador luminoso in-
tegrado
B2. Botón café Espresso/agua caliente con indicador lu-
minoso integrado
B3. Botón vapor con indicador luminoso integrado
Sección café de ltro
B4. Display
B5. Botón “Coee ON/OFF”
B6. Botón BOLD (aroma intenso)
B7. Botón AUTO
B8. Botón HOUR (hora)
B9. Botón MIN
4.3 Descripción de los accesorios
C1. Portaltro espresso
C2. Filtro una taza espresso
3. ADVERTENCIAS DE SEGURIDAD
• Este aparato se ha fabricado para “preparar café” y “bebidas
calientes”. Tenga cuidado de no quemarse con los chorros
de agua o de vapor, o utilizando el aparato de forma im-
propia.
• Nunca toque las supercies calientes del aparato.
• Después de haber desembalado el aparato, controle su
integridad. En caso de duda, no utilice el aparato y pón-
gase en contacto con el personal del centro de asistencia
De’Longhi.
• No deje los elementos del embalaje (bolsas de plástico,
espuma de poliestireno, etc.) al alcance de los niños ya que
constituyen fuentes potenciales de peligro.
• Este aparato está destinado exclusivamente al uso domés-
tico. Cualquier uso diferente se considerará impropio y, por
consiguiente, peligroso.
• El fabricante no puede ser considerado responsable por los
daños derivados de usos impropios, incorrectos e irraciona-
les.
• No toque el aparato con las manos o los pies mojados o
húmedos.
• No permita que los niños usen el aparato sin supervisión.
• No permita que los niños jueguen con el aparato.
• En caso de avería o de funcionamiento incorrecto del
aparato, apáguelo y no intente repararlo. Para posibles
reparaciones, diríjase solamente e a un centro de asistencia
técnica De’Longhi y solicite la utilización de repuestos ori-
ginales. El incumplimiento de todo lo mencionado arriba
puede perjudicar la seguridad del aparato.
• El usuario no deberá sustituir el cable de alimentación ya
que esta operación requiere la utilización de herramientas
especiales. En caso de daño, póngase en contacto exclusi-
vamente con el centro de asistencia autorizado para evitar
todo tipo de riesgo.
Lea detenidamente este manual de instrucciones antes de instalar y usar el aparato. Solo así, podrá obtener las mejo-
res prestaciones y la máxima seguridad durante el uso.

27
C3. Filtro dos tazas espresso
C4. Filtro para cápsulas espresso
C5. Medidor de café con prensador
C6. Filtro permanente de tono dorado
C7. Jarra para café ltro
C8. Filtro anticloro
C9. Descalcicador 100ml (1 uso)
4.4 Instalación
• Coloque el aparato sobre una supercie de trabajo alejada
de grifos y fregaderos.
• Asegúrese de que el voltaje de la toma coincida con el valor
indicado en la placa de datos del aparato.
Enchufe el aparato solamente a un enchufe de corriente
con valor nominal mínimo de 10A, equipado con una toma
tierra eciente. El fabricante no será considerado responsa-
ble por los posibles accidentes causados por la ausencia de
una toma de tierra del eciente.
• Si el enchufe y la clavija del aparato son incompatibles,
haga sustituir el enchufe por otro de tipo adecuado por
personal cualicado.
• Nunca instale la cafetera en un ambiente donde la tempe-
ratura puede descender debajo o ser igual 0°C (32°F) (si el
agua se congela, el aparato puede estropearse).
5. FILTRO ANTICLORO
El ltro elimina el sabor a cloro del agua. Para montar el ltro,
proceda del modo siguiente:
• Retire el portaltro de su soporte tirando de este hacia arri-
ba (g. 1).
• Retire el ltro anticloro de la bolsa de plástico y enjuáguelo
con agua corriente (g. 2).
• Abra el portaltro y coloque con cuidado el ltro en su lu-
gar tal como muestra la g. 2.
• Cierre con cuidado el recipiente del ltro (g. 2), y vuelva a
colocarlo en su soporte, empujándolo bien hacia abajo.
•
El ltro anticloro se debe reemplazar cada 80 ciclos, y al menos
al cabo de 6 meses de uso.
6. PRIMERA UTILIZACIÓN
Antes de utilizar el aparato por primera vez, deberá lavar to-
dos los accesorios y los circuitos internos de la cafetera del modo
siguiente:
CAFETERA PARA CAFÉ FILTRO:
• Encender la cafetera sin usar café molido por 2 ciclos com-
pletos.
CAFETERA PARA ESPRESSO:
• Abra la tapadera y retire el depósito de agua.
• Llene el depósito de agua hasta el nivel máximo.
• Introduzca el depósito de agua en su soporte empujando
hacia el fondo el depósito de agua y cierre la tapadera
(también es posible llenar el depósito usando una jarra).
• Introduzca el ltro de café requerido en el portaltro y en-
ganche el portaltro vacío en el aparato.
• Coloque un recipiente grande bajo las boquillas (34 /oz, 1l
capacidad).
• Pulse los botones “Espresso ON/OFF” y y descargue la
mitad del depósito por la salida de la caldera.
• Gire el botón regulador de vapor a y elimine el agua
restante del vaporizador luego vuelva a colocar el botón de
vapor en OFF.
• Vacíe el recipiente y colóquelo de nuevo bajo los surtidores,
a continuación efectúe un segundo enjuague.
7. PREPARAR CAFÉ DE FILTRO
7.1 Programar el reloj
Cuando se conecta por primera vez la cafetera al enchufe, “AM
0:00” parpadea en el display.
Para programar la hora, proceda del modo siguiente:
1. Mantenga presionado el botón “HOUR” (Fig. 3) durante tres
segundos hasta que el número de la hora parpadea en el
display.
2. Antes de que el display deje de parpadear (5 segundos
aproximadamente), programe la hora pulsando repetida-
mente el botón “HOUR”.
3. Programe los minutos pulsando repetidamente el botón
“MIN” (Fig. 3). (Para realizar de forma más rápida esta ope-
ración, mantenga pulsado el botón.)
4. Después de haber programado la hora, espere 5 segundos.
Cuando el display deja de parpadear, el ajuste de la hora
quedará guardado.
Para reiniciar la hora, pulse y mantenga pulsado el botón
HOUR durante tres segundos, y luego siga el procedimiento
descrito a partir del punto 2.
Por favor observe: En el caso de fallo eléctrico temporal, el
ajuste de hora no permanece guardado en la memoria.
7.2 Programar el encendido automático (AUTO
BUTTON)
Es posible programar el aparato para preparar de forma auto-
mática café de ltro. En primero lugar, asegúrese de que la hora
está congurada de forma correcta.
Para programar el inicio diferido (es decir la hora a la que desea
que el café esté preparado), proceda del modo siguiente:
1. Pulse y mantenga pulsado el botón AUTO (Fig. 4) durante
unos tres segundos hasta que 0:00 parpadea en el display.
2. Antes de que el display deje de parpadear (5 segundos
aproximadamente), programe la hora que desea pulsando

28
repetidamente el botón “HOUR”.
3. Programe los minutos pulsando repetidamente el botón
“MIN”.
4. Al cabo de 5 segundos, el display dejará de parpadear y el
ajuste de hora programado quedará guardado.
5. Después de programar el aparato como se ha descrito an-
teriormente, pulse el botón AUTO para que la preparación
del café se efectúe a la hora programada (El botón AUTO se
enciende y permanece encendido).
Por favor observe:
• Si desea cambiar la hora de inicio después de haberla pro-
gramada, pulse el botón AUTO durante unos 2 segundos y
luego programe la nueva hora como se ha descrito ante-
riormente a partir del punto 2.
• Tenga en cuenta que a la hora programada, la cafetera
comenzará a preparar sólo café de ltro. La cafetera para
espresso no se enciende.
• Para cancelar el encendido automático, pulse de nuevo el
botón Auto (se apagará y no permanecerá encendido).
7.3 Ajuste mantener caliente
La cafetera está congurada en fábrica para mantener el café
caliente durante dos horas después de la preparación del café.
Sin embargo, es posible cambiar este ajuste del modo siguiente:
1. Pulse y mantenga pulsado el botón “Coee ON/OFF” (Fig. 5)
durante unos tres segundos hasta que 0:00 parpadea en el
display.
2. Para cambiar la hora pulse repetidamente el botón HOUR
(y de ser necesario también el botón MIN).
3. Después de haber programado la hora, espere 5 segundos.
Cuando el display deja de parpadear, el ajuste de la hora
quedará guardado.
Por favor observe: Cuando se programa 0:00, el aparato se
apaga. (El ajuste de la hora se puede congurar entre 1 minuto
y 11 horas y 59 minutos).
7.4 Preparar café de ltro
• Abra la tapa del portaltro, girándola hacia la derecha (g.
7).
• Llene la jarra hasta la indicación de nivel correspondiente
a la cantidad de tazas de café que quiere preparar, procu-
rando no superar el nivel MAX de 10 tazas (g. 8), de lo
contrario, a n de no llenar demasiado la cafetera, el agua
en exceso rebosará por la parte trasera del aparato.
• A continuación
vierta el agua en el depósito de agua del apa-
rato (g. 9).
• Coloque el ltro de tono dorado en el portaltro (g. 10).
• Eche el café molido en el ltro con el medidor de la dota-
ción y nivélelo uniformemente (g. 11). Por norma gene-
ral, eche un medidor raso de café (aprox. 7 gramos) por
cada taza de café (por ejemplo, 10 medidores para obtener
10 tazas).
• Cierre la tapa del portaltro y coloque la jarra, con la tapa-
dera en su sitio, sobre la placa térmica.
• Presione el botón “Coee ON/OFF”. El botón se enciende
para indicar que se está preparando el café de ltro.
• El café empezará a salir después de algunos segundos.
Es normal que durante el ltrado del café, el aparato produzca
un poco de vapor.
Para mantener el café caliente después de que el aparato na-
liza el ltrado del café, se activa automáticamente la función
mantener caliente durante el tiempo seleccionado.
• Para apagar el aparato presione el botón “Coee ON/OFF”.
Por favor observe: Cuando naliza la preparación del café la
cafetera emite un pitido.
7.5 función “BOLD”
La función Bold realza el sabor de su café. Esta función activa
un proceso de ltrado único, echando lentamente el agua en el
ltro, ltrando poco a poco el café molido para extraer el mejor
sabor y aroma de su café.
Para activarla, presione el botón “BOLD” después de presionar el
botón “Coee ON/OFF” (g. 6); el botón se enciende. Presione de
nuevo el botón para apagar la función.
Se aconseja usar esta función para la preparación de 1 hasta 4
tazas. No utilice este botón para el ltrado de una jarra completa
de café.
Es posible seleccionar esta función también cuando se usa la
función automática (consulte el apartado 7.2).
Si quiere activar la función bold para el ltrado diferido, después
de programar el temporizador deberá activar la función bold
presionando el botón.
8. ESPRESSO
8.1 Precalentamiento de la unidad espresso
Para preparar café espresso a la temperatura correcta, es nece-
sario precalentar la cafetera del modo siguiente:
1. Presione el botón “Espresso ON/OFF” (g. 12) para encen-
der la cafetera. El indicador luminoso integrado indica que
el aparato se está calentando.
2. Introduzca el ltro en el portaltro (g. 13). Enganche el
portaltro con ltro en el aparato (g. 14) sin añadir café
premolido.
2. Coloque un taza bajo el portaltro. Utilice la misma taza
que utilizará para preparar el café a n de calentarla pre-
viamente.
3. Espere que el indicador luminoso integrado “Espresso ON/
OFF” deje de parpadear: ahora el aparato está listo para

29
preparar café espresso.
4. Presione el botón (g. 15). Llene la taza con agua
y luego interrumpa el suministro presionando el mismo
botón y vacíe la taza.
Por favor observe:
• Es normal que se produzca un poco de vapor inocuo cuando
se retira el portaltro.
• Nunca utilice el aparato sin agua en el depósito o sin el de-
pósito.
8.2 Cómo se prepara café espresso con café
premolido
1. Precaliente el aparato y el portaltro según se lo descrito
en el apartado anterior.
2. Coloque el ltro de café molido en el portaltro. Para
preparar un café espresso, utilice el ltro con el símbolo
en el fondo; para preparar dos cafés espresso, utili-
ce el ltro con el símbolo en el fondo.
3. Para preparar un café espresso, eche un medidor raso de
café premolido (aproximadamente 7 g/0,25 oz) en el ltro
(g. 16). Para preparar dos café espresso, eche dos medido-
res raso de café.
Importante:
Para el correcto funcionamiento, antes de echar el café premo-
lido, asegúrese de que en el ltro no haya residuos de café de la
preparación anterior.
4. Distribuya uniformemente el café molido y presiónelo lige-
ramente con el prensador (g. 17).
El prensado del café molido es fundamental para obtener
un buen café espresso. Si el café se prensa demasiado, el
café saldrá lentamente y se obtendrá una crema de color
oscuro. Si el café se prensa poco, el café saldrá demasiado
rápido y la crema será suave y de color claro.
5. Retire el café excedente del borde del portaltro y engan-
che éste último a la máquina. Insértelo bien (g. 14) para
evitar pérdidas de agua.
6. Coloque la taza o las tazas bajo los surtidores del portaltro
(g. 18). Se aconseja calentar las tazas antes de preparar el
café enjuagándolas con agua caliente.
7. Compruebe que el indicador luminoso “Espresso ON/OFF”
esté encendido de modo jo (si parpadea espere a que deje
de hacerlo), luego presione el botón (g. 15). Obte-
nida la cantidad de espresso deseada, presione el mismo
botón para interrumpir la salida.
8. Para retirar el portaltro, gire la empuñadura de derecha a
izquierda.
¡Peligro de quemaduras!
Para evitar salpicaduras, nunca desenganche el portaltro
mientras está saliendo café por el aparato.
9. Para eliminar el café usado vacíe los fondos volteando el
portaltro y golpeándolo con rmeza (g. 19).
10. Para apagar la cafetera, presione el botón “Espresso ON/
OFF” .
Cómo se prepara café espresso con cápsulas
1. Precalentar el aparato como se describe en la sección “PRE-
CALENTAMIENTO DE LA UNIDAD DE CAFÉ (8.1)”, compro-
bando antes que el ltro está montado. De esta manera se
obtiene el café más caliente.
Por favor observe:
Utilice las cápsulas que cumplan con la norma ESE, se indica en
el envase con el símbolo siguiente.
La norma ESE es un sistema que han adoptado los
productores más importantes de pastillas de café,
que permite preparar un café espresso fácilmente
y de forma más limpia.
2. Coloque el ltro para cápsulas espresso (con el símbolo
en el fondo) el en portaltro (g. 13).
3. Introduzca la cápsula centrándola lo más posible sobre el
ltro (g. 20). Siga rigurosamente las instrucciones que
guran en el envase de las pastillas para colocar la pastilla
correctamente en el ltro.
4. Enganche el portaltro al aparato. Gírelo siempre hasta
que haga tope (g. 14).
5. Proceda como en los puntos 6, 7 y 8 del apartado anterior.
9. CÓMO PREPARAR CAPPUCCINO O BEBIDAS A
BASE DE LECHE
1. Prepare el café espresso tal y como se he descrito en los
apartados anteriores, utilizando tazas sucientemente
grandes. Asegúrese de que el aparato está encendido pre-
sionando el botón Espresso On/o.
2. Presione el botón : el indicador luminoso parpadea para
indicar que el aparato se está calentando (g. 21).
3. Mientras tanto, llene un recipiente con unos 3,5 oz/100
gramos de leche por cada capuchino o 6 oz/170 gramos
por cada bebida a base de leche que quiere preparar. En la
elección de las dimensiones de la jarra tenga en cuenta que
la leche duplica o triplica su volumen.
Por favor observe:
Se aconseja utilizar leche entera o leche 2% a temperatura de
nevera.
4. Solamente en los modelos con Sistema Cappuccino
ajustable: Asegúrese de que el anillo de selección del

30
vaporizador esté colocado hacia abajo en la posición CA-
PPUCCINO y coloque la jarra con leche bajo el vaporizador.
5. Espere a que el indicador luminoso deje de parpadear,
ello indicará que la caldera ha alcanzado al temperatura
ideal para la producción de vapor. Mientras que la caldera
se calienta, es normal que salga un poco de agua y vapor
en la bandeja de goteo.
6. Retire el vaporizador girándolo a la izquierda (g. 22). Du-
rante esta operación, procure no tocar la salida de la calde-
ra ya que está caliente. Luego coloque la jarra de leche bajo
el vaporizador.
7. Sumerja el vaporizador en la leche. (g. 23). Gire el botón
de vapor en sentido antihorario a la posición ON (g.
24). Por el vaporizador comienza a salir vapor, que vuelve la
textura de la leche cremosa y espumosa. Para obtener una
espuma más cremosa, sumerja el vaporizador en la leche y
mueva el recipiente con movimientos lentos hacia arriba y
abajo.
8. Tras alcanzar la temperatura deseada (la ideal es
60°C/140°F) y la densidad de espuma deseada, interrum-
pa la salida de vapor girando el botón de vapor en sentido
horario a la posición OFF y presione el botón .
9. Vierta la leche montada en las tazas que contienen el café
espresso preparado anteriormente. El capuchino está listo.
Por favor observe:
• Para preparar varios capuchinos, primero se deben prepa-
rar todos los cafés y solo al nal se debe preparar la lecha
montada para todos los capuchinos.
• Si se desea volver a hacer el café inmediatamente des-
pués de haber montado la leche, hay que enfriar an-
tes la caldera, en caso contrario el café sale quemado.
Para enfriar la caldera, coloque un recipiente bajo la salida
de la caldera, presione el botón y haga salir el agua
hasta que el botón parpadea “Espresso ON/OFF”. Luego pre-
pare el café espresso como se ha descrito anteriormente.
• Limpie el vaporizador de leche después de cada uso
para evitar residuos de leche u obstrucciones.
Se recomienda el suministro de vapor como
máximo 60 segundos y no montar la leche
más de tres veces consecutivas.
10. PREPARAR LECHE CALIENTE SIN ESPUMA
SÓLO ALGUNOS MODELOS
Para preparar leche caliente sin espuma, proceda según lo des-
crito en el apartado anterior, asegurándose de que el anillo del
vaporizador esté colocado hacia arriba en la posición “HOT MILK”
(leche caliente).
11. LIMPIEZA DEL VAPORIZADOR DESPUÉS DEL
USO
Importante:
Por motivos de higiene se recomienda limpiar siempre el vapori-
zador de leche después de usarlo.
Proceda del modo siguiente:
1. Haga salir un poco de vapor durante unos segundos giran-
do el botón de vapor en sentido antihorario (g. 24). Con
esta operación el vaporizador descarga la leche que pueda
quedar eventualmente en su interior. Apague el aparato
pulsando el botón “Espresso ON/OFF”.
2. Con una mano mantenga sujeto el tubo vaporizador y con
la otra desbloquee el vaporizador girándolo en sentido an-
tihorario, sáquelo después hacia abajo (g. 27).
3. Quite la boquilla de racor vapor del tubo de suministro ti-
rando de este hacia abajo.
4. Lave cuidadosamente el vaporizador y la boquilla vapor
con agua caliente.
5. Compruebe que los dos agujeros indicados por las echas
en la g. 28 no está atascados. De ser necesario, limpiarlos
con un aller.
6. Monte de nuevo la boquilla de racor vapor, y presione con
fuerza hacia arriba para introducirlo en el tubo de vapor.
7. Vuelva a colocar el vaporizador empujando hacia arriba y
girando en sentido horario.
12. AGUA CALIENTE
1. Presione el botón “Espresso ON/OFF” (g. 12) para encen-
der el aparato, el indicador luminoso integrado indica que
el aparato se está calentando.
2. Mientras tanto, coloque una taza bajo el vaporizador.
3.
El indicador luminoso integrado “Espresso ON/OFF” deja
de parpadear, presione el botón (g. 15) y al mismo
tiempo gire el botón de vapor en sentido antihorario a la
posición ON (g. 24). El agua comienza a salir por el
vaporizador.
4. Para interrumpir la salida del agua caliente, presione de
nuevo el botón y gire el botón de vapor en sentido
horario a la posición OFF.
Se aconseja un suministro de agua caliente
durante 60 segundos como máximo.
13. LIMPIEZA
¡Peligro!
• Para la limpieza, no sumerja nunca la cafetera en agua. Es
un aparato eléctrico.
• Antes de limpiar el exterior del aparato, apague la cafetera,

31
desenchúfela de la corriente y deje que se enfríe.
13.1 Limpieza de la bandeja de goteo
¡Importante!
La bandeja de goteo tiene un indicador de nivel (de color rojo)
que muestra el nivel de agua contenida. Antes de que este indi-
cador empiece a sobresalir de la bandeja apoyatazas, es necesa-
rio vaciar la bandeja y limpiarla, de lo contrario el agua podría
rebosar por el borde y estropear la máquina, la supercie de
apoyo o la zona que la rodea.
1. Saque la bandeja de goteo.
2. Saque la bandeja apoyatazas, elimine el agua y limpie la
bandeja con un paño, luego monte de nuevo la bandeja de
goteo.
3. Vuelva a colocar en su sitio la bandeja de goteo.
13.2 Limpieza y mantenimiento del ltro para
espresso
Limpie los ltros de café cada semana:
Filtros para 1 y 2 tazas
1. Saque el ltro perforado tirando de la correspondiente
lengüeta (g. 29);
2. Enjuague los ltros bajo el chorro de agua corriente (g.
30);
3. Asegúrese de que los agujeros no estén atascados. De ser
así límpielos usando un aller (g. 30 y 31);
4. Reintroduzca el ltro perforado en su soporte empujándo-
lo bien hasta que haga tope.
Filtro cápsula
Enjuagar bajo el chorro de agua corriente. Asegúrese de que los
agujeros no estén atascados. De ser así límpielos usando un al-
ler (g. 30 y 31).
13.3 Limpieza de la salida caldera
Cada 300 cafés espresso, es necesario limpiar la salida de la cal-
dera espresso de la siguiente manera:
• Asegúrese de que el aparato no esté caliente y que esté
desconectado de la corriente;
• Con la ayuda de un destornillador, destornille el tornillo
que ja la salida de la caldera (g. 32);
• Quite la salida de la caldera;
• Limpie con un paño húmedo la caldera (g. 32);
• Limpie la salida meticulosamente con agua caliente
frotándola con un cepillo. Asegúrese de que los agujeros no
estén atascados. De ser necesario, limpiarlos con un aller.
• Enjuague bajo un chorro de agua, frotando todo el tiempo.
• Vuela a montar la salida de la caldera procurando colocarla
correctamente en la junta.
La garantía no es válida si la limpieza arriba descrita no se realiza
correctamente.
13.4 Otras operaciones de limpieza
1. No use solventes ni detergentes abrasivos para limpiar la
cafetera. Es suciente utilizar un paño húmedo y suave.
2. Limpie regularmente el portaltro, los ltros y el depósito
de agua.
¡Peligro!
Para la limpieza, no sumerja nunca la cafetera en agua. Es un
aparato eléctrico.
14. DESCALCIFICACIÓN
Con el paso del tiempo la cal se acumulará causando obstruccio-
nes y perjudicando
el correcto funcionamiento de la cafetera.
14.1 Descalcicación de la unidad espresso
Se aconseja descalcicar la cafetera para espresso cuando el
aviso de descalcicación parpadea (el botón de vapor (B3)
se enciende con destello doble de luz) y esto sucede después de
preparar 200 café. Este aviso no impide ninguna otra función.
El aviso podrá ser aplazado temporalmente pulsando los boto-
nes del lado espresso. Al nal del siguiente ciclo de ltrado, si la
descalcicación no ha nalizado, el aviso parpadea en el botón
de vapor. Se aconseja utilizar el descalcicador De'Longhi que
se encuentra en el mercado.
Proceda del modo siguiente:
1. Llene el depósito con el descalcicador (utilice la muestra
incluida en el envase), obtenida diluyendo el producto con
agua, de acuerdo con las indicaciones que guran en el en-
vase.
2. Presione el botón “Espresso ON/OFF” (g. 12) para encen-
der el aparato. El indicador luminoso integrado parpadea.
3. Asegúrese de que el portaltro no esté enganchado y colo-
que un recipiente bajo la salida de la caldera.
4. Presione y mantenga pulsado el botón vapor (B3)
durante al menos 6 seg. De este modo iniciará el proceso
automático de descalcicación.
5. El proceso de descalcicación tarda unos 30 minutos en
nalizar. Mientras tanto, el botón descalcicación parpa-
dea. Mientras el aparato comienza a suministrar agua, abra
un vez el botón de vapor durante 2-3 segundos para que
salga un poco de agua por el elemento vaporizador.
6. Para eliminar los residuos de solución y la cal, enjuague
bien el depósito, luego llénelo de nuevo con aguar fresca
(sin descalcicador).
7. Presione el botón (g. 15) y haga salir agua hasta
La page charge ...
La page charge ...
La page charge ...
La page charge ...
La page charge ...
La page charge ...
La page charge ...
La page charge ...
La page charge ...
La page charge ...
La page charge ...
La page charge ...
La page charge ...
La page charge ...
-
 1
1
-
 2
2
-
 3
3
-
 4
4
-
 5
5
-
 6
6
-
 7
7
-
 8
8
-
 9
9
-
 10
10
-
 11
11
-
 12
12
-
 13
13
-
 14
14
-
 15
15
-
 16
16
-
 17
17
-
 18
18
-
 19
19
-
 20
20
-
 21
21
-
 22
22
-
 23
23
-
 24
24
-
 25
25
-
 26
26
-
 27
27
-
 28
28
-
 29
29
-
 30
30
-
 31
31
-
 32
32
-
 33
33
-
 34
34


DeLonghi COM530M Le manuel du propriétaire
- Catégorie
- Cafetières
- Taper
- Le manuel du propriétaire
dans d''autres langues
- English: DeLonghi COM530M Owner's manual
- español: DeLonghi COM530M El manual del propietario
Documents connexes
-
DeLonghi ECP31.21 Le manuel du propriétaire
-
-
DeLonghi BCO120T Manuel utilisateur
-
-
-
-
-
-
-
Autres documents
-
Beko CEP 5302 B Manuel utilisateur
-
 Create THERA MATT RETRO Le manuel du propriétaire
-
Create THERA RETRO Manuel utilisateur
-
Create Thera Retro Espresso Coffee Machine Manuel utilisateur
-
Tefal CM1608MX Manuel utilisateur
-
-
Solac CA4815 Le manuel du propriétaire
-
Tefal EX3220MX Manuel utilisateur
-
IKEA Smakrik EM Le manuel du propriétaire
-
Solac CA4805 Mode d'emploi
