Portable Winch PCA-1263 Le manuel du propriétaire
- Taper
- Le manuel du propriétaire

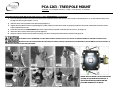
PCA-1263 - TREE/POLE MOUNT
Includes: 1 x Tree/pole mount, 1 x strap, 1 hex wrench, 1 carabiner
Using the tree/pole mount with anchor strap (REFER TO WINCH USER MANUAL FOR MORE INFO)
1) Place the tree/pole mount at the base of the tree or pole. Insert the strap’s hook into the anchor point on the left (figure 1, no 1); then feed the strap’s end
through the ratchet system (figure 1, no 2);
2) Slide the whole set-up upward to the desired height (figure 2);
3) Tighten the sling with the wrench supplied (figure 3) while making sure the rubber pads are properly positioned. The pads should offer maximum contact
surface with the tree or pole;
4) Install the receiver hitch (not included) without the square tubing and fasten it with the hitch pin and ‘’R’’ pin (figure 4);
5) Attach the winch anchor hooks to the eye bolts (figure 5);
6) Wrap the rope around the drum and start winching. The winch will align itself automatically with the load (figure 6).
IF YOU NEED TO PULL DOWNWARD, YOU WILL NEED TO INSTALL EITHER A PULLEY OR A ROLLER TO PREVENT DAMAGE TO THE WINCH SUPPORT PLATE.
AFTER PULLING FOR A FEW SECONDS WITH THE TREE/POLE MOUNT, RELEASE THE TENSION OFF THE PORTABLE CAPSTAN WINCH. CHECK THE SOLIDITY OF
THE INSTALLATION AND TIGHTEN THE SLING AGAIN.
NOTE: The hex wrench can be stored in the
opening on top of the tree mount (no. 1
above) and locked in position with the
provided carabiner (no. 2 above).

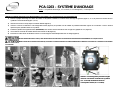
PCA-1263 – SYSTÈME D’ANCRAGE
Inclus: 1 x Système d’ancrage, 1 x courroie, 1 clé hexagonale, 1 mousqueton
Utiliser le système d’ancrage pour arbres/poteaux (VOIR MANUEL DE L’UTILISATEUR POUR PLUS D’INFORMATION)
1) Placez la plaque d’ancrage à la base de l’arbre ou du poteau. Installez la courroie dans l’ancrage de gauche (figure 1, no 1) et passez-la ensuite dans le
système à rochet de droite (figure 1, no 2);
2) Glissez le tout vers le haut jusqu’à la hauteur désirée (figure 2);
3) Serrez la courroie à l’aide de la clé hexagonale fournie (figure 3) en prenant soin de vérifier le positionnement des appuis en caoutchouc. Ceux-ci doivent
épouser le plus possible l’arbre ou le poteau;
4) Installez le plateau de support du treuil (non fourni) sans le tube carré et arrimez-le avec la tige et la goupille en ‘’R’’ (figure 4);
5) Accrochez les crochets de sûreté du treuil aux boulons à œil (figure 5);
6) Enroulez la corde autour du tambour et tirez. Le treuil s’alignera automatiquement avec la charge (figure 6).
SI VOUS DEVEZ TIRER VERS LE BAS, VOUS DEVEZ INSTALLER UNE POULIE OU UN ROULEAU AFIN D’ÉVITER D’ENDOMMAGER LA PLAQUE D’APPUI.
APRÈS AVOIR MIS LE DISPOSITIF EN CHARGE, RELÂCHEZ LA TENSION DU TREUIL À CABESTAN PORTABLE. VÉRIFIEZ LA SOLIDITÉ DE L’ANCRAGE ET RESSERREZ
LA COURROIE.
NOTE: La clé hexagonale peut être rangée
dans les ouvertures à l’arrière du système
(no. 1 ci-haut) et barrée à l’aide du
mousqueton fourni (no. 2 ci-haut).
-
 1
1
-
 2
2


Portable Winch PCA-1263 Le manuel du propriétaire
- Taper
- Le manuel du propriétaire
dans d''autres langues
Documents connexes

Autres documents
-
 Champion Power Equipment 20049 Le manuel du propriétaire
-
 Champion Power Equipment 80195 Manuel utilisateur
-
Ramsey Winch REP 8000 Le manuel du propriétaire
-
 Superwinch 1618201 Manuel utilisateur
-
Warn 96800 Manuel utilisateur
-
3M 8518000 Mode d'emploi
-
Lynx Personnel/Material Hoists Le manuel du propriétaire
-
Arctic Cat KIT-WINCH, PV3000 [PRLR] Manuel utilisateur
-


