
86400910-A 06/12/15
Carpet Maintainer
Quick Dry Scrubber
Operating instructions (ENG)
MODELS:
IM
1.006-636.0
IMX
1.006-640.0
IMXIE17
1.006-641.0
From Serial Number (Ref No1*)
*See Serial Number Page
in Spare Parts List
or call manufacturer

Warranty Registration
Thank you for purchasing our product. Warranty registration is quick and easy.
Your registration will allow us to serve you better over the lifetime of the product.
To register your product go to :
http://warranty.karcherna.com/
2 86400910 Operator’s Manual - Carpet Maintainer
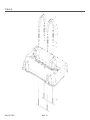
Machine Data Label
Overview
The Carpet Maintainer is designed to maintain carpet using the Quick Dry Carpet Care System. The machine
has two counter rotating brushes that scrub chemical into the carpet. The chemicals, iCapsol or Prochem
ProCaps, encapsulates the dirt, allowing both to be vacuumed up once the chemical has dried. The brushes
also raise the pile of the carpet. The Deluxe models have a solution tank and pump powered spraying system,
which applies the chemical to the carpet as the machine is used.

3
Table of Contents
Machine Data Label . . . . . . . . . . . . . . . . . . . . . . . . 2
Overview . . . . . . . . . . . . . . . . . . . . . . . . . . . . . . . . 2
Table of Contents . . . . . . . . . . . . . . . . . . . . . . . . . 3
How To Use This Manual . . . . . . . . . . . . . . . . . . . 4
Safety
IMPORTANT SAFETY INSTRUCTIONS . . . . . . . 5
HAZARD INTENSITY LEVEL . . . . . . . . . . . . . . . . 7
Grounding Instructions – 120V Only . . . . . . . . . . . 9
Safety Labels . . . . . . . . . . . . . . . . . . . . . . . . . . . 10
Operations
Technical Specifications . . . . . . . . . . . . . . . . . . . 11
How The Machine Works . . . . . . . . . . . . . . . . . . 12
Quick Dry Carpet Care System Instructions . . . . 12
Components . . . . . . . . . . . . . . . . . . . . . . . . . . . . 13
Machine Operation . . . . . . . . . . . . . . . . . . . . . . . 14
Pre-Run Machine Inspection. . . . . . . . . . . . . . . . 14
Starting Machine . . . . . . . . . . . . . . . . . . . . . . . . . 14
Transporting A Sprayer. . . . . . . . . . . . . . . . . . . . 15
Shut-down And Storage . . . . . . . . . . . . . . . . . . . 15
Maintenance
Brush Cleaning And Maintenance . . . . . . . . . . . 16
Motor Replacement & Grooved Belt Tensioning. 16
Motor Replacement & Toothed Belt Tensioning . 18
Machine Maintenance. . . . . . . . . . . . . . . . . . . . . 20
Machine Troubleshooting . . . . . . . . . . . . . . . . . . 21
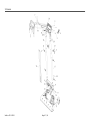
Suggested Spare Parts. . . . . . . . . . . . . . . . . . . . 22
86400910 Operator’s Manual - Carpet Maintainer

4
How To Use This Manual
This manual contains the following sections:
• How to use this manual
•Safety
• Operations
• Maintenance
• Suggested Spare Parts
The HOW TO USE THIS MANUAL section will tell
you how to find important information for ordering
correct repair parts.
Parts may be ordered from authorized dealers. When
placing an order for parts, the machine model and
machine serial number are important. Refer to the
MACHINE DATA box which is filled out during the
installation of your machine. The MACHINE DATA
box is located on the inside of the front cover of this
manual.
The model and serial number of your machine is on
the operator’s left hand side, side panel of base.
The SAFETY section contains important information
regarding hazardous or unsafe practices of the
machine. Levels of hazards are identified that could
result in product damage, personal injury, or severe
injury resulting in death.
The OPERATIONS section is to familiarize the
operator with the operation and function of the
machine.
The MAINTENANCE section contains preventive
maintenance to keep the machine and its compo-
nents in good working condition. They are listed in
this general order:
• Batteries
• Scrub Brushes
• Adjusting squeegee
•Scrub Deck Skirts
• Squeegee Blade
• Service Schedule
NOTE: If a service or option kit is installed on your
machine, be sure to keep the KIT INSTRUCTIONS
which came with the kit. It contains replacement
parts numbers needed for ordering future parts.
NOTE: The manual part number is located on the
lower right corner of the front cover.
Model:
Date of Purchase:
Serial Number:
Dealer:
Address:
Phone Number:
Sales Representative:
86400910 Operator’s Manual - Carpet Maintainer

5
Safety
IMPORTANT SAFETY INSTRUCTIONS
When using this machine, basic precaution
must always be followed, including the following:
READ ALL INSTRUCTIONS BEFORE USING THIS MACHINE.
To reduce the risk of fire, electric shock, or injury:
Connect to a properly grounded outlet. See Grounding Instructions.
Do not leave the machine unattended. Unplug machine from outlet when not in use and before maintenance or
service.
Do not allow machine to be used as a toy. Close attention is necessary when used by or near children.
Use only as described in this manual. Use only manufacturer’s recommended components and attachments.
Do not use damaged electrical cord or plug. Follow all instructions in this manual concerning grounding the
machine. If the machine is not working properly, has been dropped, damaged, left outdoors, or dropped into
water, return it to an authorized service center.
Do not pull or carry machine by electrical cord, use as a handle, close a door on cord, or pull cord around sharp
edges or corners.
Do not run machine over cord or allow the rotating brushes to come in contact with the cord. Keep cord away
from heated surfaces.
Do not unplug machine by pulling on cord. To unplug, grasp the electrical plug, not the electrical cord.
Do not handle the electrical plug or machine with wet hands.
Do not operate the machine with any openings blocked. Keep openings free of debris that may reduce airflow.
Machine is designed for indoor use only and must not be operated or stored outdoors in wet conditions.
Turn off all controls before unplugging.
Maintenance and repairs must be done by qualified personnel.
Do not operate this machine near flammable fluids, dust or vapors.
READ AND SAVE THESE INSTRUCTIONS
86400910 Operator’s Manual - Carpet Maintainer

6
Safety
CONSIGNES DE SÉCURITÉ IMPORTANTES
Lors de l'utilisation de cette machine, des précautions de base
doivent toujours être prises, y compris les précautions suivantes :
LIRE TOUTES LES INSTRUCTIONS AVANT D'UTILISER CETTE MACHINE.
Pour réduire le risque d'incendie, d'électrocution ou de
blessure :
Cet appareil ne doit être connecter qu a des prises ayant une sortie de terre.
Ne pas laisser l’appareil sans surveillance lorsqu’il est branché. Débrancher lorsque l’appareil n’est pas utilisé
et avant l’entretien.
Ne pas permettre aux enfants de jouer avec l’appareil. Une attention particulière est nécessaire lorsque l’appa-
reil est utilisé par des enfants ou à proximité de ces derniers.
Utiliser cet appareil conformément aux instructions du présent manuel uniquement. N’utiliser que conformément
à cette notice avec les accessoires recommandés par le fabricant.
Ne pas utiliser si le cordon ou la fiche est endommagé. Retourner l’appareil à un atelier de réparation s’il ne
fonctionne pas bien, s’il est tombé ou s’il a été endommagé, oublié à l’extérieur ou immergé.
Ne pas tirer soulever ou traîner l’appareil par le cordon. Ne pas utiliser le cordon comme une poignée, le coincer
dans l’embrasure d’unée porte ou l’appuyer contre des arêtes vives ou des coins. Ne pas faire rouler l’appareil
sur le cordon.
Ne pas débrancher en tirant sur le cordon. Tirer plutôt la fiche.
Ne pas toucher la fiche ou l’appareil lorsque vos mains sont humides.
N’insérer aucun objet dans les ouvertures. Ne pas utiliser l’appareil lorsqu’une ouverture est bloquée. S’assure
que de la poussière, de la peluche, des cheveux ou d’autres matières ne réduisent pas le débit d’air.
Cette machine est faite pour un usage à sec seulement et ne doit pas être utilisée ou rangée à l'extérieur dans
des conditions humides.
Éteignez toutes les commandes avant de débrancher.
L’entretien et les réparations de la machine doivent être effectuées par un personnel qualifié.
N'utilisez pas cette machine avec ou à proximité de combustibles, poussières de céréales, solvants, diluants ou
autres matériaux inflammables.
LIRE ET CONSERVER CES INSTRUCTIONS
86400910 Operator’s Manual - Carpet Maintainer

7
Safety
The following symbols are used throughout this guide as indicated in their descriptions:
HAZARD INTENSITY LEVEL
There are three levels of hazard intensity identified by signal words -WARNING and CAUTION and FOR
SAFETY. The level of hazard intensity is determined by the following definitions:
WARNING - Hazards or unsafe practices which COULD result in severe personal injury or death.
CAUTION - Hazards or unsafe practices which could result in minor personal injury or product or property
damage.
FOR SAFETY: To Identify actions which must be followed for safe operation of equipment.
Report machine damage or faulty operation immediately. Do not use the machine if it is not in proper operating
condition. Following is information that signals some potentially dangerous conditions to the operator or the
equipment. Read this information carefully. Know when these conditions can exist. Locate all safety devices on
the machine. Please take the necessary steps to train the machine operating personnel.
FOR SAFETY:
DO NOT OPERATE MACHINE:
Unless Trained and Authorized.
Unless Operation Guide is Read and understood.
In Flammable or Explosive areas.
In areas with possible falling objects
WHEN SERVICING MACHINE:
Avoid moving parts. Do not wear loose clothing; jackets, shirts, or sleeves when working on the machine. Use
manufacturer approved replacement parts.
86400910 Operator’s Manual - Carpet Maintainer

8
Safety
Les symboles suivants sont utilisés dans tout ce manuel, tels que décrits ici :
NIVEAU D'INTENSITÉ DU DANGER
Il existe trois niveaux d'intensité du danger, identifiés par des termes d'avertissement - AVERTISSEMENT,
ATTENTION et POUR VOTRE SÉCURITÉ. Le niveau d'intensité du danger est déterminé par les définitions
suivantes :
AVERTISSEMENT - Les dangers ou des pratiques contraires à la sécurité qui POURRAIENT entraîner des
blessures personnelles ou la mort.
ATTENTION - Les dangers ou des pratiques contraires à la sécurité qui pourraient entraîner des blessures
personnelles légères ou des dégâts sur le produit ou d'autres biens.
POUR DES RAISONS DE SÉCURITÉ : Pour identifier les actions qui doivent être exécutées pour un
fonctionnement sûr de l'équipement.
Signaler immédiatement tout dommage subi par la machine ou fonctionnement défectueux. Ne pas utiliser la
machine si elle ne fonctionne pas correctement. Ci-dessous se trouvent les informations indiquant les condi-
tions potentiellement dangereuses pour l'opérateur ou l'équipement. Lire attentivement ces informations. Être
conscient que ces conditions peuvent survenir. Repérer tous les dispositifs de sécurité sur la machine. Suivre
les étapes nécessaires de formation du personnel qui utilise la machine.
POUR DES RAISONS DE SÉCURITÉ :
NE PAS FAIRE FONCTIONNER LA MACHINE :
Sauf si le personnel est formé et autorisé.
Sauf si le manuel d'utilisation est lu et compris.
Dans des zones inflammables ou explosives.
Dans des zones contenant des objets susceptibles de tomber
LORS DE L'ENTRETIEN DE LA MACHINE :
Éviter les pièces mobiles. Ne pas porter de vêtements, vestes, chemises ou manches vagues lors de l'entretien
de la machine. Utiliser les pièces de rechange approuvées par le fabricant.
86400910 Operator’s Manual - Carpet Maintainer

9
Safety
THIS PRODUCT IS FOR COMMERCIAL
USE ONLY.
Electrical
In the USA, this machine operates on a standard 15
amp 120V, 60 hz, A.C. power circuit. The amp, hertz,
and voltage are listed on the data label found on each
machine. Using voltages above or below those
indicated on the data label will cause serious damage
to the motors.
Extension Cords
If an extension cord is used, the wire size must be at
least one size larger than the power cord on the
machine, and must be limited to 50 feet (15.5m) in
length.
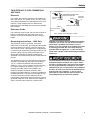
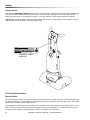
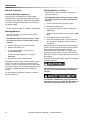
Grounding Instructions – 120V Only
This appliance must be grounded. If it should
malfunction or break down, grounding provides a path
of least resistance for electric current to reduce the
risk of electric shock. This appliance is equipped with
a cord having an equipment-grounding conductor and
grounding plug. The plug must be inserted into an
appropriate outlet that is properly installed and
grounded in accordance with all local codes and ordi-
nances.
This appliance is for use on a nominal 120-volt circuit,
and has a grounded plug that looks like the plug in
“Fig. A”. A temporary adapter that looks like the
adapter in “Fig. C” may be used to connect this plug
to a 2-pole receptacle as shown in “Fig. B”, if a
properly grounded outlet is not available. The
temporary adapter should be used only until a
properly grounded outlet (Fig. A) can be installed by a
qualified electrician. The green colored rigid ear, lug,
or the like extending from the adapter must be
connected to a permanent ground such as a properly
grounded outlet box cover. Whenever the adapter is
used, it must be held in place by a metal screw.
Improper connection of the equipment-grounding
conductor can result in a risk of electric shock.
Check with a qualified electrician or service
person if you are in doubt as to whether the outlet
is properly grounded. Do not modify the plug
provided with the appliance - if it will not fit the
outlet, have a proper outlet installed by a qualified
electrician.
Le raccordement incorrect du conducteur de terre
d'équipement peut entraîner des risques d'élec-
trocution. Vérifiez auprès d'un électricien qualifié
ou d'un responsable de l'entretien si vous avez
quelque doute que ce soit quant au raccordement
à la terre de votre prise murale. Ne modifiez pas la
fiche fournie avec l'appareil : si elle ne corre-
spond pas à la prise murale, faites installer une
prise adéquate par un électricien qualifié.
86400910 Operator’s Manual - Carpet Maintainer
USING AN ADAPTOR
GROUNDING CONNECTION
Note: Adaptors are not allowed in Canada.
Outlet
Tab for Grounding
Outlet Box
FIGURE C
Grounded
FIGURE A
Adaptor
Screw
FIGURE B
Adaptor
Metal Screw
Grounded
Grounding Pin

10
Safety
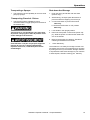
Safety Labels
The following WARNING LABEL(S) are found on your cleaning unit. These labels point out important Warnings
and Cautions which should be followed at all times. Failure to follow warnings and cautions could result in
fatality, personal injury to yourself and/or others, or property damage. Follow these instructions carefully!
DO NOT remove these labels. These drawings indicate the location of safety labels on the machine. If at any
time the labels become illegible, promptly replace them.
Technical Specifications
Special Notes:
The sound pressure level at the operator’s ear was measured to be 67.7dBA. This was a nearfield, broad-band
measurement taken on a carpeted floor. This appliance contains no possible source of impact noise. The instan-
taneous sound pressure level is below 63 Pa.
The weighted root mean square acceleration at the operator’s arms was measured to be below 2.5m/s
2
. This
was a tri-axial, third-octave-band measurement made during normal operation on a composite tile floor. The
measurement and related calculations were made in accordance with ISO 5349-1.
86400910 Operator’s Manual - Carpet Maintainer
WARNING LABEL
86220140

11
Operations
Technical Specifications
120V
230V
This appliance is not intended for use by persons (including children) with reduced physical, sensory or mental
capabilities, or lack of experience and knowledge, unless they have been given supervision or instruction
concerning use of the appliance by a person responsible for their safety. Children should be supervised to
ensure that they do not play with the appliance.
Cet appareil n'est pas prévu à l'usage des personnes (enfants y compris) avec des possibilités physiques,
sensorielles ou mentales réduites, ou le manque d'expérience et de connaissance, à moins qu'ils aient été
donnés la surveillance ou l'instruction au sujet de l'utilisation de l'appareil par une personne chargée de leur
sûreté. Des enfants devraient être dirigés pour s'assurer qu'ils ne jouent pas avec l'appareil.
ITEM DIMENSION/CAPACITY
Electrical 120V
Nominal Power 0.5 HP
Rated Amperage 7 Amps
Brush Width 17 – 16.5” (430 - 420 mm)
Brush RPM 470 RPM
Wheels 3 inches (75 mm) non-marking grey
Dimensions - Weight
- Weight - Deluxe
48 lbs. (22 kg)
56 lbs. (25 kg)
Dimensions – Height with handle 45.5” (1.16 m)
Dimensions – Depth 16 inches (0.4 m)
Power Cord 40 feet (12.2 m)
Solution Tank Volume - Deluxe 2 gallon
Pump Pressure - Deluxe 50 psi
Solution Flow - Deluxe 0.1 gpm
Spray Jet Size - Deluxe .010
ITEM DIMENSION/CAPACITY
Electrical 230V
Nominal Power 0.5 HP
Rated Amperage 4 Amps
Brush Width 17 – 16.5” (430 - 420 mm)
Brush RPM 470 RPM
Wheels 3 inches (75 mm) non-marking grey
Dimensions - Weight
- Weight - Deluxe
48 lbs. (22 kg)
56 lbs. (25 kg)
Dimensions – Height - with handle 45.5” (1.16 m)
Dimensions – Depth 16 inches (0.4 m)
Power Cord 40 feet (12.2 m)
Solution Tank Volume - Deluxe 2 gallon
Pump Pressure - Deluxe 50 psi
Solution Flow - Deluxe 0.1 gpm
Spray Jet Size - Deluxe .010
86400910 Operator’s Manual - Carpet Maintainer

12
Operations
How The Machine Works
The Carpet Maintainer is designed to maintain your
carpet using the Quick Dry Carpet Care System. By
using the Carpet Maintainer in conjunction with
iCapsol or Prochem ProCaps chemical solution, you
can perform a regular light cleaning and grooming of
your carpet very quickly, and have the carpet dry and
ready for traffic within 20 minutes.
The handle movement flexibility allows the machine
to clean under low furniture. There is a hand
operated on/off switch and auto-handle lock keeping
the handle in an upright position. This unit is
equipped with a safety feature that when unplugged
from the wall or the handle dropped, will automati-
cally reset to the off position.
The debris tray is used to catch unwanted carpet
debris and should be cleaned regularly and prior to
transporting.
This appliance conforms with international and
national safety directives: EN55014-2, EN5504-1,
EN61000-3-2/3-3, EN60335-1/2-10/2-69/2-67. IEC
60335-1/2/10/2-67/2-69. LVD 73/23/EEC.
Deluxe
This unit is equipped with an onboard spray pump
and solution tank. By using the onboard spraying
system a light treatment of chemical can be applied
to the carpet and brushed in during a single pass of
the machine.
Quick Dry Carpet Care System
Instructions
Test for colorfastness in an inconspicuous area
before use.
1. Vacuum carpet to remove loose soil.
2. Dilute iCapsol or Prochem ProCaps at 8oz. per
gallon of water (1:16) into the solution tank.
3. Pre-spray carpet to be cleaned at a rate of 600–
1000 sq. ft. per gallon of diluted solution. Do not
over wet.
4. No dwell time is required. Do not allow chemical
to dry before brushing.
5. Brush treated area to emulsify soils using the
Windsor iCapsol or other carpet-brushing
machine.
6. Allow to dry until dry to touch (approximately 20
minutes) before opening area to traffic.
7. Vacuum carpet when fully dry to remove encap-
sulated soil.
Tips: Pre-treat carpet spots with iCapsol Interim
cleaning solution. Work on a manageable area and
do not allow cleaning solution to dry on carpet before
brushing.
Deluxe
The Deluxe is provided with a removable solution
tank. To remove tank for filling and cleaning, press
the gray release button on the blue coupler located at
the top of the tank. Next remove upper straps from
mounting pegs. The tank will now freely separate
from the machine base. After filling tank remount to
machine by reversing the process mentioned above.
The proper 1:16 dilution ratio can be achieved by
adding one pint (16 oz.) of recommended chemical
and slowly filling the tank with water (2
gallons).Adding water slowly will help prevent
foaming.
To achieve a coverage rate of 600–1000 sq. ft. per
gallon using the onboard sprayer, spray solution only
during the forward stroke of operation. Use the back-
stroke to brush the chemical into the carpet.
86400910 Operator’s Manual - Carpet Maintainer

13
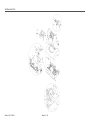
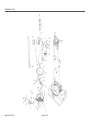
Operations
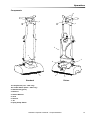
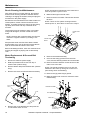
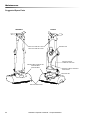
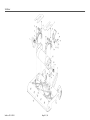
Components
1A. Stop Switch (red - 120V only)
1B. On/Off Switch (black - 230V only)
2. Start Switch (green)
3. Brushes
4. Handle Release
5. Tank
6. Strainer
7. Jet
8. Spray Pump Switch
6
2
4
3
2
5
1A
7
3
8
4
1B 1B
1A
86400910 Operator’s Manual - Carpet Maintainer
Deluxe
Standard

14
Operations
Machine Operation
Pre-Run Machine Inspection
Perform a pre-run inspection to find possible
problems that could cause poor performance or
lost time from breakdown. Check the rating plate
to confirm voltage and frequency is the same as
the power supply.
NOTE: A 10% variation in voltage is acceptable.
Starting Machine
NOTE: Perform pre-run machine check before
operating machine.
FOR SAFETY: Before starting machine, make
sure that all covers are in place and secured
properly.
1. Connect the machine to a power supply.
2. Release the handle lock.
3. A. Press green button to power on the
machine,120V only.
B. Set black on/off switch to “on” position,
230V only.
4. Press green button to start brushes.
After applying a light spray of diluted interim carpet
cleaner onto the carpet using a pressurized tank
sprayer, commence cleaning by pushing and pulling
the machine slowly over the wetted carpet. Move the
machine in multiple directions and overlapping
strokes.
For best results use Windsor iCapsol or Prochem
ProCaps products.
Starting Machine – Deluxe
NOTE: Perform pre-run machine check before
operating machine.
FOR SAFETY: Before starting machine, make
sure that all covers are in place and secured
properly.
1. Connect the machine to a power supply.
2. Release the handle lock.
3. A. Press green button to power on machine,
120V only.
B. Set black on/off switch to “on” position, 230V
only.
4. Press green button to start brushes.
5. Press and hold blue button to spray chemical.
Once machine is plugged in spray function is
operational.
Apply a light spray of diluted interim carpet cleaner
onto the carpet using the onboard spraying system.
Spray chemical while pushing the machine
forward.Brush the chemical into the carpet while
pulling the machine slowly over the wetted carpet.
Move the machine in multiple directions and overlap-
ping strokes.
For best results use Windsor iCapsol or Prochem
ProCaps products.
Flammable materials can cause an explosion or
fire. Do not use flammable materials with this
machine.
Les matières inflammables peuvent provoquer
une explosion ou un incendie. Ne pas utiliser de
matériaux inflammables dans les réservoirs.
86400910 Operator’s Manual - Carpet Maintainer

15
Operations
Transporting a Sprayer
1. This machine has the capability to mount a small
pump-up sprayer.
Transporting Chemical - Deluxe
1. This machine has the capability to mount
chemical bottles or trigger sprayers to the back of
the solution tank.
This machine is not intended to carry more than
30 pounds. Carrying more than 30 pounds could
cause damage to the machine.
Cette machine n'est pas conçue pour supporter
plus de 30 livres. Si le poids supporté était
supérieur à 30 livres, la machine pourrait être
endommagée.
Shut-down And Storage
1. Flush the spray jet and tank with hot water
(Deluxe only)
2. After flushing, uncouple quick disconnect to
prevent water from dripping out of front jet.
3. a. Press red button to power off machine
120V only.
b. Set black on/off switch to “off” position
230V only.
4. Lock handle in the upright position.
5. Disconnect the power cord from the power sup-
ply. Wind the power cord around the cable hold-
ers on the handle.
6. Remove the brushes for cleaning. See Brush
Cleaning and Maintenance section.
7. Clean debris tray.
The machine is now ready for storage until the next
use. Make sure to store your equipment in a dry place
to prolong the life of your machine. Storage outdoors
or unprotected could cause damage to your machine
or internal parts, therefore voiding your warranty.
86400910 Operator’s Manual - Carpet Maintainer

16
Maintenance
Brush Cleaning And Maintenance
After each session of carpet cleaning, the brushes
and the brush housing should be cleaned. Before
cleaning or changing the brushes, always unplug the
machine from the power supply.
Brushes are removed without tools. After handle is in
locked position, tilt the machine back and rest on
handle. To release brush from spring clip pull spring
clip away from brush end cap. Lift brush out of
machine.
The brushes may be soaked in warm or hot water
using mild detergent, and then rinsed with warm
water.
NOTE: Brushes with crushed bristles can often be
restored to original condition by soaking in hot
water.
Keep brushes clean and free from debris. Rotate
brushes after every use as this will increase the life
span of the brushes and ensure even wear.
Before reinstalling brushes, clean out machine brush
housing and hopper by wiping with a clean damp
cloth.
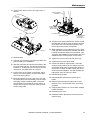
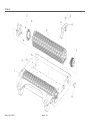
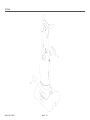
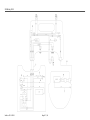
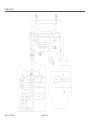
Motor Replacement & Grooved Belt
Tensioning
1. Disconnect machine power supply.
2. Detach quick disconnect hose from top of
solution tank. (Deluxe Only)
3. Remove elastic straps and solution tank. (Deluxe
Only)
4. Remove two dome screws and dome assembly.
5. Remove the circuit breaker boot and push the
circuit breaker clear of cover.
NOTE: All directions mentioned in this manual are
from the operator’s point of view.
6. Mark left and right on the lift cams.
7. Remove the two cam bolts. This will also free the
lift cams.
NOTE: There are four plastic bushings that the
handle pivots on, leave them on the motor clamps.
8. Remove the handle assembly.
9. Unscrew the wiring grommet from the main
cover, and set retaining bracket and screw aside.
10. Remove the front and back screws and move the
main cover to the side.
NOTE: The handle assembly and cover are still
attached to the frame by wiring. Be careful not to
pinch wiring when reassembling.
11. Remove the (2) plastic finger guards.
12. Mark the tension set screws for reference when
reassembling.
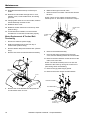
DOME
COVER
CIRCUIT BREAKER
& BOOT
WIRING GROMMET
LIFTING CAM
LIFTING CAM
LEFT
RIGHT
LEFT SIDE
RIGHT SIDE
LIFT BRACKET
MOTOR CLAMP
MOTOR
PLASTIC FINGER
GUARD (2)
86400910 Operator’s Manual - Carpet Maintainer

17
Maintenance
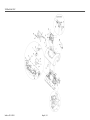
13. Unplug motor wires. Loosen end cap screws, 1
full turn.
14. Back off set screws to release belt tension.
15. Remove the motor clamps and lift brackets.
16. Remove belts and belt covers.
17. Lift motor out of housing. Remove pulleys and
adjustment bracket with screw. Set parts aside for
re-installation.
18. Take the new motor and loosen the screws in the
long rear drive end cap. This allows the end cap
to swivel +/- 20 degrees. Do not remove the end
cap screws, only back them off 1 full turn. Install
adjustment bracket to the opposite end. Torque to
40 in-lbs (4.5Nm)
19. Put the motor in the cradle on the frame. Place
pulleys onto motor shaft's. Loop the drive belt
onto the right motor drive pulley
NOTE: Do not let the pulleys extend more than
0.5mm (0.02in) past the motor shaft.
20. Reinstall the motor clamps, only tighten the rear
screws. The front screws will be tightened later.
21. From the bottom, remove the left driver plate
(front brush).
22. Loop and align the belt on the motor pulley.
23. Install one screw from the service kit (P/N 9.841-
005.0) into the pulley, captured by the belt.
24. Rotate the pulley to install the second captured
screw.
25. Use the 2 screws to rotate the assembly to install
the third screw.
26. Rotate the pulley and guide the belt onto the
pulley. To ensure proper alignment, reverse
rotation may be necessary. Use caution when
prying against the frame.
27. Gently pry the motor up from the frame and
tighten the left set screw. Use the kit’s distance
tool to center the motor and set the belt tension.
28. Repeat the previous step for the right set screw.
29. Place lift brackets on motor, align over pins.
30. Tighten the screw in the long gear drive cap.
31. Tighten all four motor clamp bolts.
32. Check both belts for equal tension. The belts
should not sag under their own weight, however,
should flex easily when squeezed with fingers. If
the tension is clearly unequal, loosen the motor
mount bolts and re-tighten. This will equalize the
belt tension from on side to the other.
33. Reinstall finger guards.
MOTOR
BELT
BELT
END CAP
SCREWS
ACCESS HOLE
FOR LOWER
SCREW
PULLEY
PULLEY
LEFT SIDE
RIGHT SIDE
REAR
FRONT
ROTATE MOTOR
ROTATE MOTOR
HANDLE MOUNT
MOTOR CLAMPS
ASSEMBLY
LEFT HAND
GEAR DRIVE
RIGHT HAND
GEAR DRIVE
LIFT BRACKETS
86400910 Operator’s Manual - Carpet Maintainer

18
Maintenance
34. Reinstall lift brackets with top surface lip on
inside.
35. Reinsert circuit breaker through hole in cover,
reattach cover, circuit breaker boot, and wiring
grommet.
36. Verifying lifter cams are on correct side, reattach
handle assembly and belt covers.
37. Reattach dome cover.
38. Reattach solution tank and reconnect top hose.
(Deluxe Only)
39. If new belts were installed, run the machine
unloaded for 10 minutes to seat them properly.
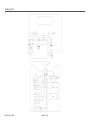
Motor Replacement & Toothed Belt
Tensioning
1. Disconnect machine power supply.
2. Detach quick disconnect hose from top of
solution tank. (Deluxe Only)
3. Remove elastic straps and solution tank. (Deluxe
Only)
4. Remove two dome screws and dome assembly.
5. Remove the circuit breaker boot and push the
circuit breaker clear of cover.
6. Mark left and right on the lift cams.
7. Remove the two cam bolts. This will also free the
lift cams.
NOTE: There are four plastic bushings that the
handle pivots on, leave them on the motor clamps.
8. Remove the handle assembly.
9. Unscrew the wiring grommet from the main
cover, and set retaining bracket and screw aside.
10. Remove the front and back screws and move the
main cover to the side.
NOTE: The handle assembly and cover are still
attached to the frame by wiring. Be careful not to
pinch wiring when reassembling.
11. Remove the (2) plastic finger guards.
12. Remove the motor clamps and lift brackets.
DOME
COVER
CIRCUIT BREAKER
& BOOT
WIRING GROMMET
LIFTING CAM
LIFTING CAM
LEFT
RIGHT
LIFT BRACKET
MOTOR CLAMP
MOTOR
PLASTIC FINGER
GUARD (2)
86400910 Operator’s Manual - Carpet Maintainer

19
Maintenance
13. Unplug motor wires. Loosen end cap screws, 1
full turn.
14. Remove belts.
15. Lift motor out of housing, and remove pulleys. Set
pulleys aside for re-installation.
16. Take the new motor and loosen the screws in the
long rear drive end cap. This allows the end cap
to swivel +/- 20 degrees. Do not remove the end
cap screws, only back them off 1 full turn.
17. Put the motor in the cradle on the frame. Place
pulleys onto motor shaft's. Loop the drive belts
onto motor drive pulleys.
18. Place lift brackets on motor, align over pins. Put
the motor/clamp mount assembly over the motor
and lightly snug the retaining bolts. The motor
must be able to turn inside the motor clamps. If
clamps are too tight to move the motor by hand,
loosen clamp bolts.
19. Turn the motor body inside motor clamps so that
the left hand gear drive pivots upwards. Take all
of the slack out of the left hand gear drive belt
and snug left hand motor clamp bolts.
20. While holding the motor stationary, turn the right
hand gear drive downward so that the gear drive
housing touches the setscrew in the frame. This
set screw was installed on the assembly line and
establishes the correct position for the motor.
21. Tighten the screw in the long gear drive cap.
22. Tighten all four motor clamp bolts.
23. Check both belts for equal tension. The belts
should not sag under their own weight, however,
should flex easily when squeezed with fingers. If
the tension is clearly unequal, loosen the motor
mount bolts and retighten. This will equalize the
belt tension from on side to the other.
24. Reinstall finger guards
25. Reinstall lift brackets with top surface lip on
inside.
26. Reinsert circuit breaker through hole in cover,
reattach cover, circuit breaker boot, and wiring
grommet.
27. Verifying lifter cams are on correct side, reattach
handle assembly.
28. Reattach dome cover.
29. Reattach solution tank and reconnect top hose.
(Deluxe Only)
END CAP
SCREWS
ACCESS HOLE
FOR LOWER
SCREW
PULLEY
PULLEY
MOTOR
BELT
BELT
ROTATE MOTOR
ROTATE MOTOR
HANDLE MOUNT
MOTOR CLAMPS
ASSEMBLY
LEFT HAND
GEAR DRIVE
RIGHT HAND
GEAR DRIVE
LIFT BRACKETS
86400910 Operator’s Manual - Carpet Maintainer

20
Maintenance
Machine Maintenance
The Maintainer requires very little maintenance. Wipe
down the machine periodically with a clean cloth. DO
NOT spray water directly over the top of machine.
Deformation of the brush bristles can result in
unbalanced running and excessive vibrating or
jumping.
La déformation des poils de la brosse peut
entraîner un fonctionnement déséquilibré et
causer des vibrations ou sauts excessifs.
The machine is fitted with a circuit breaker. In the
unlikely event of overloading, the circuit breaker will
automatically trip. It can be reset after approximately
30 seconds (or when the machine cools down) by
pushing the set button located on the cover housing.
Daily Maintenance
1. Clean and inspect brushes.
2. Clean and inspect brush housing, debris tray and
machine. Rinse debris tray if needed.
3. Inspect power cord for wear or damage. This
cable will lie on wet carpet. To prevent electrical
shock replace cords that are frayed or have
cracked insulation immediately.
4. Flush the tank, pump and spray jet with hot water
(Deluxe only).
5. Clean Strainer.
Periodic Maintenance
1. Check all handles, switches, electrical cables
and connections on your machine for damage.
Repair or replace immediately.
2. Inspect and/or replace brushes.
Replace brushes when main bristles are worn to
the same level as the yellow indicator bristles.
Check spray pattern. Clean or replace jet if the pat-
tern is blocked or uneven
Annual Maintenance
1. Check all bearings for noise and wear.
2. Check motor for operation.
3. Check overall machine for operation.
4. Check belts for wear and change belts every
second year.
86400910 Operator’s Manual - Carpet Maintainer
La page est en cours de chargement...
La page est en cours de chargement...
La page est en cours de chargement...
La page est en cours de chargement...
La page est en cours de chargement...
La page est en cours de chargement...
La page est en cours de chargement...
La page est en cours de chargement...
La page est en cours de chargement...
La page est en cours de chargement...
La page est en cours de chargement...
La page est en cours de chargement...
La page est en cours de chargement...
La page est en cours de chargement...
La page est en cours de chargement...
La page est en cours de chargement...
La page est en cours de chargement...
La page est en cours de chargement...
La page est en cours de chargement...
La page est en cours de chargement...
La page est en cours de chargement...
La page est en cours de chargement...
La page est en cours de chargement...
La page est en cours de chargement...
La page est en cours de chargement...
La page est en cours de chargement...
La page est en cours de chargement...
La page est en cours de chargement...
La page est en cours de chargement...
La page est en cours de chargement...
La page est en cours de chargement...
La page est en cours de chargement...
La page est en cours de chargement...
La page est en cours de chargement...
La page est en cours de chargement...
La page est en cours de chargement...
La page est en cours de chargement...
-
 1
1
-
 2
2
-
 3
3
-
 4
4
-
 5
5
-
 6
6
-
 7
7
-
 8
8
-
 9
9
-
 10
10
-
 11
11
-
 12
12
-
 13
13
-
 14
14
-
 15
15
-
 16
16
-
 17
17
-
 18
18
-
 19
19
-
 20
20
-
 21
21
-
 22
22
-
 23
23
-
 24
24
-
 25
25
-
 26
26
-
 27
27
-
 28
28
-
 29
29
-
 30
30
-
 31
31
-
 32
32
-
 33
33
-
 34
34
-
 35
35
-
 36
36
-
 37
37
-
 38
38
-
 39
39
-
 40
40
-
 41
41
-
 42
42
-
 43
43
-
 44
44
-
 45
45
-
 46
46
-
 47
47
-
 48
48
-
 49
49
-
 50
50
-
 51
51
-
 52
52
-
 53
53
-
 54
54
-
 55
55
-
 56
56
-
 57
57


Windsor iCapsol Mini Deluxe Le manuel du propriétaire
- Taper
- Le manuel du propriétaire
- Ce manuel convient également à
dans d''autres langues
Documents connexes
-
Windsor BDS 43/Duo C Le manuel du propriétaire
-
-
-
-
Kärcher Armada® BRC 40/22 C Le manuel du propriétaire
-
-
-
-
-
Autres documents
-
Prochem blazer gt Le manuel du propriétaire
-
Clarke Image 20 IX Manuel utilisateur
-
Clarke IMAGE 16 120V Manuel utilisateur
-
-
 UNELVENT TD MIXVENT SILENT Le manuel du propriétaire
-
 Airmax KoiAir KASeries Installation & Maintenance
-
Cricket AutoMop CKTA24H Operating Instructions Manual
-
Minuteman FR17115-11 Manuel utilisateur

