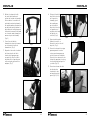
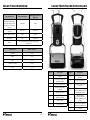
Tornado TS050-W13-U Le manuel du propriétaire
- Catégorie
- Machine à plancher
- Taper
- Le manuel du propriétaire
Ce manuel convient également à

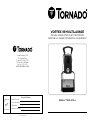
Model No. TS050-W18-U
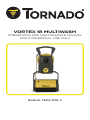
VORTEX 18 MULTIWASH
OPERATIONS AND MAINTENANCE MANUAL
FOR COMMERCIAL USE ONLY

2 3
Getting Started
Introduction 2
Warranty 3
Grounding Instructions 4
Important Safety Instructions 5-6
Cleaning Agents 7
Technical Specifications 8
Brush Selection 9
Operating Instructions
Key Features 10
Assembly 11-13
Controls 14-16
Operation 17-18
Cleaning 19-21
Transport and Storage 22
Maintenance 23
Accessories 24
Fault Diagnosis 25
CONTENTS INTRODUCTION
Your new Tornado unit is a high quality, precision-made product. All parts used
in the manufacturing of this unit have passed rigid quality control standards prior
to assembly. Please safeguard the original receipt/invoice given at the time of
purchase. If you experience any problems with your unit during the warranty period,
the original receipt/invoice will act as proof of purchase.
Upon receipt, inspect outer box for exterior damage. Unpack all internal parts,
ensure no hidden damage is found.
Each unit is tested and thoroughly inspected prior to shipping. If damage is
discovered, immediately notify the transportation company that delivered your
machine and request an inspection. As a manufacturer, we are unable to act upon
any claim for concealed damage and you must originate the claim. Be sure to keep
the carton, packing inserts, and carrier’s receipt until the inspector has verified
your claim.
Protect the environment
Please dispose of packaging materials in an
environmentally safe way according to local waste
disposal regulations.
Always remember to recycle.

4 5
Warranty
Within 30 days of purchase, to activate product warranty, go to:
https://tornadovac.com/services/warranty-registration-form.aspx
For warranty information go to www.tornadovac.com.
Warning Labels
Prior to operating the unit, read and understand completely
this owner’s manual paying special attention to warning labels.
These labels indicate a potentially hazardous situation that
could result in death or serious injury if not avoided. Use only as
described in this manual.
Important
There are no owner serviceable parts inside this machine.
Removal of screws and accessing internal components will void
all warranty claims.
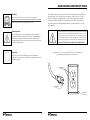
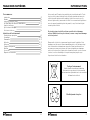
GROUNDING INSTRUCTIONS
GROUNDING
PIN
GROUNDING
OUTLET
GROUNDED
OUTLET BOX
This appliance must be grounded. If it should electrically malfunction, grounding
provides a path of least resistance for the current to reduce the risk of electric
shock. This machine is equipped with a cord having an equipment grounding
conductor and grounding plug. The plug must be inserted into an appropriate
outlet that is properly installed and grounded in accordance with all local codes
and ordinances.
Improper connection of the equipment grounding conductor can result
in a risk of electric shock. Check with a qualified electrician or service
person if you are in doubt as to whether the outlet is properly grounded.
Do not modify the plug provided with the appliance. If the plug will not
fit the outlet, have the proper outlet installed by a qualified electrician.
DO NOT REMOVE THE GROUNDING PIN FOR ANY REASON.
This appliance is for use on a nominal 115-volt circuit and has a
grounding plug that appears as shown below.

6 7
IMPORTANT SAFETY
INSTRUCTIONS
Read and understand this owner’s manual and all labels on the unit
before operating. Safety is a combination of common sense, staying
alert, and knowing how your unit works. To reduce the risk of personal
injury or damage to your unit use only as indicated in this manual.
FOR COMMERCIAL USE ONLY
To reduce the risk of fire, electrical shock, or injury,
the instructions below must be read and understood
completely prior to machine operation
SAVE THESE INSTRUCTIONS
IMPORTANT:
The manufacturer cannot accept responsibility for
damage caused when the appliance is not used according to the instructions, or for
uses other than those for which it was intended.
WARNING:
• This machine must only be used for the
manufacturer’s approved application as
described in this manual.
• The machine must be unpacked and assembled
in accordance with these instructions before
connecting to the electrical supply.
• Only genuine accessories and spare parts
provided with the machine or those approved
by the manufacturer should be used. The use
of other accessories may impair the safety of
the machine. All repairs must be performed by a
qualified service agent.
• DO NOT modify the machine from its original
design.
• Operators must be fully trained in the use of the
machine in accordance with these instructions
and be able to perform regular user maintenance
as outlined in this manual.
• Operators should be physically capable to
maneuver, transport and operate the machine.
• Operators should be able to recognize unusual
operation of the machine and report any
problems.
• This machine is not intended for use by persons
(including children) with reduced physical,
sensory or mental capabilities, or lack of
experience and knowledge unless they have
been given instruction concerning use of the
machine and are under supervision by a person
responsible for their safety.
• Keep children and unauthorized persons away
from the machine when in use.
DO NOT use the machine as a toy.
• DO NOT use with a damaged cord or plug. If it
has been damaged, left outdoors or dropped in
water, return it to a service center for inspection
and/or repair.
• DO NOT use where hazardous dust is present.
• DO NOT use in an explosive environment.
• DO NOT pick up or use near flammable or
combustible fluids, hazardous dusts or vapors.
• CAUTION –If it is suspected that there is
hazardous dust or flammable/corrosive material,
stop cleaning the area immediately and consult
your supervisor.
• DO NOT use to clean up any
burning or lighted materials such as
cigarettes, matches, ashes, or other
combustible objects.
• Only use the machine on firm, level
surfaces. DO NOT use the machine on
gradient or slope of more that 2%.
IMPORTANT SAFETY
INSTRUCTIONS
SAVE THESE INSTRUCTIONS
• CAUTION –This machine is for dry, indoor
use only and should not be used or stored
outdoors or in wet conditions.
Protect from rain.
• Take care when using this machine near
the top of stairs to avoid loss of balance.
• DO NOT cover the machine when in use.
• DO NOT run the machine dry as this
could damage the floor surface and/or the
machine itself.
• DO NOT leave the machine running
unattended.
• Keep hair, loose clothing, hands, feet,
and all other parts of the body away from
openings and moving parts. Do not put
hands under base as rotating parts can
cause injury.
• DO NOT put any object into openings. DO
NOT use with any opening blocked. Keep
free of dust, debris and anything that may
reduce airflow.
• DO NOT use volatile or combustible
solvents (e.g., diesel, petrol, PA,
trichloromethane) nor any corrosive, toxic,
or highly irritant substance to wash floors,
even if diluted. In the event of accidental
contact with any such substances (e.g.,
due to spills) follow the decontamination
procedures in force at the user site. If
in any doubt about the condition of the
machine, contact Tornado or the dealer/
agent who supplied the machine.
• DO NOT leave the machine unattended
when plugged in. Unplug from outlet
when not in use and before changing
brushes or attempting any maintenance or
adjustment.
• DO NOT fill the machine with water hotter
than 104°F (40°C).
• When used on escalators, ensure the
machine is positioned at the bottom of
the escalator with the escalator moving
towards the operator.
• DO NOT pull or carry by cord, use cord as
a handle, close a door on cord, or pull cord
around sharp edges on corners.
• DO NOT run machine over cord. Keep cord
away from heated surfaces.
• DO NOT unplug by pulling on cord. To
unplug, grasp the plug, not the cord. Do
not handle plug or machine with wet hands.
Turn off all controls before unplugging.
• Connect only to a properly grounded
outlet. See grounding instructions.
• Use care to keep electrical supply cable
from contacting moving parts such as floor
brushes.
• Make sure voltage and frequency at the
wall receptacle correspond with that
indicated on nameplate before plugging in
machine.
• The machine must be kept clean and in
good condition with regular inspections of
the power cord and plug for signs of any
damage. If any parts are damaged, they
shall only be replaced by an approved part
by the manufacturer, its service agent or
a similar qualified person in order to avoid
a hazard.
• Only replace the power cord with original
OEM equipment.

8 9
• When using cleaning and care agents, the manufacturer’s danger warnings must
be followed, and proper PPE must be worn per manufacturer’s instruction.
• Only use low-foaming, non-combustible cleaning agents which DO NOT contain
generally health-hazardous substances.
•
Please ensure that after each use, any chemical residue is rinsed out with clean water.
Let the machine do the work. Grip the handle as lightly as possible.
• Wear suitable footwear to avoid slipping.
• Wear suitable clothing to keep dry.
• Do not smoke when using the machine.
• Do not use excessively foaming or highly corrosive cleaning solutions. If operating
on a flooded floor, ensure that water depth does not exceed 6mm (1/4 inch).
CLEANING AGENTS
OPERATOR GUIDELINES
The manufacturer cannot accept responsibility for damage caused
when the appliance is not used in accordance with the instructions
provided or for uses other than those for which it was intended.
This machine is heavy. Do not attempt to lift the machine
without assistance. Incorrect lifting techniques may result in
personal injury.
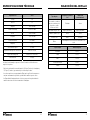
TECHNICAL SPECIFICATIONS
Handle vibration does not exceed 2.5 m/s2 when operating on a smooth, hard surface.
• Noise levels measured at a distance of 3.28 feet (1 meter) from machine and 5.25
feet (1.6 meters) above floor when washing a hard floor.
• Above values are approximate. Since the company’s policy is to continuously
improve the product, there could be changes without prior notice.
• Cleaning Capacity above is theoretical as there are potentially many variances in
machine operation.
Specification Value
Voltage 115
Hertz 60
Cleaning Width 18 in / 440 mm
Handle Height 44 in / 1110 mm
Width 22 in / 550 mm
Length 15 in / 390 mm
Motor Power 1150 Watts
Amperage 10
Brush Speed 670 RPM
Solution Tank Capacity 1 Gallon / 4 Liters
Cleaning Capacity 4844 ft2/hr. / 450 m2/hr.
Noise Level 71 db(A)

10 11
BRUSH SELECTION
Floor Type First Time Cleaning Maintenance Cleaning
Grouted Tile, Ceramic,
Mosaic, Wood, Sports
Floors, Rubber, Vinyl Tile Standard Soft
Short Pile Carpet Carpet Carpet
Marble, Granite, Slate Soft Soft
Smooth Concrete Hard Standard
Others To suit individual floor conditions
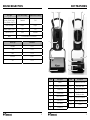
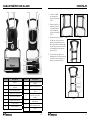
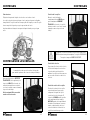
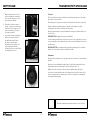
KEY FEATURES
Item Description
1 Handle
2 Solution Control Button
3 Power Cord
4 Solution Tank
5 Handle Bracket
6 Solution Hose
7 Front Brush
8 Rear Brush
Item Description
9 Handle Release Pedal
10 Dirty Water Tank
11 Dirty Water Tank Lid
12 Pump Control Cable
Routing Location
13 Power Cord Retainer
14 Power Cord Wrap Hooks
15 Cable
1 142 3 15
13
5
7 8
10
11
12
9
4
6
Brush Type Part Number
Standard 93216
Soft 93212
Hard 93218
Escalator 35086
Side 93094

12 13
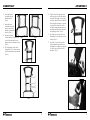
ASSEMBLY
Fig. 3
Fig. 2
Fig. 4
1
2
3
4
5
ASSEMBLY
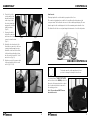
Fig. 5
Fig. 6
Fig. 7
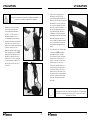
1. Insert the handle
assembly into the
handle bracket.
(Fig.1)
2. Using the knob,
star washer and flat
washer, fasten the
handle to the handle
bracket. (Fig. 2)
3. Ensure the handle
solution tank pin is toward the
front of the unit and the cord
wrap hooks are towards the rear.
(Fig. 3)
4. Feed the pump control cable
through the (5) locations shown
in the handle bracket and handle.
(Fig. 4)
Fig. 1
5. Plug the end of the pump control
cable into the socket in the handle
assembly. This plug is not polarity
sensitive and will fit into the handle
either way. Ensure there is enough
slack at the bottom of the cable
so that the pump housing lid is not
raised when the handle is moved to
the working position. (Fig. 5)
6. Feed the loop of the power cord
through the slot in the power cord
retainer. (Fig. 6)
7. Hook the loop over the lip of the
retainer and pull any slack back
through the slot. Wrap cord around
4 cord hooks on the back of the
machine. (Fig. 7)

14 15
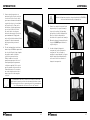
ASSEMBLY
Fig. 10
Fig. 9
Fig. 12Fig. 11
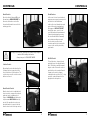
CONTROLS
BRUSH CONTROLS
How it works:
Cleaning liquid in the solution tank is sprayed onto the floor.
The counter rotating brushes scrub the floor and throw the dirty water on the
conveyor drum. The front brush does most of the scrubbing and drying. The rear
brush completes the scrubbing and collects the remaining water from the floor.
The blade fitted to the recovery tank wipes the drum and collects the dirty water.
To put machine in TRANSPORT MODE,
move red lever to the DOWN position. In
this mode, the transport wheels contact
the floor when the handle is moved to
the working position.
Note: The machine will NOT turn on
when in this mode.
The handle must be in the upright and locked
position to change the transport / work lever.
8. Place the lip of the
solution tank on the
handle bracket and
rotate it up so that
the solution tank pin
engages the solution
tank pin retainer.
(Fig. 8)
9. Pressing the white
tab on the connector
will release the elbow
connector from the tank.
(Fig. 9)
10. Attach the hose barb end of the
black elbow connector to the hose
coming from the pump housing.
Attach the other end of the elbow
to the tank by pushing the elbow
into the connection until it “clicks”
and locks in. (Fig. 10)
11. Attach one end of the power cable
to the unit and the other to a wall
outlet. (Fig. 11 & 12)
Fig. 8

16 17
CONTROLS
Brush Controls:
Move the slider all the way UP to put
the machine in WORKING MODE. In
this mode, the brushes contact the
floor when the handle is moved to the
working position.
Solution Control:
By pushing the red solution button, the
cleaning solution is sprayed onto the
floor from the front of the machine. The
solution stops once the solution control
button is released.
Brush Contact Control:
Brush contact control is adjustable in 4
steps in order to compensate for brush
wear and control scrubbing effect.
Contact is MINIMUM when the knob is
fully down and MAXIMUM when fully
raised. If the machine does not move
when the handle is lowered, slide the
brush contact control slider up one step.
Keeping slider in the UP, working position while transporting the
machine WILL damage the brushes.
Always transport in TRANSPORT MODE.
Circuit Breaker:
In the event of circuit overload due to
improper power supply or unexpected
obstruction to the brush/drum
rotation, the circuit breaker trips and
protects the motor from damage. If
this happens, UNPLUG THE UNIT,
identify the cause, correct it, and
reset the breaker after a minimum of
1 minute from tripping by pressing
the circuit breaker button manually
and continue working as normal.
If no obstruction can be found,
consult a qualified electrician as the
source circuit could be potentially
problematic.
On / Off Control:
To start the motor, depress the red
pedal with your foot and pull handle
back. The brushes and the drum will
begin to rotate. Release the red foot
pedal in this position and pull handle
towards you in order to engage
rotating brushes onto the floor. To stop
operation, return the handle to the
upright and locked position.
CONTROLS

18 19
OPERATION
1. Fill the freshwater tank with
cleaning solution at a maximum
temperature of 104°F (40°C).
Add cleaning solution per
manufacturer’s recommendations.
2. Press the red foot pedal lightly
with your foot and pull handle back
to start the motor. The brushes
and the drum will begin to rotate.
Pulling the handle towards you
WITHOUT pressing the pedal
lowers the machine and engages
the rotating brushes with the floor.
To stop working, return the handle
to the upright and locked position.
Prior to machine operation, pre-sweep floor to
remove debris before using the unit.
OPERATION
3. Move forward while sparingly
pushing the solution control button.
This button should only be pushed
intermittently based on the floor
type and amount of soil on the floor.
For tiled or stone floors apply very
little solution. Release the solution
control button to stop the solution
discharge approximately 12 inches
before end of forward motion.
Continue to move forward up to the
wall without pressing button.
4. Pull the machine backwards in the
same track WITHOUT discharging
any solution. When you reach the
starting point, change the track and
repeat the steps above. When you
are changing the track, allow some
overlap with the cleaned area to
ensure complete coverage. In case
of large halls, make a U-turn while
moving forward. If quick drying is
required, move on the same track
without discharging solution.
Should the machine fail to operate, please refer to the
troubleshooting section in the back of this instruction manual.
If the problem/remedy is not listed, please contact the
Tornado Technical Service Department

20 21
CLEANING
1. When floor cleaning operation is
complete, return handle to upright
and locked position and unplug the
power cord. Wrap the power cord
around the hooks on the handle.
2. Move the transport lever to the
DOWN position to remove brushes
from floor.
3. Lift the recovery tank lid and
remove recovery tank. Empty tank
and rinse completely with clean
water. Clean steel wiper blade prior
to re-inserting recovery tank.
Prior to cleaning, ensure unit is OFF and
disconnected from power supply.
CLEANING
Avoid touching the sharp edges of the dirty water
tank as injury to hands can occur.
4. To prevent possible clogging of the
solution lines, empty any unused
solution from the tank, lines and
filter and flush completely with
clean water. Store dry.
5. Release brushes by removing brush
shafts held in by quick release
retaining balls.
6. Remove brushes and wash them
either by dipping in a bucket/sink or
in running water.
Dispose of dirty water in accordance with all local, state,
and federal hazardous material disposal regulations.

22 23
CLEANING
7. Turn machine on its side and wipe
clean the rubberized drum and
machine body with clean, damp cloth
.
8. Re-install the brushes after
washing. It is easier to push the
brush shaft in from the right-
hand side of the machine (side of
electrical cable and foot pedal).
9. The purpose of the small multi-
colored plastic plugs is to provide
a method of brush identification
to be used in different areas.
Additionally, this helps the operator
easily identify the brushes in order
to avoid cross contamination.
Transport:
Take extreme care when moving the machine up or down steps or stairs.
Incorrect lifting techniques may result in personal injury.
As stated earlier in this manual, this machine is heavy. Do not attempt to lift the
machine without assistance.
Carefully wrap the power cord and store in a dry, indoor location.
DO NOT expose the machine to rain or moisture.
When transporting the machine, ensure that all components, tanks and removable
parts are securely fastened and that the power cord and plug are not trailing.
DO NOT lift or transport the machine while it contains liquid as this will add
considerable weight to the unit.
When transporting the machine, the handle should be locked in the upright position.
Storage:
Always store the machine with the handle in the vertical position which will turn the
machine OFF.
Wrap the power cord around the power cord wrap hooks ensuring that the plug is
not trailing on the floor.
Always unplug, empty, wipe down and dry the machine after use.
Both the solution and recovery tanks should be emptied and flushed out with clean
water to ensure the seals and pumps are free from any cleaning detergents.
TRANSPORT AND STORAGE
Store machine in a dry indoor area only.

24 25
MAINTENANCE
Besides those outlined above, all additional servicing
and repairs should only be performed by an
Authorized Tornado Servicing Agent.
Prior to performing any maintenance, ensure unit
is OFF and disconnected from power supply.
Recommended operator checks prior to use:
1. BODY OF MACHINE – Wipe down with a clean, damp cloth.
2. POWER CORD – Regularly inspect sheath, plug, and cord anchorage for
damage or loose connection. Only replace power cord with OEM specified
replacement part.
3. BRUSHES – For maximum life, wash the brushes regularly. Ensure machine is
in TRANSPORT MODE when not in use. Store additional brushes in a vertical
position to avoid bending of bristles. Check for permanent bending of bristles
in a particular direction. This may occur if the machine is not operated for
several days without removing the brushes which is not recommended. If this
occurs, reverse the brush so that the bent bristles can flex back to original
position.
4. WIPER BLADE – After an extended period of use, the wiper blade may wear.
If this occurs, the water collection performance will decrease and should be
replaced by an authorized service center.
5. SOLUTION FEED FILTER – The filter prevents clogging of the pump and spray
nozzle and should be periodically cleaned.
6. NOZZLE MAINTENANCE – If the spray of the nozzle becomes blocked, slide
the nozzle cover off and remove the nozzle. Wash the nozzle in clean water
ensuring that the nozzle is clear prior to refitting.
ACCESSORIES
The side brush can be used to clean corners near the walls.
UNPLUG MACHINE PRIOR TO SIDE BRUSH INSTALLATION.
Do not use side brush in a room without mop
boards. Walls will get dirty.
Side Brush Installation:
1. Remove the front brush and brush shaft.
2. Fix the shield assembly on the side plate.
3. Insert the side brush shaft through the
shield and main brush.
Side Brush Use:
1. Tilt the machine at an angle that will allow
the rear brush to collect the dirty water.
2. Use side brush only for washing edges
and corners of floor.

26
FAULT DIAGNOSIS
Do not use side brush in a room without mop
boards. Walls will get dirty.
TROUBLE REASON REMEDY
Machine fails to start
Transport Slider is in
DOWN position.
Move Transport Slider to
the working (UP) position.
Circuit breaker has tripped.
Remove any obstruction
to the brush/drum. Wait
1 minute and reset the
circuit breaker.
Transport wheels not
raising off of the ground
when handle lowered.
Check for debris and
clean machine.
Lack of
voltage / electrical supply.
Check power cord, plug,
and socket outlet.
Machine fails to pick up
water from the floor.
Incorrectly fitted /
damaged recovery tank.
Refit or replace
recovery tank.
Worn brushes. Check brush pressure.
Replace brushes if needed.
Drum not rotating. See below.
Drum not rotating. Debris around drum or base
of machine.
Clean drum and base
of machine.
Drum is rotating, but
brushes are not. Debris around brushes. Clean drum and base of
the machine.
Machine fails to spray
solution onto the floor.
Faulty pump.
If there is no noise present
from the pump, check
that the pump cable is
fitted correctly.
Improper water hose
connection.
Check the quick lock
connector for proper fitting.
Solution tank empty. Fill solution tank.
Clogged jet. Clean jet.
Blocked filter or faulty
valve in solution tank.
Clean / replace filter
or valve.
Motor makes a humming
noise but does not turn.
Debris around drum and
base of machine.
Clean drum and base
of machine.
T-OM-VOR18 04/2022
Tornado Industries, LLC
3101 Wichita Court
Ft. Worth, TX 76140-1755
Phone: 800-VACUUMS
Fax: 1-817-551-0719
WWW.TORNADOVAC.COM
Record of Purchase
Serial Number:
Purchase Date:
Dealer:
Phone Number:

29
N.° de modelo TS050-W18-U
VORTEX 18 MULTIWASH
MANUAL DE OPERACIONES Y
MANTENIMIENTO
PARA USO COMERCIAL ÚNICAMENTE
Pasos iniciales
Introducción 30
Garantía 31
Instrucciones de conexión a tierra 32
Importantes instrucciones de seguridad 33-34
Agentes de limpieza 35
Especificaciones técnicas 36
Selección de los cepillos 37
Instrucciones de operación
Características clave 38
Montaje 39-41
Controles 42-44
Operación 45-46
Limpieza 47-49
Transporte y almacenamiento 50
Mantenimiento 51
Accesorios 52
Diagnóstico de fallas 53
CONTENTS

30 31
INTRODUCCIÓN
Su nueva unidad Tornado es un producto de alta calidad fabricado con precisión.
Todas las piezas utilizadas en la fabricación de esta unidad han pasado estrictos
estándares de control de calidad antes del montaje. Conserve el recibo o la factura
original entregados al momento de la compra. Si experimenta algún problema con
su unidad durante la vigencia de la garantía, el recibo o factura original actuará
como prueba de compra.
Al recibir la unidad, inspeccione la caja exterior en busca de daños exteriores.
Desembale todas las piezas internas y asegúrese de que no presenten daños
ocultos.
Cada unidad se prueba e inspecciona minuciosamente antes del envío. Si descubre
daños, notifique inmediatamente a la empresa de transporte que entregó su
máquina y solicite una inspección. Como fabricante, no podemos responder a
ningún reclamo por vicios ocultos y usted debe iniciar el reclamo. Asegúrese de
guardar la caja de cartón, los folletos y el recibo del transportista hasta que el
inspector haya verificado su reclamo.
Proteja el medioambiente
Deseche los materiales de embalaje de forma segura
para el medio ambiente de acuerdo con las normas
locales sobre la eliminación de residuos.
Recuerde siempre reciclar.
Garantía
Dentro de los 30 días posteriores a la compra, para activar la garantía del
producto, visite:
https://tornadovac.com/services/warranty-registration-form.aspx
Para obtener información sobre la garantía, visite www.tornadovac.com.
Etiquetas de advertencia
Antes de operar la unidad, lea y comprenda completamente
este manual del propietario, prestando especial atención a las
etiquetas de advertencia. Estas etiquetas indican una situación
potencialmente peligrosa que podría provocar la muerte o
lesiones graves si no se evita. Use solo como se describe en este
manual.
Importante
No hay ninguna pieza reparable por el propietario dentro de
esta máquina. La extracción de tornillos y el acceso a los
componentes internos anularán todos los reclamos de garantía.

32 33
INSTRUCCIONES DE CONEXIÓN A TIERRA
GROUNDING
PIN
GROUNDING
OUTLET
GROUNDED
OUTLET BOX
Este aparato debe estar conectado a tierra. En caso de mal funcionamiento
eléctrico, la conexión a tierra proporciona una vía de menor resistencia para
la corriente, reduciendo así el riesgo de descarga eléctrica. Esta máquina está
equipada con un cable que tiene un conductor de conexión a tierra del equipo y un
enchufe de conexión a tierra. El enchufe debe insertarse en una toma de corriente
apropiada que esté correctamente instalada y conectada a tierra de acuerdo con
todos los códigos y ordenanzas locales.
La conexión incorrecta del conductor de conexión a tierra del
equipo puede resultar en un riesgo de descarga eléctrica. Consulte
con un electricista calificado o personal de servicio si tiene dudas
sobre si el tomacorriente está conectado a tierra correctamente. No
modifique el enchufe provisto con el artefacto. Si el enchufe no encaja
en el tomacorriente, haga que un electricista calificado instale el
tomacorriente adecuado.
NO QUITE LA CLAVIJA DE CONEXIÓN A TIERRA POR NINGUNA RAZÓN.
Este aparato es para uso en un circuito nominal de 115 voltios
y tiene un enchufe con conexión a tierra que se parece al
ilustrado a continuación.
IMPORTANTES INSTRUCCIONES
DE SEGURIDAD
Lea y comprenda este manual del propietario y todas las etiquetas de la unidad antes
de utilizarla. La seguridad es una combinación de sentido común, mantenerse alerta
y saber cómo funciona su unidad. Para reducir el riesgo de lesiones personales
o daños a su unidad, utilícela únicamente como se indica en este manual.
PARA USO COMERCIAL ÚNICAMENTE
Para reducir el riesgo de incendio, descarga eléctrica o lesiones,
debe leer y comprender las siguientes instrucciones
por completo antes de operar la máquina
GUARDE ESTAS INSTRUCCIONES
IMPORTANTE:
El fabricante no se hace responsable de los
daños causados cuando el aparato no se utiliza de acuerdo con las instrucciones, o
para usos distintos de aquellos para los que fue diseñado.
ADVERTENCIA:
• Esta máquina solo debe utilizarse para la
aplicación aprobada por el fabricante como
se describe en este manual.
• La máquina debe ser desembalada
y ensamblada de acuerdo con estas
instrucciones antes de conectarla al
suministro eléctrico.
• Se deben utilizar únicamente los accesorios
y las piezas de repuesto originales
suministrados con la máquina o aprobados
por el fabricante. El uso de otros accesorios
puede perjudicar la seguridad de la máquina.
Todas las reparaciones deben ser realizadas
por un agente de servicio calificado.
• NO modifique el diseño original de la
máquina.
• Los operadores deben estar plenamente
formados en el uso de la máquina de acuerdo
con estas instrucciones y ser capaces de
realizar el mantenimiento regular del usuario
como se describe en este manual.
• Los operadores deben ser físicamente
capaces de maniobrar, transportar y manejar
la máquina.
• Los operadores deben ser capaces de
reconocer el funcionamiento inusual de la
máquina e informar de cualquier problema.
• Esta máquina no está destinada a ser utilizada
por personas (incluidos los niños) con
capacidades físicas, sensoriales o mentales
reducidas, o con falta de experiencia y
conocimientos, a menos que hayan recibido
instrucciones sobre el uso de la máquina o
se encuentren bajo la supervisión de una
persona responsable de su seguridad.
• Mantenga a los niños y a las personas no
autorizadas lejos de la máquina cuando
esté en uso. NO utilice la máquina como un
juguete.
• NO la utilice con un cable o enchufe dañado.
Si se ha dañado, ha sido dejada al aire libre o
se ha caído al agua, devuélvala a un centro de
servicio para su inspección o reparación.
• NO la utilice donde haya polvo peligroso.
• NO la utilice en un ambiente con riesgo de
explosión.
• NO la recoja ni la utilice cerca de líquidos
inflamables o combustibles, polvos o vapores
peligrosos.
• PRECAUCIÓN: si se sospecha de la presencia
de polvo peligroso o materiales inflamables/
corrosivos, deje de limpiar la zona
inmediatamente y consulte a su superior.
• NO la use para limpiar materiales quemados

34 35
IMPORTANTES INSTRUCCIONES
DE SEGURIDAD
GUARDE ESTAS INSTRUCCIONES
o encendidos, como cigarrillos, fósforos,
cenizas u otros objetos combustibles.
• Utilice la máquina solo en superficies
firmes y niveladas. NO utilice la máquina en
pendientes de más del 2 %.
• PRECAUCIÓN: esta máquina es para uso
en interiores en seco únicamente y no debe
ser utilizada o almacenada al aire libre o en
condiciones de humedad.
Protéjala de la lluvia.
• Tenga cuidado al usar esta máquina cerca de
la parte superior de las escaleras para evitar
la pérdida del equilibrio.
• NO cubra la máquina cuando esté en uso.
• NO haga funcionar la máquina en seco ya que
esto podría dañar la superficie del piso o la
máquina misma.
• NO deje la máquina en funcionamiento sin
vigilancia.
• Mantenga el cabello, la ropa holgada, las
manos, los pies y todas las demás partes del
cuerpo alejados de las aberturas y las partes
móviles. No coloque las manos debajo de
la base ya que las piezas giratorias pueden
causar lesiones.
• NO introduzca ningún objeto en las aberturas.
NO lo use con ninguna abertura bloqueada.
Manténgala libre de polvo, suciedad y
cualquier cosa que pueda reducir el flujo de
aire.
• NO use solventes volátiles o combustibles
(por ejemplo, diésel, gasolina, PA,
triclorometano) ni ninguna sustancia
corrosiva, tóxica o altamente irritante para
lavar los pisos, incluso si está diluida. En
caso de contacto accidental con cualquiera
de estas sustancias (p. ej., debido a
derrames), siga los procedimientos de
descontaminación vigentes en el lugar del
usuario. Si tiene alguna duda sobre el estado
de la máquina, comuníquese con Tornado o
con el distribuidor/agente que suministró la
máquina.
• NO deje la máquina sin vigilancia cuando esté
enchufada. Desenchúfela del tomacorriente
cuando no esté en uso y antes de cambiar los
cepillos o intentar cualquier mantenimiento
o ajuste.
• NO llene la máquina con agua a más de 40 °C
(104 °F).
• Cuando sea utilizada en escaleras
mecánicas, asegúrese de que la máquina
esté colocada en la parte inferior de la
escalera mecánica con la escalera mecánica
moviéndose hacia el operador.
• NO tire del cable ni lo transporte, ni utilice el
cable como una manija, ni cierre una puerta
con el cable, ni tire del cable alrededor de
bordes o esquinas afilados.
• NO haga funcionar la máquina sobre el cable.
Mantenga el cable alejado de superficies
calientes.
• NO desenchufe tirando del cable. Para
desenchufar, tire del enchufe, no del cable.
No manipule el enchufe ni la máquina con las
manos mojadas. Apague todos los controles
antes de desenchufar.
• Conéctelo únicamente a un tomacorriente
correctamente conectado a tierra. Consulte
las instrucciones de conexión a tierra.
• Procure evitar que el cable de suministro
eléctrico entre en contacto con las piezas
móviles, como los cepillos para pisos.
• Asegúrese de que el voltaje y la frecuencia
en el receptáculo de la pared correspondan
con los indicados en la placa de identificación
antes de enchufar la máquina.
• La máquina debe mantenerse limpia y en
buenas condiciones con inspecciones
periódicas del cable de alimentación y el
enchufe para detectar signos de daños. Si
las piezas están dañadas, sólo deben ser
sustituidas por una pieza aprobada por
el fabricante, su agente de servicio o una
persona calificada similar para evitar un
peligro.
• Solo reemplace el cable de alimentación con
equipo OEM original.
• Al usar agentes de limpieza y cuidado, se deben seguir las advertencias de peligro del
fabricante y se debe usar el EPP adecuado según las instrucciones del fabricante.
• Utilice únicamente agentes de limpieza no combustibles y poco espumosos que NO
contengan sustancias nocivas para la salud en general.
• Asegúrese de enjuagar con agua limpia cualquier residuo químico que quede
después de cada uso.
Deje que la máquina haga el trabajo. Sujete la manija lo más suavemente posible.
• Utilice un calzado adecuado para evitar resbalones.
• Lleve ropa adecuada para mantenerse seco.
• No fume cuando utilice la máquina.
• No utilice soluciones de limpieza excesivamente espumosas o altamente
corrosivas. Si opera la máquina en un piso inundado, asegúrese de que la
profundidad del agua no exceda los 6 mm (1/4 de pulgada).
AGENTES DE LIMPIEZA
DIRECTRICES DEL OPERADOR
El fabricante no se hace responsable de los daños causados
cuando el aparato no es utilizado de acuerdo con las instrucciones
proporcionadas, o es utilizado para usos distintos de aquellos para
los que fue diseñado.
Esta máquina es pesada. No intente levantar la máquina sin ayuda.
Las técnicas de elevación incorrectas pueden provocar lesiones
personales.

36 37
ESPECIFICACIONES TÉCNICAS
La vibración de la manija no supera los 2,5 m/s2 cuando se utiliza sobre una
superficie lisa y dura.
• Niveles de ruido medidos a una distancia de 3,28 pies (1 metro) de la máquina y
5,25 pies (1,6 metros) por encima del piso al lavar un piso duro.
• Los valores anteriores son aproximados. Dado que la política de la empresa es
mejorar continuamente el producto, podría haber cambios sin previo aviso.
• La Capacidad de limpieza anterior es teórica, ya que existen potencialmente
muchas variaciones en el funcionamiento de la máquina.
Especificación Valor
Voltaje 115
hercios 60
limpieza 18 in / 440 mm
Altura de la manija 44 in / 1110 mm
Ancho 22 in / 550 mm
Longitud 15 in / 390 mm
Potencia del motor 1150 Watts
Amperaje 10
Velocidad del cepillo 670 RPM
Capacidad del depósito de solución 1 Gallon / 4 Liters
Capacidad de limpieza 4844 ft2/hr. / 350 m2/hr.
Nivel de ruido 71 db(A)
SELECCIÓN DEL CEPILLO
Tipo de piso Limpieza por primera
vez Limpieza de
mantenimiento
Baldosa con lechada
de cemento, cerámica,
mosaico, madera, pisos
deportivos, goma,
baldosa de vinilo
Estándar Suave
Alfombra de pelo corto Carpet (alfombra) Carpet (alfombra)
Mármol, granito, laja Suave Suave
Concreto liso Duro Estándar
Otros Para adaptarse a las condiciones individuales del
suelo
Tipo de cepillo Número de pieza
Estándar 93216
Suave 93212
Duro 93218
Escalera mecánica 33086
Lateral 93094

38 39
CARACTERÍSTICAS CLAVE
1 142 3 15
13
5
7 8
10
11
12
9
4
6
Artículo Descripción
1 Manija
2Botón de control de la
solución
3 Cable de alimentación
4 Depósito de solución
5 Soporte de la manija
6 Manguera de solución
7 Cepillo frontal
8 Cepillo Trasero
Artículo Descripción
9Pedal de liberación de la
manija
10 Depósito de agua sucia
11 Tapa del depósito de agua
sucia
12 Ubicación de la ruta del
cable de control de la
bomba
13 Retenedor del cable de
alimentación
14 Ganchos para enrollar el
cable de alimentación
15 Cable
MONTAJE
Fig. 3
Fig. 2
Fig. 4
1
2
3
4
5
1. Inserte el conjunto
de la manija en el
soporte de la manija.
(Fig. 1)
2. Usando la perilla, la
arandela de estrella
y la arandela plana,
sujete la manija al
soporte de la manija.
(Fig. 2)
3. Asegúrese de que la clavija
del depósito de solución en la
manija esté apuntando hacia la
parte delantera de la unidad y que
los ganchos para enrollar el cable
estén apuntando hacia la parte
trasera. (Fig. 3)
4. Pase el cable de control de la
bomba por las (5) ubicaciones que
se muestran en el soporte de la
manija y en la manija. (Fig. 4)
Fig. 1
La page charge ...
La page charge ...
La page charge ...
La page charge ...
La page charge ...
La page charge ...
La page charge ...
La page charge ...
La page charge ...
La page charge ...
La page charge ...
La page charge ...
La page charge ...
La page charge ...
La page charge ...
La page charge ...
La page charge ...
La page charge ...
La page charge ...
La page charge ...
La page charge ...
La page charge ...
-
 1
1
-
 2
2
-
 3
3
-
 4
4
-
 5
5
-
 6
6
-
 7
7
-
 8
8
-
 9
9
-
 10
10
-
 11
11
-
 12
12
-
 13
13
-
 14
14
-
 15
15
-
 16
16
-
 17
17
-
 18
18
-
 19
19
-
 20
20
-
 21
21
-
 22
22
-
 23
23
-
 24
24
-
 25
25
-
 26
26
-
 27
27
-
 28
28
-
 29
29
-
 30
30
-
 31
31
-
 32
32
-
 33
33
-
 34
34
-
 35
35
-
 36
36
-
 37
37
-
 38
38
-
 39
39
-
 40
40
-
 41
41
-
 42
42


Tornado TS050-W13-U Le manuel du propriétaire
- Catégorie
- Machine à plancher
- Taper
- Le manuel du propriétaire
- Ce manuel convient également à
dans d''autres langues
Autres documents
-
Hoover F5906900 Manuel utilisateur
-
-
-
-
-
-
-
-
 Truvox Multiwash 240 Manuel utilisateur
