Panasonic MC-CG885 Le manuel du propriétaire
- Catégorie
- Aspirateurs
- Taper
- Le manuel du propriétaire
Ce manuel convient également à

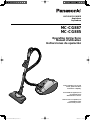
VACUUM CLEANER
Aspirateur
Aspiradora
MC-CG887
MC-CG885
Operating Instructions
Manuel d’utilisation
Instrucciones de operación
Before operating your vacuum
cleaner, please read these
instructions completely.
Avant d’utiliser l’appareil, il est
recommandé de lire
attentivement ce manuel.
Antes de usar su aspiradora, lea
completamente estas
instrucciones por favor.

2
CONSUMER INFORMATION
Please read IMPORTANT SAFETY INSTRUCTIONS on page 2 before use. Read and understand all instructions.
TO OUR VALUED CUSTOMER
We are very pleased to welcome you to the Panasonic family of products. Thank you for purchasing this product. Our intent is that you
become one of our many satisfied customers.
Proper assembly and safe use of your vacuum cleaner are your responsibilities.Your vacuum cleaner is intended only for
household use. The vacuum cleaner should be stored in a dry, indoor area. Read the Operating Instructions carefully for
important use and safety information.
Special care is required when vacuuming certain types of carpet or floor covering. Always check the carpet or floor covering
manufacturer’s recommended cleaning instructions before vacuuming.
PLEASE PAY CLOSE ATTENTION TO ALL WARNING AND CAUTION STATEMENTS.
WARNING
statements are designed to alert you to the possibility of personal injury, loss of human life, and/or
damage to the vacuum cleaner and/or personal property if the instructions given are not followed.
CAUTION
statements are designed to alert you to the possibility of damage to the vacuum cleaner and/or
personal property if the instructions given are not followed.
WARNING
TO AVOID ELECTRICAL SHOCK
Never vacuum damp or wet surfaces or liquids.
DO NOT store vacuum cleaner outdoors.
Replace worn or frayed power cord immediately.
Unplug from outlet when not in use and before servicing.
TO AVOID ACCIDENTS
Except for hand-held cleaners, keep vacuum cleaner on floor - not chairs, tables, steps, stairs, etc.
Store vacuum cleaner promptly after each use to prevent accidents such as tripping over power cord
or vacuum cleaner.
Use vacuum cleaner and accessories only in a manner intended by the manufacturer.
The use of an extension cord is not recommended.
IMPORTANT SAFETY INSTRUCTIONS
When using your vacuum cleaner, basic precautions should always be followed
READ ALL INSTRUCTIONS BEFORE USING THIS VACUUM CLEANER
WARNING
To reduce the risk of fire, electric shock, or injury:
• DO NOT leave vacuum cleaner plugged in when not in use. Unplug from outlet when not in use and before servicing.
• To reduce the risk of fire, or electric shock - DO NOT use outdoors or on wet surfaces.
• DO NOT allow to be used as a toy. Close attention is necessary when used by or near children.
• Use only as described in this manual. Use only manufacturer’s recommended attachments.
• DO NOT use with damaged cord or plug. If vacuum cleaner is not working as it should, or if it has been dropped, damaged, left
outdoors, or dropped into water, return it to an Authorized Panasonic Service Center.
• DO NOT pull or carry by cord, use cord as a handle, close door on cord, or pull cord around sharp edges or corners. Do not run
vacuum cleaner over cord. Keep cord away from heated surfaces.
• Hold plug when rewinding onto cord reel. DO NOT allow plug to whip when rewinding.
• DO NOT unplug by pulling on cord. To unplug, grasp the plug, not the cord.
• DO NOT handle plug or vacuum cleaner with wet hands.
• DO NOT put any objects into openings. DO NOT use with any opening blocked; keep free of dust, lint, hair, and anything that may
reduce air flow.
• Keep hair, loose clothing, fingers, and all parts of body away from openings and moving parts.
• DO NOT pick up anything that is burning or smoking, such as cigarettes, matches, or hot ashes.
• DO NOT use without dust bag and/or filters in place.
• Turn off all controls before unplugging.
• Use extra care when cleaning on stairs.
• DO NOT use vacuum cleaner to pick up flammable or combustible liquids such as gasoline or use in areas where they may be
present.
• DO NOT operate vacuum cleaner with punctured hose. The hose contains electrical wires. Replace if cut or worn. Avoid picking up
sharp objects.
• Always turn off vacuum cleaner before connecting or disconnecting the hose or Power Nozzle.
SAVE THESE INSTRUCTIONS
THIS VACUUM CLEANER IS INTENDED FOR HOUSEHOLD USE ONLY
Note: Before you plug in your Panasonic vacuum cleaner, make sure that the voltage indicated on the rating plate located at the back
of the vacuum cleaner is the same as your local supply.

5
TABLE OF CONTENTS
Table des matières
Tabla de contenido
CONSUMER INFORMATION / IMPORTANT SAFETY INSTRUCTIONS ........................................................................ 2
Renseignements importants / Importantes mesures de sécurité ................................................................................. 3
Información para el consumidor / Instrucciones importantes de seguridad ............................................................4
PARTS IDENTIFICATION ................................................................................................................................................. 6
Nomenclature ...............................................................................................................................................................6
Identificación de piezas ...........................................................................................................................................6
HOW TO ASSEMBLE YOUR CLEANER ......................................................................................................................... 8
ASSEMBLAGE DE VOTRE ASPIRATEUR ..................................................................................................................9
CÓMO MONTAR LA ASPIRADORA ....................................................................................................................... 9
HOW TO OPERATE YOUR CLEANER .......................................................................................................................... 10
MODE D’EMPLOI DE VOTRE ASPIRATEUR .............................................................................................................11
CÓMO UTILIZAR LA ASPIRADORA ......................................................................................................................11
MAINTENANCE AND SERVICING .................................................................................................................................14
MAINTENANCE ET ENTRETIEN .............................................................................................................................. 15
MANTENIMIENTO Y REPARACIÓN ....................................................................................................................15
SPECIFICATIONS ...........................................................................................................................................................24
SPÉCIFICATIONS ......................................................................................................................................................24
ESPECIFICACIONES ...........................................................................................................................................24
BEFORE REQUESTING SERVICE ................................................................................................................................ 25
Guide de dépannage ..................................................................................................................................................26
Antes de pedir servicio .......................................................................................................................................... 27
WARRANTY .............................................................................................................................................................. 28, 30
Garantie ......................................................................................................................................................................31
Garantía ................................................................................................................................................................29
WHAT TO DO WHEN SERVICE IS NEEDED ................................................................................................................. 32
Service après-vente ...................................................................................................................................................32
Cuando necesita servicio ......................................................................................................................................32

6
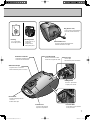
Mini turbine nozzle
Suceur à mini-turbine
Boquilla de miniturbina
Mini turbine nozzle holder
Support du suceur à mini-turbine
Soporte de la boquilla de
miniturbina
Only MC-CG887
Handle with 3 way On/Off switch and Power control switch
MC-CG887 uniquement
Poignée avec commutateur à 3 vitesses et interrupteur principal
Sólo MC-CG887
Mango con selector de encendido/apagado de 3 vías e interruptor
de control de potencia
Only MC-CG885
Handle with 3 way On/Off switch
MC-CG885 uniquement
Poignée avec commutateur à 3 vitesses
Only MC-CG885
Mango con selector de encendido/apagado de 3 vías
Hose
Tuyau
Manguera
Only MC-CG887
Telescopic wand
MC-CG887 uniquement
Bras télescopique
Sólo MC-CG887
Tubo telescópico
Only MC-CG885
Extension wand
MC-CG885 uniquement
Tubes extensibles
Sólo MC-CG885
Tuba extensible
Power nozzle
Tête motorisée
Power Nozzle
Headlight
Dispositif d’éclairage
Luz
Wand quick release pedal
Pédale de dégagement du tube
Pedal de liberación rápida del
tubo
Handle release pedal
Pédale de dégagement de l’inclinaison du manche
Pedal de liberación del mango
Pile height pedal
Indicateur de la hauteur des brosses
Indicator de nivel de pelo de la alfombra
Pile height indicator
Indicateur de la hauteur des brosses
Indicator de nivel de pelo de la alfombra
Overload protector
Protecteur de surcharge
Protector contra sobrecargas
PARTS IDENTIFICATION
Nomenclature
Identificación de piezas

7
Attachment storage
Logement des accessoires
Almacenamiento para accesorios
Hood release
Loquet de dégagement du
couvercle
Pestillo de la tapa
Performance indicator
Indicateur de performance
Indicador de rendimiento
Cord rewind pedal
Bouton de ramasse câble
Pedal de recogida del cable
Crevice tool
Suceur plat
Herramienta para hendiduras
Dusting brush
Brosse à épousseter
Cepillo para sacudir
Pre-motor filter
Filtre situé avant le moteur
Filtro pre-motor
Dust bag
Sac à poussière
Bolsa para polvo
Dust bag holder
Support du sac à
poussière
Soporte de la
bolsa para polvo
Plug (Power cord)
Prise (Cordon d’alimentation)
Enchufe (Cordón eléctrico)
Exhaust filter cover
Couvercle du filtre d’échappement
Cubierta del filtro de escape
Canister hood
Couvercle du traîneau
Tapa de la aspiradora

8
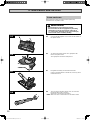
B-4
B-3
B-2
B-1
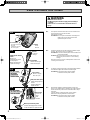
Notch
Fente
Ranura
Hose latch tab
Languette de blocage
du tuyau
Pestaña de sujeción
de la manguera
Handle
Poignée
Mango
Lock button
Bouton de blocage
Botón de bloqueo
Handle quick release
button
Bouton de
dégagement rapide
de la poignée
Botón de liberación
rápida del mango
Only MC-CG887
MC-CG887
uniquement
Sólo MC-CG887
Only MC-CG885
MC-CG885 uniquement
Sólo MC-CG885
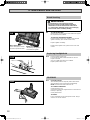
Adjust button
Bouton de réglage
Botón de ajuste
Raised area
Portion en
relief
Área
elevada
Wand quick release pedal
Pédale de dégagement du tube
Pedal de liberación rápida del tubo
Wand quick release pedal
Pédale de dégagement
du tube
Pedal de liberación
rápida del tubo
B-HOW TO ASSEMBLE YOUR CLEANER
WARNING
Electrical Shock Hazard.
DO NOT plug into electrical supply until assembly is
complete.
Failure to do so could result in electrical shock or
injury.
B-1 Line up the hose latch tab and notch in canister hood
and insert the hose into the canister
until it snaps in place.
To remove: Do not open hood before removing hose.
With hood closed, lift hose latch tab
upward and pull on hose.
B-2 Insert the handle into the wand until lock button snaps
in place. Be sure the hose is not twisted.
To remove: Press the handle quick release button and
pull out the handle.
To store: Disconnect the hose from the wands and
canister to prevent stress on hose during
storage.
Store the hose in a loosely coiled position so the hose
covering is not stressed.
B-3 To adjust, simply push down on the wand adjust button
and slide the upper wand to the desired length.
To remove: Press wand quick release pedal.
Pull wands out of power nozzle.
B-4 Slide wands together until wand button snaps into
place. Turn wand button to slotted area of wand swivel.
Insert wands into power nozzle until the button snaps
into place.
Connect power nozzle plug and cord as shown.
Raised area of plug must face toward hand.
To remove: Press wand quick release pedal.
Pull wands out of power nozzle.

10
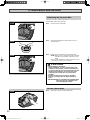
C-1
C-2
C-3
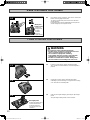
B-5
Pile height pedal
Pédale de réglage de la
hauteur des brosses
Pedal de selección
de nivel de pelo de la
alfombra
Wand quick
release pedal
Pédale de
dégagement
du tube
Pedal de
liberación
rápida del tubo
C-HOW TO OPERATE YOUR CLEANER
B-5 If the power nozzle is attached, turn vacuum cleaner off
before removing plug from wands.
To remove wands from power nozzle, lock wands in
upright position.
Press wand quick release pedal with foot and pull the
wands straight up out of power nozzle.
B-HOW TO ASSEMBLE YOUR CLEANER
WARNING
Personal Injury and Product Damage Hazard
• DO NOT plug in if switch is in ON position. Personal
injury or property damage could result.
• The cord moves rapidly when rewinding.
Keep children away and provide a clear path when
rewinding the cord to prevent personal injury.
• DO NOT use outlets above counters. Damage from
the cord to items in surrounding area could occur.
C-1 Pull the cord out of the canister to desired length.
The cord will not rewind until the cord rewind pedal is
pushed.
C-2 Unplug the vacuum cleaner. Hold the plug while
rewinding to prevent damage or injury from the moving
cord. Push the cord rewind pedal.
C-3 Select a pile height setting by pressing the pile height
pedal.
The pile height setting shows on the indicator.

12
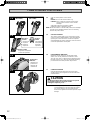
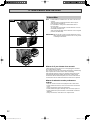
C-4
C-5
C-6
C-7
Increase
suction
Augmentation
de l’aspiration
Aumentar
aspiración
Decrease
suction
Diminution de
l’aspiration
Disminuir
aspiración
Suction control
Régulateur d’aspiration
Control de aspiración
Performance
indicator
Indicateur de
performance
Indicador de
rendimiento
(MC-CG887) (MC-CG885)
C-HOW TO OPERATE YOUR CLEANER
C-4 Select a switch position on the handle.
OFF
FLOOR: turns on the canister motor only.
CARPET: turns on both the canister and the power
nozzle motors and turns on the canister
headlight
Adjust the power level (Only MC-CG887).
Sliding the switch to adjust the power.
NOTE: When this switch is in the FLOOR position, the headlight
and dirt sensors DO NOT function since no electricity
flows to the power nozzle.
C-5 SUCTION CONTROL
The suction control allows you to change the vacuum
cleaner suction for different fabrics and carpet weights.
Opening the control decreases suction for draperies
and lightweight rugs, while closing the control increases
suction for upholsteries and carpets.
C-6 PERFORMANCE INDICATOR
When the vacuum cleaner is running with normal
airflow, color on the performance indicator is clear.
The red color comes on whenever the airflow becomes
blocked. If that occurs, check the disposable dust bag,
pre-motor filter and other possible clog locations.
C-7 STORAGE POSITION
Slide the wand holder attached to the nozzle pipe
straight into the wand supporter on the left side of the
canister bottom.
CAUTION
DO NOT leave the Power nozzle running in one spot in
the upright position for any length of time.
Damage to carpet may occur.
Note: Refer to your carpet manufacturers cleaning
recommendations. Some more delicate carpets
may require that they be vacuumed with the
Power nozzle agitator turned off to prevent carpet
damage.

14
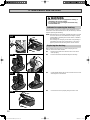
D-1
D-2
D-3
D-4
D - MAINTENANCE AND SERVICING
WARNING
• Disconnect the electrical supply before cleaning or
maintaining the vacuum cleaner.
• To avoid injury, keep your fingers and hands away
from the beater bar.
Indicator for replacing the dust bag
Turn the power control to the highest setting and lift the nozzle
off the floor. If the dust indicator turns red, the dust bag is full and
requires replacing the dust bag.
NOTE: If the dust bag is not properly installed, the dust cover will
not close. Be sure to check that the dust bag is properly
installed before operating the vacuum cleaner, otherwise
dust will leak out.
The dust bag can easily lay on the dust cover packing or
clip between the bag collar and the body, so be sure to
properly extend it into the body of the vacuum cleaner.
Replacing the dust bag
Before replacing the dust bag, turn off and unplug vacuum
cleaner, remove hose from canister.
D-1 Lift the hood release and raise the dust cover until it
clicks properly.
D-2 Remove the basket and throw away the dust bag.
D-3 Set the basket first to the vacuum cleaner and set a new
dust bag back to the basket.
D-4 Close the dust cover properly until you hear it click.

16
D-5
D-6
D-7
D-8
D - MAINTENANCE AND SERVICING
Power nozzle care
Always follow all safety precautions before performing
maintenance to the power nozzle.
WARNING
• Electrical Shock or Personal Injury Hazard.
• Disconnect the electrical supply before performing
maintenance to the vacuum cleaner. Failure to do
so could result in electrical shock or personal injury
from vacuum cleaner suddenly starting.
Inspect once a month.
D-5 Unscrew the two agitator cover screws on the bottom of
the power nozzle.
D-6 To remove the power nozzle cover, grasp the side
latches and pull out first.
Then grasp the rear latches and pull out.
D-7 Lift agitator assembly out and remove the belt.
Using an old tooth brush or similar tool, clean any dirt or
lint from the brush.
D-8 Then cut across threads, strings, hairs, etc. from the
beater bar with a pair of scissors.
(Removal as per reverse procedure)
NOTE: Take care not to cut the brush. Do not wash in water.

18
D-9
D-10
D-11
Base support bars
Barres de support de la base
Barra de soporte de la base
Agitator assembly
Assemblage de l’agitateur
Ensamble del agitador
D - MAINTENANCE AND SERVICING
Brush Servicing
WARNING
• Electrical Shock or Personal Injury Hazard
• Disconnect electrical supply before performing
maintenance to the vacuum cleaner. Failure to do
so could result in electrical shock or personal injury
from vacuum cleaner suddenly starting.
D-9 TO CHECK BRUSHES:
When brushes are worn to the level of the base support
bar, replace the brush dowel.
TO REPLACE AGITATOR ASSEMBLY
Remove power nozzle cover, agitator cover, belt and
agitator assembly. (See “Power nozzle care”).
Replace agitator assembly.
Replace belt, agitator cover, power nozzle cover and
screws.
Replacing Headlight Bulb
D-10 Remove power nozzle cover.
Push in and turn bulb counterclockwise to remove.
Replace the bulb.
Only use a bulb rated 130 V AC-15 Watts.
Replace power nozzle cover.
FEATURES
D-11 Overload Protector
The overload protector stops the power nozzle motor
when the brush jams and prevents belt breakage.
NOTE: Canister motor will continue to run.
TO CORRECT PROBLEM:
Unplug electrical cord.
Check brush and brush support areas for excessive lint
build-up or jamming.
Clean jammed area.
TO RESET:
Press reset button on top of the power nozzle. Plug in
and turn on vacuum cleaner.

20
D-14
D-12
D-13
D-15
D - MAINTENANCE AND SERVICING
Maintaining the Pre-motor fi lter
Follow the procedure written below when the suction power is not
restored after replacing the dust bag.
D-12 Remove the pre-motor filter.
D-13 Wash gently with water and then allow to dry in a
shaded location.
D-14 Return the pre-motor filter to its original position.
NOTE: Make sure you remember to replace the filter.
If the filter is not installed, it will cause motor
failure.
• Do not wash the filter in a washing machine or dry it
with a dryer or other source of hot air.
CAUTION
• NEVER REUSE A DUST BAG.
Very fine materials, such as carpet freshener, face
powder, fine dust, plaster, soot, new carpet lint, etc.,
can clog the bag and cause it to burst before it is full
and may cause damage to vacuum cleaner motor.
Change bag more often when vacuuming these
materials.
• DO NOT use hot air or hot surface to dry filters.
Keep at room temperature for approximately 24
hours.
• IMPORTANT: Before re-installing the washable filters,
make sure they are completely dry to
avoid damaging the cleaner.
Vacuum cleaner body
D-15 Wipe with a soft cloth soaked with water.

22
D-16
D - MAINTENANCE AND SERVICING
Exhaust fi lter
D-16 Exhaust filter is installed in the rear side of the vacuum
cleaner.
This filter retains small dust particles which may be
present in the expelled air.
It is advisable to change the exhaust filter when it
becomes dirty.
To change the exhaust filter, hold the exhaust cover (as
illustrated) and pull it out.
After changing the filter, set the exhaust cover to original
position (as illustrated).
IMPORTANT: Never use the vacuum cleaner without the correct
filters properly installed. Failure to do so may result
in damage to the motor.
What to do if your cleaner does not work
Check that the vacuum cleaner is correctly plugged in and that
the socket outlet is working.
This vacuum cleaner has a thermal protector which automatically
trips to protect the vacuum cleaner from overheating.
If the thermal protector device has operated, wait until it resets
automatically after approximately 60 minutes. If after having
checked the above mentioned points, the vacuum cleaner does
not work, take it to an Authorized Service Centre to be repaired.
What to do when the suction performance
reduces
• Stop the vacuum cleaner and unplug from the socket outlet.
• Check whether the wands, hose and accessories are blocked
or not.
If they are blocked, remove the obstruction.
• Check whether the paper dust bag is full. If it is full, replace it .
• Check whether the pre-motor filter or exhaust filter is blocked
with dust.
If they are blocked, clean them out or replace them.

24
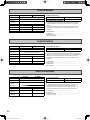
SPECIFICATIONS
MC-CG887 MC-CG885
Optional Accessory
Power source 120 V~60 Hz Product name Model number
Current 12 Amps Dust bag (PACK 4/u.) C-18
Dimensions
(W x L x H)
312 mm x 489 mm x 243 mm
REMINDER FOR CUSTOMER
The model and serial number of this product may be found
on the nameplate located on the underside of your vacuum
cleaner.
You should note the model and serial number in the spaces
provided and retain this book as a permanent record of your
purchase.
Model Number. ..........................................................................
Serial No. ...................................................................................
Date Purchased. ........................................................................
Where Purchased. .....................................................................
Net weight 6.5 kg
Extension wands Telescopic Metal x 2
Dusting brush √√
Crevice tool √√
mini turbine nozzle
√ -
SPÉCIFICATIONS
MC-CG887 MC-CG885
Accessoire en option
Alimentation 120 V~60 Hz Nom du produit N° de Modèle.
Courant 12 Amps Sac à poussière (paquet de 4) C-18
Dimensions
(I x L x H)
312 mm x 489 mm x 243 mm
RAPPEL DE VOTRE ACHAT
Pour toute réclamation ou information concernant cet appareil,
nous vous recommandons de prendre note des renseignements
détaillés. Les numéros de série et modèle se trouvent sur la
plaque des caractéristiques située sur la partie inférieure de
l’appareil.
N° de Modèle. ............................................................................
N° de Série. ...............................................................................
Date d’achat. .............................................................................
Lieu d’achat. ..............................................................................
Poids net 6.5 kg
Tubes extensibles Téléscopique Métal x 2
Brosse à
épousseter
√√
Suceur plat √√
Suceur à mini-turbine
√ -
ESPECIFICACIONES
MC-CG887 MC-CG885
Accesorio opcional
Alimentación
120 V~60 Hz Nombre del producto N° de Modelo
Corriente 12 Amps
Bolsa para polvo (set de 4 unidades)
C-18
Dimensiones
(A x L x Al)
312 mm x 489 mm x 243 mm
AVISO PARA EL CLIENTE
El número de serie y modelo, se encuentran en la placa de
características situada en la parte inferior del aparato.
El número de serie y modelo, se encuentran en la placa de
características situada en la parte inferior de del aparato.
N° de Modelo. ............................................................................
N° de Serie. ................................................................................
Fecha de compra. ......................................................................
Lugar de compra. ......................................................................
Peso neto 6.5 kg
Tuba extensible Telescopic Metal x 2
Brocha pequeña
√√
Herramienta para
hendiduras
√√
boquilla de
miniturbina
√ -

25
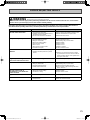
BEFORE REQUESTING SERVICE
WARNING Electric Shock or Personal Injury Hazard.
Disconnect the electrical supply before performing maintenance to the vacuum cleaner. Failure to do so could result in
electric shock or personal injury from vacuum cleaner suddenly starting.
Review this chart to find do-it-yourself solutions for minor performance problems. Any service needed, other than those
described in these Operating Instructions, should be performed by an authorized service representative.
PROBLEM POSSIBLE CAUSE POSSIBLE SOLUTION
Vacuum cleaner won’t start. 1. Unplugged at wall outlet.
2. Tripped circuit breaker/blown fuse at
household service panel.
3. Loose hose electrical connections.
1.
Plug in firmly, push ON/OFF switch to ON.
2. Reset circuit breaker or replace fuse.
3. Reconnect hose ends.
Poor job of dirt pick-up. 1. Full or clogged dust bag.
2. Clogged airflow passages.
3. Dirty pre-motor filter.
4. Wrong pile height setting.
5. Open suction control.
6. Hole in hose.
7. Worn power nozzle brushes.
8. Canister hood open.
1. Change bag.
2. Clear airflow passages.
3. Maintaining the pre-motor filter.
4. Adjust setting.
5. Adjust control.
6. Replace hose.
7. Replace agitator.
8. Close and latch hood.
Power Nozzle will not run when
attached.
1. Power nozzle connections unplugged.
2. Tripped overload protector in power
nozzle.
1. Plug in firmly.
2. Remove any items that may be caught
or jammed, then reset. If vacuum cleaner
starts and stops again, clean agitator and
end caps, then reset.
Any, some, or all red lights in dirt
sensor burn and never turn clear.
1. Dirt passage is clogged. 1. Check for clogs in air passages.
Performance indicator is red. 1. Full or clogged dust bag.
2. Dirty pre-motor filter.
3. Clogged airflow passage.
4. Certain attachment tools.
1. Change bag.
2. Maintaining the pre-motor filter.
3. Clear clog from airflow passage.
4. This is normal. Light should go off when
tool is removed.
Vacuum Cleaner picks up
moveablerugs -or- Power Nozzle
pushes too hard.
1. Wrong pile height setting.
2. Suction too strong.
1. Adjust setting.
2. Open suction control.
Light won’t work. 1. Burned out light bulb. 1. Change light bulb.
Cord won’t rewind. 1. Dirty power cord.
2. Cord jammed.
1. Clean the power cord.
2. Pull out cord and rewind.

28
WARRANTY
Panasonic Vacuum Cleaner
Limited Warranty
Panasonic Consumer Electronics Company (collectively referred to as “the warrantor”) will repair this product with new or refurbished
parts free of charge, in the U.S.A. or Puerto Rico for one (1) years from the date of original purchase in the event of a defect in
materials or workmanship.
This Limited Warranty Excludes both Labor and Parts for the following items which require normal replacement: Disposable
Dust Bag, Filters, Belts, Light Bulbs, Agitator Brushes and Batteries (if supplied).
Carry-in or mail-in service in the U.S.A. can be obtained during the warranty period by contacting a Panasonic Services Company
(PASC) Factory Servicenter listed in the Servicenter Directory. Or call, toll free, 1-800-211-PANA (7262) to locate a PASC Authorized
Servicenter. Carry-in or mail-in service in Puerto Rico can be obtained during the warranty period by calling the local Panasonic Sales
Company telephone number listed in the Servicenter Directory.
This warranty is extended only to the original purchaser. A purchase receipt or other proof of date of original purchase will be required
before warranty performance is rendered.
This warranty only covers failures due to defects in materials and workmanship which occur during normal use and does not cover
damages which occur in shipment, or failures which are caused by products not supplied by the warrantor, or failures which result from
accident, misuse, abuse, neglect, bug infestation, mishandling, misapplication, faulty installation, improper operation or maintenance,
alteration, modification, power line surge, improper voltage supply, lightning damage, commercial use such as hotel, office, restaurant
or other business or rental use of the product, or service by anyone other than a PASC Authorized Servicenter, or damage that is
attributable to acts of God.
LIMITS AND EXCLUSIONS:
There are no express warranties except as listed above.
THE WARRANTOR SHALL NOT BE LIABLE FOR INCIDENTAL OR CONSEQUENTIAL DAMAGES RESULTING FROM THE USE
OF THIS PRODUCT, OR ARISING OUT OF ANY BREACH OF THIS WARRANTY. ALL EXPRESS AND IMPLIED WARRANTIES,
INCLUDING THE WARRANTIES OF MERCHANTABILITY AND FITNESS FOR A PARTICULAR PURPOSE, ARE LIMITED TO THE
APPLICABLE WARRANTY PERIOD SET FORTH ABOVE.
Some states do not allow the exclusion or limitation of incidental or consequential damages, or limitations on how long an implied
warranty lasts, so the above exclusions or limitations may not apply to you.
This warranty gives you specific legal rights and you may also have other rights which vary from state to state. If a problem with this
product develops during or after the warranty period, you may contact your dealer or Servicenter. If the problem is not handled to your
satisfaction, then write to the Consumer Affairs Department at the listed address on the back cover.

30
WARRANTY
Panasonic Canada Inc.
5770 Ambler Drive, Mississauga, Ontario L4W 2T3
Panasonic Vacuum Cleaner
Limited Warranty
Panasonic Canada Inc. warrants this product to be free from defects in material and workmanship and agrees to remedy any such
defect for a period as stated below from the date of original purchase.
Vacuum Cleaner - One (1) years, parts and labour
In-home Service will be carried out only to locations accessible by roads and within 50 km of an authorized Panasonic service facility.
LIMITATIONS AND EXCLUSIONS
This warranty does not apply to products purchased outside Canada or to any product which has been improperly installed, subjected
to usage for which the product was not designed, misused or abused, damaged during shipping, or which has been altered or repaired
in any way that affects the reliability or detracts from the performance, nor does it cover any product which is used commercially.
Dry cell batteries are also excluded from coverage under this warranty. This warranty is extended to the original end user purchaser
only. A purchase receipt or other proof of date of original purchase is required before warranty service is performed.
THIS EXPRESS, LIMITED WARRANTY IS IN LIEU OF ALL OTHER WARRANTIES, EXPRESS OR IMPLIED, INCLUDING
ANY IMPLIED WARRANTIES OF MERCHANTABILITY AND FITNESS FOR A PARTICULAR PURPOSE. IN NO EVENT WILL
PANASONIC CANADA INC. BE LIABLE FOR ANY SPECIAL, INDIRECT OR CONSEQUENTIAL DAMAGES.
In certain instances, some jurisdictions do not allow the exclusion or limitation of incidental or consequential damages, or the exclusion
of implied warranties, so the above limitations and exclusions may not be applicable.
WARRANTY SERVICE
FOR PRODUCT OPERATION ASSISTANCE, please contact:
Our Customer Care Centre: Telephone #: (905) 624-5505
1-800 #: 1-800-561-5505
Fax #: (905) 238-2360
Email link: "Contact Us" on www.panasonic.ca
FOR PRODUCT REPAIRS, please locate your nearest Authorized Servicentre at www.panasonic.ca :
Link : "ServicentresTM locator" under "Customer support"
IF YOU SHIP THE PRODUCT TO A SERVICENTRE
Carefully pack and send prepaid, adequately insured and preferably in the original carton.
Include details of the defect claimed, and proof of date of original purchase.

WHAT TO DO WHEN SERVICE IS NEEDED
If your Panasonic Vacuum Cleaner needs service, look in the yellow pages of the telephone book under HOME APPLIANCE
SERVICE for your nearest Panasonic Services Company (“PASC”) Factory Servicenter, or PASC authorized Servicenter, or
call, 1-800-211-PANA (7262) toll free to find a convenient servicenter. DO NOT send the product to the Executive or Regional
Sales offices. They are NOT equipped to make repairs.
If you ship the product
Carefully pack and send it prepaid, adequately insured and preferably in the original carton. Attach a postage-paid letter
to the outside of the carton, which contains a description of your complaint. DO NOT send the product to the Executive or
Regional Sales Offices.They are NOT equipped to make repairs.
PANASONIC CONSUMER ELECTRONICS COMPANY
DIVISION OF PANASONIC CORPORATION OF NORTH AMERICA
One Panasonic Way
Secaucus, New Jersey 07094
World Wide Web Address
http://www.panasonic.com
What to do when service is needed Service après-vente (Canada)
WARRANTY SERVICE
For product operation and information assistance, please contact your Dealer or our Customer Care Centre at:
Telephone #:(905) 624-5505 Fax #: (905) 238-2360 Web: www.panasonic.ca
For product repairs, please contact one of the following:
• Your Dealer who will inform you of an authorized Servicentre nearest you.
• Our Customer Care Centre at (905) 624-5505 or www.panasonic.ca
• A Panasonic Factory Servicentre listed on warranty page.
RÉPARATION SOUS GARANTIE
Pour de l’aide sur le fonctionnement de l’appareil ou pour toute demande d’information, veuillez contacter votre détaillant ou notre
service à la clientèle au:
N° de téléphone : (905) 624-5505 N° de télécopieur : (905) 238-2360 Site Internet : www.panasonic.ca
Pour la réparation des appareils, veuillez consulter:
• votre détaillant, lequel pourra vous renseigner sur le centre de service agréé le plus près de votre domicile ;
• notre service à la clientèle au (905) 624-5505 ou www.panasonic.ca;
• un de nos centres de service.
Cuando necesita servicio
Si su aspiradora Panasonic necesita servicio, busque el Centro de Servicio Panasonic o un Centro de Servicio PASC autorizado más
cercano bajo "Servicio de Eléctrodomésticos" en las páginas amarillas de la guía de teléfonos o llame gratis al 1-800-211-PANA (7262)
para encontrar un centro de servicio conveniente. No mande el producto a las Executive o Regional Sales Offices. No están equipadas
para arreglar estos productos.
Si manda el producto
Empaquete con cuidado en el cartón original si posible y mándelo prepagado y con seguro suficiente. Ponga una carta con sellos en la
que describe su problema con el producto en el exterior del cartón. No mande el producto a las Executive o Regional Sales Offices. No
están equipadas para arreglar estos productos.
PANAMEX COMPANY
DIVISION OF PANASONIC CORPORATION OF NORTH AMERICA
One Panasonic Way
Secaucus, New Jersey 07094
World Wide Web Address
http://www.panasonic.com
© Panasonic Corporation 2008. All Rights Reserved.
V01Z5L00U
S0808-0
Printed in P.R.C.
Imprimé à R.P.C.
PANASONIC CORPORATION
OF NORTH AMERICA
One Panasonic Way Secaucus,
New Jersey 07094
World Wide Web Address
http://www.panasonic.com
PANASONIC SALES COMPANY,
DIVISION OF PANASONIC PUERTO
RICO, INC.
Ave. 65 de Infanteria.Km.9.5 San Gabriel
Industrial Park Carolina,Puerto Rico 00985
PANASONIC CANADA INC.
5770 Ambler Drive Mississauga, Ontario
L4W 2T3
-
 1
1
-
 2
2
-
 3
3
-
 4
4
-
 5
5
-
 6
6
-
 7
7
-
 8
8
-
 9
9
-
 10
10
-
 11
11
-
 12
12
-
 13
13
-
 14
14
-
 15
15
-
 16
16
-
 17
17
-
 18
18


Panasonic MC-CG885 Le manuel du propriétaire
- Catégorie
- Aspirateurs
- Taper
- Le manuel du propriétaire
- Ce manuel convient également à
dans d''autres langues
- English: Panasonic MC-CG885 Owner's manual
Documents connexes
-
Panasonic MC-CG887 Manuel utilisateur
-
Panasonic MC-CG983 Manuel utilisateur
-
-
-
-
-
-
-
-